Configure Identity Provider user access
User access lets people authenticate to Aembit Desktop: Aembit Desktop gives a person working on a Windows 11 machine access to enterprise HTTP and HTTPS services without holding static credentials. The person signs in through their organization's Identity Provider, and a local proxy injects Aembit-brokered credentials into traffic from the tools they run. through an existing Single Sign-On (SSO) Identity Provider. Enable user access for each Identity Provider that people use to sign in.
Before you begin
Section titled “Before you begin”Before you configure user access, make sure you have:
- Administrator access to your Aembit Tenant: Aembit Tenants serve as isolated, dedicated environments within Aembit that provide complete separation of administrative domains and security configurations.Learn more.
- Aembit Desktop enabled for your Aembit Tenant by Aembit support, which is what makes the Users tab appear.
- An existing OIDC 1.0 or SAML 2.0 Identity Provider.
Configure user access
Section titled “Configure user access”-
Log in to your Aembit Tenant.
-
Click Administration in the left sidebar, then select Identity Providers.
-
Click the Identity Provider that people use to sign in.
-
Click Edit.
-
Select the Users tab.
The tab appears only after Aembit support enables Aembit Desktop for your Aembit Tenant.
-
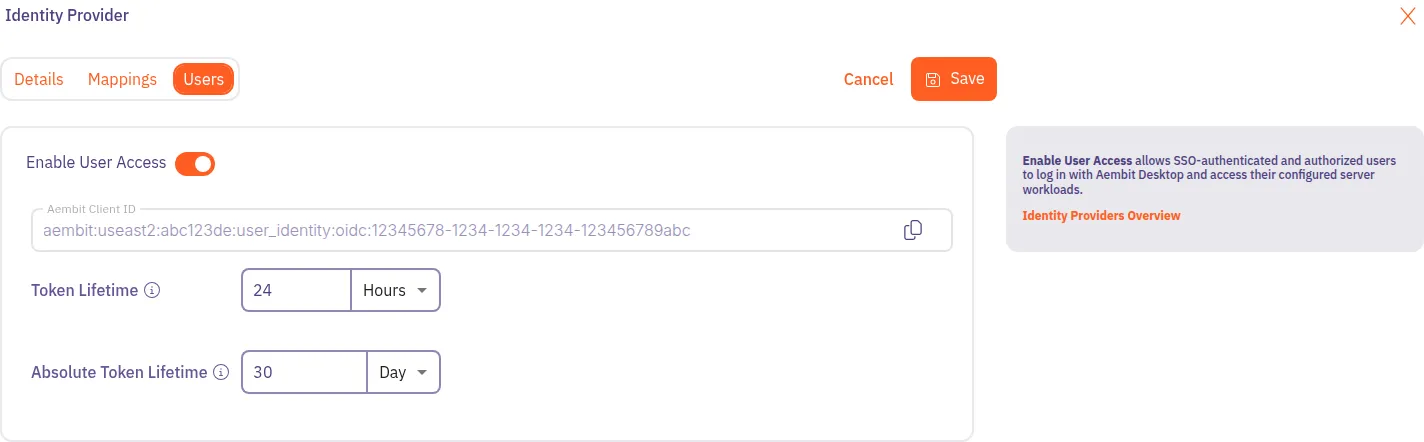
Turn on Enable User Access.
Aembit displays the Aembit Client ID, Token Lifetime, and Absolute Token Lifetime fields.
-
Set Token Lifetime, how long each access token lasts and how long a session can go without renewing.
Select Minutes or Hours as the unit. The default is 24 hours, and the minimum is 5 minutes.
-
Set Absolute Token Lifetime, the maximum duration of a session before the person must authenticate again.
Select Hour, Day, Week, or Month as the unit. The default is 30 days, and the maximum is 365 days. The value must be greater than Token Lifetime.
-
Copy the Aembit Client ID with the copy button beside the field.
The value identifies this Identity Provider rather than an individual person, and a Client Workload’s Aembit Client ID is a different value. Give it to everyone who signs in to Aembit Desktop through this Identity Provider.
-
Click Save.
Use the Aembit Client ID
Section titled “Use the Aembit Client ID”People pass the Aembit Client ID to adt login when they sign in to Aembit Desktop.
You can also deliver it to their machines in a settings file, as
in Configure Aembit Desktop settings.
Continue with Set up user access for Aembit Desktop to create the Client
Workload, Trust Provider, and Access Policy that grant access to a Server Workload.