Configure a Google GCP WIF Credential Provider
Aembit’s Credential Provider: Credential Providers obtain the specific access credentials—such as API keys, OAuth tokens, or temporary cloud credentials—that Client Workloads need to authenticate to Server Workloads.Learn more for Google Workload Identity Federation (WIF) lets your workloads obtain short-lived Google Cloud credentials through Aembit acting as a third-party federated Identity Provider (IdP). Use it to authenticate to any Google Cloud service, such as BigQuery, Vertex AI, or Cloud Storage, without managing long-lived service account keys.
Prerequisites
Section titled “Prerequisites”To configure a Google Workload Identity Federation Credential Provider, you must have the following:
-
Access to your Aembit Tenant: Aembit Tenants serve as isolated, dedicated environments within Aembit that provide complete separation of administrative domains and security configurations.Learn more with permission to manage Credential Providers.
-
Access to a Google Cloud project where you can manage IAM, service accounts, and Workload Identity Federation.
Create the Credential Provider
Section titled “Create the Credential Provider”Create the Credential Provider in Aembit first, so you can copy its OIDC Issuer URL into Google Cloud during setup.
-
Log in to your Aembit Tenant, and in the left sidebar, click Credential Providers.
-
Click + New to open the Credential Provider dialog.
-
Enter a Name and an optional Description.
-
In the Credential Type dropdown, select Google Workload Identity Federation, which reveals the remaining fields.
-
Copy the auto-generated OIDC Issuer URL and store it for later. You paste this value into Google Cloud when you add the Workload Identity Federation provider.
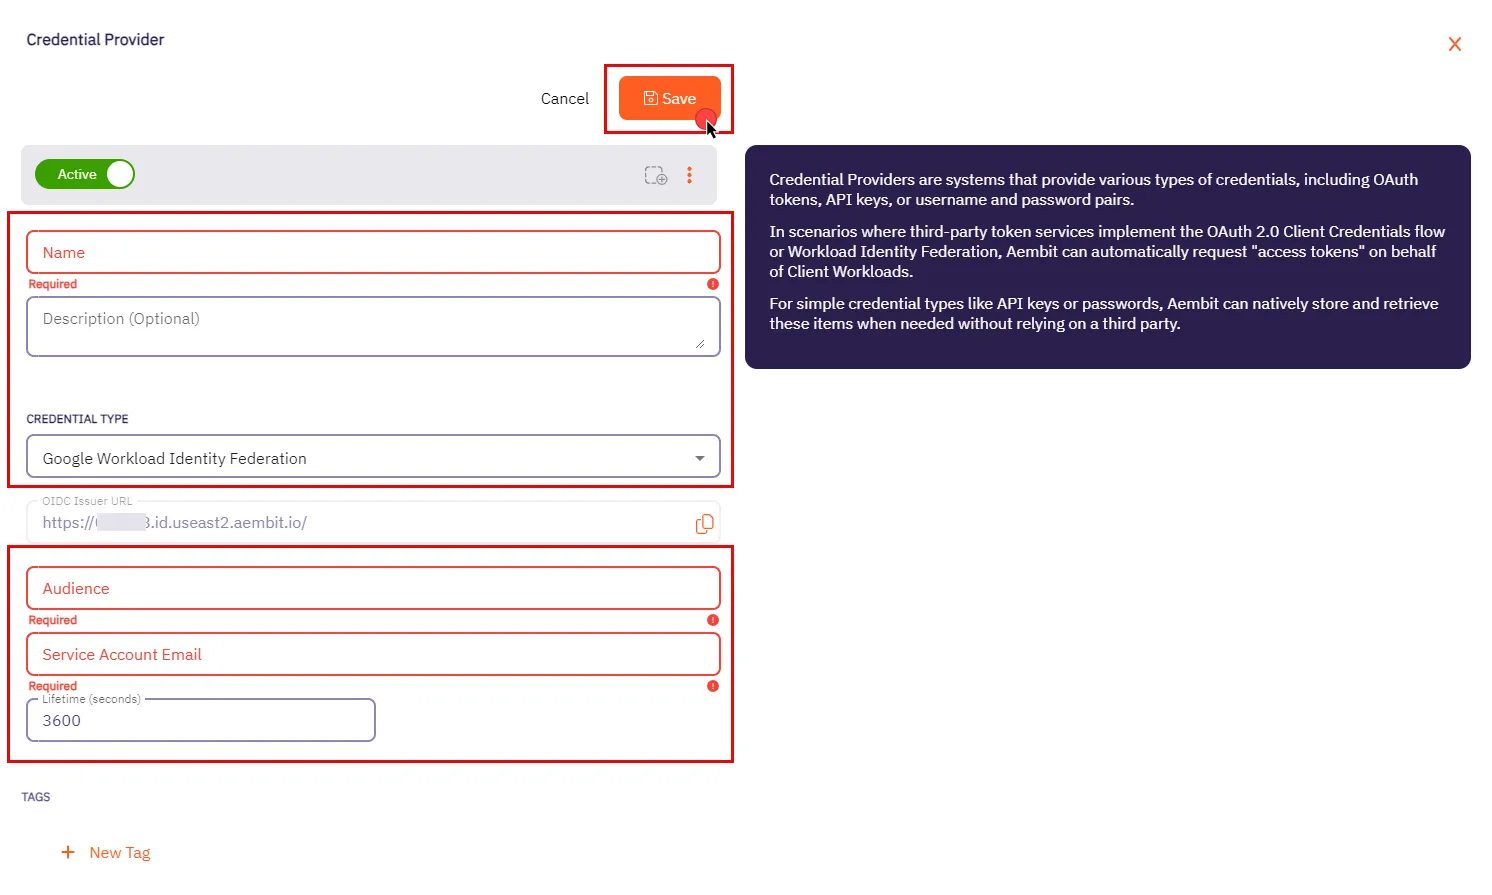
Leave the Audience and Service Account Email fields empty for now, and keep the Aembit web UI open. You complete these fields after you finish the Google Cloud setup in the following sections.
Set up the service account
Section titled “Set up the service account”Create a service account for Aembit to impersonate, then grant it the IAM roles your workloads need.
-
Sign in to the Google Cloud console, and confirm you are working in a project where you have authorization.
-
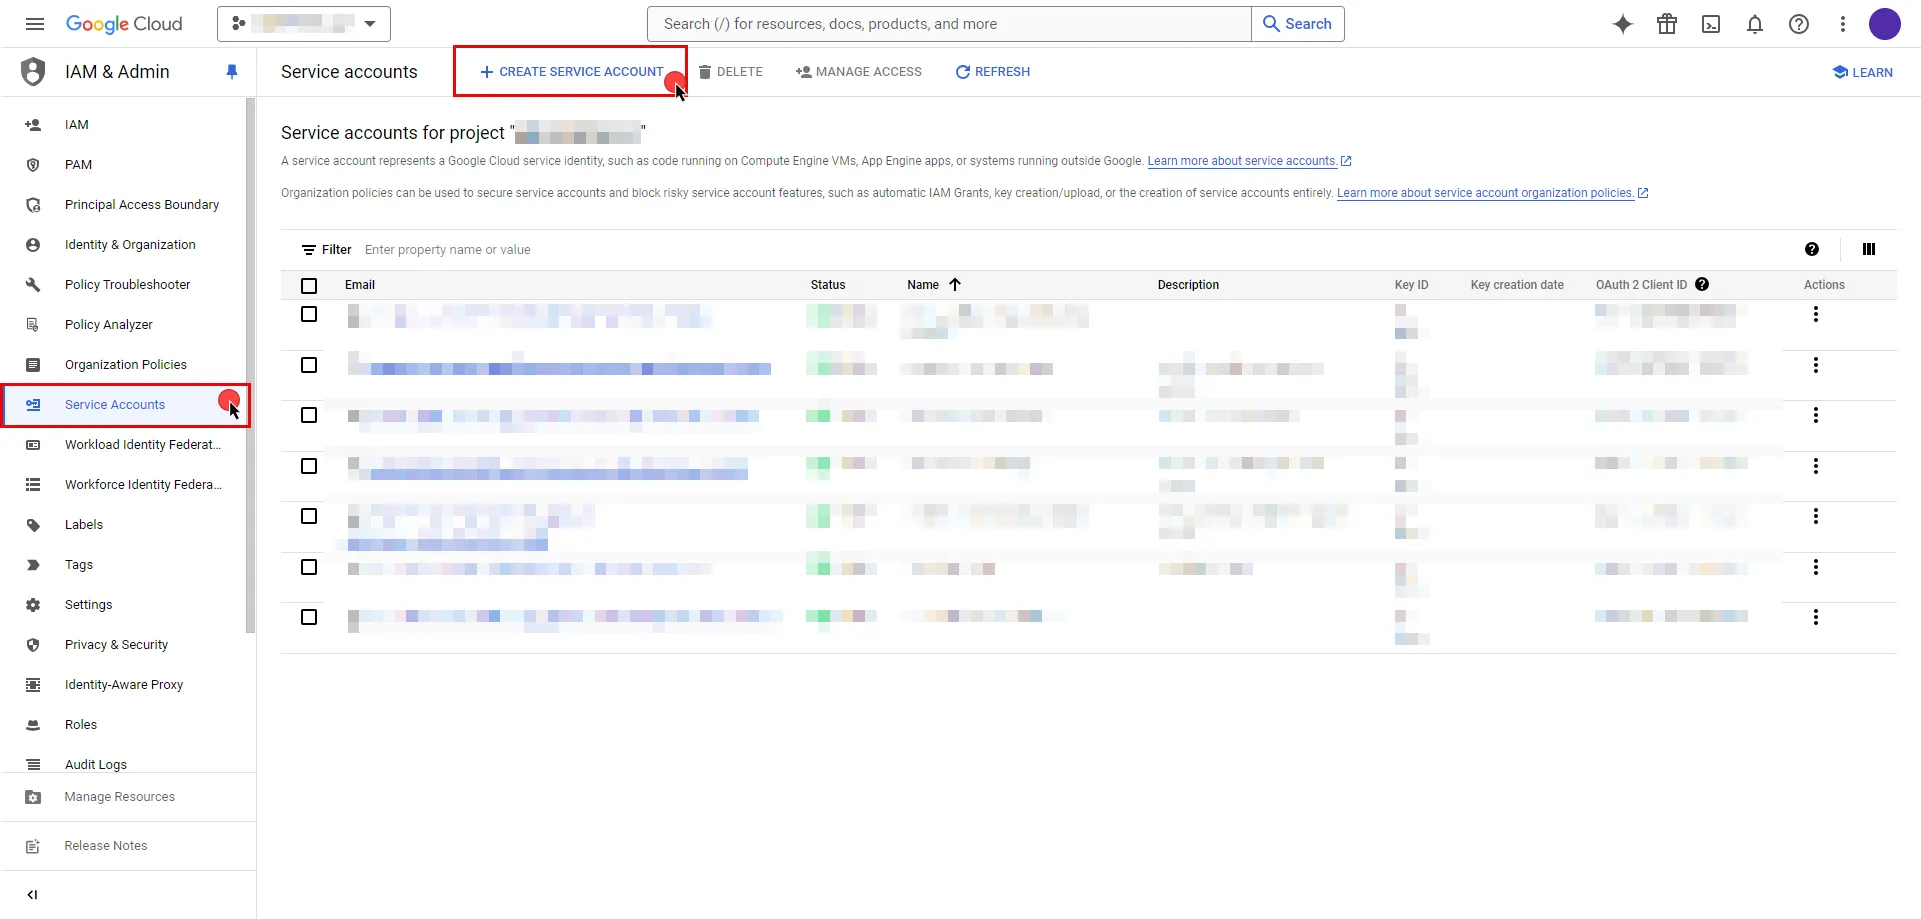
On the Service Accounts page, click Create Service Account.
-
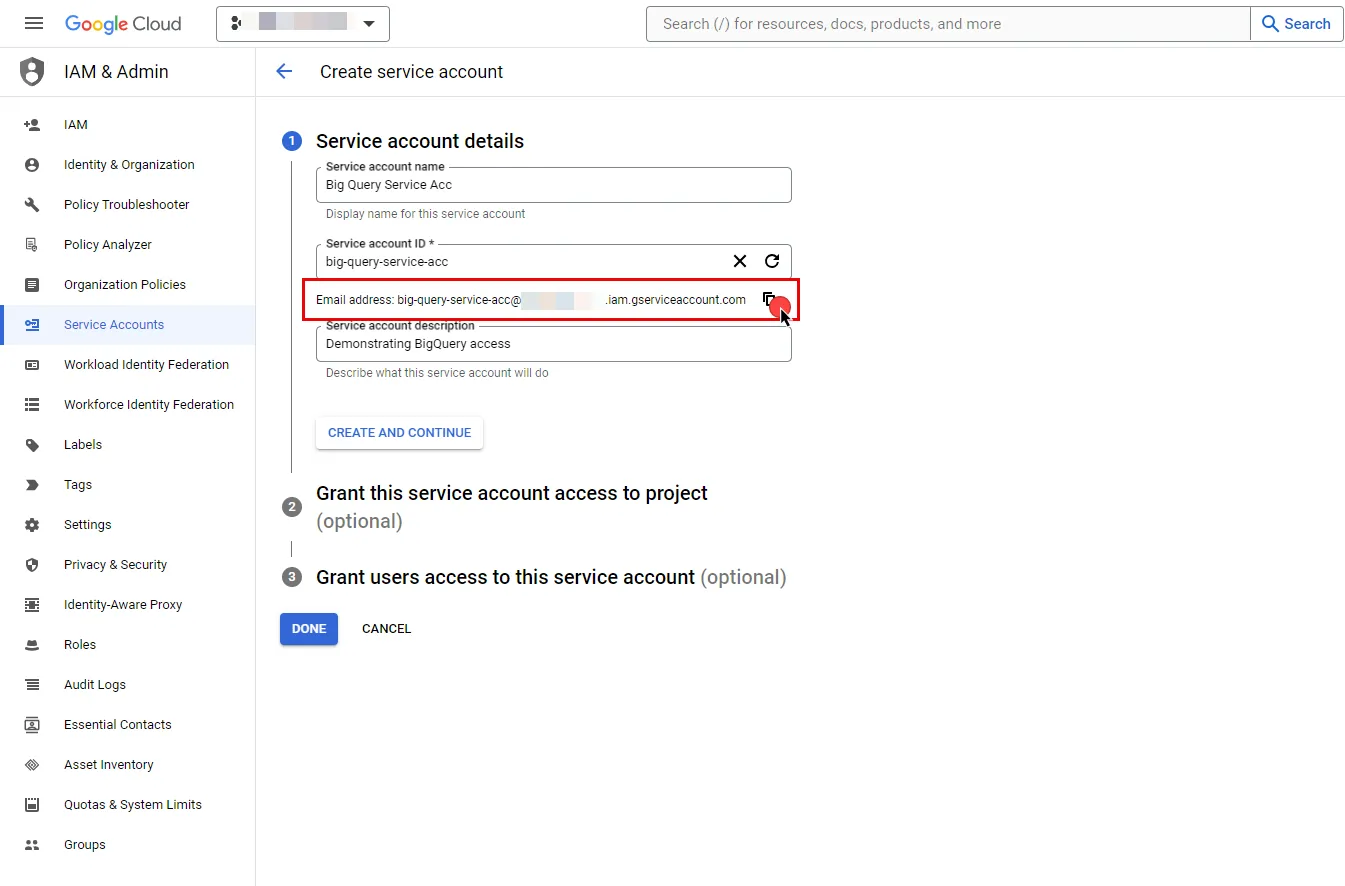
Enter a name for the service account. Google Cloud generates the ID from the name, but you can edit it; the description is optional.
-
Click the copy icon next to the Email address, and store the email for later.
-
Click Done.
-
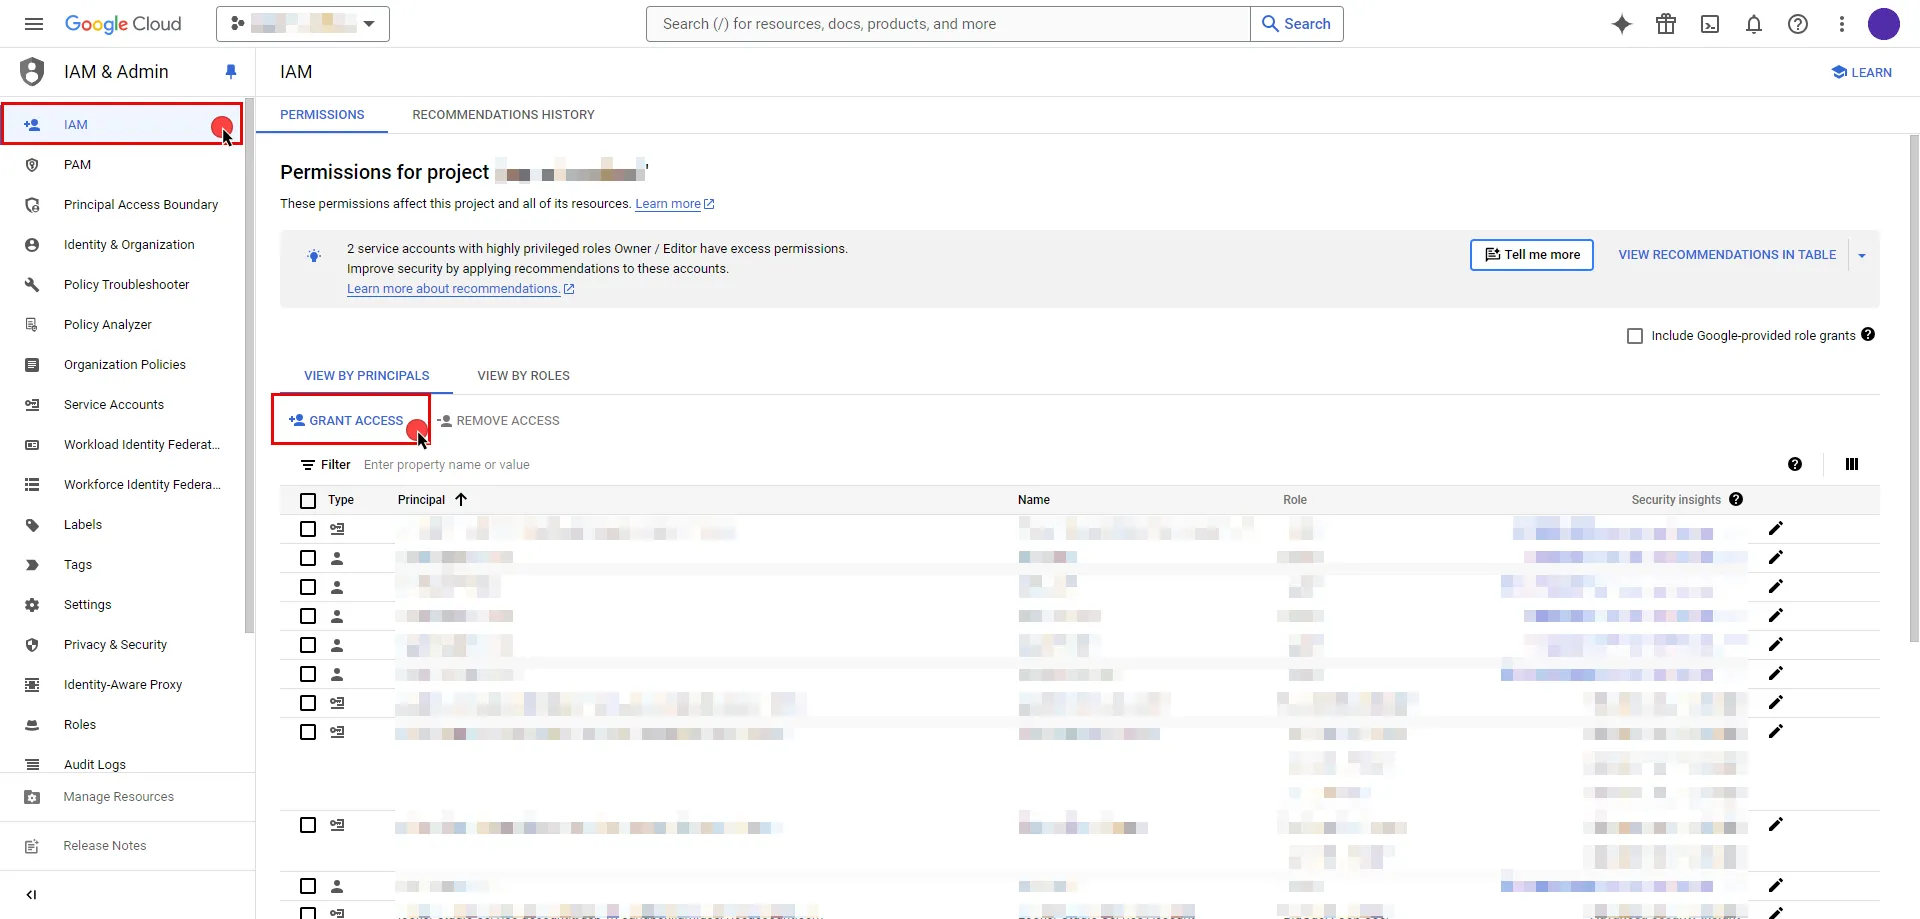
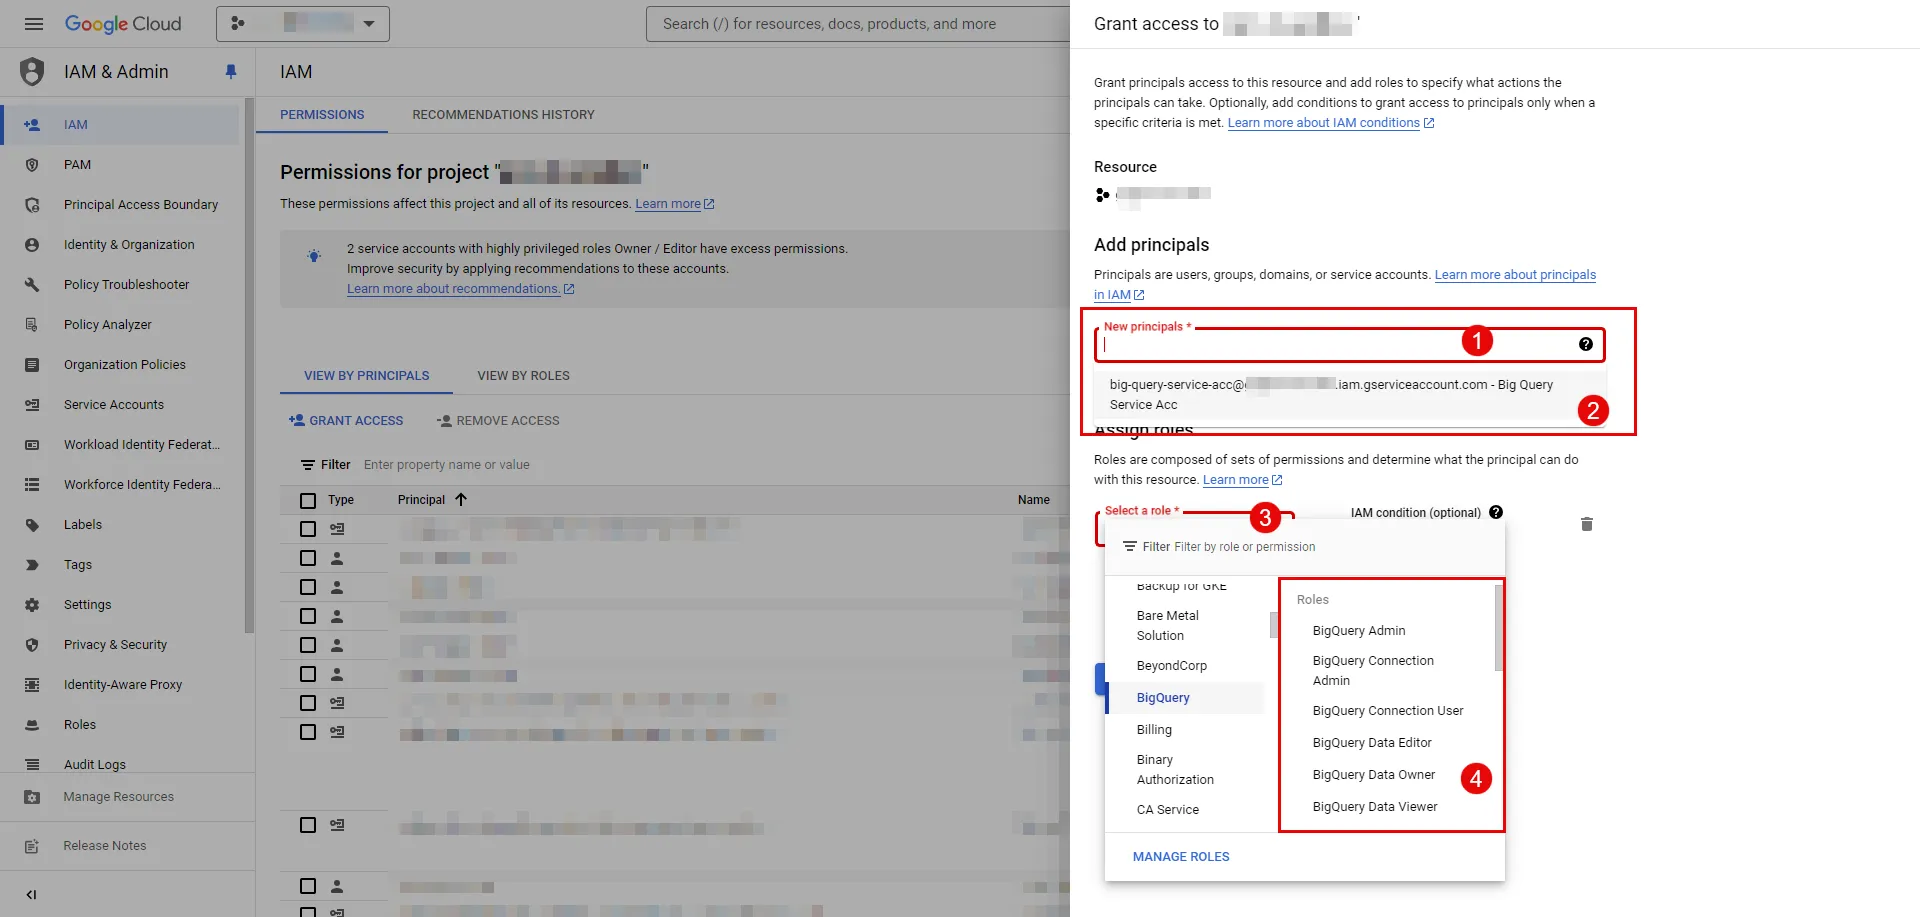
In the left sidebar, select IAM, then click Grant Access.
-
Under New principals, start typing your service account name, then select it from the results.
-
In the Role dropdown, select the role that fits your workload’s needs, then click Save.
Create a workload identity federation pool
Section titled “Create a workload identity federation pool”Create a Workload Identity Federation pool and add an OpenID Connect (OIDC) provider that trusts Aembit as the issuer.
-
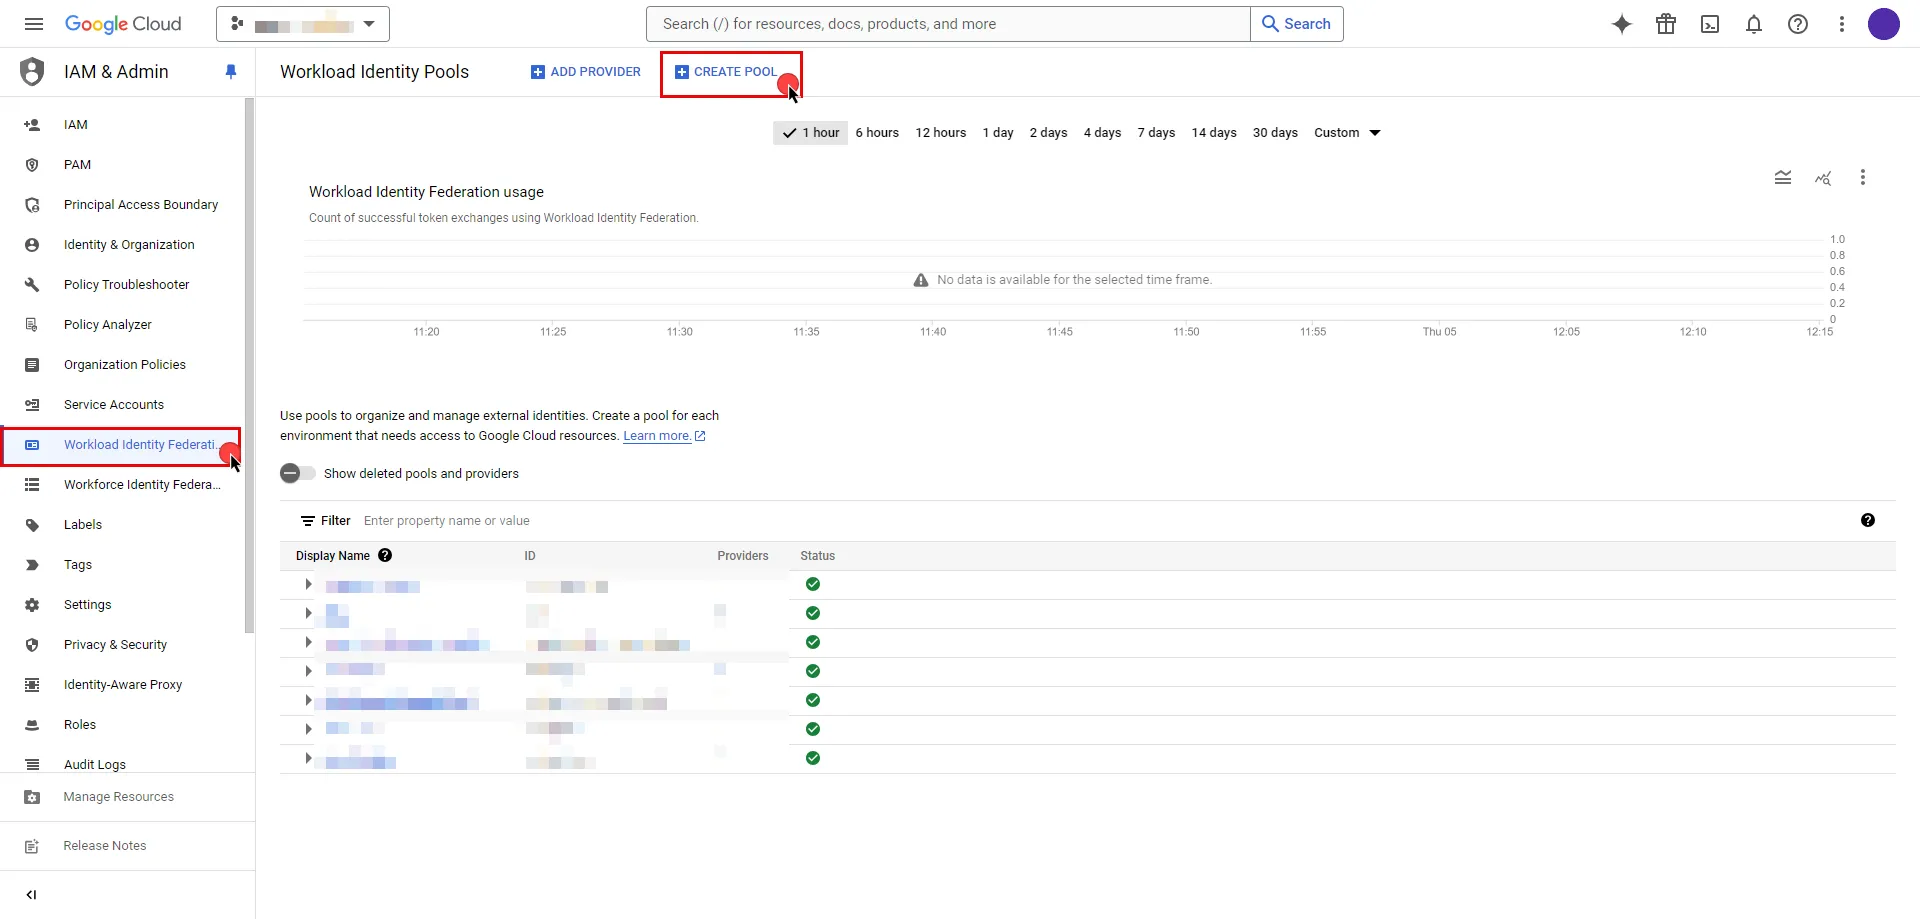
In the Google Cloud console, go to Workload Identity Federation. If this is your first pool, click Get Started; otherwise, click Create Pool.
-
Enter a name for the pool, then click Continue. Google Cloud generates the ID from the name, but you can edit it; the description is optional.
-
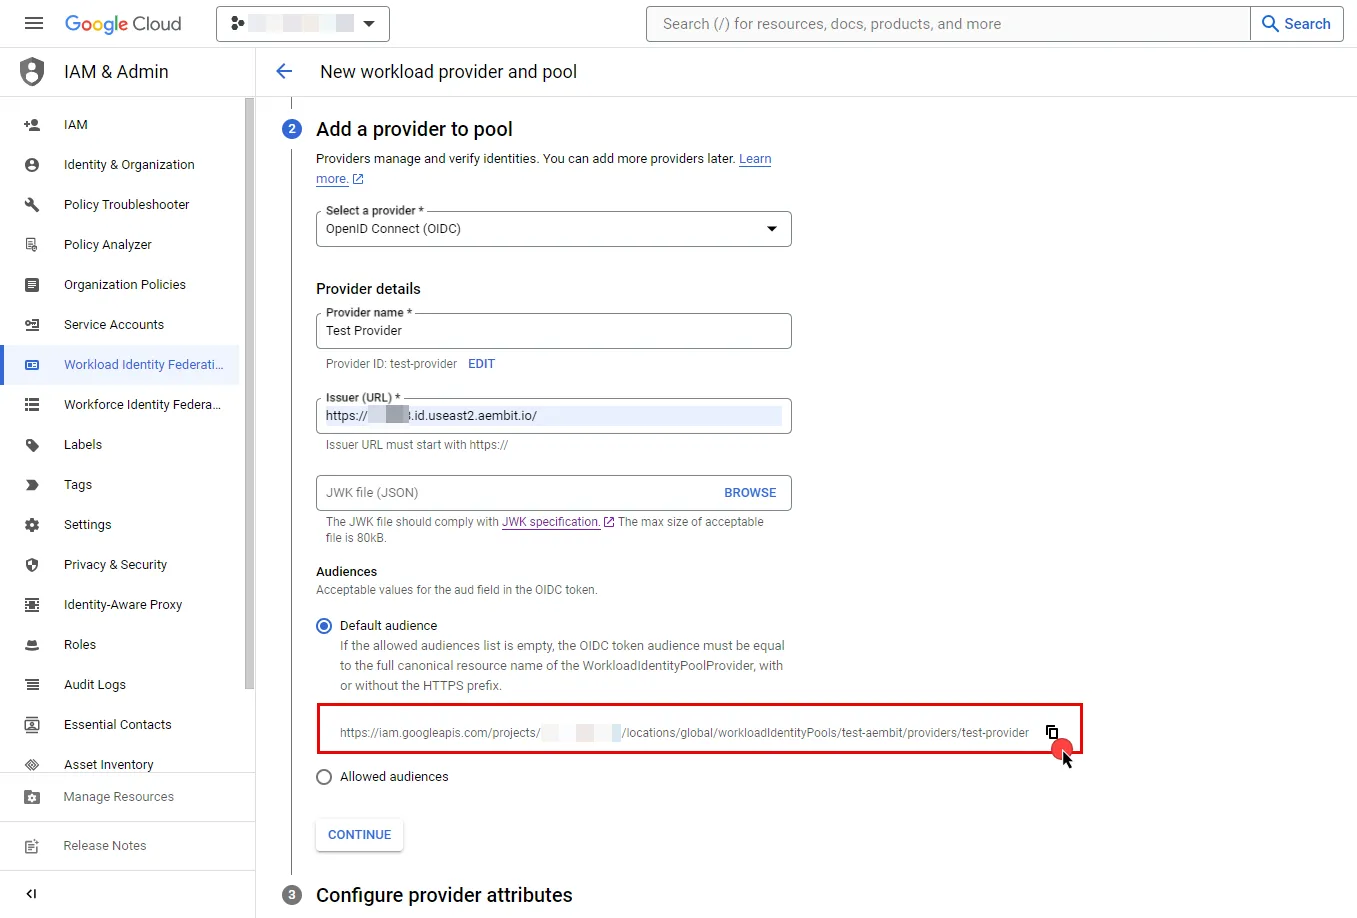
For the provider, select OpenID Connect (OIDC), then enter a name for the provider.
-
In the Issuer (URL) field, paste the OIDC Issuer URL you copied from your Aembit Credential Provider.
-
For the audience, keep Default audience, click the Copy to clipboard icon next to the generated value, store it for later, then click Continue.
-
On the Configure provider attributes step, configure the attribute mapping. In the OIDC 1 field, enter
assertion.tenantso it maps to the default Google 1 attribute,google.subject. This maps the Aembit tenant claim to the Google subject that you grant access to in the next section.Google attribute (Google 1) OIDC attribute (OIDC 1) google.subjectassertion.tenant -
Click Save.
Grant the pool access to the service account
Section titled “Grant the pool access to the service account”Grant the pool’s identities permission to impersonate the service account you created.
-
In the pool you just created, click Grant Access.
-
Select Grant access using Service Account impersonation, then select your service account from the dropdown.
-
For Attribute name, select subject.
-
For Attribute value, enter your Aembit Tenant ID, then click Save. Your Tenant ID is the subdomain of your Aembit URL; for example, in
https://xyz.aembit.io, the Tenant ID isxyz.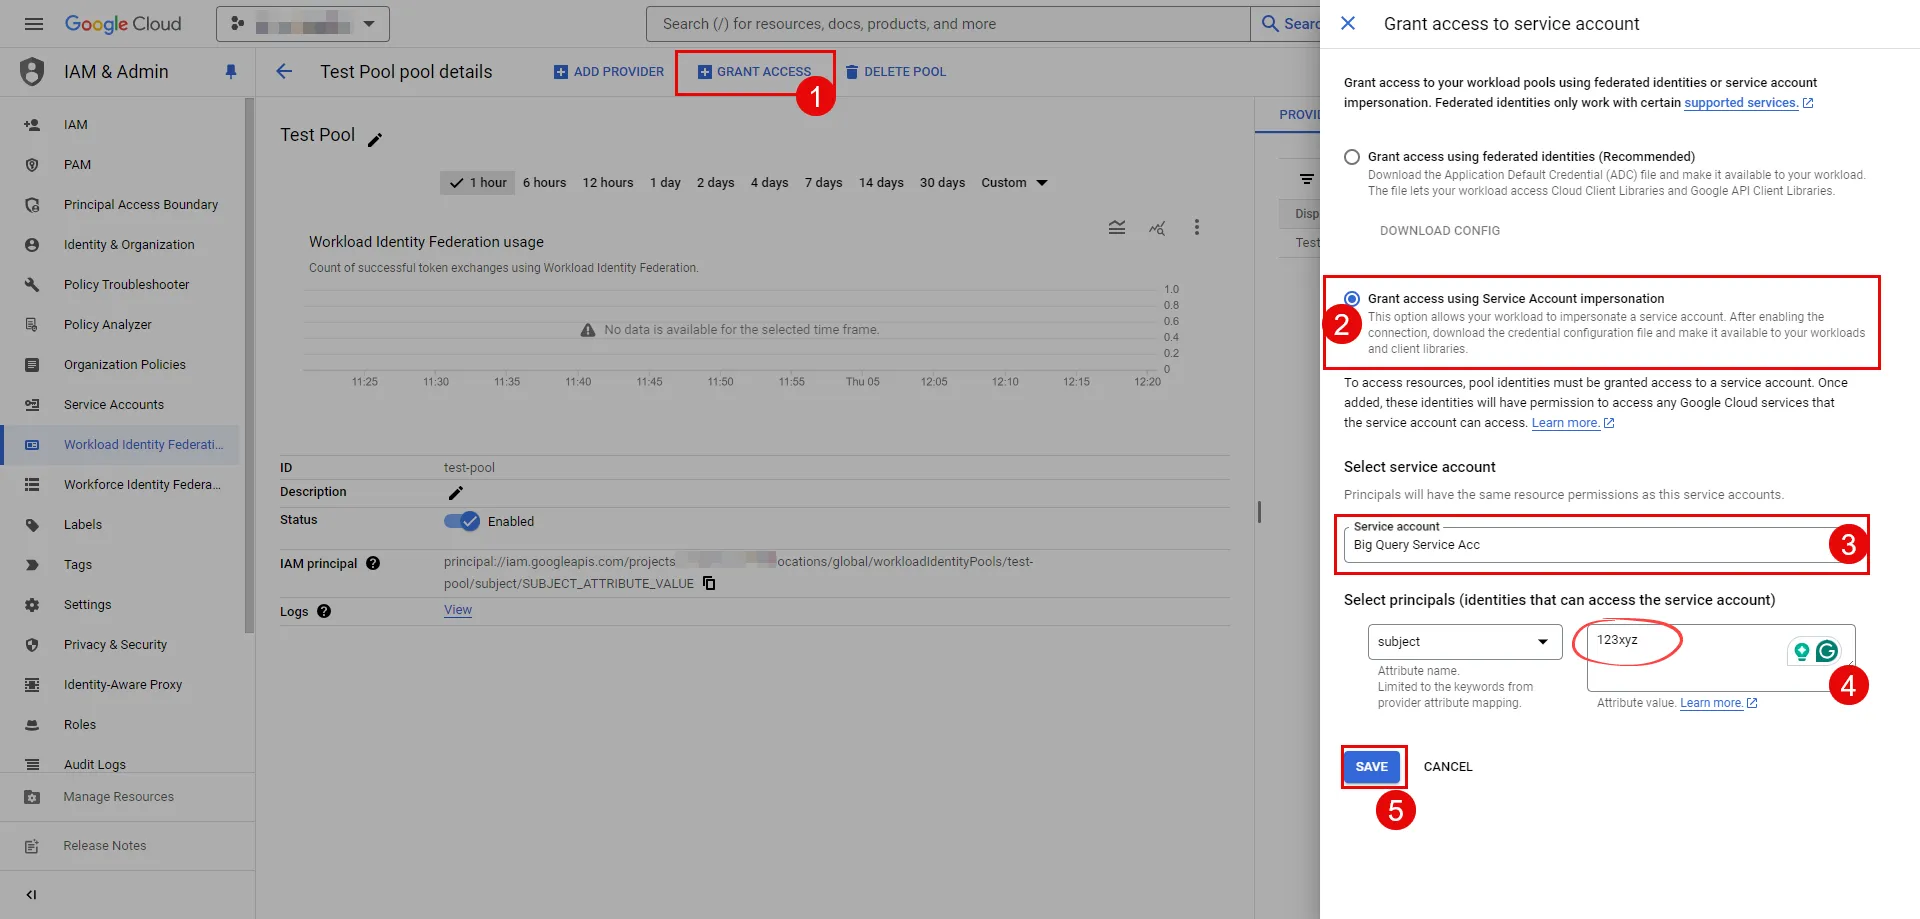
Complete the Credential Provider in your Aembit Tenant
Section titled “Complete the Credential Provider in your Aembit Tenant”Return to the Aembit web UI you left open, and complete the Credential Provider you started:
-
Configure the following fields:
Field Value Audience The audience value you copied when you added the OIDC provider Service Account Email The service account email you copied from Google Cloud Lifetime The duration the credentials remain valid, to a maximum of 3,600 seconds (1 hour) The Audience must match either the default audience or one of the provider’s allowed audiences. The default audience is the full canonical resource name of the Workload Identity Pool Provider. The Service Account Email has the form
service-account-name@project-id.iam.gserviceaccount.com.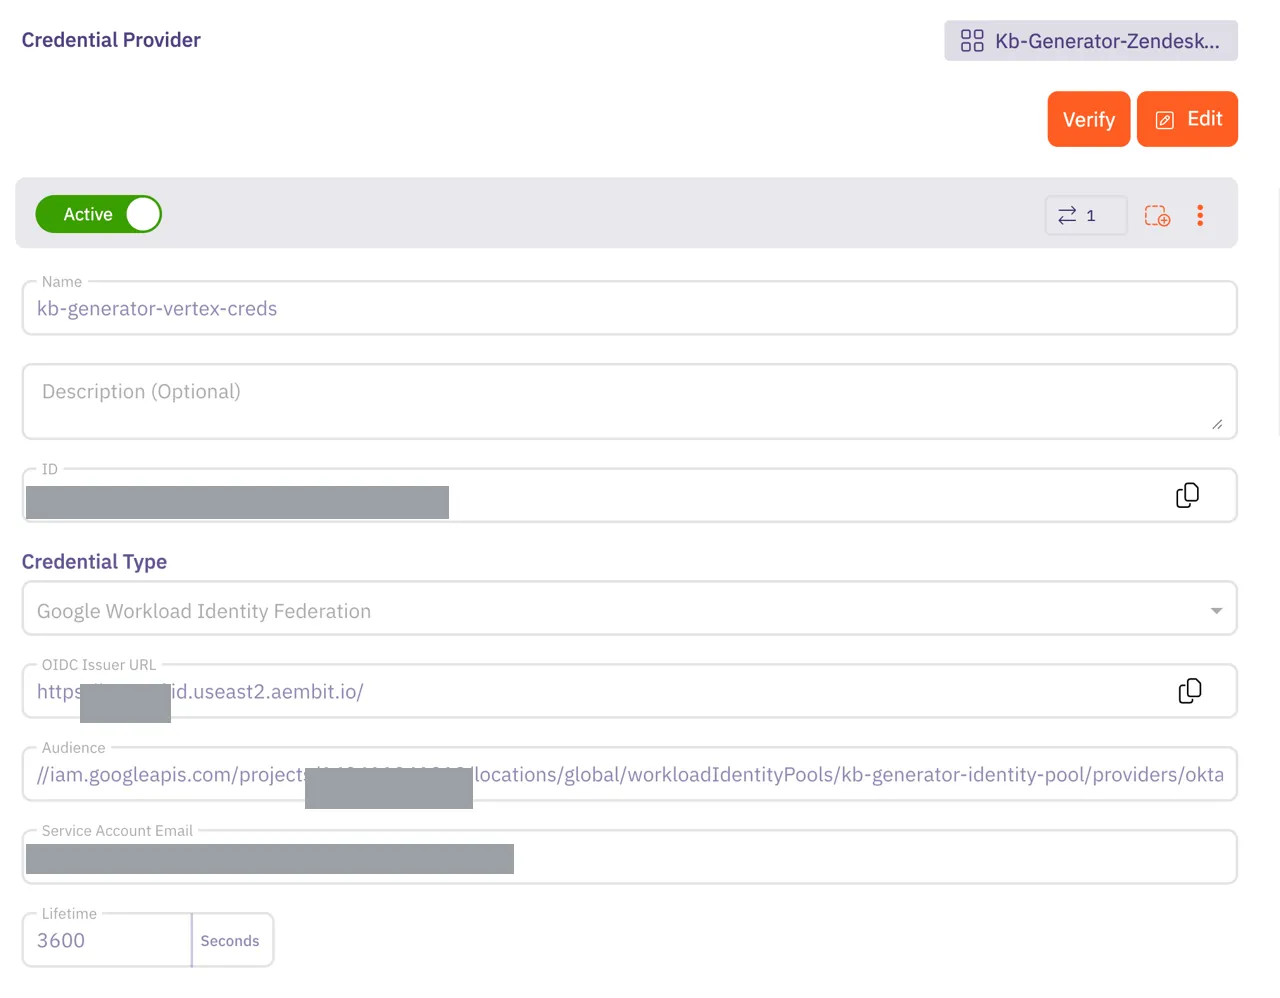
-
Click Save. Your Google Workload Identity Federation Credential Provider now appears in your list of Credential Providers.
Verify the connection
Section titled “Verify the connection”Verify that Aembit can exchange tokens with Google Cloud using your new Credential Provider:
-
On the Credential Providers page, select the Credential Provider you created.
-
Click Verify. After a few moments, a green banner confirms the connection. If verification fails, recheck the audience, the service account email, and the attribute mapping and grant in Google Cloud.
You’re now ready to use your Google Workload Identity Federation Credential Provider with your Server Workloads in an Aembit Access Policy.
Google Cloud and Credential Provider value mappings
Section titled “Google Cloud and Credential Provider value mappings”The following table shows how each Aembit Credential Provider field maps to a Google Cloud value and where to find it:
| Aembit Credential Provider field | Google Cloud value | Where to find it |
|---|---|---|
| OIDC Issuer URL | Provider Issuer (URL) | Aembit generates this value; you paste it into the OIDC provider when you create the pool |
| Audience | Workload Identity Pool Provider audience | The audience shown when you add the OIDC provider |
| Service Account Email | Service account email | The Service Accounts page, or the email you copied when you created the service account |
| Lifetime | — | Set in Aembit, to a maximum of 3,600 seconds (1 hour) |