Create an OIDC ID Token Credential Provider
The OIDC ID Token Credential Provider enables secure identity token generation and exchange with third-party services.
You can configure the following options for your OIDC ID Token Credential Provider:
- custom claims configuration.
- flexible signing algorithms (ES256 and RS256).
- support for Workload Identity Federation (WIF) solutions such as AWS Security Token Service (STS), Google Cloud Platform (GCP) WIF, Azure WIF, Vault, and more.
Create an OIDC ID Token Credential Provider
Section titled “Create an OIDC ID Token Credential Provider”To create an OIDC ID Token Credential Provider, follow these steps:
-
Log into your Aembit Tenant, and go to Credential Providers in the left sidebar.
-
(Optional) In the top right corner, select the Resource Set that you want this Credential Provider to reside.
-
Click + New, which displays the Credential Provider pop out menu.
-
Enter a Name and optional Description.
-
Under Credential Type, select OIDC ID Token, revealing more fields.
-
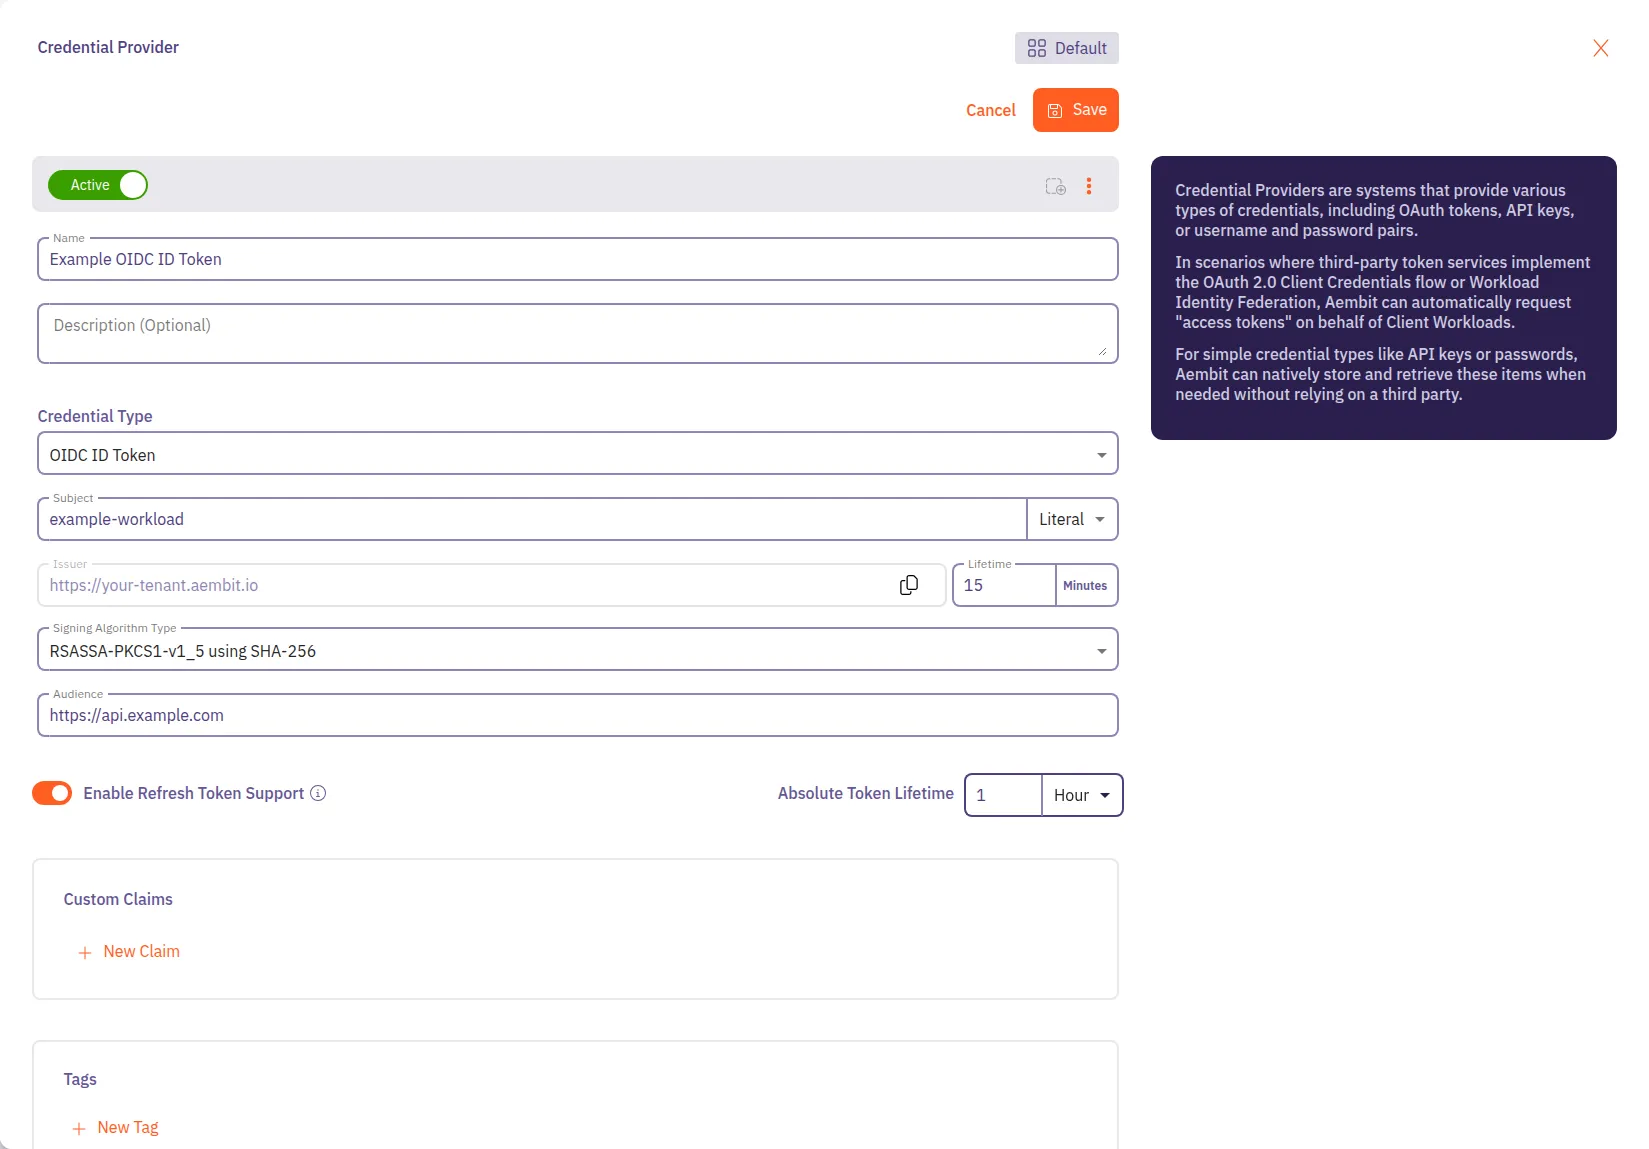
Fill out the remaining fields:
-
Subject - Enter the unique identifier for the workload receiving the token.
Choose how Aembit determines the subject claim in your OIDC tokens:
- Dynamic - Aembit determines the subject at runtime based on the calling workload’s identity.
You can use expressions like
${oidc.identityToken.decode.payload.user_login}to extract values from incoming OIDC tokens. - Literal - Aembit uses a fixed value that as the subject for all tokens
- Dynamic - Aembit determines the subject at runtime based on the calling workload’s identity.
You can use expressions like
-
Issuer - The issuer URL identifies who created and signed the token.
This value should match what your relying party expects. Aembit automatically generates this value based on your tenant information.
-
Lifetime - Specify how long (in minutes; default: 15) your OIDC tokens remain valid after issuance. Match your security requirements and target system expectations:
- Shorter lifetimes (minutes to hours) increase security
- Longer lifetimes reduce token refresh frequency
-
Signing Algorithm Type - Select the algorithm Aembit uses to sign your OIDC tokens:
- RSASSA-PKCS1-v1_5 using SHA-256 - RS256 Signature with SHA-256 (widely supported)
- ECDSA using P-256 and SHA-256 - ES256 signature with P-256 curve and SHA-256
-
Audience - Enter the URI or identifier of the service or API that validates this token. This should match what your target identity broker or service expects.
-
-
(Optional) To enable refresh token support, toggle Enable Refresh Token Support to on.
When enabled, the MCP Authorization Server can return refresh tokens alongside access tokens during OAuth token requests. Refresh tokens are single-use, and each exchange returns a new refresh token. This option only applies to MCP Authorization Server flows.
Set the Absolute Token Lifetime to control how long refresh tokens remain valid for exchanging for new access tokens after initial issuance. This value must be greater than the Lifetime value. The absolute token lifetime doesn’t reset with each refresh token exchange. Once it expires, the client must complete a new authorization flow.
-
(Optional) For Custom Claims, click New Claim.
For a list of common custom claims, see Common OIDC claims.
Then fill out the following:
-
Enter Claim Name (for example:
groups,email,role,environment). -
For Value enter the value based on which type you choose:
- Literal - Enter the exact string value to include in the token
- Dynamic - Enter an expression using the syntax
${expression}or extract claims from OIDC tokens
Dynamic claims examples
- Extract user email from OIDC token:
${oidc.identityToken.decode.payload.user_email} - Extract user login:
${oidc.identityToken.decode.payload.user_login} - Environment variable:
${os.environment.K8S_POD_NAME} - Combine values:
${oidc.identityToken.decode.payload.user_login}_custom_suffix
For detailed information on dynamic claims syntax and examples, see OIDC Dynamic Claims.
-
-
(Optional) Repeat the preceding step for each additional Claim.
-
Click Save.
Verify your OIDC ID Token Credential Provider
Section titled “Verify your OIDC ID Token Credential Provider”To verify an OIDC ID Token is retrievable from the identity provider you configured, follow these steps:
-
In your Aembit Tenant, go to Credential Providers in the left sidebar menu.
-
Select the OIDC ID Token from the list of Credential Providers that you want to verify.
This reveals the Credential Provider pop out menu.
-
Click Verify at the top.

-
When successful, Aembit posts a green notification that says “Verified successfully.”
If the verification isn’t successful, double check your configuration to make sure all the values are correct, then try again.