How to create an OIDC 1.0 Identity Provider
Configuring an OIDC 1.0 (OpenID Connect) Identity Provider (IdP) allows you to offer alternate authentication methods for how users sign in to your Aembit Tenant. For example, Single Sign-On (SSO) instead of the default authentication method of an email and password.
When you configure an OIDC-capable IdP in your Aembit Tenant, Aembit provides a redirect URL that you must configure in your third-party IdP.
Before you start
Section titled “Before you start”Before you configure an OIDC 1.0 Identity Provider, ensure:
-
You have administrator access to both your Aembit Tenant and your Identity Provider.
-
You have registered Aembit as an OIDC application in your Identity Provider and have the necessary credentials (such as Client ID and, if applicable, Client Secret) available.
-
You have your Identity Provider’s base URL (also called the issuer URL or OIDC discovery endpoint).
-
You have your OIDC application’s Client ID from your Identity Provider.
-
You have a Teams or Enterprise subscription plan. The Identity Providers feature isn’t available on the Professional plan.
Configure an OIDC 1.0 Identity Provider
Section titled “Configure an OIDC 1.0 Identity Provider”To configure an OIDC 1.0 IdP to work with Aembit, follow these steps:
-
Log into your Aembit Tenant.
-
Click Administration in the left sidebar.
-
At the top, select Administration ☰ Identity Providers.
Aembit displays the Identity Providers page with a list of existing Identity Providers.
-
Click + New, revealing the Identity Provider pop out menu.
-
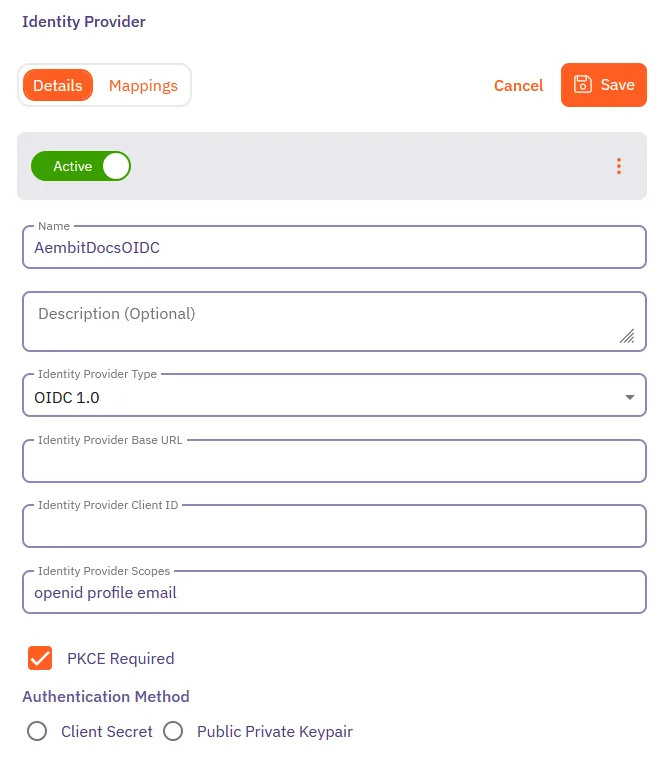
On the Details tab, fill out the following fields:
-
Name - The name of the OIDC Identity Provider (for example, Okta OIDC or Azure OIDC).
-
Description - A description of the OIDC Identity Provider (this is optional).
-
Identity Provider Type - Select OIDC 1.0 from the dropdown.
-
Identity Provider Base URL - The OIDC base URL of your Identity Provider. This is typically the issuer URL or OIDC discovery endpoint.
See Provider-specific examples for guidance on finding this URL of your IdP.
-
Identity Provider Client ID - The Client ID from your OIDC application in your Identity Provider.
-
Identity Provider Scopes - The OIDC scopes required for authentication.
Aembit provides a default set of required scopes:
openid profile email.You can add additional scopes, such as
groups, if your IdP supports them and you want to enable automatic user creation based on group membership. See Configure automatic user creation for more information. -
PKCE Required - Enable this checkbox to require Proof Key for Code Exchange (PKCE), an additional security layer for OAuth 2.0 flows. Aembit recommends leaving this enabled for enhanced security.
-
Authentication Method - Choose between Client Secret and Public Private Keypair:
-
Client Secret: If you select this option, you’ll need to enter the client secret from your OIDC application in the Identity Provider Client Secret field.
-
Public Private Keypair: If you select this option, Aembit provides a JWKS URL that you must configure in your IdP. Ensure your IdP can access this URL over the internet for key validation. This allows secure communication using JWT signing without requiring a client secret.
-
-
-
After entering the Identity Provider details, Aembit displays a Redirect URL.
Copy this URL and configure it in your third-party IdP as the redirect URI or callback URL of your OIDC application.
-
Optionally, in the Mappings tab of the Identity Provider page you may specify mapping information between group claims configured in your IdP and user roles available in your tenant.
Adding this information enables automatic user creation based on the information in the OIDC ID token sent by your IdP.
See Configure automatic user creation for more information.
-
Click Save.
Aembit displays the newly created OIDC IdP on the Identity Provider page. Now, when users log in to your Aembit Tenant, the login UI displays the available OIDC SSO option.
Provider-specific examples
Section titled “Provider-specific examples”Follow these steps to configure Okta as an OIDC 1.0 Identity Provider for Aembit.
-
In Okta, create a new OIDC application or select an existing one.
-
Copy the Client ID from the application’s settings.
-
For the Identity Provider Base URL, use your Okta domain in this format:
https://your-domain.okta.com -
If using Public Private Keypair:
-
In Okta, go to your application’s General Settings.
-
Set Client authentication to Public key / Private key.
-
Enable Require Proof Key for Code Exchange (PKCE).
-
Configure the JWKS URL option and paste the JWKS URL provided by Aembit.
-
-
If using Client Secret:
-
Copy the client secret from your Okta application.
-
Paste it into the Identity Provider Client Secret field in Aembit.
-
-
In Okta, add the Aembit Redirect URL to your application’s Sign-in redirect URIs.
-
Save your configuration in both Okta and Aembit.
Follow these steps to configure Azure AD (Microsoft Entra ID) as an OIDC 1.0 Identity Provider for Aembit.
-
In Azure Portal, go to App registrations and register a new application (or select an existing one).
-
Copy the Application (client) ID.
-
For the Identity Provider Base URL, go to Endpoints in your Azure application.
Copy the portion of the URL that contains your tenant ID. The format is:
https://login.microsoftonline.com/{tenant-id}/v2.0 -
If using Public Private Keypair:
-
Azure AD supports JWT bearer authentication.
-
Configure the JWKS URL from Aembit in your Azure application settings.
-
-
If using Client Secret:
-
Go to Certificates & secrets in your Azure application.
-
Click New client secret.
-
Copy the secret value and paste it into the Identity Provider Client Secret field in Aembit.
-
-
In Azure, go to your application’s Authentication settings.
-
Under Platform configurations, add a Web platform if not already present.
-
Add the Aembit Redirect URL to the Redirect URIs.
-
Click Configure to save.
-
Save your configuration in Aembit.
Testing your OIDC SSO setup
Section titled “Testing your OIDC SSO setup”Before enabling “Require Single Sign On” for your entire organization, test your OIDC SSO configuration:
-
Open an incognito or private browser window.
-
Go to your Aembit Tenant login page.
-
Click your new OIDC SSO option (for example, “Okta OIDC” or “Azure OIDC”).
-
Verify you’re redirected to your IdP’s login page.
-
Log in using your IdP credentials.
-
Verify you’re redirected back to Aembit and successfully logged in.
-
Don’t enable “Require Single Sign On” in your Sign-On Policy until you have successfully tested SSO login with at least one user.
Troubleshooting
Section titled “Troubleshooting”The following sections describe common issues you may encounter when setting up OIDC SSO and how to resolve them.
SSO button doesn’t appear on login page
Section titled “SSO button doesn’t appear on login page”Solution: Wait a few moments and refresh the page. If the button still doesn’t appear, verify that you clicked Save in the Identity Provider configuration.
Error after IdP login
Section titled “Error after IdP login”Solution: Verify that the Redirect URL in your IdP exactly matches the Redirect URL provided by Aembit.
Can’t complete OIDC setup
Section titled “Can’t complete OIDC setup”Solution: Ensure you have a Teams or Enterprise subscription plan. The Identity Providers feature isn’t available on the Professional plan. Contact Aembit by completing the Contact Us form to upgrade your plan.
Authentication fails with PKCE error
Section titled “Authentication fails with PKCE error”Solution: Ensure that you enable PKCE in both Aembit (PKCE Required checkbox) and your IdP’s OIDC application settings.
Invalid or expired tokens
Section titled “Invalid or expired tokens”Solution: If using Public Private Keypair authentication, verify that your IdP can access the JWKS URL provided by Aembit. Check for any firewall or network restrictions that might block this URL.
See also
Section titled “See also”- Identity Providers overview - Understand how Identity Providers work with Aembit
- Automatic User Creation - Configure automatic user creation with Identity Providers
- Sign-On Policy - Configure Sign-On policies including SSO requirements