Create an X.509-SVID Credential Provider
Create an X.509-SVID Credential Provider in your Aembit Tenant. See About the X.509-SVID Credential Provider for a conceptual overview of this Credential Provider.
Prerequisites
Section titled “Prerequisites”Before you create an X.509-SVID Credential Provider, confirm the following:
- Agent Proxy is running v1.31 or later.
- The destination Server Workload supports validating SPIFFE-compliant X.509-SVID certificates and is configured with the mTLS Authentication method. See Enable mTLS on a Server Workload.
- A Standalone CA is available to sign X.509-SVID certificates. See Configure a Standalone CA to create and assign one.
Create an X.509-SVID Credential Provider
Section titled “Create an X.509-SVID Credential Provider”To create an X.509-SVID Credential Provider, follow these steps:
-
Log into your Aembit Tenant, and click Credential Providers.
-
(Optional) Select the Resource Set that you want this Credential Provider to reside in.
-
Click + New.
-
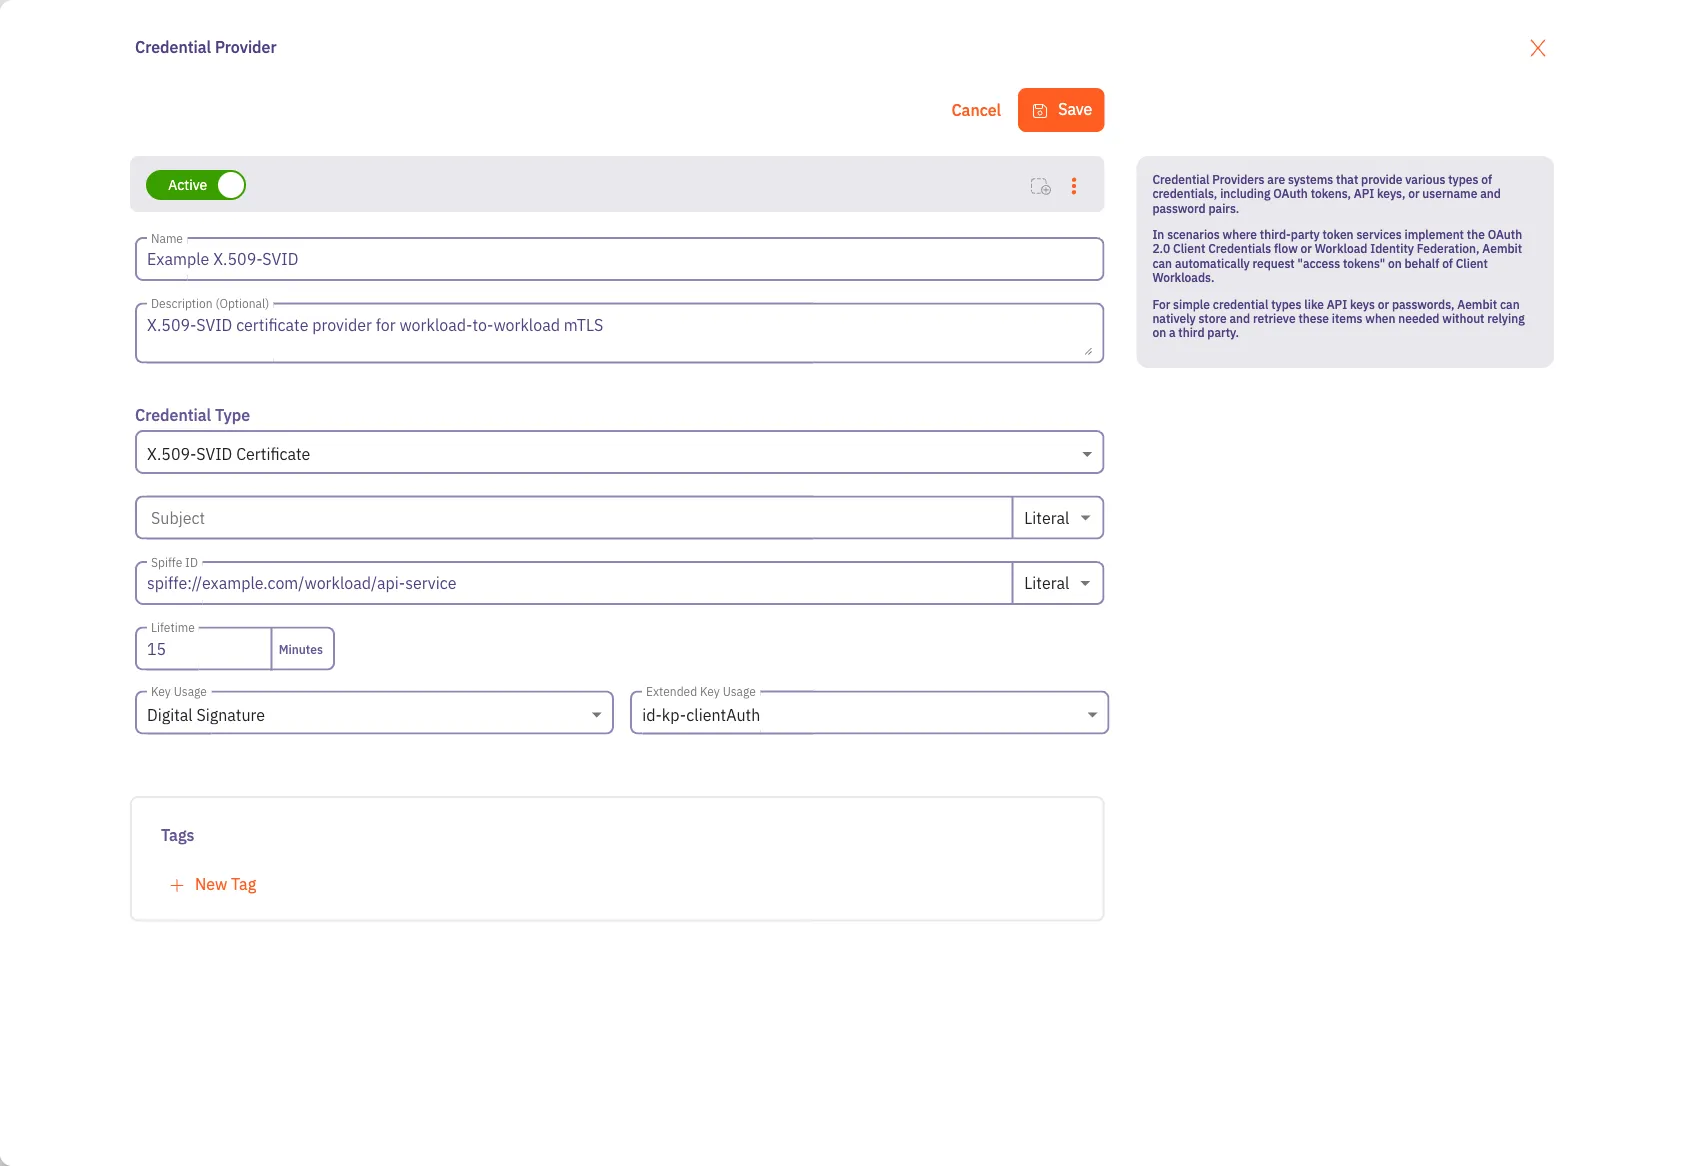
Enter a Name and optional Description.
-
Under Credential Type, select X.509-SVID Certificate, revealing more fields.
-
Fill out the remaining fields:
-
Subject - (Optional) The X.509 certificate Subject Distinguished Name (DN).
SPIFFE-aware Server Workloads identify the Client Workload from the SPIFFE ID in the URI Subject Alternative Name (SAN), not from the Subject DN. Populate it only when a non-SPIFFE-aware Server Workload authorizes clients by reading the Subject DN, a compliance framework requires a populated DN, or you want descriptive metadata embedded in the certificate for auditing.
Choose how to specify the Subject:
- Literal - Enter a fixed DN (for example,
CN=api-service,O=example.com,C=US). - Dynamic - Use template expressions with the syntax
${expression}to resolve DN components at issuance time from the Client Workload’s attestation.
- Literal - Enter a fixed DN (for example,
-
Spiffe ID - Enter the SPIFFE ID that Aembit embeds as the URI Subject Alternative Name on the issued certificate.
Choose how to specify the SPIFFE ID:
-
Literal - Enter a fixed SPIFFE ID (for example,
spiffe://example.com/workload/api-service). -
Dynamic - Use template expressions that resolve at issuance time using values from the Client Workload’s attestation. Use the syntax
${expression}.For example:
spiffe://your-domain/ns/${oidc.identityToken.decode.payload.namespace}/sa/${oidc.identityToken.decode.payload.service_account}for Kubernetesspiffe://your-domain/aws/account/${aws.account}/role/${aws.role}for AWS
For detailed dynamic-expression syntax, see Dynamic Claims for OIDC ID Token, JWT-SVID Token, and X.509-SVID Credential Providers.
-
-
Lifetime - Enter the certificate lifetime in minutes (default 15). Agent Proxy automatically refreshes the certificate before expiration (typically at 80% of the configured lifetime).
-
Key Usage - Digital Signature is the only Key Usage that the X.509-SVID Credential Provider supports.
-
Extended Key Usage — Select one or both EKU values to include on the issued certificate:
id-kp-clientAuth(default) — The certificate authenticates the holder when it initiates a TLS handshake. This is the correct choice for outbound mTLS from Agent Proxy.id-kp-serverAuth— The certificate also authenticates the holder when it accepts a TLS handshake. Include this only when the same workload also accepts inbound TLS connections and presents this certificate to the connecting party.
-
Standalone Certificate Authority - (Optional) Select a specific Standalone CA to sign leaf certificates issued by this Credential Provider.
When you select a Standalone CA here, Aembit uses it for every X.509-SVID certificate issued by this Credential Provider, overriding the Standalone CA otherwise associated with the Resource Set or Client Workload. Ensure your Server Workload environment trusts the selected Standalone CA using configuration appropriate to that environment.
If you leave this field empty, Aembit uses the Standalone CA assigned to the Resource Set (or to the specific Client Workload).
-
Tags - (Optional) Add tags to organize and filter the Credential Provider in your Aembit Tenant.
-
-
Click Save.
Use the Credential Provider in an Access Policy
Section titled “Use the Credential Provider in an Access Policy”After you save the Credential Provider, attach it to an Access Policy that links a Client Workload to a Server Workload configured for mTLS Authentication:
-
Click Access Policies.
-
Create a new Access Policy or select an existing one.
-
Add the Client Workload, Server Workload (with mTLS Authentication configured), Trust Provider, and the new X.509-SVID Credential Provider.
-
Click Save.
When Agent Proxy resolves the policy at runtime, it generates a key pair, submits a Certificate Signing Request to Aembit Cloud, and uses the returned X.509-SVID certificate for the mTLS handshake to the Server Workload.