Create an Azure Key Vault Credential Provider
The Azure Key Vault Credential Provider uses the Azure Entra Federation Credential Provider Integration to enable secure, policy-driven retrieval of static credentials stored in your Azure Key Vault. This includes API keys, usernames, and passwords. This integration allows you to leverage Aembit’s conditional access controls and centralized auditing for secrets managed in Azure, supporting both public and private network access scenarios.
Supported credential types and workloads
Section titled “Supported credential types and workloads”| Credential Value Type | Supported Workloads & Protocols |
|---|---|
| Single Value | HTTP (Bearer, Header, Query Parameter) |
| Username/Password | HTTP (Basic Auth), Redshift, PostgreSQL, MySQL, Redis |
Prerequisites
Section titled “Prerequisites”You must have the following to create an Azure Key Vault Credential Provider:
-
Access to an Azure subscription with permissions to create and manage an Azure Key Vault instance with secrets and appropriate access policies or Role-Based Access Control (RBAC) roles assigned
-
A completed Azure Entra Federation Credential Provider Integration
-
An Azure Key Vault with secrets you want to manage via Aembit
-
Access to your Aembit Tenant with permissions to create Credential Providers and manage Access Policies
-
For Private Network Access: Aembit Agent Proxy v1.26+ deployed in your environment
-
Terraform only:
-
You have Terraform installed.
-
You have the Aembit Terraform Provider configured.
-
Accessing Azure Key Vault on private networks
Section titled “Accessing Azure Key Vault on private networks”For Key Vault instances on private networks (such as an Azure Virtual Network), enable Private Network Access during configuration to allow your colocated Agent Proxy to handle credential retrieval directly.
For details on when to use Private Network Access, how it works, and troubleshooting, see Private Network Access for Credential Providers.
Configure Azure Key Vault for Aembit
Section titled “Configure Azure Key Vault for Aembit”To configure Azure Key Vault for Aembit, follow these steps:
-
Go to Create a resource → Key Vault → Create in the Azure portal.
-
Select your Subscription and Resource Group.
-
Enter a Key Vault name and select your Region.
-
Choose the Permission Model (Azure RBAC or Vault access policy).
-
Grant access to the federated app using one of the following methods:
- Open the Key Vault and go to Access control (IAM).
- Click Add role assignment.
- Select Key Vault Secrets User.
- Click Next, then Select members.
- Search for and select your federated app.
- Click Select, then Review + assign twice.
- Open the Key Vault and go to Access policies.
- Click + Create.
- Under Secret permissions, check Get and List.
- Click Next, search for your federated app, and select it.
- Click Next twice, then Create.
-
Add secrets to the Key Vault:
- Go to Objects → Secrets.
- Click + Generate/Import.
- Enter a name and value for the secret.
- Click Create.
For username/password, you must create two separate secrets.
Create an Azure Key Vault Credential Provider
Section titled “Create an Azure Key Vault Credential Provider”To create an Azure Key Vault Credential Provider, follow these steps:
-
Log into your Aembit Tenant, and go to Credential Providers in the left sidebar.
-
(Optional) In the top right corner, select the Resource Set that you want this Credential Provider to reside.
-
Click + New, which displays the Credential Provider pop out menu.
-
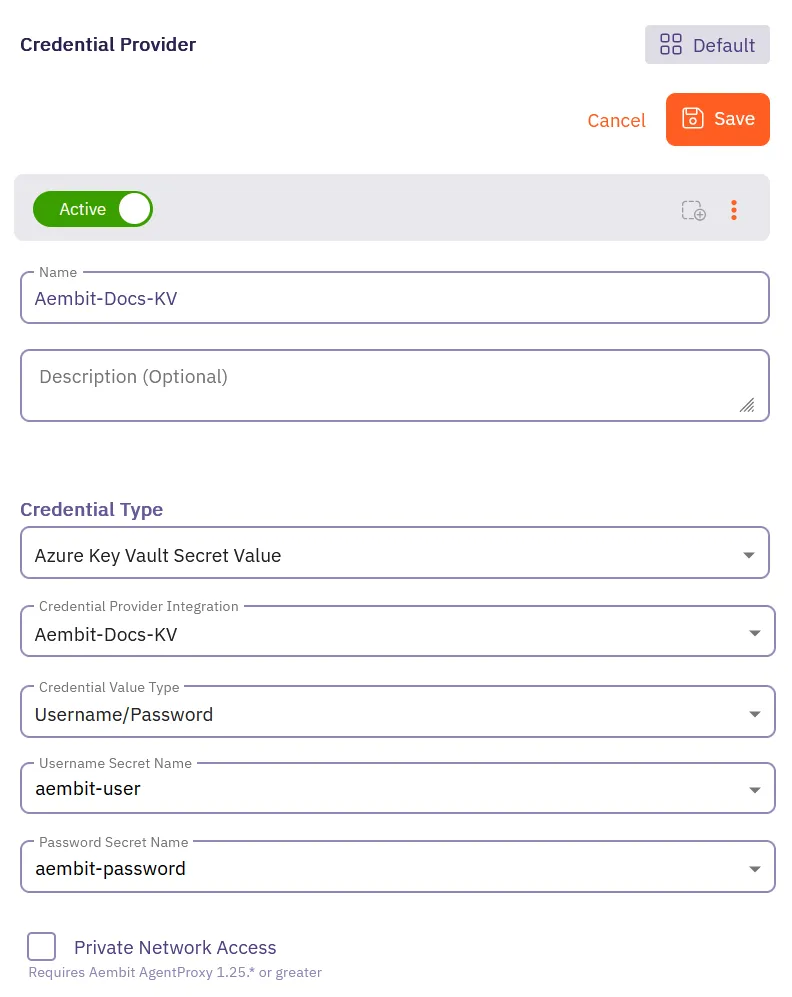
Enter a Name and optional Description.
-
Under Credential Type, select Azure Key Vault Secret Value, revealing more fields.
-
Fill out the remaining fields:
-
Select CP Integration - Select the Azure Entra Federation integration you’ve already configured.
-
Credential Value Type - Select the type of credential (Single Value or Username/Password).
-
Secret Name - Select or enter the name of the secret in Azure Key Vault. If you enabled Fetch Secret Names in the Azure Entra Federation integration, the secret names automatically load in a dropdown for easier selection. If Fetch Secret Names wasn’t enabled, manually enter the secret name. For Username/Password, enter two separate secret names (one for username, one for password).
-
Private Network Access - Enable this if your Key Vault exists in a private network or is only accessible from your Edge deployment. See Accessing Azure Key Vault on private networks for details.
-
-
Click Save.
Aembit displays the new Credential Provider in the list of Credential Providers.
Configure Azure Key Vault CP using the Aembit Terraform provider
Section titled “Configure Azure Key Vault CP using the Aembit Terraform provider”To configure an Azure Key Vault Credential Provider using the Aembit Terraform Provider, follow the steps in this section.
-
Ensure you have completed the Configure Azure Key Vault for Aembit steps.
-
Ensure you have created an Azure Entra Federation integration and have its integration ID.
You can obtain the integration ID by running:
Terminal window terraform state show aembit_credential_provider_integration.azure_entra_federation -
Create a new Terraform configuration file (such as
azure-kv-cp.tf) based on your credential type:provider "aembit" {}resource "aembit_credential_provider" "azure_kv" {name = "<Desired Credential Provider Name>"is_active = trueazure_key_vault_value = {credential_provider_integration_id = "<Azure Entra Federation Integration ID>"secret_name_1 = "<Secret Name in Azure Key Vault>"private_network_access = false}}Example Terraform resource file for API Key
provider "aembit" {}resource "aembit_credential_provider" "azure_kv_api_key" {name = "Azure KV API Key"is_active = trueazure_key_vault_value = {credential_provider_integration_id = "a1b2c3d4-e5f6-7890-abcd-ef1234567890"secret_name_1 = "api-key-secret"private_network_access = false}}provider "aembit" {}resource "aembit_credential_provider" "azure_kv" {name = "<Desired Credential Provider Name>"is_active = trueazure_key_vault_value = {credential_provider_integration_id = "<Azure Entra Federation Integration ID>"secret_name_1 = "<Username Secret Name in Azure Key Vault>"secret_name_2 = "<Password Secret Name in Azure Key Vault>"private_network_access = false}}Example Terraform resource file for Database Credentials
provider "aembit" {}resource "aembit_credential_provider" "azure_kv_db_creds" {name = "Azure KV Database Credentials"is_active = trueazure_key_vault_value = {credential_provider_integration_id = "a1b2c3d4-e5f6-7890-abcd-ef1234567890"secret_name_1 = "db-username"secret_name_2 = "db-password"private_network_access = false}} -
Apply the Terraform configuration:
Terminal window terraform apply
Your Azure Key Vault Credential Provider is now ready to use in your Access Policies!
Troubleshooting
Section titled “Troubleshooting”- UI/Integration Errors: If you encounter errors when creating the integration or credential provider (for example UI logout, 500 errors), verify Azure permissions and configuration details.
- Secret Not Found: Ensure the secret name matches exactly and that the federated app has the correct permissions.
- Access Denied: Double-check RBAC or access policy assignments in Azure Key Vault.