Create a GitLab Service Account Integration for a GitLab.com plan
The GitLab Service Account Credential Provider Integration allows you to create a Managed GitLab Account Credential Provider, which provides credential lifecycle management and rotation capabilities for secure authentication between your GitLab instances and other Client Workloads. This page details everything you need to create a GitLab Service Account Credential Provider Integration.
This integration requires the use of two types of GitLab accounts:
-
GitLab Administrator account in a top-level-group with the
Ownerrole. This administrator account performs the initial authorization for the Aembit Credential Provider Integration to start communicating with GitLab. -
GitLab Service Account that the preceding GitLab Administrator account eventually creates. This service account performs credential lifecycle management for the Managed GitLab Account Credential Provider.
See How the GitLab Service Account integration works for more details.
Prerequisites
Section titled “Prerequisites”-
Ownerrole access to GitLab Admin area and REST API -
A GitLab Personal Access Token (PAT) for your GitLab service account with the
Ownerrole as well asapiandself_rotatescopes
Configure a GitLab service account integration
Section titled “Configure a GitLab service account integration”To create a GitLab service account integration, follow these steps:
-
Log into your Aembit Tenant, and go to Credential Providers -> Integrations in the left sidebar.
-
(Optional) In the top right corner, select the Resource Set that you want this Credential Provider Integration to reside.
-
Click + New, which displays the Integration pop out menu.
-
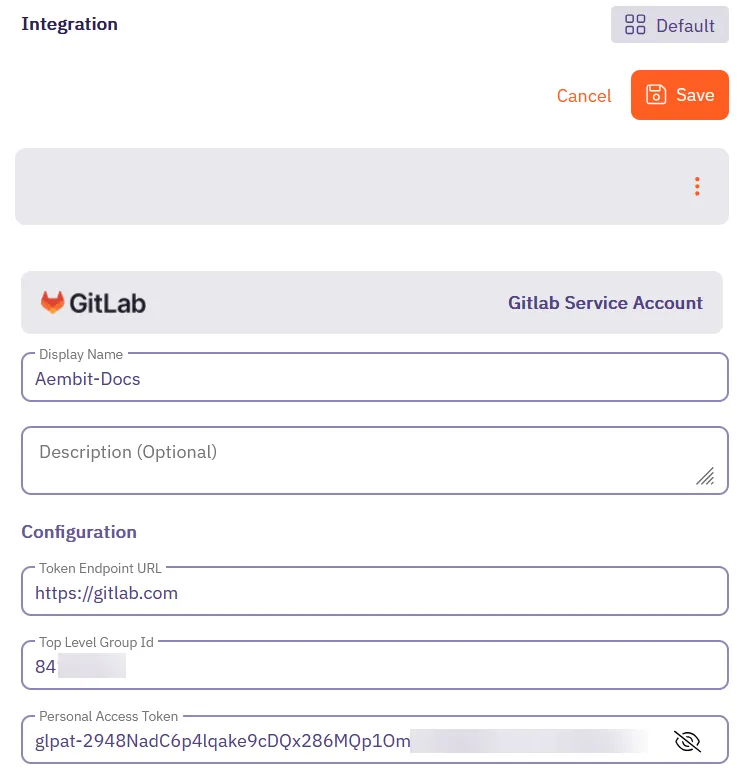
Select GitLab Service Account, and enter a Display Name and optional Description.
-
Fill out the remaining fields:
-
Token Endpoint URL - Enter
https://gitlab.com, indicating that you’re using a GitLab.com plan.See GitLab subscriptions for more details.
-
Top Level Group ID - Enter the numeric ID of the top-level group that contains your GitLab service account.
See GitLab’s Find the Group ID for more details. -
Personal Access Token - Enter the Personal Access Token that’s associated with your GitLab Service Account.
If you don’t already have a GitLab service account with a PAT, see Create a GitLab service account and PAT.
The form should look similar to the following screenshot:
-
-
Click Save.
Aembit displays the new integration in the list of Credential Provider Integrations.
Create a GitLab service account and PAT
Section titled “Create a GitLab service account and PAT”The service account you use for the GitLab Service Account Credential Provider Integration must be in a top-level group
with the Owner role to have access to GitLab APIs.
To create a GitLab service account and PAT, use either the GitLab UI or GitLab API:
-
Follow GitLab’s documentation to Create a Service Account using the GitLab UI.
-
Follow GitLab’s documentation to Create a Personal Access Token for the service account you just created.
Ensure that you select the following scopes:apiself_rotate
-
Copy the token value and store it in a secure location as you won’t be able to view it again.
-
Use this token to create the GitLab Service Account Credential Provider Integration in your Aembit Tenant.
You must perform the following steps using your GitLab Admin account that has Owner role access to a top-level group.
You’ll also need your numerical top-level group ID. Follow GitLab’s documentation to Find the Group ID.
-
From your terminal, enter the following command to create the GitLab service account you want to associate with the integration. Make sure to replace:
<GITLAB_TOKEN>with your GitLab Admin account’s Personal Access Token<numeric_group_id>with your top-level group ID See Find the Group ID for more details- For
<sa_name>and<sa_username>, enter values that follow your organization’s patterns
Terminal window curl --header "PRIVATE-TOKEN: <GITLAB_TOKEN>" \-X POST "https://gitlab.com/api/v4/groups/<numeric_group_id>/service_accounts" \--data "name=<sa_name>" \--data "username=<sa_username>"If successful, the response should look similar to the following:
Terminal window {"id":12345678,"username":"my-service-account","name":"my-service-account","email":"mysa@example.com"}The
idis the user ID of the Service Account. Record thisid, as you’ll need it in the next step. -
Create a PAT for the GitLab service account you just created.
Make sure to replace:
<GITLAB_TOKEN>with your GitLab Admin account’s Personal Access Token<numeric_group_id>with your top-level group ID<service_account_user_id>with theidyou recorded from the previous step- For
<sa_name>, enter a value that follows your organization’s patterns
Terminal window curl --header "PRIVATE-TOKEN: <GITLAB_TOKEN>" \-X POST "https://gitlab.com/api/v4/groups/<numeric_group_id>/service_accounts/<service_account_user_id>/personal_access_tokens" \--data "name=<sa_username>" \--data "scopes[]=api" \--data "scopes[]=self_rotate"If successful, the response should look similar to the following:
Terminal window {"id":1234,"name":"<token_name>","revoked":false,"created_at":"2025-03-21T20:18:23.333Z","description":null,"scopes":["api","self_rotate"],"user_id":<service_account_user_id>,"last_used_at":null,"active":true,"expires_at":"2025-03-31","token":"<token>"}Record the
tokenvalue as you’ll need it in the final step. -
Add the new service account you just created to your top-level group:
Make sure to replace:
<GITLAB_TOKEN>with your GitLab API access token<numeric_group_id>with your top-level group ID<service_account_user_id>with theidyou recorded earlier
Terminal window curl --header "PRIVATE-TOKEN: <GITLAB_TOKEN>" \-X POST "https://gitlab.com/api/v4/groups/<numeric_group_id>/members" \--data "user_id=<service_account_user_id>" \--data "access_level=50"