Create an Azure Entra Federation Credential Provider Integration
The Azure Entra Federation Credential Provider Integration allows you to create an Azure Key Vault Credential Provider. This enables the credential provider to retrieve secret values from Azure Key Vault without requiring long-lived secrets or static credentials. It leverages Azure’s Workload Identity Federation, allowing Aembit to authenticate using short-lived, federated tokens based on OpenID Connect (OIDC) standards. This page details everything you need to create an Azure Entra Federation Credential Provider Integration.
See How the Azure Entra Federation integration works for more details.
Prerequisites
Section titled “Prerequisites”To configure an Azure Entra Federation integration, you must have and do the following:
-
Ability to access and manage your Aembit Tenant.
-
Ability to access and manage a Microsoft Entra registered application
-
An Azure Key Vault with secrets you want to manage via Aembit.
-
Terraform only:
-
You have Terraform installed.
-
You have the Aembit Terraform Provider configured.
-
Create an integration
Section titled “Create an integration”This section explains how to configure an Azure Entra Federation integration in the Aembit web UI. These steps assume you already have a Microsoft Entra registered application (see Prerequisites).
You must configure the Aembit integration at the same time as the Azure Entra registered application credential.
-
Log into your Aembit Tenant, and in the left sidebar menu, go to Credential Providers → Integrations.
-
(Optional) In the top right corner, select the Resource Set that you want this Credential Provider Integration to reside.
-
Click + New, which displays the Integration pop out menu.
-
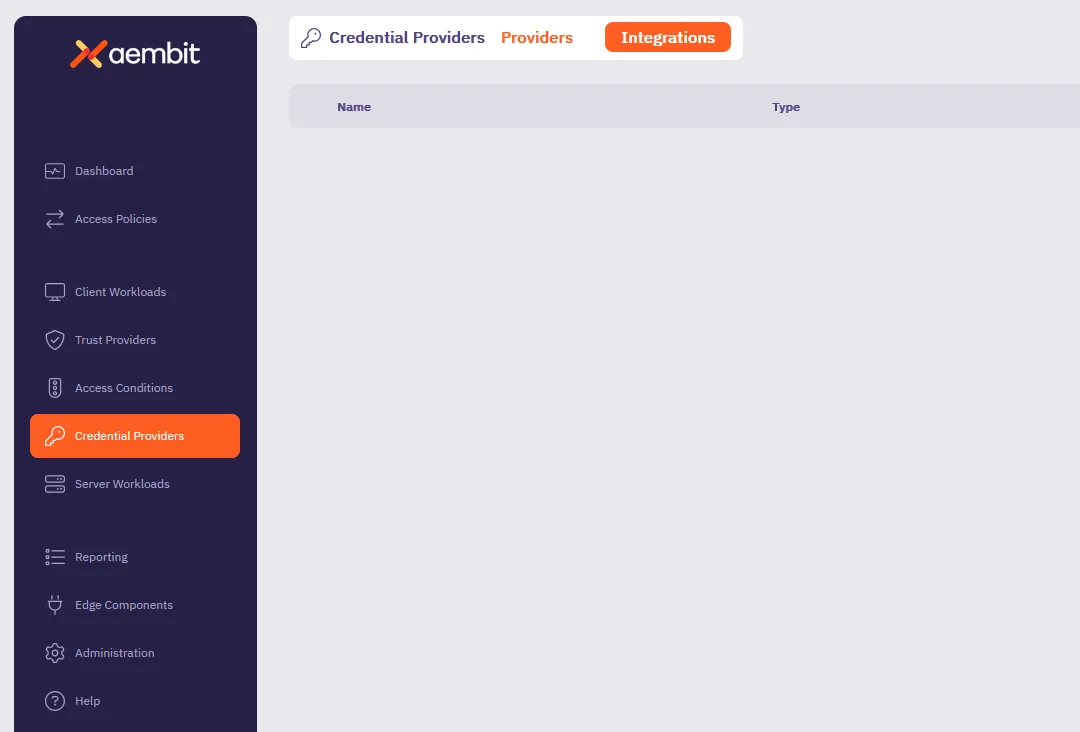
Select Azure Entra Federation, and enter a Display Name and optional Description.
Before filling out these fields, you must add the credential for your Azure Entra registered application in the Azure Entra Portal first.
Keep the Aembit web UI open while you work on the next section.
Add a credential for your Azure Entra registered app
Section titled “Add a credential for your Azure Entra registered app”In the Azure Entra Portal, create a new credential for your registered application:
-
In your Azure Entra Portal, go to App registrations and select your registered application from the list.
-
Go to Manage → Certificates & secrets and select the Federated Credentials tab.
-
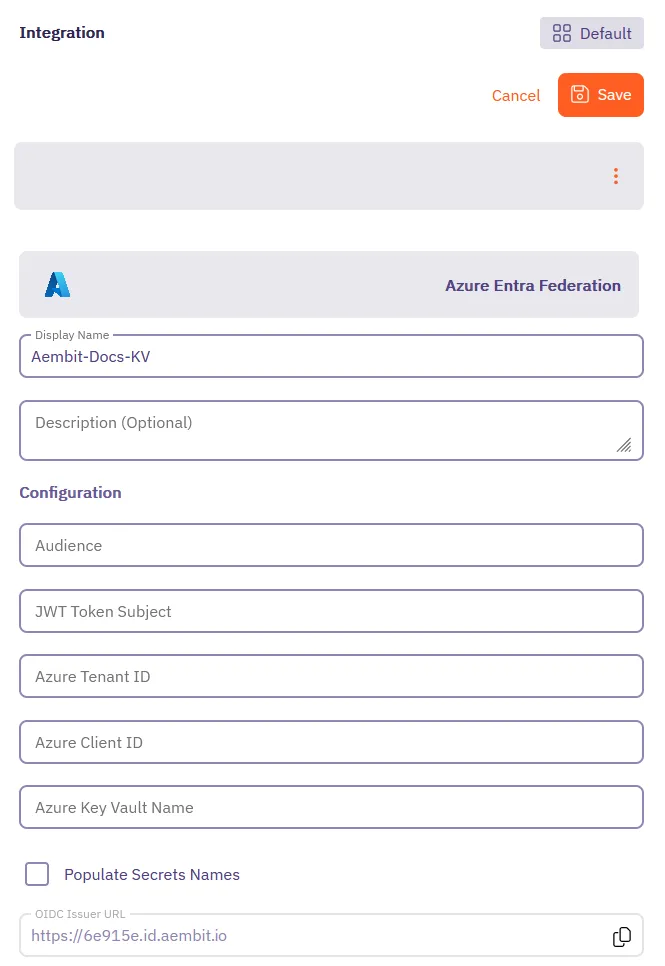
Click Add credential, to reveal the Add a credential page and fill out the following sections (for quick reference, see the mappings section):
-
For Connect your account -
-
Federated credential scenario - Select Other issuer
-
Issuer - From the Aembit Integration form, copy and paste the OIDC Issuer URL
-
Type - Select Explicit subject identifier
-
Value - Enter the desired value (this must match the JWT Token Subject value you enter on the Aembit Integration form)
-
-
For Credential details -
-
Name - Enter the desired name
-
Audience - Use the default value or optionally change it to the desired value (this must match the Audience value on the Aembit Integration form)
Your Aembit Integration form and Entra registered application credential should look similar to the following example:
-
-
Click Add and your new credential shows up on the Federated credentials tab in Azure Entra.
-
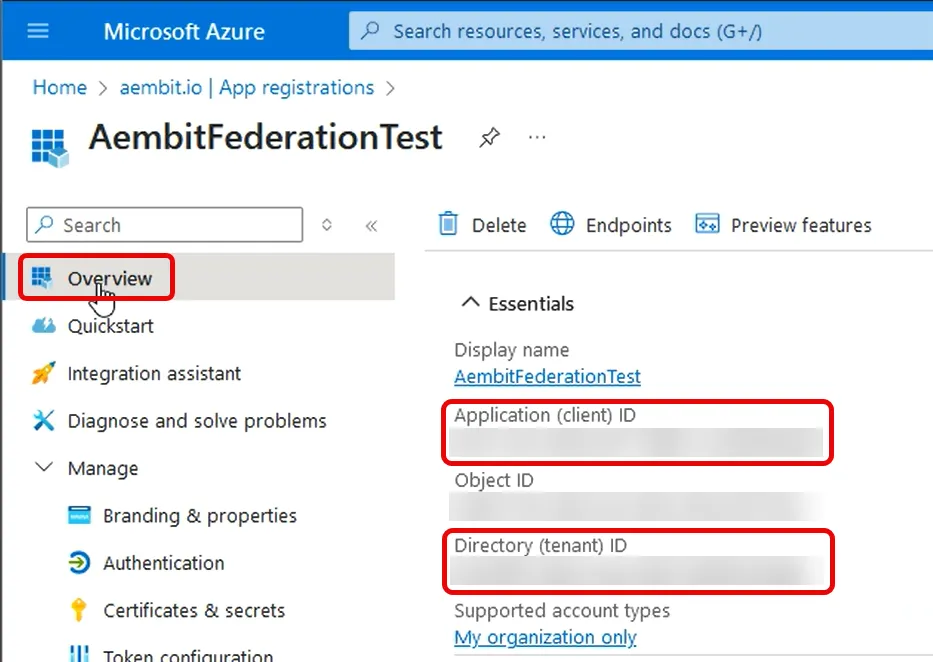
While still on your registered application, go to the Overview section.
Keep the Azure Entra Portal open to use it in the next section.
Complete the integration in the Aembit web UI
Section titled “Complete the integration in the Aembit web UI”Go back to the Aembit web UI, and complete the Integration form:
-
Use the info from your Azure Entra registered application’s Overview page to complete the following fields for the Aembit Integration (for quick reference, see the mappings section):
-
Azure Tenant ID - copy and paste the Directory (tenant) ID.
-
Azure Client ID - copy and paste the Application (client) ID.
-
-
For Azure Key Vault Name, enter the name of your Azure Key Vault.
-
(Optional) Enable Fetch Secret Names to load the secret names from the Azure Key Vault. When enabled, secret names automatically populate in a dropdown when setting up the Azure Key Vault Credential Provider, making it easier to select secrets.
-
Click Save.
Your Azure Entra Federation integration now displays in your list of Credential Provider Integrations in the Aembit web UI.
You’re now ready to use your Azure Entra Federation integration to create an Azure Key Vault Credential Provider!
Configure Azure Entra Federation using the Aembit Terraform provider
Section titled “Configure Azure Entra Federation using the Aembit Terraform provider”To configure an Azure Entra Federation integration using the Aembit Terraform Provider, follow the steps in this section.
-
Follow the steps to Add a credential for your Azure Entra registered app.
Leaving the Issuer blank and stopping before you add the new credential.
Keep this page open as you’ll need some values from it.
-
Create a new Terraform configuration file (such as
azure-entra-federation.tf) with the following structure:provider "aembit" {}resource "aembit_credential_provider_integration" "azure_entra_federation" {name = "<Desired Integration Name>"description = "<Optional Description>"azure_entra_federation = {audience = "<Audience from Azure Federated Credentials creation page>"subject = "<Subject from Azure Federated Credentials creation page>"azure_tenant = "<Azure Tenant ID from Azure Entra Application>"client_id = "<Azure Client ID from Azure Entra Application>"key_vault_name = "<Name of your Azure Key Vault>"fetch_secret_names = true}}Example Terraform resource file for Azure Key Vault
provider "aembit" {}resource "aembit_credential_provider_integration" "azure_entra_federation" {name = "Azure Key Vault Integration"description = "Integration for accessing Azure Key Vault secrets"azure_entra_federation = {audience = "api://AzureADTokenExchange"subject = "aembit:integration:keyvault"azure_tenant = "7f492ad1-25ec-4bfe-9c3a-84b517de8f2c"client_id = "3d845691-7abc-4def-a123-456789abcdef"key_vault_name = "my-key-vault"fetch_secret_names = true}} -
Apply the Terraform configuration:
Terminal window terraform apply -
After the Terraform apply completes successfully, the Aembit Terraform provider generates an OIDC Issuer URL as the value for
oidc_issuer_url.Run the following command to obtain the value for
oidc_issuer_url:Terminal window terraform state show aembit_credential_provider_integration.azure_entra_federation -
Copy the URL from
oidc_issuer_urland return to the Azure Portal’s Add a credential page. -
Paste the URL from
oidc_issuer_urlinto the Issuer field. -
Click Add and your new credential shows up on the Federated credentials tab in Azure Entra.
You’re now ready to use your Azure Entra Federation integration to create an Azure Key Vault Credential Provider!
Azure Entra and Integration value mappings
Section titled “Azure Entra and Integration value mappings”The following table shows how the different values in Azure Entra from your registered application map to the required values in the Aembit Integration and Terraform provider:
| Aembit Integration value | Azure Entra credential value | Azure UI location | Terraform value |
|---|---|---|---|
| OIDC Issuer URL | Account Issuer | Integration form | Auto-populated |
| Audience | Credential Audience | Registered app credential | audience |
| JWT Token Subject | Account Value | Registered app credential | subject |
| Azure Tenant ID | Directory (tenant) ID | Your app’s Overview | azure_tenant |
| Azure Client ID | Application (client) ID | Your app’s Overview | client_id |
| Azure Key Vault Name | Key Vault name | Azure Key Vault resource | key_vault_name |
| Fetch Secret Names | N/A | Integration form | fetch_secret_names |