Salesforce REST
Salesforce is a cloud-based platform that helps businesses manage customer relationships, sales, and services. It supports integration with tools and offers customization to fit different business needs.
You can find the Aembit configuration required to work with the Salesforce service as a Server Workload using the Salesforce apps and APIs.
Aembit supports multiple authentication and authorization methods for Salesforce. This page describes scenarios where you configure the Credential Provider for Salesforce via:
OAuth 2.0 authorization code
Section titled “OAuth 2.0 authorization code”Server Workload configuration
Section titled “Server Workload configuration”To retrieve connection information in Salesforce:
-
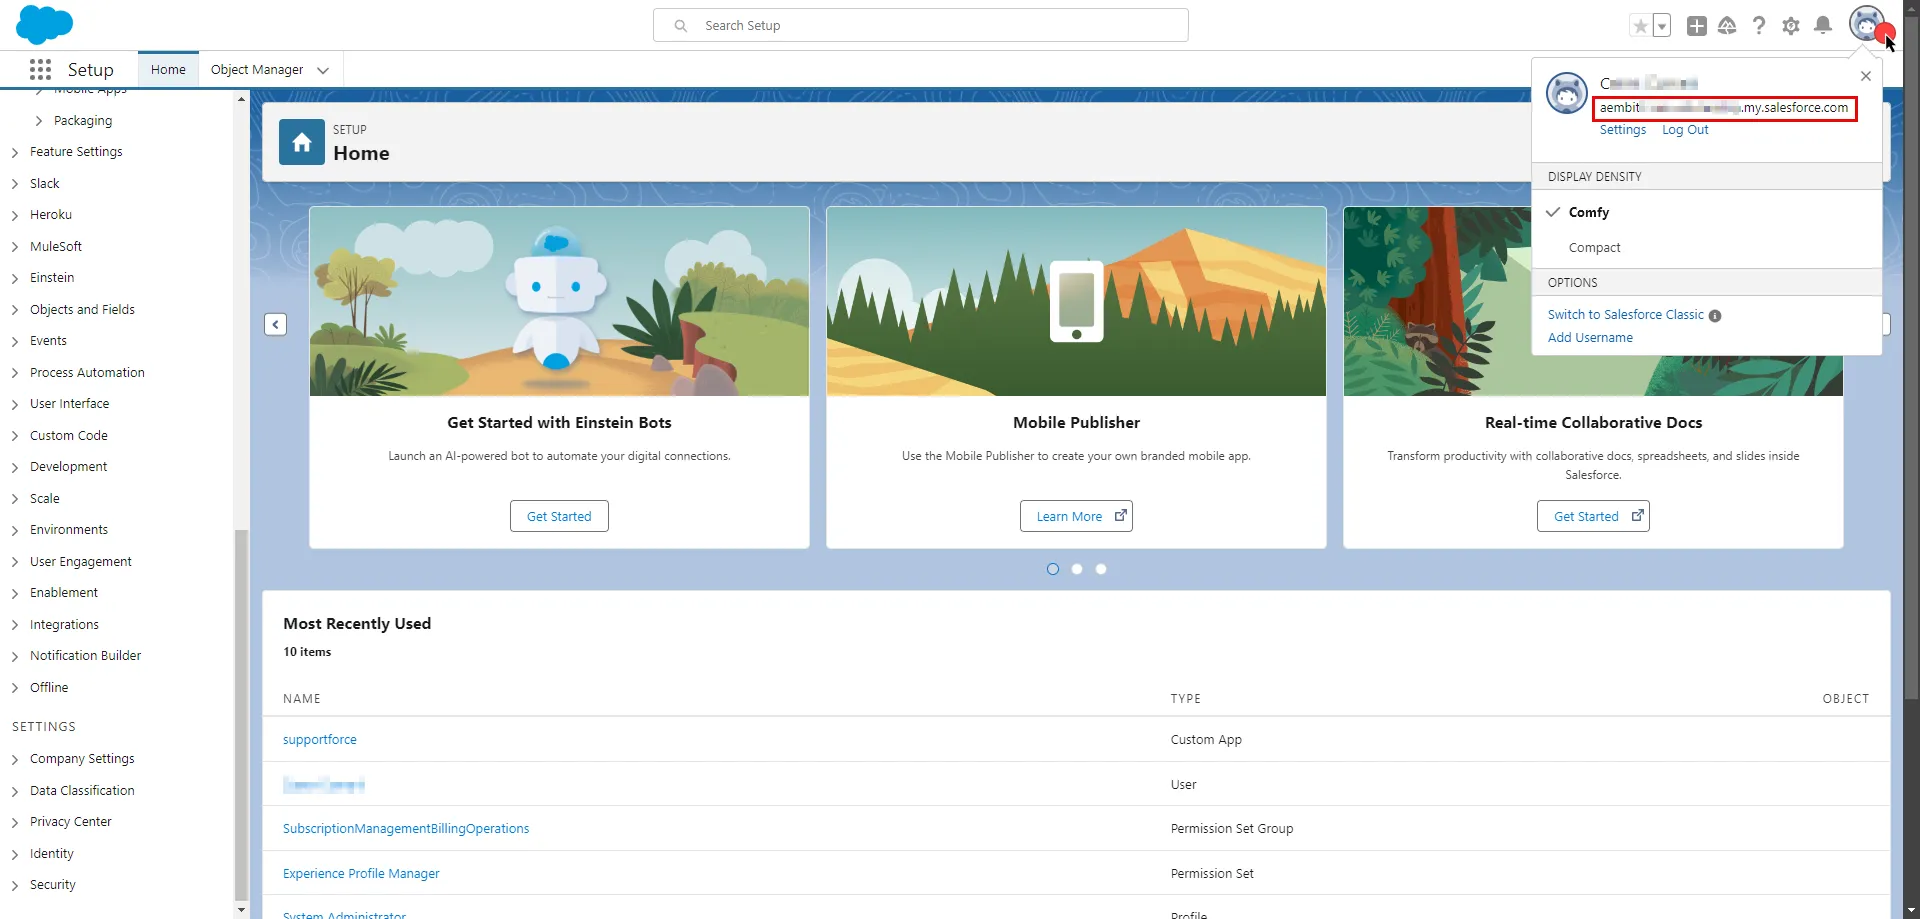
In the upper-right corner of any page, click your profile photo. The endpoint appears in the dropdown menu under your username. Copy the endpoint.
-
Create a new Server Workload.
- Name - Choose a user-friendly name.
-
Configure the service endpoint:
- Host -
<domain>.my.salesforce.com(Provide the endpoint copied from Salesforce) - Application Protocol - HTTP
- Port - 443
- Forward to Port - 443 with TLS
- Authentication method - HTTP Authentication
- Authentication scheme - Bearer
- Host -
Salesforce app configuration
Section titled “Salesforce app configuration”-
Log in to your Salesforce account.
-
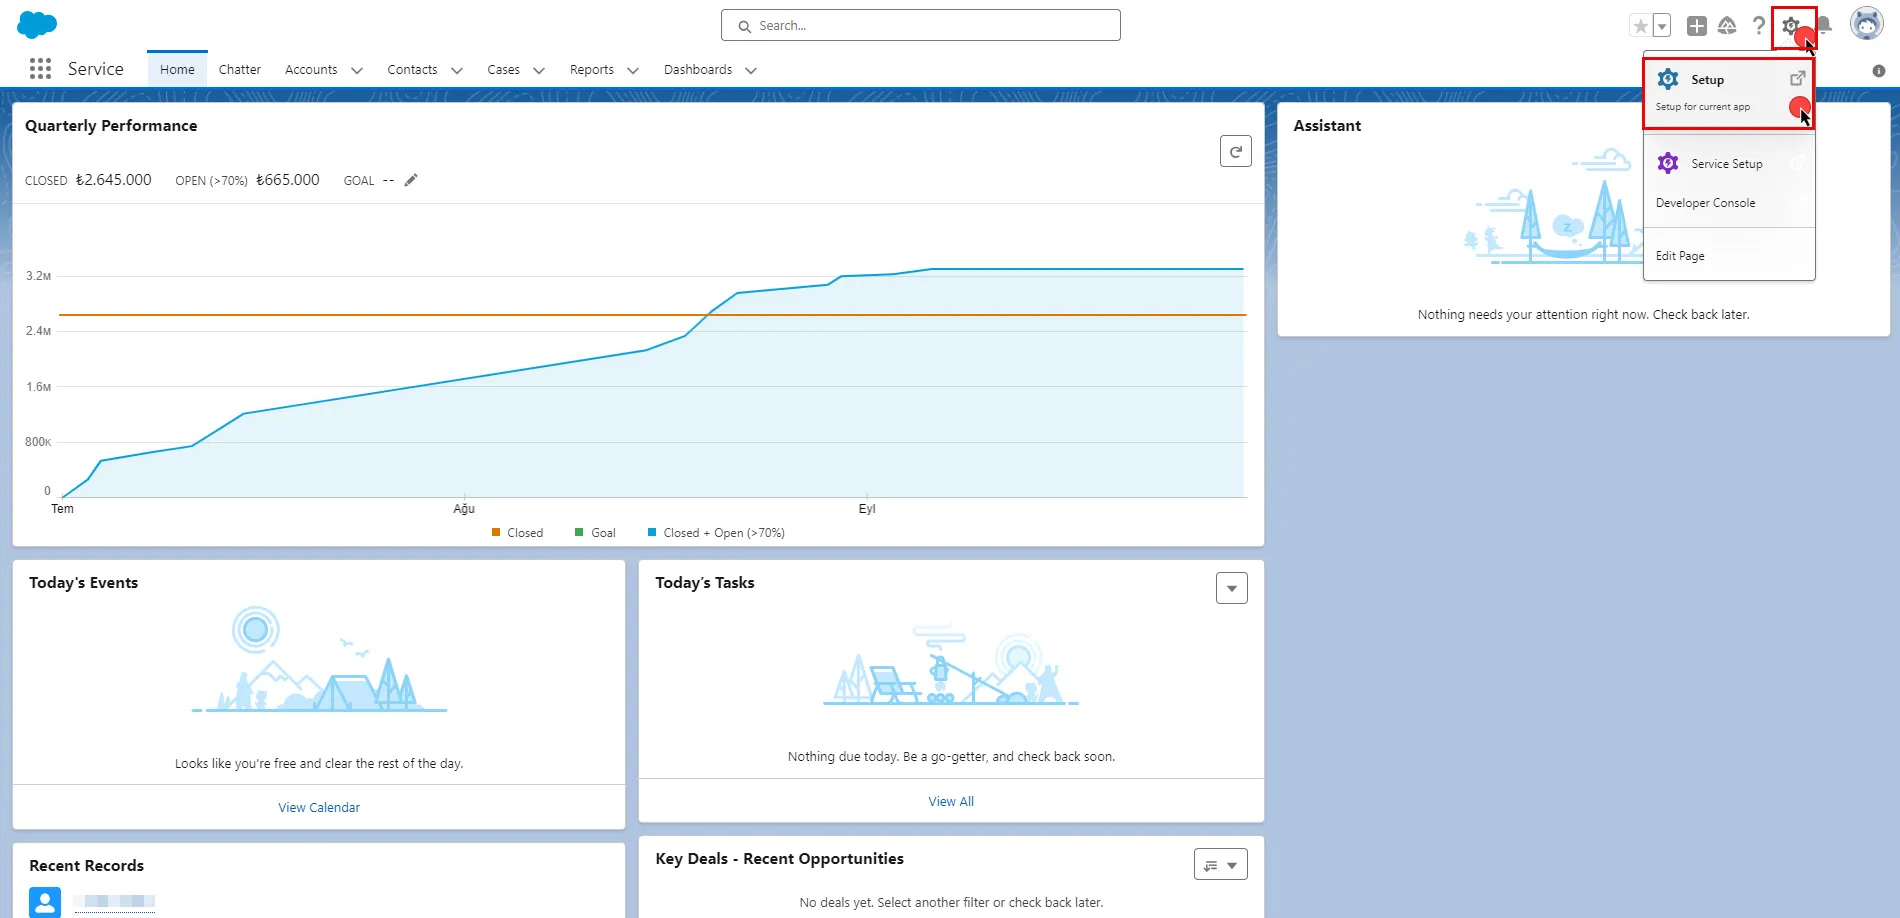
In the upper-right corner of any page, click the cog icon and then click Setup.
-
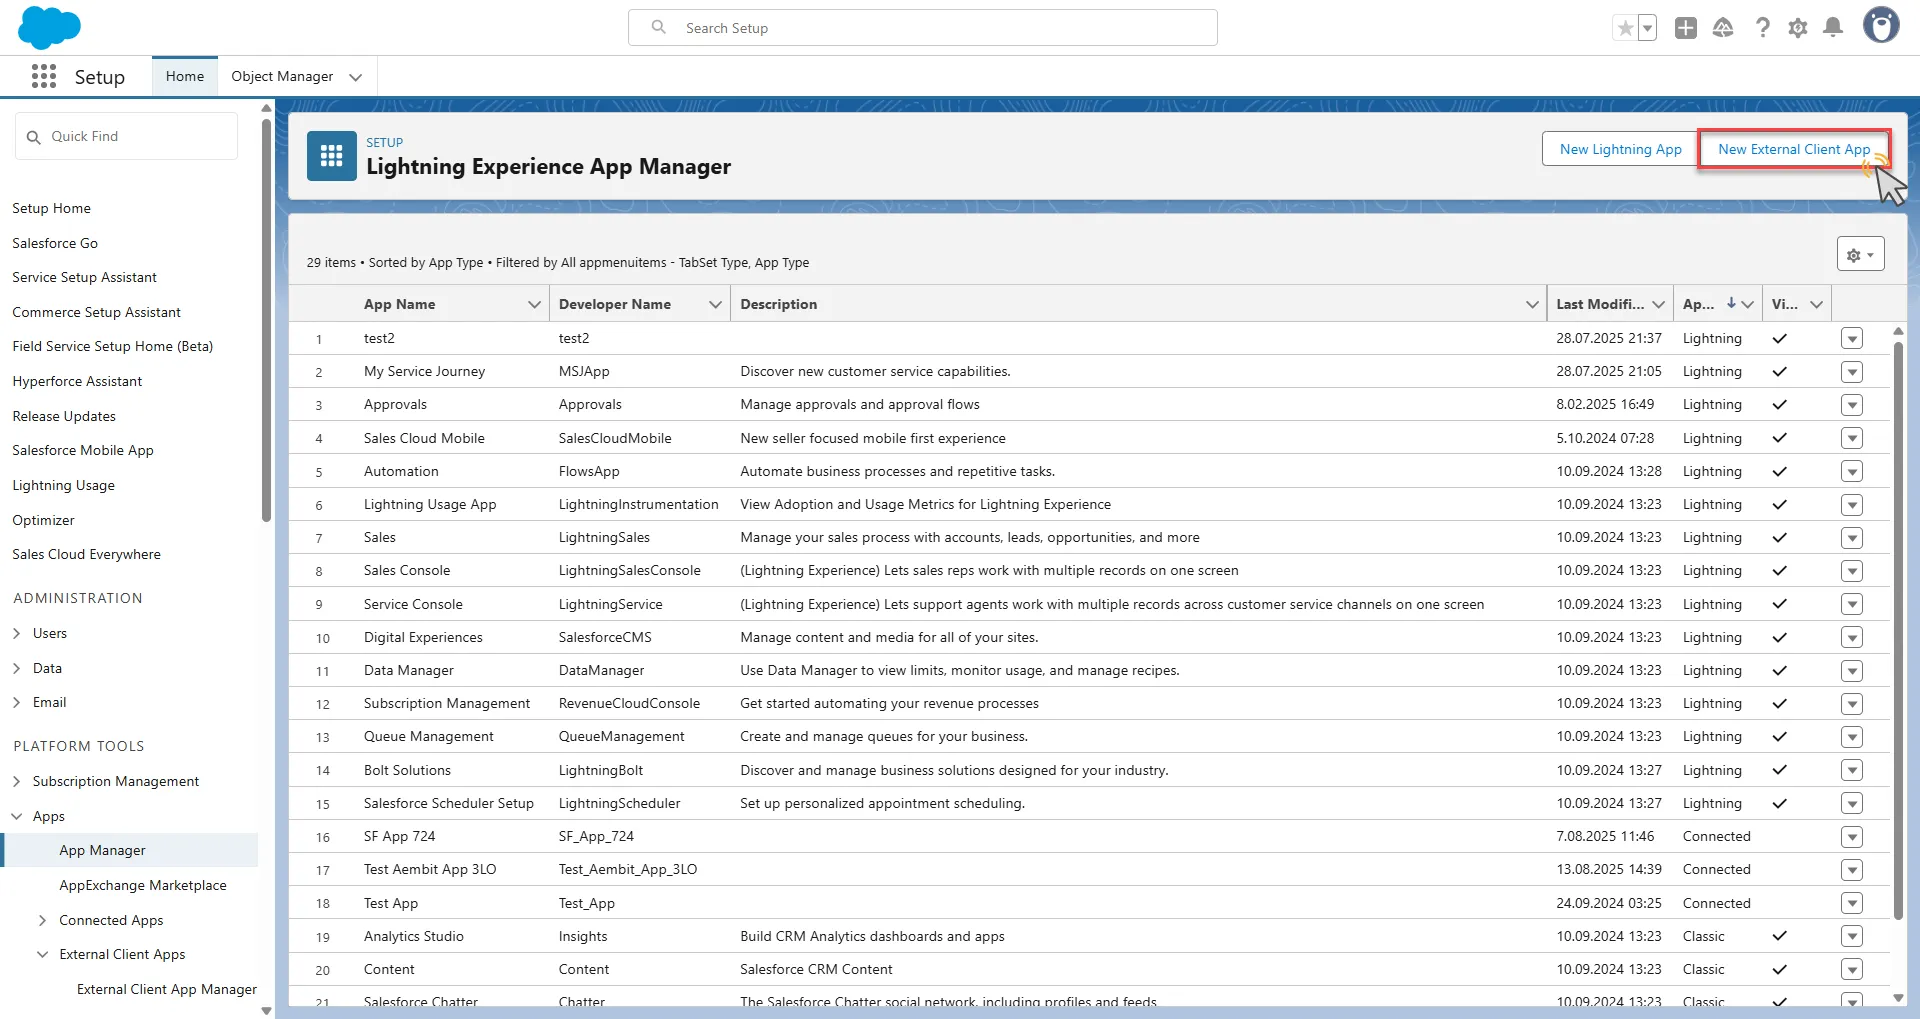
In the search box at the top of the Setup page, type App Manager and select it from the search results.
-
In the top-right corner of the page, click New External Client App.
-
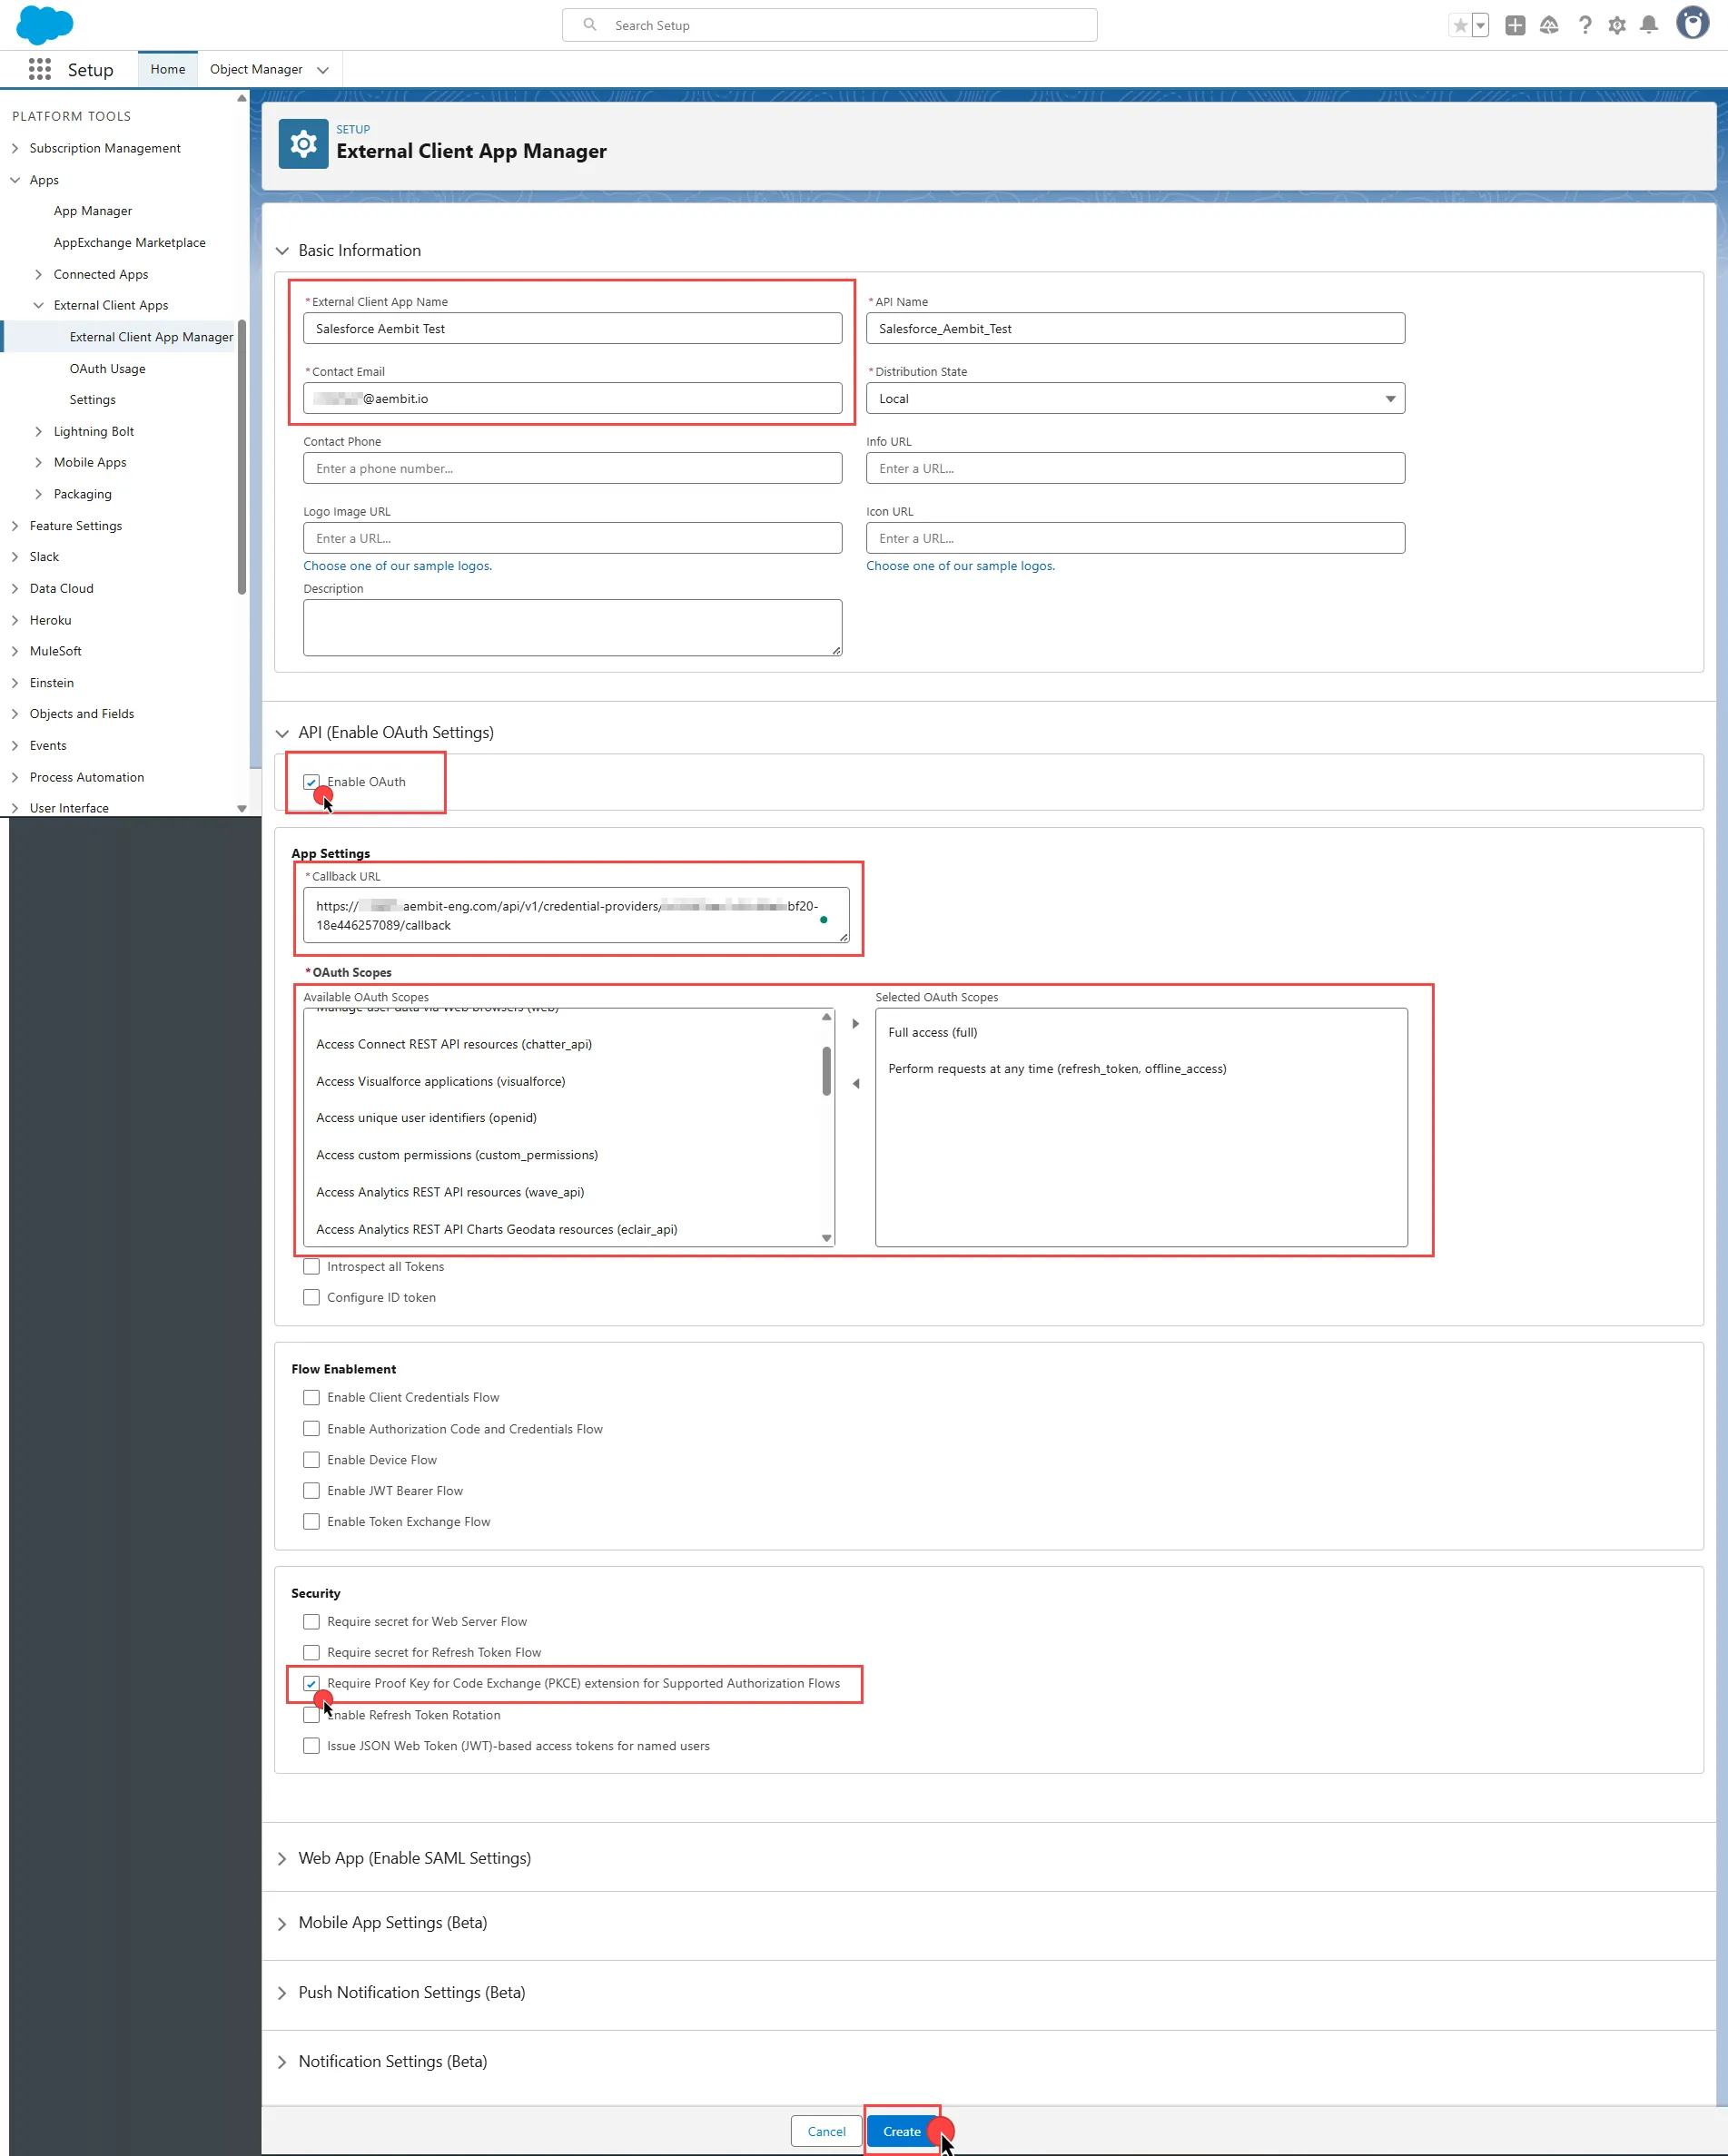
Configure the app based on your preferences. Below are key choices:
- Provide a name for your connected app. The API Name auto-generates based on the app name, but you can edit it if needed.
- Enter a valid email address in the Contact Email field.
- Scroll down and expand the API (Enable OAuth Settings) section.
- Check the Enable OAuth box.
- Switch to the Aembit UI to create a new Credential Provider, selecting the OAuth 2.0 Authorization Code credential type.
- After setting up the Credential Provider, copy the Callback URL.
- Return to Salesforce and paste the copied URL into the Callback URL field.
- Select the necessary OAuth Scopes for your application based on your needs.
- Under the Security section, check the Require secret for Web Server Flow box.
- Check the Require secret for Refresh Token Flow box.
- Check the Require Proof Key for Code Exchange (PKCE) Extension for Supported Authorization Flows box.
- At the bottom of the page, click Create to complete the app creation process.
For detailed information on the OAuth 2.0 Web Server Flow on Salesforce, see the official Salesforce documentation.
Credential Provider configuration
Section titled “Credential Provider configuration”-
Log in to your Salesforce account.
-
In the upper-right corner of any page, click the cog icon and then click Setup.
-
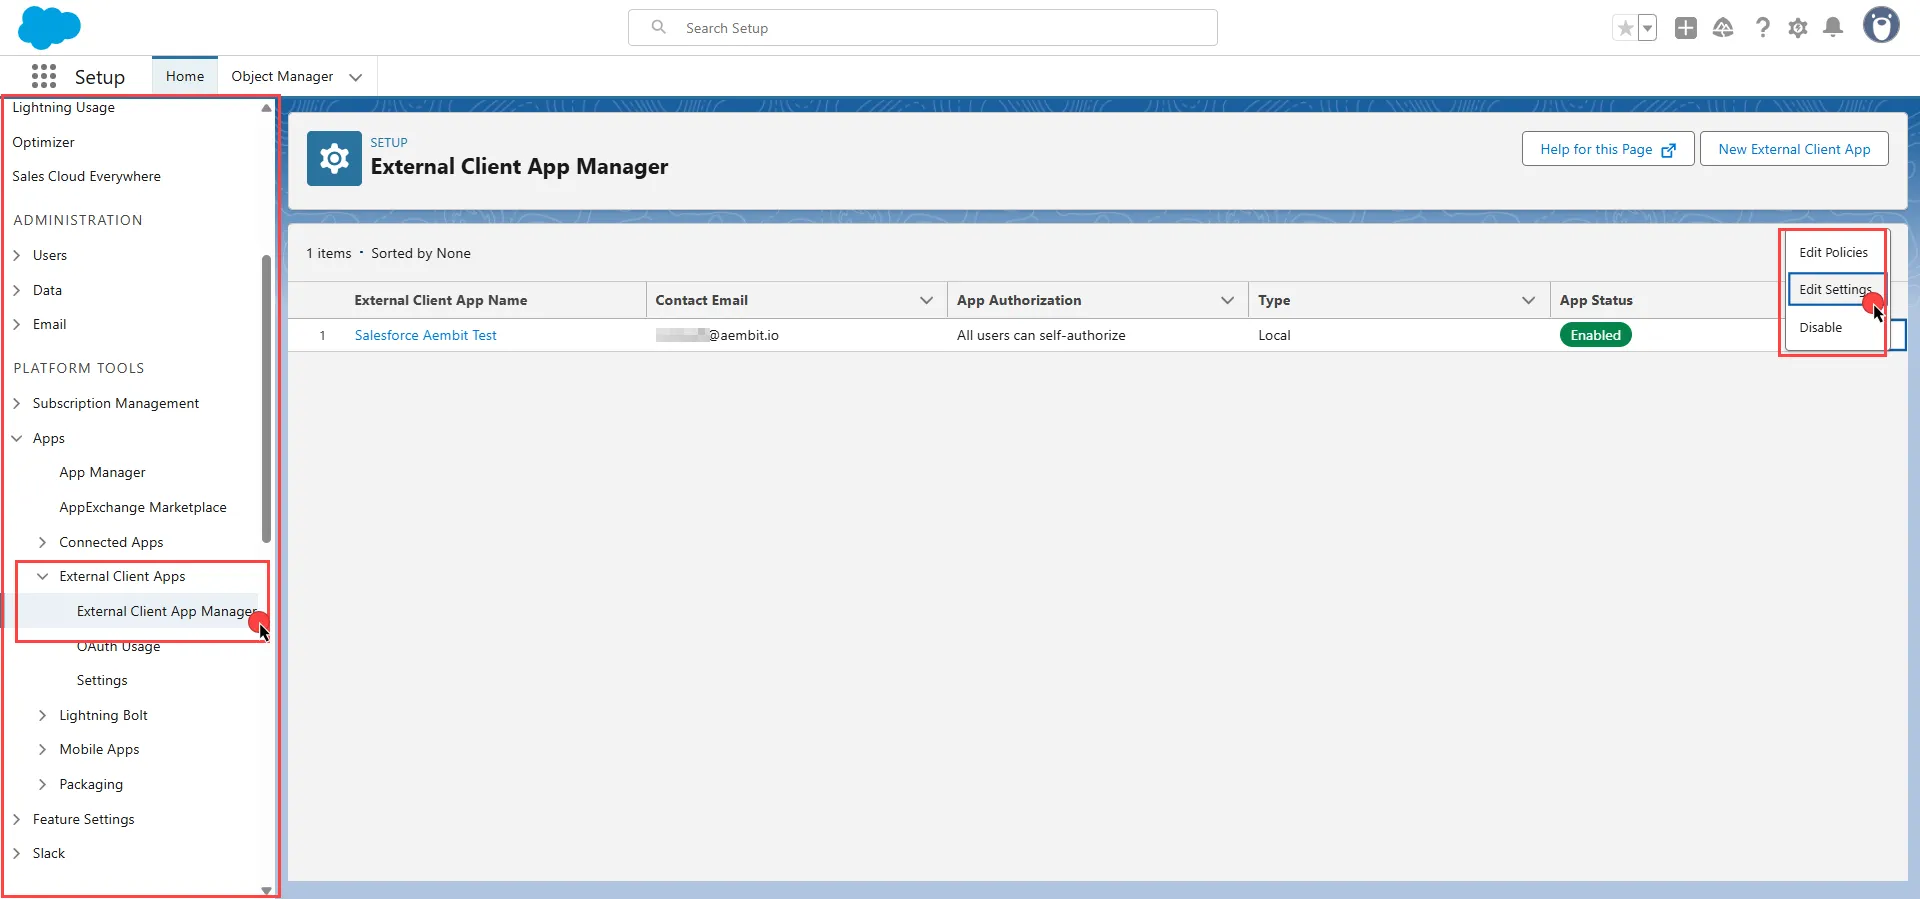
On the left-side menu, scroll down and find External Client Apps under Platform Tools.
-
Expand it and click External Client App Manager under it.
-
Find your app from the list and click the icon at the end of the row. Select Edit Settings from the dropdown menu.
-
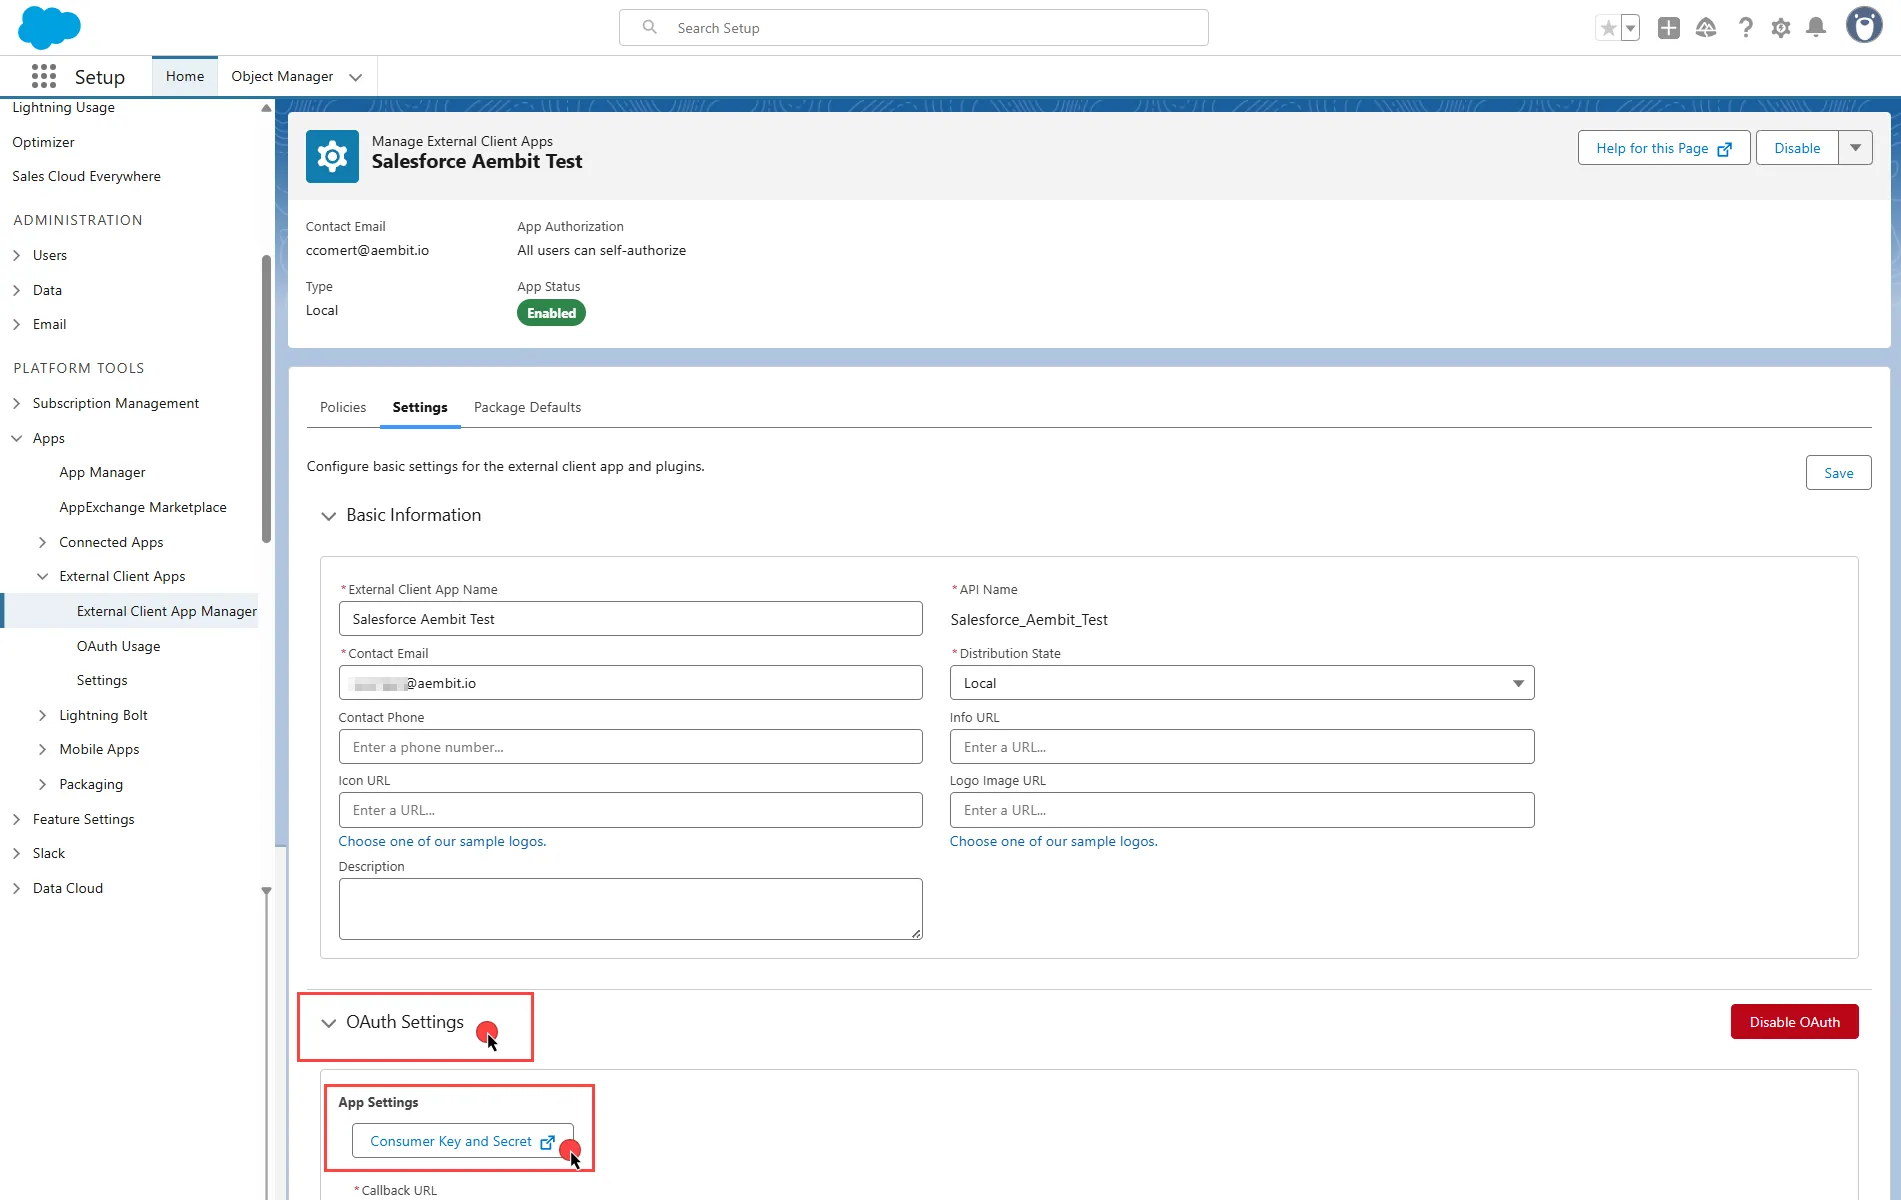
Scroll down and expand the OAuth Settings section.
-
Click the Consumer Key and Secret. Salesforce asks you to verify your identity.
-
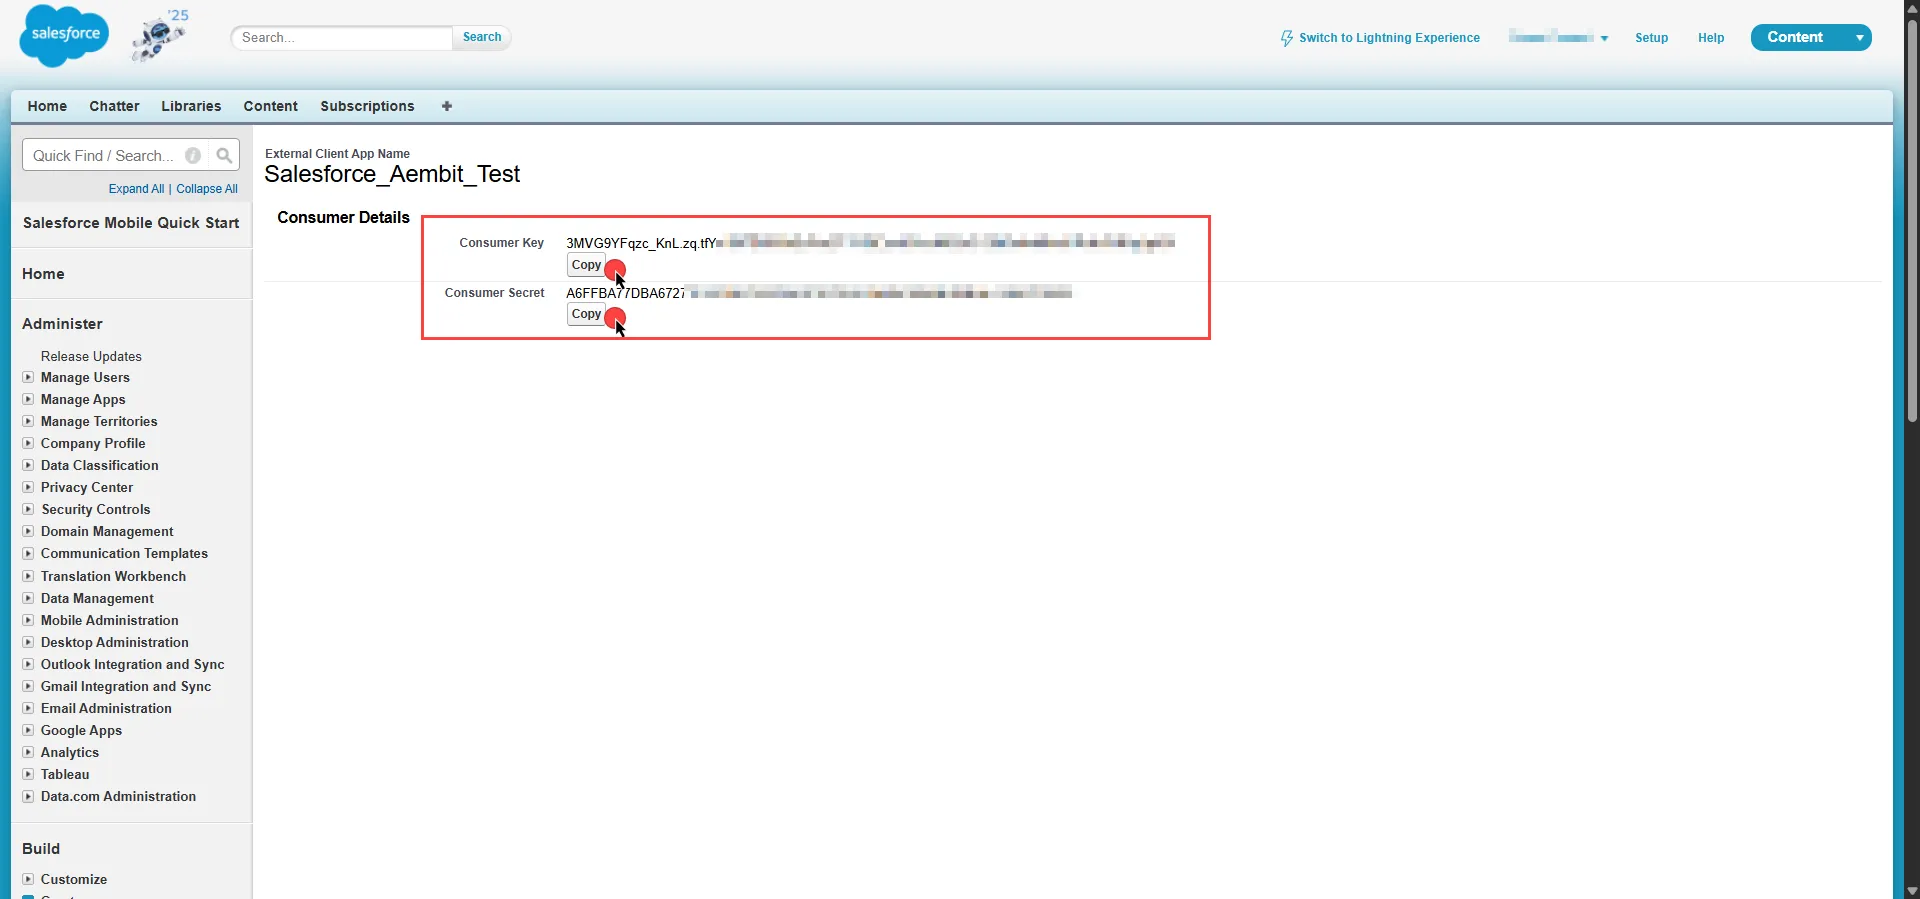
After verifying your identity, on the opened page, copy both the Consumer Key and Consumer Secret. Store these details securely for later use in the tenant configuration.
-
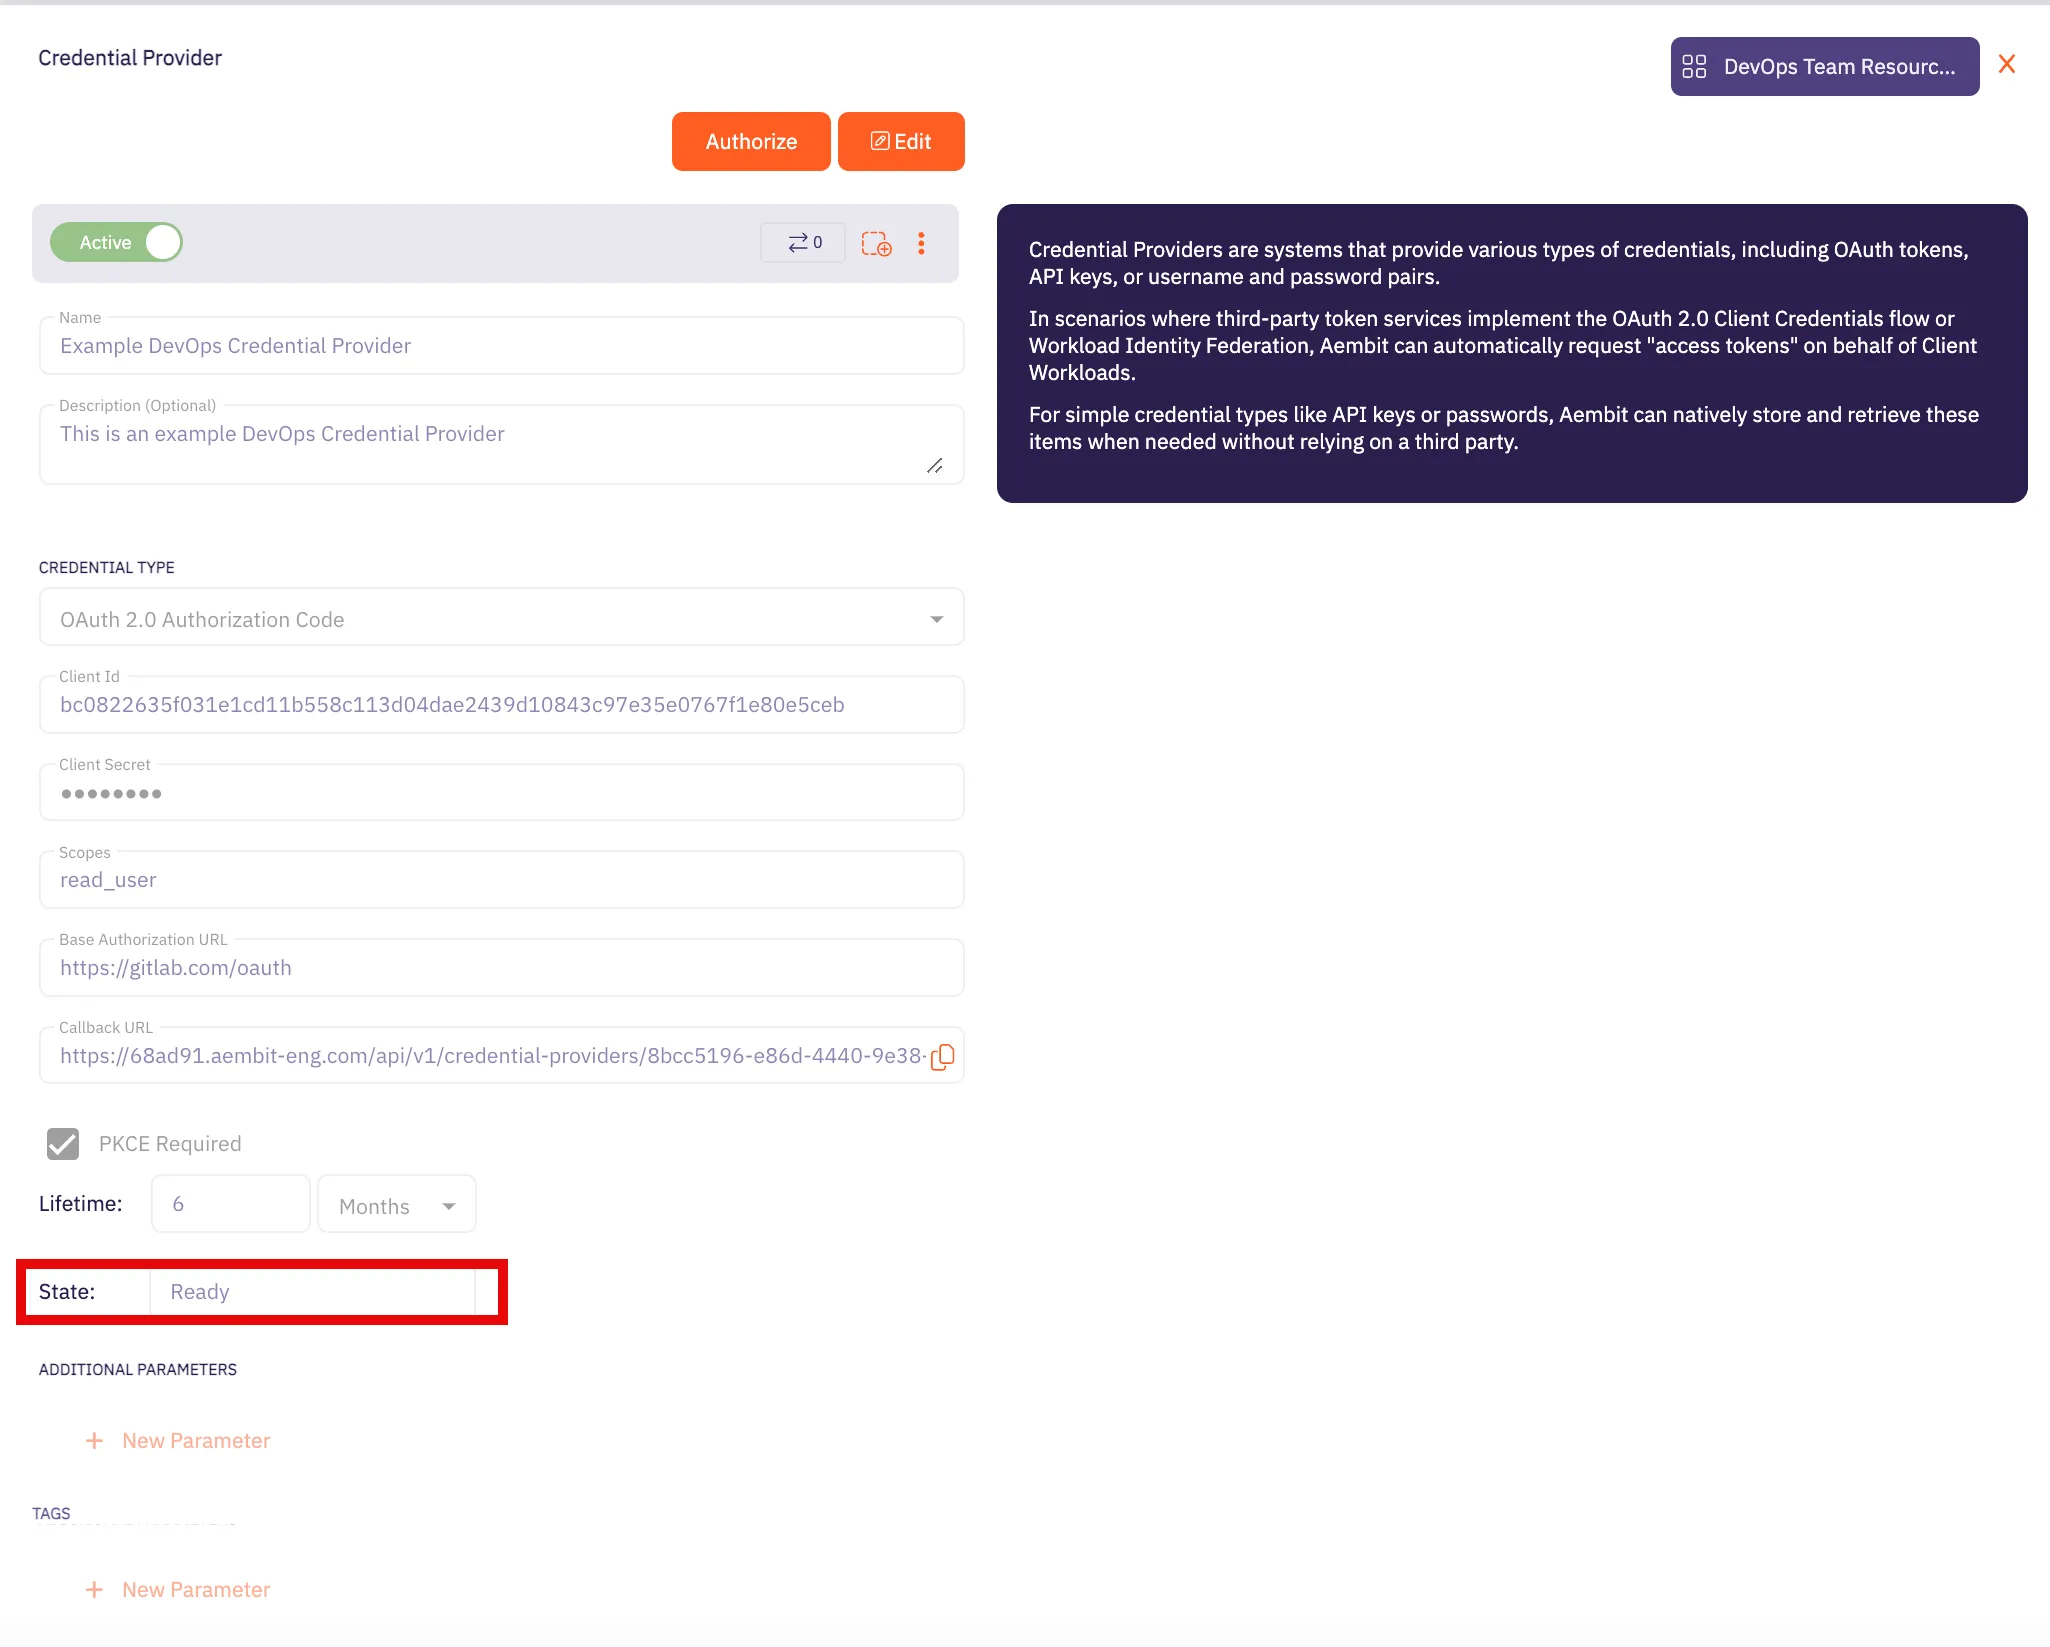
Create a new Credential Provider.
- Name - Choose a user-friendly name.
- Credential Type - OAuth 2.0 Authorization Code
- Callback URL (Read-Only) - Aembit auto-generates this read-only URL.
- Client ID - Provide the Consumer Key copied from Salesforce.
- Client Secret - Provide the Consumer Secret copied from Salesforce.
- Scopes - You can leave this field empty, as Salesforce defaults to your selected scopes for the app.
- OAuth URL -
https://<domain>.my.salesforce.com/
Click URL Discovery to populate the Authorization and Token URL fields, which you can leave as populated.
- PKCE Required - On
- Lifetime - 1 year (Salesforce doesn’t specify a refresh token lifetime. Aembit recommends this value.)
-
Click Save to save your changes on the Credential Provider.
-
In the Aembit UI, click Authorize. Aembit directs you to a page where you can review the access request. Click Accept to complete the OAuth 2.0 Authorization Code flow. You should see a success page and Aembit redirects you automatically. You can also verify that your flow is complete by checking the State value in the Credential Provider. After completion, it should be in a Ready state.
OAuth 2.0 client credentials
Section titled “OAuth 2.0 client credentials”Server Workload configuration
Section titled “Server Workload configuration”To retrieve connection information in Salesforce:
-
In the upper-right corner of any page, click your profile photo. The endpoint appears in the dropdown menu under your username. Copy the endpoint.
-
Create a new Server Workload.
- Name - Choose a user-friendly name.
-
Configure the service endpoint:
- Host -
<domain>.my.salesforce.com(Provide the endpoint copied from Salesforce) - Application Protocol - HTTP
- Port - 443
- Forward to Port - 443 with TLS
- Authentication method - HTTP Authentication
- Authentication scheme - Bearer
- Host -
Salesforce app configuration
Section titled “Salesforce app configuration”-
Log in to your Salesforce account.
-
In the upper-right corner of any page, click the cog icon and then click Setup.
-
In the search box at the top of the Setup page, type App Manager and select it from the search results.
-
In the top-right corner of the page, click New External Client App.
-
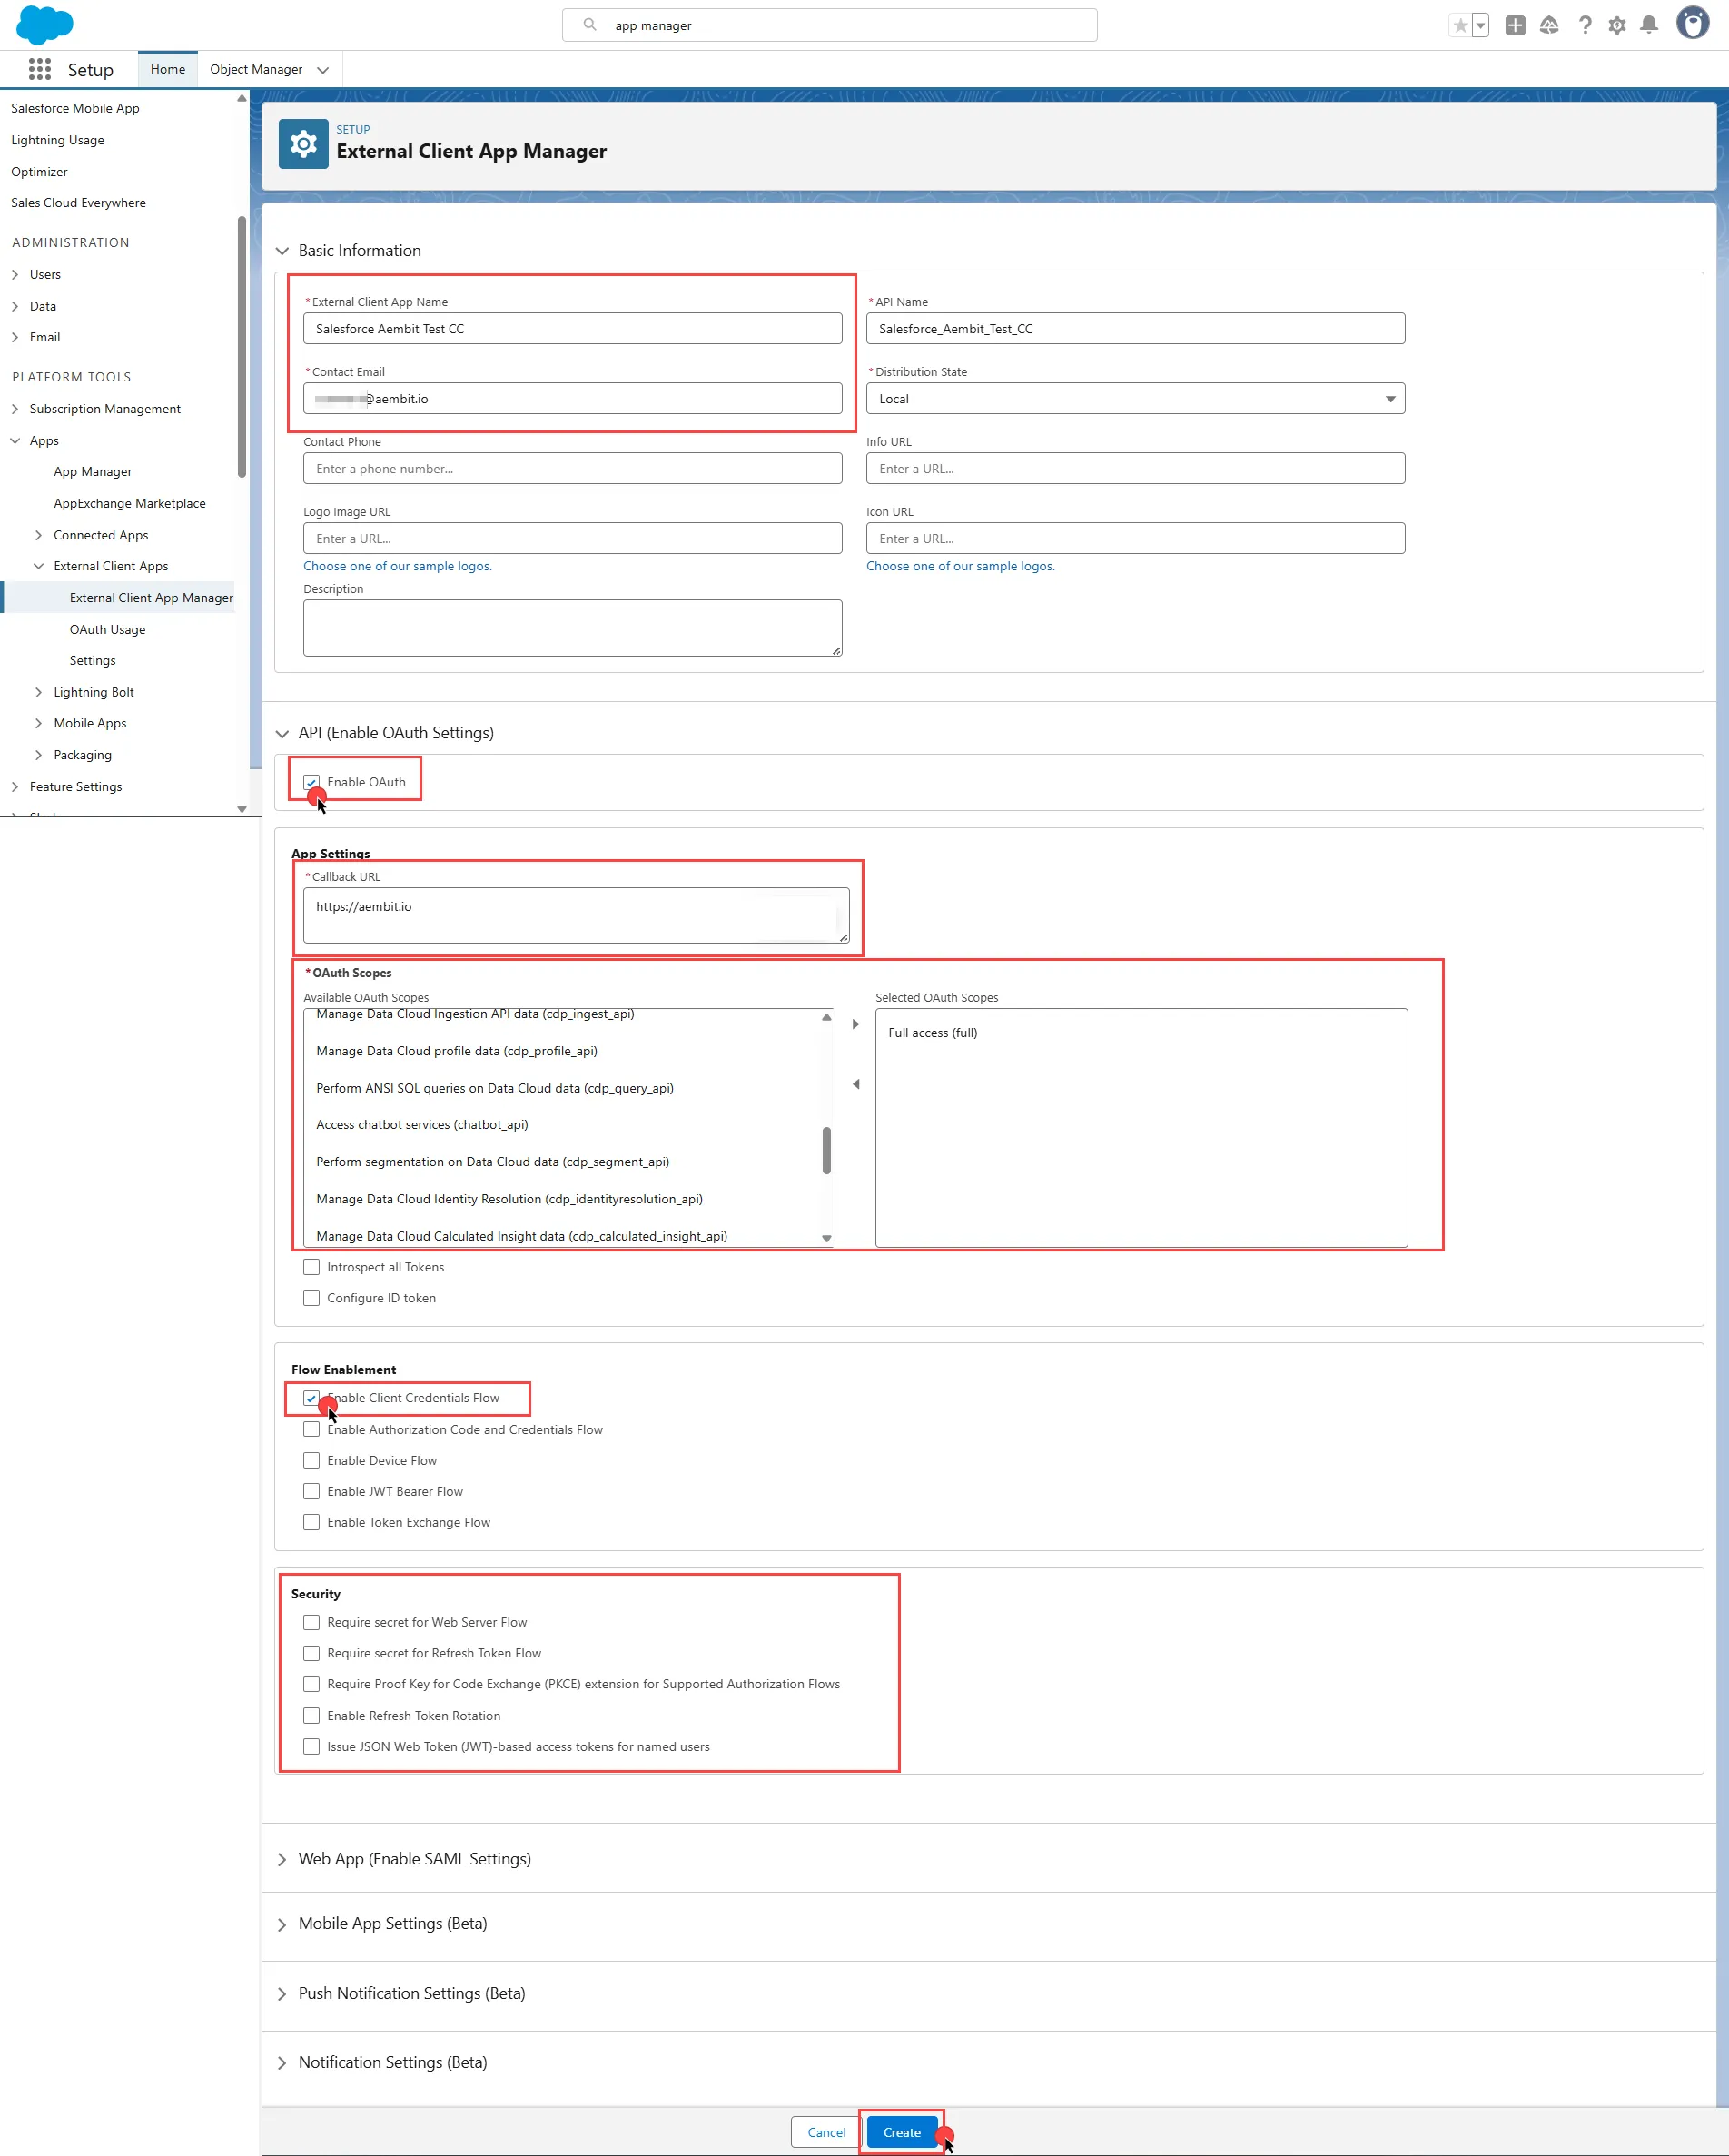
Configure the app based on your preferences. Below are key choices:
- Provide a name for your connected app. The API Name auto-generates based on the app name, but you can edit it if needed.
- Enter a valid email address in the Contact Email field.
- Scroll down and expand the API (Enable OAuth Settings) section.
- Check the Enable OAuth box.
- Enter a placeholder URL such as
https://aembit.ioin the Callback URL field to pass the required check. (This field isn’t used for the Client Credentials Flow.) - Select the necessary OAuth Scopes for your application based on your needs.
- Check the Enable Client Credentials Flow box. When the pop-up window appears, click OK to proceed.
- Clear the Proof Key for Code Exchange, Require Secret for Web Server Flow, and Require Secret for Refresh Token Flow boxes.
- At the bottom of the page, click Create to complete the app creation process.
-
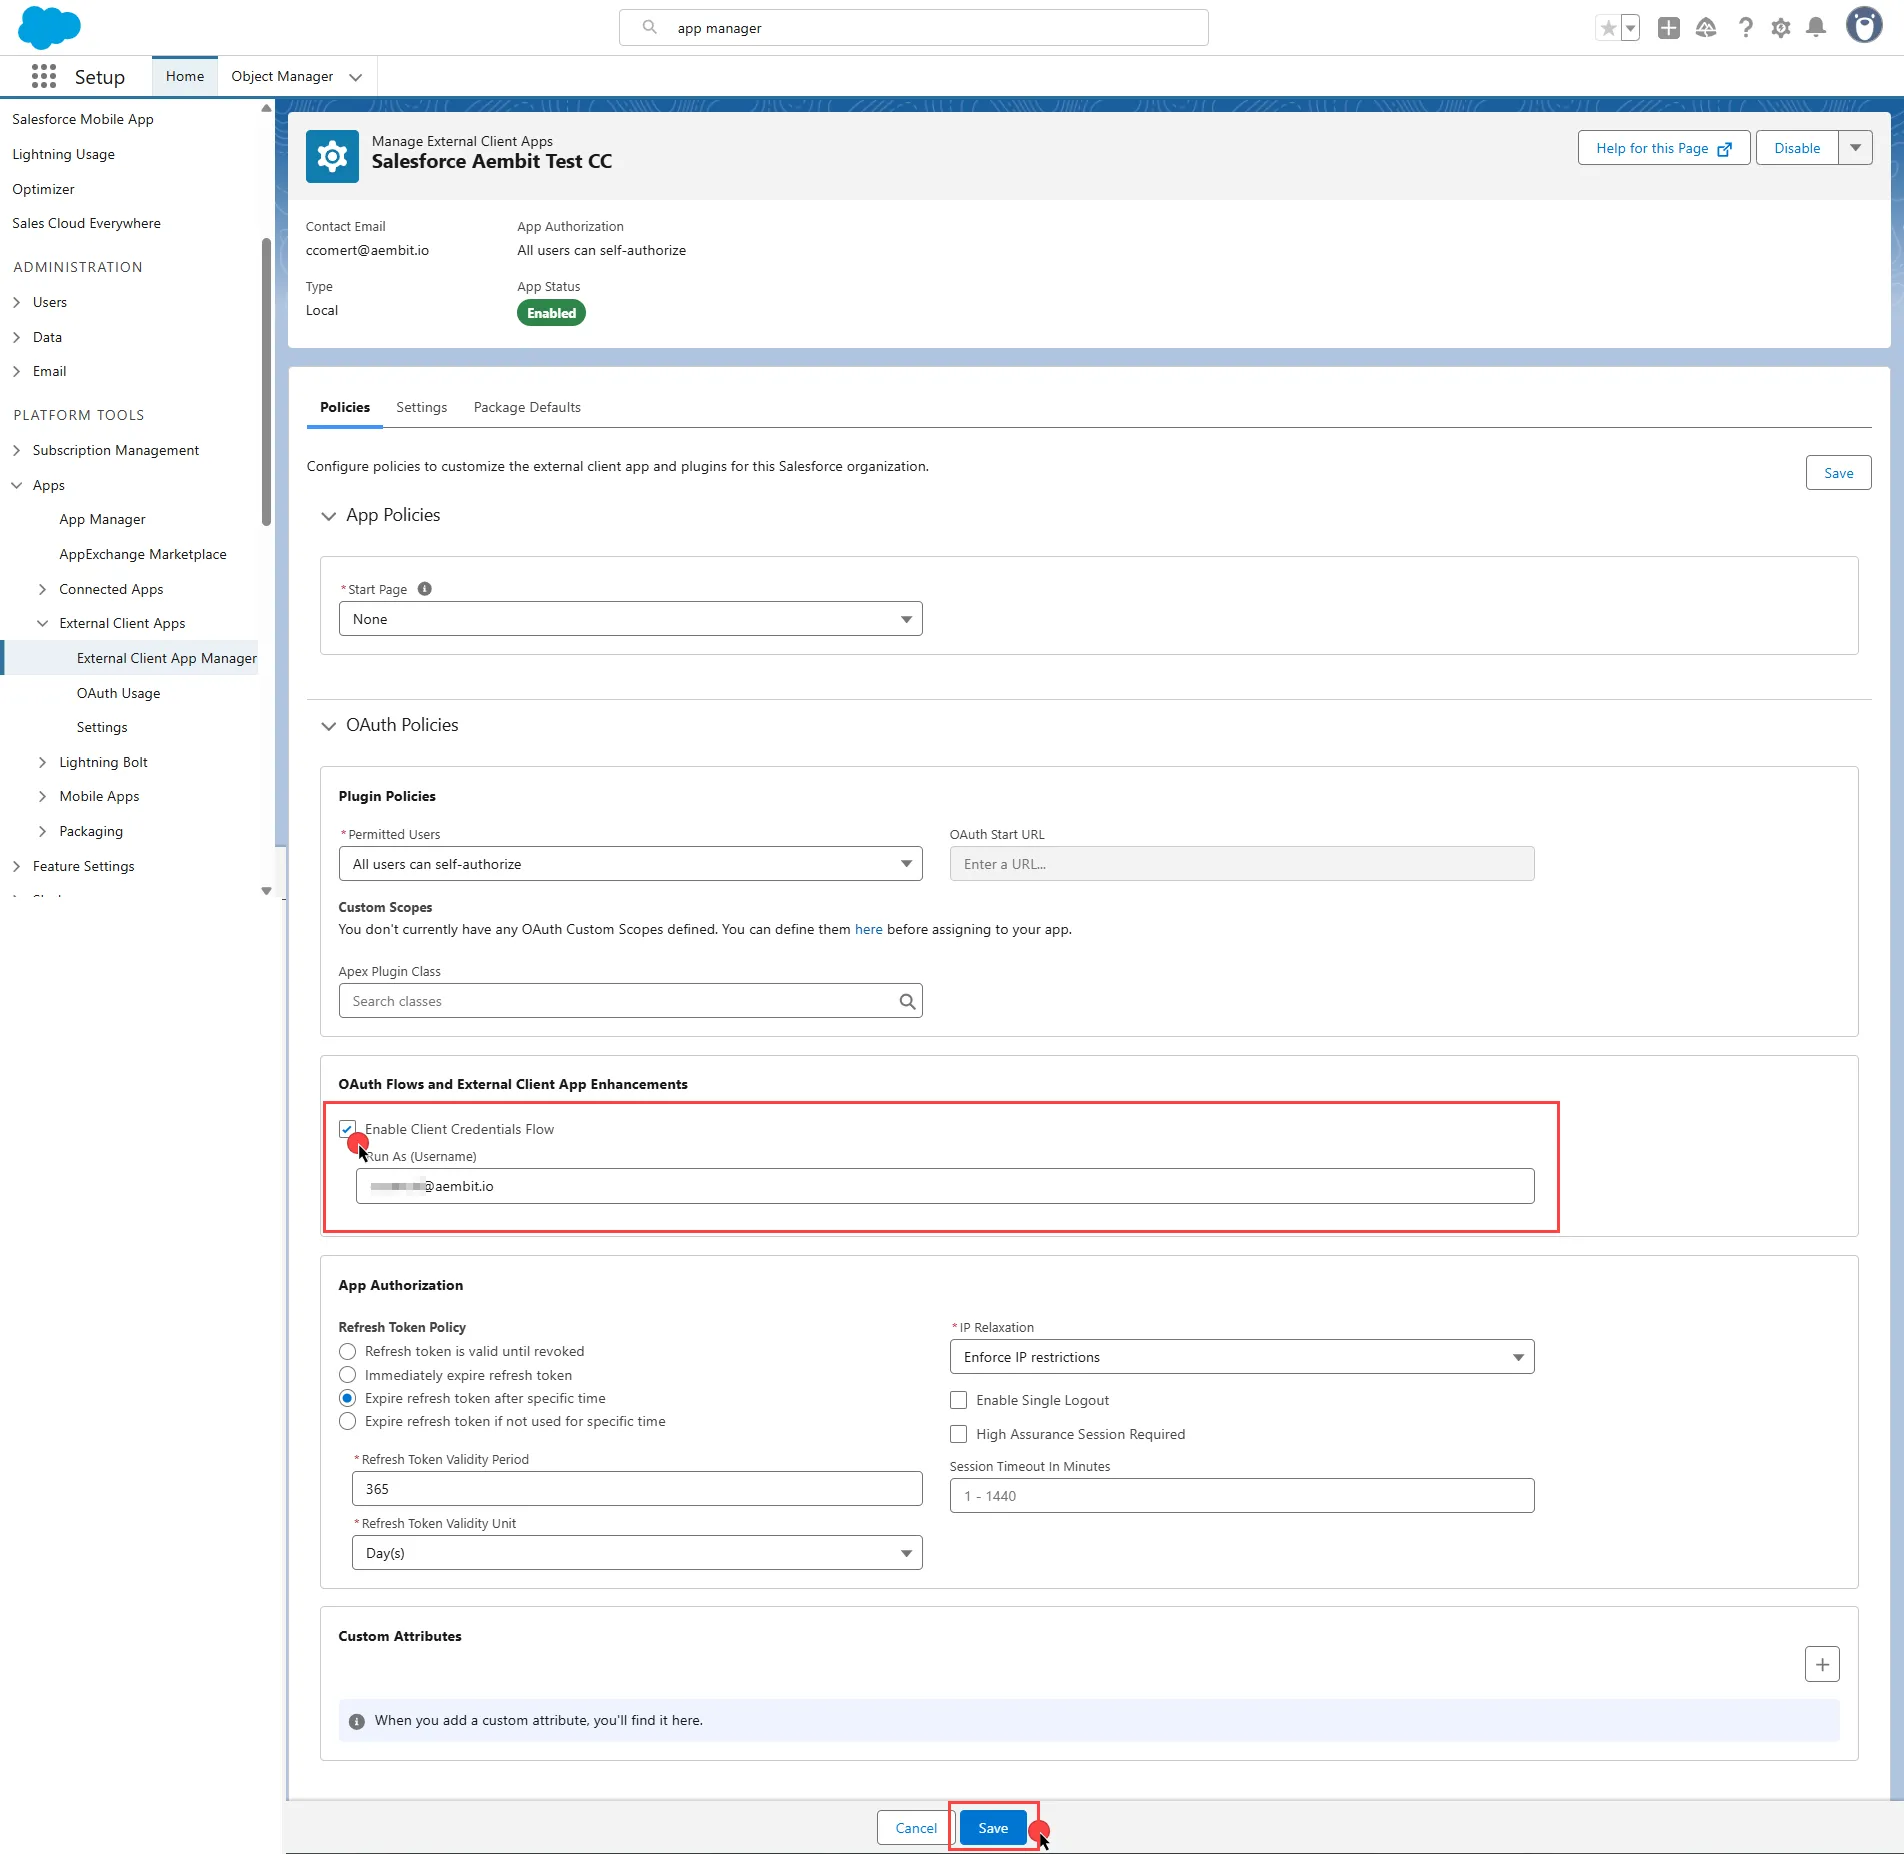
On the detail page of your newly created app, click Edit.
-
Expand the OAuth Policies section.
-
Under the OAuth Flows and External Client App Enhancements section, check Enable Client Credentials Flow.
-
Enter the email address of the user you want to designate into the Run As field.
For detailed information on the OAuth 2.0 Client Credentials Flow on Salesforce, see the official Salesforce documentation.
Credential Provider configuration
Section titled “Credential Provider configuration”-
Log in to your Salesforce account.
-
In the upper-right corner of any page, click the cog icon and then click Setup.
-
On the left-side menu, scroll down and find External Client Apps under Platform Tools.
-
Expand it and click External Client App Manager under it.
-
Find your app from the list and click the icon at the end of the row. Select Edit Settings from the dropdown menu.
-
Scroll down and expand the OAuth Settings section.
-
Click the Consumer Key and Secret. Salesforce asks you to verify your identity.
-
After verifying your identity, on the opened page, copy both the Consumer Key and Consumer Secret. Store these details securely for later use in the tenant configuration.
-
Create a new Credential Provider.
- Name - Choose a user-friendly name.
- Credential Type - OAuth 2.0 Client Credentials
- Token endpoint -
https://<domain>.my.salesforce.com/services/oauth2/token - Client ID - Provide the Consumer Key copied from Salesforce.
- Client Secret - Provide the Consumer Secret copied from Salesforce.
- Scopes - You can leave this field empty, as Salesforce defaults to your selected scopes for the app.
- Credential Style - Authorization Header
Client workload configuration
Section titled “Client workload configuration”Aembit now handles the credentials required to access the Server Workload, eliminating the need for you to manage them directly. You can remove any previously used credentials from the Client Workload.
If you access the Server Workload through SDK or library, the SDK or library may still require credentials to be present for initialization purposes. In this scenario, you can provide placeholder credentials. Aembit overwrites these placeholder credentials with the appropriate ones during the access process.
Access Policy
Section titled “Access Policy”Create an Access Policy for a Client Workload to access the Salesforce Server Workload. Assign the newly created Credential Provider to this Access Policy.