Deploy Aembit to Kubernetes
Aembit provides different deployment options that you can use to deploy Aembit Edge Components in your environment. Each of these options provides similar features and functionality. The steps for each of these options, however, are specific to the deployment option you select.
This page describes the process to deploy Aembit Edge Components to Kubernetes cluster using Helm.
To deploy Aembit Edge Components to your Kubernetes cluster, you must follow these steps:
- Prepare Edge Components
- Add and install the Aembit Edge Helm chart
- Annotate Client Workloads
- Optional configurations
You also have the option to upgrade the Aembit Edge Helm chart.
To further customize your deployments, see the available optional configurations.
Prerequisites
Section titled “Prerequisites”-
Make sure you run all commands from your local terminal with
kubectlconfigured for your cluster. -
Verify that you have set your current context in Kubernetes correctly:
Terminal window kubectl config current-contextIf the context output is incorrect, set it correctly by running:
Terminal window kubectl config use-context <your-cluster-context>
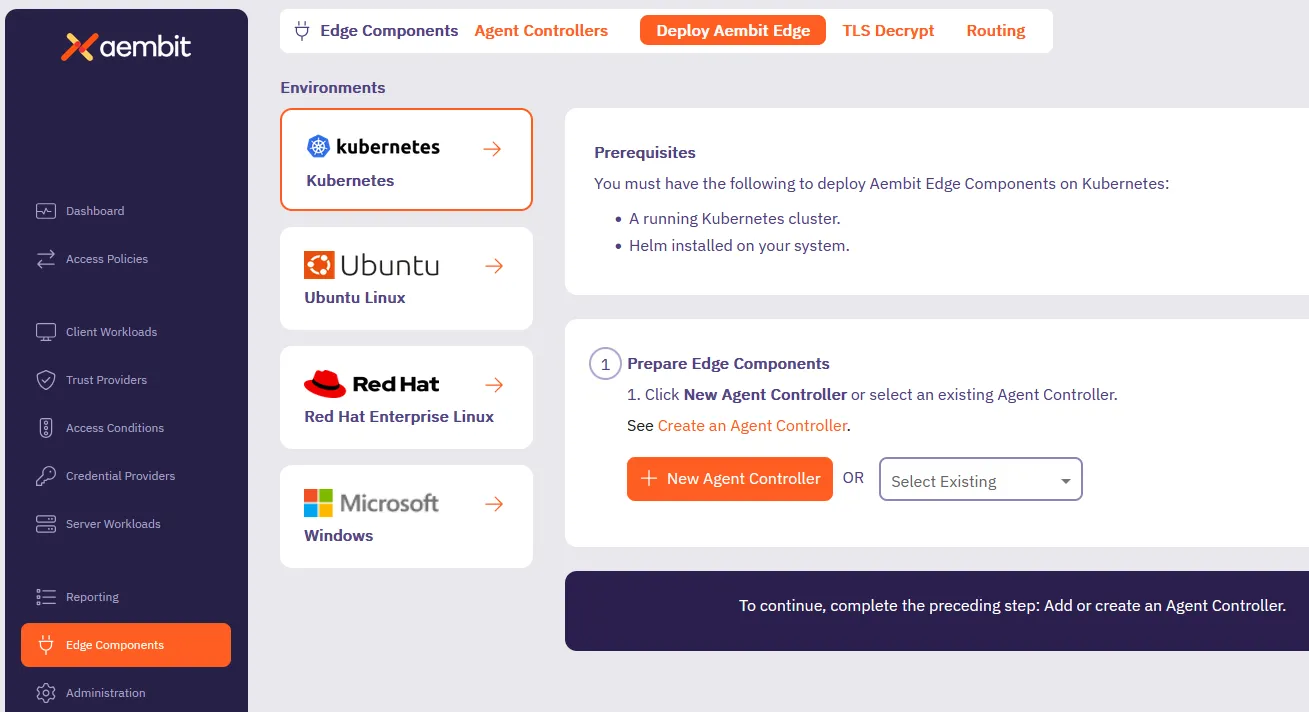
Step 1 - Prepare Edge Components
Section titled “Step 1 - Prepare Edge Components”-
Log into your Aembit Tenant and go to Edge Components -> Deploy Aembit Edge.
-
In the Prepare Edge Components section, click New Agent Controller or select an existing one.
-
If the Agent Controller you selected does have a Trust Provider configured, skip ahead to the next section.
Otherwise, click Generate Code.
This creates a temporary Device Code that Aembit uses to authorize your Agent Controller.
Step 2 - Install Aembit Edge Helm chart
Section titled “Step 2 - Install Aembit Edge Helm chart”Follow the steps in the Install Aembit Edge Helm chart section:
About the Aembit Edge Helm chart
The Aembit Edge Helm chart is a package that contains all the necessary Kubernetes resources to deploy Aembit Edge Components in your Kubernetes cluster. It includes configurations for the Aembit Agent Controller, Agent Proxy, and Agent Injector, allowing you to easily manage and scale your Aembit Edge deployment. The Helm chart also provides a way to customize the deployment using values files or command-line options, making it flexible and adaptable to your specific needs.
-
Add the Aembit Helm repository to your local Helm configuration by running:
Terminal window helm repo add aembit https://helm.aembit.io -
Install the Aembit Helm chart by running the following command, making sure to replace:
-
<tenantId>with your Aembit Tenant ID (Find this in the Aembit Tenant URL:https://<tenantId>.aembit.io) -
<agentControllerId>with the ID of the Agent Controller you created or selected in the previous step.
Also, this is the time to add extra Helm configurations options to the installation that fit your needs.
Terminal window helm install aembit aembit/aembit \-n aembit \--create-namespace \--set tenant=<tenantId>,agentController.id=<agentControllerId>If you set up a Device Code, the
helm installcommand setsagentController.deviceCode=<deviceCode>instead. -
Step 3 - Annotate Client Workloads
Section titled “Step 3 - Annotate Client Workloads”For Aembit Edge to manage your client workloads, you must annotate them with aembit.io/agent-inject: "enabled" so that
the Aembit Agent Proxy can intercept network requests from them.
To add this annotation to your client workloads, you can:
-
Modify your client workload’s Helm chart by adding the following annotation in the deployment template and applying the changes:
template:metadata:annotations:aembit.io/agent-inject: "enabled" -
If using ArgoCD, update your GitOps repository with the annotation and sync the changes.
-
Directly modify your deployment YAML files to include the annotation in the pod template metadata section and applying your changes:
apiVersion: apps/v1kind: Deploymentmetadata:name: your-applicationspec:template:metadata:annotations:aembit.io/agent-inject: "enabled"
Upgrade the Aembit Edge Helm chart
Section titled “Upgrade the Aembit Edge Helm chart”To stay up to date with the latest features and improvements, follow these steps to update and upgrade the Aembit Edge Helm chart:
-
From your local terminal with
kubectlconfigured for your cluster, update the Aembit Helm chart repo:Terminal window helm repo update aembit -
Upgrade the Helm chart:
Terminal window helm upgrade aembit aembit/aembit -n aembit
Add the Agent Injector TLS certificate to your certificate management procedures
Section titled “Add the Agent Injector TLS certificate to your certificate management procedures”The Aembit Helm chart relies on a TLS certificate for the Agent Injector service. Next read through the guide on Managing the Agent Injector Certificate.
Optional configurations
Section titled “Optional configurations”The following sections contain optional configurations that you can use to customize your Kubernetes deployments.
Agent Proxy native sidecar configuration
Section titled “Agent Proxy native sidecar configuration”For Kubernetes versions 1.29 and higher, Aembit supports init-container-based Client Workloads.
This starts the Agent Proxy as part of the init containers.
To enable native sidecar configurations, do the following:
-
Make sure you add the required Client Workload annotation.
-
Set the Helm chart value
agentProxy.nativeSidecar=trueduring chart installation by adding the following flag:Terminal window --set agentProxy.nativeSidecar=true
Edge Component environment variables
Section titled “Edge Component environment variables”The Edge Components you deploy as part of this process have environment variables that you can configure to customize your deployment further. See Edge Component environment variables reference, for all available configuration options.
Aembit Edge Component configurations
Section titled “Aembit Edge Component configurations”The Aembit Helm chart includes configurations that control the behavior of Aembit Edge Components (both Agent Controller and Agent Proxy). See Helm chart config options, for all available configuration options.
Client Workload annotations
Section titled “Client Workload annotations”Beyond the required aembit.io/agent-inject annotation, you can apply optional annotations to your
Client Workload pod specs to further configure Agent Proxy behavior.
| Annotation | Description |
|---|---|
aembit.io/agent-inject | Required Enables Agent Proxy injection for this deployment. Example: "enabled" |
aembit.io/resource-set-id | Sets the Resource Set ID for Agent Proxy associated with pods in this deployment. Example: "f251f0c5-5681-42f0-a374-fef98d9a5005" |
aembit.io/client-id | Sets the Aembit Client ID for Agent Proxy associated with pods in this deployment. Example: "7e75e718-7634-480b-9f7b-a07bb5a4f11d" |
aembit.io/agent-proxy-env-<ENV_VAR_NAME> | Sets a specific environment variable on Agent Proxy container for pods in this deployment. Example: "false" |
aembit.io/agent-configmap | Mounts Kubernetes ConfigMap data into Agent Proxy container for pods in this deployment. Example: '["agent-controller-config:device_code"]' |
aembit.io/steering-mode | Sets the steering mode for Agent Proxy. Required on OpenShift. Example: "explicit" |
For detailed descriptions, usage examples, and configuration steps for each annotation, see the Client Workload annotation reference.
Delaying pod startup until Agent Proxy has registered
Section titled “Delaying pod startup until Agent Proxy has registered”By default, Agent Proxy allows Client Workload pods to enter the
Running state as soon as proxying
ports become available, even if registration with Aembit Cloud isn’t yet complete.
While in this pre-registration state, Agent Proxy operates in Passthrough mode and can’t inject credentials into Client
Workloads. As a result, you may have to retry application requests.
To delay the Client Workload pod startup until registration completes, set the
AEMBIT_PASS_THROUGH_TRAFFIC_BEFORE_REGISTRATION Agent Proxy environment variable to false.
This causes the postStart lifecycle hook to wait until Agent Proxy has registered with the Aembit Cloud service before
entering the Running state.
If registration fails to complete within 120 seconds (due to misconfiguration or connectivity issues) the pod
fails to start and eventually enters a CrashBackOff state.
To override how long the Client Workload pods wait during postStart, set the Agent Proxy
AEMBIT_POST_START_MAX_WAIT_SEC environment variable to specify the maximum wait time in seconds.
Important limitation
Due to a known Kubernetes issue, pod deletion doesn’t
correctly interrupt the postStart hook.
As a result, deleting a pod that’s waiting for Agent Proxy registration takes the full AEMBIT_POST_START_MAX_WAIT_SEC
duration, even if you’ve set the pod’s terminationGracePeriodSeconds to a lower value.
See Edge Component environment variables reference, for a
description of the AEMBIT_PASS_THROUGH_TRAFFIC_BEFORE_REGISTRATION and AEMBIT_POST_START_MAX_WAIT_SEC configuration
options.
Deploying on OpenShift
Section titled “Deploying on OpenShift”The Aembit Helm Chart supports deploying to OpenShift, including Red Hat OpenShift Service on AWS (ROSA).
You must specify two additional options to the Helm chart.
First, you must specify the
SecurityContextConstraint
(SCC) to grant to the service account used to deploy
the Agent Controller and Agent Injector under. The anyuid SCC is the most appropriate standard SCC. You may
also specify a custom SCC as long as it allows running as the root user within the container.
--set serviceAccount.openshift.scc=anyuidSecond, you must set runAsRestricted=true to make the Agent Proxy container
definition drop all its privileges. Dropping privileges makes the container
definition compatible with the restricted-v2 SecurityContextConstraint
(SCC). Your Client Workload Pod can run in a more permissive SCC. However Agent
Proxy can provide proxy service in explicit steering mode without elevated
privileges. Setting this option simplifies SCC determination and conforms to
the principle of least privilege.
--set agentProxy.runAsRestricted=true