Edge API authentication with OIDC ID Token
The oidc attestation method accepts an ID token from any OpenID Connect provider.
Use it when your platform issues OIDC tokens to workloads but has no dedicated attestation method of its own.
GitHub Actions, GitLab Jobs, and Terraform Cloud each have a dedicated method and their own Trust Provider: Trust Providers validate Client Workload identities through workload attestation, verifying identity claims from the workload's runtime environment rather than relying on pre-shared secrets.Learn more type.
Reach for oidc for everything else, such as a serverless platform that injects an OIDC token into each request or an
identity provider you run yourself.
Prerequisites
Section titled “Prerequisites”To authenticate using an OIDC ID token, you must have the following:
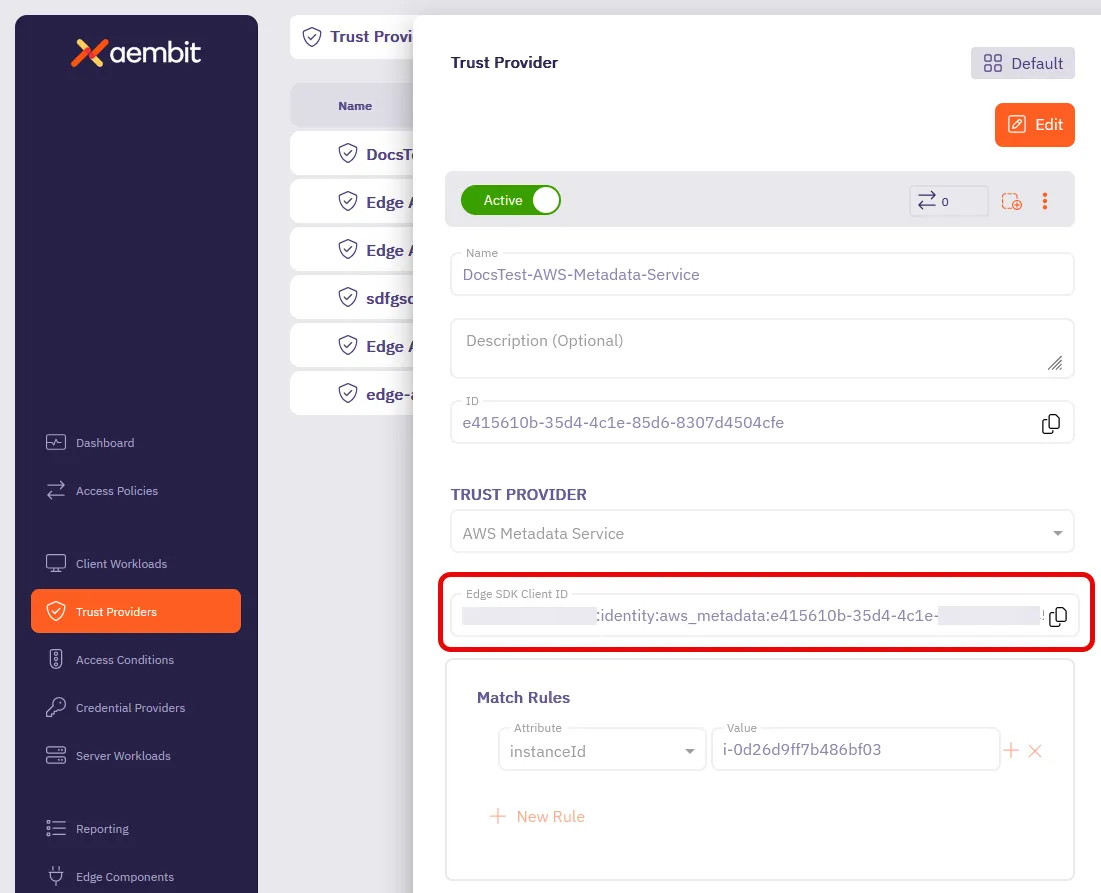
- Your Trust Provider’s Edge SDK Client ID: A structured identifier that Aembit generates when you configure a Trust Provider, encoding your region, tenant, and Trust Provider. It identifies a Trust Provider rather than an individual Client Workload.Learn more (how to find it)
- An OIDC ID Token Trust Provider in Aembit
- A way for Aembit to get your provider’s signing keys. The Trust Provider offers four attestation methods: OIDC Discovery, Symmetric Key, Upload JWKS, and Upload Public Key.
- An ID token whose claims satisfy the match rules on that Trust Provider
Unlike the cloud provider methods, this one has a setup dependency you can’t skip. Aembit validates the token signature itself, so supply your provider’s public keys before you send the first request. If you pick OIDC Discovery, Aembit must be able to reach your provider’s discovery endpoint over the internet. For a provider that isn’t publicly reachable, upload the JWKS: JSON Web Key Set - A set of cryptographic keys published at a well-known endpoint, used to verify the signatures of JSON Web Tokens (JWTs) issued by an authorization server.Learn more or the public key directly instead.
Authenticate with an OIDC ID token
Section titled “Authenticate with an OIDC ID token”To authenticate with the Aembit Edge API using an OIDC ID token, follow these steps:
-
Get an ID token from your identity provider.
How you do this depends on the platform. On Vercel Functions, for example, the token arrives in the
x-vercel-oidc-tokenrequest header. Check your provider’s documentation for where it puts the token.Whatever the source, the value must be a signed JWT on a single line, with no line breaks or surrounding whitespace.
-
Decode the token payload and compare it against your match rules.
You should see something similar to the following:
{"aud": "aembit-prod-api-access","iss": "https://identity-provider.my-company.com","sub": "workload-id-98765","exp": 1770000000,"iat": 1769996400}Your Trust Provider can match on
aud,iss,sub, or any custom claim the token carries. Every match rule you configure must match, so confirm each one is present with the value you expect before you send the request. -
Construct the authentication request payload using the
clientIdand the ID token.It should look something like this:
Terminal window {"clientId": "<edge-sdk-client-id>","client": {"oidc": {"identityToken": "<oidc-id-token>"}}} -
Send the authentication request to your Aembit Edge API endpoint:
Terminal window curl --location 'https://<your-aembit-edge-url>/edge/v1/auth' \--header 'Content-Type: application/json' \--data '{"clientId": "your-edge-sdk-client-id","client": {"oidc": {"identityToken": "eyJhbGciOiJSUzI1NiIsImtpZCI6IjZjZTk1MWQ4NTNkMWQ0YTJlNjQxMWQ..."}}}'When successful, you’ll receive output similar to:
{"accessToken": "eyJhbGciOiJSUzI1NiIsImtpZCI6IkpyR3JLQ0x6RVFN...","tokenType": "Bearer","expiresIn": 3600} -
Use the
accessTokenas thebearerTokenin subsequent API calls to authenticate your requests. This token is valid for the duration specified inexpiresIn(in seconds).If the request fails, check the signing keys first. A token that decodes cleanly and matches every rule still fails when Aembit can’t reach the discovery endpoint or when the uploaded JWKS no longer holds the key that signed the token.
How to find your Edge SDK Client ID
Section titled “How to find your Edge SDK Client ID”-
Log in to your Aembit Tenant.
-
Go to the Trust Providers section in the left sidebar.
-
Select the Trust Provider you want to use for Edge API authentication.
-
In the TRUST PROVIDER section, find the Edge SDK Client ID field.
-
Copy the Edge SDK Client ID to use in your authentication requests.