Edge API authentication with AWS IAM Role
To authenticate with the Aembit Edge API using AWS IAM Role, you need to provide a signed AWS Security Token Service (STS) GetCallerIdentity request. This authentication method uses AWS Signature Version 4 (SigV4) to sign the request, proving your identity through the IAM role attached to your EC2 instance.
Prerequisites
Section titled “Prerequisites”To authenticate using an AWS IAM Role, you must have the following:
- Your Trust Provider’s Edge SDK Client ID
- EC2 instance with an attached IAM role that has
sts:GetCallerIdentitypermission - SSH access to the instance or terminal access
- Python 3.x with the
requestslibrary installed (for the Python method) - AWS credentials accessible from the instance (automatically available via instance metadata)
The IAM role attached to your EC2 instance must have at minimum the following permission:
{ "Version": "2012-10-17", "Statement": [ { "Effect": "Allow", "Action": "sts:GetCallerIdentity", "Resource": "*" } ]}Authenticate with AWS IAM Role
Section titled “Authenticate with AWS IAM Role”To authenticate with the Aembit Edge API using AWS IAM Role, follow these steps:
-
Open your terminal and SSH into your EC2 instance.
-
Retrieve AWS credentials from AWS’s Instance Metadata Service (IMDS) version2 with the following command. These credentials are automatically provided by AWS for instances with attached IAM roles:
Terminal window # Get the AWS credentials from instance metadataTOKEN=`curl -X PUT "http://169.254.169.254/latest/api/token" -H "X-aws-ec2-metadata-token-ttl-seconds: 21600"` \&& ROLE_NAME=`curl -H "X-aws-ec2-metadata-token: $TOKEN" http://169.254.169.254/latest/meta-data/iam/security-credentials/` \&& curl -H "X-aws-ec2-metadata-token: $TOKEN" http://169.254.169.254/latest/meta-data/iam/security-credentials/$ROLE_NAMEFirst, get the session token:
Terminal window [string]$token = (Invoke-WebRequest -Headers @{'X-aws-ec2-metadata-token-ttl-seconds' = '21600'} `-Method PUT -Uri 'http://169.254.169.254/latest/api/token' -UseBasicParsing).ContentThen get the role name:
Terminal window [string]$roleName = (Invoke-WebRequest -Headers @{'X-aws-ec2-metadata-token' = $token} `-Uri 'http://169.254.169.254/latest/meta-data/iam/security-credentials/' -UseBasicParsing).ContentFinally, get the credentials:
Terminal window (Invoke-WebRequest -Headers @{'X-aws-ec2-metadata-token' = $token} `-Uri "http://169.254.169.254/latest/meta-data/iam/security-credentials/$roleName" -UseBasicParsing).ContentYou should get output similar to:
...{"Code": "Success","LastUpdated": "2025-01-15T10:30:45Z","Type": "AWS-HMAC","AccessKeyId": "ASIA42HLLFVDQQZD2PSX","SecretAccessKey": "iMapV1Wn6fKCanxLwsE1RGgzUy2H7BR95zMbmKuR","Token": "IQoJb3JpZ2luX2VjEO///////////wEaCXVzLWVhc3QtMSJI...","Expiration": "2025-01-15T16:30:45Z"} -
Generate the signed STS GetCallerIdentity request headers using one of the following methods:
Using this method, you’ll create a standalone Python script that manually implements AWS SigV4 signing.
Create a file named
generate_sts_headers.pywith the following content. Replace the placeholder values with your actual AWS credentials obtained in the previous step:import datetime, hashlib, hmac, json, sys# Replace these with your actual AWS credentials from step 2ACCESS_KEY = "ACCESS_KEY_PLACEHOLDER"SECRET_KEY = "SECRET_KEY_PLACEHOLDER"SESSION_TOKEN = "SESSION_TOKEN_PLACEHOLDER..." # Your full session tokenREGION = "REGION_PLACEHOLDER" # Your AWS regiondef sign(key, msg):return hmac.new(key, msg.encode("utf-8"), hashlib.sha256).digest()def getSignatureKey(key, date_stamp, regionName, serviceName):kDate = sign(('AWS4' + key).encode('utf-8'), date_stamp)kRegion = sign(kDate, regionName)kService = sign(kRegion, serviceName)kSigning = sign(kService, 'aws4_request')return kSigning# Request detailsmethod = 'POST'service = 'sts'host = f'{service}.{REGION}.amazonaws.com'endpoint = f'https://{host}/'content_type = 'application/x-www-form-urlencoded; charset=utf-8'request_parameters = "Action=GetCallerIdentity&Version=2011-06-15"# Create timestampt = datetime.datetime.utcnow()amz_date = t.strftime('%Y%m%dT%H%M%SZ')date_stamp = t.strftime('%Y%m%d')# Create canonical requestcanonical_uri = '/'canonical_querystring = ''canonical_headers = f'content-type:{content_type}\nhost:{host}\nx-amz-date:{amz_date}\nx-amz-security-token:{SESSION_TOKEN}\n'signed_headers = 'content-type;host;x-amz-date;x-amz-security-token'payload_hash = hashlib.sha256(request_parameters.encode('utf-8')).hexdigest()canonical_request = f'{method}\n{canonical_uri}\n{canonical_querystring}\n{canonical_headers}\n{signed_headers}\n{payload_hash}'# Create string to signalgorithm = 'AWS4-HMAC-SHA256'credential_scope = f'{date_stamp}/{REGION}/{service}/aws4_request'string_to_sign = f'{algorithm}\n{amz_date}\n{credential_scope}\n{hashlib.sha256(canonical_request.encode()).hexdigest()}'# Calculate signaturesigning_key = getSignatureKey(SECRET_KEY, date_stamp, REGION, service)signature = hmac.new(signing_key, string_to_sign.encode('utf-8'), hashlib.sha256).hexdigest()# Create authorization headerauthorization_header = f'{algorithm} Credential={ACCESS_KEY}/{credential_scope}, SignedHeaders={signed_headers}, Signature={signature}'# Output the headers needed for Aembit authenticationheaders_for_aembit = {"Content-Type": content_type,"X-Amz-Date": amz_date,"X-Amz-Security-Token": SESSION_TOKEN,"Authorization": authorization_header}print("Headers for Aembit stsGetCallerIdentity:")print(json.dumps(headers_for_aembit, indent=2))print(f"\nRegion: {REGION}")Run the script and note the output headers and region:
Terminal window python3 generate_sts_headers.pyUsing this method, you’ll use the AWS SDK for Python (Boto3), enabling automatic credential handling and leverages AWS SDK signing logic.
To use the to handle signing automatically:
-
Install Boto3 if not already available:
Terminal window # pippip3 install boto3# aptapt install python3-boto3 -
Create a Python script named
generate_sts_headers_boto3.pythat uses Boto3’s internal signing mechanisms:import boto3import jsonfrom botocore.auth import SigV4Authfrom botocore.awsrequest import AWSRequest# Boto3 will automatically use instance credentialssession = boto3.Session()credentials = session.get_credentials()# Set your regionregion = 'REGION_PLACEHOLDER' # Change to your AWS region# Create the STS GetCallerIdentity requestrequest = AWSRequest(method='POST',url=f'https://sts.{region}.amazonaws.com/',data='Action=GetCallerIdentity&Version=2011-06-15',headers={'Content-Type': 'application/x-www-form-urlencoded; charset=utf-8'})# Sign the request using SigV4SigV4Auth(credentials, "sts", region).add_auth(request)# Extract headers for Aembit authenticationheaders_for_aembit = {'Content-Type': request.headers.get('Content-Type'),'X-Amz-Date': request.headers.get('X-Amz-Date'),'X-Amz-Security-Token': request.headers.get('X-Amz-Security-Token'),'Authorization': request.headers.get('Authorization')}print("Headers for Aembit stsGetCallerIdentity:")print(json.dumps(headers_for_aembit, indent=2))print(f"\nRegion: {region}") -
Run the script:
Terminal window python3 generate_sts_headers_boto3.py
-
-
Construct the authentication request payload using the
clientId, headers, and region from the previous steps:{"clientId": "<edge-sdk-client-id>","client": {"aws": {"stsGetCallerIdentity": {"headers": {"Content-Type": "application/x-www-form-urlencoded; charset=utf-8","X-Amz-Date": "20250115T103045Z","X-Amz-Security-Token": "IQoJb3JpZ2luX2VjEO...","Authorization": "AWS4-HMAC-SHA256 Credential=ASIA42HLLFVDQQZD2PSX/20250115/us-east-1/sts/aws4_request, SignedHeaders=content-type;host;x-amz-date;x-amz-security-token, Signature=abc123..."},"region": "<region-from-step-3>"}}}} -
Send the authentication request to your Aembit Edge API endpoint:
Terminal window curl --location 'https://<your-aembit-edge-url>/edge/v1/auth' \--header 'Content-Type: application/json' \--data '{"clientId": "your-edge-sdk-client-id","client": {"aws": {"stsGetCallerIdentity": {"headers": {"Content-Type": "application/x-www-form-urlencoded; charset=utf-8","X-Amz-Date": "20250115T103045Z","X-Amz-Security-Token": "IQoJb3JpZ2luX2VjEO...","Authorization": "AWS4-HMAC-SHA256 Credential=ASIA42HLLFVDQQZD2PSX/20250115/us-east-1/sts/aws4_request, SignedHeaders=content-type;host;x-amz-date;x-amz-security-token, Signature=abc123..."},"region": "us-east-1"}}}}'When successful, you’ll receive output similar to:
{"accessToken": "eyJhbGciOiJSUzI1NiIsImtpZCI6IkpyR3JLQ0x6RVFN...","tokenType": "Bearer","expiresIn": 3600} -
Use the
accessTokenas thebearerTokenin subsequent API calls to authenticate your requests. This token is valid for the duration specified inexpiresIn(in seconds).
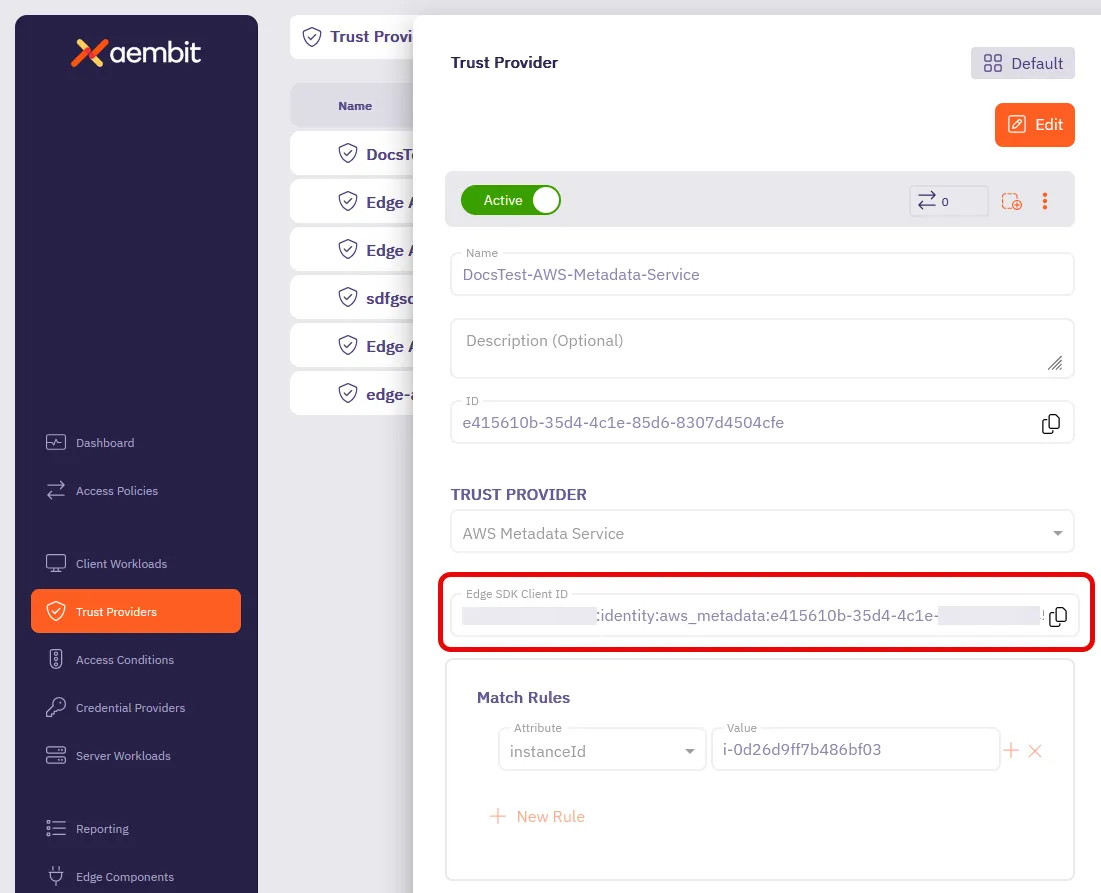
How to find your Edge SDK Client ID
Section titled “How to find your Edge SDK Client ID”-
Log in to your Aembit Tenant.
-
Go to the Trust Providers section in the left sidebar.
-
Select the Trust Provider you want to use for Edge API authentication.
-
In the TRUST PROVIDER section, find the Edge SDK Client ID field.
-
Copy the Edge SDK Client ID to use in your authentication requests.