Get started with Aembit Edge API
In this quickstart, you’ll learn how to set up Aembit Edge API with either GitHub or GitLab CI/CD to securely retrieve credentials for your cloud-native application.
This guide walks you through the following primary steps:
- Connect Aembit to GitHub or GitLab
- Configure your Aembit Tenant
- Make your first API calls to retrieve credentials
Before you begin
Section titled “Before you begin”This quickstart assumes you have a basic understanding of how Aembit works and GitHub or GitLab basic concepts.
To follow this quickstart, you must have the following:
- The
tenantIdfrom your Aembit Tenant (https://<tenantId>.aembit.io).
Create a free Aembit Tenant if you don’t have one. - Either a:
- GitHub account with:
- Access to create repositories
- A email verified GitHub account
- GitLab account with:
- Access to create projects/repositories
- A email verified GitLab account
- SSH keys configured for GitLab (see Use SSH keys to communicate with GitLab for more info)
- GitHub account with:
- (Optional) Postman installed to use the Aembit Edge API Postman Collection
Step 1: Connect Aembit to GitHub or GitLab
Section titled “Step 1: Connect Aembit to GitHub or GitLab”For the initial setup of Aembit Edge API, you’ll:
- create a GitHub or GitLab repository
- create a Trust Provider in your Aembit Tenant to authenticate your CI/CD job’s identity
- configure a CI configuration file that generates a JSON Web Token (JWT) in your CI/CD pipeline
Create a git repository
Section titled “Create a git repository”Select the appropriate tab and follow the steps within it to create a new repository in GitHub or GitLab where your CI/CD configuration file resides.
-
Go to https://github.com/, login, and create a New repository.
-
Select Create a new repository, and give it a descriptive Repository name. For this quickstart, name it
edge-api-test. -
For Visibility, choose Private.
-
Click Create repository.
Notice the URL of your new repository, which should look like this:
Terminal window https://github.com/<username>/edge-api-testWhere
<username>is your GitHub username andedge-api-testis your repository name.Keep note of the repository name (
<username>/edge-api-test). This repository name is important because it will be used to match your GitHub Action with the Aembit Trust Provider you create later.
-
Go to https://gitlab.com/, login, and create a New project/repository.
-
Select Create blank project, and give it a descriptive Project name. For this quickstart, name it
edge-api-test. -
For Visibility Level, choose Private.
-
Click Create project.
Notice the URL of your new project, which should look like this:
Terminal window https://gitlab.com/<group>/edge-api-testWhere
<group>is your GitLab username or group name andedge-api-testis your project name.Keep note of the project path (
<group>/edge-api-test). This project path is important because it will be used to match your GitLab CI job with the Aembit Trust Provider you create later.
Create an Aembit Trust Provider
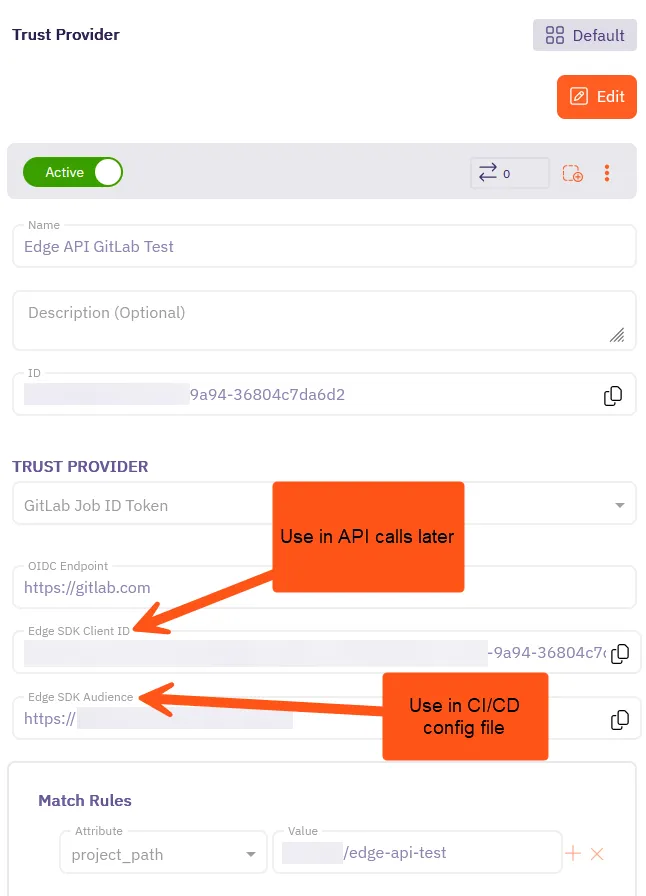
Section titled “Create an Aembit Trust Provider”For Aembit to verify the identity of your CI/CD job, you need to create a Trust Provider that uses the either a GitHub Action or GitLab Job ID Token. The Trust Provider you create automatically generates two important values:
- An Edge SDK Client ID that you’ll use in your API calls.
- An Edge SDK Audience that you’ll use in the CI/CD configuration file.
Select the appropriate tab to follow the steps for creating a Trust Provider for either GitHub or GitLab:
-
Open a new browser tab or window.
This is helpful as you’ll be switching between your GitHub repository and your Aembit Tenant. -
Log into your Aembit Tenant at
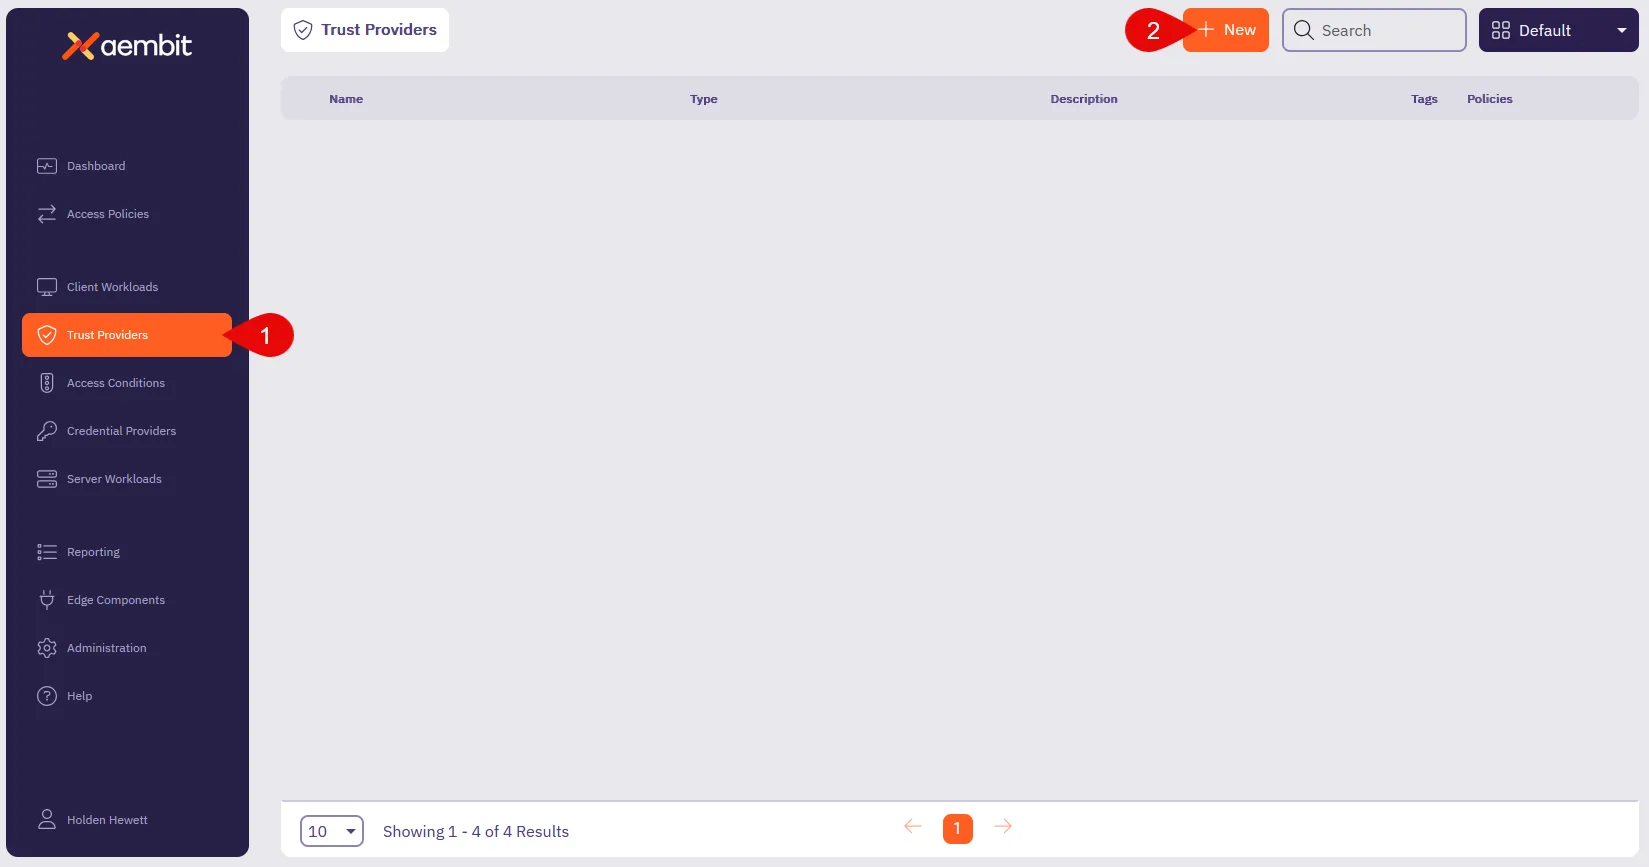
https://<tenantId>.aembit.io.Go to Trust Providers in the left sidebar menu.
Click + New.
-
Fill out the Trust Provider form:
- Name - Enter a descriptive name like
Edge API GitHub Test. - TRUST PROVIDER - Select GitHub Action ID Token, which reveals its configuration options.
- Edge SDK Audience - You’ll use this auto-generated value in your CI/CD config file.
- Match Rules - Select repository and enter the repository name as the Value.
Use the repository name you created in the previous step (like<username>/edge-api-test).
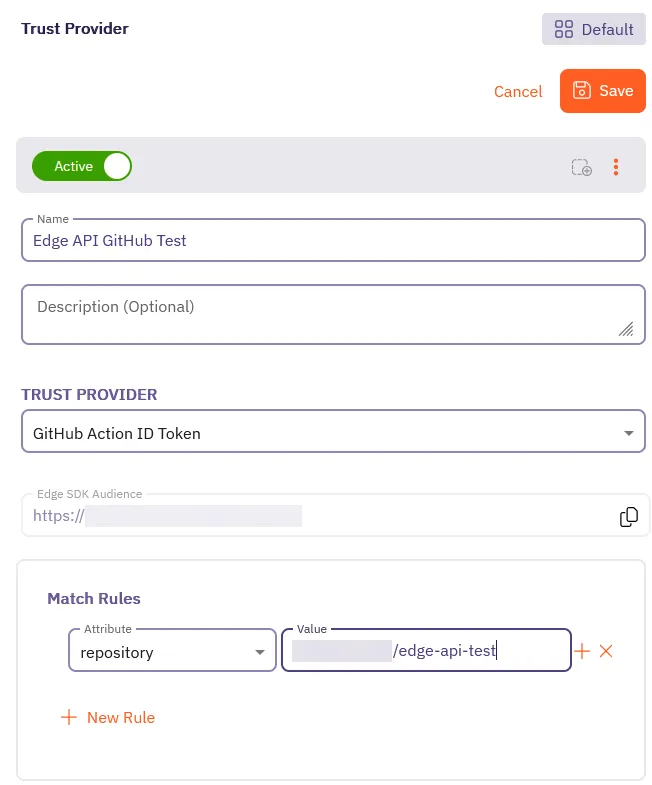
- Name - Enter a descriptive name like
-
Click Save.
Aembit displays your new Trust Provider in the list of Trust Providers.
-
Click on your newly created Trust Provider to view its details.
You’ll see Edge SDK Client ID and Edge SDK Audience that Aembit automatically generated for your Trust Provider.
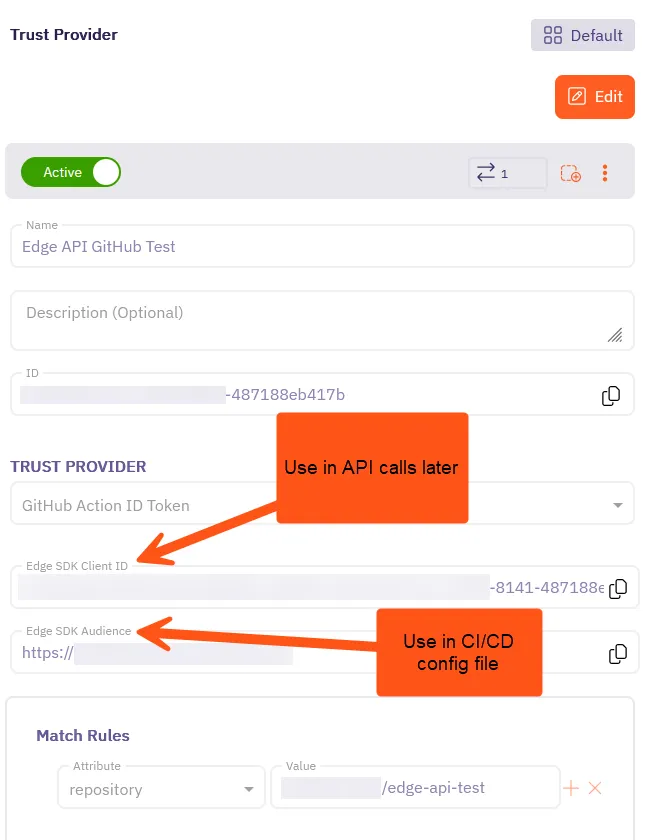
Keep this tab or window open, as you’ll need these values in the next steps.
-
Open a new browser tab or window.
This is helpful as you’ll be switching between your GitLab project and your Aembit Tenant. -
Log into your Aembit Tenant at
https://<tenantId>.aembit.io.Go to Trust Providers in the left sidebar menu.
Click + New.
-
Fill out the Trust Provider form:
- Name - Enter a descriptive name like
Edge API GitLab Test. - TRUST PROVIDER - Select GitLab Job ID Token, which reveals its configuration options.
- OIDC Endpoint - Enter
https://gitlab.com. - Edge SDK Audience - You’ll use this auto-generated value in your CI/CD config file.
- Match Rules - Select project_path and enter project path as the Value.
Use the project path you created in the previous step (like<group>/edge-api-test).
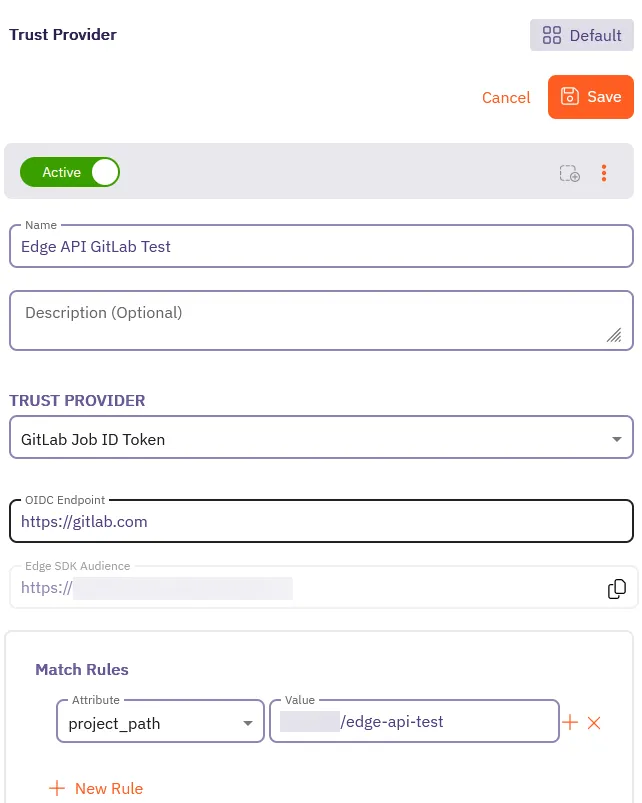
- Name - Enter a descriptive name like
-
Click Save.
Aembit displays your new Trust Provider in the list of Trust Providers.
-
Click on your newly created Trust Provider to view its details.
You’ll see Edge SDK Client ID and Edge SDK Audience that Aembit automatically generated for your Trust Provider.
Keep this tab or window open, as you’ll need these values in the next steps.
Create a CI/CD configuration file
Section titled “Create a CI/CD configuration file”Now you’ll create the CI/CD configuration file that runs in your GitHub or GitLab repository. This file uses the Trust Provider you created to authenticate your CI/CD job with Aembit Edge API. The CI/CD job generates an OpenID Connect (OIDC) token that Aembit Edge API uses to verify the identity of your CI/CD job.
The CI configuration file also prints the Base64-encoded OIDC token, which you’ll decode later to retrieve your identity token. The OIDC token is a JWT that contains information about the identity of your CI/CD job.
The CI configuration file is different for GitHub and GitLab, so be sure to follow the steps for your chosen provider:
-
Go back to your GitHub repository in the browser tab or window you opened earlier.
In your new repository, click Add file and select Create new file.
-
Create a new file called
.github/workflows/aembit-edge-api.yml.
Paste the entire filepath into the Name your file… field and GitHub automatically creates the directories.Add the following content to the file:
.github/workflows/aembit-edge-api.yml # Generate an OIDC token for Aembit Edge API with GitHubname: Generate OIDC Tokenon:workflow_dispatch:push:branches: [main]jobs:demo:runs-on: ubuntu-latestpermissions:id-token: writecontents: readsteps:- name: Get OIDC Tokenuses: actions/github-script@v7with:script: |const token = await core.getIDToken('<trustProviderAudience>');const encoded = Buffer.from(token).toString('base64');console.log('Token (split to avoid masking):');console.log(encoded.substring(0, 50));console.log(encoded.substring(50, 100));console.log(encoded.substring(100)); -
Replace
<trustProviderAudience>with the Edge SDK Audience value you copied from your Trust Provider configuration in the previous step. This value is crucial as it tells GitHub to generate an OIDC token with the correct audience for Aembit Edge API.The value should look something like this:
Terminal window https://<tenantId>.id.useast2.aembit.ioThis value is crucial as it tells GitHub to generate an OIDC token with the correct audience for Aembit Edge API.
-
Go back to your GitLab project in the browser tab or window you opened earlier.
In your new project, click Edit and select Web IDE, which opens the web-based integrated development environment.
-
Create a new file called
.gitlab-ci.ymlin the root of your project with the following content:.gitlab-ci.yml # Generate an OIDC token for Aembit Edge API with GitLabdemo:image: alpineid_tokens:GITLAB_OIDC_TOKEN:aud: <Aembit_Edge_SDK_Audience>script:- echo "Token:"- echo -n $GITLAB_OIDC_TOKEN | base64 -
Replace
<Aembit_Edge_SDK_Audience>with the Edge SDK Audience value you copied from your Trust Provider configuration in the previous step. This value is crucial as it tells GitLab to generate an OIDC token with the correct audience for Aembit Edge API.The value should look something like this:
Terminal window https://<tenantId>.id.useast2.aembit.ioThis value is crucial as it tells GitLab to generate an OIDC token with the correct audience for Aembit Edge API.
-
Click Source Control in the left side menu.
Click Commit and push to ‘main’ to save the file to your repository.
Generate an OIDC token
Section titled “Generate an OIDC token”Now that you have your CI configuration file set up, it’s time to run it and generate the OIDC token.
-
While still in your GitHub repository, click on the Actions tab at the top of the page.
-
In the left sidebar menu, you should see your workflow named Generate OIDC Token.
Click on it to view the workflow runs.
-
Click on the latest run to view its details.
Click on the “Demo” run.
Then, expand the Get OIDC Token section to reveal the full logs.
-
You should see the output containing the
Token:value which is standard Base64-encoded and should look something like this (the output is split so that GitHub won’t mask the token in the log output.):GitHub Action Output ...Token (split to avoid masking):ZXlKaGJHY2lPaUpTVXpJMU5pSXNJbXRwWkNJNklqTTRPREkyWWpFM0xUWmhNekF0TldZNVlpMWlNVFk1TFRoaVpXSTRNakF5WmpjeU15SXNJblI1Y0NJNklrcFhWQ0lzSW5nMWRDSTZJbmxyVG1GWk5IRk5YM1JoTkdzeVZHZGFUME5G... omitted for brevity ...ZHZjbXRtYkc5M1gyUnBjM0JoZEdOb0lpd2laWGh3SWpveE56VXdNVE0xTlRZeUxDSm9aV0ZrWDNKbFppSTZJaUlzSW1saGRDSTZNVGMxTURFeE16azJNaXdpYVhOeklqb2 -
Copy the Base64-encoded token from the job output.
-
Decode the token using a Base64 decoder like BASE64 Decode and Encode.
The decoded token should start witheyand should look something like this:Decoded GitHub OIDC Token eyJraWQiOiI0aTNzRkU3c3hxTlBPVDdGZHZjR0ExWlZHR0lfci10c0RYbkV1WVQ0WnFFIiwidHlwIjoianNvbiIsImFsZyI6IlJTMjU2In0.e3JuYW1lc3BhY2VfaWQiOiIxMDgzOT... omitted for brevity ...1TCmnNp0ubYcDFn5lfpiJyhTCMzKpABlyaqq03CZFSJGkgVMVfHUWKkbBvl-gt1IJFnUqgdwZ3QxSUpGblVxUEhzRkFnNm90ZVVrZTlLa2JaRkM0clc1RUZTUEFqSmFWV2lhUlj59DThis is your GitHub identity token! Hold onto it, as you’ll need it to authenticate with Aembit.
Now that you have your GitHub identity token, you must finish configuring Aembit to complete this quickstart guide.
-
While still in your GitLab project, click on the CI/CD tab in the left sidebar menu.
Click on Pipelines to view the list of pipelines.
-
You should see your pipeline named Generate OIDC Token.
Click on it to view the pipeline runs.
-
Click on the latest run to view its details.
-
In the Jobs section, click on the job that corresponds to your pipeline (something like
#10346670123: demo). -
The output contains the
Token:value which is standard Base64-encoded with padding and should look something like this:GitLab Job Output ...Token:ZXlKcmFXUWlPaUkwYVROelJrVTNjM2h4VGxCUFZEZEdaSFpqUjBFeFdsWkhSMGxmY2kxMGMwUllia1YxV1ZRMFduRkZJaXdpZEhsd0lqb2lTbGRVSWl3aVlXeG5Jam9pVWxNeU5UWWlmUS5leUp1WVcx... omitted for brevity ...dmwtZ3QxSUpGblVxUEhzRkFnNm90ZVVrZTlLa2JaRkM0clc1RUZTUEFqSmFWV2lhUkg0cUF6ckZPanJ3R3Bva1dQTW9pTlczVU0yNjBRZkVCVWluZTZFeHc= -
Copy the Base64-encoded token from the job output.
-
Decode the token using a Base64 decoder like BASE64 Decode and Encode.
The decoded token should start witheyand should look something like this:Decoded GitLab OIDC Token eyJraWQiOiI0aTNzRkU3c3hxTlBPVDdGZHZjR0ExWlZHR0lfci10c0RYbkV1WVQ0WnFFIiwidHlwIjoianNvbiIsImFsZyI6IlJTMjU2In0.e3JuYW1lc3BhY2VfaWQiOiIxMDgzOT... omitted for brevity ...1TCmnNp0ubYcDFn5lfpiJyhTCMzKpABlyaqq03CZFSJGkgVMVfHUWKkbBvl-gt1IJFnUqgdwZ3QxSUpGblVxUEhzRkFnNm90ZVVrZTlLa2JaRkM0clc1RUZTUEFqSmFWV2lhUlj59DThis is your GitLab identity token! Hold onto it, as you’ll need it to authenticate with Aembit.
Now that you have your GitLab identity token, you must finish configuring Aembit to complete this quickstart guide.
Step 2: Complete Aembit config
Section titled “Step 2: Complete Aembit config”Now that you have your identity token from your CI/CD job, it’s time to finish configuring the rest of the Aembit components you need to complete this quickstart guide.
In this section, you’ll create:
- a Client Workload that represents your CI/CD job
- a Credential Provider that defines the credentials for your target service
- a Server Workload that represents the target service you want to retrieve credentials for
- an Access Policy that ties everything together
Create a Client Workload
Section titled “Create a Client Workload”Create a Client Workload that represents your CI/CD job. This Client Workload is what authenticates with Aembit using the identity token you just generated. You must create this Client Workload so you can retrieve credentials for your target service later using the Aembit Edge API.
This Client Workload represents your GitHub CI job that authenticates with Aembit using the identity token.
-
Switch back to the tab or window with your Aembit Tenant, go to Client Workloads in the left sidebar menu.
Click + New.
-
Fill out the Client Workload form:
- Name - Enter a descriptive name like
GitHub Edge API Test. - Client Identification - Select GitHub ID Token Repository and enter the repository
name (
<username>/edge-api-test) you created earlier as the Value.
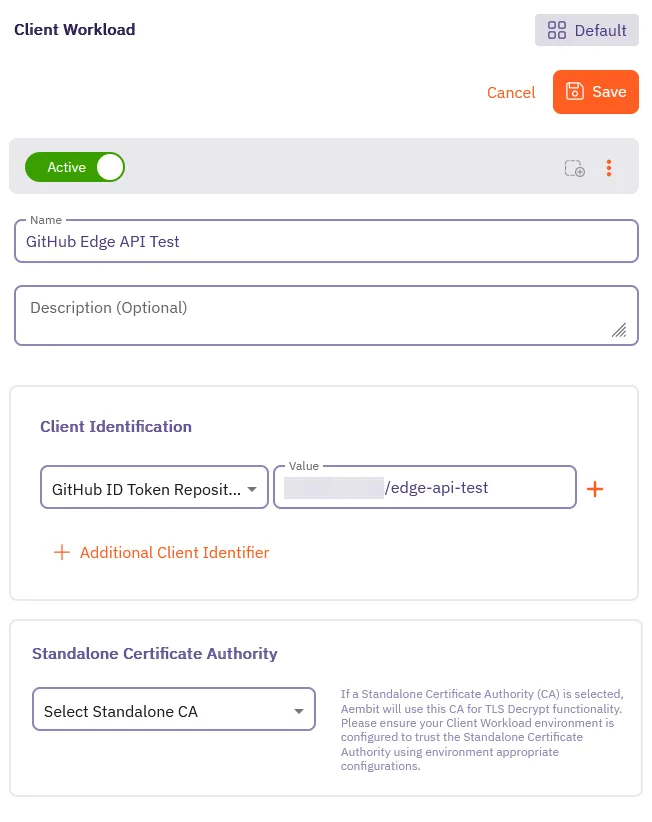
- Name - Enter a descriptive name like
-
Click Save.
Aembit displays your new Client Workload in the list of Client Workloads.
This Client Workload represents your GitLab CI job that authenticates with Aembit using the identity token.
-
Switch back to the tab or window with your Aembit Tenant, go to Client Workloads in the left sidebar menu.
Click + New.
-
Fill out the Client Workload form:
- Name - Enter a descriptive name like
GitLab Edge API Test. - Client Identification - Select GitLab ID Token Project Path and enter the project path
(
<group>/edge-api-test) you created earlier as the Value.
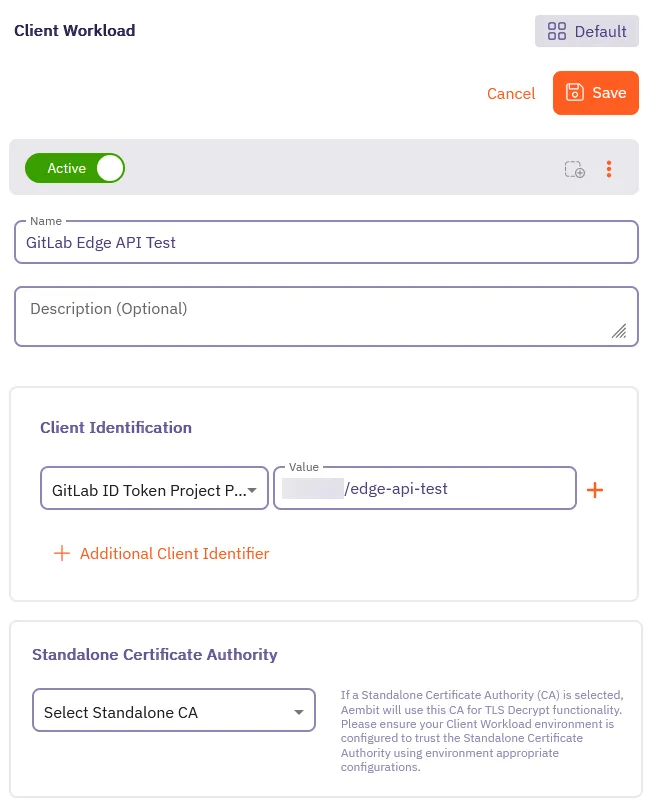
- Name - Enter a descriptive name like
-
Click Save.
Aembit displays your new Client Workload in the list of Client Workloads.
Create a Credential Provider
Section titled “Create a Credential Provider”Next, you must create a Credential Provider. Credential Providers define the credential (like an API key or database password) for your target service that you’ll retrieve using Aembit Edge API calls later.
Follow these steps to create a Credential Provider in your Aembit Tenant:
-
While still in your Aembit Tenant, go to Credential Providers in the left sidebar menu.
Click + New.
-
Fill out the Credential Provider form:
-
Enter a Name for your Credential Provider, like
My Service API Key. -
Select
API Keyas the Credential Type. -
Enter an API Key for your target service, like
my_secure_api_key_abc123xyz789.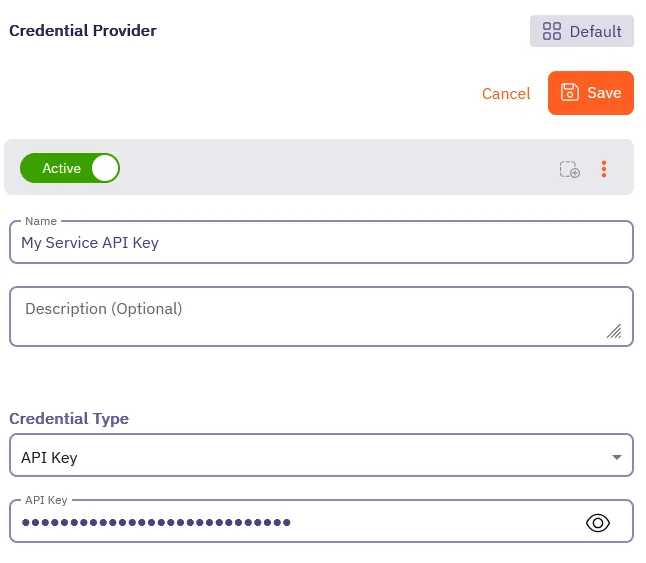
-
Click Save.
Aembit displays your new Credential Provider in the list of Credential Providers.
Create a Server Workload
Section titled “Create a Server Workload”Now, you’ll create a Server Workload that represents the target service you want to retrieve credentials for. For the purposes of this quickstart guide, this won’t be a real service, but rather a placeholder to showcase how to authenticate and retrieve credentials using Aembit Edge API. Typically, this would be a database, API, or other service that your application needs to authenticate with. This Server Workload’s credential is what you’ll be retrieving later in this quickstart.
Follow these steps to create a Server Workload in your Aembit Tenant:
-
While still in your Aembit Tenant, go to Server Workloads in the left sidebar menu.
Click + New.
-
Fill out the Server Workload form:
-
Enter a Name for your Server Workload, like
My API Service. -
In the Service Endpoint section, fill out the following fields:
- Host - Enter the hostname of your target service, like
api.myservice.com. - Application Protocol - Select
HTTP.
Record these values, as you’ll use them later when making API calls to retrieve credentials.
Leave the remaining fields at their default values.
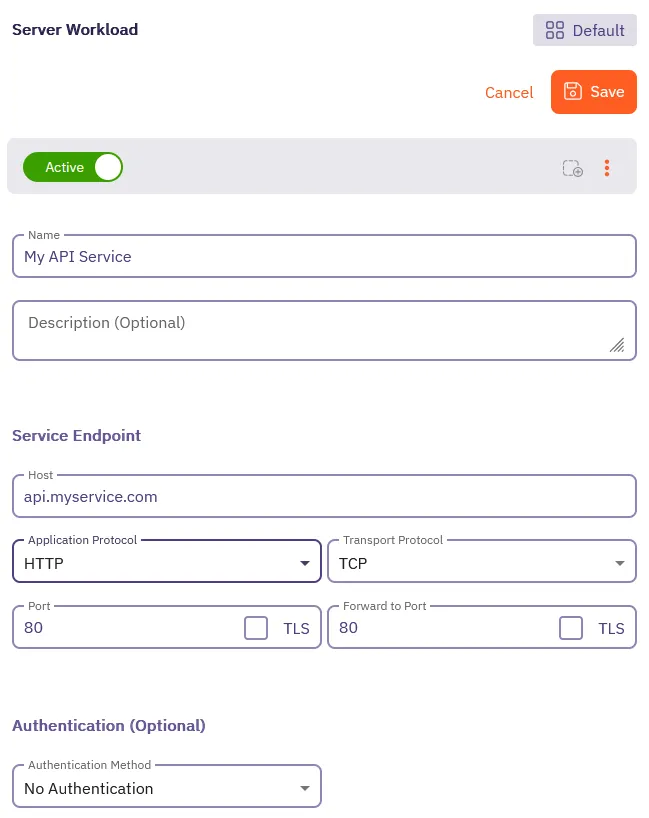
- Host - Enter the hostname of your target service, like
-
Click Save.
Aembit displays your new Server Workload in the list of Server Workloads.
Create an Access Policy
Section titled “Create an Access Policy”It’s time to put everything together into an Access Policy.
Access Policies define:
- the identity of your Client Workload through the Trust Provider
- which Client Workload (your CI/CD job) can access which Server Workload (your target service)
- the credential to retrieve for the Server Workload from the Credential Provider
You must create an Access Policy that defines these relationships, otherwise, Aembit won’t permit you to retrieve credentials.
Select the appropriate tab to follow the steps for creating an Access Policy for either GitHub or GitLab:
-
While still in your Aembit Tenant, go to Access Policies in the left sidebar menu.
-
Click + New to open the Access Policy Builder.
-
Select a Client Workload:
- Click the Client Workload card in the left panel, then select the Select Existing tab.
- Select the GitHub Client Workload you created earlier from the list.
- Click Use Selected to add the Client Workload to the policy.
-
Select a Server Workload:
- Click the Server Workload card in the left panel, then select the Select Existing tab.
- Select the Server Workload you created earlier from the list.
- Click Use Selected to add the Server Workload to the policy.
-
Select a Trust Provider:
- Click the Trust Providers card in the left panel, then select the Select Existing tab.
- Select the GitHub ID Token Trust Provider you created earlier from the list.
- Click Use Selected to add the Trust Provider to the policy.
-
Select a Credential Provider:
- Click the Credential Provider card in the left panel, then select the Select Existing tab.
- Select the Credential Provider you created earlier from the list.
- Click Use Selected to add the Credential Provider to the policy.
-
In the Access Policy Name field, enter a name for your policy.
-
Click Save Policy in the header bar. Enable the Active toggle to activate.
After saving, Aembit displays the Access Policy in the list of Access Policies.
Click on the Access Policy, the detailed view should look similar to the following screenshot:
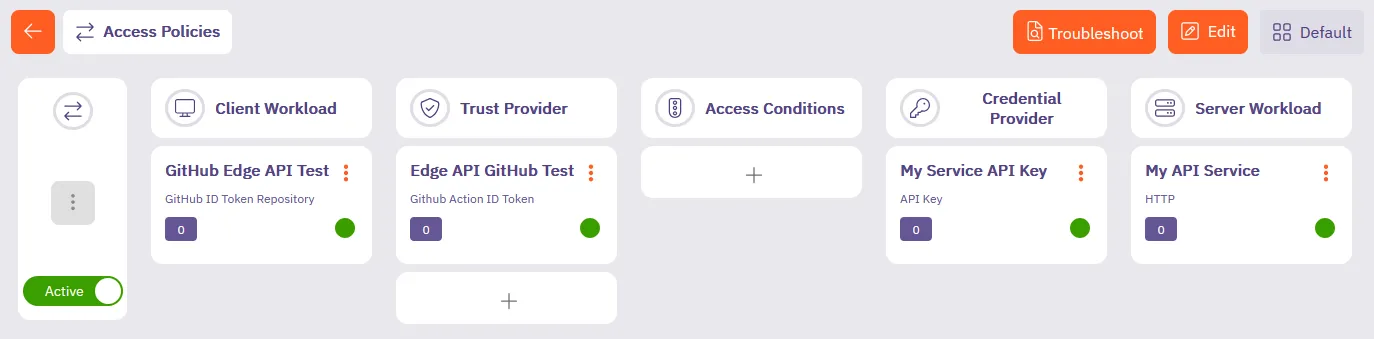
You’ve successfully created an Access Policy that permits your GitHub ID Token-based Client Workload to retrieve credentials for your target service using Aembit Edge API.
-
While still in your Aembit Tenant, go to Access Policies in the left sidebar menu.
-
Click + New to open the Access Policy Builder.
-
Select a Client Workload:
- Click the Client Workload card in the left panel, then select the Select Existing tab.
- Select the GitLab Client Workload you created earlier from the list.
- Click Use Selected to add the Client Workload to the policy.
-
Select a Server Workload:
- Click the Server Workload card in the left panel, then select the Select Existing tab.
- Select the Server Workload you created earlier from the list.
- Click Use Selected to add the Server Workload to the policy.
-
Select a Trust Provider:
- Click the Trust Providers card in the left panel, then select the Select Existing tab.
- Select the GitLab ID Token Trust Provider you created earlier from the list.
- Click Use Selected to add the Trust Provider to the policy.
-
Select a Credential Provider:
- Click the Credential Provider card in the left panel, then select the Select Existing tab.
- Select the Credential Provider you created earlier from the list.
- Click Use Selected to add the Credential Provider to the policy.
-
In the Access Policy Name field, enter a name for your policy.
-
Click Save Policy in the header bar. Enable the Active toggle to activate.
After saving, Aembit displays the Access Policy in the list of Access Policies.
Click on the Access Policy, the detailed view should look similar to the following screenshot:
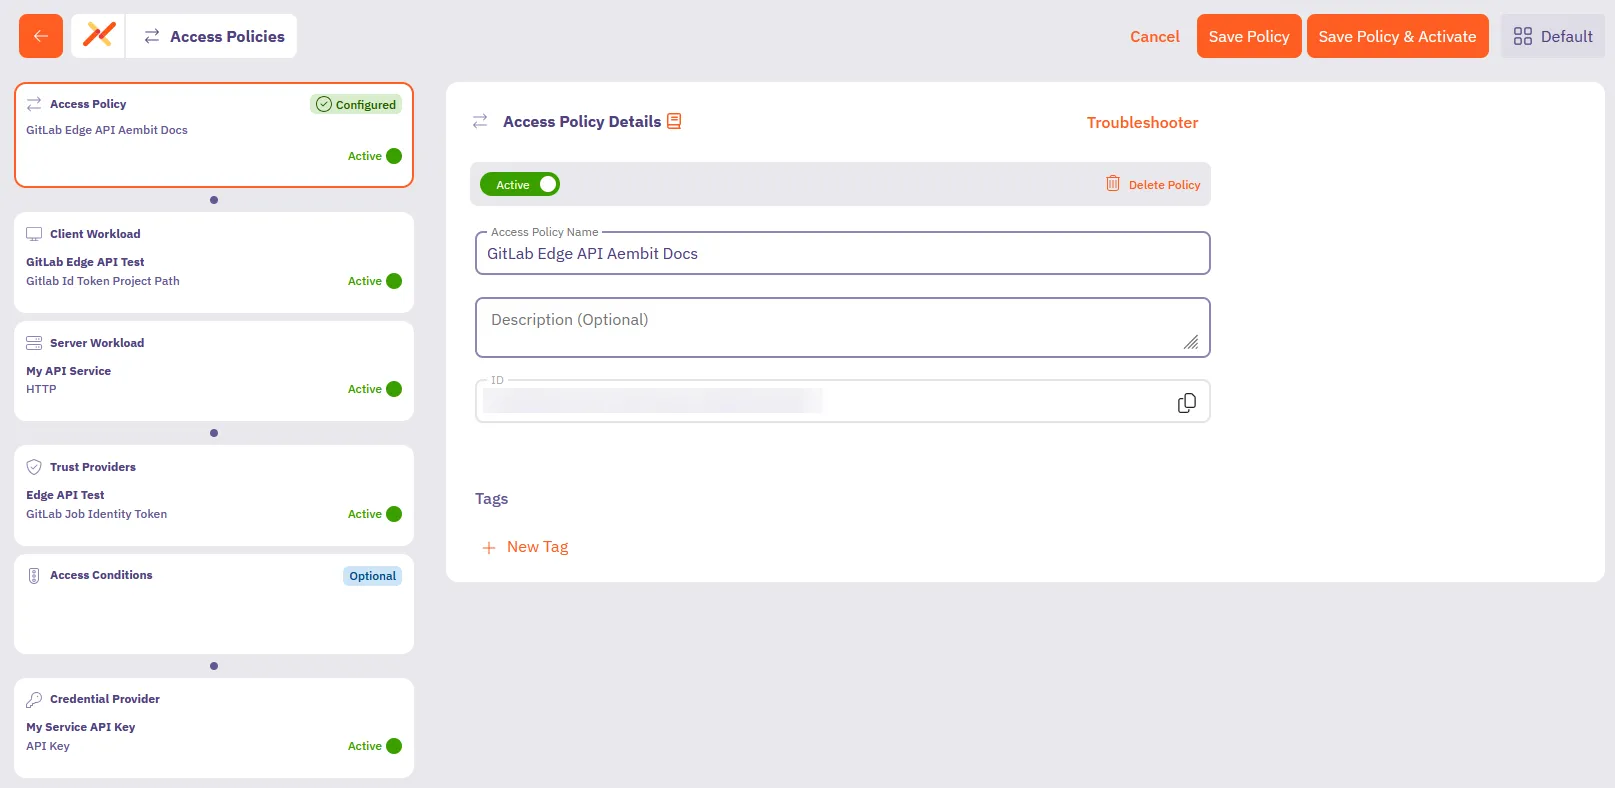
You’ve successfully created an Access Policy that permits your GitLab ID Token-based Client Workload to retrieve credentials for your target service using Aembit Edge API.
You’re doing great and almost there! 💪
You’ve successfully:
- Connected Aembit to your chosen git provider (GitHub or GitLab)
- Created Aembit components and an Access Policy that ties them together
Continue to make your first API calls with the Aembit Edge API.
Step 3: Make your first API calls
Section titled “Step 3: Make your first API calls”Now that you have your CI/CD job, Client Workload, and the rest of the Aembit components set up, you’re ready to make your first API calls to retrieve credentials for your target service.
Get your Aembit Edge API base URL
Section titled “Get your Aembit Edge API base URL”To make API calls to Aembit Edge API, you must have your Edge API base URL. Follow these steps to find it in your Aembit Tenant:
-
Hover over your username in the bottom left corner of your Aembit Tenant.
-
Select Profile.
-
Click the Edge API Base URL field to copy it. It should look something like this:
Terminal window https://<tenantId>.ec.useast2.aembit.ioWhere
<tenantId>is your Aembit Tenant ID.
Authenticate your workload
Section titled “Authenticate your workload”Before retrieving credentials, you must authenticate your workload with Aembit Edge API, you’ll use the decoded identity token from the CI job you obtained earlier in Step 1.
First, authenticate your GitLab CI job with Aembit using your identity token:
curl <your-edge-api-base-url>/edge/v1/auth \ --request POST \ --header 'Content-Type: application/json' \ --data '{ "clientId": <your-edge-sdk-client-id>, "client": { "<your-git-provider>": { "identityToken": "<your-decoded-identity-token>" } }}'import http.client
conn = http.client.HTTPSConnection("<tenantId>.aembit.io")
payload = "{\n \"clientId\": <your-edge-sdk-client-id>,\n \"client\": {\n <your-git-provider>: {\n \"identityToken\": <your-decoded-identity-token>\n }\n }\n}"
headers = { 'Content-Type': "application/json",}
conn.request("POST", "/edge/v1/auth", payload, headers)
res = conn.getresponse()data = res.read()
print(data.decode("utf-8"))fetch('<your-edge-api-base-url>/edge/v1/auth', { method: 'POST', headers: { 'Content-Type': 'application/json', }, body: JSON.stringify({ clientId: <your-edge-sdk-client-id>, client: { <your-git-provider>: { identityToken: <your-decoded-identity-token> } } })})Replace the values that apply:
<tenantId>with your Aembit Tenant ID<your-edge-api-base-url>with the Edge API base URL you copied earlier<your-git-provider>with eithergithuborgitlabdepending on your CI/CD job<your-edge-sdk-client-id>with the Client ID from your Trust Provider<your-decoded-identity-token>with your decoded GitHub or GitLab identity token (starts withey)
You’ll receive an access token response:
{ "accessToken": "eyJhbGciOiJIUzI1NiIsInR5cCI6IkpXVCJ9...", "tokenType": "Bearer", "expiresIn": 3600}The expiresIn value is in seconds, so your access token is valid for 3600 seconds, or 1 hour.
Great! You’ve successfully authenticated with Aembit. 🔑
Use the value of accessToken as the <your-access-token> in the next step to get the credential for your target
service.
Get your credential
Section titled “Get your credential”Now use the access token you just received to retrieve credentials for your target service. Select the appropriate tab to follow the steps for retrieving credentials for either GitHub or GitLab using the language of your choice:
curl --location '<your-edge-api-base-url>/edge/v1/credentials' \--header 'Content-Type: application/json' \--header 'Authorization: Bearer <your-access-token>' \--data '{ "client": { "<your-git-provider>": { "identityToken": "<your-decoded-identity-token>" } }, "server": { "host": "<your-target-service-hostname>", "port": "80" }, "credentialType": "ApiKey"}'import http.clientimport json
conn = http.client.HTTPSConnection("<your-edge-api-base-url>")payload = json.dumps({ "client": { "<your-git-provider>": { "identityToken": "<your-decoded-identity-token>" } }, "server": { "host": "<your-target-service-hostname>", "port": "80" }, "credentialType": "ApiKey"})headers = { 'Content-Type': 'application/json', 'Authorization': 'Bearer <your-access-token>'}conn.request("POST", "/edge/v1/credentials", payload, headers)res = conn.getresponse()data = res.read()print(data.decode("utf-8"))const myHeaders = new Headers();myHeaders.append("Content-Type", "application/json");myHeaders.append("Authorization", "Bearer <your-access-token>");
const raw = JSON.stringify({ "client": { "<your-git-provider>": { "identityToken": "<your-decoded-identity-token>" } }, "server": { "host": "<your-target-service-hostname>", "port": "80" }, "credentialType": "ApiKey"});
const requestOptions = { method: "POST", headers: myHeaders, body: raw, redirect: "follow"};
fetch("<your-edge-api-base-url>/edge/v1/credentials", requestOptions) .then((response) => response.text()) .then((result) => console.log(result)) .catch((error) => console.error(error));Replace these values:
<your-access-token>with the token from the authentication response<your-edge-api-base-url>with the Edge API base URL you copied earlier<your-git-provider>with eithergithuborgitlabdepending on your CI/CD job<your-decoded-identity-token>with the decoded identity token you obtained earlier (starts withey)<your-target-service-hostname>with the hostname of your target service
You’ll receive credentials for your configured service:
{ "credentialType": "ApiKey", "expiresAt": "2024-01-15T10:30:00Z", "data": { "apiKey": "someapikeythatsgreat!123" }}That’s it, you did it! 🎉🎉
You now have a valid API key to authenticate with your target service.
Summary
Section titled “Summary”In this quickstart guide, you learned how to:
- Connect Aembit to your GitHub or GitLab repository
- Create a Trust Provider to authenticate your CI/CD job
- Set up a CI/CD configuration file to generate an OIDC token
- Create Aembit components like Client Workload, Credential Provider, Server Workload, and Access Policy
- Authenticate your workload with Aembit Edge API
- Retrieve credentials for your target service using Aembit Edge API
Congratulations on completing your first Aembit Edge API integration! 🚀
Common errors and solutions
Section titled “Common errors and solutions”401 Unauthorized
Section titled “401 Unauthorized”{ "success": false, "message": "Authentication failed", "id": 12345}Common causes:
- Trust Provider not configured for your workload type
- Invalid or expired identity token
- Client Workload not matching configured patterns
- Incorrect EdgeSDK Client ID
- OIDC audience mismatch in GitLab CI configuration
Solution: Verify your Trust Provider configuration matches your workload environment and check that your EdgeSDK Client ID is correct.
400 Bad Request
Section titled “400 Bad Request”{ "success": false, "message": "Invalid request or missing parameters", "id": 12346}Common causes:
- Missing required attestation data in the
clientobject - Invalid JSON structure
- Unsupported
credentialType
Solution: Check that your request includes all required workload attestation data.
500 Internal Server Error
Section titled “500 Internal Server Error”{ "success": false, "message": "Internal server error", "id": 12347}Common causes:
- Credential Provider configuration issues
- Target service connectivity problems
- Temporary service unavailability
Solution: Check your Credential Provider configuration and try again after a brief delay.