Edge API authentication with AWS Metadata Service
To authenticate with the Aembit Edge API using AWS Metadata Service, you need to provide the instance identity document and its signature. This is typically done by querying the AWS Metadata Service from within an EC2 instance.
Prerequisites
Section titled “Prerequisites”To authenticate using the AWS Metadata Service, you must have the following:
- Your Trust Provider’s Edge SDK Client ID
- EC2 instance or Kubernetes pod (or any machine with terminal access) on AWS.
- SSH access to the instance or pod.
- Both an
instanceIdentityDocumentandinstanceIdentityDocumentSignature.- The
instanceIdentityDocumentis a JSON document that contains metadata about the instance or pod.
You must base64-encode this document in standard BASE64 format with padding. - The
instanceIdentityDocumentSignatureis a signature of the document, which is what verifies the identity document’s authenticity.
- The
The instance identity document contains useful metadata like instance ID, region, availability zone, instance type, and more, which are all securely accessible only from within the instance itself.
Authenticate with AWS Metadata Service
Section titled “Authenticate with AWS Metadata Service”To authenticate with the Aembit Edge API using the AWS Metadata Service, follow these steps:
-
Open your terminal and SSH into your EC2 instance or Kubernetes pod.
-
Generate the instance or pod
instanceIdentityDocumentusing AWS’s Instance Metadata Service (IMDS) version2 with the following command:Terminal window TOKEN=`curl -X PUT "http://169.254.169.254/latest/api/token" -H "X-aws-ec2-metadata-token-ttl-seconds: 21600"` \&& curl -H "X-aws-ec2-metadata-token: $TOKEN" http://169.254.169.254/latest/dynamic/instance-identity/documentFirst, run:
Terminal window [string]$token = (Invoke-WebRequest -Headers @{'X-aws-ec2-metadata-token-ttl-seconds' = '21600'} `-Method PUT -Uri 'http://169.254.169.254/latest/api/token' -UseBasicParsing).ContentThen, run:
Terminal window (Invoke-WebRequest -Headers @{'X-aws-ec2-metadata-token' = $token} `-Uri 'http://169.254.169.254/latest/dynamic/instance-identity/document' -UseBasicParsing).ContentSee Retrieve the instance identity document for an EC2 instance in the AWS docs for more details.
The link-local IP address
169.254.169.254is the IMDS endpoint. The first request gets a session token with a 6-hour TTL. The second request uses that session token to retrieve the instance identity document.You should get output similar to the following:
{"accountId" : "123456789012","architecture" : "x86_64","availabilityZone" : "us-east-1a","billingProducts" : null,"devpayProductCodes" : null,"marketplaceProductCodes" : null,"imageId" : "ami-0123456789abcdef0","instanceId" : "i-0123456789abcdef0","instanceType" : "t2.micro","kernelId" : null,"pendingTime" : "2025-06-12T11:38:17Z","privateIp" : "172.31.88.56","ramdiskId" : null,"region" : "us-east-1","version" : "2017-09-30"} -
Base64-encode the
instanceIdentityDocumentusing standard BASE64 encoding with padding. Aembit suggests using a tool like Base64 Encode and Decode. -
Get the
instanceIdentityDocumentSignatureusing the following command:Terminal window TOKEN=`curl -X PUT "http://169.254.169.254/latest/api/token" -H "X-aws-ec2-metadata-token-ttl-seconds: 21600"` \&& curl -H "X-aws-ec2-metadata-token: $TOKEN" http://169.254.169.254/latest/dynamic/instance-identity/signatureTOKEN=`curl -X PUT "http://169.254.169.254/latest/api/token" -H "X-aws-ec2-metadata-token-ttl-seconds: 21600"` \&& curl -H "X-aws-ec2-metadata-token: $TOKEN" http://169.254.169.254/latest/dynamic/instance-identity/signature | base64 -d >> signatureFirst, run:
Terminal window [string]$token = (Invoke-WebRequest -Method Put -Headers @{'X-aws-ec2-metadata-token-ttl-seconds' = '21600'} http://169.254.169.254/latest/api/token).ContentThen, run:
Terminal window $Signature = [Convert]::FromBase64String((Invoke-WebRequest -Headers @{'X-aws-ec2-metadata-token' = $Token} http://169.254.169.254/latest/dynamic/instance-identity/signature).Content)See Verify the instance identity document for an Amazon EC2 instance in the AWS docs for more details.
You should get output similar to the following:
Terminal window % Total % Received % Xferd Average Speed Time Time Time CurrentDload Upload Total Spent Left Speed100 56 100 56 0 0 25327 0 --:--:-- --:--:-- --:--:-- 28000VO7la7Q7cDGw1v/3vpoPwaJaBLh9r+KX5cm15KfH7K9YaCILlNJ8UbCjph0991BSSZh3h+wrtlYytdjTx0NW274MrkpUWuYOwnI3WSKIpc3ue+HkS13iL6rwaPODfh83gA5xvEvvxgtCrESPoKRcc1xyQB3AhLthSIsx0aN+V1Q=The output signature is already formatted correctly for you to use in the
authAPI request.The signature must be a single line without any extra spaces or newlines. Use a text editor or IDE to make sure.
-
Construct the authentication request payload using the
clientId,instanceIdentityDocument, andinstanceIdentityDocumentSignatureyou generated in the previous steps.It should look something like this:
Terminal window {"clientId": "<edge-sdk-client-id>","client": {"aws": {"instanceIdentityDocument":"<standard-base64-encoded-instance-identity-document>","instanceIdentityDocumentSignature":"<standard-base64-encoded-signature>"}}}When successful, you’ll receive output similar to the following:
Terminal window {"accessToken": "eyJhbGciOiJSUzI1NiIsImtpZCI6IkpyR3JLQ0x6RVFN...","tokenType": "Bearer","expiresIn": 3600} -
Use the
accessTokenas thebearerTokenin subsequent API calls to authenticate your requests. This token is valid for the duration specified inexpiresIn(in seconds).Example of an AWS attestation request to an EC2 instance
Terminal window curl --location 'https://a12b3c4.aembit.io/edge/v1/credentials' \--header 'Content-Type: application/json' \--header 'Authorization: Bearer eyJhbGciOiJSUzI1NiIsImtpZCI6IkpyR3JLQ0x6RVFN...' \--data '{"client": {"aws": {"instanceIdentityDocument":"ewogICJhY2NvdW50SWQiIDogIjEyMzQ1Njc4OTAxMiIsCiAgImFyY2hpdGVjdHVyZSIgOiAieDg2XzY0IiwKICAiYXZhaWxhYmlsaXR5Wm9uZSIgOiAidXMtZWFzdC0yIiwKICAiYmlsbGluZ1Byb2R1Y3RzIiA6IG51bGwsCiAgImRldnBheVByb2R1Y3RDb2RlcyIgOiBudWxsLAogICJtYXJrZXRwbGFjZVByb2R1Y3RDb2RlcyIgOiBudWxsLAogICJpbWFnZUlkIiA6ICJhbWktMDEyMzQ1Njc4OWFiY2RlZjAiLAogICJpbnN0YW5jZUlkIiA6ICJpLTAxMjM0NTY3ODlhYmNkZWYwIiwKICAiaW5zdGFuY2VUeXBlIiA6ICJ0Mi5taWNybyIsCiAgImtlcm5lbElkIiA6IG51bGwsCiAgInBlbmRpbmdUaW1lIiA6ICIyMDI1LTA2LTMwVDE3OjE4OjQ3WiIsCiAgInByaXZhdGVJcCIgOiAiMTcyLjMxLjcuMjAwIiwKICAicmFtZGlza0lkIiA6IG51bGwsCiAgInJlZ2lvbiIgOiAidXMtZWFzdC0yIiwKICAidmVyc2lvbiIgOiAiMjAxNy0wOS0zMCIKfQ==","instanceIdentityDocumentSignature":"aBcDeFgHiJkLmNoPqRsTuVwXyZ0123456789+/aBcDeFgHiJkLmNoPqRsTuVwXyZ0123456789+/aBcDeFgHiJkLmNoPqRsTuVwXyZ0123456789+/aBcDeFgHiJkLmNoPqRsTuVwXyZ0123456789+/aBcDeFgH="}}}'
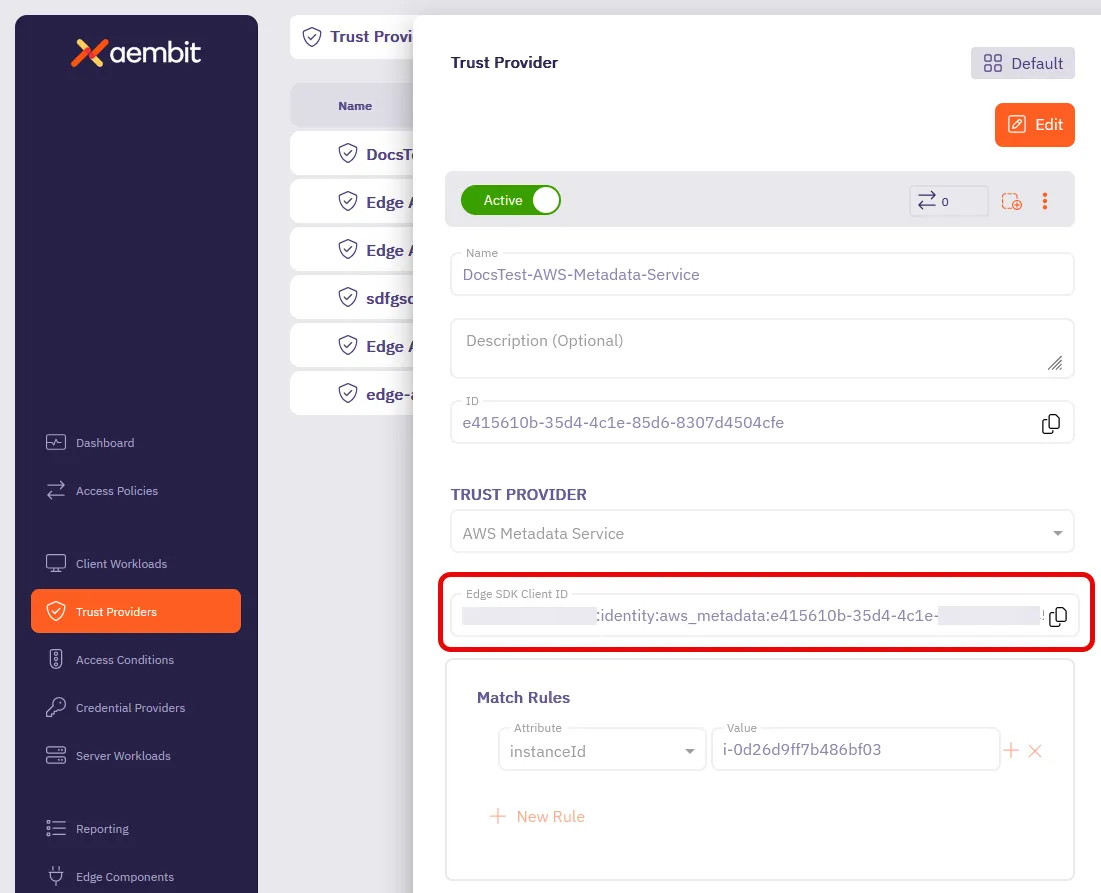
How to find your Edge SDK Client ID
Section titled “How to find your Edge SDK Client ID”-
Log in to your Aembit Tenant.
-
Go to the Trust Providers section in the left sidebar.
-
Select the Trust Provider you want to use for Edge API authentication.
-
In the TRUST PROVIDER section, find the Edge SDK Client ID field.
-
Copy the Edge SDK Client ID to use in your authentication requests.