This is the full developer documentation for DOCS
# Get started with Aembit API
> Overview of how to get started learning about and using Aembit API
The Aembit API v1 is a lightweight, RESTful API that enables clients to make calls to various API endpoints using standard HTTP URL syntax to perform Create, Read, Update and Delete (CRUD) tasks, and access different types of resources and information. Requests are made using URL and JSON request format, and responses are returned in easy-to-read JSON format.
Create, Read, Update and Delete operations are performed using the following REST verbs:
* **Create** - `POST`
* **Read** - `GET`
* **Update** - `PUT` or `PATCH`
* **Delete** - `DELETE`
Adhering to REST standards and best practices, the Aembit API was designed to be easy-to-use, with minimal complexity or sophistication.
Note
The Aembit API documentation assumes you already have a base level understanding of REST API concepts, terminology, and syntax. If you are not familiar with REST, or simply need a refresher, please see the [RESTful API Tutorial](https://restfulapi.net/) for comprehensive information about REST APIs and how to use them.
## Authentication
[Section titled “Authentication”](#authentication)
To ensure only authorized users have access to the Aembit REST API, Aembit enforces authentication to validate and verify whether a developer should be allowed to make requests. To provide flexibility to users, several types of authentication methods are supported, depending on the type of API client you want to implement.
The sections below describe the available authentication methods.
### Using the Session Access Token
[Section titled “Using the Session Access Token”](#using-the-session-access-token)
One way you may authenticate to the Aembit API is to use a session specific access token in your API requests. When you sign into your tenant, you will be assigned an access token for this session.
To locate the access token, follow the steps below.
1. Log into your tenant. The Dashboard page appears.
2. In the bottom-left corner of the Dashboard page, hover over your name. Notice that a **Profile** link appears. 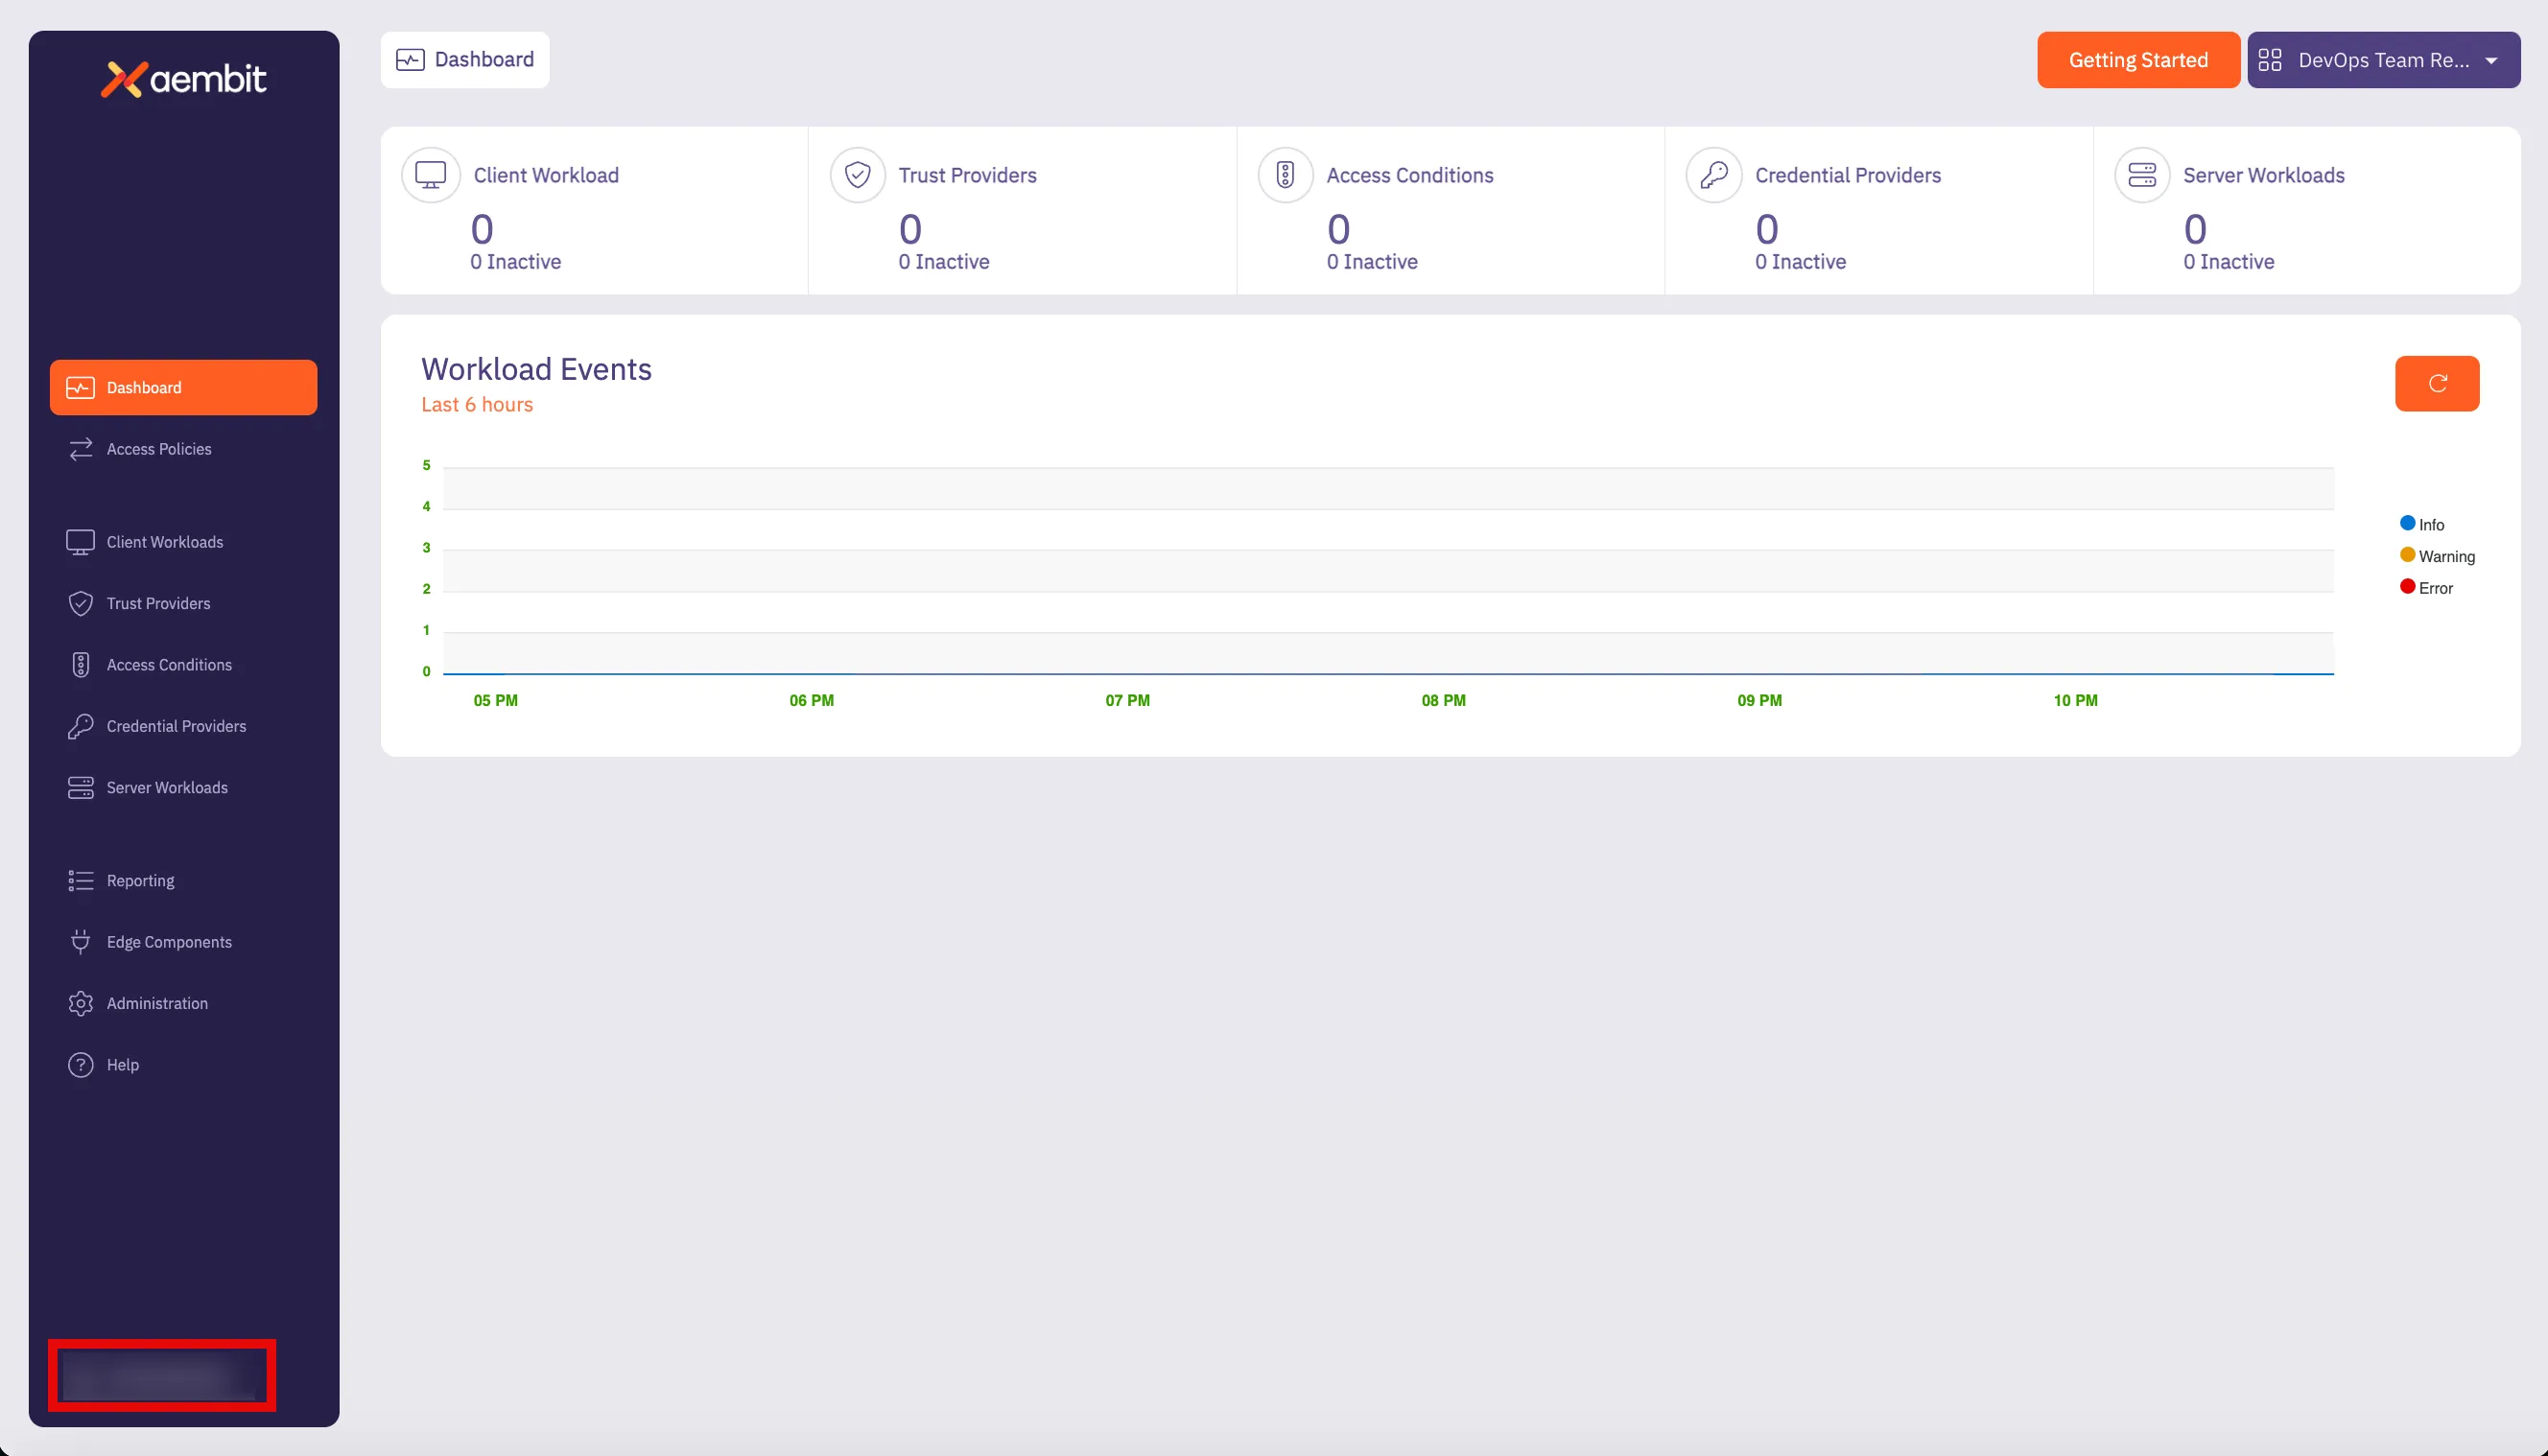
3. Click on the **Profile** link. The User Profile dialog window appears.
4. In the API Access section of the dialog window, copy the values in the **Access Token** and **API Base Url** fields. 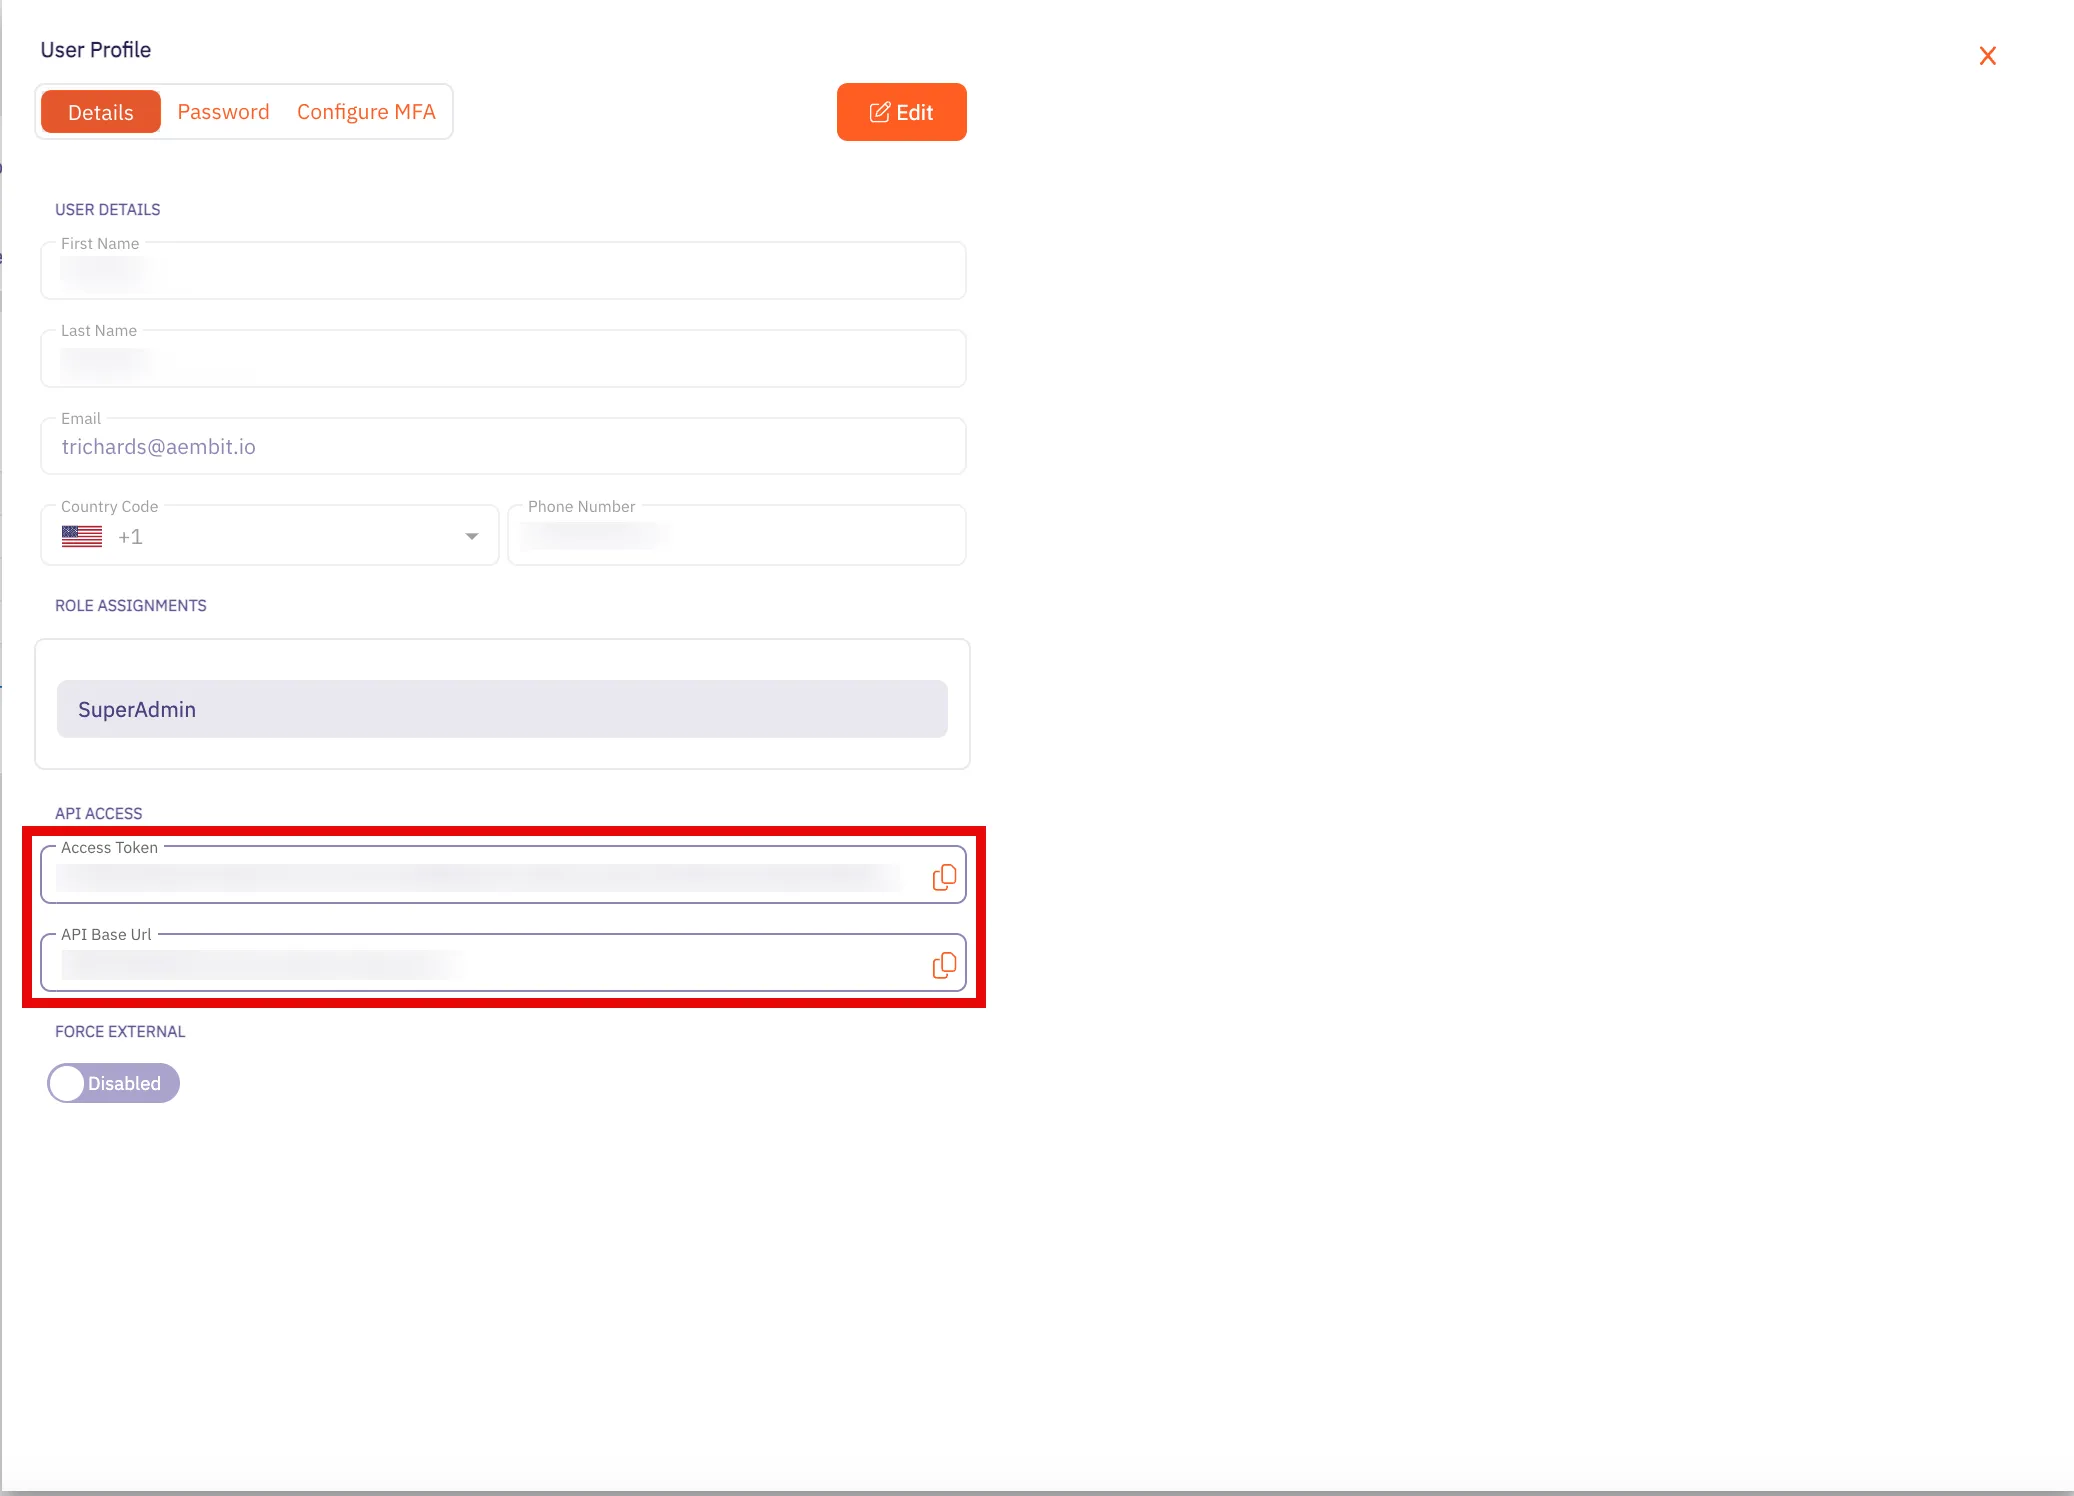
You may use the **Access Token** and **API Base Url** values in your API requests, as shown below in the [REST API Request Structure](#rest-api-request-structure) section.
### Using Aembit Native Authentication
[Section titled “Using Aembit Native Authentication”](#using-aembit-native-authentication)
Aembit also supports authentication to the Aembit API using a native authentication capability which utilizes OIDC (Open ID Connect tokens) ID Tokens. This capability requires configuring your Aembit Tenant with the appropriate components as follows:
* Client Workload
* For the source of your API requests (e.g. GitHub Actions, GitLab Jobs, etc.)
* Trust Provider
* To authenticate using cryptographic verification
* Credential Provider
* Using the Aembit Access Token type and a Role with permissions to the appropriate entities
* Server Workload
* Referencing the tenant-specific Aembit API hostname
* Access Policy
* Using the access entities above enables the configured Client Workload access to the Aembit API
## REST API Request Structure
[Section titled “REST API Request Structure”](#rest-api-request-structure)
Making a REST API call to a server requires adhering to strict syntax and formatting guidelines for the server to process the request correctly. REST APIs rely on clients and users following prescribed URL structures and HTTP methods to ensure proper request handling and response generation. While there’s flexibility in data formats, the core structure of a REST API request remains consistent to perform specific actions and tasks in a single request.
The structure of a REST API call typically consists of the following elements:
* HTTP Method (REST Verb)
* REST API Url
* Base Url
* Version
* Resource
* HTTP Authorization Header Access Token
### HTTP Method (REST Verb)
[Section titled “HTTP Method (REST Verb)”](#http-method-rest-verb)
When you want to make an API request, there are several types of requests (verbs) you can use, depending on what task you are trying to perform.
REST uses the following verbs:
* **GET** - retrieves information from one more more resources
* **POST** - creates a new resource
* **PUT** - updates an existing resource
* **PATCH** - partially updates an existing resource
* **DELETE** - deletes a resource
### Base URL
[Section titled “Base URL”](#base-url)
The Base Url value is the standard HTTP address where requests are sent to the API server.
For the Aembit API, this will use be the **API Base Url** from your Aembit Tenant and can be retrieved using the steps below:
1. Log into your Aembit Tenant.
2. On the main Dashboard page, hover over your name in the bottom-left corner and click on **Profile**. A User Profile dialog window appears. 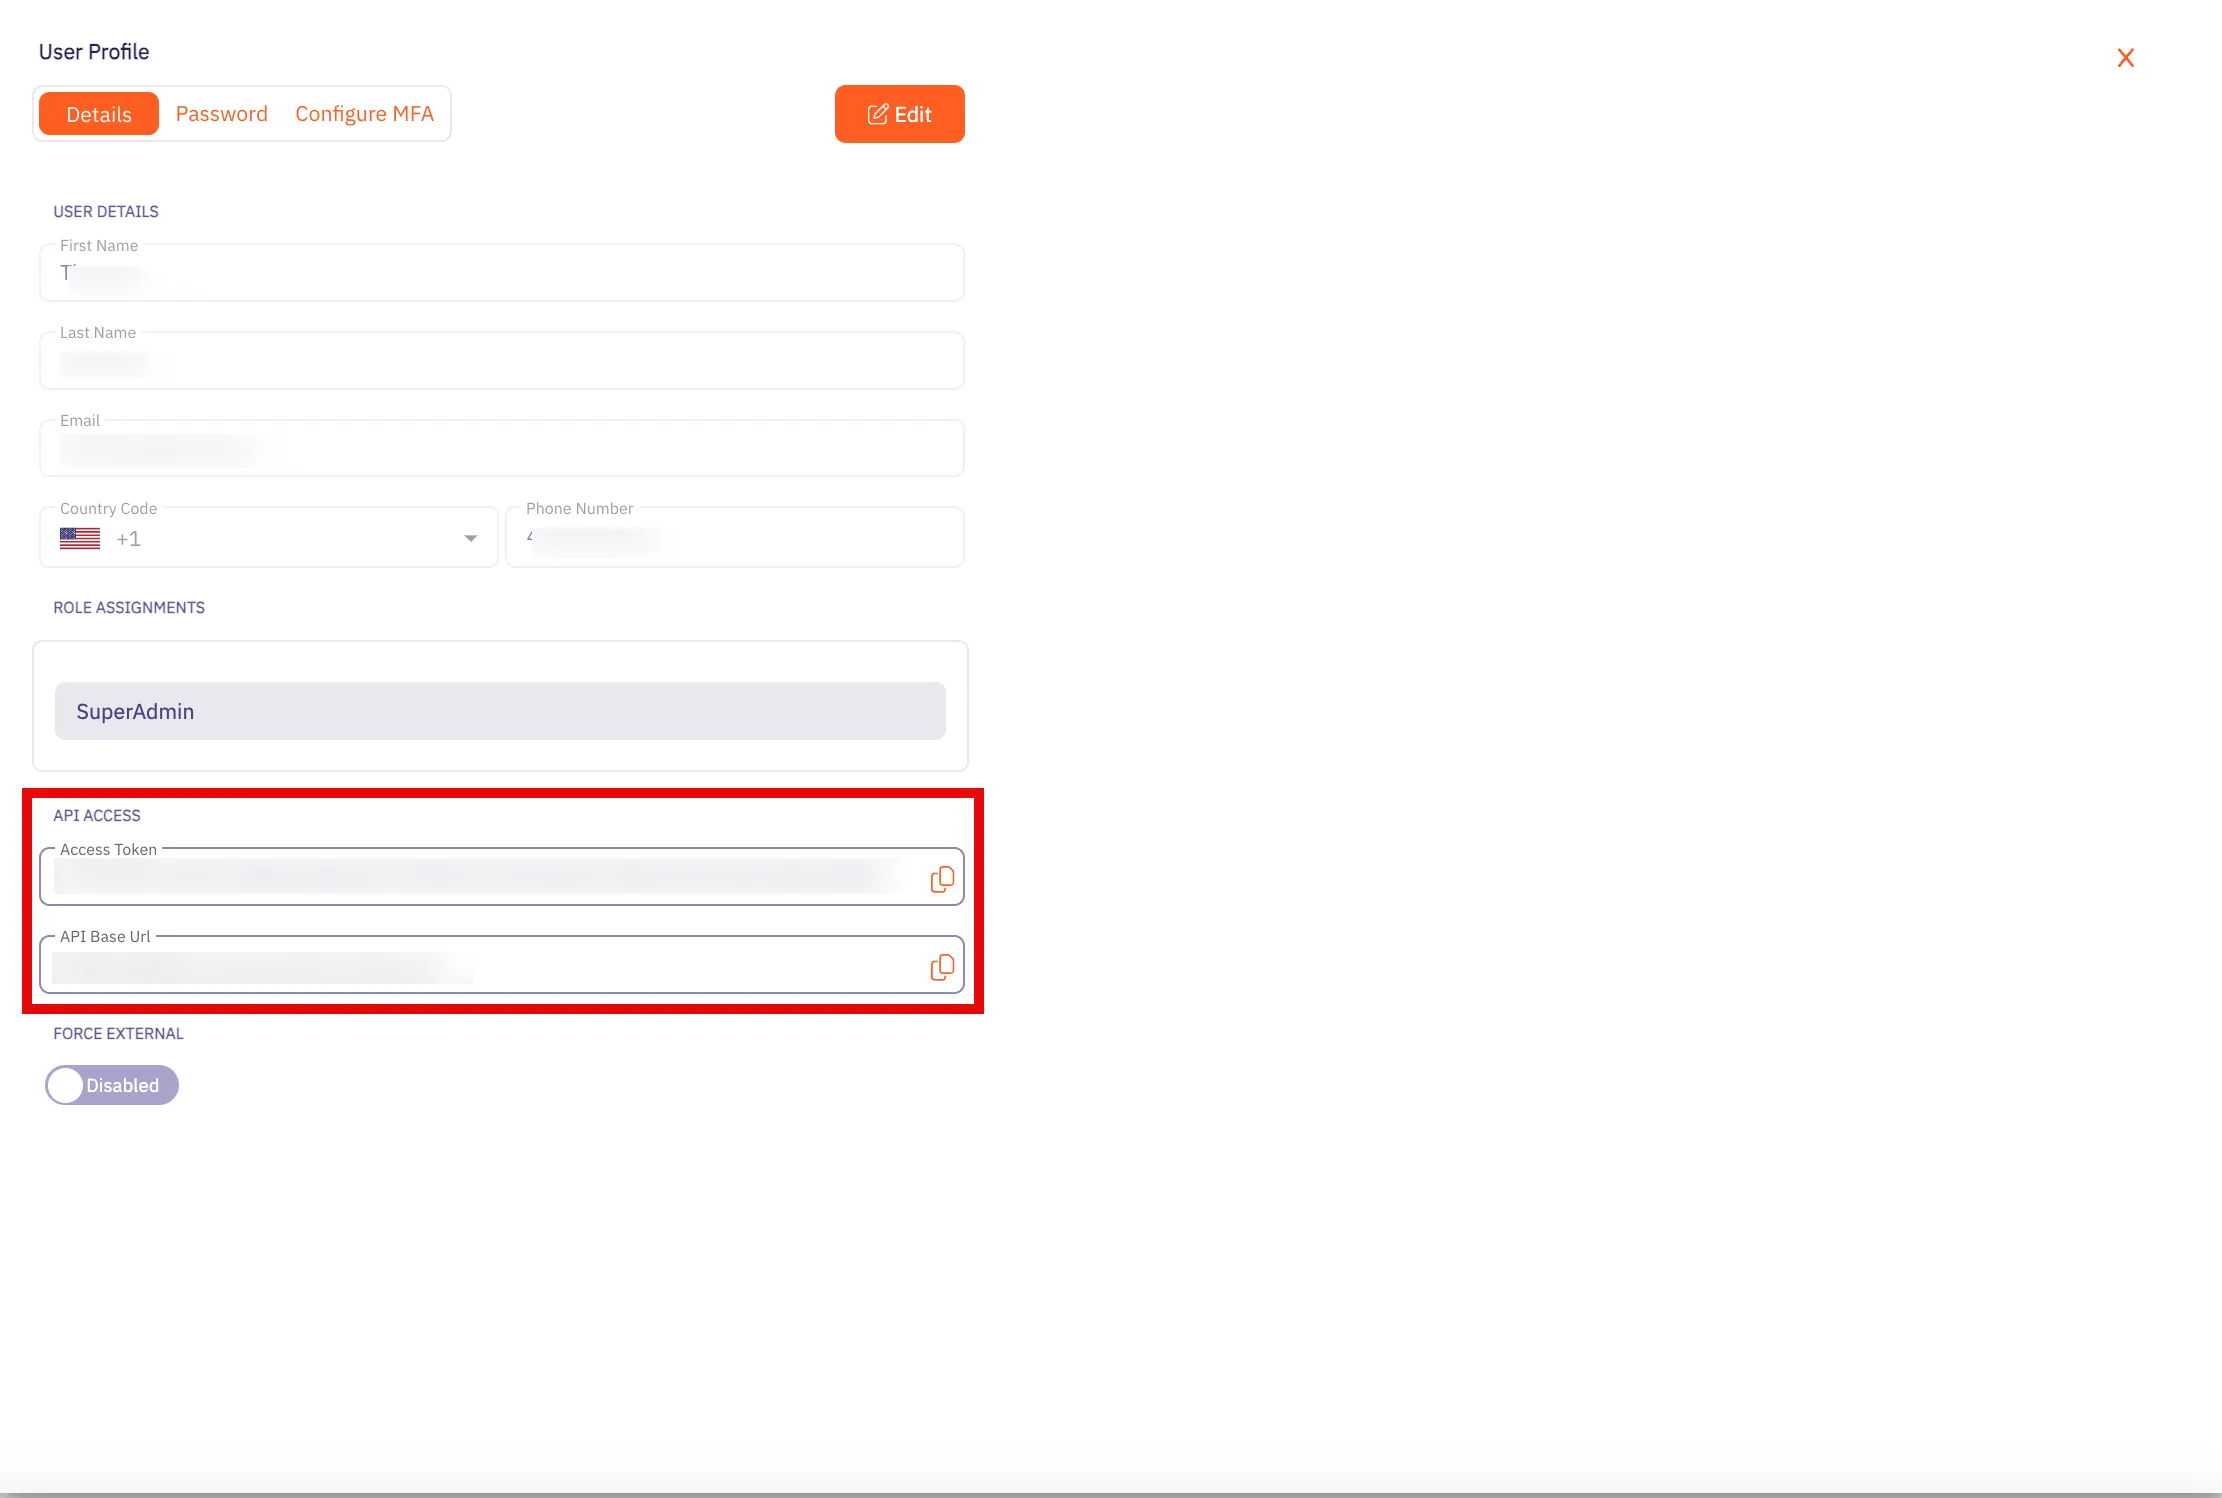
3. In the **API Access** section, copy the values in the **API Token** and **API Base Url** fields. You will need these values in your API client to make requests to the server.
### Versioning
[Section titled “Versioning”](#versioning)
Every public API, including the Aembit API, includes a **Version** that distinguishes it from other API versions. If an organization manages multiple versions of an API (e.g. v1, v2, v3, etc.), each version often includes different features and functions. Depending on the API version used in the request, you may have access to different features.
To make it easier for users to make calls to the correct API version, the version number is included the API request. So, for example, in the Aembit API, a request with the version number looks like the following example:
`/api/v1/users`
The `v1` in the URL specifies that the request is for the `v1` version of the Aembit API. By adding the version number in the URL, this tells the server that you want to access resources for that specific version of the API.
### Resource
[Section titled “Resource”](#resource)
The `resource` value is the specific resource being called. For example, `server-workloads` and `client-workloads` are resources.
### Access Token
[Section titled “Access Token”](#access-token)
The Access Token value is a unique identifier that can be included in the API request, enabling Aembit APIs to identify the requestor and verify the enabled API permissions.
Note
Aembit requires Authorization Header Bearer (access) tokens to be used when making API calls and does not support long lived credentials.
### Resource Set (optional)
[Section titled “Resource Set (optional)”](#resource-set-optional)
Aembit supports an optional feature where customers can segment their tenant into multiple isolated Resource Sets that do not interact. To manage access entities in custom Resource Sets, an additional HTTP Header value is required, `X-Aembit-ResourceSet`.
Note
If the `X-Aembit-ResourceSet` HTTP header is not specified, then the Aembit API will operate against the Default Resource Set (identified as `ffffffff-ffff-ffff-ffff-ffffffffffff`).
### REST API Request Example
[Section titled “REST API Request Example”](#rest-api-request-example)
A typical Aembit API request should look similar to the `curl` examples shown below:
```bash
curl -X GET -L 'https://tenant.aembit.io/api/v1/server-workloads' -H 'Authorization: Bearer '
curl -X GET -L 'https://tenant.aembit.io/api/v1/server-workloads' -H 'Authorization: Bearer ' -H 'X-Aembit-ResourceSet: ffffffff-ffff-ffff-ffff-ffffffffffff'
```
Where:
* `GET` is the type of request being made
* `https://tenant.aembit.io/api` is the Base URL
* `v1` is the API version
* `server-workloads` is the resource being called
## REST API Response
[Section titled “REST API Response”](#rest-api-response)
Every REST API response includes a HTTP Status Code and a response body. Successful responses will typically include a response body with the `Content-Type: application/json` and associated, structured data.
### Status Codes
[Section titled “Status Codes”](#status-codes)
Whenever you use the Aembit REST API, you will receive a HTTP status code when your request has been processed. The type of status code you receive depends on whether your request was successful or not.
The Aembit API uses standard HTTP Status Codes to denote whether a request has been successfully processed. Generally, you will see three types of status codes returned after you make a request.
* **2XX Codes** - If you request is successful, you will receive a 2XX error response code (e.g. 200, 201, etc).
* **4xx Codes** - If your request is not successful, and there is an client error in your request, you will receive a 4XX error response code (e.g. 401, 403, 404, etc).
* **5xx Codes** - If you request is not successful, and there is a server error, you will receive a 5XX error response code (e.g. 500, 502, 503, etc).
Note
For a full list of HTTP Status Codes, please see the [REST API Tutorial Status Codes](https://www.restapitutorial.com/httpstatuscodes) page.
## OpenAPI YAML
[Section titled “OpenAPI YAML”](#openapi-yaml)
Specific details about the Aembit API are available in the sections on the left and grouped based on the associated Aembit entities or features. However, in some cases, you may want the original OpenAPI document for importing into a code generator which can be downloaded with the link below.
[Download Aembit API OpenAPI Document](/cloud.yaml)
# API Reference
> Aembit Cloud API Reference
# Aembit.API - API Endpoints
> API endpoints reference for Aembit.API
# Aembit.API - API Endpoints
[Section titled “Aembit.API - API Endpoints”](#aembitapi---api-endpoints)
**Version:** v1
**Base URL:** https\://{tenant}.aembit.io
## Access Condition
[Section titled “Access Condition”](#access-condition)
### GET /api/v1/access-conditions
[Section titled “GET /api/v1/access-conditions”](#get-apiv1access-conditions)
**Summary:** Get a page of Access Conditions
**Description:** Retrieve a page of Aembit Access Conditions.
**Operation ID:** get-access-conditions
**Parameters:**
* **X-Aembit-ResourceSet** (undefined) *(optional)*: any
* **page** (undefined) *(optional)*: any
* **per-page** (undefined) *(optional)*: any
* **filter** (undefined) *(optional)*: any
* **order** (undefined) *(optional)*: any
* **group-by** (undefined) *(optional)*: any
**Responses:**
* **‘200’**: Page of Access Conditions
* Content-Type: application/json
* Schema: any
* **‘400’**: Bad Request
* **‘401’**: Not Authenticated
* **‘500’**: Internal Server Error
* Content-Type: application/json
* Schema: any
**cURL Example:**
```bash
curl -X GET \
"https://your-tenant.aembit.io/api/v1/access-conditions"
```
### POST /api/v1/access-conditions
[Section titled “POST /api/v1/access-conditions”](#post-apiv1access-conditions)
**Summary:** Create an Access Condition
**Description:** Create an Aembit Access Condition which can then be associated with an Access Policy.
**Operation ID:** post-access-condition
**Parameters:**
* **X-Aembit-ResourceSet** (undefined) *(optional)*: any
**Request Body:** AccessConditionDTO
* Content-Type: application/json
* Schema: any
**Responses:**
* **‘201’**: Successfully created Access Condition
* Content-Type: application/json
* Schema: any
* **‘400’**: Bad Request
* **‘401’**: Not Authenticated
* **‘500’**: Internal Server Error
* Content-Type: application/json
* Schema: any
**cURL Example:**
```bash
curl -X POST \
-H "Content-Type: application/json" \
-d '{"example": "data"}' \
"https://your-tenant.aembit.io/api/v1/access-conditions"
```
### PUT /api/v1/access-conditions
[Section titled “PUT /api/v1/access-conditions”](#put-apiv1access-conditions)
**Summary:** Update a single Access Condition
**Description:** Update a specific Access Condition identified by its ID.
**Operation ID:** put-access-condition
**Parameters:**
* **X-Aembit-ResourceSet** (undefined) *(optional)*: any
**Request Body:** AccessConditionDTO
* Content-Type: application/json
* Schema: any
**Responses:**
* **‘200’**: Successfully updated Access Condition
* Content-Type: application/json
* Schema: any
* **‘400’**: Bad Request
* **‘401’**: Not Authenticated
* **‘500’**: Internal Server Error
* Content-Type: application/json
* Schema: any
**cURL Example:**
```bash
curl -X PUT \
-H "Content-Type: application/json" \
-d '{"example": "data"}' \
"https://your-tenant.aembit.io/api/v1/access-conditions"
```
### GET ‘/api/v1/access-conditions/{id}’
[Section titled “GET ‘/api/v1/access-conditions/{id}’”](#get-apiv1access-conditionsid)
**Summary:** Get the identified Access Condition
**Description:** Get the Access Condition identified by its ID.
**Operation ID:** get-access-condition
**Parameters:**
* **id** (undefined) *(optional)*: any
* **X-Aembit-ResourceSet** (undefined) *(optional)*: any
**Responses:**
* **‘200’**: Access Condition
* Content-Type: application/json
* Schema: any
* **‘204’**: Access Condition Not Found
* **‘400’**: Bad Request
* **‘401’**: Not Authenticated
* **‘500’**: Internal Server Error
* Content-Type: application/json
* Schema: any
**cURL Example:**
```bash
curl -X GET \
"https://your-tenant.aembit.io'/api/v1/access-conditions/{id}'"
```
### DELETE ‘/api/v1/access-conditions/{id}’
[Section titled “DELETE ‘/api/v1/access-conditions/{id}’”](#delete-apiv1access-conditionsid)
**Summary:** Delete a single Access Condition
**Description:** Delete a specific Access Condition identified by its ID.
**Operation ID:** delete-access-condition
**Parameters:**
* **id** (undefined) *(optional)*: any
* **X-Aembit-ResourceSet** (undefined) *(optional)*: any
**Responses:**
* **‘204’**: Deleted the Access Condition
* **‘400’**: Bad Request
* **‘401’**: Not Authenticated
* **‘404’**: Not Found
* **‘500’**: Internal Server Error
* Content-Type: application/json
* Schema: any
**cURL Example:**
```bash
curl -X DELETE \
"https://your-tenant.aembit.io'/api/v1/access-conditions/{id}'"
```
### PATCH ‘/api/v1/access-conditions/{id}’
[Section titled “PATCH ‘/api/v1/access-conditions/{id}’”](#patch-apiv1access-conditionsid)
**Summary:** Patch a single Access Condition
**Description:** Patch a specific Access Condition identified by its ID.
**Operation ID:** patch-access-condition
**Parameters:**
* **id** (undefined) *(optional)*: any
* **X-Aembit-ResourceSet** (undefined) *(optional)*: any
**Request Body:** AccessConditionPatchDTO
* Content-Type: application/json
* Schema: any
**Responses:**
* **‘200’**: Successfully updated Access Condition
* Content-Type: application/json
* Schema: any
* **‘400’**: Bad Request
* **‘401’**: Not Authenticated
* **‘500’**: Internal Server Error
* Content-Type: application/json
* Schema: any
**cURL Example:**
```bash
curl -X PATCH \
-H "Content-Type: application/json" \
-d '{"example": "data"}' \
"https://your-tenant.aembit.io'/api/v1/access-conditions/{id}'"
```
## Access Policy (Deprecated)
[Section titled “Access Policy (Deprecated)”](#access-policy-deprecated)
### GET ‘/api/v1/access-policies/{id}’
[Section titled “GET ‘/api/v1/access-policies/{id}’”](#get-apiv1access-policiesid)
**Summary:** Get the identified Access Policy
**Description:** Get the Access Policy identified by its ID.
**Operation ID:** get-access-policy
**Parameters:**
* **id** (undefined) *(optional)*: any
* **X-Aembit-ResourceSet** (undefined) *(optional)*: any
**Responses:**
* **‘200’**: Access Policy
* Content-Type: application/json
* Schema: any
* **‘204’**: Access Policy Not Found
* **‘400’**: Bad Request
* **‘401’**: Not Authenticated
* **‘500’**: Internal Server Error
* Content-Type: application/json
* Schema: any
**cURL Example:**
```bash
curl -X GET \
"https://your-tenant.aembit.io'/api/v1/access-policies/{id}'"
```
### DELETE ‘/api/v1/access-policies/{id}’
[Section titled “DELETE ‘/api/v1/access-policies/{id}’”](#delete-apiv1access-policiesid)
**Summary:** Delete an Access Policy
**Description:** Delete an Access Policy.
**Operation ID:** delete-access-policy
**Parameters:**
* **id** (undefined) *(optional)*: any
* **X-Aembit-ResourceSet** (undefined) *(optional)*: any
**Responses:**
* **‘204’**: Deleted the Access Policy
* **‘400’**: Bad Request
* **‘401’**: Not Authenticated
* **‘500’**: Internal Server Error
* Content-Type: application/json
* Schema: any
**cURL Example:**
```bash
curl -X DELETE \
"https://your-tenant.aembit.io'/api/v1/access-policies/{id}'"
```
### PATCH ‘/api/v1/access-policies/{id}’
[Section titled “PATCH ‘/api/v1/access-policies/{id}’”](#patch-apiv1access-policiesid)
**Summary:** Patch an Access Policy
**Description:** Patch an Access Policy.
**Operation ID:** patch-access-policy
**Parameters:**
* **id** (undefined) *(optional)*: any
* **X-Aembit-ResourceSet** (undefined) *(optional)*: any
**Request Body:** PolicyPatchDTO
* Content-Type: application/json
* Schema: any
**Responses:**
* **‘200’**: Patched Access Policy
* Content-Type: application/json
* Schema: any
* **‘400’**: Bad Request
* **‘401’**: Not Authenticated
* **‘500’**: Internal Server Error
* Content-Type: application/json
* Schema: any
**cURL Example:**
```bash
curl -X PATCH \
-H "Content-Type: application/json" \
-d '{"example": "data"}' \
"https://your-tenant.aembit.io'/api/v1/access-policies/{id}'"
```
### GET ‘/api/v1/access-policies/getByWorkloadIds/{clientWorkloadId}/{serverWorkloadId}’
[Section titled “GET ‘/api/v1/access-policies/getByWorkloadIds/{clientWorkloadId}/{serverWorkloadId}’”](#get-apiv1access-policiesgetbyworkloadidsclientworkloadidserverworkloadid)
**Summary:** Get the identified Access Policy
**Description:** Get the Access Policy identified by a Client and Server Workload.
**Operation ID:** get-access-policy-by-workloads
**Parameters:**
* **clientWorkloadId** (undefined) *(optional)*: any
* **serverWorkloadId** (undefined) *(optional)*: any
* **X-Aembit-ResourceSet** (undefined) *(optional)*: any
**Responses:**
* **‘200’**: Access Policy
* Content-Type: application/json
* Schema: any
* **‘400’**: Bad Request
* **‘401’**: Not Authenticated
* **‘500’**: Internal Server Error
* Content-Type: application/json
* Schema: any
**cURL Example:**
```bash
curl -X GET \
"https://your-tenant.aembit.io'/api/v1/access-policies/getByWorkloadIds/{clientWorkloadId}/{serverWorkloadId}'"
```
### GET /api/v1/access-policies
[Section titled “GET /api/v1/access-policies”](#get-apiv1access-policies)
**Summary:** Get a page of Access Policies
**Description:** Retrieve a page of Access Policies.
**Operation ID:** get-access-policies
**Parameters:**
* **X-Aembit-ResourceSet** (undefined) *(optional)*: any
* **page** (undefined) *(optional)*: any
* **per-page** (undefined) *(optional)*: any
* **filter** (undefined) *(optional)*: any
* **order** (undefined) *(optional)*: any
* **group-by** (undefined) *(optional)*: any
**Responses:**
* **‘200’**: Page of Access Policies
* Content-Type: application/json
* Schema: any
* **‘400’**: Bad Request
* **‘401’**: Not Authenticated
* **‘500’**: Internal Server Error
* Content-Type: application/json
* Schema: any
**cURL Example:**
```bash
curl -X GET \
"https://your-tenant.aembit.io/api/v1/access-policies"
```
### POST /api/v1/access-policies
[Section titled “POST /api/v1/access-policies”](#post-apiv1access-policies)
**Summary:** Create an Access Policy
**Description:** Create an Access Policy.
**Operation ID:** post-access-policy
**Parameters:**
* **X-Aembit-ResourceSet** (undefined) *(optional)*: any
**Request Body:** PolicyDTO
* Content-Type: application/json
* Schema: any
**Responses:**
* **‘200’**: Created Access Policy
* Content-Type: application/json
* Schema: any
* **‘400’**: Bad Request
* **‘401’**: Not Authenticated
* **‘500’**: Internal Server Error
* Content-Type: application/json
* Schema: any
**cURL Example:**
```bash
curl -X POST \
-H "Content-Type: application/json" \
-d '{"example": "data"}' \
"https://your-tenant.aembit.io/api/v1/access-policies"
```
### PUT /api/v1/access-policies
[Section titled “PUT /api/v1/access-policies”](#put-apiv1access-policies)
**Summary:** Update an Access Policy
**Description:** Update an Access Policy.
**Operation ID:** put-access-policy
**Parameters:**
* **X-Aembit-ResourceSet** (undefined) *(optional)*: any
**Request Body:** PolicyDTO
* Content-Type: application/json
* Schema: any
**Responses:**
* **‘200’**: Updated Access Policy
* Content-Type: application/json
* Schema: any
* **‘400’**: Bad Request
* **‘401’**: Not Authenticated
* **‘500’**: Internal Server Error
* Content-Type: application/json
* Schema: any
**cURL Example:**
```bash
curl -X PUT \
-H "Content-Type: application/json" \
-d '{"example": "data"}' \
"https://your-tenant.aembit.io/api/v1/access-policies"
```
### POST ‘/api/v1/access-policies/{id}/notes’
[Section titled “POST ‘/api/v1/access-policies/{id}/notes’”](#post-apiv1access-policiesidnotes)
**Summary:** Add a note to an Access Policy
**Description:** Add a note to an Access Policy.
**Operation ID:** post-access-policy-note
**Parameters:**
* **id** (undefined) *(optional)*: any
* **X-Aembit-ResourceSet** (undefined) *(optional)*: any
**Request Body:** PolicyNoteDTO
* Content-Type: application/json
* Schema: any
**Responses:**
* **‘201’**: Note added to an Access Policy
* **‘400’**: Bad Request
* **‘401’**: Not Authenticated
* **‘500’**: Internal Server Error
* Content-Type: application/json
* Schema: any
**cURL Example:**
```bash
curl -X POST \
-H "Content-Type: application/json" \
-d '{"example": "data"}' \
"https://your-tenant.aembit.io'/api/v1/access-policies/{id}/notes'"
```
## Access Policy v2
[Section titled “Access Policy v2”](#access-policy-v2)
### GET ‘/api/v2/access-policies/{id}’
[Section titled “GET ‘/api/v2/access-policies/{id}’”](#get-apiv2access-policiesid)
**Summary:** Get the identified Access Policy
**Description:** Get the Access Policy identified by its ID.
**Operation ID:** get-access-policy-v2
**Parameters:**
* **id** (undefined) *(optional)*: any
**Responses:**
* **‘200’**: Access Policy
* Content-Type: application/json
* Schema: any
* **‘204’**: Access Policy Not Found
* **‘400’**: Bad Request
* **‘401’**: Not Authenticated
* **‘500’**: Internal Server Error
* Content-Type: application/json
* Schema: any
**cURL Example:**
```bash
curl -X GET \
"https://your-tenant.aembit.io'/api/v2/access-policies/{id}'"
```
### DELETE ‘/api/v2/access-policies/{id}’
[Section titled “DELETE ‘/api/v2/access-policies/{id}’”](#delete-apiv2access-policiesid)
**Summary:** Delete an Access Policy
**Description:** Delete an Access Policy.
**Operation ID:** delete-access-policy-v2
**Parameters:**
* **id** (undefined) *(optional)*: any
**Responses:**
* **‘204’**: Deleted the Access Policy
* **‘400’**: Bad Request
* **‘401’**: Not Authenticated
* **‘404’**: Not Found
* **‘500’**: Internal Server Error
* Content-Type: application/json
* Schema: any
**cURL Example:**
```bash
curl -X DELETE \
"https://your-tenant.aembit.io'/api/v2/access-policies/{id}'"
```
### PATCH ‘/api/v2/access-policies/{id}’
[Section titled “PATCH ‘/api/v2/access-policies/{id}’”](#patch-apiv2access-policiesid)
**Summary:** Patch an Access Policy
**Description:** Patch an Access Policy.
**Operation ID:** patch-access-policy-v2
**Parameters:**
* **id** (undefined) *(optional)*: any
**Request Body:** PatchPolicyV2DTO
* Content-Type: application/json
* Schema: any
**Responses:**
* **‘200’**: Patched Access Policy
* Content-Type: application/json
* Schema: any
* **‘400’**: Bad Request
* **‘401’**: Not Authenticated
* **‘500’**: Internal Server Error
* Content-Type: application/json
* Schema: any
**cURL Example:**
```bash
curl -X PATCH \
-H "Content-Type: application/json" \
-d '{"example": "data"}' \
"https://your-tenant.aembit.io'/api/v2/access-policies/{id}'"
```
### GET ‘/api/v2/access-policies/getByWorkloadIds/{clientWorkloadId}/{serverWorkloadId}’
[Section titled “GET ‘/api/v2/access-policies/getByWorkloadIds/{clientWorkloadId}/{serverWorkloadId}’”](#get-apiv2access-policiesgetbyworkloadidsclientworkloadidserverworkloadid)
**Summary:** Get the identified Access Policy
**Description:** Get the Access Policy identified by a Client and Server Workload.
**Operation ID:** get-access-policy-by-workloads-v2
**Parameters:**
* **clientWorkloadId** (undefined) *(optional)*: any
* **serverWorkloadId** (undefined) *(optional)*: any
**Responses:**
* **‘200’**: Access Policy
* Content-Type: application/json
* Schema: any
* **‘400’**: Bad Request
* **‘401’**: Not Authenticated
* **‘500’**: Internal Server Error
* Content-Type: application/json
* Schema: any
**cURL Example:**
```bash
curl -X GET \
"https://your-tenant.aembit.io'/api/v2/access-policies/getByWorkloadIds/{clientWorkloadId}/{serverWorkloadId}'"
```
### GET /api/v2/access-policies
[Section titled “GET /api/v2/access-policies”](#get-apiv2access-policies)
**Summary:** Get a page of Access Policies
**Description:** Retrieve a page of Access Policies.
**Operation ID:** get-access-policies-v2
**Parameters:**
* **page** (undefined) *(optional)*: any
* **per-page** (undefined) *(optional)*: any
* **filter** (undefined) *(optional)*: any
* **order** (undefined) *(optional)*: any
* **group-by** (undefined) *(optional)*: any
**Responses:**
* **‘200’**: Page of Access Policies
* Content-Type: application/json
* Schema: any
* **‘400’**: Bad Request
* **‘401’**: Not Authenticated
* **‘500’**: Internal Server Error
* Content-Type: application/json
* Schema: any
**cURL Example:**
```bash
curl -X GET \
"https://your-tenant.aembit.io/api/v2/access-policies"
```
### POST /api/v2/access-policies
[Section titled “POST /api/v2/access-policies”](#post-apiv2access-policies)
**Summary:** Create an Access Policy
**Description:** Create an Access Policy.
**Operation ID:** post-access-policy-v2
**Request Body:** CreatePolicyDTO
* Content-Type: application/json
* Schema: any
**Responses:**
* **‘200’**: Created Access Policy
* Content-Type: application/json
* Schema: any
* **‘400’**: Bad Request
* **‘401’**: Not Authenticated
* **‘500’**: Internal Server Error
* Content-Type: application/json
* Schema: any
**cURL Example:**
```bash
curl -X POST \
-H "Content-Type: application/json" \
-d '{"example": "data"}' \
"https://your-tenant.aembit.io/api/v2/access-policies"
```
### PUT /api/v2/access-policies
[Section titled “PUT /api/v2/access-policies”](#put-apiv2access-policies)
**Summary:** Update an Access Policy
**Description:** Update an Access Policy.
**Operation ID:** put-access-policy-v2
**Request Body:** CreatePolicyDTO
* Content-Type: application/json
* Schema: any
**Responses:**
* **‘200’**: Updated Access Policy
* Content-Type: application/json
* Schema: any
* **‘400’**: Bad Request
* **‘401’**: Not Authenticated
* **‘500’**: Internal Server Error
* Content-Type: application/json
* Schema: any
**cURL Example:**
```bash
curl -X PUT \
-H "Content-Type: application/json" \
-d '{"example": "data"}' \
"https://your-tenant.aembit.io/api/v2/access-policies"
```
### POST ‘/api/v2/access-policies/{id}/notes’
[Section titled “POST ‘/api/v2/access-policies/{id}/notes’”](#post-apiv2access-policiesidnotes)
**Summary:** Add a note to an Access Policy
**Description:** Add a note to an Access Policy.
**Operation ID:** post-access-policy-note-v2
**Parameters:**
* **id** (undefined) *(optional)*: any
**Request Body:** PolicyNoteDTO
* Content-Type: application/json
* Schema: any
**Responses:**
* **‘201’**: Note added to an Access Policy
* **‘400’**: Bad Request
* **‘401’**: Not Authenticated
* **‘500’**: Internal Server Error
* Content-Type: application/json
* Schema: any
**cURL Example:**
```bash
curl -X POST \
-H "Content-Type: application/json" \
-d '{"example": "data"}' \
"https://your-tenant.aembit.io'/api/v2/access-policies/{id}/notes'"
```
### GET ‘/api/v2/access-policies/{id}/notes’
[Section titled “GET ‘/api/v2/access-policies/{id}/notes’”](#get-apiv2access-policiesidnotes)
**Summary:** Gets a notes of Access Policy
**Description:** Retrieves notes of Access Policy.
**Operation ID:** get-access-policy-notes-v2
**Parameters:**
* **id** (undefined) *(optional)*: any
**Responses:**
* **‘200’**: Page of Access Policy Notes
* Content-Type: application/json
* Schema: any
* **‘400’**: Bad Request
* **‘401’**: Not Authenticated
* **‘500’**: Internal Server Error
* Content-Type: application/json
* Schema: any
**cURL Example:**
```bash
curl -X GET \
"https://your-tenant.aembit.io'/api/v2/access-policies/{id}/notes'"
```
### GET ‘/api/v2/access-policies/{id}/credential-mappings’
[Section titled “GET ‘/api/v2/access-policies/{id}/credential-mappings’”](#get-apiv2access-policiesidcredential-mappings)
**Summary:** Gets a credential mappings of Access Policy
**Description:** Retrieves credential mappings of Access Policy.
**Operation ID:** get-access-policy-credential-mappings-v2
**Parameters:**
* **id** (undefined) *(optional)*: any
**Responses:**
* **‘200’**: Page of Credential Mappings
* Content-Type: application/json
* Schema: any
* **‘400’**: Bad Request
* **‘401’**: Not Authenticated
* **‘500’**: Internal Server Error
* Content-Type: application/json
* Schema: any
**cURL Example:**
```bash
curl -X GET \
"https://your-tenant.aembit.io'/api/v2/access-policies/{id}/credential-mappings'"
```
## Agent Controller
[Section titled “Agent Controller”](#agent-controller)
### GET /api/v1/agent-controllers
[Section titled “GET /api/v1/agent-controllers”](#get-apiv1agent-controllers)
**Summary:** Get a page of Agent Controllers
**Description:** Get a page of Agent Controllers.
**Operation ID:** get-agent-controllers
**Parameters:**
* **page** (undefined) *(optional)*: any
* **per-page** (undefined) *(optional)*: any
* **filter** (undefined) *(optional)*: any
* **order** (undefined) *(optional)*: any
* **group-by** (undefined) *(optional)*: any
* **check-tls-type** (undefined) *(optional)*: any
**Responses:**
* **‘200’**: Page of Agent Controllers
* Content-Type: application/json
* Schema: any
* **‘400’**: Bad Request
* **‘401’**: Not Authenticated
* **‘500’**: Internal Server Error
* Content-Type: application/json
* Schema: any
**cURL Example:**
```bash
curl -X GET \
"https://your-tenant.aembit.io/api/v1/agent-controllers"
```
### POST /api/v1/agent-controllers
[Section titled “POST /api/v1/agent-controllers”](#post-apiv1agent-controllers)
**Summary:** Create an Agent Controller
**Description:** Create an Agent Controller.
**Operation ID:** post-agent-controller
**Request Body:** AgentControllerDTO
* Content-Type: application/json
* Schema: any
**Responses:**
* **‘201’**: Created Agent Controller
* Content-Type: application/json
* Schema: any
* **‘400’**: Bad Request
* **‘401’**: Not Authenticated
* **‘500’**: Internal Server Error
* Content-Type: application/json
* Schema: any
**cURL Example:**
```bash
curl -X POST \
-H "Content-Type: application/json" \
-d '{"example": "data"}' \
"https://your-tenant.aembit.io/api/v1/agent-controllers"
```
### PUT /api/v1/agent-controllers
[Section titled “PUT /api/v1/agent-controllers”](#put-apiv1agent-controllers)
**Summary:** Update an Agent Controller
**Description:** Update an Agent Controller.
**Operation ID:** put-agent-controller
**Request Body:** AgentControllerDTO
* Content-Type: application/json
* Schema: any
**Responses:**
* **‘200’**: Updated Agent Controller
* Content-Type: application/json
* Schema: any
* **‘400’**: Bad Request
* **‘401’**: Not Authenticated
* **‘500’**: Internal Server Error
* Content-Type: application/json
* Schema: any
**cURL Example:**
```bash
curl -X PUT \
-H "Content-Type: application/json" \
-d '{"example": "data"}' \
"https://your-tenant.aembit.io/api/v1/agent-controllers"
```
### GET ‘/api/v1/agent-controllers/{id}’
[Section titled “GET ‘/api/v1/agent-controllers/{id}’”](#get-apiv1agent-controllersid)
**Summary:** Get an Agent Controller
**Description:** Get an Agent Controller identified by its ID.
**Operation ID:** get-agent-controller
**Parameters:**
* **id** (undefined) *(optional)*: any
**Responses:**
* **‘200’**: Agent Controller
* Content-Type: application/json
* Schema: any
* **‘204’**: Agent Controller Not Found
* **‘400’**: Bad Request
* **‘401’**: Not Authenticated
* **‘500’**: Internal Server Error
* Content-Type: application/json
* Schema: any
**cURL Example:**
```bash
curl -X GET \
"https://your-tenant.aembit.io'/api/v1/agent-controllers/{id}'"
```
### PATCH ‘/api/v1/agent-controllers/{id}’
[Section titled “PATCH ‘/api/v1/agent-controllers/{id}’”](#patch-apiv1agent-controllersid)
**Summary:** Patch an Agent Controller
**Description:** Patch an Agent Controller identified by its ID.
**Operation ID:** patch-agent-controller
**Parameters:**
* **id** (undefined) *(optional)*: any
**Request Body:** AgentControllerPatchDTO
* Content-Type: application/json
* Schema: any
**Responses:**
* **‘200’**: Patched Agent Controller
* Content-Type: application/json
* Schema: any
* **‘400’**: Bad Request
* **‘401’**: Not Authenticated
* **‘500’**: Internal Server Error
* Content-Type: application/json
* Schema: any
**cURL Example:**
```bash
curl -X PATCH \
-H "Content-Type: application/json" \
-d '{"example": "data"}' \
"https://your-tenant.aembit.io'/api/v1/agent-controllers/{id}'"
```
### DELETE ‘/api/v1/agent-controllers/{id}’
[Section titled “DELETE ‘/api/v1/agent-controllers/{id}’”](#delete-apiv1agent-controllersid)
**Summary:** Delete an Agent Controller
**Description:** Delete an Agent Controller identified by its ID.
**Operation ID:** delete-agent-controller
**Parameters:**
* **id** (undefined) *(optional)*: any
**Responses:**
* **‘201’**: Successfully deleted Agent Controller
* **‘400’**: Bad Request
* **‘401’**: Not Authenticated
* **‘500’**: Internal Server Error
* Content-Type: application/json
* Schema: any
**cURL Example:**
```bash
curl -X DELETE \
"https://your-tenant.aembit.io'/api/v1/agent-controllers/{id}'"
```
### POST ‘/api/v1/agent-controllers/{agentControllerExternalId}/device-code’
[Section titled “POST ‘/api/v1/agent-controllers/{agentControllerExternalId}/device-code’”](#post-apiv1agent-controllersagentcontrollerexternaliddevice-code)
**Summary:** Generate a Device Code for an Agent Controller
**Description:** Generate a Device Code for an Agent Controller.
**Operation ID:** post-agent-controller-device-code
**Parameters:**
* **agentControllerExternalId** (undefined) *(optional)*: any
**Responses:**
* **‘201’**: Agent Controller Device Code
* Content-Type: application/json
* Schema: any
* **‘400’**: Bad Request
* **‘401’**: Not Authenticated
* **‘500’**: Internal Server Error
* Content-Type: application/json
* Schema: any
**cURL Example:**
```bash
curl -X POST \
"https://your-tenant.aembit.io'/api/v1/agent-controllers/{agentControllerExternalId}/device-code'"
```
## Audit Log
[Section titled “Audit Log”](#audit-log)
### GET /api/v1/audit-logs
[Section titled “GET /api/v1/audit-logs”](#get-apiv1audit-logs)
**Summary:** Get a page of Audit Log events
**Description:** Get a page of Audit Log events.
**Operation ID:** get-audit-logs
**Parameters:**
* **X-Aembit-ResourceSet** (undefined) *(optional)*: any
* **page** (undefined) *(optional)*: any
* **per-page** (undefined) *(optional)*: any
* **order** (undefined) *(optional)*: any
* **search** (undefined) *(optional)*: any
* **span-last-days** (undefined) *(optional)*: any
* **category** (undefined) *(optional)*: any
* **severity** (undefined) *(optional)*: any
**Responses:**
* **‘200’**: Page of Audit Logs
* Content-Type: application/json
* Schema: any
* **‘400’**: Bad Request
* **‘401’**: Not Authenticated
* **‘500’**: Internal Server Error
* Content-Type: application/json
* Schema: any
**cURL Example:**
```bash
curl -X GET \
"https://your-tenant.aembit.io/api/v1/audit-logs"
```
### GET ‘/api/v1/audit-logs/{id}’
[Section titled “GET ‘/api/v1/audit-logs/{id}’”](#get-apiv1audit-logsid)
**Summary:** Get an Audit Log event
**Description:** Get an Audit Log event identified by its ID.
**Operation ID:** get-audit-log
**Parameters:**
* **id** (undefined) *(optional)*: any
* **X-Aembit-ResourceSet** (undefined) *(optional)*: any
**Responses:**
* **‘200’**: Audit Log
* Content-Type: application/json
* Schema: any
* **‘400’**: Bad Request
* **‘401’**: Not Authenticated
* **‘500’**: Internal Server Error
* Content-Type: application/json
* Schema: any
**cURL Example:**
```bash
curl -X GET \
"https://your-tenant.aembit.io'/api/v1/audit-logs/{id}'"
```
## Access Authorization Event
[Section titled “Access Authorization Event”](#access-authorization-event)
### GET /api/v1/authorization-events
[Section titled “GET /api/v1/authorization-events”](#get-apiv1authorization-events)
**Summary:** Get a page of Access Authorization Events
**Description:** Get a page of Access Authorization Events.
**Operation ID:** get-access-authorization-events
**Parameters:**
* **X-Aembit-ResourceSet** (undefined) *(optional)*: any
* **page** (undefined) *(optional)*: any
* **per-page** (undefined) *(optional)*: any
* **order** (undefined) *(optional)*: any
* **search** (undefined) *(optional)*: any
* **span-last-hours** (undefined) *(optional)*: any
* **severity** (undefined) *(optional)*: any
* **event-type** (undefined) *(optional)*: any
**Responses:**
* **‘200’**: Page of Access Authorization Events
* Content-Type: application/json
* Schema: any
* **‘400’**: Bad Request
* **‘401’**: Not Authenticated
* **‘500’**: Internal Server Error
* Content-Type: application/json
* Schema: any
**cURL Example:**
```bash
curl -X GET \
"https://your-tenant.aembit.io/api/v1/authorization-events"
```
### GET ‘/api/v1/authorization-events/{id}’
[Section titled “GET ‘/api/v1/authorization-events/{id}’”](#get-apiv1authorization-eventsid)
**Summary:** Get an Access Authorization Event
**Description:** Get an Access Authorization Event identified by its ID.
**Operation ID:** get-access-authorization-event
**Parameters:**
* **id** (undefined) *(optional)*: any
* **X-Aembit-ResourceSet** (undefined) *(optional)*: any
**Responses:**
* **‘200’**: Access Authorization Event
* Content-Type: application/json
* Schema: any
* **‘400’**: Bad Request
* **‘401’**: Not Authenticated
* **‘500’**: Internal Server Error
* Content-Type: application/json
* Schema: any
**cURL Example:**
```bash
curl -X GET \
"https://your-tenant.aembit.io'/api/v1/authorization-events/{id}'"
```
## Credential Provider (Deprecated)
[Section titled “Credential Provider (Deprecated)”](#credential-provider-deprecated)
### GET ‘/api/v1/credential-providers/{id}’
[Section titled “GET ‘/api/v1/credential-providers/{id}’”](#get-apiv1credential-providersid)
**Summary:** Get a Credential Provider
**Description:** Get a Credential Provider identified by its ID.
**Operation ID:** get-credential-provider
**Parameters:**
* **id** (undefined) *(optional)*: any
* **X-Aembit-ResourceSet** (undefined) *(optional)*: any
**Responses:**
* **‘200’**: Credential Provider
* Content-Type: application/json
* Schema: any
* **‘204’**: Credential Provider Not Found
* **‘400’**: Bad Request
* **‘401’**: Not Authenticated
* **‘500’**: Internal Server Error
* Content-Type: application/json
* Schema: any
**cURL Example:**
```bash
curl -X GET \
"https://your-tenant.aembit.io'/api/v1/credential-providers/{id}'"
```
### DELETE ‘/api/v1/credential-providers/{id}’
[Section titled “DELETE ‘/api/v1/credential-providers/{id}’”](#delete-apiv1credential-providersid)
**Summary:** Delete a Credential Provider
**Description:** Delete a Credential Provider identified by its ID.
**Operation ID:** delete-credential-provider
**Parameters:**
* **id** (undefined) *(optional)*: any
* **X-Aembit-ResourceSet** (undefined) *(optional)*: any
**Responses:**
* **‘204’**: Deleted Credential Provider
* **‘400’**: Bad Request
* **‘401’**: Not Authenticated
* **‘500’**: Internal Server Error
* Content-Type: application/json
* Schema: any
**cURL Example:**
```bash
curl -X DELETE \
"https://your-tenant.aembit.io'/api/v1/credential-providers/{id}'"
```
### PATCH ‘/api/v1/credential-providers/{id}’
[Section titled “PATCH ‘/api/v1/credential-providers/{id}’”](#patch-apiv1credential-providersid)
**Summary:** Patch a Credential Provider
**Description:** Patch a Credential Provider.
**Operation ID:** patch-credential-provider
**Parameters:**
* **id** (undefined) *(optional)*: any
* **X-Aembit-ResourceSet** (undefined) *(optional)*: any
**Request Body:** CredentialProviderPatchDTO
* Content-Type: application/json
* Schema: any
**Responses:**
* **‘201’**: Patched Credential Provider
* Content-Type: application/json
* Schema: any
* **‘400’**: Bad Request
* **‘401’**: Not Authenticated
* **‘500’**: Internal Server Error
* Content-Type: application/json
* Schema: any
**cURL Example:**
```bash
curl -X PATCH \
-H "Content-Type: application/json" \
-d '{"example": "data"}' \
"https://your-tenant.aembit.io'/api/v1/credential-providers/{id}'"
```
### GET ‘/api/v1/credential-providers/{id}/authorize’
[Section titled “GET ‘/api/v1/credential-providers/{id}/authorize’”](#get-apiv1credential-providersidauthorize)
**Summary:** Get a Credential Provider Authorization URL
**Description:** Get a Credential Provider Authorization URL identified by the Credential Provider ID.
**Operation ID:** get-credential-provider-authorization
**Parameters:**
* **id** (undefined) *(optional)*: any
* **X-Aembit-ResourceSet** (undefined) *(optional)*: any
**Responses:**
* **‘302’**: Redirects to the Credential Provider Authorization URL
* **‘400’**: Bad Request
* **‘401’**: Not Authenticated
* **‘500’**: Internal Server Error
* Content-Type: application/json
* Schema: any
**cURL Example:**
```bash
curl -X GET \
"https://your-tenant.aembit.io'/api/v1/credential-providers/{id}/authorize'"
```
### GET /api/v1/credential-providers
[Section titled “GET /api/v1/credential-providers”](#get-apiv1credential-providers)
**Summary:** Get a page of Credential Providers
**Description:** Get a page of Credential Providers.
**Operation ID:** get-credential-providers
**Parameters:**
* **X-Aembit-ResourceSet** (undefined) *(optional)*: any
* **page** (undefined) *(optional)*: any
* **per-page** (undefined) *(optional)*: any
* **filter** (undefined) *(optional)*: any
* **order** (undefined) *(optional)*: any
* **group-by** (undefined) *(optional)*: any
**Responses:**
* **‘200’**: Page of Credential Providers
* Content-Type: application/json
* Schema: any
* **‘400’**: Bad Request
* **‘401’**: Not Authenticated
* **‘500’**: Internal Server Error
* Content-Type: application/json
* Schema: any
**cURL Example:**
```bash
curl -X GET \
"https://your-tenant.aembit.io/api/v1/credential-providers"
```
### POST /api/v1/credential-providers
[Section titled “POST /api/v1/credential-providers”](#post-apiv1credential-providers)
**Summary:** Create a Credential Provider
**Description:** Create a Credential Provider.
**Operation ID:** post-credential-provider
**Parameters:**
* **X-Aembit-ResourceSet** (undefined) *(optional)*: any
**Request Body:** CredentialProviderDTO
* Content-Type: application/json
* Schema: any
**Responses:**
* **‘201’**: Created Credential Provider
* Content-Type: application/json
* Schema: any
* **‘400’**: Bad Request
* **‘401’**: Not Authenticated
* **‘500’**: Internal Server Error
* Content-Type: application/json
* Schema: any
**cURL Example:**
```bash
curl -X POST \
-H "Content-Type: application/json" \
-d '{"example": "data"}' \
"https://your-tenant.aembit.io/api/v1/credential-providers"
```
### PUT /api/v1/credential-providers
[Section titled “PUT /api/v1/credential-providers”](#put-apiv1credential-providers)
**Summary:** Update a Credential Provider
**Description:** Update a Credential Provider.
**Operation ID:** put-credential-provider
**Parameters:**
* **X-Aembit-ResourceSet** (undefined) *(optional)*: any
**Request Body:** CredentialProviderDTO
* Content-Type: application/json
* Schema: any
**Responses:**
* **‘201’**: Updated Credential Provider
* Content-Type: application/json
* Schema: any
* **‘400’**: Bad Request
* **‘401’**: Not Authenticated
* **‘500’**: Internal Server Error
* Content-Type: application/json
* Schema: any
**cURL Example:**
```bash
curl -X PUT \
-H "Content-Type: application/json" \
-d '{"example": "data"}' \
"https://your-tenant.aembit.io/api/v1/credential-providers"
```
### GET ‘/api/v1/credential-providers/{id}/verification’
[Section titled “GET ‘/api/v1/credential-providers/{id}/verification’”](#get-apiv1credential-providersidverification)
**Summary:** Verify the Credential Provider
**Description:** Verify the Credential Provider will successfully return a credential.
**Operation ID:** get-credential-provider-verification
**Parameters:**
* **id** (undefined) *(optional)*: any
* **X-Aembit-ResourceSet** (undefined) *(optional)*: any
**Responses:**
* **‘200’**: Details on the verification of a Credential Provider
* Content-Type: application/json
* Schema: any
* **‘400’**: Bad Request
* **‘401’**: Not Authenticated
* **‘500’**: Internal Server Error
* Content-Type: application/json
* Schema: any
**cURL Example:**
```bash
curl -X GET \
"https://your-tenant.aembit.io'/api/v1/credential-providers/{id}/verification'"
```
## Credential Provider Integration
[Section titled “Credential Provider Integration”](#credential-provider-integration)
### GET ‘/api/v1/credential-integrations/{id}’
[Section titled “GET ‘/api/v1/credential-integrations/{id}’”](#get-apiv1credential-integrationsid)
**Summary:** Get a Credential Provider Integration
**Description:** Get a Credential Provider Integration identified by its ID.
**Operation ID:** get-credential-provider-integration
**Parameters:**
* **id** (undefined) *(optional)*: any
**Responses:**
* **‘200’**: Credential Provider Integration
* Content-Type: application/json
* Schema: any
* **‘400’**: Bad Request
* **‘401’**: Not Authenticated
* **‘500’**: Internal Server Error
* Content-Type: application/json
* Schema: any
**cURL Example:**
```bash
curl -X GET \
"https://your-tenant.aembit.io'/api/v1/credential-integrations/{id}'"
```
### DELETE ‘/api/v1/credential-integrations/{id}’
[Section titled “DELETE ‘/api/v1/credential-integrations/{id}’”](#delete-apiv1credential-integrationsid)
**Summary:** Delete a Credential Provider Integration
**Description:** Delete a Credential Provider Integration identified by its ID.
**Operation ID:** delete-credential-provider-integration
**Parameters:**
* **id** (undefined) *(optional)*: any
**Responses:**
* **‘204’**: Successfully deleted Credential Provider Integration
* **‘400’**: Bad Request
* **‘401’**: Not Authenticated
* **‘404’**: Not Found
* **‘500’**: Internal Server Error
* Content-Type: application/json
* Schema: any
**cURL Example:**
```bash
curl -X DELETE \
"https://your-tenant.aembit.io'/api/v1/credential-integrations/{id}'"
```
### PATCH ‘/api/v1/credential-integrations/{id}’
[Section titled “PATCH ‘/api/v1/credential-integrations/{id}’”](#patch-apiv1credential-integrationsid)
**Summary:** Patch a Credential Provider Integration
**Description:** Patch a Credential Provider Integration identified by its ID.
**Operation ID:** patch-credential-provider-integration
**Parameters:**
* **id** (undefined) *(optional)*: any
**Request Body:** CredentialProviderIntegrationPatchDTO
* Content-Type: application/json
* Schema: any
**Responses:**
* **‘200’**: Patched Credential Provider Integration
* Content-Type: application/json
* Schema: any
* **‘400’**: Bad Request
* **‘401’**: Not Authenticated
* **‘500’**: Internal Server Error
* Content-Type: application/json
* Schema: any
**cURL Example:**
```bash
curl -X PATCH \
-H "Content-Type: application/json" \
-d '{"example": "data"}' \
"https://your-tenant.aembit.io'/api/v1/credential-integrations/{id}'"
```
### GET /api/v1/credential-integrations
[Section titled “GET /api/v1/credential-integrations”](#get-apiv1credential-integrations)
**Summary:** Get a page of Credential Provider Integrations
**Description:** Get a page of Credential Provider Integrations.
**Operation ID:** get-credential-provider-integrations
**Parameters:**
* **page** (undefined) *(optional)*: any
* **per-page** (undefined) *(optional)*: any
* **filter** (undefined) *(optional)*: any
* **order** (undefined) *(optional)*: any
* **group-by** (undefined) *(optional)*: any
**Responses:**
* **‘200’**: Page of Credential Provider Integrations
* Content-Type: application/json
* Schema: any
* **‘400’**: Bad Request
* **‘401’**: Not Authenticated
* **‘500’**: Internal Server Error
* Content-Type: application/json
* Schema: any
**cURL Example:**
```bash
curl -X GET \
"https://your-tenant.aembit.io/api/v1/credential-integrations"
```
### POST /api/v1/credential-integrations
[Section titled “POST /api/v1/credential-integrations”](#post-apiv1credential-integrations)
**Summary:** Create a Credential Provider Integration
**Description:** Create a Credential Provider Integration.
**Operation ID:** post-credential-provider-integration
**Request Body:** CredentialProviderIntegrationDTO
* Content-Type: application/json
* Schema: any
**Responses:**
* **‘201’**: Created Credential Provider Integration
* Content-Type: application/json
* Schema: any
* **‘400’**: Bad Request
* **‘401’**: Not Authenticated
* **‘500’**: Internal Server Error
* Content-Type: application/json
* Schema: any
**cURL Example:**
```bash
curl -X POST \
-H "Content-Type: application/json" \
-d '{"example": "data"}' \
"https://your-tenant.aembit.io/api/v1/credential-integrations"
```
### PUT /api/v1/credential-integrations
[Section titled “PUT /api/v1/credential-integrations”](#put-apiv1credential-integrations)
**Summary:** Update a Credential Provider Integration
**Description:** Update a Credential Provider Integration.
**Operation ID:** put-credential-provider-integration
**Request Body:** CredentialProviderIntegrationDTO
* Content-Type: application/json
* Schema: any
**Responses:**
* **‘200’**: Updated Credential Provider Integration
* Content-Type: application/json
* Schema: any
* **‘400’**: Bad Request
* **‘401’**: Not Authenticated
* **‘404’**: Not Found
* **‘500’**: Internal Server Error
* Content-Type: application/json
* Schema: any
**cURL Example:**
```bash
curl -X PUT \
-H "Content-Type: application/json" \
-d '{"example": "data"}' \
"https://your-tenant.aembit.io/api/v1/credential-integrations"
```
## Credential Provider v2
[Section titled “Credential Provider v2”](#credential-provider-v2)
### POST /api/v2/credential-providers
[Section titled “POST /api/v2/credential-providers”](#post-apiv2credential-providers)
**Summary:** Create a Credential Provider
**Description:** Create a Credential Provider.
**Operation ID:** post-credential-provider2
**Parameters:**
* **X-Aembit-ResourceSet** (undefined) *(optional)*: any
**Request Body:** CredentialProviderV2DTO
* Content-Type: application/json
* Schema: any
**Responses:**
* **‘201’**: Created Credential Provider
* Content-Type: application/json
* Schema: any
* **‘400’**: Bad Request
* **‘401’**: Not Authenticated
* **‘500’**: Internal Server Error
* Content-Type: application/json
* Schema: any
**cURL Example:**
```bash
curl -X POST \
-H "Content-Type: application/json" \
-d '{"example": "data"}' \
"https://your-tenant.aembit.io/api/v2/credential-providers"
```
### PUT /api/v2/credential-providers
[Section titled “PUT /api/v2/credential-providers”](#put-apiv2credential-providers)
**Summary:** Update a Credential Provider
**Description:** Update a Credential Provider.
**Operation ID:** put-credential-provider2
**Parameters:**
* **X-Aembit-ResourceSet** (undefined) *(optional)*: any
**Request Body:** CredentialProviderV2DTO
* Content-Type: application/json
* Schema: any
**Responses:**
* **‘200’**: Updated Credential Provider
* Content-Type: application/json
* Schema: any
* **‘400’**: Bad Request
* **‘401’**: Not Authenticated
* **‘500’**: Internal Server Error
* Content-Type: application/json
* Schema: any
**cURL Example:**
```bash
curl -X PUT \
-H "Content-Type: application/json" \
-d '{"example": "data"}' \
"https://your-tenant.aembit.io/api/v2/credential-providers"
```
### GET /api/v2/credential-providers
[Section titled “GET /api/v2/credential-providers”](#get-apiv2credential-providers)
**Summary:** Get a page of Credential Providers
**Description:** Get a page of Credential Providers.
**Operation ID:** get-credential-providers-v2
**Parameters:**
* **X-Aembit-ResourceSet** (undefined) *(optional)*: any
* **page** (undefined) *(optional)*: any
* **per-page** (undefined) *(optional)*: any
* **filter** (undefined) *(optional)*: any
* **order** (undefined) *(optional)*: any
* **group-by** (undefined) *(optional)*: any
**Responses:**
* **‘200’**: Page of Credential Providers
* Content-Type: application/json
* Schema: any
* **‘400’**: Bad Request
* **‘401’**: Not Authenticated
* **‘500’**: Internal Server Error
* Content-Type: application/json
* Schema: any
**cURL Example:**
```bash
curl -X GET \
"https://your-tenant.aembit.io/api/v2/credential-providers"
```
### GET ‘/api/v2/credential-providers/{id}’
[Section titled “GET ‘/api/v2/credential-providers/{id}’”](#get-apiv2credential-providersid)
**Summary:** Get a Credential Provider
**Description:** Get a Credential Provider identified by its ID.
**Operation ID:** get-credential-provider2
**Parameters:**
* **id** (undefined) *(optional)*: any
* **X-Aembit-ResourceSet** (undefined) *(optional)*: any
**Responses:**
* **‘200’**: Credential Provider
* Content-Type: application/json
* Schema: any
* **‘204’**: Credential Provider Not Found
* **‘400’**: Bad Request
* **‘401’**: Not Authenticated
* **‘500’**: Internal Server Error
* Content-Type: application/json
* Schema: any
**cURL Example:**
```bash
curl -X GET \
"https://your-tenant.aembit.io'/api/v2/credential-providers/{id}'"
```
### DELETE ‘/api/v2/credential-providers/{id}’
[Section titled “DELETE ‘/api/v2/credential-providers/{id}’”](#delete-apiv2credential-providersid)
**Summary:** Delete a Credential Provider
**Description:** Delete a Credential Provider identified by its ID.
**Operation ID:** delete-credential-provider2
**Parameters:**
* **id** (undefined) *(optional)*: any
* **X-Aembit-ResourceSet** (undefined) *(optional)*: any
**Responses:**
* **‘204’**: Deleted Credential Provider
* **‘400’**: Bad Request
* **‘401’**: Not Authenticated
* **‘404’**: Not Found
* **‘500’**: Internal Server Error
* Content-Type: application/json
* Schema: any
**cURL Example:**
```bash
curl -X DELETE \
"https://your-tenant.aembit.io'/api/v2/credential-providers/{id}'"
```
### PATCH ‘/api/v2/credential-providers/{id}’
[Section titled “PATCH ‘/api/v2/credential-providers/{id}’”](#patch-apiv2credential-providersid)
**Summary:** Patch a Credential Provider
**Description:** Patch a Credential Provider.
**Operation ID:** patch-credential-provider-v2
**Parameters:**
* **id** (undefined) *(optional)*: any
* **X-Aembit-ResourceSet** (undefined) *(optional)*: any
**Request Body:** CredentialProviderPatchDTO
* Content-Type: application/json
* Schema: any
**Responses:**
* **‘200’**: Patched Credential Provider
* Content-Type: application/json
* Schema: any
* **‘400’**: Bad Request
* **‘401’**: Not Authenticated
* **‘500’**: Internal Server Error
* Content-Type: application/json
* Schema: any
**cURL Example:**
```bash
curl -X PATCH \
-H "Content-Type: application/json" \
-d '{"example": "data"}' \
"https://your-tenant.aembit.io'/api/v2/credential-providers/{id}'"
```
### GET ‘/api/v2/credential-providers/{id}/verification’
[Section titled “GET ‘/api/v2/credential-providers/{id}/verification’”](#get-apiv2credential-providersidverification)
**Summary:** Verify the Credential Provider
**Description:** Verify the Credential Provider will successfully return a credential.
**Operation ID:** get-credential-provider-verification-v2
**Parameters:**
* **id** (undefined) *(optional)*: any
* **X-Aembit-ResourceSet** (undefined) *(optional)*: any
**Responses:**
* **‘200’**: Details on the verification of a Credential Provider
* Content-Type: application/json
* Schema: any
* **‘400’**: Bad Request
* **‘401’**: Not Authenticated
* **‘500’**: Internal Server Error
* Content-Type: application/json
* Schema: any
**cURL Example:**
```bash
curl -X GET \
"https://your-tenant.aembit.io'/api/v2/credential-providers/{id}/verification'"
```
### GET ‘/api/v2/credential-providers/{id}/authorize’
[Section titled “GET ‘/api/v2/credential-providers/{id}/authorize’”](#get-apiv2credential-providersidauthorize)
**Summary:** Get a Credential Provider Authorization URL
**Description:** Get a Credential Provider Authorization URL identified by the Credential Provider ID.
**Operation ID:** get-credential-provider-authorization-v2
**Parameters:**
* **id** (undefined) *(optional)*: any
* **X-Aembit-ResourceSet** (undefined) *(optional)*: any
**Responses:**
* **‘302’**: Redirects to the Credential Provider Authorization URL
* **‘400’**: Bad Request
* **‘401’**: Not Authenticated
* **‘500’**: Internal Server Error
* Content-Type: application/json
* Schema: any
**cURL Example:**
```bash
curl -X GET \
"https://your-tenant.aembit.io'/api/v2/credential-providers/{id}/authorize'"
```
## DiscoveryIntegration
[Section titled “DiscoveryIntegration”](#discoveryintegration)
### GET /api/v1/discovery-integrations
[Section titled “GET /api/v1/discovery-integrations”](#get-apiv1discovery-integrations)
**Summary:** Get a page of Integrations
**Description:** Get a page of Integrations.
**Operation ID:** get-discovery-integrations
**Parameters:**
* **page** (undefined) *(optional)*: any
* **per-page** (undefined) *(optional)*: any
* **filter** (undefined) *(optional)*: any
* **order** (undefined) *(optional)*: any
**Responses:**
* **‘200’**: Page of Integrations
* Content-Type: application/json
* Schema: any
* **‘400’**: Bad Request
* **‘401’**: Not Authenticated
* **‘500’**: Internal Server Error
* Content-Type: application/json
* Schema: any
**cURL Example:**
```bash
curl -X GET \
"https://your-tenant.aembit.io/api/v1/discovery-integrations"
```
### POST /api/v1/discovery-integrations
[Section titled “POST /api/v1/discovery-integrations”](#post-apiv1discovery-integrations)
**Summary:** Create an Integration
**Description:** Create an Integration.
**Operation ID:** post-discovery-integration
**Request Body:** DiscoveryIntegrationDTO
* Content-Type: application/json
* Schema: any
**Responses:**
* **‘201’**: Created Integration
* Content-Type: application/json
* Schema: any
* **‘400’**: Bad Request
* **‘401’**: Not Authenticated
* **‘500’**: Internal Server Error
* Content-Type: application/json
* Schema: any
**cURL Example:**
```bash
curl -X POST \
-H "Content-Type: application/json" \
-d '{"example": "data"}' \
"https://your-tenant.aembit.io/api/v1/discovery-integrations"
```
### PUT /api/v1/discovery-integrations
[Section titled “PUT /api/v1/discovery-integrations”](#put-apiv1discovery-integrations)
**Summary:** Update an Integration
**Description:** Update an Integration.
**Operation ID:** put-discovery-integration
**Request Body:** DiscoveryIntegrationDTO
* Content-Type: application/json
* Schema: any
**Responses:**
* **‘200’**: Updated Integration
* Content-Type: application/json
* Schema: any
* **‘400’**: Bad Request
* **‘401’**: Not Authenticated
* **‘500’**: Internal Server Error
* Content-Type: application/json
* Schema: any
**cURL Example:**
```bash
curl -X PUT \
-H "Content-Type: application/json" \
-d '{"example": "data"}' \
"https://your-tenant.aembit.io/api/v1/discovery-integrations"
```
### GET ‘/api/v1/discovery-integrations/{id}’
[Section titled “GET ‘/api/v1/discovery-integrations/{id}’”](#get-apiv1discovery-integrationsid)
**Summary:** Get an Integration
**Description:** Get an Integration.
**Operation ID:** get-discovery-integration
**Parameters:**
* **id** (undefined) *(optional)*: any
**Responses:**
* **‘200’**: Integration
* Content-Type: application/json
* Schema: any
* **‘204’**: Integration Not Found
* **‘400’**: Bad Request
* **‘401’**: Not Authenticated
* **‘500’**: Internal Server Error
* Content-Type: application/json
* Schema: any
**cURL Example:**
```bash
curl -X GET \
"https://your-tenant.aembit.io'/api/v1/discovery-integrations/{id}'"
```
### DELETE ‘/api/v1/discovery-integrations/{id}’
[Section titled “DELETE ‘/api/v1/discovery-integrations/{id}’”](#delete-apiv1discovery-integrationsid)
**Summary:** Delete an Integration
**Description:** Delete an Integration as identified by its ID.
**Operation ID:** delete-discovery-integration
**Parameters:**
* **id** (undefined) *(optional)*: any
**Responses:**
* **‘200’**: Successfully deleted Integration
* **‘400’**: Bad Request
* **‘401’**: Not Authenticated
* **‘500’**: Internal Server Error
* Content-Type: application/json
* Schema: any
**cURL Example:**
```bash
curl -X DELETE \
"https://your-tenant.aembit.io'/api/v1/discovery-integrations/{id}'"
```
### PATCH ‘/api/v1/discovery-integrations/{id}’
[Section titled “PATCH ‘/api/v1/discovery-integrations/{id}’”](#patch-apiv1discovery-integrationsid)
**Summary:** Patch an Integration
**Description:** Patch an Integration as identified by its ID.
**Operation ID:** patch-discovery-integration
**Parameters:**
* **id** (undefined) *(optional)*: any
**Request Body:** DiscoveryIntegrationPatchDTO
* Content-Type: application/json
* Schema: any
**Responses:**
* **‘200’**: Patched Integration
* Content-Type: application/json
* Schema: any
* **‘400’**: Bad Request
* **‘401’**: Not Authenticated
* **‘500’**: Internal Server Error
* Content-Type: application/json
* Schema: any
**cURL Example:**
```bash
curl -X PATCH \
-H "Content-Type: application/json" \
-d '{"example": "data"}' \
"https://your-tenant.aembit.io'/api/v1/discovery-integrations/{id}'"
```
## Workload Event
[Section titled “Workload Event”](#workload-event)
### GET /api/v1/workload-events
[Section titled “GET /api/v1/workload-events”](#get-apiv1workload-events)
**Summary:** Get a page of Workload Events
**Description:** Get a page of Workload Events.
**Operation ID:** get-workload-events
**Parameters:**
* **X-Aembit-ResourceSet** (undefined) *(optional)*: any
* **page** (undefined) *(optional)*: any
* **per-page** (undefined) *(optional)*: any
* **order** (undefined) *(optional)*: any
* **search** (undefined) *(optional)*: any
* **span-last-hours** (undefined) *(optional)*: any
* **application-protocol** (undefined) *(optional)*: any
* **severity** (undefined) *(optional)*: any
* **source-workload** (undefined) *(optional)*: any
* **target-workload** (undefined) *(optional)*: any
**Responses:**
* **‘200’**: Page of Workload Events
* Content-Type: application/json
* Schema: any
* **‘400’**: Bad Request
* **‘401’**: Not Authenticated
* **‘500’**: Internal Server Error
* Content-Type: application/json
* Schema: any
**cURL Example:**
```bash
curl -X GET \
"https://your-tenant.aembit.io/api/v1/workload-events"
```
### GET ‘/api/v1/workload-events/{id}’
[Section titled “GET ‘/api/v1/workload-events/{id}’”](#get-apiv1workload-eventsid)
**Summary:** Get a Workload Event
**Description:** Get a Workload Event.
**Operation ID:** get-workload-event
**Parameters:**
* **id** (undefined) *(optional)*: any
* **X-Aembit-ResourceSet** (undefined) *(optional)*: any
**Responses:**
* **‘200’**: Workload Event
* Content-Type: application/json
* Schema: any
* **‘400’**: Bad Request
* **‘401’**: Not Authenticated
* **‘500’**: Internal Server Error
* Content-Type: application/json
* Schema: any
**cURL Example:**
```bash
curl -X GET \
"https://your-tenant.aembit.io'/api/v1/workload-events/{id}'"
```
## Health
[Section titled “Health”](#health)
### GET /api/v1/health
[Section titled “GET /api/v1/health”](#get-apiv1health)
**Summary:** Aembit Cloud API Health
**Description:** Get the health of the Aembit Cloud API.
**Operation ID:** get-health
**Responses:**
* **‘200’**: API Health
* Content-Type: application/json
* Schema: any
**cURL Example:**
```bash
curl -X GET \
"https://your-tenant.aembit.io/api/v1/health"
```
## Integration
[Section titled “Integration”](#integration)
### GET /api/v1/integrations
[Section titled “GET /api/v1/integrations”](#get-apiv1integrations)
**Summary:** Get a page of Integrations
**Description:** Get a page of Integrations.
**Operation ID:** get-integrations
**Parameters:**
* **X-Aembit-ResourceSet** (undefined) *(optional)*: any
* **page** (undefined) *(optional)*: any
* **per-page** (undefined) *(optional)*: any
* **filter** (undefined) *(optional)*: any
* **order** (undefined) *(optional)*: any
**Responses:**
* **‘200’**: Page of Integrations
* Content-Type: application/json
* Schema: any
* **‘400’**: Bad Request
* **‘401’**: Not Authenticated
* **‘500’**: Internal Server Error
* Content-Type: application/json
* Schema: any
**cURL Example:**
```bash
curl -X GET \
"https://your-tenant.aembit.io/api/v1/integrations"
```
### POST /api/v1/integrations
[Section titled “POST /api/v1/integrations”](#post-apiv1integrations)
**Summary:** Create an Integration
**Description:** Create an Integration.
**Operation ID:** post-integration
**Parameters:**
* **X-Aembit-ResourceSet** (undefined) *(optional)*: any
**Request Body:** IntegrationDTO
* Content-Type: application/json
* Schema: any
**Responses:**
* **‘201’**: Created Integration
* Content-Type: application/json
* Schema: any
* **‘400’**: Bad Request
* **‘401’**: Not Authenticated
* **‘500’**: Internal Server Error
* Content-Type: application/json
* Schema: any
**cURL Example:**
```bash
curl -X POST \
-H "Content-Type: application/json" \
-d '{"example": "data"}' \
"https://your-tenant.aembit.io/api/v1/integrations"
```
### PUT /api/v1/integrations
[Section titled “PUT /api/v1/integrations”](#put-apiv1integrations)
**Summary:** Update an Integration
**Description:** Update an Integration.
**Operation ID:** put-integration
**Parameters:**
* **X-Aembit-ResourceSet** (undefined) *(optional)*: any
**Request Body:** IntegrationDTO
* Content-Type: application/json
* Schema: any
**Responses:**
* **‘200’**: Updated Integration
* Content-Type: application/json
* Schema: any
* **‘400’**: Bad Request
* **‘401’**: Not Authenticated
* **‘500’**: Internal Server Error
* Content-Type: application/json
* Schema: any
**cURL Example:**
```bash
curl -X PUT \
-H "Content-Type: application/json" \
-d '{"example": "data"}' \
"https://your-tenant.aembit.io/api/v1/integrations"
```
### GET ‘/api/v1/integrations/{id}’
[Section titled “GET ‘/api/v1/integrations/{id}’”](#get-apiv1integrationsid)
**Summary:** Get an Integration
**Description:** Get an Integration.
**Operation ID:** get-integration
**Parameters:**
* **id** (undefined) *(optional)*: any
* **X-Aembit-ResourceSet** (undefined) *(optional)*: any
**Responses:**
* **‘200’**: Integration
* Content-Type: application/json
* Schema: any
* **‘204’**: Integration Not Found
* **‘400’**: Bad Request
* **‘401’**: Not Authenticated
* **‘500’**: Internal Server Error
* Content-Type: application/json
* Schema: any
**cURL Example:**
```bash
curl -X GET \
"https://your-tenant.aembit.io'/api/v1/integrations/{id}'"
```
### DELETE ‘/api/v1/integrations/{id}’
[Section titled “DELETE ‘/api/v1/integrations/{id}’”](#delete-apiv1integrationsid)
**Summary:** Delete an Integration
**Description:** Delete an Integration as identified by its ID.
**Operation ID:** delete-integration
**Parameters:**
* **id** (undefined) *(optional)*: any
* **X-Aembit-ResourceSet** (undefined) *(optional)*: any
**Responses:**
* **‘200’**: Successfully deleted Integration
* **‘400’**: Bad Request
* **‘401’**: Not Authenticated
* **‘500’**: Internal Server Error
* Content-Type: application/json
* Schema: any
**cURL Example:**
```bash
curl -X DELETE \
"https://your-tenant.aembit.io'/api/v1/integrations/{id}'"
```
### PATCH ‘/api/v1/integrations/{id}’
[Section titled “PATCH ‘/api/v1/integrations/{id}’”](#patch-apiv1integrationsid)
**Summary:** Patch an Integration
**Description:** Patch an Integration as identified by its ID.
**Operation ID:** patch-integration
**Parameters:**
* **id** (undefined) *(optional)*: any
* **X-Aembit-ResourceSet** (undefined) *(optional)*: any
**Request Body:** IntegrationPatchDTO
* Content-Type: application/json
* Schema: any
**Responses:**
* **‘200’**: Patched Integration
* Content-Type: application/json
* Schema: any
* **‘400’**: Bad Request
* **‘401’**: Not Authenticated
* **‘500’**: Internal Server Error
* Content-Type: application/json
* Schema: any
**cURL Example:**
```bash
curl -X PATCH \
-H "Content-Type: application/json" \
-d '{"example": "data"}' \
"https://your-tenant.aembit.io'/api/v1/integrations/{id}'"
```
## Log Stream
[Section titled “Log Stream”](#log-stream)
### GET /api/v1/log-streams
[Section titled “GET /api/v1/log-streams”](#get-apiv1log-streams)
**Summary:** Get a page of Log Streams
**Description:** Get a page of Log Streams.
**Operation ID:** get-log-streams
**Parameters:**
* **page** (undefined) *(optional)*: any
* **per-page** (undefined) *(optional)*: any
* **filter** (undefined) *(optional)*: any
* **order** (undefined) *(optional)*: any
**Responses:**
* **‘200’**: Page of Log Streams
* Content-Type: application/json
* Schema: any
* **‘400’**: Bad Request
* **‘401’**: Not Authenticated
* **‘500’**: Internal Server Error
* Content-Type: application/json
* Schema: any
**cURL Example:**
```bash
curl -X GET \
"https://your-tenant.aembit.io/api/v1/log-streams"
```
### POST /api/v1/log-streams
[Section titled “POST /api/v1/log-streams”](#post-apiv1log-streams)
**Summary:** Create a Log Stream
**Description:** Create a Log Stream.
**Operation ID:** post-log-stream
**Request Body:** LogStreamDTO
* Content-Type: application/json
* Schema: any
**Responses:**
* **‘201’**: Created Log Stream
* Content-Type: application/json
* Schema: any
* **‘400’**: Bad Request
* **‘401’**: Not Authenticated
* **‘500’**: Internal Server Error
* Content-Type: application/json
* Schema: any
**cURL Example:**
```bash
curl -X POST \
-H "Content-Type: application/json" \
-d '{"example": "data"}' \
"https://your-tenant.aembit.io/api/v1/log-streams"
```
### PUT /api/v1/log-streams
[Section titled “PUT /api/v1/log-streams”](#put-apiv1log-streams)
**Summary:** Update a Log Stream
**Description:** Update a Log Stream.
**Operation ID:** put-log-stream
**Request Body:** LogStreamDTO
* Content-Type: application/json
* Schema: any
**Responses:**
* **‘200’**: Updated Log Stream
* Content-Type: application/json
* Schema: any
* **‘400’**: Bad Request
* **‘401’**: Not Authenticated
* **‘500’**: Internal Server Error
* Content-Type: application/json
* Schema: any
**cURL Example:**
```bash
curl -X PUT \
-H "Content-Type: application/json" \
-d '{"example": "data"}' \
"https://your-tenant.aembit.io/api/v1/log-streams"
```
### GET ‘/api/v1/log-streams/{id}’
[Section titled “GET ‘/api/v1/log-streams/{id}’”](#get-apiv1log-streamsid)
**Summary:** Get a Log Stream
**Description:** Get a Log Stream identified by its ID.
**Operation ID:** get-log-stream
**Parameters:**
* **id** (undefined) *(optional)*: any
**Responses:**
* **‘200’**: Log Stream
* Content-Type: application/json
* Schema: any
* **‘204’**: Log Stream Not Found
* **‘400’**: Bad Request
* **‘401’**: Not Authenticated
* **‘500’**: Internal Server Error
* Content-Type: application/json
* Schema: any
**cURL Example:**
```bash
curl -X GET \
"https://your-tenant.aembit.io'/api/v1/log-streams/{id}'"
```
### DELETE ‘/api/v1/log-streams/{id}’
[Section titled “DELETE ‘/api/v1/log-streams/{id}’”](#delete-apiv1log-streamsid)
**Summary:** Delete a Log Stream
**Description:** Delete a Log Stream identified by its ID.
**Operation ID:** delete-log-stream
**Parameters:**
* **id** (undefined) *(optional)*: any
**Responses:**
* **‘204’**: Successfully deleted Log Stream
* **‘400’**: Bad Request
* **‘401’**: Not Authenticated
* **‘500’**: Internal Server Error
* Content-Type: application/json
* Schema: any
**cURL Example:**
```bash
curl -X DELETE \
"https://your-tenant.aembit.io'/api/v1/log-streams/{id}'"
```
### PATCH ‘/api/v1/log-streams/{id}’
[Section titled “PATCH ‘/api/v1/log-streams/{id}’”](#patch-apiv1log-streamsid)
**Summary:** Patch a Log Stream
**Description:** Patch a Log Stream identified by its ID.
**Operation ID:** patch-log-stream
**Parameters:**
* **id** (undefined) *(optional)*: any
**Request Body:** LogStreamPatchDTO
* Content-Type: application/json
* Schema: any
**Responses:**
* **‘200’**: Patched Log Stream
* Content-Type: application/json
* Schema: any
* **‘400’**: Bad Request
* **‘401’**: Not Authenticated
* **‘500’**: Internal Server Error
* Content-Type: application/json
* Schema: any
**cURL Example:**
```bash
curl -X PATCH \
-H "Content-Type: application/json" \
-d '{"example": "data"}' \
"https://your-tenant.aembit.io'/api/v1/log-streams/{id}'"
```
## Resource Set
[Section titled “Resource Set”](#resource-set)
### GET ‘/api/v1/resource-sets/{id}’
[Section titled “GET ‘/api/v1/resource-sets/{id}’”](#get-apiv1resource-setsid)
**Summary:** Get a Resource Set
**Description:** Get a Resource Set identified by its ID.
**Operation ID:** get-resource-set
**Parameters:**
* **id** (undefined) *(optional)*: any
**Responses:**
* **‘200’**: Resource Set
* Content-Type: application/json
* Schema: any
* **‘400’**: Bad Request
* **‘401’**: Not Authenticated
* **‘500’**: Internal Server Error
* Content-Type: application/json
* Schema: any
**cURL Example:**
```bash
curl -X GET \
"https://your-tenant.aembit.io'/api/v1/resource-sets/{id}'"
```
### PATCH ‘/api/v1/resource-sets/{id}’
[Section titled “PATCH ‘/api/v1/resource-sets/{id}’”](#patch-apiv1resource-setsid)
**Summary:** Patch a Resource Set
**Description:** Patch a Resource Set identified by its ID.
**Operation ID:** patch-resource-set
**Parameters:**
* **id** (undefined) *(optional)*: any
**Request Body:** ResourceSetPatchDTO
* Content-Type: application/json
* Schema: any
**Responses:**
* **‘200’**: Patched Resource Set
* Content-Type: application/json
* Schema: any
* **‘400’**: Bad Request
* **‘401’**: Not Authenticated
* **‘500’**: Internal Server Error
* Content-Type: application/json
* Schema: any
**cURL Example:**
```bash
curl -X PATCH \
-H "Content-Type: application/json" \
-d '{"example": "data"}' \
"https://your-tenant.aembit.io'/api/v1/resource-sets/{id}'"
```
### GET /api/v1/resource-sets
[Section titled “GET /api/v1/resource-sets”](#get-apiv1resource-sets)
**Summary:** Get a page of Resource Sets
**Description:** Get a page of Resource Sets.
**Operation ID:** get-resource-sets
**Parameters:**
* **page** (undefined) *(optional)*: any
* **per-page** (undefined) *(optional)*: any
* **filter** (undefined) *(optional)*: any
* **order** (undefined) *(optional)*: any
* **group-by** (undefined) *(optional)*: any
**Responses:**
* **‘200’**: Page of Resource Sets
* Content-Type: application/json
* Schema: any
* **‘400’**: Bad Request
* **‘401’**: Not Authenticated
* **‘500’**: Internal Server Error
* Content-Type: application/json
* Schema: any
**cURL Example:**
```bash
curl -X GET \
"https://your-tenant.aembit.io/api/v1/resource-sets"
```
### POST /api/v1/resource-sets
[Section titled “POST /api/v1/resource-sets”](#post-apiv1resource-sets)
**Summary:** Create a Resource Set
**Description:** Create a Resource Set.
**Operation ID:** post-resource-set
**Request Body:** ResourceSetDTO
* Content-Type: application/json
* Schema: any
**Responses:**
* **‘201’**: Created Resource Set
* Content-Type: application/json
* Schema: any
* **‘400’**: Bad Request
* **‘401’**: Not Authenticated
* **‘500’**: Internal Server Error
* Content-Type: application/json
* Schema: any
**cURL Example:**
```bash
curl -X POST \
-H "Content-Type: application/json" \
-d '{"example": "data"}' \
"https://your-tenant.aembit.io/api/v1/resource-sets"
```
### PUT /api/v1/resource-sets
[Section titled “PUT /api/v1/resource-sets”](#put-apiv1resource-sets)
**Summary:** Update a Resource Set
**Description:** Update a Resource Set.
**Operation ID:** put-resource-set
**Request Body:** ResourceSetDTO
* Content-Type: application/json
* Schema: any
**Responses:**
* **‘200’**: Updated Resource Set
* Content-Type: application/json
* Schema: any
* **‘400’**: Bad Request
* **‘401’**: Not Authenticated
* **‘500’**: Internal Server Error
* Content-Type: application/json
* Schema: any
**cURL Example:**
```bash
curl -X PUT \
-H "Content-Type: application/json" \
-d '{"example": "data"}' \
"https://your-tenant.aembit.io/api/v1/resource-sets"
```
## Role
[Section titled “Role”](#role)
### GET /api/v1/roles
[Section titled “GET /api/v1/roles”](#get-apiv1roles)
**Summary:** Get a page of Roles
**Description:** Get a page of Roles.
**Operation ID:** get-roles
**Parameters:**
* **page** (undefined) *(optional)*: any
* **per-page** (undefined) *(optional)*: any
* **filter** (undefined) *(optional)*: any
* **order** (undefined) *(optional)*: any
* **group-by** (undefined) *(optional)*: any
**Responses:**
* **‘200’**: Page of Roles
* Content-Type: application/json
* Schema: any
* **‘400’**: Bad Request
* **‘401’**: Not Authenticated
* **‘500’**: Internal Server Error
* Content-Type: application/json
* Schema: any
**cURL Example:**
```bash
curl -X GET \
"https://your-tenant.aembit.io/api/v1/roles"
```
### POST /api/v1/roles
[Section titled “POST /api/v1/roles”](#post-apiv1roles)
**Summary:** Create a new Role
**Description:** Create a new Role.
**Operation ID:** post-role
**Request Body:** RoleDTO
* Content-Type: application/json
* Schema: any
**Responses:**
* **‘201’**: Created Role
* Content-Type: application/json
* Schema: any
* **‘400’**: Bad Request
* **‘401’**: Not Authenticated
* **‘500’**: Internal Server Error
* Content-Type: application/json
* Schema: any
**cURL Example:**
```bash
curl -X POST \
-H "Content-Type: application/json" \
-d '{"example": "data"}' \
"https://your-tenant.aembit.io/api/v1/roles"
```
### PUT /api/v1/roles
[Section titled “PUT /api/v1/roles”](#put-apiv1roles)
**Summary:** Update a Role
**Description:** Update a Role.
**Operation ID:** put-role
**Request Body:** RoleDTO
* Content-Type: application/json
* Schema: any
**Responses:**
* **‘200’**: Updated Role
* Content-Type: application/json
* Schema: any
* **‘400’**: Bad Request
* **‘401’**: Not Authenticated
* **‘500’**: Internal Server Error
* Content-Type: application/json
* Schema: any
**cURL Example:**
```bash
curl -X PUT \
-H "Content-Type: application/json" \
-d '{"example": "data"}' \
"https://your-tenant.aembit.io/api/v1/roles"
```
### GET ‘/api/v1/roles/{id}’
[Section titled “GET ‘/api/v1/roles/{id}’”](#get-apiv1rolesid)
**Summary:** Get a Role
**Description:** Get a Role identified by its ID.
**Operation ID:** get-role
**Parameters:**
* **id** (undefined) *(optional)*: any
**Responses:**
* **‘200’**: Role
* Content-Type: application/json
* Schema: any
* **‘204’**: Role Not Found
* **‘400’**: Bad Request
* **‘401’**: Not Authenticated
* **‘500’**: Internal Server Error
* Content-Type: application/json
* Schema: any
**cURL Example:**
```bash
curl -X GET \
"https://your-tenant.aembit.io'/api/v1/roles/{id}'"
```
### DELETE ‘/api/v1/roles/{id}’
[Section titled “DELETE ‘/api/v1/roles/{id}’”](#delete-apiv1rolesid)
**Summary:** Delete a Role
**Description:** Delete a Role identified by its ID.
**Operation ID:** delete-role
**Parameters:**
* **id** (undefined) *(optional)*: any
**Responses:**
* **‘204’**: Successfully deleted Role
* **‘400’**: Bad Request
* **‘401’**: Not Authenticated
* **‘500’**: Internal Server Error
* Content-Type: application/json
* Schema: any
**cURL Example:**
```bash
curl -X DELETE \
"https://your-tenant.aembit.io'/api/v1/roles/{id}'"
```
### PATCH ‘/api/v1/roles/{id}’
[Section titled “PATCH ‘/api/v1/roles/{id}’”](#patch-apiv1rolesid)
**Summary:** Patch a Role
**Description:** Patch a Role identified by its ID.
**Operation ID:** patch-role
**Parameters:**
* **id** (undefined) *(optional)*: any
**Request Body:** RolePatchDTO
* Content-Type: application/json
* Schema: any
**Responses:**
* **‘200’**: Patch Role
* **‘400’**: Bad Request
* **‘401’**: Not Authenticated
* **‘500’**: Internal Server Error
* Content-Type: application/json
* Schema: any
**cURL Example:**
```bash
curl -X PATCH \
-H "Content-Type: application/json" \
-d '{"example": "data"}' \
"https://your-tenant.aembit.io'/api/v1/roles/{id}'"
```
## Routing
[Section titled “Routing”](#routing)
### GET ‘/api/v1/routings/{id}’
[Section titled “GET ‘/api/v1/routings/{id}’”](#get-apiv1routingsid)
**Summary:** Get a Routing
**Description:** Get a Routing identified by its ID.
**Operation ID:** get-routing
**Parameters:**
* **id** (undefined) *(optional)*: any
**Responses:**
* **‘200’**: Routing
* Content-Type: application/json
* Schema: any
* **‘400’**: Bad Request
* **‘401’**: Not Authenticated
* **‘403’**: Forbidden
* **‘404’**: Not Found
* **‘500’**: Internal Server Error
* Content-Type: application/json
* Schema: any
**cURL Example:**
```bash
curl -X GET \
"https://your-tenant.aembit.io'/api/v1/routings/{id}'"
```
### PATCH ‘/api/v1/routings/{id}’
[Section titled “PATCH ‘/api/v1/routings/{id}’”](#patch-apiv1routingsid)
**Summary:** Patch a Routing
**Description:** Patch a Routing identified by its ID.
**Operation ID:** patch-routing
**Parameters:**
* **id** (undefined) *(optional)*: any
**Request Body:** RoutingPatchDTO
* Content-Type: application/json
* Schema: any
**Responses:**
* **‘200’**: Patched Routing
* Content-Type: application/json
* Schema: any
* **‘400’**: Bad Request
* **‘401’**: Not Authenticated
* **‘500’**: Internal Server Error
* Content-Type: application/json
* Schema: any
**cURL Example:**
```bash
curl -X PATCH \
-H "Content-Type: application/json" \
-d '{"example": "data"}' \
"https://your-tenant.aembit.io'/api/v1/routings/{id}'"
```
### GET /api/v1/routings
[Section titled “GET /api/v1/routings”](#get-apiv1routings)
**Summary:** Get a page of Routings
**Description:** Get a page of Routings.
**Operation ID:** get-routings
**Parameters:**
* **page** (undefined) *(optional)*: any
* **per-page** (undefined) *(optional)*: any
* **filter** (undefined) *(optional)*: any
* **order** (undefined) *(optional)*: any
* **group-by** (undefined) *(optional)*: any
**Responses:**
* **‘200’**: Page of Routings
* Content-Type: application/json
* Schema: any
* **‘400’**: Bad Request
* **‘401’**: Not Authenticated
* **‘500’**: Internal Server Error
* Content-Type: application/json
* Schema: any
**cURL Example:**
```bash
curl -X GET \
"https://your-tenant.aembit.io/api/v1/routings"
```
### POST /api/v1/routings
[Section titled “POST /api/v1/routings”](#post-apiv1routings)
**Summary:** Create a Routing
**Description:** Create a Routing.
**Operation ID:** post-routing
**Request Body:** RoutingDTO
* Content-Type: application/json
* Schema: any
**Responses:**
* **‘201’**: Created Routing
* Content-Type: application/json
* Schema: any
* **‘400’**: Bad Request
* **‘401’**: Not Authenticated
* **‘403’**: Forbidden
* **‘500’**: Internal Server Error
* Content-Type: application/json
* Schema: any
**cURL Example:**
```bash
curl -X POST \
-H "Content-Type: application/json" \
-d '{"example": "data"}' \
"https://your-tenant.aembit.io/api/v1/routings"
```
### PUT /api/v1/routings
[Section titled “PUT /api/v1/routings”](#put-apiv1routings)
**Summary:** Update a Routing
**Description:** Update a Routing.
**Operation ID:** put-routing
**Request Body:** RoutingDTO
* Content-Type: application/json
* Schema: any
**Responses:**
* **‘200’**: Updated Routing
* Content-Type: application/json
* Schema: any
* **‘400’**: Bad Request
* **‘401’**: Not Authenticated
* **‘500’**: Internal Server Error
* Content-Type: application/json
* Schema: any
**cURL Example:**
```bash
curl -X PUT \
-H "Content-Type: application/json" \
-d '{"example": "data"}' \
"https://your-tenant.aembit.io/api/v1/routings"
```
## SignOn Policy
[Section titled “SignOn Policy”](#signon-policy)
### GET /api/v1/signin-policies
[Section titled “GET /api/v1/signin-policies”](#get-apiv1signin-policies)
**Summary:** Get a SignOn Policy
**Description:** Get a SignOn Policy by its name.
**Operation ID:** get-signon-policy
**Responses:**
* **‘200’**: SignOn Policy
* Content-Type: application/json
* Schema: any
* **‘204’**: SignOn Policy Not Found
* **‘400’**: Bad Request
* **‘401’**: Not Authenticated
* **‘500’**: Internal Server Error
* Content-Type: application/json
* Schema: any
**cURL Example:**
```bash
curl -X GET \
"https://your-tenant.aembit.io/api/v1/signin-policies"
```
## MFA SignOn Policy
[Section titled “MFA SignOn Policy”](#mfa-signon-policy)
### PUT /api/v1/signin-policies/mfa
[Section titled “PUT /api/v1/signin-policies/mfa”](#put-apiv1signin-policiesmfa)
**Summary:** Update a MFA SignOn Policy
**Description:** Update a MFA SignOn Policy.
**Operation ID:** put-mfa-signon Policy
**Request Body:** MFASignInPolicyDTO
* Content-Type: application/json
* Schema: any
**Responses:**
* **‘200’**: Updated MFA SignOn Policy
* Content-Type: application/json
* Schema: any
* **‘400’**: Bad Request
* **‘401’**: Not Authenticated
* **‘403’**: Forbidden
* Content-Type: application/json
* Schema: any
* **‘500’**: Internal Server Error
* Content-Type: application/json
* Schema: any
**cURL Example:**
```bash
curl -X PUT \
-H "Content-Type: application/json" \
-d '{"example": "data"}' \
"https://your-tenant.aembit.io/api/v1/signin-policies/mfa"
```
## SSO SignOn Policy
[Section titled “SSO SignOn Policy”](#sso-signon-policy)
### PUT /api/v1/signin-policies/sso
[Section titled “PUT /api/v1/signin-policies/sso”](#put-apiv1signin-policiessso)
**Summary:** Update a SSO SignOn Policy
**Description:** Update a SSO SignOn Policy.
**Operation ID:** put-SSO-signon Policy
**Request Body:** SSOSignInPolicyDTO
* Content-Type: application/json
* Schema: any
**Responses:**
* **‘200’**: Updated SSO SignOn Policy
* Content-Type: application/json
* Schema: any
* **‘400’**: Bad Request
* **‘401’**: Not Authenticated
* **‘500’**: Internal Server Error
* Content-Type: application/json
* Schema: any
**cURL Example:**
```bash
curl -X PUT \
-H "Content-Type: application/json" \
-d '{"example": "data"}' \
"https://your-tenant.aembit.io/api/v1/signin-policies/sso"
```
## SSO Identity Provider
[Section titled “SSO Identity Provider”](#sso-identity-provider)
### GET ‘/api/v1/sso-idps/{id}/verification’
[Section titled “GET ‘/api/v1/sso-idps/{id}/verification’”](#get-apiv1sso-idpsidverification)
**Summary:** Verify the SSO Identity Provider
**Description:** Verify the SSO Identity Provider has all necessary configuration data.
**Operation ID:** get-identity-provider-verification
**Parameters:**
* **id** (undefined) *(optional)*: any
**Responses:**
* **‘200’**: SSO Identity Provider verification
* Content-Type: application/json
* Schema: any
* **‘400’**: Bad Request
* **‘401’**: Not Authenticated
* **‘500’**: Internal Server Error
* Content-Type: application/json
* Schema: any
**cURL Example:**
```bash
curl -X GET \
"https://your-tenant.aembit.io'/api/v1/sso-idps/{id}/verification'"
```
### GET ‘/api/v1/sso-idps/{id}’
[Section titled “GET ‘/api/v1/sso-idps/{id}’”](#get-apiv1sso-idpsid)
**Summary:** Get a SSO Identity Provider
**Description:** Get a SSO Identity Provider identified by its ID.
**Operation ID:** get-identity-provider
**Parameters:**
* **id** (undefined) *(optional)*: any
**Responses:**
* **‘200’**: SSO Identity Provider
* Content-Type: application/json
* Schema: any
* **‘400’**: Bad Request
* **‘401’**: Not Authenticated
* **‘500’**: Internal Server Error
* Content-Type: application/json
* Schema: any
**cURL Example:**
```bash
curl -X GET \
"https://your-tenant.aembit.io'/api/v1/sso-idps/{id}'"
```
### DELETE ‘/api/v1/sso-idps/{id}’
[Section titled “DELETE ‘/api/v1/sso-idps/{id}’”](#delete-apiv1sso-idpsid)
**Summary:** Delete a SSO Identity Provider
**Description:** Delete a SSO Identity Provider identified by its ID.
**Operation ID:** delete-identity-provider
**Parameters:**
* **id** (undefined) *(optional)*: any
**Responses:**
* **‘204’**: Successfully deleted SSO Identity Provider
* **‘400’**: Bad Request
* **‘401’**: Not Authenticated
* **‘500’**: Internal Server Error
* Content-Type: application/json
* Schema: any
**cURL Example:**
```bash
curl -X DELETE \
"https://your-tenant.aembit.io'/api/v1/sso-idps/{id}'"
```
### PATCH ‘/api/v1/sso-idps/{id}’
[Section titled “PATCH ‘/api/v1/sso-idps/{id}’”](#patch-apiv1sso-idpsid)
**Summary:** Patch a SSO Identity Provider
**Description:** Patch a SSO Identity Provider identified by its ID.
**Operation ID:** patch-identity-provider
**Parameters:**
* **id** (undefined) *(optional)*: any
**Request Body:** SSOIdentityProviderPatchDTO
* Content-Type: application/json
* Schema: any
**Responses:**
* **‘200’**: Patched SSO Identity Provider
* Content-Type: application/json
* Schema: any
* **‘400’**: Bad Request
* **‘401’**: Not Authenticated
* **‘500’**: Internal Server Error
* Content-Type: application/json
* Schema: any
**cURL Example:**
```bash
curl -X PATCH \
-H "Content-Type: application/json" \
-d '{"example": "data"}' \
"https://your-tenant.aembit.io'/api/v1/sso-idps/{id}'"
```
### GET /api/v1/sso-idps
[Section titled “GET /api/v1/sso-idps”](#get-apiv1sso-idps)
**Summary:** Get a page of SSO Identity Providers
**Description:** Get a page of SSO Identity Providers.
**Operation ID:** get-identity-providers
**Parameters:**
* **page** (undefined) *(optional)*: any
* **per-page** (undefined) *(optional)*: any
* **filter** (undefined) *(optional)*: any
* **order** (undefined) *(optional)*: any
* **group-by** (undefined) *(optional)*: any
**Responses:**
* **‘200’**: Page of SSO Identity Providers
* Content-Type: application/json
* Schema: any
* **‘400’**: Bad Request
* **‘401’**: Not Authenticated
* **‘500’**: Internal Server Error
* Content-Type: application/json
* Schema: any
**cURL Example:**
```bash
curl -X GET \
"https://your-tenant.aembit.io/api/v1/sso-idps"
```
### POST /api/v1/sso-idps
[Section titled “POST /api/v1/sso-idps”](#post-apiv1sso-idps)
**Summary:** Create a SSO Identity Provider
**Description:** Create a SSO Identity Provider.
**Operation ID:** post-identity-provider
**Request Body:** SSOIdentityProviderDTO
* Content-Type: application/json
* Schema: any
**Responses:**
* **‘201’**: Created SSO Identity Provider
* Content-Type: application/json
* Schema: any
* **‘400’**: Bad Request
* **‘401’**: Not Authenticated
* **‘500’**: Internal Server Error
* Content-Type: application/json
* Schema: any
**cURL Example:**
```bash
curl -X POST \
-H "Content-Type: application/json" \
-d '{"example": "data"}' \
"https://your-tenant.aembit.io/api/v1/sso-idps"
```
### PUT /api/v1/sso-idps
[Section titled “PUT /api/v1/sso-idps”](#put-apiv1sso-idps)
**Summary:** Update a SSO Identity Provider
**Description:** Update a SSO Identity Provider.
**Operation ID:** put-identity-provider
**Request Body:** SSOIdentityProviderDTO
* Content-Type: application/json
* Schema: any
**Responses:**
* **‘200’**: Updated SSO Identity Provider
* Content-Type: application/json
* Schema: any
* **‘400’**: Bad Request
* **‘401’**: Not Authenticated
* **‘500’**: Internal Server Error
* Content-Type: application/json
* Schema: any
**cURL Example:**
```bash
curl -X PUT \
-H "Content-Type: application/json" \
-d '{"example": "data"}' \
"https://your-tenant.aembit.io/api/v1/sso-idps"
```
## Standalone Certificate Authority
[Section titled “Standalone Certificate Authority”](#standalone-certificate-authority)
### DELETE ‘/api/v1/certificate-authorities/{id}’
[Section titled “DELETE ‘/api/v1/certificate-authorities/{id}’”](#delete-apiv1certificate-authoritiesid)
**Summary:** Delete a Standalone Certificate Authority
**Description:** Delete a Standalone Certificate Authority identified by its ID.
**Operation ID:** delete-standalone-certificate-authority
**Parameters:**
* **id** (undefined) *(optional)*: any
**Responses:**
* **‘204’**: Successfully deleted Standalone Certificate Authority
* **‘400’**: Bad Request
* **‘401’**: Not Authenticated
* **‘500’**: Internal Server Error
* Content-Type: application/json
* Schema: any
**cURL Example:**
```bash
curl -X DELETE \
"https://your-tenant.aembit.io'/api/v1/certificate-authorities/{id}'"
```
### GET ‘/api/v1/certificate-authorities/{id}’
[Section titled “GET ‘/api/v1/certificate-authorities/{id}’”](#get-apiv1certificate-authoritiesid)
**Summary:** Get a Standalone Certificate Authority
**Description:** Get a Standalone Certificate Authority identified by its ID.
**Operation ID:** get-standalone-certificate-authority
**Parameters:**
* **id** (undefined) *(optional)*: any
**Responses:**
* **‘200’**: Standalone Certificate Authority
* Content-Type: application/json
* Schema: any
* **‘400’**: Bad Request
* **‘401’**: Not Authenticated
* **‘500’**: Internal Server Error
* Content-Type: application/json
* Schema: any
**cURL Example:**
```bash
curl -X GET \
"https://your-tenant.aembit.io'/api/v1/certificate-authorities/{id}'"
```
### PATCH ‘/api/v1/certificate-authorities/{id}’
[Section titled “PATCH ‘/api/v1/certificate-authorities/{id}’”](#patch-apiv1certificate-authoritiesid)
**Summary:** Patch a Standalone Certificate Authority
**Description:** Patch a Standalone Certificate Authority identified by its ID.
**Operation ID:** patch-standalone-certificate-authority
**Parameters:**
* **id** (undefined) *(optional)*: any
**Request Body:** StandaloneCertificatePatchDTO
* Content-Type: application/json
* Schema: any
**Responses:**
* **‘200’**: Patched Standalone Certificate Authority
* Content-Type: application/json
* Schema: any
* **‘400’**: Bad Request
* **‘401’**: Not Authenticated
* **‘500’**: Internal Server Error
* Content-Type: application/json
* Schema: any
**cURL Example:**
```bash
curl -X PATCH \
-H "Content-Type: application/json" \
-d '{"example": "data"}' \
"https://your-tenant.aembit.io'/api/v1/certificate-authorities/{id}'"
```
### GET /api/v1/certificate-authorities
[Section titled “GET /api/v1/certificate-authorities”](#get-apiv1certificate-authorities)
**Summary:** Get a page of Standalone Certificate Authorities
**Description:** Get a page of Standalone Certificate Authorities.
**Operation ID:** get-standalone-certificate-authorities
**Parameters:**
* **page** (undefined) *(optional)*: any
* **per-page** (undefined) *(optional)*: any
* **filter** (undefined) *(optional)*: any
* **order** (undefined) *(optional)*: any
* **group-by** (undefined) *(optional)*: any
**Responses:**
* **‘200’**: Page of Standalone Certificate Authorities
* Content-Type: application/json
* Schema: any
* **‘400’**: Bad Request
* **‘401’**: Not Authenticated
* **‘500’**: Internal Server Error
* Content-Type: application/json
* Schema: any
**cURL Example:**
```bash
curl -X GET \
"https://your-tenant.aembit.io/api/v1/certificate-authorities"
```
### POST /api/v1/certificate-authorities
[Section titled “POST /api/v1/certificate-authorities”](#post-apiv1certificate-authorities)
**Summary:** Create a Standalone Certificate Authority
**Description:** Create a Standalone Certificate Authority.
**Operation ID:** post-standalone-certificate-authority
**Request Body:** StandaloneCertificateDTO
* Content-Type: application/json
* Schema: any
**Responses:**
* **‘201’**: Created Standalone Certificate Authority
* Content-Type: application/json
* Schema: any
* **‘400’**: Bad Request
* **‘401’**: Not Authenticated
* **‘500’**: Internal Server Error
* Content-Type: application/json
* Schema: any
**cURL Example:**
```bash
curl -X POST \
-H "Content-Type: application/json" \
-d '{"example": "data"}' \
"https://your-tenant.aembit.io/api/v1/certificate-authorities"
```
### PUT /api/v1/certificate-authorities
[Section titled “PUT /api/v1/certificate-authorities”](#put-apiv1certificate-authorities)
**Summary:** Update a Standalone Certificate Authority
**Description:** Update a Standalone Certificate Authority.
**Operation ID:** put-standalone-certificate-authority
**Request Body:** StandaloneCertificateDTO
* Content-Type: application/json
* Schema: any
**Responses:**
* **‘200’**: Updated Standalone Certificate Authority
* Content-Type: application/json
* Schema: any
* **‘400’**: Bad Request
* **‘401’**: Not Authenticated
* **‘500’**: Internal Server Error
* Content-Type: application/json
* Schema: any
**cURL Example:**
```bash
curl -X PUT \
-H "Content-Type: application/json" \
-d '{"example": "data"}' \
"https://your-tenant.aembit.io/api/v1/certificate-authorities"
```
## Standalone TLS Decrypt
[Section titled “Standalone TLS Decrypt”](#standalone-tls-decrypt)
### GET ‘/api/v1/certificate-authorities/{id}/root-ca’
[Section titled “GET ‘/api/v1/certificate-authorities/{id}/root-ca’”](#get-apiv1certificate-authoritiesidroot-ca)
**Summary:** Download Standalone Root CA Certificate
**Description:** Download the Standalone Root CA Certificate. This CA Certificate can be used for TLS verification when utilizing the Aembit TLS Decrypt feature.
**Operation ID:** standalone-root-ca
**Parameters:**
* **id** (undefined) *(optional)*: any
**Responses:**
* **‘200’**: OK
* Content-Type: application/x-pem-file
* Schema: string (binary)
**cURL Example:**
```bash
curl -X GET \
"https://your-tenant.aembit.io'/api/v1/certificate-authorities/{id}/root-ca'"
```
## TLS Decrypt
[Section titled “TLS Decrypt”](#tls-decrypt)
### GET /api/v1/root-ca
[Section titled “GET /api/v1/root-ca”](#get-apiv1root-ca)
**Summary:** Download Tenant Root CA Certificate
**Description:** Download the Tenant Root CA Certificate. This CA Certificate can be used for TLS verification when utilizing the Aembit TLS Decrypt feature.
**Operation ID:** root-ca
**Responses:**
* **‘200’**: OK
* Content-Type: application/x-pem-file
* Schema: string (binary)
**cURL Example:**
```bash
curl -X GET \
"https://your-tenant.aembit.io/api/v1/root-ca"
```
## Trust Provider
[Section titled “Trust Provider”](#trust-provider)
### GET /api/v1/trust-providers
[Section titled “GET /api/v1/trust-providers”](#get-apiv1trust-providers)
**Summary:** Get a page of Trust Providers
**Description:** Get a page of Trust Providers.
**Operation ID:** get-trust-providers
**Parameters:**
* **X-Aembit-ResourceSet** (undefined) *(optional)*: any
* **page** (undefined) *(optional)*: any
* **per-page** (undefined) *(optional)*: any
* **filter** (undefined) *(optional)*: any
* **order** (undefined) *(optional)*: any
* **group-by** (undefined) *(optional)*: any
* **active** (undefined) *(optional)*: any
**Responses:**
* **‘200’**: Page of Trust Providers
* Content-Type: application/json
* Schema: any
* **‘400’**: Bad Request
* **‘401’**: Not Authenticated
* **‘500’**: Internal Server Error
* Content-Type: application/json
* Schema: any
**cURL Example:**
```bash
curl -X GET \
"https://your-tenant.aembit.io/api/v1/trust-providers"
```
### POST /api/v1/trust-providers
[Section titled “POST /api/v1/trust-providers”](#post-apiv1trust-providers)
**Summary:** Create a Trust Provider
**Description:** Create a Trust Provider.
**Operation ID:** post-trust-provider
**Parameters:**
* **X-Aembit-ResourceSet** (undefined) *(optional)*: any
**Request Body:** TrustProviderDTO
* Content-Type: application/json
* Schema: any
**Responses:**
* **‘200’**: Created Trust Provider
* Content-Type: application/json
* Schema: any
* **‘400’**: Bad Request
* **‘401’**: Not Authenticated
* **‘500’**: Internal Server Error
* Content-Type: application/json
* Schema: any
**cURL Example:**
```bash
curl -X POST \
-H "Content-Type: application/json" \
-d '{"example": "data"}' \
"https://your-tenant.aembit.io/api/v1/trust-providers"
```
### PUT /api/v1/trust-providers
[Section titled “PUT /api/v1/trust-providers”](#put-apiv1trust-providers)
**Summary:** Update a Trust Provider
**Description:** Update a Trust Provider.
**Operation ID:** put-trust-provider
**Parameters:**
* **X-Aembit-ResourceSet** (undefined) *(optional)*: any
**Request Body:** TrustProviderDTO
* Content-Type: application/json
* Schema: any
**Responses:**
* **‘200’**: Updated Trust Provider
* Content-Type: application/json
* Schema: any
* **‘400’**: Bad Request
* **‘401’**: Not Authenticated
* **‘500’**: Internal Server Error
* Content-Type: application/json
* Schema: any
**cURL Example:**
```bash
curl -X PUT \
-H "Content-Type: application/json" \
-d '{"example": "data"}' \
"https://your-tenant.aembit.io/api/v1/trust-providers"
```
### GET ‘/api/v1/trust-providers/{id}’
[Section titled “GET ‘/api/v1/trust-providers/{id}’”](#get-apiv1trust-providersid)
**Summary:** Get a Trust Provider
**Description:** Get a Trust Provider identified by its ID.
**Operation ID:** get-trust-provider
**Parameters:**
* **id** (undefined) *(optional)*: any
* **X-Aembit-ResourceSet** (undefined) *(optional)*: any
**Responses:**
* **‘200’**: Trust Provider
* Content-Type: application/json
* Schema: any
* **‘204’**: Trust Provider Not Found
* **‘400’**: Bad Request
* **‘401’**: Not Authenticated
* **‘500’**: Internal Server Error
* Content-Type: application/json
* Schema: any
**cURL Example:**
```bash
curl -X GET \
"https://your-tenant.aembit.io'/api/v1/trust-providers/{id}'"
```
### DELETE ‘/api/v1/trust-providers/{id}’
[Section titled “DELETE ‘/api/v1/trust-providers/{id}’”](#delete-apiv1trust-providersid)
**Summary:** Delete a Trust Provider
**Description:** Delete a Trust Provider identified by its ID.
**Operation ID:** delete-trust-provider
**Parameters:**
* **id** (undefined) *(optional)*: any
* **X-Aembit-ResourceSet** (undefined) *(optional)*: any
**Responses:**
* **‘204’**: Successfully deleted Trust Provider
* **‘400’**: Bad Request
* **‘401’**: Not Authenticated
* **‘404’**: Not Found
* **‘500’**: Internal Server Error
* Content-Type: application/json
* Schema: any
**cURL Example:**
```bash
curl -X DELETE \
"https://your-tenant.aembit.io'/api/v1/trust-providers/{id}'"
```
### PATCH ‘/api/v1/trust-providers/{id}’
[Section titled “PATCH ‘/api/v1/trust-providers/{id}’”](#patch-apiv1trust-providersid)
**Summary:** Patch a Trust Provider
**Description:** Patch a Trust Provider.
**Operation ID:** patch-trust-provider
**Parameters:**
* **id** (undefined) *(optional)*: any
* **X-Aembit-ResourceSet** (undefined) *(optional)*: any
**Request Body:** TrustProviderPatchDTO
* Content-Type: application/json
* Schema: any
**Responses:**
* **‘200’**: Patched Trust Provider
* Content-Type: application/json
* Schema: any
* **‘400’**: Bad Request
* **‘401’**: Not Authenticated
* **‘500’**: Internal Server Error
* Content-Type: application/json
* Schema: any
**cURL Example:**
```bash
curl -X PATCH \
-H "Content-Type: application/json" \
-d '{"example": "data"}' \
"https://your-tenant.aembit.io'/api/v1/trust-providers/{id}'"
```
## User
[Section titled “User”](#user)
### GET /api/v1/users
[Section titled “GET /api/v1/users”](#get-apiv1users)
**Summary:** Get a page of Users
**Description:** Get a page of Users.
**Operation ID:** get-users
**Parameters:**
* **page** (undefined) *(optional)*: any
* **per-page** (undefined) *(optional)*: any
* **filter** (undefined) *(optional)*: any
* **order** (undefined) *(optional)*: any
* **group-by** (undefined) *(optional)*: any
**Responses:**
* **‘200’**: Page of Users
* Content-Type: application/json
* Schema: any
* **‘400’**: Bad Request
* **‘401’**: Not Authenticated
* **‘500’**: Internal Server Error
* Content-Type: application/json
* Schema: any
**cURL Example:**
```bash
curl -X GET \
"https://your-tenant.aembit.io/api/v1/users"
```
### POST /api/v1/users
[Section titled “POST /api/v1/users”](#post-apiv1users)
**Summary:** Create a User
**Description:** Create a User.
**Operation ID:** post-user
**Request Body:** UserDTO
* Content-Type: application/json
* Schema: any
**Responses:**
* **‘201’**: Created User
* Content-Type: application/json
* Schema: any
* **‘400’**: Bad Request
* **‘401’**: Not Authenticated
* **‘500’**: Internal Server Error
* Content-Type: application/json
* Schema: any
**cURL Example:**
```bash
curl -X POST \
-H "Content-Type: application/json" \
-d '{"example": "data"}' \
"https://your-tenant.aembit.io/api/v1/users"
```
### PATCH ‘/api/v1/users/{id}’
[Section titled “PATCH ‘/api/v1/users/{id}’”](#patch-apiv1usersid)
**Summary:** Patch a User
**Description:** Patch a User identified by its ID.
**Operation ID:** patch-user
**Parameters:**
* **id** (undefined) *(optional)*: any
**Request Body:** UserPatchDTO
* Content-Type: application/json
* Schema: any
**Responses:**
* **‘200’**: Patched User
* Content-Type: application/json
* Schema: any
* **‘400’**: Bad Request
* **‘401’**: Not Authenticated
* **‘500’**: Internal Server Error
* Content-Type: application/json
* Schema: any
**cURL Example:**
```bash
curl -X PATCH \
-H "Content-Type: application/json" \
-d '{"example": "data"}' \
"https://your-tenant.aembit.io'/api/v1/users/{id}'"
```
### GET ‘/api/v1/users/{id}’
[Section titled “GET ‘/api/v1/users/{id}’”](#get-apiv1usersid)
**Summary:** Get a User
**Description:** Get a User identified by its ID.
**Operation ID:** get-user
**Parameters:**
* **id** (undefined) *(optional)*: any
**Responses:**
* **‘201’**: User
* Content-Type: application/json
* Schema: any
* **‘204’**: User Not Found
* **‘400’**: Bad Request
* **‘401’**: Not Authenticated
* **‘500’**: Internal Server Error
* Content-Type: application/json
* Schema: any
**cURL Example:**
```bash
curl -X GET \
"https://your-tenant.aembit.io'/api/v1/users/{id}'"
```
### PUT ‘/api/v1/users/{id}’
[Section titled “PUT ‘/api/v1/users/{id}’”](#put-apiv1usersid)
**Summary:** Update a User
**Description:** Update a User.
**Operation ID:** put-user
**Parameters:**
* **id** (undefined) *(optional)*: any
**Request Body:** UserDTO
* Content-Type: application/json
* Schema: any
**Responses:**
* **‘200’**: User
* Content-Type: application/json
* Schema: any
* **‘400’**: Bad Request
* **‘401’**: Not Authenticated
* **‘500’**: Internal Server Error
* Content-Type: application/json
* Schema: any
**cURL Example:**
```bash
curl -X PUT \
-H "Content-Type: application/json" \
-d '{"example": "data"}' \
"https://your-tenant.aembit.io'/api/v1/users/{id}'"
```
### DELETE ‘/api/v1/users/{id}’
[Section titled “DELETE ‘/api/v1/users/{id}’”](#delete-apiv1usersid)
**Summary:** Delete a User
**Description:** Delete a User identified by its ID.
**Operation ID:** delete-user
**Parameters:**
* **id** (undefined) *(optional)*: any
**Responses:**
* **‘204’**: Successfully deleted User
* **‘400’**: Bad Request
* **‘401’**: Not Authenticated
* **‘500’**: Internal Server Error
* Content-Type: application/json
* Schema: any
**cURL Example:**
```bash
curl -X DELETE \
"https://your-tenant.aembit.io'/api/v1/users/{id}'"
```
### POST ‘/api/v1/users/{id}/unlock’
[Section titled “POST ‘/api/v1/users/{id}/unlock’”](#post-apiv1usersidunlock)
**Summary:** Unlock a User
**Description:** Unlock a User identified by its ID.
**Operation ID:** post-user-unlock
**Parameters:**
* **id** (undefined) *(optional)*: any
**Responses:**
* **‘200’**: Successfully unlocked User
* Content-Type: application/json
* Schema: any
* **‘400’**: Bad Request
* **‘401’**: Not Authenticated
* **‘500’**: Internal Server Error
* Content-Type: application/json
* Schema: any
**cURL Example:**
```bash
curl -X POST \
"https://your-tenant.aembit.io'/api/v1/users/{id}/unlock'"
```
## Server Workload
[Section titled “Server Workload”](#server-workload)
### POST /api/v1/server-workloads
[Section titled “POST /api/v1/server-workloads”](#post-apiv1server-workloads)
**Summary:** Create a Server Workload
**Description:** Create a Server Workload.
**Operation ID:** post-server-workload
**Parameters:**
* **X-Aembit-ResourceSet** (undefined) *(optional)*: any
**Request Body:** ServerWorkloadExternalDTO
* Content-Type: application/json
* Schema: any
**Responses:**
* **‘204’**: Created Server Workload
* Content-Type: application/json
* Schema: any
* **‘400’**: Bad Request
* **‘401’**: Not Authenticated
* **‘500’**: Internal Server Error
* Content-Type: application/json
* Schema: any
**cURL Example:**
```bash
curl -X POST \
-H "Content-Type: application/json" \
-d '{"example": "data"}' \
"https://your-tenant.aembit.io/api/v1/server-workloads"
```
### PUT /api/v1/server-workloads
[Section titled “PUT /api/v1/server-workloads”](#put-apiv1server-workloads)
**Summary:** Update a Server Workload
**Description:** Update a Server Workload.
**Operation ID:** put-server-workload
**Parameters:**
* **X-Aembit-ResourceSet** (undefined) *(optional)*: any
**Request Body:** ServerWorkloadExternalDTO
* Content-Type: application/json
* Schema: any
**Responses:**
* **‘200’**: Updated Server Workload
* Content-Type: application/json
* Schema: any
* **‘400’**: Bad Request
* **‘401’**: Not Authenticated
* **‘500’**: Internal Server Error
* Content-Type: application/json
* Schema: any
**cURL Example:**
```bash
curl -X PUT \
-H "Content-Type: application/json" \
-d '{"example": "data"}' \
"https://your-tenant.aembit.io/api/v1/server-workloads"
```
### GET /api/v1/server-workloads
[Section titled “GET /api/v1/server-workloads”](#get-apiv1server-workloads)
**Summary:** Get a page of Server Workloads
**Description:** Get a page of Server Workloads.
**Operation ID:** get-server-workloads
**Parameters:**
* **X-Aembit-ResourceSet** (undefined) *(optional)*: any
* **page** (undefined) *(optional)*: any
* **per-page** (undefined) *(optional)*: any
* **filter** (undefined) *(optional)*: any
* **order** (undefined) *(optional)*: any
* **group-by** (undefined) *(optional)*: any
**Responses:**
* **‘200’**: Page of Server Workloads
* Content-Type: application/json
* Schema: any
* **‘400’**: Bad Request
* **‘401’**: Not Authenticated
* **‘500’**: Internal Server Error
* Content-Type: application/json
* Schema: any
**cURL Example:**
```bash
curl -X GET \
"https://your-tenant.aembit.io/api/v1/server-workloads"
```
### PATCH ‘/api/v1/server-workloads/{id}’
[Section titled “PATCH ‘/api/v1/server-workloads/{id}’”](#patch-apiv1server-workloadsid)
**Summary:** Patch a Server Workload
**Description:** Patch a Server Workload.
**Operation ID:** patch-server-workload
**Parameters:**
* **id** (undefined) *(optional)*: any
* **X-Aembit-ResourceSet** (undefined) *(optional)*: any
**Request Body:** EntityPatchDTO
* Content-Type: application/json
* Schema: any
**Responses:**
* **‘200’**: Patched Server Workload
* Content-Type: application/json
* Schema: any
* **‘400’**: Bad Request
* **‘401’**: Not Authenticated
* **‘500’**: Internal Server Error
* Content-Type: application/json
* Schema: any
**cURL Example:**
```bash
curl -X PATCH \
-H "Content-Type: application/json" \
-d '{"example": "data"}' \
"https://your-tenant.aembit.io'/api/v1/server-workloads/{id}'"
```
### GET ‘/api/v1/server-workloads/{id}’
[Section titled “GET ‘/api/v1/server-workloads/{id}’”](#get-apiv1server-workloadsid)
**Summary:** Get a Server Workload
**Description:** Get a Server Workload identified by its ID.
**Operation ID:** get-server-workload
**Parameters:**
* **id** (undefined) *(optional)*: any
* **X-Aembit-ResourceSet** (undefined) *(optional)*: any
**Responses:**
* **‘200’**: Server Workload
* Content-Type: application/json
* Schema: any
* **‘204’**: Server Workload Not Found
* **‘400’**: Bad Request
* **‘401’**: Not Authenticated
* **‘500’**: Internal Server Error
* Content-Type: application/json
* Schema: any
**cURL Example:**
```bash
curl -X GET \
"https://your-tenant.aembit.io'/api/v1/server-workloads/{id}'"
```
### DELETE ‘/api/v1/server-workloads/{id}’
[Section titled “DELETE ‘/api/v1/server-workloads/{id}’”](#delete-apiv1server-workloadsid)
**Summary:** Delete a Server Workload
**Description:** Delete a Server Workload identified by its ID.
**Operation ID:** delete-server-workload
**Parameters:**
* **id** (undefined) *(optional)*: any
* **X-Aembit-ResourceSet** (undefined) *(optional)*: any
**Responses:**
* **‘204’**: Successfully deleted Server Workload
* **‘400’**: Bad Request
* **‘401’**: Not Authenticated
* **‘500’**: Internal Server Error
* Content-Type: application/json
* Schema: any
**cURL Example:**
```bash
curl -X DELETE \
"https://your-tenant.aembit.io'/api/v1/server-workloads/{id}'"
```
## Client Workload
[Section titled “Client Workload”](#client-workload)
### POST /api/v1/client-workloads
[Section titled “POST /api/v1/client-workloads”](#post-apiv1client-workloads)
**Summary:** Create a Client Workload
**Description:** Create a Client Workload.
**Operation ID:** post-client-workload
**Parameters:**
* **X-Aembit-ResourceSet** (undefined) *(optional)*: any
**Request Body:** ClientWorkloadExternalDTO
* Content-Type: application/json
* Schema: any
**Responses:**
* **‘204’**: Created Client Workload
* Content-Type: application/json
* Schema: any
* **‘400’**: Bad Request
* **‘401’**: Not Authenticated
* **‘500’**: Internal Server Error
* Content-Type: application/json
* Schema: any
**cURL Example:**
```bash
curl -X POST \
-H "Content-Type: application/json" \
-d '{"example": "data"}' \
"https://your-tenant.aembit.io/api/v1/client-workloads"
```
### PUT /api/v1/client-workloads
[Section titled “PUT /api/v1/client-workloads”](#put-apiv1client-workloads)
**Summary:** Update a Client Workload
**Description:** Update a Client Workload.
**Operation ID:** put-client-workload
**Parameters:**
* **X-Aembit-ResourceSet** (undefined) *(optional)*: any
**Request Body:** ClientWorkloadExternalDTO
* Content-Type: application/json
* Schema: any
**Responses:**
* **‘200’**: Updated Client Workload
* Content-Type: application/json
* Schema: any
* **‘400’**: Bad Request
* **‘401’**: Not Authenticated
* **‘500’**: Internal Server Error
* Content-Type: application/json
* Schema: any
**cURL Example:**
```bash
curl -X PUT \
-H "Content-Type: application/json" \
-d '{"example": "data"}' \
"https://your-tenant.aembit.io/api/v1/client-workloads"
```
### GET /api/v1/client-workloads
[Section titled “GET /api/v1/client-workloads”](#get-apiv1client-workloads)
**Summary:** Get a page of Client Workloads
**Description:** Get a page of Client Workloads.
**Operation ID:** get-client-workloads
**Parameters:**
* **X-Aembit-ResourceSet** (undefined) *(optional)*: any
* **page** (undefined) *(optional)*: any
* **per-page** (undefined) *(optional)*: any
* **filter** (undefined) *(optional)*: any
* **order** (undefined) *(optional)*: any
* **group-by** (undefined) *(optional)*: any
**Responses:**
* **‘200’**: Page of Client Workloads
* Content-Type: application/json
* Schema: any
* **‘400’**: Bad Request
* **‘401’**: Not Authenticated
* **‘500’**: Internal Server Error
* Content-Type: application/json
* Schema: any
**cURL Example:**
```bash
curl -X GET \
"https://your-tenant.aembit.io/api/v1/client-workloads"
```
### PATCH ‘/api/v1/client-workloads/{id}’
[Section titled “PATCH ‘/api/v1/client-workloads/{id}’”](#patch-apiv1client-workloadsid)
**Summary:** Patch a Client Workload
**Description:** Patch a Client Workload.
**Operation ID:** patch-client-workload
**Parameters:**
* **id** (undefined) *(optional)*: any
* **X-Aembit-ResourceSet** (undefined) *(optional)*: any
**Request Body:** ClientWorkloadPatchDTO
* Content-Type: application/json
* Schema: any
**Responses:**
* **‘200’**: Patched Client Workload
* Content-Type: application/json
* Schema: any
* **‘400’**: Bad Request
* **‘401’**: Not Authenticated
* **‘500’**: Internal Server Error
* Content-Type: application/json
* Schema: any
**cURL Example:**
```bash
curl -X PATCH \
-H "Content-Type: application/json" \
-d '{"example": "data"}' \
"https://your-tenant.aembit.io'/api/v1/client-workloads/{id}'"
```
### GET ‘/api/v1/client-workloads/{id}’
[Section titled “GET ‘/api/v1/client-workloads/{id}’”](#get-apiv1client-workloadsid)
**Summary:** Get a Client Workload
**Description:** Get a Client Workload identified by its ID.
**Operation ID:** get-client-workload
**Parameters:**
* **id** (undefined) *(optional)*: any
* **X-Aembit-ResourceSet** (undefined) *(optional)*: any
**Responses:**
* **‘200’**: Client Workload
* Content-Type: application/json
* Schema: any
* **‘204’**: Client Workload Not Found
* **‘400’**: Bad Request
* **‘401’**: Not Authenticated
* **‘500’**: Internal Server Error
* Content-Type: application/json
* Schema: any
**cURL Example:**
```bash
curl -X GET \
"https://your-tenant.aembit.io'/api/v1/client-workloads/{id}'"
```
### DELETE ‘/api/v1/client-workloads/{id}’
[Section titled “DELETE ‘/api/v1/client-workloads/{id}’”](#delete-apiv1client-workloadsid)
**Summary:** Delete a Client Workload
**Description:** Delete a Client Workload identified by its ID.
**Operation ID:** delete-client-workload
**Parameters:**
* **id** (undefined) *(optional)*: any
* **X-Aembit-ResourceSet** (undefined) *(optional)*: any
**Responses:**
* **‘204’**: Successfully deleted Client Workload
* **‘400’**: Bad Request
* **‘401’**: Not Authenticated
* **‘404’**: Not Found
* **‘500’**: Internal Server Error
* Content-Type: application/json
* Schema: any
**cURL Example:**
```bash
curl -X DELETE \
"https://your-tenant.aembit.io'/api/v1/client-workloads/{id}'"
```
# Aembit.API - Full Reference
> Complete API reference including endpoints and schemas for Aembit.API
# Aembit.API
[Section titled “Aembit.API”](#aembitapi)
**Version:** v1
## Base URL
[Section titled “Base URL”](#base-url)
https\://{tenant}.aembit.io
***
# Aembit.API - API Endpoints
[Section titled “Aembit.API - API Endpoints”](#aembitapi---api-endpoints)
**Version:** v1
**Base URL:** https\://{tenant}.aembit.io
## Access Condition
[Section titled “Access Condition”](#access-condition)
### GET /api/v1/access-conditions
[Section titled “GET /api/v1/access-conditions”](#get-apiv1access-conditions)
**Summary:** Get a page of Access Conditions
**Description:** Retrieve a page of Aembit Access Conditions.
**Operation ID:** get-access-conditions
**Parameters:**
* **X-Aembit-ResourceSet** (undefined) *(optional)*: any
* **page** (undefined) *(optional)*: any
* **per-page** (undefined) *(optional)*: any
* **filter** (undefined) *(optional)*: any
* **order** (undefined) *(optional)*: any
* **group-by** (undefined) *(optional)*: any
**Responses:**
* **‘200’**: Page of Access Conditions
* Content-Type: application/json
* Schema: any
* **‘400’**: Bad Request
* **‘401’**: Not Authenticated
* **‘500’**: Internal Server Error
* Content-Type: application/json
* Schema: any
**cURL Example:**
```bash
curl -X GET \
"https://your-tenant.aembit.io/api/v1/access-conditions"
```
### POST /api/v1/access-conditions
[Section titled “POST /api/v1/access-conditions”](#post-apiv1access-conditions)
**Summary:** Create an Access Condition
**Description:** Create an Aembit Access Condition which can then be associated with an Access Policy.
**Operation ID:** post-access-condition
**Parameters:**
* **X-Aembit-ResourceSet** (undefined) *(optional)*: any
**Request Body:** AccessConditionDTO
* Content-Type: application/json
* Schema: any
**Responses:**
* **‘201’**: Successfully created Access Condition
* Content-Type: application/json
* Schema: any
* **‘400’**: Bad Request
* **‘401’**: Not Authenticated
* **‘500’**: Internal Server Error
* Content-Type: application/json
* Schema: any
**cURL Example:**
```bash
curl -X POST \
-H "Content-Type: application/json" \
-d '{"example": "data"}' \
"https://your-tenant.aembit.io/api/v1/access-conditions"
```
### PUT /api/v1/access-conditions
[Section titled “PUT /api/v1/access-conditions”](#put-apiv1access-conditions)
**Summary:** Update a single Access Condition
**Description:** Update a specific Access Condition identified by its ID.
**Operation ID:** put-access-condition
**Parameters:**
* **X-Aembit-ResourceSet** (undefined) *(optional)*: any
**Request Body:** AccessConditionDTO
* Content-Type: application/json
* Schema: any
**Responses:**
* **‘200’**: Successfully updated Access Condition
* Content-Type: application/json
* Schema: any
* **‘400’**: Bad Request
* **‘401’**: Not Authenticated
* **‘500’**: Internal Server Error
* Content-Type: application/json
* Schema: any
**cURL Example:**
```bash
curl -X PUT \
-H "Content-Type: application/json" \
-d '{"example": "data"}' \
"https://your-tenant.aembit.io/api/v1/access-conditions"
```
### GET ‘/api/v1/access-conditions/{id}’
[Section titled “GET ‘/api/v1/access-conditions/{id}’”](#get-apiv1access-conditionsid)
**Summary:** Get the identified Access Condition
**Description:** Get the Access Condition identified by its ID.
**Operation ID:** get-access-condition
**Parameters:**
* **id** (undefined) *(optional)*: any
* **X-Aembit-ResourceSet** (undefined) *(optional)*: any
**Responses:**
* **‘200’**: Access Condition
* Content-Type: application/json
* Schema: any
* **‘204’**: Access Condition Not Found
* **‘400’**: Bad Request
* **‘401’**: Not Authenticated
* **‘500’**: Internal Server Error
* Content-Type: application/json
* Schema: any
**cURL Example:**
```bash
curl -X GET \
"https://your-tenant.aembit.io'/api/v1/access-conditions/{id}'"
```
### DELETE ‘/api/v1/access-conditions/{id}’
[Section titled “DELETE ‘/api/v1/access-conditions/{id}’”](#delete-apiv1access-conditionsid)
**Summary:** Delete a single Access Condition
**Description:** Delete a specific Access Condition identified by its ID.
**Operation ID:** delete-access-condition
**Parameters:**
* **id** (undefined) *(optional)*: any
* **X-Aembit-ResourceSet** (undefined) *(optional)*: any
**Responses:**
* **‘204’**: Deleted the Access Condition
* **‘400’**: Bad Request
* **‘401’**: Not Authenticated
* **‘404’**: Not Found
* **‘500’**: Internal Server Error
* Content-Type: application/json
* Schema: any
**cURL Example:**
```bash
curl -X DELETE \
"https://your-tenant.aembit.io'/api/v1/access-conditions/{id}'"
```
### PATCH ‘/api/v1/access-conditions/{id}’
[Section titled “PATCH ‘/api/v1/access-conditions/{id}’”](#patch-apiv1access-conditionsid)
**Summary:** Patch a single Access Condition
**Description:** Patch a specific Access Condition identified by its ID.
**Operation ID:** patch-access-condition
**Parameters:**
* **id** (undefined) *(optional)*: any
* **X-Aembit-ResourceSet** (undefined) *(optional)*: any
**Request Body:** AccessConditionPatchDTO
* Content-Type: application/json
* Schema: any
**Responses:**
* **‘200’**: Successfully updated Access Condition
* Content-Type: application/json
* Schema: any
* **‘400’**: Bad Request
* **‘401’**: Not Authenticated
* **‘500’**: Internal Server Error
* Content-Type: application/json
* Schema: any
**cURL Example:**
```bash
curl -X PATCH \
-H "Content-Type: application/json" \
-d '{"example": "data"}' \
"https://your-tenant.aembit.io'/api/v1/access-conditions/{id}'"
```
## Access Policy (Deprecated)
[Section titled “Access Policy (Deprecated)”](#access-policy-deprecated)
### GET ‘/api/v1/access-policies/{id}’
[Section titled “GET ‘/api/v1/access-policies/{id}’”](#get-apiv1access-policiesid)
**Summary:** Get the identified Access Policy
**Description:** Get the Access Policy identified by its ID.
**Operation ID:** get-access-policy
**Parameters:**
* **id** (undefined) *(optional)*: any
* **X-Aembit-ResourceSet** (undefined) *(optional)*: any
**Responses:**
* **‘200’**: Access Policy
* Content-Type: application/json
* Schema: any
* **‘204’**: Access Policy Not Found
* **‘400’**: Bad Request
* **‘401’**: Not Authenticated
* **‘500’**: Internal Server Error
* Content-Type: application/json
* Schema: any
**cURL Example:**
```bash
curl -X GET \
"https://your-tenant.aembit.io'/api/v1/access-policies/{id}'"
```
### DELETE ‘/api/v1/access-policies/{id}’
[Section titled “DELETE ‘/api/v1/access-policies/{id}’”](#delete-apiv1access-policiesid)
**Summary:** Delete an Access Policy
**Description:** Delete an Access Policy.
**Operation ID:** delete-access-policy
**Parameters:**
* **id** (undefined) *(optional)*: any
* **X-Aembit-ResourceSet** (undefined) *(optional)*: any
**Responses:**
* **‘204’**: Deleted the Access Policy
* **‘400’**: Bad Request
* **‘401’**: Not Authenticated
* **‘500’**: Internal Server Error
* Content-Type: application/json
* Schema: any
**cURL Example:**
```bash
curl -X DELETE \
"https://your-tenant.aembit.io'/api/v1/access-policies/{id}'"
```
### PATCH ‘/api/v1/access-policies/{id}’
[Section titled “PATCH ‘/api/v1/access-policies/{id}’”](#patch-apiv1access-policiesid)
**Summary:** Patch an Access Policy
**Description:** Patch an Access Policy.
**Operation ID:** patch-access-policy
**Parameters:**
* **id** (undefined) *(optional)*: any
* **X-Aembit-ResourceSet** (undefined) *(optional)*: any
**Request Body:** PolicyPatchDTO
* Content-Type: application/json
* Schema: any
**Responses:**
* **‘200’**: Patched Access Policy
* Content-Type: application/json
* Schema: any
* **‘400’**: Bad Request
* **‘401’**: Not Authenticated
* **‘500’**: Internal Server Error
* Content-Type: application/json
* Schema: any
**cURL Example:**
```bash
curl -X PATCH \
-H "Content-Type: application/json" \
-d '{"example": "data"}' \
"https://your-tenant.aembit.io'/api/v1/access-policies/{id}'"
```
### GET ‘/api/v1/access-policies/getByWorkloadIds/{clientWorkloadId}/{serverWorkloadId}’
[Section titled “GET ‘/api/v1/access-policies/getByWorkloadIds/{clientWorkloadId}/{serverWorkloadId}’”](#get-apiv1access-policiesgetbyworkloadidsclientworkloadidserverworkloadid)
**Summary:** Get the identified Access Policy
**Description:** Get the Access Policy identified by a Client and Server Workload.
**Operation ID:** get-access-policy-by-workloads
**Parameters:**
* **clientWorkloadId** (undefined) *(optional)*: any
* **serverWorkloadId** (undefined) *(optional)*: any
* **X-Aembit-ResourceSet** (undefined) *(optional)*: any
**Responses:**
* **‘200’**: Access Policy
* Content-Type: application/json
* Schema: any
* **‘400’**: Bad Request
* **‘401’**: Not Authenticated
* **‘500’**: Internal Server Error
* Content-Type: application/json
* Schema: any
**cURL Example:**
```bash
curl -X GET \
"https://your-tenant.aembit.io'/api/v1/access-policies/getByWorkloadIds/{clientWorkloadId}/{serverWorkloadId}'"
```
### GET /api/v1/access-policies
[Section titled “GET /api/v1/access-policies”](#get-apiv1access-policies)
**Summary:** Get a page of Access Policies
**Description:** Retrieve a page of Access Policies.
**Operation ID:** get-access-policies
**Parameters:**
* **X-Aembit-ResourceSet** (undefined) *(optional)*: any
* **page** (undefined) *(optional)*: any
* **per-page** (undefined) *(optional)*: any
* **filter** (undefined) *(optional)*: any
* **order** (undefined) *(optional)*: any
* **group-by** (undefined) *(optional)*: any
**Responses:**
* **‘200’**: Page of Access Policies
* Content-Type: application/json
* Schema: any
* **‘400’**: Bad Request
* **‘401’**: Not Authenticated
* **‘500’**: Internal Server Error
* Content-Type: application/json
* Schema: any
**cURL Example:**
```bash
curl -X GET \
"https://your-tenant.aembit.io/api/v1/access-policies"
```
### POST /api/v1/access-policies
[Section titled “POST /api/v1/access-policies”](#post-apiv1access-policies)
**Summary:** Create an Access Policy
**Description:** Create an Access Policy.
**Operation ID:** post-access-policy
**Parameters:**
* **X-Aembit-ResourceSet** (undefined) *(optional)*: any
**Request Body:** PolicyDTO
* Content-Type: application/json
* Schema: any
**Responses:**
* **‘200’**: Created Access Policy
* Content-Type: application/json
* Schema: any
* **‘400’**: Bad Request
* **‘401’**: Not Authenticated
* **‘500’**: Internal Server Error
* Content-Type: application/json
* Schema: any
**cURL Example:**
```bash
curl -X POST \
-H "Content-Type: application/json" \
-d '{"example": "data"}' \
"https://your-tenant.aembit.io/api/v1/access-policies"
```
### PUT /api/v1/access-policies
[Section titled “PUT /api/v1/access-policies”](#put-apiv1access-policies)
**Summary:** Update an Access Policy
**Description:** Update an Access Policy.
**Operation ID:** put-access-policy
**Parameters:**
* **X-Aembit-ResourceSet** (undefined) *(optional)*: any
**Request Body:** PolicyDTO
* Content-Type: application/json
* Schema: any
**Responses:**
* **‘200’**: Updated Access Policy
* Content-Type: application/json
* Schema: any
* **‘400’**: Bad Request
* **‘401’**: Not Authenticated
* **‘500’**: Internal Server Error
* Content-Type: application/json
* Schema: any
**cURL Example:**
```bash
curl -X PUT \
-H "Content-Type: application/json" \
-d '{"example": "data"}' \
"https://your-tenant.aembit.io/api/v1/access-policies"
```
### POST ‘/api/v1/access-policies/{id}/notes’
[Section titled “POST ‘/api/v1/access-policies/{id}/notes’”](#post-apiv1access-policiesidnotes)
**Summary:** Add a note to an Access Policy
**Description:** Add a note to an Access Policy.
**Operation ID:** post-access-policy-note
**Parameters:**
* **id** (undefined) *(optional)*: any
* **X-Aembit-ResourceSet** (undefined) *(optional)*: any
**Request Body:** PolicyNoteDTO
* Content-Type: application/json
* Schema: any
**Responses:**
* **‘201’**: Note added to an Access Policy
* **‘400’**: Bad Request
* **‘401’**: Not Authenticated
* **‘500’**: Internal Server Error
* Content-Type: application/json
* Schema: any
**cURL Example:**
```bash
curl -X POST \
-H "Content-Type: application/json" \
-d '{"example": "data"}' \
"https://your-tenant.aembit.io'/api/v1/access-policies/{id}/notes'"
```
## Access Policy v2
[Section titled “Access Policy v2”](#access-policy-v2)
### GET ‘/api/v2/access-policies/{id}’
[Section titled “GET ‘/api/v2/access-policies/{id}’”](#get-apiv2access-policiesid)
**Summary:** Get the identified Access Policy
**Description:** Get the Access Policy identified by its ID.
**Operation ID:** get-access-policy-v2
**Parameters:**
* **id** (undefined) *(optional)*: any
**Responses:**
* **‘200’**: Access Policy
* Content-Type: application/json
* Schema: any
* **‘204’**: Access Policy Not Found
* **‘400’**: Bad Request
* **‘401’**: Not Authenticated
* **‘500’**: Internal Server Error
* Content-Type: application/json
* Schema: any
**cURL Example:**
```bash
curl -X GET \
"https://your-tenant.aembit.io'/api/v2/access-policies/{id}'"
```
### DELETE ‘/api/v2/access-policies/{id}’
[Section titled “DELETE ‘/api/v2/access-policies/{id}’”](#delete-apiv2access-policiesid)
**Summary:** Delete an Access Policy
**Description:** Delete an Access Policy.
**Operation ID:** delete-access-policy-v2
**Parameters:**
* **id** (undefined) *(optional)*: any
**Responses:**
* **‘204’**: Deleted the Access Policy
* **‘400’**: Bad Request
* **‘401’**: Not Authenticated
* **‘404’**: Not Found
* **‘500’**: Internal Server Error
* Content-Type: application/json
* Schema: any
**cURL Example:**
```bash
curl -X DELETE \
"https://your-tenant.aembit.io'/api/v2/access-policies/{id}'"
```
### PATCH ‘/api/v2/access-policies/{id}’
[Section titled “PATCH ‘/api/v2/access-policies/{id}’”](#patch-apiv2access-policiesid)
**Summary:** Patch an Access Policy
**Description:** Patch an Access Policy.
**Operation ID:** patch-access-policy-v2
**Parameters:**
* **id** (undefined) *(optional)*: any
**Request Body:** PatchPolicyV2DTO
* Content-Type: application/json
* Schema: any
**Responses:**
* **‘200’**: Patched Access Policy
* Content-Type: application/json
* Schema: any
* **‘400’**: Bad Request
* **‘401’**: Not Authenticated
* **‘500’**: Internal Server Error
* Content-Type: application/json
* Schema: any
**cURL Example:**
```bash
curl -X PATCH \
-H "Content-Type: application/json" \
-d '{"example": "data"}' \
"https://your-tenant.aembit.io'/api/v2/access-policies/{id}'"
```
### GET ‘/api/v2/access-policies/getByWorkloadIds/{clientWorkloadId}/{serverWorkloadId}’
[Section titled “GET ‘/api/v2/access-policies/getByWorkloadIds/{clientWorkloadId}/{serverWorkloadId}’”](#get-apiv2access-policiesgetbyworkloadidsclientworkloadidserverworkloadid)
**Summary:** Get the identified Access Policy
**Description:** Get the Access Policy identified by a Client and Server Workload.
**Operation ID:** get-access-policy-by-workloads-v2
**Parameters:**
* **clientWorkloadId** (undefined) *(optional)*: any
* **serverWorkloadId** (undefined) *(optional)*: any
**Responses:**
* **‘200’**: Access Policy
* Content-Type: application/json
* Schema: any
* **‘400’**: Bad Request
* **‘401’**: Not Authenticated
* **‘500’**: Internal Server Error
* Content-Type: application/json
* Schema: any
**cURL Example:**
```bash
curl -X GET \
"https://your-tenant.aembit.io'/api/v2/access-policies/getByWorkloadIds/{clientWorkloadId}/{serverWorkloadId}'"
```
### GET /api/v2/access-policies
[Section titled “GET /api/v2/access-policies”](#get-apiv2access-policies)
**Summary:** Get a page of Access Policies
**Description:** Retrieve a page of Access Policies.
**Operation ID:** get-access-policies-v2
**Parameters:**
* **page** (undefined) *(optional)*: any
* **per-page** (undefined) *(optional)*: any
* **filter** (undefined) *(optional)*: any
* **order** (undefined) *(optional)*: any
* **group-by** (undefined) *(optional)*: any
**Responses:**
* **‘200’**: Page of Access Policies
* Content-Type: application/json
* Schema: any
* **‘400’**: Bad Request
* **‘401’**: Not Authenticated
* **‘500’**: Internal Server Error
* Content-Type: application/json
* Schema: any
**cURL Example:**
```bash
curl -X GET \
"https://your-tenant.aembit.io/api/v2/access-policies"
```
### POST /api/v2/access-policies
[Section titled “POST /api/v2/access-policies”](#post-apiv2access-policies)
**Summary:** Create an Access Policy
**Description:** Create an Access Policy.
**Operation ID:** post-access-policy-v2
**Request Body:** CreatePolicyDTO
* Content-Type: application/json
* Schema: any
**Responses:**
* **‘200’**: Created Access Policy
* Content-Type: application/json
* Schema: any
* **‘400’**: Bad Request
* **‘401’**: Not Authenticated
* **‘500’**: Internal Server Error
* Content-Type: application/json
* Schema: any
**cURL Example:**
```bash
curl -X POST \
-H "Content-Type: application/json" \
-d '{"example": "data"}' \
"https://your-tenant.aembit.io/api/v2/access-policies"
```
### PUT /api/v2/access-policies
[Section titled “PUT /api/v2/access-policies”](#put-apiv2access-policies)
**Summary:** Update an Access Policy
**Description:** Update an Access Policy.
**Operation ID:** put-access-policy-v2
**Request Body:** CreatePolicyDTO
* Content-Type: application/json
* Schema: any
**Responses:**
* **‘200’**: Updated Access Policy
* Content-Type: application/json
* Schema: any
* **‘400’**: Bad Request
* **‘401’**: Not Authenticated
* **‘500’**: Internal Server Error
* Content-Type: application/json
* Schema: any
**cURL Example:**
```bash
curl -X PUT \
-H "Content-Type: application/json" \
-d '{"example": "data"}' \
"https://your-tenant.aembit.io/api/v2/access-policies"
```
### POST ‘/api/v2/access-policies/{id}/notes’
[Section titled “POST ‘/api/v2/access-policies/{id}/notes’”](#post-apiv2access-policiesidnotes)
**Summary:** Add a note to an Access Policy
**Description:** Add a note to an Access Policy.
**Operation ID:** post-access-policy-note-v2
**Parameters:**
* **id** (undefined) *(optional)*: any
**Request Body:** PolicyNoteDTO
* Content-Type: application/json
* Schema: any
**Responses:**
* **‘201’**: Note added to an Access Policy
* **‘400’**: Bad Request
* **‘401’**: Not Authenticated
* **‘500’**: Internal Server Error
* Content-Type: application/json
* Schema: any
**cURL Example:**
```bash
curl -X POST \
-H "Content-Type: application/json" \
-d '{"example": "data"}' \
"https://your-tenant.aembit.io'/api/v2/access-policies/{id}/notes'"
```
### GET ‘/api/v2/access-policies/{id}/notes’
[Section titled “GET ‘/api/v2/access-policies/{id}/notes’”](#get-apiv2access-policiesidnotes)
**Summary:** Gets a notes of Access Policy
**Description:** Retrieves notes of Access Policy.
**Operation ID:** get-access-policy-notes-v2
**Parameters:**
* **id** (undefined) *(optional)*: any
**Responses:**
* **‘200’**: Page of Access Policy Notes
* Content-Type: application/json
* Schema: any
* **‘400’**: Bad Request
* **‘401’**: Not Authenticated
* **‘500’**: Internal Server Error
* Content-Type: application/json
* Schema: any
**cURL Example:**
```bash
curl -X GET \
"https://your-tenant.aembit.io'/api/v2/access-policies/{id}/notes'"
```
### GET ‘/api/v2/access-policies/{id}/credential-mappings’
[Section titled “GET ‘/api/v2/access-policies/{id}/credential-mappings’”](#get-apiv2access-policiesidcredential-mappings)
**Summary:** Gets a credential mappings of Access Policy
**Description:** Retrieves credential mappings of Access Policy.
**Operation ID:** get-access-policy-credential-mappings-v2
**Parameters:**
* **id** (undefined) *(optional)*: any
**Responses:**
* **‘200’**: Page of Credential Mappings
* Content-Type: application/json
* Schema: any
* **‘400’**: Bad Request
* **‘401’**: Not Authenticated
* **‘500’**: Internal Server Error
* Content-Type: application/json
* Schema: any
**cURL Example:**
```bash
curl -X GET \
"https://your-tenant.aembit.io'/api/v2/access-policies/{id}/credential-mappings'"
```
## Agent Controller
[Section titled “Agent Controller”](#agent-controller)
### GET /api/v1/agent-controllers
[Section titled “GET /api/v1/agent-controllers”](#get-apiv1agent-controllers)
**Summary:** Get a page of Agent Controllers
**Description:** Get a page of Agent Controllers.
**Operation ID:** get-agent-controllers
**Parameters:**
* **page** (undefined) *(optional)*: any
* **per-page** (undefined) *(optional)*: any
* **filter** (undefined) *(optional)*: any
* **order** (undefined) *(optional)*: any
* **group-by** (undefined) *(optional)*: any
* **check-tls-type** (undefined) *(optional)*: any
**Responses:**
* **‘200’**: Page of Agent Controllers
* Content-Type: application/json
* Schema: any
* **‘400’**: Bad Request
* **‘401’**: Not Authenticated
* **‘500’**: Internal Server Error
* Content-Type: application/json
* Schema: any
**cURL Example:**
```bash
curl -X GET \
"https://your-tenant.aembit.io/api/v1/agent-controllers"
```
### POST /api/v1/agent-controllers
[Section titled “POST /api/v1/agent-controllers”](#post-apiv1agent-controllers)
**Summary:** Create an Agent Controller
**Description:** Create an Agent Controller.
**Operation ID:** post-agent-controller
**Request Body:** AgentControllerDTO
* Content-Type: application/json
* Schema: any
**Responses:**
* **‘201’**: Created Agent Controller
* Content-Type: application/json
* Schema: any
* **‘400’**: Bad Request
* **‘401’**: Not Authenticated
* **‘500’**: Internal Server Error
* Content-Type: application/json
* Schema: any
**cURL Example:**
```bash
curl -X POST \
-H "Content-Type: application/json" \
-d '{"example": "data"}' \
"https://your-tenant.aembit.io/api/v1/agent-controllers"
```
### PUT /api/v1/agent-controllers
[Section titled “PUT /api/v1/agent-controllers”](#put-apiv1agent-controllers)
**Summary:** Update an Agent Controller
**Description:** Update an Agent Controller.
**Operation ID:** put-agent-controller
**Request Body:** AgentControllerDTO
* Content-Type: application/json
* Schema: any
**Responses:**
* **‘200’**: Updated Agent Controller
* Content-Type: application/json
* Schema: any
* **‘400’**: Bad Request
* **‘401’**: Not Authenticated
* **‘500’**: Internal Server Error
* Content-Type: application/json
* Schema: any
**cURL Example:**
```bash
curl -X PUT \
-H "Content-Type: application/json" \
-d '{"example": "data"}' \
"https://your-tenant.aembit.io/api/v1/agent-controllers"
```
### GET ‘/api/v1/agent-controllers/{id}’
[Section titled “GET ‘/api/v1/agent-controllers/{id}’”](#get-apiv1agent-controllersid)
**Summary:** Get an Agent Controller
**Description:** Get an Agent Controller identified by its ID.
**Operation ID:** get-agent-controller
**Parameters:**
* **id** (undefined) *(optional)*: any
**Responses:**
* **‘200’**: Agent Controller
* Content-Type: application/json
* Schema: any
* **‘204’**: Agent Controller Not Found
* **‘400’**: Bad Request
* **‘401’**: Not Authenticated
* **‘500’**: Internal Server Error
* Content-Type: application/json
* Schema: any
**cURL Example:**
```bash
curl -X GET \
"https://your-tenant.aembit.io'/api/v1/agent-controllers/{id}'"
```
### PATCH ‘/api/v1/agent-controllers/{id}’
[Section titled “PATCH ‘/api/v1/agent-controllers/{id}’”](#patch-apiv1agent-controllersid)
**Summary:** Patch an Agent Controller
**Description:** Patch an Agent Controller identified by its ID.
**Operation ID:** patch-agent-controller
**Parameters:**
* **id** (undefined) *(optional)*: any
**Request Body:** AgentControllerPatchDTO
* Content-Type: application/json
* Schema: any
**Responses:**
* **‘200’**: Patched Agent Controller
* Content-Type: application/json
* Schema: any
* **‘400’**: Bad Request
* **‘401’**: Not Authenticated
* **‘500’**: Internal Server Error
* Content-Type: application/json
* Schema: any
**cURL Example:**
```bash
curl -X PATCH \
-H "Content-Type: application/json" \
-d '{"example": "data"}' \
"https://your-tenant.aembit.io'/api/v1/agent-controllers/{id}'"
```
### DELETE ‘/api/v1/agent-controllers/{id}’
[Section titled “DELETE ‘/api/v1/agent-controllers/{id}’”](#delete-apiv1agent-controllersid)
**Summary:** Delete an Agent Controller
**Description:** Delete an Agent Controller identified by its ID.
**Operation ID:** delete-agent-controller
**Parameters:**
* **id** (undefined) *(optional)*: any
**Responses:**
* **‘201’**: Successfully deleted Agent Controller
* **‘400’**: Bad Request
* **‘401’**: Not Authenticated
* **‘500’**: Internal Server Error
* Content-Type: application/json
* Schema: any
**cURL Example:**
```bash
curl -X DELETE \
"https://your-tenant.aembit.io'/api/v1/agent-controllers/{id}'"
```
### POST ‘/api/v1/agent-controllers/{agentControllerExternalId}/device-code’
[Section titled “POST ‘/api/v1/agent-controllers/{agentControllerExternalId}/device-code’”](#post-apiv1agent-controllersagentcontrollerexternaliddevice-code)
**Summary:** Generate a Device Code for an Agent Controller
**Description:** Generate a Device Code for an Agent Controller.
**Operation ID:** post-agent-controller-device-code
**Parameters:**
* **agentControllerExternalId** (undefined) *(optional)*: any
**Responses:**
* **‘201’**: Agent Controller Device Code
* Content-Type: application/json
* Schema: any
* **‘400’**: Bad Request
* **‘401’**: Not Authenticated
* **‘500’**: Internal Server Error
* Content-Type: application/json
* Schema: any
**cURL Example:**
```bash
curl -X POST \
"https://your-tenant.aembit.io'/api/v1/agent-controllers/{agentControllerExternalId}/device-code'"
```
## Audit Log
[Section titled “Audit Log”](#audit-log)
### GET /api/v1/audit-logs
[Section titled “GET /api/v1/audit-logs”](#get-apiv1audit-logs)
**Summary:** Get a page of Audit Log events
**Description:** Get a page of Audit Log events.
**Operation ID:** get-audit-logs
**Parameters:**
* **X-Aembit-ResourceSet** (undefined) *(optional)*: any
* **page** (undefined) *(optional)*: any
* **per-page** (undefined) *(optional)*: any
* **order** (undefined) *(optional)*: any
* **search** (undefined) *(optional)*: any
* **span-last-days** (undefined) *(optional)*: any
* **category** (undefined) *(optional)*: any
* **severity** (undefined) *(optional)*: any
**Responses:**
* **‘200’**: Page of Audit Logs
* Content-Type: application/json
* Schema: any
* **‘400’**: Bad Request
* **‘401’**: Not Authenticated
* **‘500’**: Internal Server Error
* Content-Type: application/json
* Schema: any
**cURL Example:**
```bash
curl -X GET \
"https://your-tenant.aembit.io/api/v1/audit-logs"
```
### GET ‘/api/v1/audit-logs/{id}’
[Section titled “GET ‘/api/v1/audit-logs/{id}’”](#get-apiv1audit-logsid)
**Summary:** Get an Audit Log event
**Description:** Get an Audit Log event identified by its ID.
**Operation ID:** get-audit-log
**Parameters:**
* **id** (undefined) *(optional)*: any
* **X-Aembit-ResourceSet** (undefined) *(optional)*: any
**Responses:**
* **‘200’**: Audit Log
* Content-Type: application/json
* Schema: any
* **‘400’**: Bad Request
* **‘401’**: Not Authenticated
* **‘500’**: Internal Server Error
* Content-Type: application/json
* Schema: any
**cURL Example:**
```bash
curl -X GET \
"https://your-tenant.aembit.io'/api/v1/audit-logs/{id}'"
```
## Access Authorization Event
[Section titled “Access Authorization Event”](#access-authorization-event)
### GET /api/v1/authorization-events
[Section titled “GET /api/v1/authorization-events”](#get-apiv1authorization-events)
**Summary:** Get a page of Access Authorization Events
**Description:** Get a page of Access Authorization Events.
**Operation ID:** get-access-authorization-events
**Parameters:**
* **X-Aembit-ResourceSet** (undefined) *(optional)*: any
* **page** (undefined) *(optional)*: any
* **per-page** (undefined) *(optional)*: any
* **order** (undefined) *(optional)*: any
* **search** (undefined) *(optional)*: any
* **span-last-hours** (undefined) *(optional)*: any
* **severity** (undefined) *(optional)*: any
* **event-type** (undefined) *(optional)*: any
**Responses:**
* **‘200’**: Page of Access Authorization Events
* Content-Type: application/json
* Schema: any
* **‘400’**: Bad Request
* **‘401’**: Not Authenticated
* **‘500’**: Internal Server Error
* Content-Type: application/json
* Schema: any
**cURL Example:**
```bash
curl -X GET \
"https://your-tenant.aembit.io/api/v1/authorization-events"
```
### GET ‘/api/v1/authorization-events/{id}’
[Section titled “GET ‘/api/v1/authorization-events/{id}’”](#get-apiv1authorization-eventsid)
**Summary:** Get an Access Authorization Event
**Description:** Get an Access Authorization Event identified by its ID.
**Operation ID:** get-access-authorization-event
**Parameters:**
* **id** (undefined) *(optional)*: any
* **X-Aembit-ResourceSet** (undefined) *(optional)*: any
**Responses:**
* **‘200’**: Access Authorization Event
* Content-Type: application/json
* Schema: any
* **‘400’**: Bad Request
* **‘401’**: Not Authenticated
* **‘500’**: Internal Server Error
* Content-Type: application/json
* Schema: any
**cURL Example:**
```bash
curl -X GET \
"https://your-tenant.aembit.io'/api/v1/authorization-events/{id}'"
```
## Credential Provider (Deprecated)
[Section titled “Credential Provider (Deprecated)”](#credential-provider-deprecated)
### GET ‘/api/v1/credential-providers/{id}’
[Section titled “GET ‘/api/v1/credential-providers/{id}’”](#get-apiv1credential-providersid)
**Summary:** Get a Credential Provider
**Description:** Get a Credential Provider identified by its ID.
**Operation ID:** get-credential-provider
**Parameters:**
* **id** (undefined) *(optional)*: any
* **X-Aembit-ResourceSet** (undefined) *(optional)*: any
**Responses:**
* **‘200’**: Credential Provider
* Content-Type: application/json
* Schema: any
* **‘204’**: Credential Provider Not Found
* **‘400’**: Bad Request
* **‘401’**: Not Authenticated
* **‘500’**: Internal Server Error
* Content-Type: application/json
* Schema: any
**cURL Example:**
```bash
curl -X GET \
"https://your-tenant.aembit.io'/api/v1/credential-providers/{id}'"
```
### DELETE ‘/api/v1/credential-providers/{id}’
[Section titled “DELETE ‘/api/v1/credential-providers/{id}’”](#delete-apiv1credential-providersid)
**Summary:** Delete a Credential Provider
**Description:** Delete a Credential Provider identified by its ID.
**Operation ID:** delete-credential-provider
**Parameters:**
* **id** (undefined) *(optional)*: any
* **X-Aembit-ResourceSet** (undefined) *(optional)*: any
**Responses:**
* **‘204’**: Deleted Credential Provider
* **‘400’**: Bad Request
* **‘401’**: Not Authenticated
* **‘500’**: Internal Server Error
* Content-Type: application/json
* Schema: any
**cURL Example:**
```bash
curl -X DELETE \
"https://your-tenant.aembit.io'/api/v1/credential-providers/{id}'"
```
### PATCH ‘/api/v1/credential-providers/{id}’
[Section titled “PATCH ‘/api/v1/credential-providers/{id}’”](#patch-apiv1credential-providersid)
**Summary:** Patch a Credential Provider
**Description:** Patch a Credential Provider.
**Operation ID:** patch-credential-provider
**Parameters:**
* **id** (undefined) *(optional)*: any
* **X-Aembit-ResourceSet** (undefined) *(optional)*: any
**Request Body:** CredentialProviderPatchDTO
* Content-Type: application/json
* Schema: any
**Responses:**
* **‘201’**: Patched Credential Provider
* Content-Type: application/json
* Schema: any
* **‘400’**: Bad Request
* **‘401’**: Not Authenticated
* **‘500’**: Internal Server Error
* Content-Type: application/json
* Schema: any
**cURL Example:**
```bash
curl -X PATCH \
-H "Content-Type: application/json" \
-d '{"example": "data"}' \
"https://your-tenant.aembit.io'/api/v1/credential-providers/{id}'"
```
### GET ‘/api/v1/credential-providers/{id}/authorize’
[Section titled “GET ‘/api/v1/credential-providers/{id}/authorize’”](#get-apiv1credential-providersidauthorize)
**Summary:** Get a Credential Provider Authorization URL
**Description:** Get a Credential Provider Authorization URL identified by the Credential Provider ID.
**Operation ID:** get-credential-provider-authorization
**Parameters:**
* **id** (undefined) *(optional)*: any
* **X-Aembit-ResourceSet** (undefined) *(optional)*: any
**Responses:**
* **‘302’**: Redirects to the Credential Provider Authorization URL
* **‘400’**: Bad Request
* **‘401’**: Not Authenticated
* **‘500’**: Internal Server Error
* Content-Type: application/json
* Schema: any
**cURL Example:**
```bash
curl -X GET \
"https://your-tenant.aembit.io'/api/v1/credential-providers/{id}/authorize'"
```
### GET /api/v1/credential-providers
[Section titled “GET /api/v1/credential-providers”](#get-apiv1credential-providers)
**Summary:** Get a page of Credential Providers
**Description:** Get a page of Credential Providers.
**Operation ID:** get-credential-providers
**Parameters:**
* **X-Aembit-ResourceSet** (undefined) *(optional)*: any
* **page** (undefined) *(optional)*: any
* **per-page** (undefined) *(optional)*: any
* **filter** (undefined) *(optional)*: any
* **order** (undefined) *(optional)*: any
* **group-by** (undefined) *(optional)*: any
**Responses:**
* **‘200’**: Page of Credential Providers
* Content-Type: application/json
* Schema: any
* **‘400’**: Bad Request
* **‘401’**: Not Authenticated
* **‘500’**: Internal Server Error
* Content-Type: application/json
* Schema: any
**cURL Example:**
```bash
curl -X GET \
"https://your-tenant.aembit.io/api/v1/credential-providers"
```
### POST /api/v1/credential-providers
[Section titled “POST /api/v1/credential-providers”](#post-apiv1credential-providers)
**Summary:** Create a Credential Provider
**Description:** Create a Credential Provider.
**Operation ID:** post-credential-provider
**Parameters:**
* **X-Aembit-ResourceSet** (undefined) *(optional)*: any
**Request Body:** CredentialProviderDTO
* Content-Type: application/json
* Schema: any
**Responses:**
* **‘201’**: Created Credential Provider
* Content-Type: application/json
* Schema: any
* **‘400’**: Bad Request
* **‘401’**: Not Authenticated
* **‘500’**: Internal Server Error
* Content-Type: application/json
* Schema: any
**cURL Example:**
```bash
curl -X POST \
-H "Content-Type: application/json" \
-d '{"example": "data"}' \
"https://your-tenant.aembit.io/api/v1/credential-providers"
```
### PUT /api/v1/credential-providers
[Section titled “PUT /api/v1/credential-providers”](#put-apiv1credential-providers)
**Summary:** Update a Credential Provider
**Description:** Update a Credential Provider.
**Operation ID:** put-credential-provider
**Parameters:**
* **X-Aembit-ResourceSet** (undefined) *(optional)*: any
**Request Body:** CredentialProviderDTO
* Content-Type: application/json
* Schema: any
**Responses:**
* **‘201’**: Updated Credential Provider
* Content-Type: application/json
* Schema: any
* **‘400’**: Bad Request
* **‘401’**: Not Authenticated
* **‘500’**: Internal Server Error
* Content-Type: application/json
* Schema: any
**cURL Example:**
```bash
curl -X PUT \
-H "Content-Type: application/json" \
-d '{"example": "data"}' \
"https://your-tenant.aembit.io/api/v1/credential-providers"
```
### GET ‘/api/v1/credential-providers/{id}/verification’
[Section titled “GET ‘/api/v1/credential-providers/{id}/verification’”](#get-apiv1credential-providersidverification)
**Summary:** Verify the Credential Provider
**Description:** Verify the Credential Provider will successfully return a credential.
**Operation ID:** get-credential-provider-verification
**Parameters:**
* **id** (undefined) *(optional)*: any
* **X-Aembit-ResourceSet** (undefined) *(optional)*: any
**Responses:**
* **‘200’**: Details on the verification of a Credential Provider
* Content-Type: application/json
* Schema: any
* **‘400’**: Bad Request
* **‘401’**: Not Authenticated
* **‘500’**: Internal Server Error
* Content-Type: application/json
* Schema: any
**cURL Example:**
```bash
curl -X GET \
"https://your-tenant.aembit.io'/api/v1/credential-providers/{id}/verification'"
```
## Credential Provider Integration
[Section titled “Credential Provider Integration”](#credential-provider-integration)
### GET ‘/api/v1/credential-integrations/{id}’
[Section titled “GET ‘/api/v1/credential-integrations/{id}’”](#get-apiv1credential-integrationsid)
**Summary:** Get a Credential Provider Integration
**Description:** Get a Credential Provider Integration identified by its ID.
**Operation ID:** get-credential-provider-integration
**Parameters:**
* **id** (undefined) *(optional)*: any
**Responses:**
* **‘200’**: Credential Provider Integration
* Content-Type: application/json
* Schema: any
* **‘400’**: Bad Request
* **‘401’**: Not Authenticated
* **‘500’**: Internal Server Error
* Content-Type: application/json
* Schema: any
**cURL Example:**
```bash
curl -X GET \
"https://your-tenant.aembit.io'/api/v1/credential-integrations/{id}'"
```
### DELETE ‘/api/v1/credential-integrations/{id}’
[Section titled “DELETE ‘/api/v1/credential-integrations/{id}’”](#delete-apiv1credential-integrationsid)
**Summary:** Delete a Credential Provider Integration
**Description:** Delete a Credential Provider Integration identified by its ID.
**Operation ID:** delete-credential-provider-integration
**Parameters:**
* **id** (undefined) *(optional)*: any
**Responses:**
* **‘204’**: Successfully deleted Credential Provider Integration
* **‘400’**: Bad Request
* **‘401’**: Not Authenticated
* **‘404’**: Not Found
* **‘500’**: Internal Server Error
* Content-Type: application/json
* Schema: any
**cURL Example:**
```bash
curl -X DELETE \
"https://your-tenant.aembit.io'/api/v1/credential-integrations/{id}'"
```
### PATCH ‘/api/v1/credential-integrations/{id}’
[Section titled “PATCH ‘/api/v1/credential-integrations/{id}’”](#patch-apiv1credential-integrationsid)
**Summary:** Patch a Credential Provider Integration
**Description:** Patch a Credential Provider Integration identified by its ID.
**Operation ID:** patch-credential-provider-integration
**Parameters:**
* **id** (undefined) *(optional)*: any
**Request Body:** CredentialProviderIntegrationPatchDTO
* Content-Type: application/json
* Schema: any
**Responses:**
* **‘200’**: Patched Credential Provider Integration
* Content-Type: application/json
* Schema: any
* **‘400’**: Bad Request
* **‘401’**: Not Authenticated
* **‘500’**: Internal Server Error
* Content-Type: application/json
* Schema: any
**cURL Example:**
```bash
curl -X PATCH \
-H "Content-Type: application/json" \
-d '{"example": "data"}' \
"https://your-tenant.aembit.io'/api/v1/credential-integrations/{id}'"
```
### GET /api/v1/credential-integrations
[Section titled “GET /api/v1/credential-integrations”](#get-apiv1credential-integrations)
**Summary:** Get a page of Credential Provider Integrations
**Description:** Get a page of Credential Provider Integrations.
**Operation ID:** get-credential-provider-integrations
**Parameters:**
* **page** (undefined) *(optional)*: any
* **per-page** (undefined) *(optional)*: any
* **filter** (undefined) *(optional)*: any
* **order** (undefined) *(optional)*: any
* **group-by** (undefined) *(optional)*: any
**Responses:**
* **‘200’**: Page of Credential Provider Integrations
* Content-Type: application/json
* Schema: any
* **‘400’**: Bad Request
* **‘401’**: Not Authenticated
* **‘500’**: Internal Server Error
* Content-Type: application/json
* Schema: any
**cURL Example:**
```bash
curl -X GET \
"https://your-tenant.aembit.io/api/v1/credential-integrations"
```
### POST /api/v1/credential-integrations
[Section titled “POST /api/v1/credential-integrations”](#post-apiv1credential-integrations)
**Summary:** Create a Credential Provider Integration
**Description:** Create a Credential Provider Integration.
**Operation ID:** post-credential-provider-integration
**Request Body:** CredentialProviderIntegrationDTO
* Content-Type: application/json
* Schema: any
**Responses:**
* **‘201’**: Created Credential Provider Integration
* Content-Type: application/json
* Schema: any
* **‘400’**: Bad Request
* **‘401’**: Not Authenticated
* **‘500’**: Internal Server Error
* Content-Type: application/json
* Schema: any
**cURL Example:**
```bash
curl -X POST \
-H "Content-Type: application/json" \
-d '{"example": "data"}' \
"https://your-tenant.aembit.io/api/v1/credential-integrations"
```
### PUT /api/v1/credential-integrations
[Section titled “PUT /api/v1/credential-integrations”](#put-apiv1credential-integrations)
**Summary:** Update a Credential Provider Integration
**Description:** Update a Credential Provider Integration.
**Operation ID:** put-credential-provider-integration
**Request Body:** CredentialProviderIntegrationDTO
* Content-Type: application/json
* Schema: any
**Responses:**
* **‘200’**: Updated Credential Provider Integration
* Content-Type: application/json
* Schema: any
* **‘400’**: Bad Request
* **‘401’**: Not Authenticated
* **‘404’**: Not Found
* **‘500’**: Internal Server Error
* Content-Type: application/json
* Schema: any
**cURL Example:**
```bash
curl -X PUT \
-H "Content-Type: application/json" \
-d '{"example": "data"}' \
"https://your-tenant.aembit.io/api/v1/credential-integrations"
```
## Credential Provider v2
[Section titled “Credential Provider v2”](#credential-provider-v2)
### POST /api/v2/credential-providers
[Section titled “POST /api/v2/credential-providers”](#post-apiv2credential-providers)
**Summary:** Create a Credential Provider
**Description:** Create a Credential Provider.
**Operation ID:** post-credential-provider2
**Parameters:**
* **X-Aembit-ResourceSet** (undefined) *(optional)*: any
**Request Body:** CredentialProviderV2DTO
* Content-Type: application/json
* Schema: any
**Responses:**
* **‘201’**: Created Credential Provider
* Content-Type: application/json
* Schema: any
* **‘400’**: Bad Request
* **‘401’**: Not Authenticated
* **‘500’**: Internal Server Error
* Content-Type: application/json
* Schema: any
**cURL Example:**
```bash
curl -X POST \
-H "Content-Type: application/json" \
-d '{"example": "data"}' \
"https://your-tenant.aembit.io/api/v2/credential-providers"
```
### PUT /api/v2/credential-providers
[Section titled “PUT /api/v2/credential-providers”](#put-apiv2credential-providers)
**Summary:** Update a Credential Provider
**Description:** Update a Credential Provider.
**Operation ID:** put-credential-provider2
**Parameters:**
* **X-Aembit-ResourceSet** (undefined) *(optional)*: any
**Request Body:** CredentialProviderV2DTO
* Content-Type: application/json
* Schema: any
**Responses:**
* **‘200’**: Updated Credential Provider
* Content-Type: application/json
* Schema: any
* **‘400’**: Bad Request
* **‘401’**: Not Authenticated
* **‘500’**: Internal Server Error
* Content-Type: application/json
* Schema: any
**cURL Example:**
```bash
curl -X PUT \
-H "Content-Type: application/json" \
-d '{"example": "data"}' \
"https://your-tenant.aembit.io/api/v2/credential-providers"
```
### GET /api/v2/credential-providers
[Section titled “GET /api/v2/credential-providers”](#get-apiv2credential-providers)
**Summary:** Get a page of Credential Providers
**Description:** Get a page of Credential Providers.
**Operation ID:** get-credential-providers-v2
**Parameters:**
* **X-Aembit-ResourceSet** (undefined) *(optional)*: any
* **page** (undefined) *(optional)*: any
* **per-page** (undefined) *(optional)*: any
* **filter** (undefined) *(optional)*: any
* **order** (undefined) *(optional)*: any
* **group-by** (undefined) *(optional)*: any
**Responses:**
* **‘200’**: Page of Credential Providers
* Content-Type: application/json
* Schema: any
* **‘400’**: Bad Request
* **‘401’**: Not Authenticated
* **‘500’**: Internal Server Error
* Content-Type: application/json
* Schema: any
**cURL Example:**
```bash
curl -X GET \
"https://your-tenant.aembit.io/api/v2/credential-providers"
```
### GET ‘/api/v2/credential-providers/{id}’
[Section titled “GET ‘/api/v2/credential-providers/{id}’”](#get-apiv2credential-providersid)
**Summary:** Get a Credential Provider
**Description:** Get a Credential Provider identified by its ID.
**Operation ID:** get-credential-provider2
**Parameters:**
* **id** (undefined) *(optional)*: any
* **X-Aembit-ResourceSet** (undefined) *(optional)*: any
**Responses:**
* **‘200’**: Credential Provider
* Content-Type: application/json
* Schema: any
* **‘204’**: Credential Provider Not Found
* **‘400’**: Bad Request
* **‘401’**: Not Authenticated
* **‘500’**: Internal Server Error
* Content-Type: application/json
* Schema: any
**cURL Example:**
```bash
curl -X GET \
"https://your-tenant.aembit.io'/api/v2/credential-providers/{id}'"
```
### DELETE ‘/api/v2/credential-providers/{id}’
[Section titled “DELETE ‘/api/v2/credential-providers/{id}’”](#delete-apiv2credential-providersid)
**Summary:** Delete a Credential Provider
**Description:** Delete a Credential Provider identified by its ID.
**Operation ID:** delete-credential-provider2
**Parameters:**
* **id** (undefined) *(optional)*: any
* **X-Aembit-ResourceSet** (undefined) *(optional)*: any
**Responses:**
* **‘204’**: Deleted Credential Provider
* **‘400’**: Bad Request
* **‘401’**: Not Authenticated
* **‘404’**: Not Found
* **‘500’**: Internal Server Error
* Content-Type: application/json
* Schema: any
**cURL Example:**
```bash
curl -X DELETE \
"https://your-tenant.aembit.io'/api/v2/credential-providers/{id}'"
```
### PATCH ‘/api/v2/credential-providers/{id}’
[Section titled “PATCH ‘/api/v2/credential-providers/{id}’”](#patch-apiv2credential-providersid)
**Summary:** Patch a Credential Provider
**Description:** Patch a Credential Provider.
**Operation ID:** patch-credential-provider-v2
**Parameters:**
* **id** (undefined) *(optional)*: any
* **X-Aembit-ResourceSet** (undefined) *(optional)*: any
**Request Body:** CredentialProviderPatchDTO
* Content-Type: application/json
* Schema: any
**Responses:**
* **‘200’**: Patched Credential Provider
* Content-Type: application/json
* Schema: any
* **‘400’**: Bad Request
* **‘401’**: Not Authenticated
* **‘500’**: Internal Server Error
* Content-Type: application/json
* Schema: any
**cURL Example:**
```bash
curl -X PATCH \
-H "Content-Type: application/json" \
-d '{"example": "data"}' \
"https://your-tenant.aembit.io'/api/v2/credential-providers/{id}'"
```
### GET ‘/api/v2/credential-providers/{id}/verification’
[Section titled “GET ‘/api/v2/credential-providers/{id}/verification’”](#get-apiv2credential-providersidverification)
**Summary:** Verify the Credential Provider
**Description:** Verify the Credential Provider will successfully return a credential.
**Operation ID:** get-credential-provider-verification-v2
**Parameters:**
* **id** (undefined) *(optional)*: any
* **X-Aembit-ResourceSet** (undefined) *(optional)*: any
**Responses:**
* **‘200’**: Details on the verification of a Credential Provider
* Content-Type: application/json
* Schema: any
* **‘400’**: Bad Request
* **‘401’**: Not Authenticated
* **‘500’**: Internal Server Error
* Content-Type: application/json
* Schema: any
**cURL Example:**
```bash
curl -X GET \
"https://your-tenant.aembit.io'/api/v2/credential-providers/{id}/verification'"
```
### GET ‘/api/v2/credential-providers/{id}/authorize’
[Section titled “GET ‘/api/v2/credential-providers/{id}/authorize’”](#get-apiv2credential-providersidauthorize)
**Summary:** Get a Credential Provider Authorization URL
**Description:** Get a Credential Provider Authorization URL identified by the Credential Provider ID.
**Operation ID:** get-credential-provider-authorization-v2
**Parameters:**
* **id** (undefined) *(optional)*: any
* **X-Aembit-ResourceSet** (undefined) *(optional)*: any
**Responses:**
* **‘302’**: Redirects to the Credential Provider Authorization URL
* **‘400’**: Bad Request
* **‘401’**: Not Authenticated
* **‘500’**: Internal Server Error
* Content-Type: application/json
* Schema: any
**cURL Example:**
```bash
curl -X GET \
"https://your-tenant.aembit.io'/api/v2/credential-providers/{id}/authorize'"
```
## DiscoveryIntegration
[Section titled “DiscoveryIntegration”](#discoveryintegration)
### GET /api/v1/discovery-integrations
[Section titled “GET /api/v1/discovery-integrations”](#get-apiv1discovery-integrations)
**Summary:** Get a page of Integrations
**Description:** Get a page of Integrations.
**Operation ID:** get-discovery-integrations
**Parameters:**
* **page** (undefined) *(optional)*: any
* **per-page** (undefined) *(optional)*: any
* **filter** (undefined) *(optional)*: any
* **order** (undefined) *(optional)*: any
**Responses:**
* **‘200’**: Page of Integrations
* Content-Type: application/json
* Schema: any
* **‘400’**: Bad Request
* **‘401’**: Not Authenticated
* **‘500’**: Internal Server Error
* Content-Type: application/json
* Schema: any
**cURL Example:**
```bash
curl -X GET \
"https://your-tenant.aembit.io/api/v1/discovery-integrations"
```
### POST /api/v1/discovery-integrations
[Section titled “POST /api/v1/discovery-integrations”](#post-apiv1discovery-integrations)
**Summary:** Create an Integration
**Description:** Create an Integration.
**Operation ID:** post-discovery-integration
**Request Body:** DiscoveryIntegrationDTO
* Content-Type: application/json
* Schema: any
**Responses:**
* **‘201’**: Created Integration
* Content-Type: application/json
* Schema: any
* **‘400’**: Bad Request
* **‘401’**: Not Authenticated
* **‘500’**: Internal Server Error
* Content-Type: application/json
* Schema: any
**cURL Example:**
```bash
curl -X POST \
-H "Content-Type: application/json" \
-d '{"example": "data"}' \
"https://your-tenant.aembit.io/api/v1/discovery-integrations"
```
### PUT /api/v1/discovery-integrations
[Section titled “PUT /api/v1/discovery-integrations”](#put-apiv1discovery-integrations)
**Summary:** Update an Integration
**Description:** Update an Integration.
**Operation ID:** put-discovery-integration
**Request Body:** DiscoveryIntegrationDTO
* Content-Type: application/json
* Schema: any
**Responses:**
* **‘200’**: Updated Integration
* Content-Type: application/json
* Schema: any
* **‘400’**: Bad Request
* **‘401’**: Not Authenticated
* **‘500’**: Internal Server Error
* Content-Type: application/json
* Schema: any
**cURL Example:**
```bash
curl -X PUT \
-H "Content-Type: application/json" \
-d '{"example": "data"}' \
"https://your-tenant.aembit.io/api/v1/discovery-integrations"
```
### GET ‘/api/v1/discovery-integrations/{id}’
[Section titled “GET ‘/api/v1/discovery-integrations/{id}’”](#get-apiv1discovery-integrationsid)
**Summary:** Get an Integration
**Description:** Get an Integration.
**Operation ID:** get-discovery-integration
**Parameters:**
* **id** (undefined) *(optional)*: any
**Responses:**
* **‘200’**: Integration
* Content-Type: application/json
* Schema: any
* **‘204’**: Integration Not Found
* **‘400’**: Bad Request
* **‘401’**: Not Authenticated
* **‘500’**: Internal Server Error
* Content-Type: application/json
* Schema: any
**cURL Example:**
```bash
curl -X GET \
"https://your-tenant.aembit.io'/api/v1/discovery-integrations/{id}'"
```
### DELETE ‘/api/v1/discovery-integrations/{id}’
[Section titled “DELETE ‘/api/v1/discovery-integrations/{id}’”](#delete-apiv1discovery-integrationsid)
**Summary:** Delete an Integration
**Description:** Delete an Integration as identified by its ID.
**Operation ID:** delete-discovery-integration
**Parameters:**
* **id** (undefined) *(optional)*: any
**Responses:**
* **‘200’**: Successfully deleted Integration
* **‘400’**: Bad Request
* **‘401’**: Not Authenticated
* **‘500’**: Internal Server Error
* Content-Type: application/json
* Schema: any
**cURL Example:**
```bash
curl -X DELETE \
"https://your-tenant.aembit.io'/api/v1/discovery-integrations/{id}'"
```
### PATCH ‘/api/v1/discovery-integrations/{id}’
[Section titled “PATCH ‘/api/v1/discovery-integrations/{id}’”](#patch-apiv1discovery-integrationsid)
**Summary:** Patch an Integration
**Description:** Patch an Integration as identified by its ID.
**Operation ID:** patch-discovery-integration
**Parameters:**
* **id** (undefined) *(optional)*: any
**Request Body:** DiscoveryIntegrationPatchDTO
* Content-Type: application/json
* Schema: any
**Responses:**
* **‘200’**: Patched Integration
* Content-Type: application/json
* Schema: any
* **‘400’**: Bad Request
* **‘401’**: Not Authenticated
* **‘500’**: Internal Server Error
* Content-Type: application/json
* Schema: any
**cURL Example:**
```bash
curl -X PATCH \
-H "Content-Type: application/json" \
-d '{"example": "data"}' \
"https://your-tenant.aembit.io'/api/v1/discovery-integrations/{id}'"
```
## Workload Event
[Section titled “Workload Event”](#workload-event)
### GET /api/v1/workload-events
[Section titled “GET /api/v1/workload-events”](#get-apiv1workload-events)
**Summary:** Get a page of Workload Events
**Description:** Get a page of Workload Events.
**Operation ID:** get-workload-events
**Parameters:**
* **X-Aembit-ResourceSet** (undefined) *(optional)*: any
* **page** (undefined) *(optional)*: any
* **per-page** (undefined) *(optional)*: any
* **order** (undefined) *(optional)*: any
* **search** (undefined) *(optional)*: any
* **span-last-hours** (undefined) *(optional)*: any
* **application-protocol** (undefined) *(optional)*: any
* **severity** (undefined) *(optional)*: any
* **source-workload** (undefined) *(optional)*: any
* **target-workload** (undefined) *(optional)*: any
**Responses:**
* **‘200’**: Page of Workload Events
* Content-Type: application/json
* Schema: any
* **‘400’**: Bad Request
* **‘401’**: Not Authenticated
* **‘500’**: Internal Server Error
* Content-Type: application/json
* Schema: any
**cURL Example:**
```bash
curl -X GET \
"https://your-tenant.aembit.io/api/v1/workload-events"
```
### GET ‘/api/v1/workload-events/{id}’
[Section titled “GET ‘/api/v1/workload-events/{id}’”](#get-apiv1workload-eventsid)
**Summary:** Get a Workload Event
**Description:** Get a Workload Event.
**Operation ID:** get-workload-event
**Parameters:**
* **id** (undefined) *(optional)*: any
* **X-Aembit-ResourceSet** (undefined) *(optional)*: any
**Responses:**
* **‘200’**: Workload Event
* Content-Type: application/json
* Schema: any
* **‘400’**: Bad Request
* **‘401’**: Not Authenticated
* **‘500’**: Internal Server Error
* Content-Type: application/json
* Schema: any
**cURL Example:**
```bash
curl -X GET \
"https://your-tenant.aembit.io'/api/v1/workload-events/{id}'"
```
## Health
[Section titled “Health”](#health)
### GET /api/v1/health
[Section titled “GET /api/v1/health”](#get-apiv1health)
**Summary:** Aembit Cloud API Health
**Description:** Get the health of the Aembit Cloud API.
**Operation ID:** get-health
**Responses:**
* **‘200’**: API Health
* Content-Type: application/json
* Schema: any
**cURL Example:**
```bash
curl -X GET \
"https://your-tenant.aembit.io/api/v1/health"
```
## Integration
[Section titled “Integration”](#integration)
### GET /api/v1/integrations
[Section titled “GET /api/v1/integrations”](#get-apiv1integrations)
**Summary:** Get a page of Integrations
**Description:** Get a page of Integrations.
**Operation ID:** get-integrations
**Parameters:**
* **X-Aembit-ResourceSet** (undefined) *(optional)*: any
* **page** (undefined) *(optional)*: any
* **per-page** (undefined) *(optional)*: any
* **filter** (undefined) *(optional)*: any
* **order** (undefined) *(optional)*: any
**Responses:**
* **‘200’**: Page of Integrations
* Content-Type: application/json
* Schema: any
* **‘400’**: Bad Request
* **‘401’**: Not Authenticated
* **‘500’**: Internal Server Error
* Content-Type: application/json
* Schema: any
**cURL Example:**
```bash
curl -X GET \
"https://your-tenant.aembit.io/api/v1/integrations"
```
### POST /api/v1/integrations
[Section titled “POST /api/v1/integrations”](#post-apiv1integrations)
**Summary:** Create an Integration
**Description:** Create an Integration.
**Operation ID:** post-integration
**Parameters:**
* **X-Aembit-ResourceSet** (undefined) *(optional)*: any
**Request Body:** IntegrationDTO
* Content-Type: application/json
* Schema: any
**Responses:**
* **‘201’**: Created Integration
* Content-Type: application/json
* Schema: any
* **‘400’**: Bad Request
* **‘401’**: Not Authenticated
* **‘500’**: Internal Server Error
* Content-Type: application/json
* Schema: any
**cURL Example:**
```bash
curl -X POST \
-H "Content-Type: application/json" \
-d '{"example": "data"}' \
"https://your-tenant.aembit.io/api/v1/integrations"
```
### PUT /api/v1/integrations
[Section titled “PUT /api/v1/integrations”](#put-apiv1integrations)
**Summary:** Update an Integration
**Description:** Update an Integration.
**Operation ID:** put-integration
**Parameters:**
* **X-Aembit-ResourceSet** (undefined) *(optional)*: any
**Request Body:** IntegrationDTO
* Content-Type: application/json
* Schema: any
**Responses:**
* **‘200’**: Updated Integration
* Content-Type: application/json
* Schema: any
* **‘400’**: Bad Request
* **‘401’**: Not Authenticated
* **‘500’**: Internal Server Error
* Content-Type: application/json
* Schema: any
**cURL Example:**
```bash
curl -X PUT \
-H "Content-Type: application/json" \
-d '{"example": "data"}' \
"https://your-tenant.aembit.io/api/v1/integrations"
```
### GET ‘/api/v1/integrations/{id}’
[Section titled “GET ‘/api/v1/integrations/{id}’”](#get-apiv1integrationsid)
**Summary:** Get an Integration
**Description:** Get an Integration.
**Operation ID:** get-integration
**Parameters:**
* **id** (undefined) *(optional)*: any
* **X-Aembit-ResourceSet** (undefined) *(optional)*: any
**Responses:**
* **‘200’**: Integration
* Content-Type: application/json
* Schema: any
* **‘204’**: Integration Not Found
* **‘400’**: Bad Request
* **‘401’**: Not Authenticated
* **‘500’**: Internal Server Error
* Content-Type: application/json
* Schema: any
**cURL Example:**
```bash
curl -X GET \
"https://your-tenant.aembit.io'/api/v1/integrations/{id}'"
```
### DELETE ‘/api/v1/integrations/{id}’
[Section titled “DELETE ‘/api/v1/integrations/{id}’”](#delete-apiv1integrationsid)
**Summary:** Delete an Integration
**Description:** Delete an Integration as identified by its ID.
**Operation ID:** delete-integration
**Parameters:**
* **id** (undefined) *(optional)*: any
* **X-Aembit-ResourceSet** (undefined) *(optional)*: any
**Responses:**
* **‘200’**: Successfully deleted Integration
* **‘400’**: Bad Request
* **‘401’**: Not Authenticated
* **‘500’**: Internal Server Error
* Content-Type: application/json
* Schema: any
**cURL Example:**
```bash
curl -X DELETE \
"https://your-tenant.aembit.io'/api/v1/integrations/{id}'"
```
### PATCH ‘/api/v1/integrations/{id}’
[Section titled “PATCH ‘/api/v1/integrations/{id}’”](#patch-apiv1integrationsid)
**Summary:** Patch an Integration
**Description:** Patch an Integration as identified by its ID.
**Operation ID:** patch-integration
**Parameters:**
* **id** (undefined) *(optional)*: any
* **X-Aembit-ResourceSet** (undefined) *(optional)*: any
**Request Body:** IntegrationPatchDTO
* Content-Type: application/json
* Schema: any
**Responses:**
* **‘200’**: Patched Integration
* Content-Type: application/json
* Schema: any
* **‘400’**: Bad Request
* **‘401’**: Not Authenticated
* **‘500’**: Internal Server Error
* Content-Type: application/json
* Schema: any
**cURL Example:**
```bash
curl -X PATCH \
-H "Content-Type: application/json" \
-d '{"example": "data"}' \
"https://your-tenant.aembit.io'/api/v1/integrations/{id}'"
```
## Log Stream
[Section titled “Log Stream”](#log-stream)
### GET /api/v1/log-streams
[Section titled “GET /api/v1/log-streams”](#get-apiv1log-streams)
**Summary:** Get a page of Log Streams
**Description:** Get a page of Log Streams.
**Operation ID:** get-log-streams
**Parameters:**
* **page** (undefined) *(optional)*: any
* **per-page** (undefined) *(optional)*: any
* **filter** (undefined) *(optional)*: any
* **order** (undefined) *(optional)*: any
**Responses:**
* **‘200’**: Page of Log Streams
* Content-Type: application/json
* Schema: any
* **‘400’**: Bad Request
* **‘401’**: Not Authenticated
* **‘500’**: Internal Server Error
* Content-Type: application/json
* Schema: any
**cURL Example:**
```bash
curl -X GET \
"https://your-tenant.aembit.io/api/v1/log-streams"
```
### POST /api/v1/log-streams
[Section titled “POST /api/v1/log-streams”](#post-apiv1log-streams)
**Summary:** Create a Log Stream
**Description:** Create a Log Stream.
**Operation ID:** post-log-stream
**Request Body:** LogStreamDTO
* Content-Type: application/json
* Schema: any
**Responses:**
* **‘201’**: Created Log Stream
* Content-Type: application/json
* Schema: any
* **‘400’**: Bad Request
* **‘401’**: Not Authenticated
* **‘500’**: Internal Server Error
* Content-Type: application/json
* Schema: any
**cURL Example:**
```bash
curl -X POST \
-H "Content-Type: application/json" \
-d '{"example": "data"}' \
"https://your-tenant.aembit.io/api/v1/log-streams"
```
### PUT /api/v1/log-streams
[Section titled “PUT /api/v1/log-streams”](#put-apiv1log-streams)
**Summary:** Update a Log Stream
**Description:** Update a Log Stream.
**Operation ID:** put-log-stream
**Request Body:** LogStreamDTO
* Content-Type: application/json
* Schema: any
**Responses:**
* **‘200’**: Updated Log Stream
* Content-Type: application/json
* Schema: any
* **‘400’**: Bad Request
* **‘401’**: Not Authenticated
* **‘500’**: Internal Server Error
* Content-Type: application/json
* Schema: any
**cURL Example:**
```bash
curl -X PUT \
-H "Content-Type: application/json" \
-d '{"example": "data"}' \
"https://your-tenant.aembit.io/api/v1/log-streams"
```
### GET ‘/api/v1/log-streams/{id}’
[Section titled “GET ‘/api/v1/log-streams/{id}’”](#get-apiv1log-streamsid)
**Summary:** Get a Log Stream
**Description:** Get a Log Stream identified by its ID.
**Operation ID:** get-log-stream
**Parameters:**
* **id** (undefined) *(optional)*: any
**Responses:**
* **‘200’**: Log Stream
* Content-Type: application/json
* Schema: any
* **‘204’**: Log Stream Not Found
* **‘400’**: Bad Request
* **‘401’**: Not Authenticated
* **‘500’**: Internal Server Error
* Content-Type: application/json
* Schema: any
**cURL Example:**
```bash
curl -X GET \
"https://your-tenant.aembit.io'/api/v1/log-streams/{id}'"
```
### DELETE ‘/api/v1/log-streams/{id}’
[Section titled “DELETE ‘/api/v1/log-streams/{id}’”](#delete-apiv1log-streamsid)
**Summary:** Delete a Log Stream
**Description:** Delete a Log Stream identified by its ID.
**Operation ID:** delete-log-stream
**Parameters:**
* **id** (undefined) *(optional)*: any
**Responses:**
* **‘204’**: Successfully deleted Log Stream
* **‘400’**: Bad Request
* **‘401’**: Not Authenticated
* **‘500’**: Internal Server Error
* Content-Type: application/json
* Schema: any
**cURL Example:**
```bash
curl -X DELETE \
"https://your-tenant.aembit.io'/api/v1/log-streams/{id}'"
```
### PATCH ‘/api/v1/log-streams/{id}’
[Section titled “PATCH ‘/api/v1/log-streams/{id}’”](#patch-apiv1log-streamsid)
**Summary:** Patch a Log Stream
**Description:** Patch a Log Stream identified by its ID.
**Operation ID:** patch-log-stream
**Parameters:**
* **id** (undefined) *(optional)*: any
**Request Body:** LogStreamPatchDTO
* Content-Type: application/json
* Schema: any
**Responses:**
* **‘200’**: Patched Log Stream
* Content-Type: application/json
* Schema: any
* **‘400’**: Bad Request
* **‘401’**: Not Authenticated
* **‘500’**: Internal Server Error
* Content-Type: application/json
* Schema: any
**cURL Example:**
```bash
curl -X PATCH \
-H "Content-Type: application/json" \
-d '{"example": "data"}' \
"https://your-tenant.aembit.io'/api/v1/log-streams/{id}'"
```
## Resource Set
[Section titled “Resource Set”](#resource-set)
### GET ‘/api/v1/resource-sets/{id}’
[Section titled “GET ‘/api/v1/resource-sets/{id}’”](#get-apiv1resource-setsid)
**Summary:** Get a Resource Set
**Description:** Get a Resource Set identified by its ID.
**Operation ID:** get-resource-set
**Parameters:**
* **id** (undefined) *(optional)*: any
**Responses:**
* **‘200’**: Resource Set
* Content-Type: application/json
* Schema: any
* **‘400’**: Bad Request
* **‘401’**: Not Authenticated
* **‘500’**: Internal Server Error
* Content-Type: application/json
* Schema: any
**cURL Example:**
```bash
curl -X GET \
"https://your-tenant.aembit.io'/api/v1/resource-sets/{id}'"
```
### PATCH ‘/api/v1/resource-sets/{id}’
[Section titled “PATCH ‘/api/v1/resource-sets/{id}’”](#patch-apiv1resource-setsid)
**Summary:** Patch a Resource Set
**Description:** Patch a Resource Set identified by its ID.
**Operation ID:** patch-resource-set
**Parameters:**
* **id** (undefined) *(optional)*: any
**Request Body:** ResourceSetPatchDTO
* Content-Type: application/json
* Schema: any
**Responses:**
* **‘200’**: Patched Resource Set
* Content-Type: application/json
* Schema: any
* **‘400’**: Bad Request
* **‘401’**: Not Authenticated
* **‘500’**: Internal Server Error
* Content-Type: application/json
* Schema: any
**cURL Example:**
```bash
curl -X PATCH \
-H "Content-Type: application/json" \
-d '{"example": "data"}' \
"https://your-tenant.aembit.io'/api/v1/resource-sets/{id}'"
```
### GET /api/v1/resource-sets
[Section titled “GET /api/v1/resource-sets”](#get-apiv1resource-sets)
**Summary:** Get a page of Resource Sets
**Description:** Get a page of Resource Sets.
**Operation ID:** get-resource-sets
**Parameters:**
* **page** (undefined) *(optional)*: any
* **per-page** (undefined) *(optional)*: any
* **filter** (undefined) *(optional)*: any
* **order** (undefined) *(optional)*: any
* **group-by** (undefined) *(optional)*: any
**Responses:**
* **‘200’**: Page of Resource Sets
* Content-Type: application/json
* Schema: any
* **‘400’**: Bad Request
* **‘401’**: Not Authenticated
* **‘500’**: Internal Server Error
* Content-Type: application/json
* Schema: any
**cURL Example:**
```bash
curl -X GET \
"https://your-tenant.aembit.io/api/v1/resource-sets"
```
### POST /api/v1/resource-sets
[Section titled “POST /api/v1/resource-sets”](#post-apiv1resource-sets)
**Summary:** Create a Resource Set
**Description:** Create a Resource Set.
**Operation ID:** post-resource-set
**Request Body:** ResourceSetDTO
* Content-Type: application/json
* Schema: any
**Responses:**
* **‘201’**: Created Resource Set
* Content-Type: application/json
* Schema: any
* **‘400’**: Bad Request
* **‘401’**: Not Authenticated
* **‘500’**: Internal Server Error
* Content-Type: application/json
* Schema: any
**cURL Example:**
```bash
curl -X POST \
-H "Content-Type: application/json" \
-d '{"example": "data"}' \
"https://your-tenant.aembit.io/api/v1/resource-sets"
```
### PUT /api/v1/resource-sets
[Section titled “PUT /api/v1/resource-sets”](#put-apiv1resource-sets)
**Summary:** Update a Resource Set
**Description:** Update a Resource Set.
**Operation ID:** put-resource-set
**Request Body:** ResourceSetDTO
* Content-Type: application/json
* Schema: any
**Responses:**
* **‘200’**: Updated Resource Set
* Content-Type: application/json
* Schema: any
* **‘400’**: Bad Request
* **‘401’**: Not Authenticated
* **‘500’**: Internal Server Error
* Content-Type: application/json
* Schema: any
**cURL Example:**
```bash
curl -X PUT \
-H "Content-Type: application/json" \
-d '{"example": "data"}' \
"https://your-tenant.aembit.io/api/v1/resource-sets"
```
## Role
[Section titled “Role”](#role)
### GET /api/v1/roles
[Section titled “GET /api/v1/roles”](#get-apiv1roles)
**Summary:** Get a page of Roles
**Description:** Get a page of Roles.
**Operation ID:** get-roles
**Parameters:**
* **page** (undefined) *(optional)*: any
* **per-page** (undefined) *(optional)*: any
* **filter** (undefined) *(optional)*: any
* **order** (undefined) *(optional)*: any
* **group-by** (undefined) *(optional)*: any
**Responses:**
* **‘200’**: Page of Roles
* Content-Type: application/json
* Schema: any
* **‘400’**: Bad Request
* **‘401’**: Not Authenticated
* **‘500’**: Internal Server Error
* Content-Type: application/json
* Schema: any
**cURL Example:**
```bash
curl -X GET \
"https://your-tenant.aembit.io/api/v1/roles"
```
### POST /api/v1/roles
[Section titled “POST /api/v1/roles”](#post-apiv1roles)
**Summary:** Create a new Role
**Description:** Create a new Role.
**Operation ID:** post-role
**Request Body:** RoleDTO
* Content-Type: application/json
* Schema: any
**Responses:**
* **‘201’**: Created Role
* Content-Type: application/json
* Schema: any
* **‘400’**: Bad Request
* **‘401’**: Not Authenticated
* **‘500’**: Internal Server Error
* Content-Type: application/json
* Schema: any
**cURL Example:**
```bash
curl -X POST \
-H "Content-Type: application/json" \
-d '{"example": "data"}' \
"https://your-tenant.aembit.io/api/v1/roles"
```
### PUT /api/v1/roles
[Section titled “PUT /api/v1/roles”](#put-apiv1roles)
**Summary:** Update a Role
**Description:** Update a Role.
**Operation ID:** put-role
**Request Body:** RoleDTO
* Content-Type: application/json
* Schema: any
**Responses:**
* **‘200’**: Updated Role
* Content-Type: application/json
* Schema: any
* **‘400’**: Bad Request
* **‘401’**: Not Authenticated
* **‘500’**: Internal Server Error
* Content-Type: application/json
* Schema: any
**cURL Example:**
```bash
curl -X PUT \
-H "Content-Type: application/json" \
-d '{"example": "data"}' \
"https://your-tenant.aembit.io/api/v1/roles"
```
### GET ‘/api/v1/roles/{id}’
[Section titled “GET ‘/api/v1/roles/{id}’”](#get-apiv1rolesid)
**Summary:** Get a Role
**Description:** Get a Role identified by its ID.
**Operation ID:** get-role
**Parameters:**
* **id** (undefined) *(optional)*: any
**Responses:**
* **‘200’**: Role
* Content-Type: application/json
* Schema: any
* **‘204’**: Role Not Found
* **‘400’**: Bad Request
* **‘401’**: Not Authenticated
* **‘500’**: Internal Server Error
* Content-Type: application/json
* Schema: any
**cURL Example:**
```bash
curl -X GET \
"https://your-tenant.aembit.io'/api/v1/roles/{id}'"
```
### DELETE ‘/api/v1/roles/{id}’
[Section titled “DELETE ‘/api/v1/roles/{id}’”](#delete-apiv1rolesid)
**Summary:** Delete a Role
**Description:** Delete a Role identified by its ID.
**Operation ID:** delete-role
**Parameters:**
* **id** (undefined) *(optional)*: any
**Responses:**
* **‘204’**: Successfully deleted Role
* **‘400’**: Bad Request
* **‘401’**: Not Authenticated
* **‘500’**: Internal Server Error
* Content-Type: application/json
* Schema: any
**cURL Example:**
```bash
curl -X DELETE \
"https://your-tenant.aembit.io'/api/v1/roles/{id}'"
```
### PATCH ‘/api/v1/roles/{id}’
[Section titled “PATCH ‘/api/v1/roles/{id}’”](#patch-apiv1rolesid)
**Summary:** Patch a Role
**Description:** Patch a Role identified by its ID.
**Operation ID:** patch-role
**Parameters:**
* **id** (undefined) *(optional)*: any
**Request Body:** RolePatchDTO
* Content-Type: application/json
* Schema: any
**Responses:**
* **‘200’**: Patch Role
* **‘400’**: Bad Request
* **‘401’**: Not Authenticated
* **‘500’**: Internal Server Error
* Content-Type: application/json
* Schema: any
**cURL Example:**
```bash
curl -X PATCH \
-H "Content-Type: application/json" \
-d '{"example": "data"}' \
"https://your-tenant.aembit.io'/api/v1/roles/{id}'"
```
## Routing
[Section titled “Routing”](#routing)
### GET ‘/api/v1/routings/{id}’
[Section titled “GET ‘/api/v1/routings/{id}’”](#get-apiv1routingsid)
**Summary:** Get a Routing
**Description:** Get a Routing identified by its ID.
**Operation ID:** get-routing
**Parameters:**
* **id** (undefined) *(optional)*: any
**Responses:**
* **‘200’**: Routing
* Content-Type: application/json
* Schema: any
* **‘400’**: Bad Request
* **‘401’**: Not Authenticated
* **‘403’**: Forbidden
* **‘404’**: Not Found
* **‘500’**: Internal Server Error
* Content-Type: application/json
* Schema: any
**cURL Example:**
```bash
curl -X GET \
"https://your-tenant.aembit.io'/api/v1/routings/{id}'"
```
### PATCH ‘/api/v1/routings/{id}’
[Section titled “PATCH ‘/api/v1/routings/{id}’”](#patch-apiv1routingsid)
**Summary:** Patch a Routing
**Description:** Patch a Routing identified by its ID.
**Operation ID:** patch-routing
**Parameters:**
* **id** (undefined) *(optional)*: any
**Request Body:** RoutingPatchDTO
* Content-Type: application/json
* Schema: any
**Responses:**
* **‘200’**: Patched Routing
* Content-Type: application/json
* Schema: any
* **‘400’**: Bad Request
* **‘401’**: Not Authenticated
* **‘500’**: Internal Server Error
* Content-Type: application/json
* Schema: any
**cURL Example:**
```bash
curl -X PATCH \
-H "Content-Type: application/json" \
-d '{"example": "data"}' \
"https://your-tenant.aembit.io'/api/v1/routings/{id}'"
```
### GET /api/v1/routings
[Section titled “GET /api/v1/routings”](#get-apiv1routings)
**Summary:** Get a page of Routings
**Description:** Get a page of Routings.
**Operation ID:** get-routings
**Parameters:**
* **page** (undefined) *(optional)*: any
* **per-page** (undefined) *(optional)*: any
* **filter** (undefined) *(optional)*: any
* **order** (undefined) *(optional)*: any
* **group-by** (undefined) *(optional)*: any
**Responses:**
* **‘200’**: Page of Routings
* Content-Type: application/json
* Schema: any
* **‘400’**: Bad Request
* **‘401’**: Not Authenticated
* **‘500’**: Internal Server Error
* Content-Type: application/json
* Schema: any
**cURL Example:**
```bash
curl -X GET \
"https://your-tenant.aembit.io/api/v1/routings"
```
### POST /api/v1/routings
[Section titled “POST /api/v1/routings”](#post-apiv1routings)
**Summary:** Create a Routing
**Description:** Create a Routing.
**Operation ID:** post-routing
**Request Body:** RoutingDTO
* Content-Type: application/json
* Schema: any
**Responses:**
* **‘201’**: Created Routing
* Content-Type: application/json
* Schema: any
* **‘400’**: Bad Request
* **‘401’**: Not Authenticated
* **‘403’**: Forbidden
* **‘500’**: Internal Server Error
* Content-Type: application/json
* Schema: any
**cURL Example:**
```bash
curl -X POST \
-H "Content-Type: application/json" \
-d '{"example": "data"}' \
"https://your-tenant.aembit.io/api/v1/routings"
```
### PUT /api/v1/routings
[Section titled “PUT /api/v1/routings”](#put-apiv1routings)
**Summary:** Update a Routing
**Description:** Update a Routing.
**Operation ID:** put-routing
**Request Body:** RoutingDTO
* Content-Type: application/json
* Schema: any
**Responses:**
* **‘200’**: Updated Routing
* Content-Type: application/json
* Schema: any
* **‘400’**: Bad Request
* **‘401’**: Not Authenticated
* **‘500’**: Internal Server Error
* Content-Type: application/json
* Schema: any
**cURL Example:**
```bash
curl -X PUT \
-H "Content-Type: application/json" \
-d '{"example": "data"}' \
"https://your-tenant.aembit.io/api/v1/routings"
```
## SignOn Policy
[Section titled “SignOn Policy”](#signon-policy)
### GET /api/v1/signin-policies
[Section titled “GET /api/v1/signin-policies”](#get-apiv1signin-policies)
**Summary:** Get a SignOn Policy
**Description:** Get a SignOn Policy by its name.
**Operation ID:** get-signon-policy
**Responses:**
* **‘200’**: SignOn Policy
* Content-Type: application/json
* Schema: any
* **‘204’**: SignOn Policy Not Found
* **‘400’**: Bad Request
* **‘401’**: Not Authenticated
* **‘500’**: Internal Server Error
* Content-Type: application/json
* Schema: any
**cURL Example:**
```bash
curl -X GET \
"https://your-tenant.aembit.io/api/v1/signin-policies"
```
## MFA SignOn Policy
[Section titled “MFA SignOn Policy”](#mfa-signon-policy)
### PUT /api/v1/signin-policies/mfa
[Section titled “PUT /api/v1/signin-policies/mfa”](#put-apiv1signin-policiesmfa)
**Summary:** Update a MFA SignOn Policy
**Description:** Update a MFA SignOn Policy.
**Operation ID:** put-mfa-signon Policy
**Request Body:** MFASignInPolicyDTO
* Content-Type: application/json
* Schema: any
**Responses:**
* **‘200’**: Updated MFA SignOn Policy
* Content-Type: application/json
* Schema: any
* **‘400’**: Bad Request
* **‘401’**: Not Authenticated
* **‘403’**: Forbidden
* Content-Type: application/json
* Schema: any
* **‘500’**: Internal Server Error
* Content-Type: application/json
* Schema: any
**cURL Example:**
```bash
curl -X PUT \
-H "Content-Type: application/json" \
-d '{"example": "data"}' \
"https://your-tenant.aembit.io/api/v1/signin-policies/mfa"
```
## SSO SignOn Policy
[Section titled “SSO SignOn Policy”](#sso-signon-policy)
### PUT /api/v1/signin-policies/sso
[Section titled “PUT /api/v1/signin-policies/sso”](#put-apiv1signin-policiessso)
**Summary:** Update a SSO SignOn Policy
**Description:** Update a SSO SignOn Policy.
**Operation ID:** put-SSO-signon Policy
**Request Body:** SSOSignInPolicyDTO
* Content-Type: application/json
* Schema: any
**Responses:**
* **‘200’**: Updated SSO SignOn Policy
* Content-Type: application/json
* Schema: any
* **‘400’**: Bad Request
* **‘401’**: Not Authenticated
* **‘500’**: Internal Server Error
* Content-Type: application/json
* Schema: any
**cURL Example:**
```bash
curl -X PUT \
-H "Content-Type: application/json" \
-d '{"example": "data"}' \
"https://your-tenant.aembit.io/api/v1/signin-policies/sso"
```
## SSO Identity Provider
[Section titled “SSO Identity Provider”](#sso-identity-provider)
### GET ‘/api/v1/sso-idps/{id}/verification’
[Section titled “GET ‘/api/v1/sso-idps/{id}/verification’”](#get-apiv1sso-idpsidverification)
**Summary:** Verify the SSO Identity Provider
**Description:** Verify the SSO Identity Provider has all necessary configuration data.
**Operation ID:** get-identity-provider-verification
**Parameters:**
* **id** (undefined) *(optional)*: any
**Responses:**
* **‘200’**: SSO Identity Provider verification
* Content-Type: application/json
* Schema: any
* **‘400’**: Bad Request
* **‘401’**: Not Authenticated
* **‘500’**: Internal Server Error
* Content-Type: application/json
* Schema: any
**cURL Example:**
```bash
curl -X GET \
"https://your-tenant.aembit.io'/api/v1/sso-idps/{id}/verification'"
```
### GET ‘/api/v1/sso-idps/{id}’
[Section titled “GET ‘/api/v1/sso-idps/{id}’”](#get-apiv1sso-idpsid)
**Summary:** Get a SSO Identity Provider
**Description:** Get a SSO Identity Provider identified by its ID.
**Operation ID:** get-identity-provider
**Parameters:**
* **id** (undefined) *(optional)*: any
**Responses:**
* **‘200’**: SSO Identity Provider
* Content-Type: application/json
* Schema: any
* **‘400’**: Bad Request
* **‘401’**: Not Authenticated
* **‘500’**: Internal Server Error
* Content-Type: application/json
* Schema: any
**cURL Example:**
```bash
curl -X GET \
"https://your-tenant.aembit.io'/api/v1/sso-idps/{id}'"
```
### DELETE ‘/api/v1/sso-idps/{id}’
[Section titled “DELETE ‘/api/v1/sso-idps/{id}’”](#delete-apiv1sso-idpsid)
**Summary:** Delete a SSO Identity Provider
**Description:** Delete a SSO Identity Provider identified by its ID.
**Operation ID:** delete-identity-provider
**Parameters:**
* **id** (undefined) *(optional)*: any
**Responses:**
* **‘204’**: Successfully deleted SSO Identity Provider
* **‘400’**: Bad Request
* **‘401’**: Not Authenticated
* **‘500’**: Internal Server Error
* Content-Type: application/json
* Schema: any
**cURL Example:**
```bash
curl -X DELETE \
"https://your-tenant.aembit.io'/api/v1/sso-idps/{id}'"
```
### PATCH ‘/api/v1/sso-idps/{id}’
[Section titled “PATCH ‘/api/v1/sso-idps/{id}’”](#patch-apiv1sso-idpsid)
**Summary:** Patch a SSO Identity Provider
**Description:** Patch a SSO Identity Provider identified by its ID.
**Operation ID:** patch-identity-provider
**Parameters:**
* **id** (undefined) *(optional)*: any
**Request Body:** SSOIdentityProviderPatchDTO
* Content-Type: application/json
* Schema: any
**Responses:**
* **‘200’**: Patched SSO Identity Provider
* Content-Type: application/json
* Schema: any
* **‘400’**: Bad Request
* **‘401’**: Not Authenticated
* **‘500’**: Internal Server Error
* Content-Type: application/json
* Schema: any
**cURL Example:**
```bash
curl -X PATCH \
-H "Content-Type: application/json" \
-d '{"example": "data"}' \
"https://your-tenant.aembit.io'/api/v1/sso-idps/{id}'"
```
### GET /api/v1/sso-idps
[Section titled “GET /api/v1/sso-idps”](#get-apiv1sso-idps)
**Summary:** Get a page of SSO Identity Providers
**Description:** Get a page of SSO Identity Providers.
**Operation ID:** get-identity-providers
**Parameters:**
* **page** (undefined) *(optional)*: any
* **per-page** (undefined) *(optional)*: any
* **filter** (undefined) *(optional)*: any
* **order** (undefined) *(optional)*: any
* **group-by** (undefined) *(optional)*: any
**Responses:**
* **‘200’**: Page of SSO Identity Providers
* Content-Type: application/json
* Schema: any
* **‘400’**: Bad Request
* **‘401’**: Not Authenticated
* **‘500’**: Internal Server Error
* Content-Type: application/json
* Schema: any
**cURL Example:**
```bash
curl -X GET \
"https://your-tenant.aembit.io/api/v1/sso-idps"
```
### POST /api/v1/sso-idps
[Section titled “POST /api/v1/sso-idps”](#post-apiv1sso-idps)
**Summary:** Create a SSO Identity Provider
**Description:** Create a SSO Identity Provider.
**Operation ID:** post-identity-provider
**Request Body:** SSOIdentityProviderDTO
* Content-Type: application/json
* Schema: any
**Responses:**
* **‘201’**: Created SSO Identity Provider
* Content-Type: application/json
* Schema: any
* **‘400’**: Bad Request
* **‘401’**: Not Authenticated
* **‘500’**: Internal Server Error
* Content-Type: application/json
* Schema: any
**cURL Example:**
```bash
curl -X POST \
-H "Content-Type: application/json" \
-d '{"example": "data"}' \
"https://your-tenant.aembit.io/api/v1/sso-idps"
```
### PUT /api/v1/sso-idps
[Section titled “PUT /api/v1/sso-idps”](#put-apiv1sso-idps)
**Summary:** Update a SSO Identity Provider
**Description:** Update a SSO Identity Provider.
**Operation ID:** put-identity-provider
**Request Body:** SSOIdentityProviderDTO
* Content-Type: application/json
* Schema: any
**Responses:**
* **‘200’**: Updated SSO Identity Provider
* Content-Type: application/json
* Schema: any
* **‘400’**: Bad Request
* **‘401’**: Not Authenticated
* **‘500’**: Internal Server Error
* Content-Type: application/json
* Schema: any
**cURL Example:**
```bash
curl -X PUT \
-H "Content-Type: application/json" \
-d '{"example": "data"}' \
"https://your-tenant.aembit.io/api/v1/sso-idps"
```
## Standalone Certificate Authority
[Section titled “Standalone Certificate Authority”](#standalone-certificate-authority)
### DELETE ‘/api/v1/certificate-authorities/{id}’
[Section titled “DELETE ‘/api/v1/certificate-authorities/{id}’”](#delete-apiv1certificate-authoritiesid)
**Summary:** Delete a Standalone Certificate Authority
**Description:** Delete a Standalone Certificate Authority identified by its ID.
**Operation ID:** delete-standalone-certificate-authority
**Parameters:**
* **id** (undefined) *(optional)*: any
**Responses:**
* **‘204’**: Successfully deleted Standalone Certificate Authority
* **‘400’**: Bad Request
* **‘401’**: Not Authenticated
* **‘500’**: Internal Server Error
* Content-Type: application/json
* Schema: any
**cURL Example:**
```bash
curl -X DELETE \
"https://your-tenant.aembit.io'/api/v1/certificate-authorities/{id}'"
```
### GET ‘/api/v1/certificate-authorities/{id}’
[Section titled “GET ‘/api/v1/certificate-authorities/{id}’”](#get-apiv1certificate-authoritiesid)
**Summary:** Get a Standalone Certificate Authority
**Description:** Get a Standalone Certificate Authority identified by its ID.
**Operation ID:** get-standalone-certificate-authority
**Parameters:**
* **id** (undefined) *(optional)*: any
**Responses:**
* **‘200’**: Standalone Certificate Authority
* Content-Type: application/json
* Schema: any
* **‘400’**: Bad Request
* **‘401’**: Not Authenticated
* **‘500’**: Internal Server Error
* Content-Type: application/json
* Schema: any
**cURL Example:**
```bash
curl -X GET \
"https://your-tenant.aembit.io'/api/v1/certificate-authorities/{id}'"
```
### PATCH ‘/api/v1/certificate-authorities/{id}’
[Section titled “PATCH ‘/api/v1/certificate-authorities/{id}’”](#patch-apiv1certificate-authoritiesid)
**Summary:** Patch a Standalone Certificate Authority
**Description:** Patch a Standalone Certificate Authority identified by its ID.
**Operation ID:** patch-standalone-certificate-authority
**Parameters:**
* **id** (undefined) *(optional)*: any
**Request Body:** StandaloneCertificatePatchDTO
* Content-Type: application/json
* Schema: any
**Responses:**
* **‘200’**: Patched Standalone Certificate Authority
* Content-Type: application/json
* Schema: any
* **‘400’**: Bad Request
* **‘401’**: Not Authenticated
* **‘500’**: Internal Server Error
* Content-Type: application/json
* Schema: any
**cURL Example:**
```bash
curl -X PATCH \
-H "Content-Type: application/json" \
-d '{"example": "data"}' \
"https://your-tenant.aembit.io'/api/v1/certificate-authorities/{id}'"
```
### GET /api/v1/certificate-authorities
[Section titled “GET /api/v1/certificate-authorities”](#get-apiv1certificate-authorities)
**Summary:** Get a page of Standalone Certificate Authorities
**Description:** Get a page of Standalone Certificate Authorities.
**Operation ID:** get-standalone-certificate-authorities
**Parameters:**
* **page** (undefined) *(optional)*: any
* **per-page** (undefined) *(optional)*: any
* **filter** (undefined) *(optional)*: any
* **order** (undefined) *(optional)*: any
* **group-by** (undefined) *(optional)*: any
**Responses:**
* **‘200’**: Page of Standalone Certificate Authorities
* Content-Type: application/json
* Schema: any
* **‘400’**: Bad Request
* **‘401’**: Not Authenticated
* **‘500’**: Internal Server Error
* Content-Type: application/json
* Schema: any
**cURL Example:**
```bash
curl -X GET \
"https://your-tenant.aembit.io/api/v1/certificate-authorities"
```
### POST /api/v1/certificate-authorities
[Section titled “POST /api/v1/certificate-authorities”](#post-apiv1certificate-authorities)
**Summary:** Create a Standalone Certificate Authority
**Description:** Create a Standalone Certificate Authority.
**Operation ID:** post-standalone-certificate-authority
**Request Body:** StandaloneCertificateDTO
* Content-Type: application/json
* Schema: any
**Responses:**
* **‘201’**: Created Standalone Certificate Authority
* Content-Type: application/json
* Schema: any
* **‘400’**: Bad Request
* **‘401’**: Not Authenticated
* **‘500’**: Internal Server Error
* Content-Type: application/json
* Schema: any
**cURL Example:**
```bash
curl -X POST \
-H "Content-Type: application/json" \
-d '{"example": "data"}' \
"https://your-tenant.aembit.io/api/v1/certificate-authorities"
```
### PUT /api/v1/certificate-authorities
[Section titled “PUT /api/v1/certificate-authorities”](#put-apiv1certificate-authorities)
**Summary:** Update a Standalone Certificate Authority
**Description:** Update a Standalone Certificate Authority.
**Operation ID:** put-standalone-certificate-authority
**Request Body:** StandaloneCertificateDTO
* Content-Type: application/json
* Schema: any
**Responses:**
* **‘200’**: Updated Standalone Certificate Authority
* Content-Type: application/json
* Schema: any
* **‘400’**: Bad Request
* **‘401’**: Not Authenticated
* **‘500’**: Internal Server Error
* Content-Type: application/json
* Schema: any
**cURL Example:**
```bash
curl -X PUT \
-H "Content-Type: application/json" \
-d '{"example": "data"}' \
"https://your-tenant.aembit.io/api/v1/certificate-authorities"
```
## Standalone TLS Decrypt
[Section titled “Standalone TLS Decrypt”](#standalone-tls-decrypt)
### GET ‘/api/v1/certificate-authorities/{id}/root-ca’
[Section titled “GET ‘/api/v1/certificate-authorities/{id}/root-ca’”](#get-apiv1certificate-authoritiesidroot-ca)
**Summary:** Download Standalone Root CA Certificate
**Description:** Download the Standalone Root CA Certificate. This CA Certificate can be used for TLS verification when utilizing the Aembit TLS Decrypt feature.
**Operation ID:** standalone-root-ca
**Parameters:**
* **id** (undefined) *(optional)*: any
**Responses:**
* **‘200’**: OK
* Content-Type: application/x-pem-file
* Schema: string (binary)
**cURL Example:**
```bash
curl -X GET \
"https://your-tenant.aembit.io'/api/v1/certificate-authorities/{id}/root-ca'"
```
## TLS Decrypt
[Section titled “TLS Decrypt”](#tls-decrypt)
### GET /api/v1/root-ca
[Section titled “GET /api/v1/root-ca”](#get-apiv1root-ca)
**Summary:** Download Tenant Root CA Certificate
**Description:** Download the Tenant Root CA Certificate. This CA Certificate can be used for TLS verification when utilizing the Aembit TLS Decrypt feature.
**Operation ID:** root-ca
**Responses:**
* **‘200’**: OK
* Content-Type: application/x-pem-file
* Schema: string (binary)
**cURL Example:**
```bash
curl -X GET \
"https://your-tenant.aembit.io/api/v1/root-ca"
```
## Trust Provider
[Section titled “Trust Provider”](#trust-provider)
### GET /api/v1/trust-providers
[Section titled “GET /api/v1/trust-providers”](#get-apiv1trust-providers)
**Summary:** Get a page of Trust Providers
**Description:** Get a page of Trust Providers.
**Operation ID:** get-trust-providers
**Parameters:**
* **X-Aembit-ResourceSet** (undefined) *(optional)*: any
* **page** (undefined) *(optional)*: any
* **per-page** (undefined) *(optional)*: any
* **filter** (undefined) *(optional)*: any
* **order** (undefined) *(optional)*: any
* **group-by** (undefined) *(optional)*: any
* **active** (undefined) *(optional)*: any
**Responses:**
* **‘200’**: Page of Trust Providers
* Content-Type: application/json
* Schema: any
* **‘400’**: Bad Request
* **‘401’**: Not Authenticated
* **‘500’**: Internal Server Error
* Content-Type: application/json
* Schema: any
**cURL Example:**
```bash
curl -X GET \
"https://your-tenant.aembit.io/api/v1/trust-providers"
```
### POST /api/v1/trust-providers
[Section titled “POST /api/v1/trust-providers”](#post-apiv1trust-providers)
**Summary:** Create a Trust Provider
**Description:** Create a Trust Provider.
**Operation ID:** post-trust-provider
**Parameters:**
* **X-Aembit-ResourceSet** (undefined) *(optional)*: any
**Request Body:** TrustProviderDTO
* Content-Type: application/json
* Schema: any
**Responses:**
* **‘200’**: Created Trust Provider
* Content-Type: application/json
* Schema: any
* **‘400’**: Bad Request
* **‘401’**: Not Authenticated
* **‘500’**: Internal Server Error
* Content-Type: application/json
* Schema: any
**cURL Example:**
```bash
curl -X POST \
-H "Content-Type: application/json" \
-d '{"example": "data"}' \
"https://your-tenant.aembit.io/api/v1/trust-providers"
```
### PUT /api/v1/trust-providers
[Section titled “PUT /api/v1/trust-providers”](#put-apiv1trust-providers)
**Summary:** Update a Trust Provider
**Description:** Update a Trust Provider.
**Operation ID:** put-trust-provider
**Parameters:**
* **X-Aembit-ResourceSet** (undefined) *(optional)*: any
**Request Body:** TrustProviderDTO
* Content-Type: application/json
* Schema: any
**Responses:**
* **‘200’**: Updated Trust Provider
* Content-Type: application/json
* Schema: any
* **‘400’**: Bad Request
* **‘401’**: Not Authenticated
* **‘500’**: Internal Server Error
* Content-Type: application/json
* Schema: any
**cURL Example:**
```bash
curl -X PUT \
-H "Content-Type: application/json" \
-d '{"example": "data"}' \
"https://your-tenant.aembit.io/api/v1/trust-providers"
```
### GET ‘/api/v1/trust-providers/{id}’
[Section titled “GET ‘/api/v1/trust-providers/{id}’”](#get-apiv1trust-providersid)
**Summary:** Get a Trust Provider
**Description:** Get a Trust Provider identified by its ID.
**Operation ID:** get-trust-provider
**Parameters:**
* **id** (undefined) *(optional)*: any
* **X-Aembit-ResourceSet** (undefined) *(optional)*: any
**Responses:**
* **‘200’**: Trust Provider
* Content-Type: application/json
* Schema: any
* **‘204’**: Trust Provider Not Found
* **‘400’**: Bad Request
* **‘401’**: Not Authenticated
* **‘500’**: Internal Server Error
* Content-Type: application/json
* Schema: any
**cURL Example:**
```bash
curl -X GET \
"https://your-tenant.aembit.io'/api/v1/trust-providers/{id}'"
```
### DELETE ‘/api/v1/trust-providers/{id}’
[Section titled “DELETE ‘/api/v1/trust-providers/{id}’”](#delete-apiv1trust-providersid)
**Summary:** Delete a Trust Provider
**Description:** Delete a Trust Provider identified by its ID.
**Operation ID:** delete-trust-provider
**Parameters:**
* **id** (undefined) *(optional)*: any
* **X-Aembit-ResourceSet** (undefined) *(optional)*: any
**Responses:**
* **‘204’**: Successfully deleted Trust Provider
* **‘400’**: Bad Request
* **‘401’**: Not Authenticated
* **‘404’**: Not Found
* **‘500’**: Internal Server Error
* Content-Type: application/json
* Schema: any
**cURL Example:**
```bash
curl -X DELETE \
"https://your-tenant.aembit.io'/api/v1/trust-providers/{id}'"
```
### PATCH ‘/api/v1/trust-providers/{id}’
[Section titled “PATCH ‘/api/v1/trust-providers/{id}’”](#patch-apiv1trust-providersid)
**Summary:** Patch a Trust Provider
**Description:** Patch a Trust Provider.
**Operation ID:** patch-trust-provider
**Parameters:**
* **id** (undefined) *(optional)*: any
* **X-Aembit-ResourceSet** (undefined) *(optional)*: any
**Request Body:** TrustProviderPatchDTO
* Content-Type: application/json
* Schema: any
**Responses:**
* **‘200’**: Patched Trust Provider
* Content-Type: application/json
* Schema: any
* **‘400’**: Bad Request
* **‘401’**: Not Authenticated
* **‘500’**: Internal Server Error
* Content-Type: application/json
* Schema: any
**cURL Example:**
```bash
curl -X PATCH \
-H "Content-Type: application/json" \
-d '{"example": "data"}' \
"https://your-tenant.aembit.io'/api/v1/trust-providers/{id}'"
```
## User
[Section titled “User”](#user)
### GET /api/v1/users
[Section titled “GET /api/v1/users”](#get-apiv1users)
**Summary:** Get a page of Users
**Description:** Get a page of Users.
**Operation ID:** get-users
**Parameters:**
* **page** (undefined) *(optional)*: any
* **per-page** (undefined) *(optional)*: any
* **filter** (undefined) *(optional)*: any
* **order** (undefined) *(optional)*: any
* **group-by** (undefined) *(optional)*: any
**Responses:**
* **‘200’**: Page of Users
* Content-Type: application/json
* Schema: any
* **‘400’**: Bad Request
* **‘401’**: Not Authenticated
* **‘500’**: Internal Server Error
* Content-Type: application/json
* Schema: any
**cURL Example:**
```bash
curl -X GET \
"https://your-tenant.aembit.io/api/v1/users"
```
### POST /api/v1/users
[Section titled “POST /api/v1/users”](#post-apiv1users)
**Summary:** Create a User
**Description:** Create a User.
**Operation ID:** post-user
**Request Body:** UserDTO
* Content-Type: application/json
* Schema: any
**Responses:**
* **‘201’**: Created User
* Content-Type: application/json
* Schema: any
* **‘400’**: Bad Request
* **‘401’**: Not Authenticated
* **‘500’**: Internal Server Error
* Content-Type: application/json
* Schema: any
**cURL Example:**
```bash
curl -X POST \
-H "Content-Type: application/json" \
-d '{"example": "data"}' \
"https://your-tenant.aembit.io/api/v1/users"
```
### PATCH ‘/api/v1/users/{id}’
[Section titled “PATCH ‘/api/v1/users/{id}’”](#patch-apiv1usersid)
**Summary:** Patch a User
**Description:** Patch a User identified by its ID.
**Operation ID:** patch-user
**Parameters:**
* **id** (undefined) *(optional)*: any
**Request Body:** UserPatchDTO
* Content-Type: application/json
* Schema: any
**Responses:**
* **‘200’**: Patched User
* Content-Type: application/json
* Schema: any
* **‘400’**: Bad Request
* **‘401’**: Not Authenticated
* **‘500’**: Internal Server Error
* Content-Type: application/json
* Schema: any
**cURL Example:**
```bash
curl -X PATCH \
-H "Content-Type: application/json" \
-d '{"example": "data"}' \
"https://your-tenant.aembit.io'/api/v1/users/{id}'"
```
### GET ‘/api/v1/users/{id}’
[Section titled “GET ‘/api/v1/users/{id}’”](#get-apiv1usersid)
**Summary:** Get a User
**Description:** Get a User identified by its ID.
**Operation ID:** get-user
**Parameters:**
* **id** (undefined) *(optional)*: any
**Responses:**
* **‘201’**: User
* Content-Type: application/json
* Schema: any
* **‘204’**: User Not Found
* **‘400’**: Bad Request
* **‘401’**: Not Authenticated
* **‘500’**: Internal Server Error
* Content-Type: application/json
* Schema: any
**cURL Example:**
```bash
curl -X GET \
"https://your-tenant.aembit.io'/api/v1/users/{id}'"
```
### PUT ‘/api/v1/users/{id}’
[Section titled “PUT ‘/api/v1/users/{id}’”](#put-apiv1usersid)
**Summary:** Update a User
**Description:** Update a User.
**Operation ID:** put-user
**Parameters:**
* **id** (undefined) *(optional)*: any
**Request Body:** UserDTO
* Content-Type: application/json
* Schema: any
**Responses:**
* **‘200’**: User
* Content-Type: application/json
* Schema: any
* **‘400’**: Bad Request
* **‘401’**: Not Authenticated
* **‘500’**: Internal Server Error
* Content-Type: application/json
* Schema: any
**cURL Example:**
```bash
curl -X PUT \
-H "Content-Type: application/json" \
-d '{"example": "data"}' \
"https://your-tenant.aembit.io'/api/v1/users/{id}'"
```
### DELETE ‘/api/v1/users/{id}’
[Section titled “DELETE ‘/api/v1/users/{id}’”](#delete-apiv1usersid)
**Summary:** Delete a User
**Description:** Delete a User identified by its ID.
**Operation ID:** delete-user
**Parameters:**
* **id** (undefined) *(optional)*: any
**Responses:**
* **‘204’**: Successfully deleted User
* **‘400’**: Bad Request
* **‘401’**: Not Authenticated
* **‘500’**: Internal Server Error
* Content-Type: application/json
* Schema: any
**cURL Example:**
```bash
curl -X DELETE \
"https://your-tenant.aembit.io'/api/v1/users/{id}'"
```
### POST ‘/api/v1/users/{id}/unlock’
[Section titled “POST ‘/api/v1/users/{id}/unlock’”](#post-apiv1usersidunlock)
**Summary:** Unlock a User
**Description:** Unlock a User identified by its ID.
**Operation ID:** post-user-unlock
**Parameters:**
* **id** (undefined) *(optional)*: any
**Responses:**
* **‘200’**: Successfully unlocked User
* Content-Type: application/json
* Schema: any
* **‘400’**: Bad Request
* **‘401’**: Not Authenticated
* **‘500’**: Internal Server Error
* Content-Type: application/json
* Schema: any
**cURL Example:**
```bash
curl -X POST \
"https://your-tenant.aembit.io'/api/v1/users/{id}/unlock'"
```
## Server Workload
[Section titled “Server Workload”](#server-workload)
### POST /api/v1/server-workloads
[Section titled “POST /api/v1/server-workloads”](#post-apiv1server-workloads)
**Summary:** Create a Server Workload
**Description:** Create a Server Workload.
**Operation ID:** post-server-workload
**Parameters:**
* **X-Aembit-ResourceSet** (undefined) *(optional)*: any
**Request Body:** ServerWorkloadExternalDTO
* Content-Type: application/json
* Schema: any
**Responses:**
* **‘204’**: Created Server Workload
* Content-Type: application/json
* Schema: any
* **‘400’**: Bad Request
* **‘401’**: Not Authenticated
* **‘500’**: Internal Server Error
* Content-Type: application/json
* Schema: any
**cURL Example:**
```bash
curl -X POST \
-H "Content-Type: application/json" \
-d '{"example": "data"}' \
"https://your-tenant.aembit.io/api/v1/server-workloads"
```
### PUT /api/v1/server-workloads
[Section titled “PUT /api/v1/server-workloads”](#put-apiv1server-workloads)
**Summary:** Update a Server Workload
**Description:** Update a Server Workload.
**Operation ID:** put-server-workload
**Parameters:**
* **X-Aembit-ResourceSet** (undefined) *(optional)*: any
**Request Body:** ServerWorkloadExternalDTO
* Content-Type: application/json
* Schema: any
**Responses:**
* **‘200’**: Updated Server Workload
* Content-Type: application/json
* Schema: any
* **‘400’**: Bad Request
* **‘401’**: Not Authenticated
* **‘500’**: Internal Server Error
* Content-Type: application/json
* Schema: any
**cURL Example:**
```bash
curl -X PUT \
-H "Content-Type: application/json" \
-d '{"example": "data"}' \
"https://your-tenant.aembit.io/api/v1/server-workloads"
```
### GET /api/v1/server-workloads
[Section titled “GET /api/v1/server-workloads”](#get-apiv1server-workloads)
**Summary:** Get a page of Server Workloads
**Description:** Get a page of Server Workloads.
**Operation ID:** get-server-workloads
**Parameters:**
* **X-Aembit-ResourceSet** (undefined) *(optional)*: any
* **page** (undefined) *(optional)*: any
* **per-page** (undefined) *(optional)*: any
* **filter** (undefined) *(optional)*: any
* **order** (undefined) *(optional)*: any
* **group-by** (undefined) *(optional)*: any
**Responses:**
* **‘200’**: Page of Server Workloads
* Content-Type: application/json
* Schema: any
* **‘400’**: Bad Request
* **‘401’**: Not Authenticated
* **‘500’**: Internal Server Error
* Content-Type: application/json
* Schema: any
**cURL Example:**
```bash
curl -X GET \
"https://your-tenant.aembit.io/api/v1/server-workloads"
```
### PATCH ‘/api/v1/server-workloads/{id}’
[Section titled “PATCH ‘/api/v1/server-workloads/{id}’”](#patch-apiv1server-workloadsid)
**Summary:** Patch a Server Workload
**Description:** Patch a Server Workload.
**Operation ID:** patch-server-workload
**Parameters:**
* **id** (undefined) *(optional)*: any
* **X-Aembit-ResourceSet** (undefined) *(optional)*: any
**Request Body:** EntityPatchDTO
* Content-Type: application/json
* Schema: any
**Responses:**
* **‘200’**: Patched Server Workload
* Content-Type: application/json
* Schema: any
* **‘400’**: Bad Request
* **‘401’**: Not Authenticated
* **‘500’**: Internal Server Error
* Content-Type: application/json
* Schema: any
**cURL Example:**
```bash
curl -X PATCH \
-H "Content-Type: application/json" \
-d '{"example": "data"}' \
"https://your-tenant.aembit.io'/api/v1/server-workloads/{id}'"
```
### GET ‘/api/v1/server-workloads/{id}’
[Section titled “GET ‘/api/v1/server-workloads/{id}’”](#get-apiv1server-workloadsid)
**Summary:** Get a Server Workload
**Description:** Get a Server Workload identified by its ID.
**Operation ID:** get-server-workload
**Parameters:**
* **id** (undefined) *(optional)*: any
* **X-Aembit-ResourceSet** (undefined) *(optional)*: any
**Responses:**
* **‘200’**: Server Workload
* Content-Type: application/json
* Schema: any
* **‘204’**: Server Workload Not Found
* **‘400’**: Bad Request
* **‘401’**: Not Authenticated
* **‘500’**: Internal Server Error
* Content-Type: application/json
* Schema: any
**cURL Example:**
```bash
curl -X GET \
"https://your-tenant.aembit.io'/api/v1/server-workloads/{id}'"
```
### DELETE ‘/api/v1/server-workloads/{id}’
[Section titled “DELETE ‘/api/v1/server-workloads/{id}’”](#delete-apiv1server-workloadsid)
**Summary:** Delete a Server Workload
**Description:** Delete a Server Workload identified by its ID.
**Operation ID:** delete-server-workload
**Parameters:**
* **id** (undefined) *(optional)*: any
* **X-Aembit-ResourceSet** (undefined) *(optional)*: any
**Responses:**
* **‘204’**: Successfully deleted Server Workload
* **‘400’**: Bad Request
* **‘401’**: Not Authenticated
* **‘500’**: Internal Server Error
* Content-Type: application/json
* Schema: any
**cURL Example:**
```bash
curl -X DELETE \
"https://your-tenant.aembit.io'/api/v1/server-workloads/{id}'"
```
## Client Workload
[Section titled “Client Workload”](#client-workload)
### POST /api/v1/client-workloads
[Section titled “POST /api/v1/client-workloads”](#post-apiv1client-workloads)
**Summary:** Create a Client Workload
**Description:** Create a Client Workload.
**Operation ID:** post-client-workload
**Parameters:**
* **X-Aembit-ResourceSet** (undefined) *(optional)*: any
**Request Body:** ClientWorkloadExternalDTO
* Content-Type: application/json
* Schema: any
**Responses:**
* **‘204’**: Created Client Workload
* Content-Type: application/json
* Schema: any
* **‘400’**: Bad Request
* **‘401’**: Not Authenticated
* **‘500’**: Internal Server Error
* Content-Type: application/json
* Schema: any
**cURL Example:**
```bash
curl -X POST \
-H "Content-Type: application/json" \
-d '{"example": "data"}' \
"https://your-tenant.aembit.io/api/v1/client-workloads"
```
### PUT /api/v1/client-workloads
[Section titled “PUT /api/v1/client-workloads”](#put-apiv1client-workloads)
**Summary:** Update a Client Workload
**Description:** Update a Client Workload.
**Operation ID:** put-client-workload
**Parameters:**
* **X-Aembit-ResourceSet** (undefined) *(optional)*: any
**Request Body:** ClientWorkloadExternalDTO
* Content-Type: application/json
* Schema: any
**Responses:**
* **‘200’**: Updated Client Workload
* Content-Type: application/json
* Schema: any
* **‘400’**: Bad Request
* **‘401’**: Not Authenticated
* **‘500’**: Internal Server Error
* Content-Type: application/json
* Schema: any
**cURL Example:**
```bash
curl -X PUT \
-H "Content-Type: application/json" \
-d '{"example": "data"}' \
"https://your-tenant.aembit.io/api/v1/client-workloads"
```
### GET /api/v1/client-workloads
[Section titled “GET /api/v1/client-workloads”](#get-apiv1client-workloads)
**Summary:** Get a page of Client Workloads
**Description:** Get a page of Client Workloads.
**Operation ID:** get-client-workloads
**Parameters:**
* **X-Aembit-ResourceSet** (undefined) *(optional)*: any
* **page** (undefined) *(optional)*: any
* **per-page** (undefined) *(optional)*: any
* **filter** (undefined) *(optional)*: any
* **order** (undefined) *(optional)*: any
* **group-by** (undefined) *(optional)*: any
**Responses:**
* **‘200’**: Page of Client Workloads
* Content-Type: application/json
* Schema: any
* **‘400’**: Bad Request
* **‘401’**: Not Authenticated
* **‘500’**: Internal Server Error
* Content-Type: application/json
* Schema: any
**cURL Example:**
```bash
curl -X GET \
"https://your-tenant.aembit.io/api/v1/client-workloads"
```
### PATCH ‘/api/v1/client-workloads/{id}’
[Section titled “PATCH ‘/api/v1/client-workloads/{id}’”](#patch-apiv1client-workloadsid)
**Summary:** Patch a Client Workload
**Description:** Patch a Client Workload.
**Operation ID:** patch-client-workload
**Parameters:**
* **id** (undefined) *(optional)*: any
* **X-Aembit-ResourceSet** (undefined) *(optional)*: any
**Request Body:** ClientWorkloadPatchDTO
* Content-Type: application/json
* Schema: any
**Responses:**
* **‘200’**: Patched Client Workload
* Content-Type: application/json
* Schema: any
* **‘400’**: Bad Request
* **‘401’**: Not Authenticated
* **‘500’**: Internal Server Error
* Content-Type: application/json
* Schema: any
**cURL Example:**
```bash
curl -X PATCH \
-H "Content-Type: application/json" \
-d '{"example": "data"}' \
"https://your-tenant.aembit.io'/api/v1/client-workloads/{id}'"
```
### GET ‘/api/v1/client-workloads/{id}’
[Section titled “GET ‘/api/v1/client-workloads/{id}’”](#get-apiv1client-workloadsid)
**Summary:** Get a Client Workload
**Description:** Get a Client Workload identified by its ID.
**Operation ID:** get-client-workload
**Parameters:**
* **id** (undefined) *(optional)*: any
* **X-Aembit-ResourceSet** (undefined) *(optional)*: any
**Responses:**
* **‘200’**: Client Workload
* Content-Type: application/json
* Schema: any
* **‘204’**: Client Workload Not Found
* **‘400’**: Bad Request
* **‘401’**: Not Authenticated
* **‘500’**: Internal Server Error
* Content-Type: application/json
* Schema: any
**cURL Example:**
```bash
curl -X GET \
"https://your-tenant.aembit.io'/api/v1/client-workloads/{id}'"
```
### DELETE ‘/api/v1/client-workloads/{id}’
[Section titled “DELETE ‘/api/v1/client-workloads/{id}’”](#delete-apiv1client-workloadsid)
**Summary:** Delete a Client Workload
**Description:** Delete a Client Workload identified by its ID.
**Operation ID:** delete-client-workload
**Parameters:**
* **id** (undefined) *(optional)*: any
* **X-Aembit-ResourceSet** (undefined) *(optional)*: any
**Responses:**
* **‘204’**: Successfully deleted Client Workload
* **‘400’**: Bad Request
* **‘401’**: Not Authenticated
* **‘404’**: Not Found
* **‘500’**: Internal Server Error
* Content-Type: application/json
* Schema: any
**cURL Example:**
```bash
curl -X DELETE \
"https://your-tenant.aembit.io'/api/v1/client-workloads/{id}'"
```
***
# Aembit.API - Data Schemas
[Section titled “Aembit.API - Data Schemas”](#aembitapi---data-schemas)
**Version:** v1
### AccessConditionDTO
[Section titled “AccessConditionDTO”](#accessconditiondto)
DTO of an individual Access Condition for enforcement during Access Policy evaluation
**Type:** object
**Properties:**
* **externalId** *(optional)*: string (uuid)
* **name** *(required)*: string - Name of the Entity
* **description** *(optional)*: string | null - Description of the Entity
* **isActive** *(required)*: boolean (boolean) - True/False value that determines if this entity is Active or Disabled
* **tags** *(optional)*: Array
* **createdAt** *(optional)*: string (date-time)
* **modifiedAt** *(optional)*: string (date-time) | null
* **createdBy** *(optional)*: string | null
* **modifiedBy** *(optional)*: string | null
* **resourceSet** *(required)*: string (uuid) - ID of the Resource Set in which this Access Entity exists
* **integrationID** *(optional)*: string (uuid) - ID of the Integration Entity used by this Access Condition
* **integration** *(optional)*: any
* **conditions** *(required)*: object - Rules which are enforced by the Access Condition
* **accessPolicyCount** *(optional)*: integer (int32) - Access Policies associated with this Access Condition
### AccessConditionListDTO
[Section titled “AccessConditionListDTO”](#accessconditionlistdto)
Page of Access Conditions
**Type:** object
**Properties:**
* **page** *(optional)*: integer (int32) - Page of entities
* **perPage** *(optional)*: integer (int32) - Number of entities requested for the current page
* **order** *(optional)*: string | null - Ordering criteria used for the current page
* **statusCode** *(optional)*: integer (int32)
* **recordsTotal** *(optional)*: integer (int32)
* **accessConditions** *(optional)*: Array
### AccessConditionPatchDTO
[Section titled “AccessConditionPatchDTO”](#accessconditionpatchdto)
Patch Request DTO for individual Access Condition
**Type:** object
**Properties:**
* **name** *(optional)*: string | null - New Name for the identified entity
* **description** *(optional)*: string | null - New Description for the identified entity
* **isActive** *(optional)*: boolean (boolean) | null - New Status for the identified entity
* **tags** *(optional)*: Array - New Tags for the identified entity
### AgentControllerDTO
[Section titled “AgentControllerDTO”](#agentcontrollerdto)
DTO of an individual Agent Controller for Agent Proxy management
**Type:** object
**Properties:**
* **id** *(optional)*: integer (int) - ID of the Agent Controller
* **externalId** *(optional)*: string (uuid) - ID of the Agent Controller
* **createdAt** *(optional)*: string (date) - Agent Controller creation Timestamp
* **version** *(optional)*: string | null - Last reported software version of the Agent Controller
* **isActive** *(optional)*: boolean (boolean) - Active status of the Agent Controller
* **name** *(required)*: string - Name of the Agent Controller
* **description** *(optional)*: string | null - Description of the Agent Controller
* **tags** *(optional)*: Array - Tags assigned to the Agent Controller
* **tlsCertificates** *(optional)*: Array - TLS Certificates associated with the Agent Controller
* **trustProviderId** *(optional)*: string (uuid) | null - Trust Provider ID of the Agent Controller used for attested authentication
* **trustProvider** *(optional)*: any
* **modifiedAt** *(optional)*: string (date) - Agent Controller modification Timestamp
* **isHealthy** *(optional)*: boolean (boolean) - Recently reported Agent Controller Health Status
* **lastReportedUptime** *(optional)*: integer (int64) - Last Reported Agent Controller Uptime (in seconds)
* **lastReportedHealthTime** *(optional)*: string (date) | null - Last Reported Agent Controller Health Time
### AgentControllerDeviceCodeDTO
[Section titled “AgentControllerDeviceCodeDTO”](#agentcontrollerdevicecodedto)
DTO of an individual Agent Controller Device Code
**Type:** object
**Properties:**
* **device\_code** *(optional)*: string | null - One time use OAuth 2 Device Code for use during AgentController deployment and registration
### AgentControllerListDTO
[Section titled “AgentControllerListDTO”](#agentcontrollerlistdto)
Page of Agent Controllers for Agent Proxy management
**Type:** object
**Properties:**
* **page** *(optional)*: integer (int32) - Page of entities
* **perPage** *(optional)*: integer (int32) - Number of entities requested for the current page
* **order** *(optional)*: string | null - Ordering criteria used for the current page
* **statusCode** *(optional)*: integer (int32) - HTTP StatusCode for the current result
* **recordsTotal** *(optional)*: integer (int32) - Total number of AgentControllers available
* **agentControllers** *(optional)*: Array - Page of AgentControllers for this request
### AgentControllerPatchDTO
[Section titled “AgentControllerPatchDTO”](#agentcontrollerpatchdto)
Patch Request DTO for individual Agent Controller
**Type:** object
**Properties:**
* **version** *(optional)*: string | null
* **isActive** *(optional)*: boolean (boolean) | null - New Status for the identified Agent Controller
* **trustProviderId** *(optional)*: string (uuid) | null - New Trust Provider to use for the identified Agent Controller
### AgentControllerTagDTO
[Section titled “AgentControllerTagDTO”](#agentcontrollertagdto)
Agent Controller Tag key and value
**Type:** object
**Properties:**
* **key** *(required)*: string - Key for the Agent Controller Tag
* **value** *(required)*: string - Value for the Agent Controller Tag
### AgentControllerTlsCertificateDTO
[Section titled “AgentControllerTlsCertificateDTO”](#agentcontrollertlscertificatedto)
Agent Controller TLS Certificate information
**Type:** object
**Properties:**
* **subject** *(required)*: string - Subject of the Certificate
* **serialNumber** *(required)*: string - Serial Number of the Certificate
* **thumbprint** *(required)*: string - Thumbprint of the Certificate
* **notBefore** *(required)*: string (date-time) - Creation Timestamp of the Certificate
* **notAfter** *(required)*: string (date-time) - Expiration Timestamp of the Certificate
* **hostName** *(required)*: string - Last reported Hostname for the Agent Controller
* **createdAt** *(required)*: string (date-time) - Creation Timestamp for this Agent Controller TLS Certificate
* **isManagedByAembit** *(optional)*: boolean (boolean) - True if the Agent Controller TLS Certificate is managed by Aembit
### AuditActorDTO
[Section titled “AuditActorDTO”](#auditactordto)
DTO for the Actor details of an Aembit Audit Log
**Type:** object
**Properties:**
* **type** *(optional)*: string | null - The type of Audit Log actor (e.g. User, System, or Role)
* **displayName** *(optional)*: string | null - Fully qualified Audit Log Actor name
* **userName** *(optional)*: string | null
* **email** *(optional)*: string | null
* **credentialProviderId** *(optional)*: string | null - Credential Provider ID that was used to generate the Role-based Access Token for this Audit Log action
* **accessPolicyId** *(optional)*: string | null - Access Policy ID that was used to generate the Role-based Access Token for this Audit Log action
### AuditClientDTO
[Section titled “AuditClientDTO”](#auditclientdto)
DTO for the Client details of an Aembit Audit Log
**Type:** object
**Properties:**
* **ipAddress** *(optional)*: string | null - IP Address of the remote client
* **userAgent** *(optional)*: any
### AuditLogDTO
[Section titled “AuditLogDTO”](#auditlogdto)
DTO for an individual Aembit Audit Log
**Type:** object
**Properties:**
* **externalId** *(optional)*: string (uuid) - ID of an Aembit Audit Log
* **resourceSetId** *(optional)*: string (uuid) - Resource Set ID of an Aembit Audit Log
* **category** *(optional)*: string | null - Category of an Aembit Audit Log (e.g. Users, AccessPolicies, Workloads, etc.)
* **actor** *(optional)*: any
* **activity** *(optional)*: string | null - Activity of an Aembit Audit Log
* **target** *(optional)*: string | null - Target of an Aembit Audit Log
* **client** *(optional)*: any
* **outcome** *(optional)*: any
* **trustProvider** *(optional)*: any
* **severity** *(optional)*: string | null - Severity of an Aembit Audit Log
* **createdAt** *(optional)*: string (date-time) - Timestamp of when this Aembit Audit Log was created
### AuditLogListDTO
[Section titled “AuditLogListDTO”](#auditloglistdto)
Page of Aembit Audit Logs
**Type:** object
**Properties:**
* **page** *(optional)*: integer (int32) - Page of entities
* **perPage** *(optional)*: integer (int32) - Number of entities requested for the current page
* **order** *(optional)*: string | null - Ordering criteria used for the current page
* **statusCode** *(optional)*: integer (int32) - HTTP Status Code of the response
* **recordsTotal** *(optional)*: integer (int32) - Total number of Aembit Audit Logs
* **auditLogs** *(optional)*: Array - Page of Aembit Audit Logs
### AuditOutcomeDTO
[Section titled “AuditOutcomeDTO”](#auditoutcomedto)
DTO for the Outcome of an individual Aembit Audit Log
**Type:** object
**Properties:**
* **reason** *(optional)*: string | null - Reason for the outcome of this Aembit Audit Log
* **result** *(optional)*: string | null - Outcome of the action associated with this Aembit Audit Log
### AuthorizationEventAtttestationResultDTO
[Section titled “AuthorizationEventAtttestationResultDTO”](#authorizationeventatttestationresultdto)
Individual Access Entity Attestation Result of an Aembit Access Authorization Event
**Type:** object
**Properties:**
* **id** *(optional)*: string (uuid) - Access Entity ID
* **name** *(optional)*: string | null - Access Entity Name
* **result** *(optional)*: string | null - Access Entity processing Result for this Access Authorization Event
* **matches** *(optional)*: Array - List of matched Access Entity Identifiers
* **reason** *(optional)*: string | null
* **attribute** *(optional)*: string | null
* **expectedValue** *(optional)*: string | null
* **actualValue** *(optional)*: string | null
### AuthorizationEventCPResultDTO
[Section titled “AuthorizationEventCPResultDTO”](#authorizationeventcpresultdto)
Individual Credential Provider Result of an Aembit Access Authorization Event
**Type:** object
**Properties:**
* **id** *(optional)*: string (uuid) - Access Entity ID
* **name** *(optional)*: string | null - Access Entity Name
* **result** *(optional)*: string | null - Access Entity processing Result for this Access Authorization Event
* **matches** *(optional)*: Array - List of matched Access Entity Identifiers
* **type** *(optional)*: string | null - Credential Provider Type
* **reason** *(optional)*: string | null - Credential Provider Failure Reason
### AuthorizationEventDTO
[Section titled “AuthorizationEventDTO”](#authorizationeventdto)
An individual Aembit Access Authorization Event
**Type:** object
**Properties:**
* **meta** *(optional)*: any
* **outcome** *(optional)*: any
* **clientRequest** *(optional)*: any
* **environment** *(optional)*: any
* **clientWorkload** *(optional)*: any
* **serverWorkload** *(optional)*: any
* **accessPolicy** *(optional)*: any
* **trustProviders** *(optional)*: Array - Trust Provider information for an individual Aembit Access Authorization Event
* **accessConditions** *(optional)*: Array - Access Condition information for an individual Aembit Access Authorization Event
* **credentialProvider** *(optional)*: any
### AuthorizationEventDataMetaDTO
[Section titled “AuthorizationEventDataMetaDTO”](#authorizationeventdatametadto)
Metadata DTO for an individual Aembit Access Authorization Event
**Type:** object
**Properties:**
* **clientIP** *(optional)*: string | null - Remote Client IP Address of the Access Authorization Request
* **timestamp** *(optional)*: string (date-time) - Timestamp of the Access Authorization Request
* **eventType** *(optional)*: string | null - Event Type of the Access Authorization Request
* **eventId** *(optional)*: string (uuid) - Unique ID of the Access Authorization Event
* **resourceSetId** *(optional)*: string (uuid) - Resource Set ID of the Access Authorization Event
* **contextId** *(optional)*: string (uuid) - Context ID of the Access Authorization Events for a single Access Authorization Request
* **directiveId** *(optional)*: string (uuid) - Directive ID of the Access Authorization Event (if available)
* **severity** *(optional)*: string | null - Severity of the Access Authorization Event (e.g. Info, Warning, Error)
### AuthorizationEventEntityResultDTO
[Section titled “AuthorizationEventEntityResultDTO”](#authorizationevententityresultdto)
Access Entity Result of an Aembit Access Authorization Event
**Type:** object
**Properties:**
* **id** *(optional)*: string (uuid) - Access Entity ID
* **name** *(optional)*: string | null - Access Entity Name
* **result** *(optional)*: string | null - Access Entity processing Result for this Access Authorization Event
* **matches** *(optional)*: Array - List of matched Access Entity Identifiers
### AuthorizationEventEnvironmentDataDTO
[Section titled “AuthorizationEventEnvironmentDataDTO”](#authorizationeventenvironmentdatadto)
**Type:** object
**Properties:**
* **network** *(optional)*: any
* **host** *(optional)*: any
* **process** *(optional)*: any
* **aembit** *(optional)*: any
* **aws** *(optional)*: any
* **gcp** *(optional)*: any
* **azure** *(optional)*: any
* **kubernetes** *(optional)*: any
* **gitlab** *(optional)*: any
* **github** *(optional)*: any
* **terraform** *(optional)*: any
### AuthorizationEventListDTO
[Section titled “AuthorizationEventListDTO”](#authorizationeventlistdto)
Page of Aembit Access Authorization Events
**Type:** object
**Properties:**
* **page** *(optional)*: integer (int32) - Page of entities
* **perPage** *(optional)*: integer (int32) - Number of entities requested for the current page
* **order** *(optional)*: string | null - Ordering criteria used for the current page
* **statusCode** *(optional)*: integer (int32) - HTTP Status Code of the response
* **recordsTotal** *(optional)*: integer (int32) - Total number of Aembit Audit Logs
* **authorizationEvents** *(optional)*: Array - Page of Aembit Access Authorization Events
### AuthorizationEventOutcomeDTO
[Section titled “AuthorizationEventOutcomeDTO”](#authorizationeventoutcomedto)
Outcome of an individual Aembit Access Authorization Event
**Type:** object
**Properties:**
* **result** *(optional)*: string | null - Result of an individual Aembit Access Authorization Event
* **reason** *(optional)*: string | null - Reason for the Result of an individual Aembit Access Authorization Event
### CPAwsStsV2DTO
[Section titled “CPAwsStsV2DTO”](#cpawsstsv2dto)
### CPGitLabManagedAccountDTO
[Section titled “CPGitLabManagedAccountDTO”](#cpgitlabmanagedaccountdto)
### CPTypeAembitAccessTokenV2DTO
[Section titled “CPTypeAembitAccessTokenV2DTO”](#cptypeaembitaccesstokenv2dto)
### CPTypeApiKeyUIV2DTO
[Section titled “CPTypeApiKeyUIV2DTO”](#cptypeapikeyuiv2dto)
### CPTypeAzureEntraFederationV2DTO
[Section titled “CPTypeAzureEntraFederationV2DTO”](#cptypeazureentrafederationv2dto)
### CPTypeGoogleWorkflowIDFederationV2DTO
[Section titled “CPTypeGoogleWorkflowIDFederationV2DTO”](#cptypegoogleworkflowidfederationv2dto)
### CPTypeJWTTokenV2DTO
[Section titled “CPTypeJWTTokenV2DTO”](#cptypejwttokenv2dto)
### CPTypeOAuth2AuthorizationCodeUIV2DTO
[Section titled “CPTypeOAuth2AuthorizationCodeUIV2DTO”](#cptypeoauth2authorizationcodeuiv2dto)
### CPTypeOAuth2ClientCredentialsUIV2DTO
[Section titled “CPTypeOAuth2ClientCredentialsUIV2DTO”](#cptypeoauth2clientcredentialsuiv2dto)
### CPTypeOAuth2CustomParameters
[Section titled “CPTypeOAuth2CustomParameters”](#cptypeoauth2customparameters)
**Type:** object
**Properties:**
* **key** *(optional)*: string | null
* **value** *(optional)*: string | null
* **valueType** *(optional)*: string | null
### CPTypeUsernamePasswordUIV2DTO
[Section titled “CPTypeUsernamePasswordUIV2DTO”](#cptypeusernamepassworduiv2dto)
### CPTypeVaultClientTokenV2DTO
[Section titled “CPTypeVaultClientTokenV2DTO”](#cptypevaultclienttokenv2dto)
### ClientRequestDTO
[Section titled “ClientRequestDTO”](#clientrequestdto)
**Type:** object
**Properties:**
* **version** *(required)*: string
* **network** *(required)*: any
### ClientWorkloadExternalDTO
[Section titled “ClientWorkloadExternalDTO”](#clientworkloadexternaldto)
**Type:** object
**Properties:**
* **externalId** *(optional)*: string (uuid)
* **name** *(required)*: string - Name of the Entity
* **description** *(optional)*: string | null - Description of the Entity
* **isActive** *(required)*: boolean (boolean) - True/False value that determines if this entity is Active or Disabled
* **tags** *(optional)*: Array
* **createdAt** *(optional)*: string (date-time)
* **modifiedAt** *(optional)*: string (date-time) | null
* **createdBy** *(optional)*: string | null
* **modifiedBy** *(optional)*: string | null
* **resourceSet** *(required)*: string (uuid) - ID of the Resource Set in which this Access Entity exists
* **identities** *(optional)*: Array
* **standaloneCertificateAuthority** *(optional)*: string (uuid) | null - Standalone Certificate Authority associated with this Client Workload
* **type** *(optional)*: string | null
* **accessPolicyCount** *(optional)*: integer (int32) - Access Policies associated with this Client Workload
### ClientWorkloadIdentityDTO
[Section titled “ClientWorkloadIdentityDTO”](#clientworkloadidentitydto)
**Type:** object
**Properties:**
* **type** *(optional)*: string | null
* **value** *(required)*: string
### ClientWorkloadListDTO
[Section titled “ClientWorkloadListDTO”](#clientworkloadlistdto)
Page of Client Workloads
**Type:** object
**Properties:**
* **page** *(optional)*: integer (int32) - Page of entities
* **perPage** *(optional)*: integer (int32) - Number of entities requested for the current page
* **order** *(optional)*: string | null - Ordering criteria used for the current page
* **statusCode** *(optional)*: integer (int32)
* **recordsTotal** *(optional)*: integer (int32)
* **clientWorkloads** *(optional)*: Array
### ClientWorkloadPatchDTO
[Section titled “ClientWorkloadPatchDTO”](#clientworkloadpatchdto)
**Type:** object
**Properties:**
* **name** *(optional)*: string | null - New Name for the identified entity
* **description** *(optional)*: string | null - New Description for the identified entity
* **isActive** *(optional)*: boolean (boolean) | null - New Status for the identified entity
* **tags** *(optional)*: Array - New Tags for the identified entity
* **identities** *(optional)*: Array
### CreatePolicyDTO
[Section titled “CreatePolicyDTO”](#createpolicydto)
Create/Update Access Policy
**Type:** object
**Properties:**
* **externalId** *(optional)*: string (uuid)
* **name** *(required)*: string - Name of the Entity
* **description** *(optional)*: string | null - Description of the Entity
* **isActive** *(required)*: boolean (boolean) - True/False value that determines if this entity is Active or Disabled
* **tags** *(optional)*: Array
* **createdAt** *(optional)*: string (date-time)
* **modifiedAt** *(optional)*: string (date-time) | null
* **createdBy** *(optional)*: string | null
* **modifiedBy** *(optional)*: string | null
* **resourceSet** *(required)*: string (uuid) - ID of the Resource Set in which this Access Entity exists
* **credentialProviders** *(optional)*: Array - Credential Providers associated with this Access Policy
* **trustProviders** *(optional)*: Array\ - Trust Providers associated with this Access Policy
* **accessConditions** *(optional)*: Array\ - Access Conditions associated with this Access Policy
* **clientWorkload** *(required)*: string (uuid) - Client Workload associated with this Access Policy
* **serverWorkload** *(required)*: string (uuid) - Server Workload associated with this Access Policy
### CredentialProviderDTO
[Section titled “CredentialProviderDTO”](#credentialproviderdto)
Individual Credential Provider
**Type:** object
**Properties:**
* **externalId** *(optional)*: string (uuid)
* **name** *(required)*: string - Name of the Entity
* **description** *(optional)*: string | null - Description of the Entity
* **isActive** *(required)*: boolean (boolean) - True/False value that determines if this entity is Active or Disabled
* **tags** *(optional)*: Array
* **createdAt** *(optional)*: string (date-time)
* **modifiedAt** *(optional)*: string (date-time) | null
* **createdBy** *(optional)*: string | null
* **modifiedBy** *(optional)*: string | null
* **resourceSet** *(required)*: string (uuid) - ID of the Resource Set in which this Access Entity exists
* **type** *(required)*: string - Credential Provider Type (e.g. oauth-client-credential, username-password, etc.)
* **roleId** *(optional)*: string (uuid) | null - Credential Provider Role for use with Aembit Access Token type Credential Providers
* **lifetimeTimeSpanSeconds** *(optional)*: integer (int32) - The Lifetime of a Credential Provider’s credential value
* **lifetimeExpiration** *(optional)*: string (date-time) | null - The expiration timestamp for a Credential Provider’s credential value
* **providerDetailJSON** *(optional)*: string | null - JSON representation of the Credential Provider configuration details
* **accessPolicyCount** *(optional)*: integer (int32) - Access Policies associated with this Credential Provider
### CredentialProviderIntegrationDTO
[Section titled “CredentialProviderIntegrationDTO”](#credentialproviderintegrationdto)
Individual Credential Provider Integration
**Type:** object
**Properties:**
* **type** *(required)*: any
* **externalId** *(optional)*: string (uuid)
* **name** *(required)*: string - Name of the Entity
* **description** *(optional)*: string | null - Description of the Entity
* **isActive** *(required)*: boolean (boolean) - True/False value that determines if this entity is Active or Disabled
* **tags** *(optional)*: Array
* **createdAt** *(optional)*: string (date-time)
* **modifiedAt** *(optional)*: string (date-time) | null
* **createdBy** *(optional)*: string | null
* **modifiedBy** *(optional)*: string | null
* **resourceSet** *(required)*: string (uuid) - ID of the Resource Set in which this Access Entity exists
* **tokenExpiration** *(optional)*: string (date-time) | null
* **lastOperationTimestamp** *(optional)*: string (date-time) | null
* **status** *(optional)*: string | null
* **errorMessage** *(optional)*: string | null
### CredentialProviderIntegrationPatchDTO
[Section titled “CredentialProviderIntegrationPatchDTO”](#credentialproviderintegrationpatchdto)
Patch Request for an individual Credential Provider Integration
**Type:** object
**Properties:**
* **name** *(optional)*: string | null - New Name for the identified entity
* **description** *(optional)*: string | null - New Description for the identified entity
* **isActive** *(optional)*: boolean (boolean) | null - New Status for the identified entity
* **tags** *(optional)*: Array - New Tags for the identified entity
### CredentialProviderIntegrationType
[Section titled “CredentialProviderIntegrationType”](#credentialproviderintegrationtype)
**Type:** string
**Possible values:** `GitLab`
### CredentialProviderPatchDTO
[Section titled “CredentialProviderPatchDTO”](#credentialproviderpatchdto)
Patch request for an individual Credential Provider
**Type:** object
**Properties:**
* **name** *(optional)*: string | null - New Name for the identified entity
* **description** *(optional)*: string | null - New Description for the identified entity
* **isActive** *(optional)*: boolean (boolean) | null - New Status for the identified entity
* **tags** *(optional)*: Array - New Tags for the identified entity
* **providerDetailJSON** *(optional)*: string | null - JSON representation of the Credential Provider configuration details
* **type** *(optional)*: string | null - Credential Provider Type (e.g. oauth-client-credential, username-password, etc.)
### CredentialProviderUIDTO
[Section titled “CredentialProviderUIDTO”](#credentialprovideruidto)
Individual Credential Provider
**Type:** object
**Properties:**
* **externalId** *(optional)*: string (uuid)
* **name** *(required)*: string - Name of the Entity
* **description** *(optional)*: string | null - Description of the Entity
* **isActive** *(required)*: boolean (boolean) - True/False value that determines if this entity is Active or Disabled
* **tags** *(optional)*: Array
* **createdAt** *(optional)*: string (date-time)
* **modifiedAt** *(optional)*: string (date-time) | null
* **createdBy** *(optional)*: string | null
* **modifiedBy** *(optional)*: string | null
* **resourceSet** *(required)*: string (uuid) - ID of the Resource Set in which this Access Entity exists
* **type** *(required)*: string - Credential Provider Type (e.g. oauth-client-credential, username-password, etc.)
* **roleId** *(optional)*: string (uuid) | null - Credential Provider Role for use with Aembit Access Token type Credential Providers
* **lifetimeTimeSpanSeconds** *(optional)*: integer (int32) - The Lifetime of a Credential Provider’s credential value
* **lifetimeExpiration** *(optional)*: string (date-time) | null - The expiration timestamp for a Credential Provider’s credential value
* **providerDetailJSON** *(optional)*: string | null - JSON representation of the Credential Provider configuration details
* **accessPolicyCount** *(optional)*: integer (int32) - Access Policies associated with this Credential Provider
### CredentialProviderUIDTOCredentialProviderListDTO
[Section titled “CredentialProviderUIDTOCredentialProviderListDTO”](#credentialprovideruidtocredentialproviderlistdto)
Page of Credential Providers
**Type:** object
**Properties:**
* **page** *(optional)*: integer (int32) - Page of entities
* **perPage** *(optional)*: integer (int32) - Number of entities requested for the current page
* **order** *(optional)*: string | null - Ordering criteria used for the current page
* **statusCode** *(optional)*: integer (int32) - HTTP Status Code of the response
* **recordsTotal** *(optional)*: integer (int32) - Total number of Credential Providers
* **credentialProviders** *(optional)*: Array - Page of Credential Providers
### CredentialProviderV2DTO
[Section titled “CredentialProviderV2DTO”](#credentialproviderv2dto)
**Type:** object
**Properties:**
* **type** *(required)*: string
* **externalId** *(optional)*: string (uuid)
* **name** *(required)*: string - Name of the Entity
* **description** *(optional)*: string | null - Description of the Entity
* **isActive** *(required)*: boolean (boolean) - True/False value that determines if this entity is Active or Disabled
* **tags** *(optional)*: Array
* **createdAt** *(optional)*: string (date-time)
* **modifiedAt** *(optional)*: string (date-time) | null
* **createdBy** *(optional)*: string | null
* **modifiedBy** *(optional)*: string | null
* **resourceSet** *(required)*: string (uuid) - ID of the Resource Set in which this Access Entity exists
* **lifetimeTimeSpanSeconds** *(optional)*: integer (int32)
* **lifetimeExpiration** *(optional)*: string (date-time) | null
* **accessPolicyCount** *(optional)*: integer (int32) - Access Policies associated with this Credential Provider
### CredentialProviderV2DTOCredentialProviderListDTO
[Section titled “CredentialProviderV2DTOCredentialProviderListDTO”](#credentialproviderv2dtocredentialproviderlistdto)
Page of Credential Providers
**Type:** object
**Properties:**
* **page** *(optional)*: integer (int32) - Page of entities
* **perPage** *(optional)*: integer (int32) - Number of entities requested for the current page
* **order** *(optional)*: string | null - Ordering criteria used for the current page
* **statusCode** *(optional)*: integer (int32) - HTTP Status Code of the response
* **recordsTotal** *(optional)*: integer (int32) - Total number of Credential Providers
* **credentialProviders** *(optional)*: Array - Page of Credential Providers
### DiscoveryIntegrationDTO
[Section titled “DiscoveryIntegrationDTO”](#discoveryintegrationdto)
Integration details for 3rd party data used by Discovery
**Type:** object
**Properties:**
* **externalId** *(optional)*: string (uuid)
* **name** *(required)*: string - Name of the Entity
* **description** *(optional)*: string | null - Description of the Entity
* **isActive** *(required)*: boolean (boolean) - True/False value that determines if this entity is Active or Disabled
* **tags** *(optional)*: Array
* **createdAt** *(optional)*: string (date-time)
* **modifiedAt** *(optional)*: string (date-time) | null
* **createdBy** *(optional)*: string | null
* **modifiedBy** *(optional)*: string | null
* **resourceSet** *(required)*: string (uuid) - ID of the Resource Set in which this Access Entity exists
* **type** *(required)*: string
* **syncFrequencySeconds** *(required)*: integer (int32)
* **lastSync** *(optional)*: string (date-time) | null
* **lastSyncStatus** *(optional)*: string | null
* **endpoint** *(required)*: string
* **discoveryIntegrationJSON** *(required)*: object
### DiscoveryIntegrationListDTO
[Section titled “DiscoveryIntegrationListDTO”](#discoveryintegrationlistdto)
Page of Integrations
**Type:** object
**Properties:**
* **page** *(optional)*: integer (int32) - Page of entities
* **perPage** *(optional)*: integer (int32) - Number of entities requested for the current page
* **order** *(optional)*: string | null - Ordering criteria used for the current page
* **statusCode** *(optional)*: integer (int32) - HTTP Status Code of the response
* **recordsTotal** *(optional)*: integer (int32) - Total number of Integrations
* **integrations** *(optional)*: Array - Page of Integrations
### DiscoveryIntegrationPatchDTO
[Section titled “DiscoveryIntegrationPatchDTO”](#discoveryintegrationpatchdto)
Patch request for an individual Integration
**Type:** object
**Properties:**
* **name** *(optional)*: string | null - New Name for the identified entity
* **description** *(optional)*: string | null - New Description for the identified entity
* **isActive** *(optional)*: boolean (boolean) | null - New Status for the identified entity
* **tags** *(optional)*: Array - New Tags for the identified entity
### EntityMetaDTO
[Section titled “EntityMetaDTO”](#entitymetadto)
**Type:** object
**Properties:**
* **externalId** *(optional)*: string (uuid)
* **name** *(optional)*: string | null
* **tags** *(optional)*: Array
### EntityPatchDTO
[Section titled “EntityPatchDTO”](#entitypatchdto)
**Type:** object
**Properties:**
* **name** *(optional)*: string | null - New Name for the identified entity
* **description** *(optional)*: string | null - New Description for the identified entity
* **isActive** *(optional)*: boolean (boolean) | null - New Status for the identified entity
* **tags** *(optional)*: Array - New Tags for the identified entity
### EventDTO
[Section titled “EventDTO”](#eventdto)
**Type:** object
**Properties:**
* **meta** *(optional)*: any
* **network** *(optional)*: any
* **outcome** *(optional)*: any
### EventListDTO
[Section titled “EventListDTO”](#eventlistdto)
**Type:** object
**Properties:**
* **page** *(optional)*: integer (int32) - Page of entities
* **perPage** *(optional)*: integer (int32) - Number of entities requested for the current page
* **order** *(optional)*: string | null - Ordering criteria used for the current page
* **statusCode** *(optional)*: integer (int32)
* **recordsTotal** *(optional)*: integer (int32)
* **workloadEvents** *(optional)*: Array
### EventMetaDTO
[Section titled “EventMetaDTO”](#eventmetadto)
**Type:** object
**Properties:**
* **timestamp** *(optional)*: string (date-time)
* **eventType** *(optional)*: string | null
* **eventId** *(optional)*: string | null
* **resourceSetId** *(optional)*: string (uuid)
* **policyId** *(optional)*: string | null
* **action** *(optional)*: string | null
* **connectionId** *(optional)*: string | null
* **severity** *(optional)*: string | null
### EventNetworkDTO
[Section titled “EventNetworkDTO”](#eventnetworkdto)
**Type:** object
**Properties:**
* **clientWorkloadIP** *(optional)*: string | null
* **clientWorkloadPort** *(optional)*: integer (int32)
* **serverWorkloadIP** *(optional)*: string | null
* **serverWorkloadPort** *(optional)*: integer (int32) | null
* **proxyPort** *(optional)*: integer (int32) | null
### EventOutcomeDTO
[Section titled “EventOutcomeDTO”](#eventoutcomedto)
**Type:** object
**Properties:**
* **result** *(optional)*: string | null
### EventResultDTO
[Section titled “EventResultDTO”](#eventresultdto)
**Type:** object
**Properties:**
* **reason** *(optional)*: string | null
* **attribute** *(optional)*: string | null
* **expectedValue** *(optional)*: string | null
* **actualValue** *(optional)*: string | null
### GenericResponseDTO
[Section titled “GenericResponseDTO”](#genericresponsedto)
DTO for a Generic API Response
**Type:** object
**Properties:**
* **success** *(optional)*: boolean - True if the API call was successful, False otherwise
* **message** *(optional)*: string | null - Message to indicate why the API call failed
* **id** *(optional)*: integer (int32) - Unique identifier of the API response
### GetPolicyDTO
[Section titled “GetPolicyDTO”](#getpolicydto)
Individual Access Policy
**Type:** object
**Properties:**
* **externalId** *(optional)*: string (uuid)
* **name** *(required)*: string - Name of the Entity
* **description** *(optional)*: string | null - Description of the Entity
* **isActive** *(required)*: boolean (boolean) - True/False value that determines if this entity is Active or Disabled
* **tags** *(optional)*: Array
* **createdAt** *(optional)*: string (date-time)
* **modifiedAt** *(optional)*: string (date-time) | null
* **createdBy** *(optional)*: string | null
* **modifiedBy** *(optional)*: string | null
* **resourceSet** *(required)*: string (uuid) - ID of the Resource Set in which this Access Entity exists
* **clientWorkload** *(optional)*: any
* **serverWorkload** *(optional)*: any
* **trustProviders** *(optional)*: Array - Trust Providers associated with this Access Policy
* **credentialProviders** *(optional)*: Array - Credential Providers associated with this Access Policy
* **accessConditions** *(optional)*: Array - Access Conditions associated with this Access Policy
### GetPolicyDTOListDTO
[Section titled “GetPolicyDTOListDTO”](#getpolicydtolistdto)
**Type:** object
**Properties:**
* **page** *(optional)*: integer (int32) - Current page number of entities
* **perPage** *(optional)*: integer (int32) - Number of entities requested for the current page
* **order** *(optional)*: string | null - Ordering criteria used for the current page
* **statusCode** *(optional)*: integer (int32) - HTTP StatusCode for the current result
* **recordsTotal** *(optional)*: integer (int32) - Total number of entities available
* **entities** *(optional)*: Array - Page of entities for this request
### GetSignInPolicyDTO
[Section titled “GetSignInPolicyDTO”](#getsigninpolicydto)
**Type:** object
**Properties:**
* **ssoRequired** *(optional)*: boolean
* **mfaRequired** *(optional)*: boolean
### GitLabCredentialProviderIntegrationDTO
[Section titled “GitLabCredentialProviderIntegrationDTO”](#gitlabcredentialproviderintegrationdto)
Individual Credential Provider Integration
### HealthDTO
[Section titled “HealthDTO”](#healthdto)
Aembit Health Status
**Type:** object
**Properties:**
* **status** *(optional)*: string | null - Aembit Health Status
* **version** *(optional)*: string | null - Aembit Cloud Version
* **gitSHA** *(optional)*: string | null - Aembit Cloud Version Git SHA
* **host** *(optional)*: string | null - Aembit Cloud Requested Hostname
* **user** *(optional)*: string | null - Aembit Cloud Authenticated User Email
* **userFullName** *(optional)*: string | null - Aembit Cloud Authenticated User Full Name
* **tenant** *(optional)*: string | null - Aembit Cloud Tenant ID
* **sessionExpiresAt** *(optional)*: string | null - Aembit Cloud Session Expiration
### IntegrationDTO
[Section titled “IntegrationDTO”](#integrationdto)
Integration details for 3rd party data used by Access Conditions
**Type:** object
**Properties:**
* **externalId** *(optional)*: string (uuid)
* **name** *(required)*: string - Name of the Entity
* **description** *(optional)*: string | null - Description of the Entity
* **isActive** *(required)*: boolean (boolean) - True/False value that determines if this entity is Active or Disabled
* **tags** *(optional)*: Array
* **createdAt** *(optional)*: string (date-time)
* **modifiedAt** *(optional)*: string (date-time) | null
* **createdBy** *(optional)*: string | null
* **modifiedBy** *(optional)*: string | null
* **resourceSet** *(required)*: string (uuid) - ID of the Resource Set in which this Access Entity exists
* **type** *(required)*: string
* **syncFrequencySeconds** *(required)*: integer (int32)
* **lastSync** *(optional)*: string (date-time) | null
* **lastSyncStatus** *(optional)*: string | null
* **endpoint** *(required)*: string
* **integrationJSON** *(required)*: object
* **accessConditionsCount** *(optional)*: integer (int32)
### IntegrationListDTO
[Section titled “IntegrationListDTO”](#integrationlistdto)
Page of Integrations
**Type:** object
**Properties:**
* **page** *(optional)*: integer (int32) - Page of entities
* **perPage** *(optional)*: integer (int32) - Number of entities requested for the current page
* **order** *(optional)*: string | null - Ordering criteria used for the current page
* **statusCode** *(optional)*: integer (int32) - HTTP Status Code of the response
* **recordsTotal** *(optional)*: integer (int32) - Total number of Integrations
* **integrations** *(optional)*: Array - Page of Integrations
### IntegrationPatchDTO
[Section titled “IntegrationPatchDTO”](#integrationpatchdto)
Patch request for an individual Integration
**Type:** object
**Properties:**
* **name** *(optional)*: string | null - New Name for the identified entity
* **description** *(optional)*: string | null - New Description for the identified entity
* **isActive** *(optional)*: boolean (boolean) | null - New Status for the identified entity
* **tags** *(optional)*: Array - New Tags for the identified entity
### JWTClaimDTO
[Section titled “JWTClaimDTO”](#jwtclaimdto)
**Type:** object
**Properties:**
* **key** *(optional)*: string | null
* **value** *(optional)*: string | null
* **valueType** *(optional)*: string | null
### JsonNode
[Section titled “JsonNode”](#jsonnode)
**Type:** object
**Properties:**
* **options** *(optional)*: any
* **parent** *(optional)*: any
* **root** *(optional)*: any
### JsonNodeOptions
[Section titled “JsonNodeOptions”](#jsonnodeoptions)
**Type:** object
**Properties:**
* **propertyNameCaseInsensitive** *(optional)*: boolean
### ListCredentialProviderIntegrationDTO
[Section titled “ListCredentialProviderIntegrationDTO”](#listcredentialproviderintegrationdto)
Page of Credential Provider Integrations
**Type:** object
**Properties:**
* **externalId** *(optional)*: string (uuid)
* **name** *(required)*: string - Name of the Entity
* **description** *(optional)*: string | null - Description of the Entity
* **isActive** *(required)*: boolean (boolean) - True/False value that determines if this entity is Active or Disabled
* **tags** *(optional)*: Array
* **createdAt** *(optional)*: string (date-time)
* **modifiedAt** *(optional)*: string (date-time) | null
* **createdBy** *(optional)*: string | null
* **modifiedBy** *(optional)*: string | null
* **url** *(optional)*: string | null
* **type** *(optional)*: any
* **status** *(optional)*: string | null
* **lastOperationTimestamp** *(optional)*: string (date-time) | null
### ListCredentialProviderIntegrationDTOListDTO
[Section titled “ListCredentialProviderIntegrationDTOListDTO”](#listcredentialproviderintegrationdtolistdto)
**Type:** object
**Properties:**
* **page** *(optional)*: integer (int32) - Current page number of entities
* **perPage** *(optional)*: integer (int32) - Number of entities requested for the current page
* **order** *(optional)*: string | null - Ordering criteria used for the current page
* **statusCode** *(optional)*: integer (int32) - HTTP StatusCode for the current result
* **recordsTotal** *(optional)*: integer (int32) - Total number of entities available
* **entities** *(optional)*: Array - Page of entities for this request
### LogStreamDTO
[Section titled “LogStreamDTO”](#logstreamdto)
Individual Log Stream
**Type:** object
**Properties:**
* **externalId** *(optional)*: string (uuid)
* **name** *(required)*: string - Name of the Entity
* **description** *(optional)*: string | null - Description of the Entity
* **isActive** *(required)*: boolean (boolean) - True/False value that determines if this entity is Active or Disabled
* **tags** *(optional)*: Array
* **createdAt** *(optional)*: string (date-time)
* **modifiedAt** *(optional)*: string (date-time) | null
* **createdBy** *(optional)*: string | null
* **modifiedBy** *(optional)*: string | null
* **dataType** *(required)*: string - Log Stream Data Type (e.g. AuditLogs, etc.)
* **type** *(required)*: any
### LogStreamDestinationType
[Section titled “LogStreamDestinationType”](#logstreamdestinationtype)
**Type:** string
**Possible values:** `AwsS3Bucket`, `GcsBucket`
### LogStreamListDTO
[Section titled “LogStreamListDTO”](#logstreamlistdto)
Page of Log Streams
**Type:** object
**Properties:**
* **page** *(optional)*: integer (int32) - Page of entities
* **perPage** *(optional)*: integer (int32) - Number of entities requested for the current page
* **order** *(optional)*: string | null - Ordering criteria used for the current page
* **statusCode** *(optional)*: integer (int32) - HTTP Status Code of the response
* **recordsTotal** *(optional)*: integer (int32) - Total number of Log Streams
* **logStreams** *(optional)*: Array - Page of Log Streams
### LogStreamPatchDTO
[Section titled “LogStreamPatchDTO”](#logstreampatchdto)
Patch Request for an individual of Log Stream
**Type:** object
**Properties:**
* **name** *(optional)*: string | null - New Name for the identified entity
* **description** *(optional)*: string | null - New Description for the identified entity
* **isActive** *(optional)*: boolean (boolean) | null - New Status for the identified entity
* **tags** *(optional)*: Array - New Tags for the identified entity
### MFASignInPolicyDTO
[Section titled “MFASignInPolicyDTO”](#mfasigninpolicydto)
**Type:** object
**Properties:**
* **mfaRequired** *(optional)*: boolean
### NetworkDTO
[Section titled “NetworkDTO”](#networkdto)
**Type:** object
**Properties:**
* **sourceIP** *(required)*: string
* **sourcePort** *(required)*: integer (int32)
* **transportProtocol** *(required)*: string
* **proxyPort** *(required)*: integer (int32)
* **targetHost** *(optional)*: string | null
* **targetPort** *(optional)*: integer (int32)
### PatchPolicyV2DTO
[Section titled “PatchPolicyV2DTO”](#patchpolicyv2dto)
Patch request for an Access Policy
**Type:** object
**Properties:**
* **name** *(optional)*: string | null - New Name for the identified entity
* **description** *(optional)*: string | null - New Description for the identified entity
* **isActive** *(optional)*: boolean (boolean) | null - New Status for the identified entity
* **tags** *(optional)*: Array - New Tags for the identified entity
* **clientWorkload** *(optional)*: string (uuid) - Client Workload associated with this Access Policy
* **serverWorkload** *(optional)*: string (uuid) - Server Workload associated with this Access Policy
* **credentialProviders** *(optional)*: Array - Credential Providers associated with this Access Policy
* **trustProviders** *(optional)*: Array\ - Trust Providers associated with this Access Policy
* **accessConditions** *(optional)*: Array\ - Access Conditions associated with this Access Policy
### PermissionDTO
[Section titled “PermissionDTO”](#permissiondto)
Individual Permission details
**Type:** object
**Properties:**
* **name** *(optional)*: string | null - Name of the Permission Target
* **read** *(optional)*: boolean - True if this permission allows access to Read the Permission Target, False otherwise
* **write** *(optional)*: boolean - True if this permission allows access to Write the Permission Target, False otherwise
* **isWritable** *(optional)*: boolean - True if this permission allows access to Write the Permission Target, False otherwise
* **isReadable** *(optional)*: boolean - True if this permission allows access to Read the Permission Target, False otherwise
* **accessLevel** *(optional)*: string | null - Description of the Permission level
### PolicyCredentialMappingDTO
[Section titled “PolicyCredentialMappingDTO”](#policycredentialmappingdto)
Access Policy Credential Mappings
**Type:** object
**Properties:**
* **credentialProviderId** *(required)*: string (uuid) - CredentialProviderId
* **mappingType** *(required)*: any
* **accountName** *(optional)*: string | null - Snowflake Username
* **headerName** *(optional)*: string | null - Header Name
* **headerValue** *(optional)*: string | null - Header Value
* **httpbodyFieldPath** *(optional)*: string | null - HttpBody Field Path
* **httpbodyFieldValue** *(optional)*: string | null - HttpBody Field Value
### PolicyCredentialProviderMappingTypes
[Section titled “PolicyCredentialProviderMappingTypes”](#policycredentialprovidermappingtypes)
**Type:** string
**Possible values:** `None`, `AccountName`, `HttpHeader`, `HttpBody`
### PolicyDTO
[Section titled “PolicyDTO”](#policydto)
Individual Access Policy
**Type:** object
**Properties:**
* **externalId** *(optional)*: string (uuid)
* **name** *(required)*: string - Name of the Entity
* **description** *(optional)*: string | null - Description of the Entity
* **isActive** *(required)*: boolean (boolean) - True/False value that determines if this entity is Active or Disabled
* **tags** *(optional)*: Array
* **createdAt** *(optional)*: string (date-time)
* **modifiedAt** *(optional)*: string (date-time) | null
* **createdBy** *(optional)*: string | null
* **modifiedBy** *(optional)*: string | null
* **resourceSet** *(required)*: string (uuid) - ID of the Resource Set in which this Access Entity exists
* **credentialProvider** *(optional)*: string (uuid) | null - Credential Provider associated with this Access Policy
* **trustProviders** *(optional)*: Array\ - Trust Providers associated with this Access Policy
* **accessConditions** *(optional)*: Array\ - Access Conditions associated with this Access Policy
* **clientWorkload** *(required)*: string (uuid) - Client Workload associated with this Access Policy
* **serverWorkload** *(required)*: string (uuid) - Server Workload associated with this Access Policy
* **clientWorkloadDetails** *(optional)*: any
* **serverWorkloadDetails** *(optional)*: any
* **policyNotes** *(optional)*: Array - Policy Notes for this Access Policy
### PolicyExternalDTO
[Section titled “PolicyExternalDTO”](#policyexternaldto)
Individual Access Policy
**Type:** object
**Properties:**
* **externalId** *(optional)*: string (uuid)
* **name** *(required)*: string - Name of the Entity
* **description** *(optional)*: string | null - Description of the Entity
* **isActive** *(required)*: boolean (boolean) - True/False value that determines if this entity is Active or Disabled
* **tags** *(optional)*: Array
* **createdAt** *(optional)*: string (date-time)
* **modifiedAt** *(optional)*: string (date-time) | null
* **createdBy** *(optional)*: string | null
* **modifiedBy** *(optional)*: string | null
* **resourceSet** *(required)*: string (uuid) - ID of the Resource Set in which this Access Entity exists
* **clientWorkload** *(optional)*: any
* **trustProviders** *(optional)*: Array - Details of the Trust Providers associated with this Access Policy
* **accessConditions** *(optional)*: Array - Details of the Access Conditions associated with this Access Policy
* **credentialProvider** *(optional)*: any
* **serverWorkload** *(optional)*: any
* **policyNotes** *(optional)*: Array - Policy Notes for this Access Policy
### PolicyListDTO
[Section titled “PolicyListDTO”](#policylistdto)
Page of Access Policies
**Type:** object
**Properties:**
* **page** *(optional)*: integer (int32) - Page of entities
* **perPage** *(optional)*: integer (int32) - Number of entities requested for the current page
* **order** *(optional)*: string | null - Ordering criteria used for the current page
* **statusCode** *(optional)*: integer (int32) - HTTP Status Code of the response
* **recordsTotal** *(optional)*: integer (int32) - Total number of Access Policies
* **accessPolicies** *(optional)*: Array - Page of Access Policies
### PolicyNoteDTO
[Section titled “PolicyNoteDTO”](#policynotedto)
Individual Note created for an Access Policy
**Type:** object
**Properties:**
* **note** *(required)*: string - Note added to an Access Policy by a User
* **createdAt** *(optional)*: string (date-time) - Timestamp the Note was created
* **createdBy** *(optional)*: string | null - Email address of the User who created the Access Policy Note
### PolicyNoteDTOListDTO
[Section titled “PolicyNoteDTOListDTO”](#policynotedtolistdto)
**Type:** object
**Properties:**
* **page** *(optional)*: integer (int32) - Current page number of entities
* **perPage** *(optional)*: integer (int32) - Number of entities requested for the current page
* **order** *(optional)*: string | null - Ordering criteria used for the current page
* **statusCode** *(optional)*: integer (int32) - HTTP StatusCode for the current result
* **recordsTotal** *(optional)*: integer (int32) - Total number of entities available
* **entities** *(optional)*: Array - Page of entities for this request
### PolicyPatchDTO
[Section titled “PolicyPatchDTO”](#policypatchdto)
Patch request for an Access Policy
**Type:** object
**Properties:**
* **name** *(optional)*: string | null - New Name for the identified entity
* **description** *(optional)*: string | null - New Description for the identified entity
* **isActive** *(optional)*: boolean (boolean) | null - New Status for the identified entity
* **tags** *(optional)*: Array - New Tags for the identified entity
* **clientWorkload** *(optional)*: string (uuid) - Client Workload associated with this Access Policy
* **serverWorkload** *(optional)*: string (uuid) - Server Workload associated with this Access Policy
* **credentialProvider** *(optional)*: string (uuid) | null - Credential Provider associated with this Access Policy
* **trustProviders** *(optional)*: Array\ - Trust Providers associated with this Access Policy
* **accessConditions** *(optional)*: Array\ - Access Conditions associated with this Access Policy
### PublicKeyValidationDTO
[Section titled “PublicKeyValidationDTO”](#publickeyvalidationdto)
Response to a request for Public Key Validation
**Type:** object
**Properties:**
* **isValidContent** *(optional)*: boolean - True if the Public Key was valid, False otherwise
* **thumbprint** *(optional)*: string | null - Thumbprint of the Public Key
* **expirationDate** *(optional)*: string | null - Expiration of the Public Key Certificate
* **certificateSubject** *(optional)*: string | null - Subject of the Public Key Certificate
* **message** *(optional)*: string | null - Message describing why the Public Key was not valid if IsValidContent is False
### RequestMetadaAembitDTO
[Section titled “RequestMetadaAembitDTO”](#requestmetadaaembitdto)
**Type:** object
**Properties:**
* **clientId** *(optional)*: string | null
### RequestMetadaAwsDTO
[Section titled “RequestMetadaAwsDTO”](#requestmetadaawsdto)
**Type:** object
**Properties:**
* **accountId** *(optional)*: string | null
* **instanceId** *(optional)*: string | null
* **ecs** *(optional)*: any
* **lambda** *(optional)*: any
### RequestMetadaAzureDTO
[Section titled “RequestMetadaAzureDTO”](#requestmetadaazuredto)
**Type:** object
**Properties:**
* **vmId** *(optional)*: string | null
* **subscriptionId** *(optional)*: string | null
### RequestMetadaEcsDTO
[Section titled “RequestMetadaEcsDTO”](#requestmetadaecsdto)
**Type:** object
**Properties:**
* **taskFamily** *(optional)*: string | null
### RequestMetadaGcpDTO
[Section titled “RequestMetadaGcpDTO”](#requestmetadagcpdto)
**Type:** object
**Properties:**
* **serviceAccount** *(optional)*: string | null
### RequestMetadaGithubDTO
[Section titled “RequestMetadaGithubDTO”](#requestmetadagithubdto)
**Type:** object
**Properties:**
* **repository** *(optional)*: string | null
* **subject** *(optional)*: string | null
### RequestMetadaGitlabDTO
[Section titled “RequestMetadaGitlabDTO”](#requestmetadagitlabdto)
**Type:** object
**Properties:**
* **namespacePath** *(optional)*: string | null
* **projectPath** *(optional)*: string | null
* **refPath** *(optional)*: string | null
* **subject** *(optional)*: string | null
### RequestMetadaHostDTO
[Section titled “RequestMetadaHostDTO”](#requestmetadahostdto)
**Type:** object
**Properties:**
* **hostname** *(optional)*: string | null
### RequestMetadaKubernetesDTO
[Section titled “RequestMetadaKubernetesDTO”](#requestmetadakubernetesdto)
**Type:** object
**Properties:**
* **namespace** *(optional)*: string | null
* **podName** *(optional)*: string | null
* **serviceAccountName** *(optional)*: string | null
### RequestMetadaLambdaDTO
[Section titled “RequestMetadaLambdaDTO”](#requestmetadalambdadto)
**Type:** object
**Properties:**
* **arn** *(optional)*: string | null
### RequestMetadaNetworkDTO
[Section titled “RequestMetadaNetworkDTO”](#requestmetadanetworkdto)
**Type:** object
**Properties:**
* **sourceIP** *(optional)*: string | null
### RequestMetadaProcessDTO
[Section titled “RequestMetadaProcessDTO”](#requestmetadaprocessdto)
**Type:** object
**Properties:**
* **name** *(optional)*: string | null
* **userName** *(optional)*: string | null
### RequestMetadaTerraformDTO
[Section titled “RequestMetadaTerraformDTO”](#requestmetadaterraformdto)
**Type:** object
**Properties:**
* **workspaceId** *(optional)*: string | null
### ResourceSetDTO
[Section titled “ResourceSetDTO”](#resourcesetdto)
Individual Resource Set
**Type:** object
**Properties:**
* **externalId** *(optional)*: string (uuid)
* **name** *(required)*: string - Name of the Entity
* **description** *(optional)*: string | null - Description of the Entity
* **isActive** *(required)*: boolean (boolean) - True/False value that determines if this entity is Active or Disabled
* **tags** *(optional)*: Array
* **createdAt** *(optional)*: string (date-time)
* **modifiedAt** *(optional)*: string (date-time) | null
* **createdBy** *(optional)*: string | null
* **modifiedBy** *(optional)*: string | null
* **serverWorkloadCount** *(optional)*: integer (int32) | null - Server Workloads associated with this Resource Set
* **clientWorkloadCount** *(optional)*: integer (int32) | null - Client Workloads associated with this Resource Set
* **accessPolicyCount** *(optional)*: integer (int32) | null - Access Policies associated with this Resource Set
* **trustProviderCount** *(optional)*: integer (int32) | null - Trust Providers associated with this Resource Set
* **accessConditionCount** *(optional)*: integer (int32) | null - Access Conditions associated with this Resource Set
* **credentialProviderCount** *(optional)*: integer (int32) | null - Credential Providers associated with this Resource Set
* **roles** *(optional)*: Array\ - Roles associated with this Resource Set
* **rolesDetails** *(optional)*: Array - Details of the Roles associated with this Resource Set
* **users** *(optional)*: Array - Users associated with this Resource Set
* **standaloneCertificateAuthority** *(optional)*: string (uuid) | null - Standalone Certificate Authority associated with this Resource Set
### ResourceSetDTOListDTO
[Section titled “ResourceSetDTOListDTO”](#resourcesetdtolistdto)
**Type:** object
**Properties:**
* **page** *(optional)*: integer (int32) - Current page number of entities
* **perPage** *(optional)*: integer (int32) - Number of entities requested for the current page
* **order** *(optional)*: string | null - Ordering criteria used for the current page
* **statusCode** *(optional)*: integer (int32) - HTTP StatusCode for the current result
* **recordsTotal** *(optional)*: integer (int32) - Total number of entities available
* **entities** *(optional)*: Array - Page of entities for this request
### ResourceSetPatchDTO
[Section titled “ResourceSetPatchDTO”](#resourcesetpatchdto)
Patch Request for an Individual Resource Set
**Type:** object
**Properties:**
* **name** *(optional)*: string | null - New Name for the identified entity
* **description** *(optional)*: string | null - New Description for the identified entity
* **isActive** *(optional)*: boolean (boolean) | null - New Status for the identified entity
* **tags** *(optional)*: Array - New Tags for the identified entity
### RoleDTO
[Section titled “RoleDTO”](#roledto)
Individual Role
**Type:** object
**Properties:**
* **externalId** *(optional)*: string (uuid)
* **name** *(required)*: string - Name of the Entity
* **description** *(optional)*: string | null - Description of the Entity
* **isActive** *(required)*: boolean (boolean) - True/False value that determines if this entity is Active or Disabled
* **tags** *(optional)*: Array
* **createdAt** *(optional)*: string (date-time)
* **modifiedAt** *(optional)*: string (date-time) | null
* **createdBy** *(optional)*: string | null
* **modifiedBy** *(optional)*: string | null
* **usersCount** *(optional)*: integer (int32) - Number of Users associated with this Role
* **credentialProvidersCount** *(optional)*: integer (int32) - Number of Credential Providers associated with this Role
* **isSystem** *(optional)*: boolean - True if this is a system included Role (e.g. SuperAdmin or Auditor)
* **permissions** *(optional)*: Array - Permissions assigned to this Role
* **resourceSets** *(optional)*: Array - Resource Sets assigned to this Role
### RoleListDTO
[Section titled “RoleListDTO”](#rolelistdto)
Page of Roles
**Type:** object
**Properties:**
* **page** *(optional)*: integer (int32) - Page of entities
* **perPage** *(optional)*: integer (int32) - Number of entities requested for the current page
* **order** *(optional)*: string | null - Ordering criteria used for the current page
* **statusCode** *(optional)*: integer (int32) - HTTP Status Code of the response
* **recordsTotal** *(optional)*: integer (int32) - Total number of Roles
* **roles** *(optional)*: Array - Page of Roles
### RolePatchDTO
[Section titled “RolePatchDTO”](#rolepatchdto)
Patch request for an individual Role
**Type:** object
**Properties:**
* **name** *(optional)*: string | null - New Name for the identified entity
* **description** *(optional)*: string | null - New Description for the identified entity
* **isActive** *(optional)*: boolean (boolean) | null - New Status for the identified entity
* **tags** *(optional)*: Array - New Tags for the identified entity
### RoutingDTO
[Section titled “RoutingDTO”](#routingdto)
Individual Routing
**Type:** object
**Properties:**
* **externalId** *(optional)*: string (uuid)
* **name** *(required)*: string - Name of the Entity
* **description** *(optional)*: string | null - Description of the Entity
* **isActive** *(required)*: boolean (boolean) - True/False value that determines if this entity is Active or Disabled
* **tags** *(optional)*: Array
* **createdAt** *(optional)*: string (date-time)
* **modifiedAt** *(optional)*: string (date-time) | null
* **createdBy** *(optional)*: string | null
* **modifiedBy** *(optional)*: string | null
* **resourceSetId** *(required)*: string (uuid) - ID of the Resource Set related to routing
* **proxyUrl** *(required)*: string - URL of the proxy. The format is http(s)://server:port
### RoutingDTOListDTO
[Section titled “RoutingDTOListDTO”](#routingdtolistdto)
**Type:** object
**Properties:**
* **page** *(optional)*: integer (int32) - Current page number of entities
* **perPage** *(optional)*: integer (int32) - Number of entities requested for the current page
* **order** *(optional)*: string | null - Ordering criteria used for the current page
* **statusCode** *(optional)*: integer (int32) - HTTP StatusCode for the current result
* **recordsTotal** *(optional)*: integer (int32) - Total number of entities available
* **entities** *(optional)*: Array - Page of entities for this request
### RoutingPatchDTO
[Section titled “RoutingPatchDTO”](#routingpatchdto)
Patch request for an individual Routing
**Type:** object
**Properties:**
* **name** *(optional)*: string | null - New Name for the identified entity
* **description** *(optional)*: string | null - New Description for the identified entity
* **isActive** *(optional)*: boolean (boolean) | null - New Status for the identified entity
* **tags** *(optional)*: Array - New Tags for the identified entity
### SSOIdentityProviderDTO
[Section titled “SSOIdentityProviderDTO”](#ssoidentityproviderdto)
Individual SSO Identity Provider
**Type:** object
**Properties:**
* **externalId** *(optional)*: string (uuid)
* **name** *(required)*: string - Name of the Entity
* **description** *(optional)*: string | null - Description of the Entity
* **isActive** *(required)*: boolean (boolean) - True/False value that determines if this entity is Active or Disabled
* **tags** *(optional)*: Array
* **createdAt** *(optional)*: string (date-time)
* **modifiedAt** *(optional)*: string (date-time) | null
* **createdBy** *(optional)*: string | null
* **modifiedBy** *(optional)*: string | null
* **entityId** *(optional)*: string | null - SAML Entity ID of the remote SSO Identity Provider
* **metadataUrl** *(optional)*: string | null - Metadata URL of the remote SSO Identity Provider
* **metadataXml** *(optional)*: string | null - Metadata XML content of the remote SSO Identity Provider
* **samlStatementRoleMappings** *(optional)*: Array - Collection of mappings of SAML attributes to Aembit roles
### SSOIdentityProviderDTOListDTO
[Section titled “SSOIdentityProviderDTOListDTO”](#ssoidentityproviderdtolistdto)
**Type:** object
**Properties:**
* **page** *(optional)*: integer (int32) - Current page number of entities
* **perPage** *(optional)*: integer (int32) - Number of entities requested for the current page
* **order** *(optional)*: string | null - Ordering criteria used for the current page
* **statusCode** *(optional)*: integer (int32) - HTTP StatusCode for the current result
* **recordsTotal** *(optional)*: integer (int32) - Total number of entities available
* **entities** *(optional)*: Array - Page of entities for this request
### SSOIdentityProviderPatchDTO
[Section titled “SSOIdentityProviderPatchDTO”](#ssoidentityproviderpatchdto)
Patch request for an individual SSO Identity Provider
**Type:** object
**Properties:**
* **name** *(optional)*: string | null - New Name for the identified entity
* **description** *(optional)*: string | null - New Description for the identified entity
* **isActive** *(optional)*: boolean (boolean) | null - New Status for the identified entity
* **tags** *(optional)*: Array - New Tags for the identified entity
### SSOSignInPolicyDTO
[Section titled “SSOSignInPolicyDTO”](#ssosigninpolicydto)
**Type:** object
**Properties:**
* **ssoRequired** *(optional)*: boolean
### SamlStatementRoleMappingDTO
[Section titled “SamlStatementRoleMappingDTO”](#samlstatementrolemappingdto)
Represents a mapping of a SAML attribute to an Aembit role
**Type:** object
**Properties:**
* **attributeName** *(optional)*: string | null - SAML Attribute name
* **attributeValue** *(optional)*: string | null - SAML Attribute value
* **roleExternalId** *(optional)*: string (uuid) - Aembit Role ID
### ServerWorkloadExternalDTO
[Section titled “ServerWorkloadExternalDTO”](#serverworkloadexternaldto)
Individual Server Workload
**Type:** object
**Properties:**
* **externalId** *(optional)*: string (uuid)
* **name** *(required)*: string - Name of the Entity
* **description** *(optional)*: string | null - Description of the Entity
* **isActive** *(required)*: boolean (boolean) - True/False value that determines if this entity is Active or Disabled
* **tags** *(optional)*: Array
* **createdAt** *(optional)*: string (date-time)
* **modifiedAt** *(optional)*: string (date-time) | null
* **createdBy** *(optional)*: string | null
* **modifiedBy** *(optional)*: string | null
* **resourceSet** *(required)*: string (uuid) - ID of the Resource Set in which this Access Entity exists
* **serviceEndpoint** *(required)*: any
* **type** *(optional)*: string | null - Type of Server Workload
* **accessPolicyCount** *(optional)*: integer (int32) - Access Policies associated with this Server Workload
### ServerWorkloadListDTO
[Section titled “ServerWorkloadListDTO”](#serverworkloadlistdto)
Page of Server Workloads
**Type:** object
**Properties:**
* **page** *(optional)*: integer (int32) - Page of entities
* **perPage** *(optional)*: integer (int32) - Number of entities requested for the current page
* **order** *(optional)*: string | null - Ordering criteria used for the current page
* **statusCode** *(optional)*: integer (int32)
* **recordsTotal** *(optional)*: integer (int32)
* **serverWorkloads** *(optional)*: Array
### StandaloneCertificatePatchDTO
[Section titled “StandaloneCertificatePatchDTO”](#standalonecertificatepatchdto)
Patch Request for an Individual Standalone Certificate Authority
**Type:** object
**Properties:**
* **name** *(optional)*: string | null - New Name for the identified entity
* **description** *(optional)*: string | null - New Description for the identified entity
* **isActive** *(optional)*: boolean (boolean) | null - New Status for the identified entity
* **tags** *(optional)*: Array - New Tags for the identified entity
* **leafLifetime** *(optional)*: integer (int32) | null
### StandaloneCertificateRequestDTO
[Section titled “StandaloneCertificateRequestDTO”](#standalonecertificaterequestdto)
Individual Standalone Certificate Authority
**Type:** object
**Properties:**
* **externalId** *(optional)*: string (uuid)
* **name** *(required)*: string - Name of the Entity
* **description** *(optional)*: string | null - Description of the Entity
* **isActive** *(required)*: boolean (boolean) - True/False value that determines if this entity is Active or Disabled
* **tags** *(optional)*: Array
* **createdAt** *(optional)*: string (date-time)
* **modifiedAt** *(optional)*: string (date-time) | null
* **createdBy** *(optional)*: string | null
* **modifiedBy** *(optional)*: string | null
* **leafLifetime** *(required)*: integer (int32) - Leaf certificate lifetime value for this Standalone Certificate Authority
### StandaloneCertificateResponseDTO
[Section titled “StandaloneCertificateResponseDTO”](#standalonecertificateresponsedto)
Individual Standalone Certificate Authority
**Type:** object
**Properties:**
* **externalId** *(optional)*: string (uuid)
* **name** *(required)*: string - Name of the Entity
* **description** *(optional)*: string | null - Description of the Entity
* **isActive** *(required)*: boolean (boolean) - True/False value that determines if this entity is Active or Disabled
* **tags** *(optional)*: Array
* **createdAt** *(optional)*: string (date-time)
* **modifiedAt** *(optional)*: string (date-time) | null
* **createdBy** *(optional)*: string | null
* **modifiedBy** *(optional)*: string | null
* **leafLifetime** *(required)*: integer (int32) - Leaf certificate lifetime value for this Standalone Certificate Authority
* **notBefore** *(optional)*: string (date-time) - Not before value of the Root CA for this Standalone Certificate Authority
* **notAfter** *(optional)*: string (date-time) - Not after value of the Root CA for this Standalone Certificate Authority
* **clientWorkloadCount** *(optional)*: integer (int32) | null - Client Workloads associated with this Standalone Certificate Authority
### StandaloneCertificateResponseDTOListDTO
[Section titled “StandaloneCertificateResponseDTOListDTO”](#standalonecertificateresponsedtolistdto)
**Type:** object
**Properties:**
* **page** *(optional)*: integer (int32) - Current page number of entities
* **perPage** *(optional)*: integer (int32) - Number of entities requested for the current page
* **order** *(optional)*: string | null - Ordering criteria used for the current page
* **statusCode** *(optional)*: integer (int32) - HTTP StatusCode for the current result
* **recordsTotal** *(optional)*: integer (int32) - Total number of entities available
* **entities** *(optional)*: Array - Page of entities for this request
### StringStringKeyValuePair
[Section titled “StringStringKeyValuePair”](#stringstringkeyvaluepair)
**Type:** object
**Properties:**
* **key** *(optional)*: string | null
* **value** *(optional)*: string | null
### TagDTO
[Section titled “TagDTO”](#tagdto)
Aembit Entity Tag Details
**Type:** object
**Properties:**
* **key** *(required)*: string - Tag Key
* **value** *(required)*: string - Tag Key Value
### TrustProviderDTO
[Section titled “TrustProviderDTO”](#trustproviderdto)
Individual Trust Provider
**Type:** object
**Properties:**
* **externalId** *(optional)*: string (uuid)
* **name** *(required)*: string - Name of the Entity
* **description** *(optional)*: string | null - Description of the Entity
* **isActive** *(required)*: boolean (boolean) - True/False value that determines if this entity is Active or Disabled
* **tags** *(optional)*: Array
* **createdAt** *(optional)*: string (date-time)
* **modifiedAt** *(optional)*: string (date-time) | null
* **createdBy** *(optional)*: string | null
* **modifiedBy** *(optional)*: string | null
* **resourceSet** *(required)*: string (uuid) - ID of the Resource Set in which this Access Entity exists
* **id** *(optional)*: integer (int32) - Trust Provider Id
* **provider** *(required)*: string - Trust Provider Type
* **matchRules** *(optional)*: Array - Trust Provider Match Rules
* **certificate** *(optional)*: string | null - Trust Provider Certificate or Public Key for cryptographic attestation
* **publicKeyValidation** *(optional)*: any
* **oidcUrl** *(optional)*: string | null - OIDC URL to use for retrieving JWKS Public Keys
* **pemType** *(optional)*: string | null - PEM Input Type
* **accessPolicyCount** *(optional)*: integer (int32) - Access Policies associated with this Trust Provider
* **agentControllersCount** *(optional)*: integer (int32) - Agent Controllers associated with this Trust Provider
* **agentControllerIds** *(optional)*: Array\ - Agent Controller IDs associated with this Trust Provider
### TrustProviderItemDTO
[Section titled “TrustProviderItemDTO”](#trustprovideritemdto)
**Type:** object
**Properties:**
* **externalId** *(optional)*: string (uuid)
* **name** *(optional)*: string | null
### TrustProviderListDTO
[Section titled “TrustProviderListDTO”](#trustproviderlistdto)
Page of Trust Providers
**Type:** object
**Properties:**
* **page** *(optional)*: integer (int32) - Page of entities
* **perPage** *(optional)*: integer (int32) - Number of entities requested for the current page
* **order** *(optional)*: string | null - Ordering criteria used for the current page
* **statusCode** *(optional)*: integer (int32) - HTTP Status Code of the response
* **recordsTotal** *(optional)*: integer (int32) - Total number of Trust Providers
* **trustProviders** *(optional)*: Array - Page of Trust Providers
### TrustProviderMatchRuleDTO
[Section titled “TrustProviderMatchRuleDTO”](#trustprovidermatchruledto)
Individual Match Rule to enforce during Trust Provider attestation
**Type:** object
**Properties:**
* **attribute** *(required)*: string - Match Rule Attribute
* **value** *(required)*: string - Match Rule Attribute Value
### TrustProviderPatchDTO
[Section titled “TrustProviderPatchDTO”](#trustproviderpatchdto)
Patch request for an individual Trust Provider
**Type:** object
**Properties:**
* **name** *(optional)*: string | null - New Name for the identified entity
* **description** *(optional)*: string | null - New Description for the identified entity
* **isActive** *(optional)*: boolean (boolean) | null - New Status for the identified entity
* **tags** *(optional)*: Array - New Tags for the identified entity
* **provider** *(optional)*: string | null - Trust Provider Type
* **matchRules** *(optional)*: Array - Trust Provider Match Rules
* **oidcUrl** *(optional)*: string | null - OIDC URL to use for retrieving JWKS Public Keys
* **pemType** *(optional)*: string | null - PEM Input Type
* **certificate** *(optional)*: string | null - Trust Provider Certificate or Public Key for cryptographic attestation
* **publicKeyValidation** *(optional)*: any
### UserAgentDTO
[Section titled “UserAgentDTO”](#useragentdto)
DTO for the HTTP User Agent of an individual Aembit Audit Log
**Type:** object
**Properties:**
* **browser** *(optional)*: string | null - The browser as determined from the HTTP User Agent
* **operatingSystem** *(optional)*: string | null - The operating system as determined from the HTTP User Agent
* **raw** *(optional)*: string | null - The raw HTTP User Agent
### UserDTO
[Section titled “UserDTO”](#userdto)
**Type:** object
**Properties:**
* **email** *(required)*: string (email)
* **externalId** *(optional)*: string (uuid)
* **roles** *(optional)*: Array\
* **rolesDetails** *(optional)*: Array
* **firstName** *(required)*: string
* **lastName** *(required)*: string
* **phoneNumber** *(optional)*: string | null
* **createdAt** *(optional)*: string (date-time)
* **isActive** *(optional)*: boolean
* **twoFactorEnabled** *(optional)*: boolean
* **isLocked** *(optional)*: boolean
* **tags** *(optional)*: Array
* **userTokens** *(optional)*: Array
### UserListDTO
[Section titled “UserListDTO”](#userlistdto)
**Type:** object
**Properties:**
* **page** *(optional)*: integer (int32) - Page of entities
* **perPage** *(optional)*: integer (int32) - Number of entities requested for the current page
* **order** *(optional)*: string | null - Ordering criteria used for the current page
* **statusCode** *(optional)*: integer (int32)
* **recordsTotal** *(optional)*: integer (int32)
* **users** *(optional)*: Array
### UserPatchDTO
[Section titled “UserPatchDTO”](#userpatchdto)
**Type:** object
**Properties:**
* **email** *(optional)*: string | null
* **firstName** *(optional)*: string | null
* **lastName** *(optional)*: string | null
* **phoneNumber** *(optional)*: string | null
* **isActive** *(optional)*: boolean | null
### UserTokensDTO
[Section titled “UserTokensDTO”](#usertokensdto)
**Type:** object
**Properties:**
* **id** *(optional)*: string (uuid)
* **name** *(optional)*: string | null
* **verified** *(optional)*: boolean
* **createdAt** *(optional)*: string (date-time)
### WorkloadExternalDTO
[Section titled “WorkloadExternalDTO”](#workloadexternaldto)
**Type:** object
**Properties:**
* **externalId** *(optional)*: string (uuid)
* **name** *(required)*: string - Name of the Entity
* **description** *(optional)*: string | null - Description of the Entity
* **isActive** *(required)*: boolean (boolean) - True/False value that determines if this entity is Active or Disabled
* **tags** *(optional)*: Array
* **createdAt** *(optional)*: string (date-time)
* **modifiedAt** *(optional)*: string (date-time) | null
* **createdBy** *(optional)*: string | null
* **modifiedBy** *(optional)*: string | null
* **resourceSet** *(required)*: string (uuid) - ID of the Resource Set in which this Access Entity exists
* **trustProviders** *(optional)*: Array
* **credentialProviderId** *(optional)*: string (uuid) | null
* **credentialProviderText** *(optional)*: string | null
* **workloadServiceEndpoints** *(optional)*: Array\
* **serviceEndpoint** *(optional)*: any
* **type** *(optional)*: string | null
### WorkloadServiceAuthenticationDTO
[Section titled “WorkloadServiceAuthenticationDTO”](#workloadserviceauthenticationdto)
Authentication configuration for a Server Workload
**Type:** object
**Properties:**
* **method** *(required)*: string - Authentication Method
* **scheme** *(required)*: string - Authentication Scheme
* **config** *(optional)*: string | null - Authentication Configuration
### WorkloadServiceEndpointDTO
[Section titled “WorkloadServiceEndpointDTO”](#workloadserviceendpointdto)
Service Endpoint for a Server Workload
**Type:** object
**Properties:**
* **externalId** *(optional)*: string | null - External ID of the Service Endpoint
* **id** *(optional)*: integer (int32) - ID of the Service Endpoint
* **host** *(required)*: string - Hostname or IP Address
* **appProtocol** *(required)*: string - Application Protocol
* **transportProtocol** *(required)*: string - Transport Protocol (e.g. TCP)
* **requestedPort** *(required)*: integer (int32) - The target port as specified by the Client Workload
* **requestedTls** *(required)*: boolean - The TLS encryption configuration of the Client Workload
* **port** *(required)*: integer (int32) - The target port to which the Agent/Proxy will communicate
* **tls** *(required)*: boolean - The TLS encryption configuration which will be used by the Agent/Proxy
* **workloadServiceAuthentication** *(optional)*: any
* **tlsVerification** *(required)*: string - TLS Verification configuration for the Agent/Proxy to Server Workload connection
* **httpHeaders** *(optional)*: Array - Static HTTP Headers to include for transmission to the Server Workload
# Aembit.API - Data Schemas
> Data schemas and models for Aembit.API
# Aembit.API - Data Schemas
[Section titled “Aembit.API - Data Schemas”](#aembitapi---data-schemas)
**Version:** v1
### AccessConditionDTO
[Section titled “AccessConditionDTO”](#accessconditiondto)
DTO of an individual Access Condition for enforcement during Access Policy evaluation
**Type:** object
**Properties:**
* **externalId** *(optional)*: string (uuid)
* **name** *(required)*: string - Name of the Entity
* **description** *(optional)*: string | null - Description of the Entity
* **isActive** *(required)*: boolean (boolean) - True/False value that determines if this entity is Active or Disabled
* **tags** *(optional)*: Array
* **createdAt** *(optional)*: string (date-time)
* **modifiedAt** *(optional)*: string (date-time) | null
* **createdBy** *(optional)*: string | null
* **modifiedBy** *(optional)*: string | null
* **resourceSet** *(required)*: string (uuid) - ID of the Resource Set in which this Access Entity exists
* **integrationID** *(optional)*: string (uuid) - ID of the Integration Entity used by this Access Condition
* **integration** *(optional)*: any
* **conditions** *(required)*: object - Rules which are enforced by the Access Condition
* **accessPolicyCount** *(optional)*: integer (int32) - Access Policies associated with this Access Condition
### AccessConditionListDTO
[Section titled “AccessConditionListDTO”](#accessconditionlistdto)
Page of Access Conditions
**Type:** object
**Properties:**
* **page** *(optional)*: integer (int32) - Page of entities
* **perPage** *(optional)*: integer (int32) - Number of entities requested for the current page
* **order** *(optional)*: string | null - Ordering criteria used for the current page
* **statusCode** *(optional)*: integer (int32)
* **recordsTotal** *(optional)*: integer (int32)
* **accessConditions** *(optional)*: Array
### AccessConditionPatchDTO
[Section titled “AccessConditionPatchDTO”](#accessconditionpatchdto)
Patch Request DTO for individual Access Condition
**Type:** object
**Properties:**
* **name** *(optional)*: string | null - New Name for the identified entity
* **description** *(optional)*: string | null - New Description for the identified entity
* **isActive** *(optional)*: boolean (boolean) | null - New Status for the identified entity
* **tags** *(optional)*: Array - New Tags for the identified entity
### AgentControllerDTO
[Section titled “AgentControllerDTO”](#agentcontrollerdto)
DTO of an individual Agent Controller for Agent Proxy management
**Type:** object
**Properties:**
* **id** *(optional)*: integer (int) - ID of the Agent Controller
* **externalId** *(optional)*: string (uuid) - ID of the Agent Controller
* **createdAt** *(optional)*: string (date) - Agent Controller creation Timestamp
* **version** *(optional)*: string | null - Last reported software version of the Agent Controller
* **isActive** *(optional)*: boolean (boolean) - Active status of the Agent Controller
* **name** *(required)*: string - Name of the Agent Controller
* **description** *(optional)*: string | null - Description of the Agent Controller
* **tags** *(optional)*: Array - Tags assigned to the Agent Controller
* **tlsCertificates** *(optional)*: Array - TLS Certificates associated with the Agent Controller
* **trustProviderId** *(optional)*: string (uuid) | null - Trust Provider ID of the Agent Controller used for attested authentication
* **trustProvider** *(optional)*: any
* **modifiedAt** *(optional)*: string (date) - Agent Controller modification Timestamp
* **isHealthy** *(optional)*: boolean (boolean) - Recently reported Agent Controller Health Status
* **lastReportedUptime** *(optional)*: integer (int64) - Last Reported Agent Controller Uptime (in seconds)
* **lastReportedHealthTime** *(optional)*: string (date) | null - Last Reported Agent Controller Health Time
### AgentControllerDeviceCodeDTO
[Section titled “AgentControllerDeviceCodeDTO”](#agentcontrollerdevicecodedto)
DTO of an individual Agent Controller Device Code
**Type:** object
**Properties:**
* **device\_code** *(optional)*: string | null - One time use OAuth 2 Device Code for use during AgentController deployment and registration
### AgentControllerListDTO
[Section titled “AgentControllerListDTO”](#agentcontrollerlistdto)
Page of Agent Controllers for Agent Proxy management
**Type:** object
**Properties:**
* **page** *(optional)*: integer (int32) - Page of entities
* **perPage** *(optional)*: integer (int32) - Number of entities requested for the current page
* **order** *(optional)*: string | null - Ordering criteria used for the current page
* **statusCode** *(optional)*: integer (int32) - HTTP StatusCode for the current result
* **recordsTotal** *(optional)*: integer (int32) - Total number of AgentControllers available
* **agentControllers** *(optional)*: Array - Page of AgentControllers for this request
### AgentControllerPatchDTO
[Section titled “AgentControllerPatchDTO”](#agentcontrollerpatchdto)
Patch Request DTO for individual Agent Controller
**Type:** object
**Properties:**
* **version** *(optional)*: string | null
* **isActive** *(optional)*: boolean (boolean) | null - New Status for the identified Agent Controller
* **trustProviderId** *(optional)*: string (uuid) | null - New Trust Provider to use for the identified Agent Controller
### AgentControllerTagDTO
[Section titled “AgentControllerTagDTO”](#agentcontrollertagdto)
Agent Controller Tag key and value
**Type:** object
**Properties:**
* **key** *(required)*: string - Key for the Agent Controller Tag
* **value** *(required)*: string - Value for the Agent Controller Tag
### AgentControllerTlsCertificateDTO
[Section titled “AgentControllerTlsCertificateDTO”](#agentcontrollertlscertificatedto)
Agent Controller TLS Certificate information
**Type:** object
**Properties:**
* **subject** *(required)*: string - Subject of the Certificate
* **serialNumber** *(required)*: string - Serial Number of the Certificate
* **thumbprint** *(required)*: string - Thumbprint of the Certificate
* **notBefore** *(required)*: string (date-time) - Creation Timestamp of the Certificate
* **notAfter** *(required)*: string (date-time) - Expiration Timestamp of the Certificate
* **hostName** *(required)*: string - Last reported Hostname for the Agent Controller
* **createdAt** *(required)*: string (date-time) - Creation Timestamp for this Agent Controller TLS Certificate
* **isManagedByAembit** *(optional)*: boolean (boolean) - True if the Agent Controller TLS Certificate is managed by Aembit
### AuditActorDTO
[Section titled “AuditActorDTO”](#auditactordto)
DTO for the Actor details of an Aembit Audit Log
**Type:** object
**Properties:**
* **type** *(optional)*: string | null - The type of Audit Log actor (e.g. User, System, or Role)
* **displayName** *(optional)*: string | null - Fully qualified Audit Log Actor name
* **userName** *(optional)*: string | null
* **email** *(optional)*: string | null
* **credentialProviderId** *(optional)*: string | null - Credential Provider ID that was used to generate the Role-based Access Token for this Audit Log action
* **accessPolicyId** *(optional)*: string | null - Access Policy ID that was used to generate the Role-based Access Token for this Audit Log action
### AuditClientDTO
[Section titled “AuditClientDTO”](#auditclientdto)
DTO for the Client details of an Aembit Audit Log
**Type:** object
**Properties:**
* **ipAddress** *(optional)*: string | null - IP Address of the remote client
* **userAgent** *(optional)*: any
### AuditLogDTO
[Section titled “AuditLogDTO”](#auditlogdto)
DTO for an individual Aembit Audit Log
**Type:** object
**Properties:**
* **externalId** *(optional)*: string (uuid) - ID of an Aembit Audit Log
* **resourceSetId** *(optional)*: string (uuid) - Resource Set ID of an Aembit Audit Log
* **category** *(optional)*: string | null - Category of an Aembit Audit Log (e.g. Users, AccessPolicies, Workloads, etc.)
* **actor** *(optional)*: any
* **activity** *(optional)*: string | null - Activity of an Aembit Audit Log
* **target** *(optional)*: string | null - Target of an Aembit Audit Log
* **client** *(optional)*: any
* **outcome** *(optional)*: any
* **trustProvider** *(optional)*: any
* **severity** *(optional)*: string | null - Severity of an Aembit Audit Log
* **createdAt** *(optional)*: string (date-time) - Timestamp of when this Aembit Audit Log was created
### AuditLogListDTO
[Section titled “AuditLogListDTO”](#auditloglistdto)
Page of Aembit Audit Logs
**Type:** object
**Properties:**
* **page** *(optional)*: integer (int32) - Page of entities
* **perPage** *(optional)*: integer (int32) - Number of entities requested for the current page
* **order** *(optional)*: string | null - Ordering criteria used for the current page
* **statusCode** *(optional)*: integer (int32) - HTTP Status Code of the response
* **recordsTotal** *(optional)*: integer (int32) - Total number of Aembit Audit Logs
* **auditLogs** *(optional)*: Array - Page of Aembit Audit Logs
### AuditOutcomeDTO
[Section titled “AuditOutcomeDTO”](#auditoutcomedto)
DTO for the Outcome of an individual Aembit Audit Log
**Type:** object
**Properties:**
* **reason** *(optional)*: string | null - Reason for the outcome of this Aembit Audit Log
* **result** *(optional)*: string | null - Outcome of the action associated with this Aembit Audit Log
### AuthorizationEventAtttestationResultDTO
[Section titled “AuthorizationEventAtttestationResultDTO”](#authorizationeventatttestationresultdto)
Individual Access Entity Attestation Result of an Aembit Access Authorization Event
**Type:** object
**Properties:**
* **id** *(optional)*: string (uuid) - Access Entity ID
* **name** *(optional)*: string | null - Access Entity Name
* **result** *(optional)*: string | null - Access Entity processing Result for this Access Authorization Event
* **matches** *(optional)*: Array - List of matched Access Entity Identifiers
* **reason** *(optional)*: string | null
* **attribute** *(optional)*: string | null
* **expectedValue** *(optional)*: string | null
* **actualValue** *(optional)*: string | null
### AuthorizationEventCPResultDTO
[Section titled “AuthorizationEventCPResultDTO”](#authorizationeventcpresultdto)
Individual Credential Provider Result of an Aembit Access Authorization Event
**Type:** object
**Properties:**
* **id** *(optional)*: string (uuid) - Access Entity ID
* **name** *(optional)*: string | null - Access Entity Name
* **result** *(optional)*: string | null - Access Entity processing Result for this Access Authorization Event
* **matches** *(optional)*: Array - List of matched Access Entity Identifiers
* **type** *(optional)*: string | null - Credential Provider Type
* **reason** *(optional)*: string | null - Credential Provider Failure Reason
### AuthorizationEventDTO
[Section titled “AuthorizationEventDTO”](#authorizationeventdto)
An individual Aembit Access Authorization Event
**Type:** object
**Properties:**
* **meta** *(optional)*: any
* **outcome** *(optional)*: any
* **clientRequest** *(optional)*: any
* **environment** *(optional)*: any
* **clientWorkload** *(optional)*: any
* **serverWorkload** *(optional)*: any
* **accessPolicy** *(optional)*: any
* **trustProviders** *(optional)*: Array - Trust Provider information for an individual Aembit Access Authorization Event
* **accessConditions** *(optional)*: Array - Access Condition information for an individual Aembit Access Authorization Event
* **credentialProvider** *(optional)*: any
### AuthorizationEventDataMetaDTO
[Section titled “AuthorizationEventDataMetaDTO”](#authorizationeventdatametadto)
Metadata DTO for an individual Aembit Access Authorization Event
**Type:** object
**Properties:**
* **clientIP** *(optional)*: string | null - Remote Client IP Address of the Access Authorization Request
* **timestamp** *(optional)*: string (date-time) - Timestamp of the Access Authorization Request
* **eventType** *(optional)*: string | null - Event Type of the Access Authorization Request
* **eventId** *(optional)*: string (uuid) - Unique ID of the Access Authorization Event
* **resourceSetId** *(optional)*: string (uuid) - Resource Set ID of the Access Authorization Event
* **contextId** *(optional)*: string (uuid) - Context ID of the Access Authorization Events for a single Access Authorization Request
* **directiveId** *(optional)*: string (uuid) - Directive ID of the Access Authorization Event (if available)
* **severity** *(optional)*: string | null - Severity of the Access Authorization Event (e.g. Info, Warning, Error)
### AuthorizationEventEntityResultDTO
[Section titled “AuthorizationEventEntityResultDTO”](#authorizationevententityresultdto)
Access Entity Result of an Aembit Access Authorization Event
**Type:** object
**Properties:**
* **id** *(optional)*: string (uuid) - Access Entity ID
* **name** *(optional)*: string | null - Access Entity Name
* **result** *(optional)*: string | null - Access Entity processing Result for this Access Authorization Event
* **matches** *(optional)*: Array - List of matched Access Entity Identifiers
### AuthorizationEventEnvironmentDataDTO
[Section titled “AuthorizationEventEnvironmentDataDTO”](#authorizationeventenvironmentdatadto)
**Type:** object
**Properties:**
* **network** *(optional)*: any
* **host** *(optional)*: any
* **process** *(optional)*: any
* **aembit** *(optional)*: any
* **aws** *(optional)*: any
* **gcp** *(optional)*: any
* **azure** *(optional)*: any
* **kubernetes** *(optional)*: any
* **gitlab** *(optional)*: any
* **github** *(optional)*: any
* **terraform** *(optional)*: any
### AuthorizationEventListDTO
[Section titled “AuthorizationEventListDTO”](#authorizationeventlistdto)
Page of Aembit Access Authorization Events
**Type:** object
**Properties:**
* **page** *(optional)*: integer (int32) - Page of entities
* **perPage** *(optional)*: integer (int32) - Number of entities requested for the current page
* **order** *(optional)*: string | null - Ordering criteria used for the current page
* **statusCode** *(optional)*: integer (int32) - HTTP Status Code of the response
* **recordsTotal** *(optional)*: integer (int32) - Total number of Aembit Audit Logs
* **authorizationEvents** *(optional)*: Array - Page of Aembit Access Authorization Events
### AuthorizationEventOutcomeDTO
[Section titled “AuthorizationEventOutcomeDTO”](#authorizationeventoutcomedto)
Outcome of an individual Aembit Access Authorization Event
**Type:** object
**Properties:**
* **result** *(optional)*: string | null - Result of an individual Aembit Access Authorization Event
* **reason** *(optional)*: string | null - Reason for the Result of an individual Aembit Access Authorization Event
### CPAwsStsV2DTO
[Section titled “CPAwsStsV2DTO”](#cpawsstsv2dto)
### CPGitLabManagedAccountDTO
[Section titled “CPGitLabManagedAccountDTO”](#cpgitlabmanagedaccountdto)
### CPTypeAembitAccessTokenV2DTO
[Section titled “CPTypeAembitAccessTokenV2DTO”](#cptypeaembitaccesstokenv2dto)
### CPTypeApiKeyUIV2DTO
[Section titled “CPTypeApiKeyUIV2DTO”](#cptypeapikeyuiv2dto)
### CPTypeAzureEntraFederationV2DTO
[Section titled “CPTypeAzureEntraFederationV2DTO”](#cptypeazureentrafederationv2dto)
### CPTypeGoogleWorkflowIDFederationV2DTO
[Section titled “CPTypeGoogleWorkflowIDFederationV2DTO”](#cptypegoogleworkflowidfederationv2dto)
### CPTypeJWTTokenV2DTO
[Section titled “CPTypeJWTTokenV2DTO”](#cptypejwttokenv2dto)
### CPTypeOAuth2AuthorizationCodeUIV2DTO
[Section titled “CPTypeOAuth2AuthorizationCodeUIV2DTO”](#cptypeoauth2authorizationcodeuiv2dto)
### CPTypeOAuth2ClientCredentialsUIV2DTO
[Section titled “CPTypeOAuth2ClientCredentialsUIV2DTO”](#cptypeoauth2clientcredentialsuiv2dto)
### CPTypeOAuth2CustomParameters
[Section titled “CPTypeOAuth2CustomParameters”](#cptypeoauth2customparameters)
**Type:** object
**Properties:**
* **key** *(optional)*: string | null
* **value** *(optional)*: string | null
* **valueType** *(optional)*: string | null
### CPTypeUsernamePasswordUIV2DTO
[Section titled “CPTypeUsernamePasswordUIV2DTO”](#cptypeusernamepassworduiv2dto)
### CPTypeVaultClientTokenV2DTO
[Section titled “CPTypeVaultClientTokenV2DTO”](#cptypevaultclienttokenv2dto)
### ClientRequestDTO
[Section titled “ClientRequestDTO”](#clientrequestdto)
**Type:** object
**Properties:**
* **version** *(required)*: string
* **network** *(required)*: any
### ClientWorkloadExternalDTO
[Section titled “ClientWorkloadExternalDTO”](#clientworkloadexternaldto)
**Type:** object
**Properties:**
* **externalId** *(optional)*: string (uuid)
* **name** *(required)*: string - Name of the Entity
* **description** *(optional)*: string | null - Description of the Entity
* **isActive** *(required)*: boolean (boolean) - True/False value that determines if this entity is Active or Disabled
* **tags** *(optional)*: Array
* **createdAt** *(optional)*: string (date-time)
* **modifiedAt** *(optional)*: string (date-time) | null
* **createdBy** *(optional)*: string | null
* **modifiedBy** *(optional)*: string | null
* **resourceSet** *(required)*: string (uuid) - ID of the Resource Set in which this Access Entity exists
* **identities** *(optional)*: Array
* **standaloneCertificateAuthority** *(optional)*: string (uuid) | null - Standalone Certificate Authority associated with this Client Workload
* **type** *(optional)*: string | null
* **accessPolicyCount** *(optional)*: integer (int32) - Access Policies associated with this Client Workload
### ClientWorkloadIdentityDTO
[Section titled “ClientWorkloadIdentityDTO”](#clientworkloadidentitydto)
**Type:** object
**Properties:**
* **type** *(optional)*: string | null
* **value** *(required)*: string
### ClientWorkloadListDTO
[Section titled “ClientWorkloadListDTO”](#clientworkloadlistdto)
Page of Client Workloads
**Type:** object
**Properties:**
* **page** *(optional)*: integer (int32) - Page of entities
* **perPage** *(optional)*: integer (int32) - Number of entities requested for the current page
* **order** *(optional)*: string | null - Ordering criteria used for the current page
* **statusCode** *(optional)*: integer (int32)
* **recordsTotal** *(optional)*: integer (int32)
* **clientWorkloads** *(optional)*: Array
### ClientWorkloadPatchDTO
[Section titled “ClientWorkloadPatchDTO”](#clientworkloadpatchdto)
**Type:** object
**Properties:**
* **name** *(optional)*: string | null - New Name for the identified entity
* **description** *(optional)*: string | null - New Description for the identified entity
* **isActive** *(optional)*: boolean (boolean) | null - New Status for the identified entity
* **tags** *(optional)*: Array - New Tags for the identified entity
* **identities** *(optional)*: Array
### CreatePolicyDTO
[Section titled “CreatePolicyDTO”](#createpolicydto)
Create/Update Access Policy
**Type:** object
**Properties:**
* **externalId** *(optional)*: string (uuid)
* **name** *(required)*: string - Name of the Entity
* **description** *(optional)*: string | null - Description of the Entity
* **isActive** *(required)*: boolean (boolean) - True/False value that determines if this entity is Active or Disabled
* **tags** *(optional)*: Array
* **createdAt** *(optional)*: string (date-time)
* **modifiedAt** *(optional)*: string (date-time) | null
* **createdBy** *(optional)*: string | null
* **modifiedBy** *(optional)*: string | null
* **resourceSet** *(required)*: string (uuid) - ID of the Resource Set in which this Access Entity exists
* **credentialProviders** *(optional)*: Array - Credential Providers associated with this Access Policy
* **trustProviders** *(optional)*: Array\ - Trust Providers associated with this Access Policy
* **accessConditions** *(optional)*: Array\ - Access Conditions associated with this Access Policy
* **clientWorkload** *(required)*: string (uuid) - Client Workload associated with this Access Policy
* **serverWorkload** *(required)*: string (uuid) - Server Workload associated with this Access Policy
### CredentialProviderDTO
[Section titled “CredentialProviderDTO”](#credentialproviderdto)
Individual Credential Provider
**Type:** object
**Properties:**
* **externalId** *(optional)*: string (uuid)
* **name** *(required)*: string - Name of the Entity
* **description** *(optional)*: string | null - Description of the Entity
* **isActive** *(required)*: boolean (boolean) - True/False value that determines if this entity is Active or Disabled
* **tags** *(optional)*: Array
* **createdAt** *(optional)*: string (date-time)
* **modifiedAt** *(optional)*: string (date-time) | null
* **createdBy** *(optional)*: string | null
* **modifiedBy** *(optional)*: string | null
* **resourceSet** *(required)*: string (uuid) - ID of the Resource Set in which this Access Entity exists
* **type** *(required)*: string - Credential Provider Type (e.g. oauth-client-credential, username-password, etc.)
* **roleId** *(optional)*: string (uuid) | null - Credential Provider Role for use with Aembit Access Token type Credential Providers
* **lifetimeTimeSpanSeconds** *(optional)*: integer (int32) - The Lifetime of a Credential Provider’s credential value
* **lifetimeExpiration** *(optional)*: string (date-time) | null - The expiration timestamp for a Credential Provider’s credential value
* **providerDetailJSON** *(optional)*: string | null - JSON representation of the Credential Provider configuration details
* **accessPolicyCount** *(optional)*: integer (int32) - Access Policies associated with this Credential Provider
### CredentialProviderIntegrationDTO
[Section titled “CredentialProviderIntegrationDTO”](#credentialproviderintegrationdto)
Individual Credential Provider Integration
**Type:** object
**Properties:**
* **type** *(required)*: any
* **externalId** *(optional)*: string (uuid)
* **name** *(required)*: string - Name of the Entity
* **description** *(optional)*: string | null - Description of the Entity
* **isActive** *(required)*: boolean (boolean) - True/False value that determines if this entity is Active or Disabled
* **tags** *(optional)*: Array
* **createdAt** *(optional)*: string (date-time)
* **modifiedAt** *(optional)*: string (date-time) | null
* **createdBy** *(optional)*: string | null
* **modifiedBy** *(optional)*: string | null
* **resourceSet** *(required)*: string (uuid) - ID of the Resource Set in which this Access Entity exists
* **tokenExpiration** *(optional)*: string (date-time) | null
* **lastOperationTimestamp** *(optional)*: string (date-time) | null
* **status** *(optional)*: string | null
* **errorMessage** *(optional)*: string | null
### CredentialProviderIntegrationPatchDTO
[Section titled “CredentialProviderIntegrationPatchDTO”](#credentialproviderintegrationpatchdto)
Patch Request for an individual Credential Provider Integration
**Type:** object
**Properties:**
* **name** *(optional)*: string | null - New Name for the identified entity
* **description** *(optional)*: string | null - New Description for the identified entity
* **isActive** *(optional)*: boolean (boolean) | null - New Status for the identified entity
* **tags** *(optional)*: Array - New Tags for the identified entity
### CredentialProviderIntegrationType
[Section titled “CredentialProviderIntegrationType”](#credentialproviderintegrationtype)
**Type:** string
**Possible values:** `GitLab`
### CredentialProviderPatchDTO
[Section titled “CredentialProviderPatchDTO”](#credentialproviderpatchdto)
Patch request for an individual Credential Provider
**Type:** object
**Properties:**
* **name** *(optional)*: string | null - New Name for the identified entity
* **description** *(optional)*: string | null - New Description for the identified entity
* **isActive** *(optional)*: boolean (boolean) | null - New Status for the identified entity
* **tags** *(optional)*: Array - New Tags for the identified entity
* **providerDetailJSON** *(optional)*: string | null - JSON representation of the Credential Provider configuration details
* **type** *(optional)*: string | null - Credential Provider Type (e.g. oauth-client-credential, username-password, etc.)
### CredentialProviderUIDTO
[Section titled “CredentialProviderUIDTO”](#credentialprovideruidto)
Individual Credential Provider
**Type:** object
**Properties:**
* **externalId** *(optional)*: string (uuid)
* **name** *(required)*: string - Name of the Entity
* **description** *(optional)*: string | null - Description of the Entity
* **isActive** *(required)*: boolean (boolean) - True/False value that determines if this entity is Active or Disabled
* **tags** *(optional)*: Array
* **createdAt** *(optional)*: string (date-time)
* **modifiedAt** *(optional)*: string (date-time) | null
* **createdBy** *(optional)*: string | null
* **modifiedBy** *(optional)*: string | null
* **resourceSet** *(required)*: string (uuid) - ID of the Resource Set in which this Access Entity exists
* **type** *(required)*: string - Credential Provider Type (e.g. oauth-client-credential, username-password, etc.)
* **roleId** *(optional)*: string (uuid) | null - Credential Provider Role for use with Aembit Access Token type Credential Providers
* **lifetimeTimeSpanSeconds** *(optional)*: integer (int32) - The Lifetime of a Credential Provider’s credential value
* **lifetimeExpiration** *(optional)*: string (date-time) | null - The expiration timestamp for a Credential Provider’s credential value
* **providerDetailJSON** *(optional)*: string | null - JSON representation of the Credential Provider configuration details
* **accessPolicyCount** *(optional)*: integer (int32) - Access Policies associated with this Credential Provider
### CredentialProviderUIDTOCredentialProviderListDTO
[Section titled “CredentialProviderUIDTOCredentialProviderListDTO”](#credentialprovideruidtocredentialproviderlistdto)
Page of Credential Providers
**Type:** object
**Properties:**
* **page** *(optional)*: integer (int32) - Page of entities
* **perPage** *(optional)*: integer (int32) - Number of entities requested for the current page
* **order** *(optional)*: string | null - Ordering criteria used for the current page
* **statusCode** *(optional)*: integer (int32) - HTTP Status Code of the response
* **recordsTotal** *(optional)*: integer (int32) - Total number of Credential Providers
* **credentialProviders** *(optional)*: Array - Page of Credential Providers
### CredentialProviderV2DTO
[Section titled “CredentialProviderV2DTO”](#credentialproviderv2dto)
**Type:** object
**Properties:**
* **type** *(required)*: string
* **externalId** *(optional)*: string (uuid)
* **name** *(required)*: string - Name of the Entity
* **description** *(optional)*: string | null - Description of the Entity
* **isActive** *(required)*: boolean (boolean) - True/False value that determines if this entity is Active or Disabled
* **tags** *(optional)*: Array
* **createdAt** *(optional)*: string (date-time)
* **modifiedAt** *(optional)*: string (date-time) | null
* **createdBy** *(optional)*: string | null
* **modifiedBy** *(optional)*: string | null
* **resourceSet** *(required)*: string (uuid) - ID of the Resource Set in which this Access Entity exists
* **lifetimeTimeSpanSeconds** *(optional)*: integer (int32)
* **lifetimeExpiration** *(optional)*: string (date-time) | null
* **accessPolicyCount** *(optional)*: integer (int32) - Access Policies associated with this Credential Provider
### CredentialProviderV2DTOCredentialProviderListDTO
[Section titled “CredentialProviderV2DTOCredentialProviderListDTO”](#credentialproviderv2dtocredentialproviderlistdto)
Page of Credential Providers
**Type:** object
**Properties:**
* **page** *(optional)*: integer (int32) - Page of entities
* **perPage** *(optional)*: integer (int32) - Number of entities requested for the current page
* **order** *(optional)*: string | null - Ordering criteria used for the current page
* **statusCode** *(optional)*: integer (int32) - HTTP Status Code of the response
* **recordsTotal** *(optional)*: integer (int32) - Total number of Credential Providers
* **credentialProviders** *(optional)*: Array - Page of Credential Providers
### DiscoveryIntegrationDTO
[Section titled “DiscoveryIntegrationDTO”](#discoveryintegrationdto)
Integration details for 3rd party data used by Discovery
**Type:** object
**Properties:**
* **externalId** *(optional)*: string (uuid)
* **name** *(required)*: string - Name of the Entity
* **description** *(optional)*: string | null - Description of the Entity
* **isActive** *(required)*: boolean (boolean) - True/False value that determines if this entity is Active or Disabled
* **tags** *(optional)*: Array
* **createdAt** *(optional)*: string (date-time)
* **modifiedAt** *(optional)*: string (date-time) | null
* **createdBy** *(optional)*: string | null
* **modifiedBy** *(optional)*: string | null
* **resourceSet** *(required)*: string (uuid) - ID of the Resource Set in which this Access Entity exists
* **type** *(required)*: string
* **syncFrequencySeconds** *(required)*: integer (int32)
* **lastSync** *(optional)*: string (date-time) | null
* **lastSyncStatus** *(optional)*: string | null
* **endpoint** *(required)*: string
* **discoveryIntegrationJSON** *(required)*: object
### DiscoveryIntegrationListDTO
[Section titled “DiscoveryIntegrationListDTO”](#discoveryintegrationlistdto)
Page of Integrations
**Type:** object
**Properties:**
* **page** *(optional)*: integer (int32) - Page of entities
* **perPage** *(optional)*: integer (int32) - Number of entities requested for the current page
* **order** *(optional)*: string | null - Ordering criteria used for the current page
* **statusCode** *(optional)*: integer (int32) - HTTP Status Code of the response
* **recordsTotal** *(optional)*: integer (int32) - Total number of Integrations
* **integrations** *(optional)*: Array - Page of Integrations
### DiscoveryIntegrationPatchDTO
[Section titled “DiscoveryIntegrationPatchDTO”](#discoveryintegrationpatchdto)
Patch request for an individual Integration
**Type:** object
**Properties:**
* **name** *(optional)*: string | null - New Name for the identified entity
* **description** *(optional)*: string | null - New Description for the identified entity
* **isActive** *(optional)*: boolean (boolean) | null - New Status for the identified entity
* **tags** *(optional)*: Array - New Tags for the identified entity
### EntityMetaDTO
[Section titled “EntityMetaDTO”](#entitymetadto)
**Type:** object
**Properties:**
* **externalId** *(optional)*: string (uuid)
* **name** *(optional)*: string | null
* **tags** *(optional)*: Array
### EntityPatchDTO
[Section titled “EntityPatchDTO”](#entitypatchdto)
**Type:** object
**Properties:**
* **name** *(optional)*: string | null - New Name for the identified entity
* **description** *(optional)*: string | null - New Description for the identified entity
* **isActive** *(optional)*: boolean (boolean) | null - New Status for the identified entity
* **tags** *(optional)*: Array - New Tags for the identified entity
### EventDTO
[Section titled “EventDTO”](#eventdto)
**Type:** object
**Properties:**
* **meta** *(optional)*: any
* **network** *(optional)*: any
* **outcome** *(optional)*: any
### EventListDTO
[Section titled “EventListDTO”](#eventlistdto)
**Type:** object
**Properties:**
* **page** *(optional)*: integer (int32) - Page of entities
* **perPage** *(optional)*: integer (int32) - Number of entities requested for the current page
* **order** *(optional)*: string | null - Ordering criteria used for the current page
* **statusCode** *(optional)*: integer (int32)
* **recordsTotal** *(optional)*: integer (int32)
* **workloadEvents** *(optional)*: Array
### EventMetaDTO
[Section titled “EventMetaDTO”](#eventmetadto)
**Type:** object
**Properties:**
* **timestamp** *(optional)*: string (date-time)
* **eventType** *(optional)*: string | null
* **eventId** *(optional)*: string | null
* **resourceSetId** *(optional)*: string (uuid)
* **policyId** *(optional)*: string | null
* **action** *(optional)*: string | null
* **connectionId** *(optional)*: string | null
* **severity** *(optional)*: string | null
### EventNetworkDTO
[Section titled “EventNetworkDTO”](#eventnetworkdto)
**Type:** object
**Properties:**
* **clientWorkloadIP** *(optional)*: string | null
* **clientWorkloadPort** *(optional)*: integer (int32)
* **serverWorkloadIP** *(optional)*: string | null
* **serverWorkloadPort** *(optional)*: integer (int32) | null
* **proxyPort** *(optional)*: integer (int32) | null
### EventOutcomeDTO
[Section titled “EventOutcomeDTO”](#eventoutcomedto)
**Type:** object
**Properties:**
* **result** *(optional)*: string | null
### EventResultDTO
[Section titled “EventResultDTO”](#eventresultdto)
**Type:** object
**Properties:**
* **reason** *(optional)*: string | null
* **attribute** *(optional)*: string | null
* **expectedValue** *(optional)*: string | null
* **actualValue** *(optional)*: string | null
### GenericResponseDTO
[Section titled “GenericResponseDTO”](#genericresponsedto)
DTO for a Generic API Response
**Type:** object
**Properties:**
* **success** *(optional)*: boolean - True if the API call was successful, False otherwise
* **message** *(optional)*: string | null - Message to indicate why the API call failed
* **id** *(optional)*: integer (int32) - Unique identifier of the API response
### GetPolicyDTO
[Section titled “GetPolicyDTO”](#getpolicydto)
Individual Access Policy
**Type:** object
**Properties:**
* **externalId** *(optional)*: string (uuid)
* **name** *(required)*: string - Name of the Entity
* **description** *(optional)*: string | null - Description of the Entity
* **isActive** *(required)*: boolean (boolean) - True/False value that determines if this entity is Active or Disabled
* **tags** *(optional)*: Array
* **createdAt** *(optional)*: string (date-time)
* **modifiedAt** *(optional)*: string (date-time) | null
* **createdBy** *(optional)*: string | null
* **modifiedBy** *(optional)*: string | null
* **resourceSet** *(required)*: string (uuid) - ID of the Resource Set in which this Access Entity exists
* **clientWorkload** *(optional)*: any
* **serverWorkload** *(optional)*: any
* **trustProviders** *(optional)*: Array - Trust Providers associated with this Access Policy
* **credentialProviders** *(optional)*: Array - Credential Providers associated with this Access Policy
* **accessConditions** *(optional)*: Array - Access Conditions associated with this Access Policy
### GetPolicyDTOListDTO
[Section titled “GetPolicyDTOListDTO”](#getpolicydtolistdto)
**Type:** object
**Properties:**
* **page** *(optional)*: integer (int32) - Current page number of entities
* **perPage** *(optional)*: integer (int32) - Number of entities requested for the current page
* **order** *(optional)*: string | null - Ordering criteria used for the current page
* **statusCode** *(optional)*: integer (int32) - HTTP StatusCode for the current result
* **recordsTotal** *(optional)*: integer (int32) - Total number of entities available
* **entities** *(optional)*: Array - Page of entities for this request
### GetSignInPolicyDTO
[Section titled “GetSignInPolicyDTO”](#getsigninpolicydto)
**Type:** object
**Properties:**
* **ssoRequired** *(optional)*: boolean
* **mfaRequired** *(optional)*: boolean
### GitLabCredentialProviderIntegrationDTO
[Section titled “GitLabCredentialProviderIntegrationDTO”](#gitlabcredentialproviderintegrationdto)
Individual Credential Provider Integration
### HealthDTO
[Section titled “HealthDTO”](#healthdto)
Aembit Health Status
**Type:** object
**Properties:**
* **status** *(optional)*: string | null - Aembit Health Status
* **version** *(optional)*: string | null - Aembit Cloud Version
* **gitSHA** *(optional)*: string | null - Aembit Cloud Version Git SHA
* **host** *(optional)*: string | null - Aembit Cloud Requested Hostname
* **user** *(optional)*: string | null - Aembit Cloud Authenticated User Email
* **userFullName** *(optional)*: string | null - Aembit Cloud Authenticated User Full Name
* **tenant** *(optional)*: string | null - Aembit Cloud Tenant ID
* **sessionExpiresAt** *(optional)*: string | null - Aembit Cloud Session Expiration
### IntegrationDTO
[Section titled “IntegrationDTO”](#integrationdto)
Integration details for 3rd party data used by Access Conditions
**Type:** object
**Properties:**
* **externalId** *(optional)*: string (uuid)
* **name** *(required)*: string - Name of the Entity
* **description** *(optional)*: string | null - Description of the Entity
* **isActive** *(required)*: boolean (boolean) - True/False value that determines if this entity is Active or Disabled
* **tags** *(optional)*: Array
* **createdAt** *(optional)*: string (date-time)
* **modifiedAt** *(optional)*: string (date-time) | null
* **createdBy** *(optional)*: string | null
* **modifiedBy** *(optional)*: string | null
* **resourceSet** *(required)*: string (uuid) - ID of the Resource Set in which this Access Entity exists
* **type** *(required)*: string
* **syncFrequencySeconds** *(required)*: integer (int32)
* **lastSync** *(optional)*: string (date-time) | null
* **lastSyncStatus** *(optional)*: string | null
* **endpoint** *(required)*: string
* **integrationJSON** *(required)*: object
* **accessConditionsCount** *(optional)*: integer (int32)
### IntegrationListDTO
[Section titled “IntegrationListDTO”](#integrationlistdto)
Page of Integrations
**Type:** object
**Properties:**
* **page** *(optional)*: integer (int32) - Page of entities
* **perPage** *(optional)*: integer (int32) - Number of entities requested for the current page
* **order** *(optional)*: string | null - Ordering criteria used for the current page
* **statusCode** *(optional)*: integer (int32) - HTTP Status Code of the response
* **recordsTotal** *(optional)*: integer (int32) - Total number of Integrations
* **integrations** *(optional)*: Array - Page of Integrations
### IntegrationPatchDTO
[Section titled “IntegrationPatchDTO”](#integrationpatchdto)
Patch request for an individual Integration
**Type:** object
**Properties:**
* **name** *(optional)*: string | null - New Name for the identified entity
* **description** *(optional)*: string | null - New Description for the identified entity
* **isActive** *(optional)*: boolean (boolean) | null - New Status for the identified entity
* **tags** *(optional)*: Array - New Tags for the identified entity
### JWTClaimDTO
[Section titled “JWTClaimDTO”](#jwtclaimdto)
**Type:** object
**Properties:**
* **key** *(optional)*: string | null
* **value** *(optional)*: string | null
* **valueType** *(optional)*: string | null
### JsonNode
[Section titled “JsonNode”](#jsonnode)
**Type:** object
**Properties:**
* **options** *(optional)*: any
* **parent** *(optional)*: any
* **root** *(optional)*: any
### JsonNodeOptions
[Section titled “JsonNodeOptions”](#jsonnodeoptions)
**Type:** object
**Properties:**
* **propertyNameCaseInsensitive** *(optional)*: boolean
### ListCredentialProviderIntegrationDTO
[Section titled “ListCredentialProviderIntegrationDTO”](#listcredentialproviderintegrationdto)
Page of Credential Provider Integrations
**Type:** object
**Properties:**
* **externalId** *(optional)*: string (uuid)
* **name** *(required)*: string - Name of the Entity
* **description** *(optional)*: string | null - Description of the Entity
* **isActive** *(required)*: boolean (boolean) - True/False value that determines if this entity is Active or Disabled
* **tags** *(optional)*: Array
* **createdAt** *(optional)*: string (date-time)
* **modifiedAt** *(optional)*: string (date-time) | null
* **createdBy** *(optional)*: string | null
* **modifiedBy** *(optional)*: string | null
* **url** *(optional)*: string | null
* **type** *(optional)*: any
* **status** *(optional)*: string | null
* **lastOperationTimestamp** *(optional)*: string (date-time) | null
### ListCredentialProviderIntegrationDTOListDTO
[Section titled “ListCredentialProviderIntegrationDTOListDTO”](#listcredentialproviderintegrationdtolistdto)
**Type:** object
**Properties:**
* **page** *(optional)*: integer (int32) - Current page number of entities
* **perPage** *(optional)*: integer (int32) - Number of entities requested for the current page
* **order** *(optional)*: string | null - Ordering criteria used for the current page
* **statusCode** *(optional)*: integer (int32) - HTTP StatusCode for the current result
* **recordsTotal** *(optional)*: integer (int32) - Total number of entities available
* **entities** *(optional)*: Array - Page of entities for this request
### LogStreamDTO
[Section titled “LogStreamDTO”](#logstreamdto)
Individual Log Stream
**Type:** object
**Properties:**
* **externalId** *(optional)*: string (uuid)
* **name** *(required)*: string - Name of the Entity
* **description** *(optional)*: string | null - Description of the Entity
* **isActive** *(required)*: boolean (boolean) - True/False value that determines if this entity is Active or Disabled
* **tags** *(optional)*: Array
* **createdAt** *(optional)*: string (date-time)
* **modifiedAt** *(optional)*: string (date-time) | null
* **createdBy** *(optional)*: string | null
* **modifiedBy** *(optional)*: string | null
* **dataType** *(required)*: string - Log Stream Data Type (e.g. AuditLogs, etc.)
* **type** *(required)*: any
### LogStreamDestinationType
[Section titled “LogStreamDestinationType”](#logstreamdestinationtype)
**Type:** string
**Possible values:** `AwsS3Bucket`, `GcsBucket`
### LogStreamListDTO
[Section titled “LogStreamListDTO”](#logstreamlistdto)
Page of Log Streams
**Type:** object
**Properties:**
* **page** *(optional)*: integer (int32) - Page of entities
* **perPage** *(optional)*: integer (int32) - Number of entities requested for the current page
* **order** *(optional)*: string | null - Ordering criteria used for the current page
* **statusCode** *(optional)*: integer (int32) - HTTP Status Code of the response
* **recordsTotal** *(optional)*: integer (int32) - Total number of Log Streams
* **logStreams** *(optional)*: Array - Page of Log Streams
### LogStreamPatchDTO
[Section titled “LogStreamPatchDTO”](#logstreampatchdto)
Patch Request for an individual of Log Stream
**Type:** object
**Properties:**
* **name** *(optional)*: string | null - New Name for the identified entity
* **description** *(optional)*: string | null - New Description for the identified entity
* **isActive** *(optional)*: boolean (boolean) | null - New Status for the identified entity
* **tags** *(optional)*: Array - New Tags for the identified entity
### MFASignInPolicyDTO
[Section titled “MFASignInPolicyDTO”](#mfasigninpolicydto)
**Type:** object
**Properties:**
* **mfaRequired** *(optional)*: boolean
### NetworkDTO
[Section titled “NetworkDTO”](#networkdto)
**Type:** object
**Properties:**
* **sourceIP** *(required)*: string
* **sourcePort** *(required)*: integer (int32)
* **transportProtocol** *(required)*: string
* **proxyPort** *(required)*: integer (int32)
* **targetHost** *(optional)*: string | null
* **targetPort** *(optional)*: integer (int32)
### PatchPolicyV2DTO
[Section titled “PatchPolicyV2DTO”](#patchpolicyv2dto)
Patch request for an Access Policy
**Type:** object
**Properties:**
* **name** *(optional)*: string | null - New Name for the identified entity
* **description** *(optional)*: string | null - New Description for the identified entity
* **isActive** *(optional)*: boolean (boolean) | null - New Status for the identified entity
* **tags** *(optional)*: Array - New Tags for the identified entity
* **clientWorkload** *(optional)*: string (uuid) - Client Workload associated with this Access Policy
* **serverWorkload** *(optional)*: string (uuid) - Server Workload associated with this Access Policy
* **credentialProviders** *(optional)*: Array - Credential Providers associated with this Access Policy
* **trustProviders** *(optional)*: Array\ - Trust Providers associated with this Access Policy
* **accessConditions** *(optional)*: Array\ - Access Conditions associated with this Access Policy
### PermissionDTO
[Section titled “PermissionDTO”](#permissiondto)
Individual Permission details
**Type:** object
**Properties:**
* **name** *(optional)*: string | null - Name of the Permission Target
* **read** *(optional)*: boolean - True if this permission allows access to Read the Permission Target, False otherwise
* **write** *(optional)*: boolean - True if this permission allows access to Write the Permission Target, False otherwise
* **isWritable** *(optional)*: boolean - True if this permission allows access to Write the Permission Target, False otherwise
* **isReadable** *(optional)*: boolean - True if this permission allows access to Read the Permission Target, False otherwise
* **accessLevel** *(optional)*: string | null - Description of the Permission level
### PolicyCredentialMappingDTO
[Section titled “PolicyCredentialMappingDTO”](#policycredentialmappingdto)
Access Policy Credential Mappings
**Type:** object
**Properties:**
* **credentialProviderId** *(required)*: string (uuid) - CredentialProviderId
* **mappingType** *(required)*: any
* **accountName** *(optional)*: string | null - Snowflake Username
* **headerName** *(optional)*: string | null - Header Name
* **headerValue** *(optional)*: string | null - Header Value
* **httpbodyFieldPath** *(optional)*: string | null - HttpBody Field Path
* **httpbodyFieldValue** *(optional)*: string | null - HttpBody Field Value
### PolicyCredentialProviderMappingTypes
[Section titled “PolicyCredentialProviderMappingTypes”](#policycredentialprovidermappingtypes)
**Type:** string
**Possible values:** `None`, `AccountName`, `HttpHeader`, `HttpBody`
### PolicyDTO
[Section titled “PolicyDTO”](#policydto)
Individual Access Policy
**Type:** object
**Properties:**
* **externalId** *(optional)*: string (uuid)
* **name** *(required)*: string - Name of the Entity
* **description** *(optional)*: string | null - Description of the Entity
* **isActive** *(required)*: boolean (boolean) - True/False value that determines if this entity is Active or Disabled
* **tags** *(optional)*: Array
* **createdAt** *(optional)*: string (date-time)
* **modifiedAt** *(optional)*: string (date-time) | null
* **createdBy** *(optional)*: string | null
* **modifiedBy** *(optional)*: string | null
* **resourceSet** *(required)*: string (uuid) - ID of the Resource Set in which this Access Entity exists
* **credentialProvider** *(optional)*: string (uuid) | null - Credential Provider associated with this Access Policy
* **trustProviders** *(optional)*: Array\ - Trust Providers associated with this Access Policy
* **accessConditions** *(optional)*: Array\ - Access Conditions associated with this Access Policy
* **clientWorkload** *(required)*: string (uuid) - Client Workload associated with this Access Policy
* **serverWorkload** *(required)*: string (uuid) - Server Workload associated with this Access Policy
* **clientWorkloadDetails** *(optional)*: any
* **serverWorkloadDetails** *(optional)*: any
* **policyNotes** *(optional)*: Array - Policy Notes for this Access Policy
### PolicyExternalDTO
[Section titled “PolicyExternalDTO”](#policyexternaldto)
Individual Access Policy
**Type:** object
**Properties:**
* **externalId** *(optional)*: string (uuid)
* **name** *(required)*: string - Name of the Entity
* **description** *(optional)*: string | null - Description of the Entity
* **isActive** *(required)*: boolean (boolean) - True/False value that determines if this entity is Active or Disabled
* **tags** *(optional)*: Array
* **createdAt** *(optional)*: string (date-time)
* **modifiedAt** *(optional)*: string (date-time) | null
* **createdBy** *(optional)*: string | null
* **modifiedBy** *(optional)*: string | null
* **resourceSet** *(required)*: string (uuid) - ID of the Resource Set in which this Access Entity exists
* **clientWorkload** *(optional)*: any
* **trustProviders** *(optional)*: Array - Details of the Trust Providers associated with this Access Policy
* **accessConditions** *(optional)*: Array - Details of the Access Conditions associated with this Access Policy
* **credentialProvider** *(optional)*: any
* **serverWorkload** *(optional)*: any
* **policyNotes** *(optional)*: Array - Policy Notes for this Access Policy
### PolicyListDTO
[Section titled “PolicyListDTO”](#policylistdto)
Page of Access Policies
**Type:** object
**Properties:**
* **page** *(optional)*: integer (int32) - Page of entities
* **perPage** *(optional)*: integer (int32) - Number of entities requested for the current page
* **order** *(optional)*: string | null - Ordering criteria used for the current page
* **statusCode** *(optional)*: integer (int32) - HTTP Status Code of the response
* **recordsTotal** *(optional)*: integer (int32) - Total number of Access Policies
* **accessPolicies** *(optional)*: Array - Page of Access Policies
### PolicyNoteDTO
[Section titled “PolicyNoteDTO”](#policynotedto)
Individual Note created for an Access Policy
**Type:** object
**Properties:**
* **note** *(required)*: string - Note added to an Access Policy by a User
* **createdAt** *(optional)*: string (date-time) - Timestamp the Note was created
* **createdBy** *(optional)*: string | null - Email address of the User who created the Access Policy Note
### PolicyNoteDTOListDTO
[Section titled “PolicyNoteDTOListDTO”](#policynotedtolistdto)
**Type:** object
**Properties:**
* **page** *(optional)*: integer (int32) - Current page number of entities
* **perPage** *(optional)*: integer (int32) - Number of entities requested for the current page
* **order** *(optional)*: string | null - Ordering criteria used for the current page
* **statusCode** *(optional)*: integer (int32) - HTTP StatusCode for the current result
* **recordsTotal** *(optional)*: integer (int32) - Total number of entities available
* **entities** *(optional)*: Array - Page of entities for this request
### PolicyPatchDTO
[Section titled “PolicyPatchDTO”](#policypatchdto)
Patch request for an Access Policy
**Type:** object
**Properties:**
* **name** *(optional)*: string | null - New Name for the identified entity
* **description** *(optional)*: string | null - New Description for the identified entity
* **isActive** *(optional)*: boolean (boolean) | null - New Status for the identified entity
* **tags** *(optional)*: Array - New Tags for the identified entity
* **clientWorkload** *(optional)*: string (uuid) - Client Workload associated with this Access Policy
* **serverWorkload** *(optional)*: string (uuid) - Server Workload associated with this Access Policy
* **credentialProvider** *(optional)*: string (uuid) | null - Credential Provider associated with this Access Policy
* **trustProviders** *(optional)*: Array\ - Trust Providers associated with this Access Policy
* **accessConditions** *(optional)*: Array\ - Access Conditions associated with this Access Policy
### PublicKeyValidationDTO
[Section titled “PublicKeyValidationDTO”](#publickeyvalidationdto)
Response to a request for Public Key Validation
**Type:** object
**Properties:**
* **isValidContent** *(optional)*: boolean - True if the Public Key was valid, False otherwise
* **thumbprint** *(optional)*: string | null - Thumbprint of the Public Key
* **expirationDate** *(optional)*: string | null - Expiration of the Public Key Certificate
* **certificateSubject** *(optional)*: string | null - Subject of the Public Key Certificate
* **message** *(optional)*: string | null - Message describing why the Public Key was not valid if IsValidContent is False
### RequestMetadaAembitDTO
[Section titled “RequestMetadaAembitDTO”](#requestmetadaaembitdto)
**Type:** object
**Properties:**
* **clientId** *(optional)*: string | null
### RequestMetadaAwsDTO
[Section titled “RequestMetadaAwsDTO”](#requestmetadaawsdto)
**Type:** object
**Properties:**
* **accountId** *(optional)*: string | null
* **instanceId** *(optional)*: string | null
* **ecs** *(optional)*: any
* **lambda** *(optional)*: any
### RequestMetadaAzureDTO
[Section titled “RequestMetadaAzureDTO”](#requestmetadaazuredto)
**Type:** object
**Properties:**
* **vmId** *(optional)*: string | null
* **subscriptionId** *(optional)*: string | null
### RequestMetadaEcsDTO
[Section titled “RequestMetadaEcsDTO”](#requestmetadaecsdto)
**Type:** object
**Properties:**
* **taskFamily** *(optional)*: string | null
### RequestMetadaGcpDTO
[Section titled “RequestMetadaGcpDTO”](#requestmetadagcpdto)
**Type:** object
**Properties:**
* **serviceAccount** *(optional)*: string | null
### RequestMetadaGithubDTO
[Section titled “RequestMetadaGithubDTO”](#requestmetadagithubdto)
**Type:** object
**Properties:**
* **repository** *(optional)*: string | null
* **subject** *(optional)*: string | null
### RequestMetadaGitlabDTO
[Section titled “RequestMetadaGitlabDTO”](#requestmetadagitlabdto)
**Type:** object
**Properties:**
* **namespacePath** *(optional)*: string | null
* **projectPath** *(optional)*: string | null
* **refPath** *(optional)*: string | null
* **subject** *(optional)*: string | null
### RequestMetadaHostDTO
[Section titled “RequestMetadaHostDTO”](#requestmetadahostdto)
**Type:** object
**Properties:**
* **hostname** *(optional)*: string | null
### RequestMetadaKubernetesDTO
[Section titled “RequestMetadaKubernetesDTO”](#requestmetadakubernetesdto)
**Type:** object
**Properties:**
* **namespace** *(optional)*: string | null
* **podName** *(optional)*: string | null
* **serviceAccountName** *(optional)*: string | null
### RequestMetadaLambdaDTO
[Section titled “RequestMetadaLambdaDTO”](#requestmetadalambdadto)
**Type:** object
**Properties:**
* **arn** *(optional)*: string | null
### RequestMetadaNetworkDTO
[Section titled “RequestMetadaNetworkDTO”](#requestmetadanetworkdto)
**Type:** object
**Properties:**
* **sourceIP** *(optional)*: string | null
### RequestMetadaProcessDTO
[Section titled “RequestMetadaProcessDTO”](#requestmetadaprocessdto)
**Type:** object
**Properties:**
* **name** *(optional)*: string | null
* **userName** *(optional)*: string | null
### RequestMetadaTerraformDTO
[Section titled “RequestMetadaTerraformDTO”](#requestmetadaterraformdto)
**Type:** object
**Properties:**
* **workspaceId** *(optional)*: string | null
### ResourceSetDTO
[Section titled “ResourceSetDTO”](#resourcesetdto)
Individual Resource Set
**Type:** object
**Properties:**
* **externalId** *(optional)*: string (uuid)
* **name** *(required)*: string - Name of the Entity
* **description** *(optional)*: string | null - Description of the Entity
* **isActive** *(required)*: boolean (boolean) - True/False value that determines if this entity is Active or Disabled
* **tags** *(optional)*: Array
* **createdAt** *(optional)*: string (date-time)
* **modifiedAt** *(optional)*: string (date-time) | null
* **createdBy** *(optional)*: string | null
* **modifiedBy** *(optional)*: string | null
* **serverWorkloadCount** *(optional)*: integer (int32) | null - Server Workloads associated with this Resource Set
* **clientWorkloadCount** *(optional)*: integer (int32) | null - Client Workloads associated with this Resource Set
* **accessPolicyCount** *(optional)*: integer (int32) | null - Access Policies associated with this Resource Set
* **trustProviderCount** *(optional)*: integer (int32) | null - Trust Providers associated with this Resource Set
* **accessConditionCount** *(optional)*: integer (int32) | null - Access Conditions associated with this Resource Set
* **credentialProviderCount** *(optional)*: integer (int32) | null - Credential Providers associated with this Resource Set
* **roles** *(optional)*: Array\ - Roles associated with this Resource Set
* **rolesDetails** *(optional)*: Array - Details of the Roles associated with this Resource Set
* **users** *(optional)*: Array - Users associated with this Resource Set
* **standaloneCertificateAuthority** *(optional)*: string (uuid) | null - Standalone Certificate Authority associated with this Resource Set
### ResourceSetDTOListDTO
[Section titled “ResourceSetDTOListDTO”](#resourcesetdtolistdto)
**Type:** object
**Properties:**
* **page** *(optional)*: integer (int32) - Current page number of entities
* **perPage** *(optional)*: integer (int32) - Number of entities requested for the current page
* **order** *(optional)*: string | null - Ordering criteria used for the current page
* **statusCode** *(optional)*: integer (int32) - HTTP StatusCode for the current result
* **recordsTotal** *(optional)*: integer (int32) - Total number of entities available
* **entities** *(optional)*: Array - Page of entities for this request
### ResourceSetPatchDTO
[Section titled “ResourceSetPatchDTO”](#resourcesetpatchdto)
Patch Request for an Individual Resource Set
**Type:** object
**Properties:**
* **name** *(optional)*: string | null - New Name for the identified entity
* **description** *(optional)*: string | null - New Description for the identified entity
* **isActive** *(optional)*: boolean (boolean) | null - New Status for the identified entity
* **tags** *(optional)*: Array - New Tags for the identified entity
### RoleDTO
[Section titled “RoleDTO”](#roledto)
Individual Role
**Type:** object
**Properties:**
* **externalId** *(optional)*: string (uuid)
* **name** *(required)*: string - Name of the Entity
* **description** *(optional)*: string | null - Description of the Entity
* **isActive** *(required)*: boolean (boolean) - True/False value that determines if this entity is Active or Disabled
* **tags** *(optional)*: Array
* **createdAt** *(optional)*: string (date-time)
* **modifiedAt** *(optional)*: string (date-time) | null
* **createdBy** *(optional)*: string | null
* **modifiedBy** *(optional)*: string | null
* **usersCount** *(optional)*: integer (int32) - Number of Users associated with this Role
* **credentialProvidersCount** *(optional)*: integer (int32) - Number of Credential Providers associated with this Role
* **isSystem** *(optional)*: boolean - True if this is a system included Role (e.g. SuperAdmin or Auditor)
* **permissions** *(optional)*: Array - Permissions assigned to this Role
* **resourceSets** *(optional)*: Array - Resource Sets assigned to this Role
### RoleListDTO
[Section titled “RoleListDTO”](#rolelistdto)
Page of Roles
**Type:** object
**Properties:**
* **page** *(optional)*: integer (int32) - Page of entities
* **perPage** *(optional)*: integer (int32) - Number of entities requested for the current page
* **order** *(optional)*: string | null - Ordering criteria used for the current page
* **statusCode** *(optional)*: integer (int32) - HTTP Status Code of the response
* **recordsTotal** *(optional)*: integer (int32) - Total number of Roles
* **roles** *(optional)*: Array - Page of Roles
### RolePatchDTO
[Section titled “RolePatchDTO”](#rolepatchdto)
Patch request for an individual Role
**Type:** object
**Properties:**
* **name** *(optional)*: string | null - New Name for the identified entity
* **description** *(optional)*: string | null - New Description for the identified entity
* **isActive** *(optional)*: boolean (boolean) | null - New Status for the identified entity
* **tags** *(optional)*: Array - New Tags for the identified entity
### RoutingDTO
[Section titled “RoutingDTO”](#routingdto)
Individual Routing
**Type:** object
**Properties:**
* **externalId** *(optional)*: string (uuid)
* **name** *(required)*: string - Name of the Entity
* **description** *(optional)*: string | null - Description of the Entity
* **isActive** *(required)*: boolean (boolean) - True/False value that determines if this entity is Active or Disabled
* **tags** *(optional)*: Array
* **createdAt** *(optional)*: string (date-time)
* **modifiedAt** *(optional)*: string (date-time) | null
* **createdBy** *(optional)*: string | null
* **modifiedBy** *(optional)*: string | null
* **resourceSetId** *(required)*: string (uuid) - ID of the Resource Set related to routing
* **proxyUrl** *(required)*: string - URL of the proxy. The format is http(s)://server:port
### RoutingDTOListDTO
[Section titled “RoutingDTOListDTO”](#routingdtolistdto)
**Type:** object
**Properties:**
* **page** *(optional)*: integer (int32) - Current page number of entities
* **perPage** *(optional)*: integer (int32) - Number of entities requested for the current page
* **order** *(optional)*: string | null - Ordering criteria used for the current page
* **statusCode** *(optional)*: integer (int32) - HTTP StatusCode for the current result
* **recordsTotal** *(optional)*: integer (int32) - Total number of entities available
* **entities** *(optional)*: Array - Page of entities for this request
### RoutingPatchDTO
[Section titled “RoutingPatchDTO”](#routingpatchdto)
Patch request for an individual Routing
**Type:** object
**Properties:**
* **name** *(optional)*: string | null - New Name for the identified entity
* **description** *(optional)*: string | null - New Description for the identified entity
* **isActive** *(optional)*: boolean (boolean) | null - New Status for the identified entity
* **tags** *(optional)*: Array - New Tags for the identified entity
### SSOIdentityProviderDTO
[Section titled “SSOIdentityProviderDTO”](#ssoidentityproviderdto)
Individual SSO Identity Provider
**Type:** object
**Properties:**
* **externalId** *(optional)*: string (uuid)
* **name** *(required)*: string - Name of the Entity
* **description** *(optional)*: string | null - Description of the Entity
* **isActive** *(required)*: boolean (boolean) - True/False value that determines if this entity is Active or Disabled
* **tags** *(optional)*: Array
* **createdAt** *(optional)*: string (date-time)
* **modifiedAt** *(optional)*: string (date-time) | null
* **createdBy** *(optional)*: string | null
* **modifiedBy** *(optional)*: string | null
* **entityId** *(optional)*: string | null - SAML Entity ID of the remote SSO Identity Provider
* **metadataUrl** *(optional)*: string | null - Metadata URL of the remote SSO Identity Provider
* **metadataXml** *(optional)*: string | null - Metadata XML content of the remote SSO Identity Provider
* **samlStatementRoleMappings** *(optional)*: Array - Collection of mappings of SAML attributes to Aembit roles
### SSOIdentityProviderDTOListDTO
[Section titled “SSOIdentityProviderDTOListDTO”](#ssoidentityproviderdtolistdto)
**Type:** object
**Properties:**
* **page** *(optional)*: integer (int32) - Current page number of entities
* **perPage** *(optional)*: integer (int32) - Number of entities requested for the current page
* **order** *(optional)*: string | null - Ordering criteria used for the current page
* **statusCode** *(optional)*: integer (int32) - HTTP StatusCode for the current result
* **recordsTotal** *(optional)*: integer (int32) - Total number of entities available
* **entities** *(optional)*: Array - Page of entities for this request
### SSOIdentityProviderPatchDTO
[Section titled “SSOIdentityProviderPatchDTO”](#ssoidentityproviderpatchdto)
Patch request for an individual SSO Identity Provider
**Type:** object
**Properties:**
* **name** *(optional)*: string | null - New Name for the identified entity
* **description** *(optional)*: string | null - New Description for the identified entity
* **isActive** *(optional)*: boolean (boolean) | null - New Status for the identified entity
* **tags** *(optional)*: Array - New Tags for the identified entity
### SSOSignInPolicyDTO
[Section titled “SSOSignInPolicyDTO”](#ssosigninpolicydto)
**Type:** object
**Properties:**
* **ssoRequired** *(optional)*: boolean
### SamlStatementRoleMappingDTO
[Section titled “SamlStatementRoleMappingDTO”](#samlstatementrolemappingdto)
Represents a mapping of a SAML attribute to an Aembit role
**Type:** object
**Properties:**
* **attributeName** *(optional)*: string | null - SAML Attribute name
* **attributeValue** *(optional)*: string | null - SAML Attribute value
* **roleExternalId** *(optional)*: string (uuid) - Aembit Role ID
### ServerWorkloadExternalDTO
[Section titled “ServerWorkloadExternalDTO”](#serverworkloadexternaldto)
Individual Server Workload
**Type:** object
**Properties:**
* **externalId** *(optional)*: string (uuid)
* **name** *(required)*: string - Name of the Entity
* **description** *(optional)*: string | null - Description of the Entity
* **isActive** *(required)*: boolean (boolean) - True/False value that determines if this entity is Active or Disabled
* **tags** *(optional)*: Array
* **createdAt** *(optional)*: string (date-time)
* **modifiedAt** *(optional)*: string (date-time) | null
* **createdBy** *(optional)*: string | null
* **modifiedBy** *(optional)*: string | null
* **resourceSet** *(required)*: string (uuid) - ID of the Resource Set in which this Access Entity exists
* **serviceEndpoint** *(required)*: any
* **type** *(optional)*: string | null - Type of Server Workload
* **accessPolicyCount** *(optional)*: integer (int32) - Access Policies associated with this Server Workload
### ServerWorkloadListDTO
[Section titled “ServerWorkloadListDTO”](#serverworkloadlistdto)
Page of Server Workloads
**Type:** object
**Properties:**
* **page** *(optional)*: integer (int32) - Page of entities
* **perPage** *(optional)*: integer (int32) - Number of entities requested for the current page
* **order** *(optional)*: string | null - Ordering criteria used for the current page
* **statusCode** *(optional)*: integer (int32)
* **recordsTotal** *(optional)*: integer (int32)
* **serverWorkloads** *(optional)*: Array
### StandaloneCertificatePatchDTO
[Section titled “StandaloneCertificatePatchDTO”](#standalonecertificatepatchdto)
Patch Request for an Individual Standalone Certificate Authority
**Type:** object
**Properties:**
* **name** *(optional)*: string | null - New Name for the identified entity
* **description** *(optional)*: string | null - New Description for the identified entity
* **isActive** *(optional)*: boolean (boolean) | null - New Status for the identified entity
* **tags** *(optional)*: Array - New Tags for the identified entity
* **leafLifetime** *(optional)*: integer (int32) | null
### StandaloneCertificateRequestDTO
[Section titled “StandaloneCertificateRequestDTO”](#standalonecertificaterequestdto)
Individual Standalone Certificate Authority
**Type:** object
**Properties:**
* **externalId** *(optional)*: string (uuid)
* **name** *(required)*: string - Name of the Entity
* **description** *(optional)*: string | null - Description of the Entity
* **isActive** *(required)*: boolean (boolean) - True/False value that determines if this entity is Active or Disabled
* **tags** *(optional)*: Array
* **createdAt** *(optional)*: string (date-time)
* **modifiedAt** *(optional)*: string (date-time) | null
* **createdBy** *(optional)*: string | null
* **modifiedBy** *(optional)*: string | null
* **leafLifetime** *(required)*: integer (int32) - Leaf certificate lifetime value for this Standalone Certificate Authority
### StandaloneCertificateResponseDTO
[Section titled “StandaloneCertificateResponseDTO”](#standalonecertificateresponsedto)
Individual Standalone Certificate Authority
**Type:** object
**Properties:**
* **externalId** *(optional)*: string (uuid)
* **name** *(required)*: string - Name of the Entity
* **description** *(optional)*: string | null - Description of the Entity
* **isActive** *(required)*: boolean (boolean) - True/False value that determines if this entity is Active or Disabled
* **tags** *(optional)*: Array
* **createdAt** *(optional)*: string (date-time)
* **modifiedAt** *(optional)*: string (date-time) | null
* **createdBy** *(optional)*: string | null
* **modifiedBy** *(optional)*: string | null
* **leafLifetime** *(required)*: integer (int32) - Leaf certificate lifetime value for this Standalone Certificate Authority
* **notBefore** *(optional)*: string (date-time) - Not before value of the Root CA for this Standalone Certificate Authority
* **notAfter** *(optional)*: string (date-time) - Not after value of the Root CA for this Standalone Certificate Authority
* **clientWorkloadCount** *(optional)*: integer (int32) | null - Client Workloads associated with this Standalone Certificate Authority
### StandaloneCertificateResponseDTOListDTO
[Section titled “StandaloneCertificateResponseDTOListDTO”](#standalonecertificateresponsedtolistdto)
**Type:** object
**Properties:**
* **page** *(optional)*: integer (int32) - Current page number of entities
* **perPage** *(optional)*: integer (int32) - Number of entities requested for the current page
* **order** *(optional)*: string | null - Ordering criteria used for the current page
* **statusCode** *(optional)*: integer (int32) - HTTP StatusCode for the current result
* **recordsTotal** *(optional)*: integer (int32) - Total number of entities available
* **entities** *(optional)*: Array - Page of entities for this request
### StringStringKeyValuePair
[Section titled “StringStringKeyValuePair”](#stringstringkeyvaluepair)
**Type:** object
**Properties:**
* **key** *(optional)*: string | null
* **value** *(optional)*: string | null
### TagDTO
[Section titled “TagDTO”](#tagdto)
Aembit Entity Tag Details
**Type:** object
**Properties:**
* **key** *(required)*: string - Tag Key
* **value** *(required)*: string - Tag Key Value
### TrustProviderDTO
[Section titled “TrustProviderDTO”](#trustproviderdto)
Individual Trust Provider
**Type:** object
**Properties:**
* **externalId** *(optional)*: string (uuid)
* **name** *(required)*: string - Name of the Entity
* **description** *(optional)*: string | null - Description of the Entity
* **isActive** *(required)*: boolean (boolean) - True/False value that determines if this entity is Active or Disabled
* **tags** *(optional)*: Array
* **createdAt** *(optional)*: string (date-time)
* **modifiedAt** *(optional)*: string (date-time) | null
* **createdBy** *(optional)*: string | null
* **modifiedBy** *(optional)*: string | null
* **resourceSet** *(required)*: string (uuid) - ID of the Resource Set in which this Access Entity exists
* **id** *(optional)*: integer (int32) - Trust Provider Id
* **provider** *(required)*: string - Trust Provider Type
* **matchRules** *(optional)*: Array - Trust Provider Match Rules
* **certificate** *(optional)*: string | null - Trust Provider Certificate or Public Key for cryptographic attestation
* **publicKeyValidation** *(optional)*: any
* **oidcUrl** *(optional)*: string | null - OIDC URL to use for retrieving JWKS Public Keys
* **pemType** *(optional)*: string | null - PEM Input Type
* **accessPolicyCount** *(optional)*: integer (int32) - Access Policies associated with this Trust Provider
* **agentControllersCount** *(optional)*: integer (int32) - Agent Controllers associated with this Trust Provider
* **agentControllerIds** *(optional)*: Array\ - Agent Controller IDs associated with this Trust Provider
### TrustProviderItemDTO
[Section titled “TrustProviderItemDTO”](#trustprovideritemdto)
**Type:** object
**Properties:**
* **externalId** *(optional)*: string (uuid)
* **name** *(optional)*: string | null
### TrustProviderListDTO
[Section titled “TrustProviderListDTO”](#trustproviderlistdto)
Page of Trust Providers
**Type:** object
**Properties:**
* **page** *(optional)*: integer (int32) - Page of entities
* **perPage** *(optional)*: integer (int32) - Number of entities requested for the current page
* **order** *(optional)*: string | null - Ordering criteria used for the current page
* **statusCode** *(optional)*: integer (int32) - HTTP Status Code of the response
* **recordsTotal** *(optional)*: integer (int32) - Total number of Trust Providers
* **trustProviders** *(optional)*: Array - Page of Trust Providers
### TrustProviderMatchRuleDTO
[Section titled “TrustProviderMatchRuleDTO”](#trustprovidermatchruledto)
Individual Match Rule to enforce during Trust Provider attestation
**Type:** object
**Properties:**
* **attribute** *(required)*: string - Match Rule Attribute
* **value** *(required)*: string - Match Rule Attribute Value
### TrustProviderPatchDTO
[Section titled “TrustProviderPatchDTO”](#trustproviderpatchdto)
Patch request for an individual Trust Provider
**Type:** object
**Properties:**
* **name** *(optional)*: string | null - New Name for the identified entity
* **description** *(optional)*: string | null - New Description for the identified entity
* **isActive** *(optional)*: boolean (boolean) | null - New Status for the identified entity
* **tags** *(optional)*: Array - New Tags for the identified entity
* **provider** *(optional)*: string | null - Trust Provider Type
* **matchRules** *(optional)*: Array - Trust Provider Match Rules
* **oidcUrl** *(optional)*: string | null - OIDC URL to use for retrieving JWKS Public Keys
* **pemType** *(optional)*: string | null - PEM Input Type
* **certificate** *(optional)*: string | null - Trust Provider Certificate or Public Key for cryptographic attestation
* **publicKeyValidation** *(optional)*: any
### UserAgentDTO
[Section titled “UserAgentDTO”](#useragentdto)
DTO for the HTTP User Agent of an individual Aembit Audit Log
**Type:** object
**Properties:**
* **browser** *(optional)*: string | null - The browser as determined from the HTTP User Agent
* **operatingSystem** *(optional)*: string | null - The operating system as determined from the HTTP User Agent
* **raw** *(optional)*: string | null - The raw HTTP User Agent
### UserDTO
[Section titled “UserDTO”](#userdto)
**Type:** object
**Properties:**
* **email** *(required)*: string (email)
* **externalId** *(optional)*: string (uuid)
* **roles** *(optional)*: Array\
* **rolesDetails** *(optional)*: Array
* **firstName** *(required)*: string
* **lastName** *(required)*: string
* **phoneNumber** *(optional)*: string | null
* **createdAt** *(optional)*: string (date-time)
* **isActive** *(optional)*: boolean
* **twoFactorEnabled** *(optional)*: boolean
* **isLocked** *(optional)*: boolean
* **tags** *(optional)*: Array
* **userTokens** *(optional)*: Array
### UserListDTO
[Section titled “UserListDTO”](#userlistdto)
**Type:** object
**Properties:**
* **page** *(optional)*: integer (int32) - Page of entities
* **perPage** *(optional)*: integer (int32) - Number of entities requested for the current page
* **order** *(optional)*: string | null - Ordering criteria used for the current page
* **statusCode** *(optional)*: integer (int32)
* **recordsTotal** *(optional)*: integer (int32)
* **users** *(optional)*: Array
### UserPatchDTO
[Section titled “UserPatchDTO”](#userpatchdto)
**Type:** object
**Properties:**
* **email** *(optional)*: string | null
* **firstName** *(optional)*: string | null
* **lastName** *(optional)*: string | null
* **phoneNumber** *(optional)*: string | null
* **isActive** *(optional)*: boolean | null
### UserTokensDTO
[Section titled “UserTokensDTO”](#usertokensdto)
**Type:** object
**Properties:**
* **id** *(optional)*: string (uuid)
* **name** *(optional)*: string | null
* **verified** *(optional)*: boolean
* **createdAt** *(optional)*: string (date-time)
### WorkloadExternalDTO
[Section titled “WorkloadExternalDTO”](#workloadexternaldto)
**Type:** object
**Properties:**
* **externalId** *(optional)*: string (uuid)
* **name** *(required)*: string - Name of the Entity
* **description** *(optional)*: string | null - Description of the Entity
* **isActive** *(required)*: boolean (boolean) - True/False value that determines if this entity is Active or Disabled
* **tags** *(optional)*: Array
* **createdAt** *(optional)*: string (date-time)
* **modifiedAt** *(optional)*: string (date-time) | null
* **createdBy** *(optional)*: string | null
* **modifiedBy** *(optional)*: string | null
* **resourceSet** *(required)*: string (uuid) - ID of the Resource Set in which this Access Entity exists
* **trustProviders** *(optional)*: Array
* **credentialProviderId** *(optional)*: string (uuid) | null
* **credentialProviderText** *(optional)*: string | null
* **workloadServiceEndpoints** *(optional)*: Array\
* **serviceEndpoint** *(optional)*: any
* **type** *(optional)*: string | null
### WorkloadServiceAuthenticationDTO
[Section titled “WorkloadServiceAuthenticationDTO”](#workloadserviceauthenticationdto)
Authentication configuration for a Server Workload
**Type:** object
**Properties:**
* **method** *(required)*: string - Authentication Method
* **scheme** *(required)*: string - Authentication Scheme
* **config** *(optional)*: string | null - Authentication Configuration
### WorkloadServiceEndpointDTO
[Section titled “WorkloadServiceEndpointDTO”](#workloadserviceendpointdto)
Service Endpoint for a Server Workload
**Type:** object
**Properties:**
* **externalId** *(optional)*: string | null - External ID of the Service Endpoint
* **id** *(optional)*: integer (int32) - ID of the Service Endpoint
* **host** *(required)*: string - Hostname or IP Address
* **appProtocol** *(required)*: string - Application Protocol
* **transportProtocol** *(required)*: string - Transport Protocol (e.g. TCP)
* **requestedPort** *(required)*: integer (int32) - The target port as specified by the Client Workload
* **requestedTls** *(required)*: boolean - The TLS encryption configuration of the Client Workload
* **port** *(required)*: integer (int32) - The target port to which the Agent/Proxy will communicate
* **tls** *(required)*: boolean - The TLS encryption configuration which will be used by the Agent/Proxy
* **workloadServiceAuthentication** *(optional)*: any
* **tlsVerification** *(required)*: string - TLS Verification configuration for the Agent/Proxy to Server Workload connection
* **httpHeaders** *(optional)*: Array - Static HTTP Headers to include for transmission to the Server Workload
# Aembit changelog
> New Aembit feature updates and changes
Aembit frequently releases new features and updates to improve overall usability and functionality. This page lists each of these updates, with a brief description of what has changed, what you may need to do to use the feature updates, and a link to the Aembit technical documentation where you can go to read more detailed technical documentation for the feature.
## June 3, 2025
[Section titled “June 3, 2025”](#june-3-2025)
Introducing **Workload Discovery Filtering** for improved workload management and visibility across your discovered infrastructure. This enhancement adds comprehensive filtering capabilities to both Client Workloads and Server Workloads discovery pages, enabling you to quickly locate and analyze specific workloads.
Filtering options include:
* **Client Workloads**: Filter by Client Workload Identifiers and Workload Discovery Source
* **Server Workloads**: Filter by Port, Protocol, and Workload Discovery Source
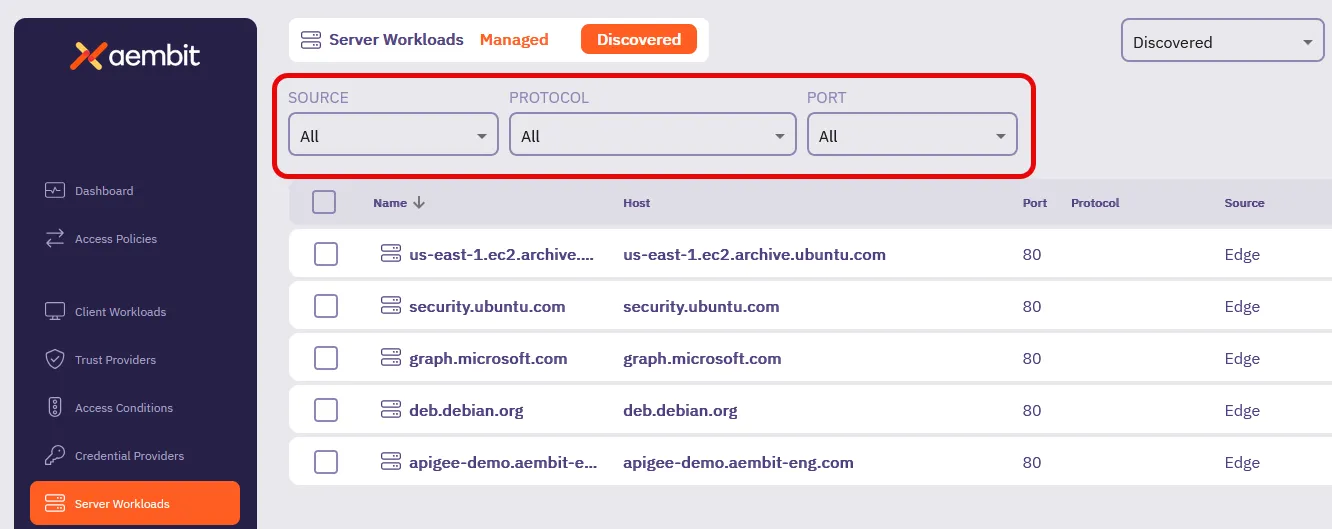
This feature streamlines workload management by enabling you to efficiently search through discovered workloads, making it easier to identify, analyze, and onboard relevant workloads into your Aembit environment.
To learn more about discovered workload filtering, see [Workload Discovery Filtering](/user-guide/discovery/managing-discovered-workloads#filtering-discovered-workloads).
***
You can now view the Global Policy Compliance status of your Access Policies using the new **Global Policy Compliance** page under **Reporting** in the left nav menu. Quickly get an overall view of the compliance status of your Access Policies and optionally filter for specific statuses.
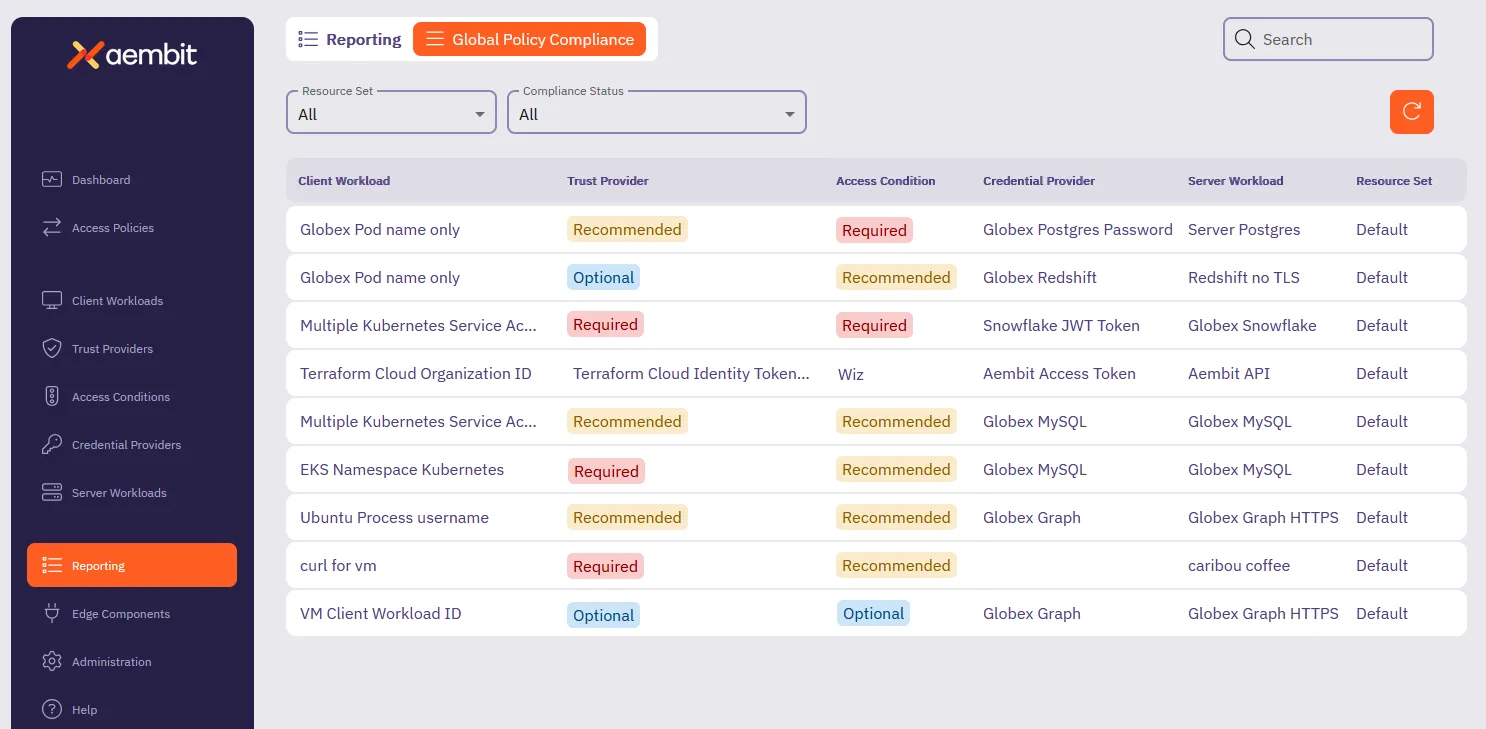
To learn more about reporting on Global Policy Compliance status, see [How to review Global Policy Compliance](/user-guide/audit-report/global-policy).
## June 2, 2025
[Section titled “June 2, 2025”](#june-2-2025)
Aembit has released a new version of Agent Controller, version `1.23.2160`, with the following changes:
* Security enhancements for Kerberos and Aembit-managed PKI.
* Added the `AEMBIT_HTTP_PORT_DISABLED` environment variable to enable you to disable Agent Controller’s HTTP port.
***
Updated Edge Components:
* Agent Proxy 1.23.2160
Updated Edge Packages:
* Helm Chart 1.23
* Terraform ECS module 1.23
See [Edge Components supported versions](/reference/edge-components/edge-component-supported-versions) for more details.
## May 30, 2025
[Section titled “May 30, 2025”](#may-30-2025)
Aembit has added enhancements to Agent Injector which include:
* Improved compatibility with pod-level `securityContext` settings for Kubernetes Client Workloads.
* TLS certificate security enhancements.
* Agent Injector now supports the [`AEMBIT_LOG_LEVEL`](/reference/edge-components/edge-component-env-vars) environment variable.
## May 26, 2025
[Section titled “May 26, 2025”](#may-26-2025)
Introducing **Log Streams for CrowdStrike Next-Gen SIEM** for real-time security event monitoring and enhanced threat detection. This integration enables rapid streaming of Aembit Edge event logs and audit logs directly to CrowdStrike’s Next-Gen Security Information and Event Management (SIEM) platform using the HTTP Event Collector (HEC) protocol.
By connecting Aembit with CrowdStrike Next-Gen SIEM, you can:
* Stream Access Authorization Events, Audit Logs, and Workload Events to CrowdStrike SIEM
* Configure TLS encryption and verification options
* Automatic failure notifications for Aembit admins
* Seamless integration with existing CrowdStrike HEC configurations
This feature enhances your organization’s security posture by improving threat detection capabilities, streamlining incident management, and supporting compliance monitoring requirements through centralized log analysis in CrowdStrike.
To learn more, see [Log Streams for CrowdStrike Next-Gen SIEM](/user-guide/administration/log-streams/crowdstrike-siem).
***
Aembit has applied security and performance enhancements to Agent Proxy in this release.
***
Aembit has added the `AEMBIT_CLIENT_WORKLOAD_PROCESS_IDENTIFICATION_ENABLED` Agent Proxy environment variable to Enable [Process Name](/user-guide/access-policies/client-workloads/identification/process-name) Client Workload identification.
***
Updated Edge Components:
* Agent Proxy
Updated Edge Packages:
* Helm Chart
* VM Agent Proxy package
* Terraform ECS module
* AWS Lambda Extension
* AWS Lambda Layer
See [Edge Components supported versions](/reference/edge-components/edge-component-supported-versions) for more details.
## May 22, 2025
[Section titled “May 22, 2025”](#may-22-2025)
The Aembit Edge Terraform ECS module now supports Terraform variables that allow you to set Agent Controller and Agent Proxy [environment variables](/reference/edge-components/edge-component-env-vars) directly.
You may now set logging levels for these Edge Components in AWS ECS Fargate environments, and leverage configuration options that the Edge Terraform ECS module doesn’t support directly as variables yet.
See [AWS ECS Fargate](/user-guide/deploy-install/serverless/aws-ecs-fargate#configuration-variables) documentation for more information..
## May 06, 2025
[Section titled “May 06, 2025”](#may-06-2025)
To increase the available deployment options for Amazon Web Services (AWS) Lambda users, Aembit now provides a Lambda Layer to support zip-based Lambda Functions. This joins our existing [AWS Lambda Container](/user-guide/deploy-install/serverless/aws-lambda-container) support.
For more detailed information on how to deploy Aembit Edge Components to AWS Lambda Functions using our Lambda Layer, please refer to the [AWS Lambda Functions](/user-guide/deploy-install/serverless/aws-lambda-function) documentation.
***
Introducing **Global Policy Compliance** for centralized security enforcement across your Aembit environment. This feature allows administrators to establish organization-wide security standards for Access Policies and Agent Controllers, ensuring consistent security practices and preventing the creation of policies that might inadvertently expose resources.
With Global Policy Compliance, you can enforce requirements for Trust Providers and Access Conditions across all Access Policies, as well as Trust Provider and TLS Hostname requirements for Agent Controllers. The three-tier enforcement model lets you set requirements as Required, Recommended (default), or Optional based on your organization’s security needs.
Global Policy Compliance visually identifies non-compliant components through color-coded status icons:
* Red indicators for required but missing elements
* Yellow indicators for recommended but missing elements
* Green indicators for compliant Access Policies
* Gray indicators for disabled or not active Access Policies
To learn more about Global Policy Compliance, see the [Global Policy Compliance Overview](/user-guide/administration/global-policy/).
***
Introducing **OIDC ID Token Credential Provider** for secure identity token generation and exchange with third-party services. By leveraging Aembit’s custom Identity Provider (IdP) capabilities, this Credential Provider generates JWT-formatted tokens that seamlessly integrate with various Workload Identity Federation (WIF) solutions.
The OIDC ID Token Credential Provider offers flexible configuration options including:
* Custom claims configuration with both dynamic and literal subject support
* Choice of signing algorithms (RS256 or ES256)
* Integration with identity brokers such as AWS STS, GCP WIF, Azure WIF, and HashiCorp Vault
This new Credential Provider is particularly valuable for:
* Secure access to cloud provider resources through their WIF solutions
* Authentication with HashiCorp Vault using OIDC tokens
* Integration with any service supporting OIDC/JWT authentication
To learn more about this feature, see [About the OIDC ID Token Credential Provider](/user-guide/access-policies/credential-providers/about-oidc-id-token).
***
Introducing **Log Stream for Splunk SIEM** to enhance your security monitoring capabilities. This integration enables rapid streaming of Aembit Edge event logs and audit logs directly to Splunk using Splunk’s HTTP Event Collector (HEC) protocol.
By connecting Aembit with Splunk SIEM, you can:
* Enhance threat detection with comprehensive security data
* Improve incident management through centralized logging
* Streamline compliance monitoring for your organization
The setup process is straightforward, requiring only a properly configured HTTP Event Collector in your Splunk environment and a few configuration steps in the Aembit Admin UI. Aembit will automatically send email notifications if Log Stream transactions consistently fail, ensuring you’re always aware of your logging status.
To learn more about setting up this integration, see [How to stream Aembit events to Splunk SIEM](/user-guide/administration/log-streams/splunk-siem).
## April 25, 2025
[Section titled “April 25, 2025”](#april-25-2025)
Aembit has released the new [Discovery](/user-guide/discovery/) feature, which automatically identifies workloads across your infrastructure, increasing the visibility, scalability, and access control over your workloads.
Discovery uses [Sources](/user-guide/discovery/sources/) to find workloads in your environments—natively through [Aembit Edge Discovery](/user-guide/discovery/sources/aembit-edge) and through integrations with services such as [Wiz](/user-guide/discovery/sources/wiz).
See [Discovery](/user-guide/discovery/) for full details.
## April 24, 2025
[Section titled “April 24, 2025”](#april-24-2025)
Aembit now supports deploying Edge Components on AWS Elastic Kubernetes Service (EKS) using Fargate compute profiles. For details on feature support in this environment, please refer to Aembit’s [AWS EKS Fargate deployment guide](/user-guide/deploy-install/serverless/aws-eks-fargate) and product [support matrix](/reference/support-matrix).
## April 22, 2025
[Section titled “April 22, 2025”](#april-22-2025)
For the [GitLab Managed Service Account](/user-guide/access-policies/credential-providers/managed-gitlab-account) Credential Provider, you can now specify the name of the service account that Aembit creates in GitLab for that Credential Provider.
Additionally, you can now create GitLab Service Account integrations for GitLab.com plans. See [Create a GitLab Service Account Integration for a GitLab.com plan](/user-guide/access-policies/credential-providers/integrations/gitlab)
## April 21, 2025
[Section titled “April 21, 2025”](#april-21-2025)
Aembit has added the `AEMBIT_PASS_THROUGH_TRAFFIC_BEFORE_REGISTRATION` Agent Proxy environment variable to enable you to delay the Client Workload Kubernetes pod startup until registration between Agent Proxy and Agent Controller completes. See [Delaying pod startup until Agent Proxy has registered](/user-guide/deploy-install/kubernetes/kubernetes#delaying-pod-startup-until-agent-proxy-has-registered) for details.
***
Aembit has applied security enhancements and hardening to Agent Proxy in this release.
***
Updated Edge Components:
* Agent Proxy
Updated Edge Packages:
* Helm Chart
* VM Agent Proxy package
* Terraform ECS module
* AWS Lambda Extension
See [Edge Components supported versions](/reference/edge-components/edge-component-supported-versions) for more details.
## April 15, 2025
[Section titled “April 15, 2025”](#april-15-2025)
Agent Controllers now support **Allowed TLS Hostname** as a configurable field in your Aembit Tenant:
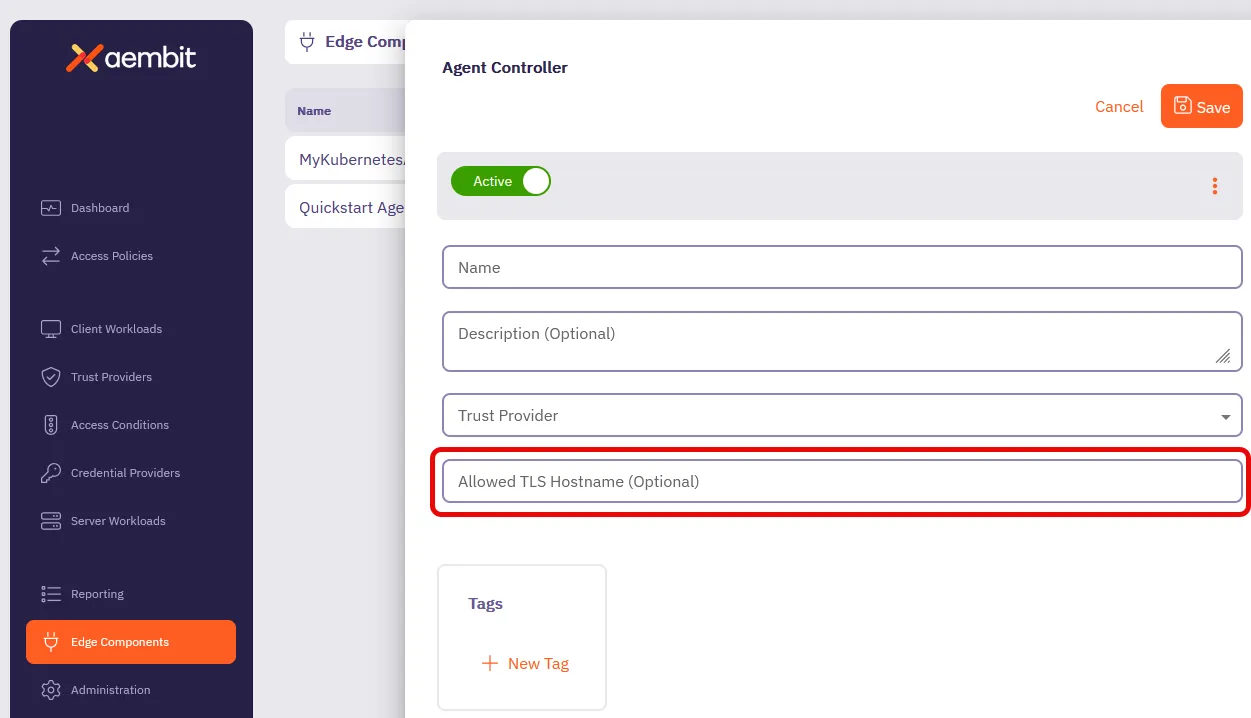
**Allowed TLS Hostname** serves the same purpose as the [`AEMBIT_MANAGED_TLS_HOSTNAME`](/reference/edge-components/edge-component-env-vars#agent-controller-environment-variables) Agent Controller environment variable.
Configuring an **Allowed TLS Hostname** allows you to specify which domain name Aembit Managed TLS includes in the TLS certificate. This makes sure secure connections from your Agent Proxies are only valid when using this exact domain name to reach your Agent Controller, enhancing security without restricting which Agent Proxies can communicate with it.
To configure your Agent Controller with an allowed TLS hostname, see [How to create and Agent Controller](/user-guide/deploy-install/advanced-options/agent-controller/create-agent-controller) or [Configure Agent Controller TLS with Aembit’s PKI](/user-guide/deploy-install/advanced-options/agent-controller/configure-aembit-pki-agent-controller-tls).
## April 03, 2025
[Section titled “April 03, 2025”](#april-03-2025)
The Kerberos Trust Provider now supports the attestation of Client Workloads running on Windows Server virtual machines (VMs) joined to Active Directory (AD). See [Kerberos Trust Provider](/user-guide/access-policies/trust-providers/kerberos-trust-provider) for details.
You can now install Agent Controller on Windows Server 2019 and Windows Server 2022 virtual machines. See [Agent Controller on Windows Server](/user-guide/deploy-install/virtual-machine/windows/agent-controller-install-windows) for details.
## March 25, 2025
[Section titled “March 25, 2025”](#march-25-2025)
Introducing **Standalone CAs** for more granular control over TLS Decrypt management. This feature allows you to create and manage dedicated Certificate Authorities (CAs) that function independently from Aembit’s default Tenant-level certificates.
With Standalone CAs, you can assign CAs directly to specific Client Workloads or Resource Sets, creating isolated trust boundaries and enabling precise management of TLS traffic across different environments. Aembit intelligently selects the appropriate CA using a clear hierarchy: Client Workload level -> Resource Set level -> Tenant level.
To learn more about Standalone CAs, see [About Standalone CA for TLS Decrypt](/user-guide/deploy-install/advanced-options/tls-decrypt/configure-tls-decrypt).
***
We’ve updated the **Deploy Edge Components** experience in the Aembit admin UI to streamline how you deploy Aembit Edge Components.
We’ve added deployment guides directly in the Aembit admin UI for each type of deployment such as Kubernetes, Ubuntu Linux, Red Hat Enterprise Linux, or Microsoft. Now when you’re deploying new Aembit Edge Components, you’ll have a guided experience to get you up and running faster.
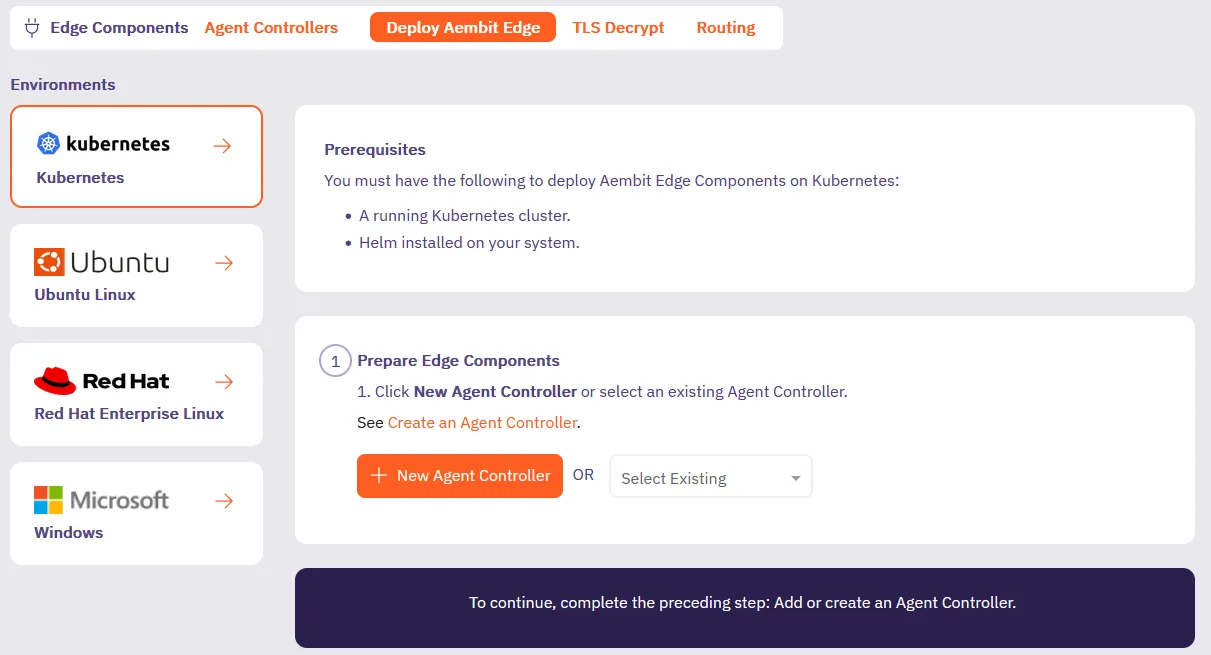
***
Introducing [Credential Provider Integrations](/user-guide/access-policies/credential-providers/), which automate credential lifecycle management for third-party systems. This feature makes sure your workloads always have valid credentials without manual management, enhancing both security and operational efficiency, eliminating manual credential management.
Our new Credential Provider Integrations feature makes this possible by connecting Aembit directly to third-party systems like with the [GitLab Service Account integration](/user-guide/access-policies/credential-providers/integrations/gitlab). The GitLab Service Account integration enables you to create a [Managed GitLab Account Credential Provider](/user-guide/access-policies/credential-providers/managed-gitlab-account), which allows you to manage the credential lifecycle of your GitLab service accounts.
This gives you fine-grained control while eliminating the overhead of manual credential management.
## March 5, 2025
[Section titled “March 5, 2025”](#march-5-2025)
The Aembit Credential Provider for AWS Security Token Service (STS) now supports the AWS SigV4 and SigV4a request signing protocols. Aembit automatically signs requests to AWS services using SigV4 for regional services or SigV4a for global/multi-region services.
See [How Aembit uses AWS SigV4 and SigV4a](/user-guide/access-policies/credential-providers/aws-sigv4) to learn more and [AWS Security Token Service (STS) Federation](/user-guide/access-policies/credential-providers/aws-security-token-service-federation) to configure an AWS STS Credential Provider.
Updated Edge Components:
* Agent Proxy
Updated Edge Packages:
* Helm Chart
* VM Agent Proxy package
* Terraform ECS module
* AWS Lambda Extension
See [Edge Components supported versions](/reference/edge-components/edge-component-supported-versions).
## March 3, 2025
[Section titled “March 3, 2025”](#march-3-2025)
Restored Agent Proxy termination behavior when you set `AEMBIT_SIGTERM_STRATEGY` to `immediate`.
Updated Edge Components:
* Agent Proxy
Updated Edge Packages:
* Helm Chart
* VM Agent Proxy package
* AWS Lambda Extension
See [Edge Components supported versions](/reference/edge-components/edge-component-supported-versions).
## February 27, 2025
[Section titled “February 27, 2025”](#february-27-2025)
Enhanced Agent Controllers to now serve the entire CA certificate chain instead of just the leaf certificate.
Updated Edge Components:
* Agent Controller
Updated Edge Packages:
* Helm Chart version
* Terraform ECS module version
* VM Agent Controller package
See [Edge Components supported versions](/reference/edge-components/edge-component-supported-versions).
## February 25, 2025
[Section titled “February 25, 2025”](#february-25-2025)
Aembit’s Access Condition integration with Wiz now supports Lambda Containers. See [Access Condition for Wiz](/user-guide/access-policies/access-conditions/wiz) to configure an Access Condition.
## February 20, 2025
[Section titled “February 20, 2025”](#february-20-2025)
Aembit now supports accessing HashiCorp Vault Credential Providers that reside on private networks. This allows your colocated Agent Proxy to handle authentication directly instead of Aembit Cloud. See [Accessing Vault on private networks](/user-guide/access-policies/credential-providers/vault-client-token#accessing-vault-on-private-networks) for more info.
Aembit now supports Conditional Access for CrowdStrike on Windows. To set up Conditional Access for CrowdStrike on Windows, follow the steps in [Access Condition for CrowdStrike](/user-guide/access-policies/access-conditions/crowdstrike).
Aembit now supports the AWS Role Trust Provider on Agent Proxy for ECS Fargate deployments.
Enhanced Vault token header behavior.
Enhanced Agent Proxy initialization on Kubernetes to prevent other processes from interfering and impacting its startup.
Updated Edge Components:
* Agent Proxy
Updated Edge Packages:
* Helm Chart
* Terraform ECS module
* VM Agent Proxy package
* AWS Lambda Extension
See [Edge Components supported versions](/reference/edge-components/edge-component-supported-versions).
## February 11, 2025
[Section titled “February 11, 2025”](#february-11-2025)
Aembit now supports[Azure Entra Workload Identity Federation as a Credential Provider](/user-guide/access-policies/credential-providers/azure-entra-workload-identity-federation). This enables you to automatically obtain credentials through Aembit as a third-party federated Identity Provider (IdP) to securely authenticate with Azure Entra to access your Azure Entra registered applications and managed identities.
Aembit now supports [Automatic User Creation](/user-guide/administration/identity-providers/automatic-user-creation) triggered by SSO login requests. Aembit has enhanced the Identity Provider configuration page with additional parameters, enabling you to map SAML attributes from your Identity Provider to the user roles defined in your Aembit Tenant.
You can now [change the leaf certificate lifetime](/user-guide/deploy-install/advanced-options/tls-decrypt/configure-tls-decrypt#change-your-leaf-certificate-lifetime) when using the TLS Decrypt feature.
## January 28, 2025
[Section titled “January 28, 2025”](#january-28-2025)
Aembit Agent Proxy supports virtual machine deployments for Windows Server 2019 and Windows Server 2022. See [Agent Proxy install](/user-guide/deploy-install/virtual-machine/linux/agent-proxy-install-linux) for details.
## December 26, 2024
[Section titled “December 26, 2024”](#december-26-2024)
Aembit Edge Components have been updated to include support for RedHat Enterprise Linux (RHEL) 8 and 9 with Security-Enhanced Linux (SELinux). With this improvement, administrators may now add additional layers of security to their system architecture.
For more information on integrating Aembit Edge Components with SELinux, please see the [SELinux support](/user-guide/deploy-install/virtual-machine/linux/agent-proxy-selinux-config) page.
## December 17, 2024
[Section titled “December 17, 2024”](#december-17-2024)
Aembit has added support for defining a SignOn Policy, enabling you to customize the login experience for your users.
For more information, please see the [SignOn Policy](/user-guide/administration/sign-on-policy/) page.
## November 22, 2024
[Section titled “November 22, 2024”](#november-22-2024)
Aembit has released an updated AWS Lambda Extension, enhancing support for Client Workload identification earlier in the Lambda container lifecycle.
For more information, please refer to the [AWS Lambda Container Supported Phases](/user-guide/deploy-install/serverless/aws-lambda-container#supported-phases).
## November 14, 2024
[Section titled “November 14, 2024”](#november-14-2024)
Aembit has released a new, pre-packaged deployment model that enables you to use a Virtual Appliance configuration and setup for deploying Aembit Edge Components in your environment. This virtual appliance image includes both Agent Controller and Agent Proxy bundled together in a single OVA file.
For more detailed information on how to deploy the Aembit Virtual Appliance, please see the [Virtual Appliance](/user-guide/deploy-install/virtual-appliances/virtual-appliance) technical documentation.
## October 29, 2024
[Section titled “October 29, 2024”](#october-29-2024)
Aembit Edge Components have been updated to newer versions to improve overall performance and functionality.
The following components and packages have been updated:
* Helm Chart
* Agent Proxy
For the latest available versions of these components, please see the [Edge Components Supported Versions](/reference/edge-components/edge-component-supported-versions) page.
## October 28, 2024
[Section titled “October 28, 2024”](#october-28-2024)
Agent Proxy has been updated to include a new environment variable that enables Agent Proxy to monitor network traffic so you can perform detailed debugging if you encounter network traffic errors.
For more detailed information on this feature, please see the [Agent Proxy Debug Network Tracing](/user-guide/troubleshooting/agent-proxy-debug-network-tracing) page.
## October 25, 2024
[Section titled “October 25, 2024”](#october-25-2024)
The Aembit Terraform Provider is regularly updated with new features and capabilities to give you additional configuration options.
You may now use multiple Trust Provider match rules of the same type (OR-based combinations) in your Terraform Provider configuration.
For more detailed technical information on how to use similar match rule types in GitLab using the Aembit Terraform Provider, please see the [Aembit Terraform Provider Registry](https://registry.terraform.io/providers/Aembit/aembit/latest/docs) technical documentation.
## October 23, 2024
[Section titled “October 23, 2024”](#october-23-2024)
Aembit regularly releases new enhancements and improvements to Aembit Edge and Aembit Cloud components to provide additional features and functionality for your Aembit environment.
The following new features and enhancements have been released:
* Enhanced Access Authorization Events
* Explicit Steering
* Updated Aembit Edge Component Versions
### Enhanced Access Authorization Events
[Section titled “Enhanced Access Authorization Events”](#enhanced-access-authorization-events)
Aembit automatically records and collects various types of workload metadata in access authorization events, enabling you to use this information to audit and analyze security events.
The information collected and recorded in these access authorization events has been enhanced to now capture and display additional workload metadata, including **VM hostname**, **IP address**, and **process name**.
For more information on access authorization events, please refer to the following technical documentation pages:
* [Access Authorization Events](/user-guide/audit-report/access-authorization-events)
### Explicit Steering
[Section titled “Explicit Steering”](#explicit-steering)
Aembit continues to look for ways to improve the overall user experience in an Aembit environment, while also providing additional functionality and features that enhance this experience. One of these ways is by enabling you to route only specific types of traffic through Aembit, via the explicit steering feature.
With explicit steering, you can now configure Client Workloads to direct only certain types of traffic to the Agent Proxy. This enables you to have more precise control of which traffic is managed by the Agent Proxy.
For more information on the explicit steering feature, please refer to the [Explicit Steering](/user-guide/deploy-install/advanced-options/agent-proxy/explicit-steering) page.
### Aembit Edge Components Update
[Section titled “Aembit Edge Components Update”](#aembit-edge-components-update)
Aembit Edge Components have been updated to newer versions to improve overall performance and functionality.
The following components and packages have been updated:
* Helm Chart
* Agent Controller
* Agent Proxy
For the latest available versions of these components, please see the [Edge Components Supported Versions](/reference/edge-components/edge-component-supported-versions) page.
## October 18, 2024
[Section titled “October 18, 2024”](#october-18-2024)
The Aembit Terraform Provider is regularly updated with new features and capabilities to give you additional configuration options.
Aembit now supports both GitLab Job Client Identifiers and GitLab Job Trust Provider types, enabling you to manage Client Workloads in Gitlab using the Aembit Terraform Provider.
For more detailed technical information on how to manage Client Workloads in GitLab using the Aembit Terraform Provider, please see the [Aembit Terraform Provider Registry](https://registry.terraform.io/providers/Aembit/aembit/latest/docs) technical documentation.
## October 8, 2024
[Section titled “October 8, 2024”](#october-8-2024)
Aembit regularly releases new enhancements and improvements to Aembit Edge and Aembit Cloud components to provide additional features and functionality for your Aembit environment.
The following four new major features have been released:
* Terraform Provider support for Access Policies with Multiple Credential Providers
* Admin Dashboard enhancements and improvements
* Exposure of Prometheus-compatible Aembit Edge metrics
* Updated Edge Component Versions
### Terraform Provider Support for Access Policies with Multiple Credential Providers
[Section titled “Terraform Provider Support for Access Policies with Multiple Credential Providers”](#terraform-provider-support-for-access-policies-with-multiple-credential-providers)
Aembit has released a Terraform Provider update that enables users to add multiple Credential Providers to an Access Policy.
Aembit now supports use cases where the Aembit Terraform Provider can manage Aembit Access Policies associated with individual or multiple Credential Providers.
For more information about this feature, please see the [Multiple Credential Providers - Terraform](/user-guide/access-policies/credential-providers/advanced-options/multiple-credential-providers-terraform) page.
### Admin Dashboard Enhancements and Improvements
[Section titled “Admin Dashboard Enhancements and Improvements”](#admin-dashboard-enhancements-and-improvements)
Aembit continually makes improvements and enhancements to the Admin Dashboard to provide greater visibility and insight into your Aembit environment.
The Admin Dashboard has been updated and enhanced with additional tiles and panels that provide detailed information on Client and Server Workloads, Credential Usage by Type, the number of Access Condition failures based on Access Policies over the past 24 hours, and several other visualizations.
For more information on the Admin Dashboard and these additional panels, please see the [Admin Dashboard Overview](/user-guide/administration/admin-dashboard/) page.
### Exposure of Prometheus-compatible Aembit Edge Metrics
[Section titled “Exposure of Prometheus-compatible Aembit Edge Metrics”](#exposure-of-prometheus-compatible-aembit-edge-metrics)
Aembit aims to provides users with the ability to view detailed Aembit Edge metrics and data.
Aembit now exposes Prometheus-compatible metrics which enables users to view, and troubleshoot Aembit Edge Components (Agent Proxy, Agent Controller, and Agent Injector), while supporting both Kubernetes and virtual machine deployment models.
For more detailed information on how Aembit exposes Prometheus-compatible metrics, please see the [Aembit Edge Prometheus-compatible Metrics](/user-guide/deploy-install/advanced-options/aembit-edge-prometheus-compatible-metrics) page.
### Aembit Edge Components Update
[Section titled “Aembit Edge Components Update”](#aembit-edge-components-update-1)
Aembit Edge Components have been updated to newer versions to improve overall performance and functionality.
The following components and packages have been updated:
* Helm Chart
* Terraform ECS Module
* AWS Lambda Extension
* VM Artifacts
* Agent Controller
* Agent Proxy
For the latest available versions of these components, please see the [Edge Components Supported Versions](/reference/edge-components/edge-component-supported-versions) page.
## October 1, 2024
[Section titled “October 1, 2024”](#october-1-2024)
Aembit has released improvements to its reporting and logging/auditing capabilities, giving you improved visibility into access authorization events and audit logs. With these enhancements, you can more easily diagnose issues and troubleshoot problems in your environment.
### Improved Access Authorization Events and Audit Logging
[Section titled “Improved Access Authorization Events and Audit Logging”](#improved-access-authorization-events-and-audit-logging)
Improvements have been made to the Aembit Tenant’s reporting capabilities and reporting documentation, enabling increased visibility into access authorization events and audit logs. The Aembit technical documentation has also been augmented to assist with using these capabilities.
For more information on these access authorization event and audit log improvements, please see the following pages:
* [Access Authorization Events](/user-guide/audit-report/access-authorization-events)
* [Audit Logs](/user-guide/audit-report/audit-logs/)
## September 30, 2024
[Section titled “September 30, 2024”](#september-30-2024)
Aembit has released two new updates and improvements to Aembit components:
* Agent Controller functionality has been enhanced to enable real-time monitoring and status of Agent Controllers in the Aembit Tenant.
* Aembit Edge Components and packages have been updated to the latest versions.
### Agent Controller Real-Time Health Status and Health Update
[Section titled “Agent Controller Real-Time Health Status and Health Update”](#agent-controller-real-time-health-status-and-health-update)
You may now view the real-time health status of Agent Controllers in the Aembit Tenant.
For more information on how to check the health status of Agent Controllers, please see the [Tenant Health Check](/user-guide/troubleshooting/tenant-health-check) page.
### Edge Components Update
[Section titled “Edge Components Update”](#edge-components-update)
Aembit Edge Components have been updated to newer versions to improve overall performance and functionality.
The following components and packages have been updated:
* Helm Chart
* Terraform ECS Module
* VM Artifacts
* Agent Controller
For the latest available versions of these components, please see the [Edge Components Supported Versions](/reference/edge-components/edge-component-supported-versions) page.
## September 20, 2024
[Section titled “September 20, 2024”](#september-20-2024)
Aembit Edge Components are regularly updated to newer versions to address specific bug fixes and optimize performance of these components.
We recently identified a known issue that was resolved with a new Helm Chart version.
For the latest available versions of these components, please see the [Edge Components Supported Versions](/reference/edge-components/edge-component-supported-versions) page.
## September 18, 2024
[Section titled “September 18, 2024”](#september-18-2024)
Aembit regularly provides feature and functionality updates to various components to extend capabilities and performance.
Aembit has released a feature improvement that enables you to work with Custom Resource Sets in GitHub Actions and GitLab Jobs CI/CD pipelines.
### Custom Resource Set Support for GitHub Actions and GitLab Jobs
[Section titled “Custom Resource Set Support for GitHub Actions and GitLab Jobs”](#custom-resource-set-support-for-github-actions-and-gitlab-jobs)
For users that would like to implement a CI/CD pipeline solution using Aembit with a custom Resource Set, separate from other workloads, Aembit has introduced Resource Set support for both GitHub Actions and GitLab Jobs.
Aembit supports Workload Identity and Access with GitHub Actions or GitLab Jobs, in your CI/CD workloads and encourages scoping these for appropriate access control. Adding support for Resource Sets in these solutions provides you with additional options and flexibility in best managing and protecting your CI/CD workloads.
For more information on how to configure Resource Sets in GitHub Actions and GitLab Jobs, please see the following pages:
* [GitHub Actions](/user-guide/deploy-install/serverless/github-actions)
* [GitLab Jobs](/user-guide/deploy-install/serverless/gitlab-jobs)
## September 17, 2024
[Section titled “September 17, 2024”](#september-17-2024)
Aembit regularly releases updates to Aembit components and packages to improve overall performance of your environment.
The following updates have been released:
* Aembit Edge Component Updates
* Agent Controller PKI-Based TLS Support for Kubernetes and virtual machines
### Aembit Edge Component Updates
[Section titled “Aembit Edge Component Updates”](#aembit-edge-component-updates)
Aembit Edge Components have been updated to newer versions to improve overall performance and functionality.
The following components and packages have been updated:
* Helm Chart
* Terraform ECS Module
* VM Artifacts
* AWS Lambda Extension
For the latest available versions of these components, please see the [Edge Components Supported Versions](/reference/edge-components/edge-component-supported-versions) page.
### Agent Controller PKI-Based TLS Support for Kubernetes and virtual machine Deployments
[Section titled “Agent Controller PKI-Based TLS Support for Kubernetes and virtual machine Deployments”](#agent-controller-pki-based-tls-support-for-kubernetes-and-virtual-machine-deployments)
Aembit has extended the Aembit PKI-based Agent Controller TLS functionality beyond just ECS deployment models to include Kubernetes and virtual machine deployments.
* For Kubernetes deployments, if the Customer’s PKI-based Agent Controller is already configured, it will remain unchanged. Otherwise, Aembit’s PKI-based Agent Controller TLS is enabled by default.
* For virtual machine deployments, you need to configure Aembit’s PKI-based Agent Controller TLS manually.
## September 5, 2024
[Section titled “September 5, 2024”](#september-5-2024)
Aembit Edge Components are updated on a regular basis to include new features, functionality, and package improvements.
Aembit has released new versions of the following components and packages:
* Helm Chart
* Terraform ECS Module
* VM Artifacts
* AWS Lambda
* Agent Proxy
Note
Agent Proxy has been updated to address a specific issue related to idle timeouts for HTTP persistent connections (currently 1 hour). If no new request comes over a connection, the request will be closed by Agent Proxy.
For the latest available versions of these components, please see the [Edge Components Supported Versions](/reference/edge-components/edge-component-supported-versions) page.
## August 27, 2024
[Section titled “August 27, 2024”](#august-27-2024)
Aembit recently released the following two updates to improve the Aembit user experience:
* The Aembit Tenant UI has been updated with an expanded Admin Dashboard with additional metrics and data.
* Access Policies have been improved to enable users to add multiple Credential Providers to Access Policies.
### Updated Admin Dashboard
[Section titled “Updated Admin Dashboard”](#updated-admin-dashboard)
Aembit has released an updated Admin Dashboard with additional metrics and data you can review when logging into your tenant. You will now see the following metrics displayed from the last 24 hours:
* Client Workloads (Managed)
* Server Workloads (Managed)
* Credentials (Usage By Type)
* Workloads Connections (Managed)
### Multiple Service Accounts per Access Policy
[Section titled “Multiple Service Accounts per Access Policy”](#multiple-service-accounts-per-access-policy)
Aembit now supports the ability for you to have multiple Credential Providers associated with an Access Policy for specific use cases.
Adding and mapping multiple Credential Providers to an Access Policy can be very useful when you have a single Access Policy, but want to have different Credential Providers associated with that Access Policy.
For example, if you want to have the same Client Workload access the same Server Workload, but use different credentials for different functions, this feature enables you to specify the appropriate Credential Providers for each function on an Access Policy.
For more detailed information on how you can add multiple Credential Providers to an Access Policy, please see the [Multiple Credential Providers](/user-guide/access-policies/credential-providers/advanced-options/multiple-credential-providers) page.
## August 9, 2024
[Section titled “August 9, 2024”](#august-9-2024)
Kubernetes recently introduced support for native sidecar containers. Aembit now leverages this model for the Agent Proxy, where possible.
Aembit now automatically injects the Agent Proxy as a native sidecar, allowing init container Client Workloads.
Note
This change only applies to Kubernetes deployments of version 1.29 and above.
For more information on how you can use Agent Proxy as a sidecar to support init containers, please see the [Kubernetes Deployment](/user-guide/deploy-install/kubernetes/kubernetes#optional-configurations) page.
## August 1, 2024
[Section titled “August 1, 2024”](#august-1-2024)
Aembit has released comprehensive API technical documentation for the Aembit API.
With this documentation release, you now have access to a complete library technical content, usage information, and the latest version of the OpenAPI specification, which you can use to learn how to use the Aembit API.
For more detailed information on the Aembit API technical documentation, please see the page.
## July 29, 2024
[Section titled “July 29, 2024”](#july-29-2024)
Aembit has released two major enhancements to Aembit Edge Components: Aembit Edge Terraform Module for AWS ECS, and ECS TLS support.
### Aembit ECS Terraform Registry
[Section titled “Aembit ECS Terraform Registry”](#aembit-ecs-terraform-registry)
Aembit releases updates to the Aembit ECS Terraform Registry on a regular basis to provide users with additional features and functionality, including improvements to Agent Proxy and Agent Controller.
For more information on the latest ECS Terraform Registry release, please see the [Aembit Terraform Registry](https://registry.terraform.io/modules/Aembit/ecs/aembit/latest) page.
### ECS TLS Support
[Section titled “ECS TLS Support”](#ecs-tls-support)
Aembit has released an ECS deployment enhancement that enable Transport Layer Security (TLS) between the Agent Proxy and Agent Controller using Aembit-provided Private Key Infrastructure (PKI).
Note
There is no option to use your own PKI for ECS deployments.
## July 18, 2024
[Section titled “July 18, 2024”](#july-18-2024)
Aembit has released an Aembit Terraform Provider update to the Terraform Registry.
This update includes several improvements and enhancements, including:
* Support for Custom Resource Sets.
* Removal of the deprecated AWS ECS Role Trust Provider (replaced previously by the AWS Role Trust Provider).
* Support for Credential Providers of type OAuth2 Authorization Code.
For more information on these updates and changes, please see the [Aembit Terraform Registry](https://registry.terraform.io/providers/Aembit/aembit/1.15.0) page.
## July 3, 2024
[Section titled “July 3, 2024”](#july-3-2024)
Aembit now supports dynamically steering only specific traffic to the Agent Proxy.
The dynamic steering feature introduces the ability to restrict this proxied traffic to a specific list of hostnames. When this feature is enabled, only egress traffic to the user-specified hostnames will be proxied. This enables you to have more precise control over which destinations’ traffic is managed by the Agent Proxy.
## June 26, 2024
[Section titled “June 26, 2024”](#june-26-2024)
Aembit has released the following two new features that improve Credential Provider support, and additional options for identifying Client Workloads and Trust Provider Match Rules.
### OAuth 2.0 Authorization Code Credential Provider Support
[Section titled “OAuth 2.0 Authorization Code Credential Provider Support”](#oauth-20-authorization-code-credential-provider-support)
Aembit now supports 3-legged OAuth (3LO) workflows to enable applications to request permission from a user to access their account data and act on the user’s behalf via the OAuth 2.0 Authorization Code Credential Provider.
With 3LO support, an application may access services or other applications for which the user has been granted permission.
The following 3rd party services are now supported with OAuth 2.0 Authorization Code Credential Providers:
* [Atlassian](https://developer.atlassian.com/cloud/confluence/oauth-2-3lo-apps/)
* [GitLab](https://docs.gitlab.com/ee/api/oauth2.html)
* [Slack](https://api.slack.com/legacy/oauth)
* [GCP BigQuery](https://cloud.google.com/bigquery/docs/third-party-integration#authentication)
* [Apigee](https://docs.apigee.com/api-platform/security/oauth/oauth-introduction)
* [PagerDuty](https://www.pagerduty.com/blog/build-sophisticated-apps-for-your-pagerduty-environment-using-oauth-2-0-and-api-scopes/)
For more information on configuring OAuth 2.0 Authorization Credential Provider with these 3rd party services, please see the [OAuth 2.0 Authorization Code Credential](/user-guide/access-policies/credential-providers/oauth-authorization-code) technical documentation page.
### Client Workload and Trust Provider Match Rules Support
[Section titled “Client Workload and Trust Provider Match Rules Support”](#client-workload-and-trust-provider-match-rules-support)
Aembit now supports more options for identifying Client Workloads and specifying Trust Provider Match Rules, including multiple “or” condition matches and support for wildcards.
## June 10, 2024
[Section titled “June 10, 2024”](#june-10-2024)
Aembit has released beta support for the OAuth 2.0 Authorization Code Credential Provider.
Many organizations require Credential Provider support for various 3rd party SaaS services which only support short lived credentials with the OAuth 2.0 Authorization Code Flow. These services included:
* Atlassian
* GitLab
* Slack
* GCP BigQuery
* Apigee
* PagerDuty
This beta release enables users to use 3rd party SaaS services and have short-lived access tokens generated on demand for authentication to APIs that these 3rd party services provide.
For more information on how to configure the OAuth 2.0 Authorization Code Credential Provider to be used with any of these 3rd party services, please see the [OAUth 2.0 Authorization Code Credential Provider](/user-guide/access-policies/credential-providers/oauth-client-credentials) page.
## June 5, 2024
[Section titled “June 5, 2024”](#june-5-2024)
Aembit has released two new feature updates that enhance existing Aembit functionality.
### Aembit Containers
[Section titled “Aembit Containers”](#aembit-containers)
All injected Aembit containers are now run as non-root users.
### Agent Proxy File Descriptor Limits
[Section titled “Agent Proxy File Descriptor Limits”](#agent-proxy-file-descriptor-limits)
Users may configure limits for the number of file descriptors Agent Proxy is allowed to open on a VM. You may configure this number when Agent Proxy is installed (using the `AEMBIT_FD_LIMIT` flag).
*virtual machines*
* *Default Limit* - 65535, set by Agent Proxy installer
* *Configuration* - This limit is configurable via the `AEMBIT_FD_LIMIT` environment variable. This value is passed directly to `systemd` in Agent Proxy’s service file at the time of installation.
* *Example* - `AEMBIT_FD_LIMIT=200000 [...] ./install`
*Kubernetes*
* *Default Limit* - This limit is inherited from container runtime.
* *Configuration* - There is no official support without modifying the underlying runtime. For more information on configuring these limits, please see the [Kubernetes limits support](https://github.com/kubernetes/kubernetes/issues/3595) GitHub thread.
*AWS ECS*
* *Default Limit* - 1024
* *Configuration* - This limit is configurable via the ECS Task Definition API or ECS Dashboard. Please refer to the [AWS ECS Developer Guide](https://docs.aws.amazon.com/AmazonECS/latest/developerguide/fargate-tasks-services.html#fargate-resource-limits) for more detailed information on how to configure these limits.
*AWS Lambda*
* *Default Limit* - 1024
* *Configuration* - This limit is not configurable. For more information, please refer to the [AWS Lambda Developer Guide](https://docs.aws.amazon.com/lambda/latest/dg/gettingstarted-limits.html#function-configuration-deployment-and-execution).
## June 4, 2024
[Section titled “June 4, 2024”](#june-4-2024)
Aembit has released an update to support AWS Role-Based Trust Providers.
The ability to create and use different types of Trust Providers in your Aembit environment enables you to have flexibility in how resources are managed. With this enhancement, you now have an additional option when selecting a Trust Provider.
For more information on AWS Role-Based Trust Providers, please see the [AWS Role Trust Provider](/user-guide/access-policies/trust-providers/aws-role-trust-provider) page.
## May 30, 2024
[Section titled “May 30, 2024”](#may-30-2024)
Many organizations have certain security requirements that specify which resources should be managed by a group. To address these security needs, Aembit has released a new Resource Sets feature that enables you to determine which groups will have access to various resources.
You may find it necessary to segment management responsibilities for certain entities and resources in your Aembit environment between different individuals and groups for security reasons. To accommodate this requirement, Aembit has released the Resource Sets feature.
Resource Sets enable you to group entities and resources (e.g. Credential Providers, Trust Providers, Identity Providers, etc.) into a single collection and assign specific users to manage these resources.
For more detailed technical information on how to use create and manage Resource Sets, please refer to the [Resource Sets](/user-guide/administration/resource-sets/) technical documentation.
## May 15, 2024
[Section titled “May 15, 2024”](#may-15-2024)
In some cases, you may find it necessary to manually shut down Agent Proxy when the main container exits, but a sidecar is still running. Since you may not want to kill the whole job, since it will look like a cancelled job, Aembit now provides a solution that enables you to gracefully terminate the job while allowing the sidecar to still run.
For more detailed information on this feature, please refer to the Agent Proxy Shutdown page.
## April 30, 2024
[Section titled “April 30, 2024”](#april-30-2024)
There are many different deployment options you can currently use to deploy Aembit Edge Components in your environment, including GitHub Actions, GitLab Jobs, and Kubernetes.
To increase the available deployment options for our users, Aembit now provides support for users who wish to deploy Aembit Edge Components to an Amazon Web Services (AWS) Lambda Container.
For more detailed information on how to deploy Aembit Edge Components to AWS Lambda Containers, please refer to the [AWS Lambda Container](/user-guide/deploy-install/serverless/aws-lambda-container) technical documentation.
## April 23, 2024
[Section titled “April 23, 2024”](#april-23-2024)
Aembit has released two new features on Aembit Cloud:
* Access Condition support for Geographic IP (GeoIP) restrictions
* Log Stream support for streaming to Google Cloud Storage Buckets
### Aembit GeoIP Access Conditions
[Section titled “Aembit GeoIP Access Conditions”](#aembit-geoip-access-conditions)
You may now configure and add Aembit GeoIP conditions in your Aembit Tenant. This new Access Condition type enables you to explicitly designate which countries/regions will have access to Server Workloads from policy-enabled Client Workloads.
For more information on this feature, please refer to the [Access Conditions for GeoIP Restriction](/user-guide/access-policies/access-conditions/aembit-geoip) page.
### Google Cloud Storage Bucket Log Streams
[Section titled “Google Cloud Storage Bucket Log Streams”](#google-cloud-storage-bucket-log-streams)
Aembit now supports Log Streams that target Google Cloud Storage (GCS) Buckets. You may add or configure this new Log Stream destination type in the Administration tab of your Aembit Tenant.
For more information on this feature, please refer to the [Google Cloud Storage Bucket Log Streams](/user-guide/access-policies/access-conditions/aembit-geoip) page.
## April 8, 2024
[Section titled “April 8, 2024”](#april-8-2024)
Aembit Edge Components now support virtual machine deployments to virtual machines running Red Hat 8.9.
## April 4, 2024
[Section titled “April 4, 2024”](#april-4-2024)
Aembit now supports GitLab CI/CD Jobs as Client Workloads.
For more information on how to configure GitLabs Jobs with Aembit Client Workloads, please refer to the [Script-based Agent](/user-guide/deploy-install/serverless/gitlab-jobs) page.
## March 19, 2024
[Section titled “March 19, 2024”](#march-19-2024)
An issue was identified in the Agent Controller component due to the non-rotation of the public/private key pair used for Kerberos attestation. This issue has been resolved by implementing a process by which these private/public key pairs will be automatically rotated when the certificate reaches 80% of its lifespan.
## March 12, 2024
[Section titled “March 12, 2024”](#march-12-2024)
Aembit has released a Kerberos Trust Provider that enables the attestation of Client Workloads running in virtual machine environments joined to Active Directory. This attestation method is specifically designed for on-premise deployments where alternative attestation methods, such as AWS or Azure metadata service trust providers, are not available.
For more detailed information on this Kerberos Trust Provider, please refer to the [Kerberos Trust Provider](/user-guide/access-policies/trust-providers/kerberos-trust-provider) technical documentation.
## March 11, 2024
[Section titled “March 11, 2024”](#march-11-2024)
Aembit now supports secure communication between Agent Proxy and Agent Controller using Transport Layer Security (TLS) for both Kubernetes and virtual machine deployments.
For more information on how to configure TLS for Agent Controller, please refer to the [Configuring TLS for Agent Controller](/user-guide/deploy-install/advanced-options/agent-controller/configure-customer-pki-agent-controller-tls) documentation.
## March 9, 2024
[Section titled “March 9, 2024”](#march-9-2024)
Aembit has officially released a Terraform Provider to the [Hashicorp Terraform Registry](https://registry.terraform.io/modules/Aembit/ecs/aembit/latest).
The Aembit Terraform Provider enables users to manage Aembit Cloud resources using terraform manually or via CI/CD workflows.
For more detailed information about the Aembit Terraform Provider, please see the [Aembit Terraform documentation](/user-guide/access-policies/advanced-options/terraform/terraform-configuration).
## February 27, 2024
[Section titled “February 27, 2024”](#february-27-2024)
Aembit now supports SAML/SSO authentication for administrators who wish to simplify the Aembit Tenant login process for their users. Instead of requiring a user to enter their username/password credentials every time a user tries to access the Aembit Tenant, users will now be able to use a 3rd party SAML SSO Provider (e.g. Google, Okta, Microsoft Entrata) to log into the tenant.
For more information on how to configure Identity Providers using SAML, please see the [Configuring Identity Providers](/user-guide/administration/identity-providers/create-identity-provider) technical documentation.
## January 31, 2024
[Section titled “January 31, 2024”](#january-31-2024)
Aembit now supports Wiz integration. Using the Wiz Integration API, you can work with both your Aembit Tenant and Wiz to identify customer assets and vulnerabilities.
For more detailed information about the Aembit -> Wiz integration, please refer to the [Wiz Integration page](/user-guide/access-policies/access-conditions/integrations/wiz) on the Aembit technical documentation site.
## January 16, 2024
[Section titled “January 16, 2024”](#january-16-2024)
### Support for Access Authorization Events
[Section titled “Support for Access Authorization Events”](#support-for-access-authorization-events)
Aembit has now enabled support for Access Authorization Events. Access Authorization Events enable customers to observe credential requests.
### Support for Google CloudRun Jobs as Client Workloads
[Section titled “Support for Google CloudRun Jobs as Client Workloads”](#support-for-google-cloudrun-jobs-as-client-workloads)
Aembit supports Google CloudRun Jobs as Client Workloads. With this support, you can now:
* authenticate to the Aembit IdP using Attestation with the GCP Cloud Run Job Identity
* request and retrieve a secret from GCP Secret Manager
## January 15, 2024
[Section titled “January 15, 2024”](#january-15-2024)
Aembit now supports integration with CrowdStrike. This integration allows you to leverage CrowdStrike’s service to prevent Server Workload access from Client Workloads that do not meet an expected state.
For more information about this integration, please refer to the [CrowdStrike Integration page](/user-guide/access-policies/access-conditions/integrations/crowdstrike) on the Aembit technical documentation site.
## January 4, 2024
[Section titled “January 4, 2024”](#january-4-2024)
The Aembit Agent Controller can now be installed in high availability configurations. Because the Agent Controller is a critical Aembit Edge Component that manages Agent Proxy registration and credential acquisition for Aembit Cloud access, HA support was necessary to ensure the continuous availability of the Agent Controller.
For information on installing and configuring Agent Controller in high availability environments, please see the [Agent Controller High Availability](/user-guide/deploy-install/advanced-options/agent-controller/agent-controller-high-availability) page.
## December 7, 2023
[Section titled “December 7, 2023”](#december-7-2023)
In an effort to ensure **only** Client Workloads that run in a secure environment can access Server Workloads, Aembit has enabled integrations with CrowdStrike and its CrowdStrike Falcon Sensor. CrowdStrike Falcon Sensor checks multiple items on the virtual machine (VM) to verify the VM is secure.
## November 14, 2023
[Section titled “November 14, 2023”](#november-14-2023)
Several new feature updates and additions have been made to improve Aembit user experience. These updates include:
* Admin console multi-factor authentication support
* Edge components VM deployment support
### Multi-factor authentication support
[Section titled “Multi-factor authentication support”](#multi-factor-authentication-support)
Aembit now supports Multi-Factor Authentication (MFA) so users can provide different authentication methods. Users can:
* scan a QR code to configure their compatible authentication application
* retrieve MFA Recovery Codes in case the device or application is unavailable
* view the users who have configured MFA within the Aembit Users view.
### Linux-based VM deployment support
[Section titled “Linux-based VM deployment support”](#linux-based-vm-deployment-support)
Users may now deploy Aembit Edge Components to VMs (non-Kubernetes). This feature enables users to have options on how they want to deploy these components.
For more detailed information about this feature, please see the [virtual machine Installation](/user-guide/deploy-install/virtual-machine) page.
## October 16, 2023
[Section titled “October 16, 2023”](#october-16-2023)
Aembit has released a new feature for Credential Providers called “Dynamic Claims.” This feature allows you to set the Subject claim and Custom claims with either literal strings or dynamic values when setting up Credential Providers in your Aembit client tenant.
For more detailed information about Dynamic Claims, please refer to [Dynamic Claims page](/user-guide/access-policies/credential-providers/advanced-options/dynamic-claims)
Note
This feature is currently only supported for Vault integration.
# What is Aembit?
> An overview of Aembit, its core principles, and key capabilities
Aembit is a cloud-native Identity and Access Management (IAM) platform. It’s derived from the word ‘ambit’ (meaning boundary or scope). Unlike traditional *User IAM* that focuses on human access to applications, Aembit facilitates secure interactions between automated systems or workloads. Aembit is specifically designed for managing access between workloads, or *Workload IAM*.
A workload is any application or program that utilizes computing resources to perform tasks. This definition includes CI/CD jobs, databases, third-party APIs, serverless functions, and custom applications. Workloads run in different environments like Kubernetes or virtual machines. Aembit primarily focuses on securing communication between these workloads over TCP/IP networks.
Traditional approaches to workload authentication rely on static credentials that are embedded in code, configuration files, or environment variables. These credentials must be manually created, rotated, and protected. This creates significant security and operational challenges.

Aembit takes a fundamentally different approach by shifting from managing static secrets to managing access based on verified workload identity and policy. This Workload IAM approach provides just-in-time, ephemeral credentials while enforcing dynamic access policies.

Unlike traditional approaches that focus on storing and managing secrets, Aembit facilitates secure interactions between automated systems by verifying workload identity and applying policy-based access controls. These include applications, services, and APIs across diverse environments using different identity types (non-human, machine, service account, and others).

[How Aembit works ](/get-started/how-aembit-works)A deeper look at how Aembit works and its architecture
→
## Aembit’s core principles
[Section titled “Aembit’s core principles”](#aembits-core-principles)
* **Manage Access, Not Secrets** - The foundational principle of Aembit is to shift the security focus from *managing static credentials* to *managing access* based on verified workload identity and policy. Instead of relying on long-lived secrets that you must store, protect, and rotate, Aembit employs mechanisms to authenticate workloads based on their intrinsic properties and environment.
> Aembit grants access based on defined [Access Policies](/get-started/concepts/access-policies) and real-time context.
* **Zero Trust Architecture** - Aembit’s identity-centric approach aligns with the *principles of Zero Trust* architecture, extending concepts traditionally applied to human users into the domain of non-human workloads.
> Aembit never implicitly trusts access.
* **Least Privilege** - Aembit verifies every access request based on a Client Workload’s identity, the specific resource its requesting (Server Workload), and applicable contextual constraints defined in the Access Policy. This confirms adherence to the *principle of Least Privilege*.
> Aembit grants only the necessary permissions required for a specific task at a specific time.
## What Aembit can do for you
[Section titled “What Aembit can do for you”](#what-aembit-can-do-for-you)
Aembit’s value proposition centers on enhancing security and operational efficiency in managing non-human identities.
This offers specific benefits for different roles:
### Build applications with secretless access
[Section titled “Build applications with secretless access”](#build-applications-with-secretless-access)
If you’re building and deploying applications, managing secrets is a common challenge. Aembit solves this by enabling a “secretless” approach for workload-to-workload access. Aembit allows your applications to dynamically obtain credentials based on their verified identity and policy, simplifying your development process by:
* Removing the need to embed credentials in application code, configuration files, or environment variables.
* Authenticating applications using their runtime attributes (like container signatures), removing the need for initial secrets (“secret zero” problem).
* Handling authentication via network interception, so you can focus on business logic instead of auth code.

[Aembit quickstart ](/get-started/quickstart/quickstart-core/)Start building with Aembit by checking out the quickstart guide
→
### Advance security maturity and risk reduction
[Section titled “Advance security maturity and risk reduction”](#advance-security-maturity-and-risk-reduction)
From a strategic perspective focused on risk and security maturity, Aembit provides a dedicated platform to secure non-human identities, a significant source of enterprise risk. By replacing insecure static credentials with an identity-first, secretless approach, Aembit drastically reduces the attack surface and the risk of breaches.
Aembit supports implementing a Zero Trust architecture for workloads, simplifies compliance and auditing, and offers centralized visibility and governance to advance your organization’s security maturity by:
* Reducing credential exposure risk through ephemeral, Just-In-Time (JIT) access grants.
* Implementing Zero Trust principles for machine-to-machine communication.
* Centralizing access logs for simplified compliance reporting and incident investigation.
* Providing consistent access patterns across cloud, SaaS, and on-premises resources.
* Addressing the security gap in non-human workload interactions without adding developer overhead.

[Aembit use cases ](/get-started/use-cases/)Check out Aembit's use cases to see how it can help you
→
### Enhance security posture and enforce access control
[Section titled “Enhance security posture and enforce access control”](#enhance-security-posture-and-enforce-access-control)
As a security engineer responsible for defining and enforcing controls, Aembit enhances your security posture by focusing on securing non-human identity access. Aembit provides centralized policy management and conditional access capabilities, enabling you to enforce granular controls based on verifiable workload identity and real-time context like security posture.
This helps implement Zero Trust principles for workloads and reduces risk by:
* Verifying workload identity using concrete attributes like container signatures or cloud metadata.
* Implementing fine-grained access controls based on workload context and runtime conditions.
* Reducing attack surface by eliminating long-lived static credentials.
* Providing standardized logging of all access attempts for troubleshooting and audit trails.
* Enabling identity-based security without requiring deep security expertise from application developers.

[Aembit security posture ](/get-started/security-posture/)Check out Aembit's software architecture, threat model, and compliance
→
### Streamline secure deployments and operations
[Section titled “Streamline secure deployments and operations”](#streamline-secure-deployments-and-operations)
For those focused on automating and managing infrastructure, Aembit integrates workload identity and access management directly into your operational workflows. Aembit enables you to focus on building and deploying applications through the following benefits:
* Automating credential management tasks, reducing time spent on access provisioning and rotation.
* Eliminating manual secret rotation workflows that distract from core development work.
* Integrating with existing workloads without requiring application code changes.
* Providing a Terraform provider for managing configurations and infrastructure as code.
* Centralizing access management across multiple environments from a single interface.

[Scaling Aembit with Terraform ](/get-started/concepts/scaling-terraform)See how Aembit integrates with Terraform to manage your infrastructure
→
## Key capabilities
[Section titled “Key capabilities”](#key-capabilities)
The tables in the following sections detail Aembit’s primary capabilities, along with example use cases and what benefit Aembit provides for each:
### Secretless workload authentication
[Section titled “Secretless workload authentication”](#secretless-workload-authentication)
| | |
| -------------------- | --------------------------------------------------------------------------------------------------------------------------------------------------------------------------------------------------------------------------------------------------------------------------------------------- |
| **Capability** | Aembit authenticates workloads (like applications or scripts) based on their verifiable environment attributes (workload attestation) rather than relying on stored secrets like API keys or passwords. |
| **Example Use Case** | In a multicloud setup, an automated script running in an AWS EC2 instance needs to access a database hosted in Google Cloud. Instead of embedding database credentials within the script or its configuration, Aembit verifies the script’s identity based on its AWS environment attributes. |
| **Benefit** | Aembit eliminates the risk of the database credentials being exposed if the script’s code or configuration files are compromised. It also removes the operational overhead of rotating and managing those static secrets. |
### Conditional Access Policies
[Section titled “Conditional Access Policies”](#conditional-access-policies)
| | |
| -------------------- | -------------------------------------------------------------------------------------------------------------------------------------------------------------------------------------------------------------------------------------------------------------------------------------------------------------------------------------------------------------------------------------------- |
| **Capability** | Aembit enables Multi-Factor Authentication (MFA)-like controls for workloads by defining access policies that consider not just the workload’s identity but also real-time contextual factors like security posture (results from a vulnerability scan), geographical location, or time of day. |
| **Example Use Case** | A microservice responsible for processing payments is only allowed to access the production billing API if **all** the following are true: 1) its identity is verified, 2) a recent security scan (for example, via Snyk integration) shows no critical vulnerabilities, 3) the request originates from the expected cloud region, 4) the request originates during specific business hours. |
| **Benefit** | Aembit provides a higher level of assurance than identity alone, mimicking for non-human interactions. Aembit enables fine-grained, risk-adaptive control, reducing the likelihood of unauthorized access even if a workload’s basic identity is somehow spoofed. |
### Identity brokering across heterogeneous environments
[Section titled “Identity brokering across heterogeneous environments”](#identity-brokering-across-heterogeneous-environments)
| | |
| -------------------- | -------------------------------------------------------------------------------------------------------------------------------------------------------------------------------------------------------------------------------------------------------------------------------------------- |
| **Capability** | Aembit acts as a central intermediary, managing access requests between workloads that might reside in different environments (multiple public clouds, on-premises data centers, SaaS applications, third-party APIs). |
| **Example Use Case** | A legacy application running in an on-premises data center needs to fetch customer data from Salesforce (SaaS) and store processed results in an AWS S3 bucket (public cloud). Aembit manages the authentication and authorization for both interactions through a unified policy framework. |
| **Benefit** | It simplifies security management in complex, hybrid/multi-cloud setups by providing a single point of control and visibility, eliminating the need to configure and manage disparate access control mechanisms for each environment. |
### Centralized Access Policy management & auditing
[Section titled “Centralized Access Policy management & auditing”](#centralized-access-policy-management--auditing)
| | |
| -------------------- | ------------------------------------------------------------------------------------------------------------------------------------------------------------------------------------------------------------------------------------------------------------------------------------------------------ |
| **Capability** | Aembit provides a global system to define, enforce, and monitor access rules between all managed non-human identities. It also offers centralized logging and auditing of all access events. |
| **Example Use Case** | A security team needs to define a policy stating that only specific, approved data analytics services running in Kubernetes can access a sensitive data warehouse (like Snowflake ). They also need a consolidated audit trail of all access attempts to this data warehouse for compliance reporting. |
| **Benefit** | Centralization simplifies administration, makes sure policy enforcement is consistent across the board, and makes auditing and compliance reporting much easier compared to managing policies and logs scattered across different systems. |
### Automation and “No-Code Auth”
[Section titled “Automation and “No-Code Auth””](#automation-and-no-code-auth)
| | |
| -------------------- | ------------------------------------------------------------------------------------------------------------------------------------------------------------------------------------------------------------------------------------------------------------------------------------------------------------------------------------------------------------------------------- |
| **Capability** | Aembit automates the process of authenticating workloads and providing them with necessary credentials just-in-time. Its interception mechanism (via Aembit Edge) aims to secure workload communication without requiring you to modify application code to handle authentication logic. |
| **Example Use Case** | A development team deploys a new microservice. Instead of writing code to handle API key retrieval and injection for accessing downstream services, they deploy Aembit Edge Components alongside their service. Aembit then: 1) automatically intercepts outgoing calls, 2) handles authentication/authorization via a central Access Policy, 3) injects credentials as needed. |
| **Benefit** | Aembit reduces developer friction, speeds up deployment cycles, and makes sure the security implementation is consistent without placing the burden of complex authentication coding on application developers. It also improves operational efficiency by automating credential lifecycle management. |
## Additional resources
[Section titled “Additional resources”](#additional-resources)
* [How Aembit Works](/get-started/how-aembit-works)
* [Use cases](/get-started/use-cases/)
* [Security posture](/get-started/security-posture/)
* [Aembit User Guide](/user-guide)
# Conceptual overview
> This page provides a high-level conceptual overview of Aembit and its components
This topic explains how Aembit operates behind the scenes (at a high level) to provide secure, seamless access between workloads. Use the links in each section to dive deeper into specific topics related to how Aembit works or start configuring and using those features.
## Aembit as an identity broker
[Section titled “Aembit as an identity broker”](#aembit-as-an-identity-broker)
Aembit operates conceptually as an identity broker. It acts as an intermediary, facilitating secure access requests initiated by a [Client Workload](/get-started/concepts/client-workloads) (like an application or script) attempting to connect to a target [Server Workload](/get-started/concepts/server-workloads) (like an API or database).
These workloads may operate across security boundaries or reside in different compute environments. For example, a Client Workload in AWS accessing a Server Workload in Azure. By centralizing the brokering function, Aembit helps you simplify the management of trust relationships and Access Policies across your disparate security boundaries and environments.
## Workloads
[Section titled “Workloads”](#workloads)
Workloads are the fundamental entities in Aembit’s access control model. They represent software applications, services, or processes that either request access to resources ([Client Workloads](#client-workloads)) or provide resources that others access ([Server Workloads](#server-workloads)).
Aembit establishes secure communication channels between these workloads by verifying their identities, evaluating access policies, and providing Just-In-Time (JIT) credentials without requiring code changes to your applications.
### Client Workloads
[Section titled “Client Workloads”](#client-workloads)
Client Workloads are the initiators of access requests in Aembit’s security model. They represent any non-human entity that needs to consume services or resources provided by Server Workloads. Examples include:
* Web applications requesting data from APIs
* Microservices communicating with other services
* Background jobs accessing databases
* CI/CD pipelines deploying to cloud environments
* Scheduled tasks retrieving configuration information
When a Client Workload attempts to access a Server Workload, [Aembit Edge](#aembit-edge) intercepts the request and works with [Aembit Cloud](#aembit-cloud) to verify the Client Workload’s identity through an [Access Policy](#access-policies). This verification happens without the Client Workload storing or managing long-lived credentials, eliminating credential sprawl, and reducing security risks.

[More on Client Workloads ](/get-started/concepts/client-workloads)See Core Concepts
→

[Configure Client Workloads ](/user-guide/access-policies/client-workloads/)See the Aembit User Guide
→
### Server Workloads
[Section titled “Server Workloads”](#server-workloads)
Server Workloads are the targets of access requests in Aembit’s security model. They represent services or resources that Client Workloads need to access. Examples include:
* REST APIs and web services
* Databases and data warehouses
* Third-party SaaS applications
* Cloud provider services
* Legacy applications and internal systems
Server Workloads can exist in multiple environments, like public cloud, private cloud, on-premises, or SaaS, and Aembit provides consistent access controls regardless of their location. For each Server Workload, you can define authentication requirements, network locations, and specific access restrictions.
Aembit helps you manage credentials for Server Workloads through Credential Providers, which generate or retrieve the appropriate authentication material for each Server Workload once Aembit grants access.

[More on Server Workloads ](/get-started/concepts/server-workloads)See Core Concepts
→

[Configure Server Workloads ](/user-guide/access-policies/server-workloads/)See the Aembit User Guide
→
***
## Access Policies
[Section titled “Access Policies”](#access-policies)
Aembit uses [Access Policies](/get-started/concepts/access-policies) to control which Client Workloads can access which Server Workloads and under what conditions.
Access Policies evaluate the following components when making access decisions:
* **Client Workloads** - Any non-human entity that initiates an access request to consume a service or resource provided by a Server Workload.
* **Trust Providers** - Attest to workload identities and provide information about the environment in which they operate with high reliability and trustworthiness.
* **Access Conditions** - Criteria Aembit checks when evaluating an Access Policy to determine whether to grant a Client Workload access to a target Server Workload.
* **Credential Providers** - Systems that provide access credentials, such as OAuth tokens, service account tokens, API keys, or username-and-password pairs.
* **Server Workloads** - Software applications that serve requests from Client Workloads such as third-party SaaS APIs, API gateways, databases, and data warehouses.
For a simplified illustration of the Access Policy evaluation flow, see \[Evaluation flow: how Aembit grants access]\(/get-started/how-aembit-works#access-policy-flow-putting-it-all together).
If a request meets all requirements, Aembit allows the connection and injects the credential. If any step fails, Aembit denies the request and logs the reason.

[More on Access Policies ](/get-started/concepts/access-policies)See Core Concepts
→

[Configure Access Policies ](/user-guide/access-policies/)See the Aembit User Guide
→
***
### Trust Providers
[Section titled “Trust Providers”](#trust-providers)
Instead of Client Workloads managing and presenting a long-lived secret for authentication, Aembit uses [Trust Providers](/get-started/concepts/trust-providers) to cryptographically verify the identity of Client Workloads attempting to access target Server Workloads. Trust Providers verify a Client Workload’s identity using evidence obtained directly from its runtime environment—also known as workload attestation.
Aembit integrates with many Trust Providers to support attestation across different environments:
* AWS
* Azure
* Kubernetes
* CI/CD platforms
* Aembit Agent Controller in Kerberos environments
Trust Providers supply cryptographically signed evidence, such as platform identity documents or tokens, about the Client Workload to Aembit Cloud. Aembit Cloud then validates this evidence to confirm the workload’s identity before proceeding with access policy evaluation. Upon successful attestation, Aembit Cloud gains high confidence in the Client Workload’s identity without relying on a shared secret.

[More on Trust Providers ](/get-started/concepts/trust-providers)See Core Concepts
→

[Set up Trust Providers ](/user-guide/access-policies/trust-providers/)See the Aembit User Guide
→
***
### Access Conditions
[Section titled “Access Conditions”](#access-conditions)
Aembit uses [Access Conditions](/get-started/concepts/access-conditions) to provide a mechanism for adding dynamic, context-aware constraints to Access Policies—similar to Multi-Factor Authentication (MFA) for human identities.
Access Conditions allow Access Policies to incorporate rapid environmental or operational factors into the access decision. For example:
* **Time** - restrictions based on the time of day or day of the week
* **GeoIP** - geographic location of the requesting workload
During \[Access Policy evaluation]\(/get-started/how-aembit-works#access-policy-flow-putting-it-all together), after Aembit Cloud matches the Client and Server Workloads to an Access Policy *and* it verifies the Client Workload’s identity, Aembit Cloud explicitly evaluates all associated Access Conditions. Only if all Access Conditions pass, along with the Client Workload’s identity check, does the Access Policy grant access and trigger the Credential Provider.
Aembit also integrates with external security posture management tools, such as Wiz or CrowdStrike. This allows Access Policies to enforce conditions such as “Aembit only grants access if Wiz reports a healthy security posture for that Client Workload.

[More on Access Conditions ](/get-started/concepts/access-conditions)See Core Concepts
→

[Set up Access Conditions ](/user-guide/access-policies/access-conditions/)See the Aembit User Guide
→
***
### Credential Providers
[Section titled “Credential Providers”](#credential-providers)
Aembit uses [Credential Providers](/get-started/concepts/credential-providers) to facilitate secure authentication between workloads. Credential Providers generate and manage the credentials needed for a Client Workload to authenticate to a Server Workload when an Access Policy determines to grant a Client Workload access. Credential Providers abstract away the complexity of different authentication mechanisms and credential types, providing a consistent interface for workload-to-workload authentication regardless of the underlying systems.
When an Access Policy evaluation succeeds, Aembit Cloud triggers the Credential Provider to generate the appropriate credentials for the specific authentication mechanism that the target Server Workload requires. This interaction is what allows a Client Workload to authenticate to a Server Workload without storing or managing long-lived credentials. This design limits exposure and prevents credential sprawl.
Aembit supports many types of Credential Providers to accommodate different authentication requirements:
* **Basic Authentication** - For systems requiring username/password authentication
* **OAuth 2.0** - For modern API authentication flows
* **API Key** - For services using API key-based authentication
* **Certificate-Based** - For systems requiring mutual TLS authentication
* **Cloud Provider Credentials** - For accessing cloud services (AWS, Azure, GCP) through Workload Identity Federation (WIF)
* **SAML** - For enterprise federated authentication scenarios
* **Kubernetes Tokens** - For Kubernetes-based workloads
You can also set up Credential Providers for external secrets management systems like HashiCorp Vault, AWS Secrets Manager, or Azure Key Vault to retrieve sensitive authentication material when needed.
To provide **credential lifecycle management** capabilities, Aembit offers [Credential Provider integrations](/user-guide/access-policies/credential-providers/integrations/) with services like GitLab to create, rotate, and delete access credentials on your behalf.

[More on Credential Providers ](/get-started/concepts/credential-providers)See Core Concepts
→

[Set up Credential Providers ](/user-guide/access-policies/credential-providers/)See the Aembit User Guide
→
***
## Observability
[Section titled “Observability”](#observability)
Aembit logs every access request (Access Authorization Events) and administrative change. These logs help you understand what’s happening, troubleshoot problems, and meet compliance goals and requirements.
Key event types include:
* **Audit Logs:** Track administrative changes to the platform.
* **Workload Events:** Provide high-level visibility into workload interactions.
* **Access Authorization Events:** Offer **detailed, step-by-step visibility** into policy evaluation for each access request. These logs show Client/Server identification, the outcome of **Trust Provider attestation** (identity verification), **Access Conditions verification** (contextual checks), **Credential Provider retrieval**, and the final **Allow/Deny verdict**. This granularity is essential for **troubleshooting access issues**.
Aembit logs the following:
* Each request’s source, destination, and decision.
* The specific policy that allowed or blocked access.
* Details about which Trust Provider verified an identity.
* What credential Aembit delivered (or why it didn’t).
You can view this information in your Aembit Tenant UI or export it to external log systems for long-term storage and analysis by setting up a [Log Stream](/user-guide/administration/log-streams/).
See [Audit and report](/get-started/concepts/audit-report)

[More on Auditing ](/get-started/concepts/audit-report)See Core Concepts
→

[Audit Aembit logs ](/user-guide/audit-report/)See the Aembit User Guide
→
***
## Aembit’s architecture
[Section titled “Aembit’s architecture”](#aembits-architecture)
Aembit consists of two cooperating systems: [Aembit Edge](#aembit-edge) and [Aembit Cloud](#aembit-cloud).
Aembit Edge communicates with Aembit Cloud to handle authentication and authorization of access between your workloads.
Separating the control plane and the data plane enables you to centralize policy management in the cloud while keeping the enforcement mechanism close to the workloads in your environments. The interception model employed by Aembit Edge is key to enabling the “No-Code Auth” capability.
### Aembit Edge
[Section titled “Aembit Edge”](#aembit-edge)
[Aembit Edge](#aembit-edge) acts as the **data plane** or interception point and runs alongside Client Workloads in your infrastructure (such as a Kubernetes cluster).
The primary function of Aembit Edge is to intercept outbound network requests from Client Workloads destined for target Server Workloads.
Upon interception, Aembit Edge sends requests from Client Workloads to Aembit Cloud which handles the authentication and authorization of that request. If Aembit Cloud approves access, then Aembit Edge does the following:
1. Receives a credential from Aembit Cloud.
2. Injects the credential into the original request “just-in-time.”
3. Forwards the modified request to the intended target Server Workload.
Aembit Edge also sends detailed access event logs to Aembit Cloud for auditing purposes.

[More on Aembit Edge ](/get-started/concepts/aembit-edge)See Core Concepts
→

[Configure Aembit Edge ](/user-guide/deploy-install/)See the Aembit User Guide
→
***
### Aembit Cloud
[Section titled “Aembit Cloud”](#aembit-cloud)
[Aembit Cloud](/get-started/concepts/aembit-cloud) acts as the **control plane** and receives requests intercepted by Aembit Edge.
Aembit Cloud determines whether to authorize Client Workload requests and what credential to deliver.
The primary functions of Aembit Cloud are to:
1. Evaluate access requests.
2. Authenticate Client Workloads and attest their identities through a [Trust Provider](/get-started/concepts/trust-providers).
3. Enforce [Access Policies](/get-started/concepts/access-policies) (including [Access Conditions](/get-started/concepts/access-conditions) such as GeoIP or time).
4. Interact with external [Credential Providers](/get-started/concepts/credential-providers) to obtain and issue necessary credentials.
5. Communicate access decisions to Aembit Edge.
You can [administer Aembit Cloud](/get-started/concepts/administration) through your unique, and isolated Aembit Tenant to define access rules, configure trust and credential sources, and monitor access events.
Aembit Cloud logs all Access Authorization Events so you can [audit and report](/get-started/concepts/audit-report) metadata related to access control.
Aembit only logs metadata
Crucially, Aembit functions purely as a control plane; it doesn’t process or log any actual data from your workloads, only metadata related to access control.

[More on Aembit Cloud ](/get-started/concepts/aembit-cloud)See Core Concepts
→

[Configure Aembit Cloud ](/user-guide/access-policies/)See the Aembit User Guide
→
***
## Administration
[Section titled “Administration”](#administration)
Administration in Aembit provides a comprehensive framework for managing security policies, credentials, and access controls across your organization to control and monitor how your users access and use Aembit. To administer Aembit, you can do so through your unique, dedicated environment—your [Aembit Tenant](#about-aembit-tenants).
Aembit’s Administration UI provides centralized management of all Aembit’s primary components, including Access Policies. Additionally, you can configure and manage advanced Aembit Edge Component features such as TLS Decrypt, PKI-based TLS, proxy steering methods, and more.
Aembit’s administration system follows a Role-Based Access Control (RBAC) model, allowing you to delegate specific administrative responsibilities while maintaining the principle of least privilege.
Aembit’s administration capabilities include:
* **Admin Dashboard** - A central interface providing visibility into system status, recent activities, and security alerts.
* **Users** - Management of human users who interact with the Aembit administrative interface.
* **Roles** - Predefined and custom sets of responsibilities that you can assign to your users to control their administrative access.
* **Permissions** - Granular controls that define what actions your users can perform within your Aembit Tenant.
* **Discovery** - Tools for identifying and cataloging workloads across your infrastructure.
* **Resource Sets** - Logical groupings of resources that help organize and manage access at scale across your environment.
* **Log Streams** - Configuration for sending security and audit logs to external monitoring systems.
* **Identity Providers** - Integration with external identity systems for authenticating administrators.
* **Sign-On Policies** - Rules governing how administrators authenticate to the Aembit system.
### About Aembit Tenants
[Section titled “About Aembit Tenants”](#about-aembit-tenants)
Aembit Tenants serve as isolated, dedicated environments within Aembit that provide complete separation of administrative domains and security configurations.
Each tenant operates independently with its own set of:
* **Administrative Users** - Users who manage the tenant have no access to other tenants.
* **Resources** - All workloads, policies, and configurations are tenant-specific.
* **Security Boundaries** - Complete isolation makes sure configurations in one tenant can’t affect others.

[More on Administration ](/get-started/concepts/administration)See Core Concepts
→

[Configure Admin settings ](/user-guide/administration/)See the Aembit User Guide
→
***
## Aembit Terraform Provider
[Section titled “Aembit Terraform Provider”](#aembit-terraform-provider)
Aembit supports scalable, repeatable infrastructure-as-code (IaC) workflows through the [Aembit Terraform Provider](https://registry.terraform.io/providers/Aembit/aembit/latest).
Terraform gives you the ability to:
* Codify access policies and workload identity configuration.
* Version control changes to your identity and access infrastructure.
* Apply changes consistently across staging, production, and multicloud environments.
* Automate onboarding for new workloads, trust providers, and credential integrations.
This helps reduce manual steps, eliminate configuration drift, and ensure your access policies are reproducible and reviewable.
The Aembit Terraform Provider supports all core Aembit resources:
| Resource Type | Terraform Support |
| -------------------- | ---------------------------- |
| Trust Providers | ✅ Create and configure |
| Client Workloads | ✅ Manage identity matching |
| Server Workloads | ✅ Define endpoints, auth |
| Credential Providers | ✅ Integrate secrets/tokens |
| Access Policies | ✅ Authorize workload access |
| Access Conditions | ✅ Enforce dynamic controls |
| Resource Sets | ✅ Segment environments |
| Roles & Permissions | ✅ Assign fine-grained access |
This full coverage enables you to declare your Aembit configuration as code, just like cloud resources or Kubernetes objects.

[More on Aembit & Terraform ](/get-started/concepts/scaling-terraform)See Core Concepts
→

[Scale with Terraform ](/user-guide/access-policies/advanced-options/terraform/)See the Aembit User Guide
→
***
## Additional resources
[Section titled “Additional resources”](#additional-resources)
* [Access Policies](/get-started/concepts/access-policies)
* [Audit and report](/get-started/concepts/audit-report)
* [Administering Aembit](/get-started/concepts/administration)
* [Scaling with Terraform](/get-started/concepts/scaling-terraform)
# About Access Conditions
> Description of Access Conditions and how they work
Work in progress
This page is a work in progress. It may contain incomplete or unverified information.
Please check back later for updates.
If you have feedback or suggestions, please fill out the [Aembit New Docs Feedback Survey](https://forms.gle/mfjhV2TtXP1pXAym8).
Thanks for your patience!
# About Access Policies
> Description of Access Policies, their components, and how the evaluation flow works
Access Policies are the central mechanism within Aembit. Access Policies define, enforce, and audit access between Non-Human Identities (NHI), such as applications, scripts, services, and infrastructure components.
The fundamental purpose of Access Policies is to govern workload-to-workload interactions. They do by cryptographically verifying workload identity and contextual factors, rather than relying on the distribution and management of static secrets. This approach aims to deliver granular, dynamic, and continuously verifiable control over NHI access, enhancing security posture and simplifying operations in complex, distributed environments.
This topic provides high-level details of Aembit Access Policies, focusing on their core components and the intricate interplay between the components during Access Policy evaluation.
## Access Policy components
[Section titled “Access Policy components”](#access-policy-components)
Click each link card to learn more details about each Access Policy component:

[Client Workloads ](/user-guide/access-policies/client-workloads/)Client Workloads are any non-human entity that initiates an access request to consume a service or resource provided by a Server Workload.
→

[Server Workloads ](/user-guide/access-policies/server-workloads/)Server Workloads are software applications that serve requests from Client Workloads such as third-party SaaS APIs, API gateways, databases, and data warehouses.
→

[Trust Providers ](/user-guide/access-policies/trust-providers/)Trust Providers attest to workload identities and provide information about the environment in which they operate with high reliability and trustworthiness.
→

[Access Conditions ](/user-guide/access-policies/access-conditions/)Access Conditions are criteria Aembit checks when evaluating an Access Policy to determine whether to grant a Client Workload access to a target Server Workload.
→

[Credential Providers ](/user-guide/access-policies/credential-providers/)Credential Providers are systems that provide access credentials, such as OAuth tokens, service account tokens, API keys, or username-and-password pairs.
→
Aembit’s multi-component structure provides many advantages and separates concerns:
* Trust Providers handle identity verification
* Access Conditions handle context
* Credential Providers handle target authentication
* Access Policies orchestrate everything
This modularity allows Aembit to adapt to diverse environments and authentication protocols. See how Aembit evaluates Access Policies in the next section.
## The Access Policy evaluation flow
[Section titled “The Access Policy evaluation flow”](#the-access-policy-evaluation-flow)
The power of Aembit Access Policies lies in the coordinated interaction of its distinct components during an access attempt.
The following Access Policy evaluation flow diagram illustrates this process:

The following explains the Access Policy evaluation flow in detail:
1. **Request Initiation & Interception** - A Client Workload attempts to connect to a Server Workload. When you deploy Aembit Edge alongside your Client Workloads, it transparently intercepts this outgoing network request.
2. **Identity Evidence Retrieval** - Aembit Edge interacts with the local environment to retrieve identity evidence suitable for the configured Trust Provider by fetching a cached cloud metadata token or platform OIDC token. Aembit caches identity evidence to prevent Access Policies from failing if the external system goes down for a brief time.
Upon successful identification, Aembit Cloud identifies the specific Access Policy that governs the interaction between the now-verified Client Workload and the intended Server Workload.
3. **Match request to an Access Policy** - Aembit Edge sends the identity evidence to Aembit Cloud to match the requesting Client Workload and the Server Workload its requesting to access with an Access Policy. If no policy matches both workloads, Aembit denies the request.
4. **Authentication via Trust Provider** - If you’ve configured a Trust Provider, Aembit Cloud uses the appropriate Trust Provider associated with the identified Client Workload to perform cryptographic attestation, verifying the workload’s identity based on its environment. Aembit also caches the identity evidence from the Trust Provider it uses for attestation.
Aembit logs attestation events to its Authorization Log, which you can view in your Aembit Tenant UI.
5. **Access Condition Check** - If you’ve configured Access Conditions, Aembit Cloud evaluates any Access Conditions associated with the matched Access Policy. This may involve checking time constraints, geographic rules, or querying external systems (like Wiz) for security posture data. If using external systems, Aembit caches their security posture data for the same reasons as for Trust Provider identity evidence.
The Client Workload must meet all conditions for authorization to proceed.
6. **Credential Provisioning Request** - If Aembit verifies the Client Workload’s identity and it satisfies all Access Conditions, Aembit Cloud logs the Access Policy Authorization Event and then interacts with the Credential Provider.
Aembit requests an appropriate access credential required by the target Server Workload (like an OAuth token, a temporary AWS key via STS, or an Azure token via WIF).
7. **Credential Injection & Request Forwarding** - Aembit Cloud returns the policy decision (allow) and the freshly obtained access credential to Aembit Edge.
Finally, Aembit Edge injects the credential into the original Client Workload’s request (like adding an `Authorization: Bearer ` header) and forwards the modified request to the actual Server Workload endpoint.
## Additional resources
[Section titled “Additional resources”](#additional-resources)
* [Aembit Edge: The data plane](/get-started/concepts/aembit-edge)
* [Aembit Cloud: The control plane](/get-started/concepts/aembit-cloud)
* [Aembit administration](/get-started/concepts/administration)
* [Scaling with Terraform](/get-started/concepts/scaling-terraform)
# About Administering Aembit
> Discover Aembit's administration capabilities
This page provides an of all administrative capabilities available in your Aembit Tenant.
## Admin dashboard
[Section titled “Admin dashboard”](#admin-dashboard)
The Admin dashboard serves as your command center for monitoring the health and activity of your Aembit deployment. It provides real-time visibility into workload connections, credential usage, and potential security issues. This visibility allows you to identify and address operational concerns.
The [Admin dashboard](/user-guide/administration/admin-dashboard/) provides:
* Summary metrics for configured workloads and entities
* Workload event history with severity indicators
* Client and Server Workloads connection metrics
* Credential usage analytics
* Application protocol distribution
* Access condition failure monitoring
## User management
[Section titled “User management”](#user-management)
User management in Aembit allows you to control who can access your Aembit Tenant and what actions they can perform. This capability is essential for implementing the principle of least privilege and making sure you have proper separation of duties within your organization.
[User management](/user-guide/administration/users/) features include:
* [Add users](/user-guide/administration/users/add-user) with specific roles and contact information
* Configure external authentication options
* Manage user credentials and access rights
## Roles and permissions
[Section titled “Roles and permissions”](#roles-and-permissions)
Aembit’s role-based access control system allows you to create customized roles with precise permissions. This enables you to delegate administrative responsibilities without granting excessive privileges. This granular approach to access control helps maintain security while supporting collaborative administration.
[Role-based access control](/user-guide/administration/roles/) provides:
* [Create specialized roles](/user-guide/administration/roles/add-roles) beyond default SuperAdmin and Auditor
* Configure granular permissions for each role
* Integrate with Resource Sets for multi-tenancy
## Workload Discovery
[Section titled “Workload Discovery”](#workload-discovery)
Workload Discovery automates the identification and management of workloads within your Aembit environment. It simplifies the process of adding new workloads by automatically detecting them to provide a streamlined workflow for onboarding.
Workload Discovery allows you to:
* [Manage Workload Discovery](/user-guide/administration/discovery/) in your environment.
* Integrate security tools like [Wiz](/user-guide/administration/discovery/integrations/wiz) to discover workloads.
## Identity providers
[Section titled “Identity providers”](#identity-providers)
Identity provider integration allows you to leverage your existing identity infrastructure with Aembit. By connecting your corporate identity provider, you can make sure consistent authentication policies across your organization. This integration simplifies user management through automatic provisioning and role mapping.
[Identity provider integration](/user-guide/administration/identity-providers/) enables:
* Connect with [SAML 2.0 providers](/user-guide/administration/identity-providers/create-identity-provider) (Okta, Google, Microsoft Entra ID)
* Enable Single Sign-On (SSO) authentication
* Configure [SSO automatic user creation](/user-guide/administration/identity-providers/automatic-user-creation) for new users
## Resource Sets
[Section titled “Resource Sets”](#resource-sets)
Resource Sets provide powerful multi-tenancy capabilities, allowing you to segment your Aembit environment for different teams, applications, or business units. This isolation makes sure administrators can only manage resources within their assigned domains. It supports organizational boundaries while maintaining centralized oversight.
[Resource Sets](/user-guide/administration/resource-sets/) allow you to:
* [Create isolated resource groups](/user-guide/administration/resource-sets/create-resource-set)
* [Add workloads and resources](/user-guide/administration/resource-sets/adding-resources-to-resource-set) to specific sets
* [Assign roles](/user-guide/administration/resource-sets/assign-roles) for managing each Resource Set
* [Deploy Resource Sets](/user-guide/administration/resource-sets/deploy-resource-set) using specific methods
## Global Policy Compliance
[Section titled “Global Policy Compliance”](#global-policy-compliance)
Aembit’s Global Policy Compliance is a security enforcement feature that allows you to establish organization-wide security standards for Access Policies and Agent Controllers. Global Policy Compliance ensures consistent security practices across your Aembit environment and prevents the creation of policies that might inadvertently expose resources.
See [Global Policy Compliance](/user-guide/administration/global-policy/) for more information and configuration details, and see [Global Policy Compliance report dashboard](/user-guide/audit-report/global-policy) to review the compliance status of your Aembit Tenant’s global policies.
## Log streams
[Section titled “Log streams”](#log-streams)
Log streams extend Aembit’s audit and monitoring capabilities by forwarding logs to external systems. This enables long-term storage, analysis, and compliance reporting. The integration with your existing security monitoring infrastructure allows Aembit activity to become part of your organization’s overall security operations.
[Log streams](/user-guide/administration/log-streams/) allow you to:
* Forward logs to [AWS S3 buckets](/user-guide/administration/log-streams/aws-s3)
* Export logs to [Google Cloud Storage](/user-guide/administration/log-streams/gcs-bucket)
* Configure multiple stream types for different log categories
## Sign-on policy
[Section titled “Sign-on policy”](#sign-on-policy)
Sign-on policy controls how administrators authenticate to the Aembit platform. This central configuration point allows you to enforce strong authentication requirements. It makes sure that access to this privileged system follows your organization’s security standards.
The [Sign-on policy](/user-guide/administration/sign-on-policy/) page allows you to:
* Configure SSO enforcement requirements
* Set up multi-factor authentication policies
* Manage authentication grace periods
# About Aembit Cloud
> A high-level overview of Aembit Cloud's purpose and its features
Work in progress
This page is a work in progress. It may contain incomplete or unverified information.
Please check back later for updates.
If you have feedback or suggestions, please fill out the [Aembit New Docs Feedback Survey](https://forms.gle/mfjhV2TtXP1pXAym8).
Thanks for your patience!
# About Aembit Edge
> A high-level overview of Aembit Edge's purpose and its features
Work in progress
This page is a work in progress. It may contain incomplete or unverified information.
Please check back later for updates.
If you have feedback or suggestions, please fill out the [Aembit New Docs Feedback Survey](https://forms.gle/mfjhV2TtXP1pXAym8).
Thanks for your patience!
# About Auditing and reporting
> A high-level overview of Aembit's auditing and reporting capabilities
Work in progress
This page is a work in progress. It may contain incomplete or unverified information.
Please check back later for updates.
If you have feedback or suggestions, please fill out the [Aembit New Docs Feedback Survey](https://forms.gle/mfjhV2TtXP1pXAym8).
Thanks for your patience!
# About Client Workloads
> Client Workloads overview
Work in progress
This page is a work in progress. It may contain incomplete or unverified information.
Please check back later for updates.
If you have feedback or suggestions, please fill out the [Aembit New Docs Feedback Survey](https://forms.gle/mfjhV2TtXP1pXAym8).
Thanks for your patience!
# Credential Providers overview
> Overview of Credential Providers and their role in Aembit
Work in progress
This page is a work in progress. It may contain incomplete or unverified information.
Please check back later for updates.
If you have feedback or suggestions, please fill out the [Aembit New Docs Feedback Survey](https://forms.gle/mfjhV2TtXP1pXAym8).
Thanks for your patience!
# Scaling Aembit with Terraform
> Description of how to scale with the Aembit Terraform provider
Aembit supports scalable, repeatable infrastructure-as-code workflows through its official **Terraform provider**. By managing Aembit resources declaratively in code, you can automate onboarding, ensure consistent policies across environments, and scale access controls alongside your infrastructure.
This guide explains how the Aembit Terraform Provider works and how to use it to scale Aembit in production environments.
## Why Use Terraform with Aembit?
[Section titled “Why Use Terraform with Aembit?”](#why-use-terraform-with-aembit)
Terraform gives you the ability to:
* **Codify access policies and workload identity configuration**
* **Version control changes** to your identity and access infrastructure
* **Apply changes consistently** across staging, production, and multicloud environments
* **Automate onboarding** for new workloads, trust providers, and credential integrations
This helps reduce manual steps, eliminate configuration drift, and ensure your access policies are reproducible and reviewable.
## What Can You Manage?
[Section titled “What Can You Manage?”](#what-can-you-manage)
The Aembit Terraform Provider supports all core Aembit resources:
| Resource Type | Terraform Support |
| -------------------- | ---------------------------- |
| Trust Providers | ✅ Create and configure |
| Client Workloads | ✅ Manage identity matching |
| Server Workloads | ✅ Define endpoints, auth |
| Credential Providers | ✅ Integrate secrets/tokens |
| Access Policies | ✅ Authorize workload access |
| Access Conditions | ✅ Enforce dynamic controls |
| Resource Sets | ✅ Segment environments |
| Roles & Permissions | ✅ Assign fine-grained access |
This full coverage enables you to declare your Aembit configuration as code, just like cloud resources or Kubernetes objects.
## How the Terraform Provider Works
[Section titled “How the Terraform Provider Works”](#how-the-terraform-provider-works)
1. **Authenticate** with your Aembit Tenant by providing an access token.
2. **Declare resources** like workloads, policies, and credential providers in `.tf` files.
3. **Run `terraform apply`** to push the desired state to Aembit.
4. Aembit **provisions or updates** the corresponding resources in your tenant.
Example provider block:
```hcl
provider "aembit" {
token = var.aembit_api_token
tenant_id = var.aembit_tenant_id
}
```
# About Server Workloads
> Overview of Server Workloads and their role in Aembit
Work in progress
This page is a work in progress. It may contain incomplete or unverified information.
Please check back later for updates.
If you have feedback or suggestions, please fill out the [Aembit New Docs Feedback Survey](https://forms.gle/mfjhV2TtXP1pXAym8).
Thanks for your patience!
# About Trust Providers
> Understanding Trust Providers and their role in verifying workload identities in Aembit
**Trust Providers** validate the identity of [Client Workloads](/get-started/concepts/client-workloads) through a process called workload attestation. Instead of relying on pre-shared secrets like API keys, passwords, or certificates Trust Providers verify identity by consulting trusted systems in the workload’s runtime environment.
The core idea is simple but powerful: rather than asking, “What secret do you know?”, Trust Providers ask, “Can your environment vouch for who you are?” It’s similar to checking someone’s government-issued ID rather than taking their word for it.
You can think of Trust Providers as a kind of certificate authority for workloads—but instead of issuing certificates, they produce cryptographically verifiable claims about a workload’s environment. Aembit uses these claims to establish trust before granting access, reducing the risk of unauthorized workloads posing as trusted ones.

[Start configuring Trust Providers ](/user-guide/access-policies/trust-providers/)See Trust Providers in the User Guide
→
## How Trust Providers work
[Section titled “How Trust Providers work”](#how-trust-providers-work)
The following steps outline the process of how Trust Providers work in Aembit:
1. **Client Workload Request** - A Client Workload (e.g., a microservice or application) attempts to access a Server Workload (e.g., a database or API).
2. **Workload Attestation** - When a Client Workload attempts to access a Server Workload, Aembit Edge gathers identity evidence from the Client Workload’s runtime environment.
3. **Evidence Submission** - Aembit Edge submits this identity evidence to Aembit Cloud.
4. **Trust Provider Validation** - Aembit Cloud uses a configured Trust Provider to validate the submitted evidence. The Trust Provider checks the evidence against its own records and policies to confirm the workload’s identity.
Trust Providers vs. Attestation Sources
When configuring a Trust Provider in Aembit, you aren’t configuring the external attestation source itself (like AWS, Azure, Kubernetes, or GitHub). Instead, you’re telling Aembit how to validate the identity evidence coming from that attestation source and what criteria to use when determining if a workload should be trusted.
5. **Identity Confirmation** - If the Trust Provider validates the evidence, Aembit Cloud confirms the Client Workload’s identity.
6. **Access Policy Evaluation** - With the workload’s identity established, Aembit Cloud proceeds with evaluating the remaining components of the Access Policy.
At this point in the process, Aembit continues to evaluate the Access Policy, which may include additional [Access Conditions](/get-started/concepts/access-conditions), such as checking the workload’s attributes, permissions, or other contextual information.
The following diagram illustrates this process:

## Supported environments
[Section titled “Supported environments”](#supported-environments)
Aembit integrates with a variety of Trust Providers to support workload attestation across different environments, including:
**Cloud Providers**
* [AWS Role](/user-guide/access-policies/trust-providers/aws-role-trust-provider) and [AWS Metadata Service](/user-guide/access-policies/trust-providers/aws-metadata-service-trust-provider)
* [Azure Metadata Service](/user-guide/access-policies/trust-providers/azure-metadata-service-trust-provider)
* [Google Cloud Platform Identity Token](/user-guide/access-policies/trust-providers/gcp-identity-token-trust-provider)
**Container Orchestration**
* [Kubernetes Service Account](/user-guide/access-policies/trust-providers/kubernetes-service-account-trust-provider)
**CI/CD Platforms**
* [GitHub Actions](/user-guide/access-policies/trust-providers/github-trust-provider)
* [GitLab Jobs](/user-guide/access-policies/trust-providers/gitlab-trust-provider)
* [Terraform Cloud Identity Token](/user-guide/access-policies/trust-providers/terraform-cloud-identity-token-trust-provider)
**On-Premises**
* [Kerberos](/user-guide/access-policies/trust-providers/kerberos-trust-provider)
## Benefits of using trust providers
[Section titled “Benefits of using trust providers”](#benefits-of-using-trust-providers)
* **Enhanced Security** - Eliminates reliance on static, long-lived secrets, reducing the attack surface.
* **Simplified Management** - Centralizes identity verification, simplifying access control across diverse environments.
* **Improved Auditability** - Provides a clear audit trail of workload identities and access attempts.
* **Zero-Trust Architecture** - This approach verifies every workload access request before granting access, enabling a zero-trust model.
# How Aembit works
> A simplified description of how Aembit works, including its architecture and components
In modern technical environments, applications, services, scripts, and APIs frequently need to communicate with each other and access shared resources like databases, SaaS platforms, or other internal services. These automated systems operating without direct human interaction are **Non-Human Identities (NHI)** or just **workloads**.
Use the links in each section to dive deeper into specific topics related to how Aembit works or start configuring and using those features.
## The core problem Aembit solves
[Section titled “The core problem Aembit solves”](#the-core-problem-aembit-solves)
Most organizations secure workload access using static, long-lived secrets (API keys, passwords, tokens) that are:
* Difficult to securely distribute and store
* Prone to leakage and theft
* Hard to rotate regularly
* A significant security risk when compromised
## Introducing Workload IAM
[Section titled “Introducing Workload IAM”](#introducing-workload-iam)
Aembit solves these challenges by providing its Workload Identity and Access Management (Workload IAM) platform.
At their core, workload-to-workload interactions involve one workload (**Client Workload**) initiating a request to access another workload or service (**Server Workload**). Examples include a microservice calling an API, a script accessing a database, or a CI/CD job deploying to a cloud provider.
Aembit shifts authentication away from what a workload knows (static secrets) to who a workload verifiably is based on its environment and context. Instead of using a traditional password or API key, Aembit verifies a workload’s identity cryptographically using evidence from its runtime environment, such as:
* Where the workload running
* What platform issued the workload’s identity
* Cloud instance metadata
* Kubernetes service account tokens
* SPIFFE Verifiable Identity Documents (SVID)

### Client Workloads
[Section titled “Client Workloads”](#client-workloads)
Client Workloads are the initiators of requests to access Server Workloads. Client Workloads can be any service, API, or resource that needs to access another service, API, or resource.

[More on Client Workloads ](/get-started/concepts/client-workloads)See Core Concepts
→

[Configure Client Workloads ](/user-guide/access-policies/client-workloads/)See the Aembit User Guide
→
### Server Workloads
[Section titled “Server Workloads”](#server-workloads)
Server Workloads are the target of Client Workload requests. Server Workloads can be any service, API, or resource that a Client Workload needs to access.

[More on Server Workloads ](/get-started/concepts/server-workloads)See Core Concepts
→

[Configure Server Workloads ](/user-guide/access-policies/server-workloads/)See the Aembit User Guide
→
## Secure workloads with Access Policies
[Section titled “Secure workloads with Access Policies”](#secure-workloads-with-access-policies)
Aembit manages workload-to-workload access through **Access Policies**. Access Policies serve as the central control mechanism to define **who** (which Client Workload) **can access what** (which Server Workload) **under what conditions**. This policy-driven approach replaces the need for Client Workloads to possess static secrets for every service they need to access.
Instead of relying on secrets embedded in the client, Access Policies work by leveraging the inherent identity of the workload. Aembit verifies a Client Workload’s identity from its runtime environment and orchestrates the secure provisioning of necessary credentials just-in-time (JIT) to the Server Workload its trying to access.

Access Policies link a specific Client Workload to a specific Server Workload and define the security checks required for access.

[More on Access Policies ](/get-started/concepts/access-policies)See Core Concepts
→

[Configure Access Policies ](/user-guide/access-policies/)See the Aembit User Guide
→
The components of an Access Policy include:
* A Client Workload (who wants access)
* A Server Workload (what they want to access)
* A Trust Provider (how to verify the client’s identity)
* Access Conditions (when/where/under what circumstances to allow access)
* A Credential Provider (what credentials to issue)
The following sections briefly describe these key components of an Access Policy:
### Trust Providers
[Section titled “Trust Providers”](#trust-providers)
Trust Providers are fundamental to Aembit’s “secretless” approach. Trust Providers **cryptographically verify the identity** of Client Workloads *without* clients needing a pre-shared secret to authenticate itself to Aembit.
Trust Providers authenticate the workload’s identity by examining verifiable evidence from its environment, such as cloud instance metadata, Kubernetes service account tokens, or OIDC tokens from CI/CD platforms.

Aembit calls this **Workload Attestation**. If the Trust Provider can’t verify the workload’s identity, Aembit denies access to the Server Workload.

[More on Trust Providers ](/get-started/concepts/trust-providers)See Core Concepts
→

[Set up Trust Providers ](/user-guide/access-policies/trust-providers/)See the Aembit User Guide
→
Once Aembit successfully verifies the identity of a Client Workload through a Trust Provider it goes to the next step in the Access Policy Evaluation flow: Access Conditions.
### Access Conditions
[Section titled “Access Conditions”](#access-conditions)
Once a Client Workload’s identity is successfully verified by a Trust Provider, Aembit evaluates any Access Conditions you may have defined in the Access Policy. Access Conditions add **contextual checks** to the access decision. You can enforce rules based on factors like the time of day, geographic location (GeoIP), or even the security posture of the workload’s host derived from integrations with tools like Wiz or CrowdStrike.

All Access Conditions you configure must evaluate successfully for authorization to proceed. This provides a level of dynamic, risk-adaptive security, providing a Multi-Factor Authentication (MFA)-like strength for non-human access.

[More on Access Conditions ](/get-started/concepts/access-conditions)See Core Concepts
→

[Set up Access Conditions ](/user-guide/access-policies/access-conditions/)See the Aembit User Guide
→
Once Aembit successfully verifies the context of a Client Workload through Access Conditions it goes to the next step in the Access Policy Evaluation flow: Credential Provider.
### Credential Providers
[Section titled “Credential Providers”](#credential-providers)
If a Client Workload’s identity is verified by a Trust Provider and the Client Workload meets all Access Conditions, Aembit then invokes the necessary **Credential Provider**. The role of the Credential Provider is to **obtain the specific access credential** required by the target Server Workload.
This could involve interacting with systems like cloud Security Token Services (like AWS STS, Azure WIF, Google WIF), OAuth servers, or internal credential stores to get a short-lived token, API key, or other required secret.

Credential Providers abstract away the complexity of how the target Server Workload expects to authenticate Client Workloads.

[More on Credential Providers ](/get-started/concepts/credential-providers)See Core Concepts
→

[Set up Credential Providers ](/user-guide/access-policies/credential-providers/)See the Aembit User Guide
→
## Aembit’s architecture
[Section titled “Aembit’s architecture”](#aembits-architecture)
Aembit’s ability to execute its identity-first, policy-driven access flow is enabled by its two main architectural components working together: Aembit Cloud and Aembit Edge.
### Aembit Cloud
[Section titled “Aembit Cloud”](#aembit-cloud)
**Aembit Cloud** is Aembit’s **centralized control plane**, where all the configuration and policy management occurs. Aembit Cloud is where you define and manage your Client Workloads, Server Workloads, Access Policies, Trust Providers, Access Conditions, and Credential Providers.
Aembit Cloud receives requests from Aembit Edge (more on that in the next section), and performs Access Policy decision-making logic and administrative tasks such as:
* authenticating Client Workloads using Trust Providers
* evaluating Access Conditions
* interacting with Credential Providers to obtain necessary credentials
* centralizes all access event logs for auditing and visibility
It then sends the authorization decision and any credentials back to Aembit Edge.

Aembit Cloud is explicitly designed *not* to process or log the actual application data exchanged between workloads; it only handles metadata related to the access control decision.

[More on Aembit Cloud ](/get-started/concepts/aembit-cloud)See Core Concepts
→

[Configure Aembit Cloud ](/user-guide/access-policies/)See the Aembit User Guide
→
### Aembit Edge
[Section titled “Aembit Edge”](#aembit-edge)
**Aembit Edge** is Aembit’s **distributed data plane** and **enforcement point**, deployed directly within your environments, close to your workloads. Aembit Edge’s primary job is to transparently intercept outbound network requests from Client Workloads destined for Server Workloads.
Upon interception, Aembit Edge gathers identity evidence from its local runtime environment, communicates with Aembit Cloud for authentication, policy evaluation, and credential retrieval. Once Aembit authenticates a Client Workload’s identity, Aembit Edge **injects the credential just-in-time (JIT)** into Client Workload’s original request before forwarding it to the target Server Workload.

If Aembit Cloud denies a request, Aembit Edge blocks it. This interception and injection capability allows Aembit to secure access for many existing applications without requiring code changes (“no-code auth”). Aembit Edge also sends detailed access event logs back to the Cloud.

[More on Aembit Edge ](/get-started/concepts/aembit-edge)See Core Concepts
→

[Deploy Aembit Edge ](/user-guide/deploy-install/)See the Aembit User Guide
→
## Logging and auditing
[Section titled “Logging and auditing”](#logging-and-auditing)
Aembit provides **comprehensive, centralized logging and auditing** critical for security and visibility. Its logging is identity-centric, linking events to verified workload or administrator identities. Aembit’s logging capabilities include recording workload access attempts or Access Authorization Events and administrative actions.
You can export logs using **Log Streams** to external destinations like **AWS S3** and **Google Cloud Storage** for retention and integration with SIEM platforms.

Aembit’s logging directly supports **compliance requirements**, by generating detailed, identity-based audit records. It also aids **security incident response and forensic analysis** by providing clear context and attribution for workload activities.

[More on Auditing ](/get-started/concepts/audit-report)See Core Concepts
→

[Audit Aembit logs ](/user-guide/audit-report/)See the Aembit User Guide
→
## Access Policy flow: Putting it all together
[Section titled “Access Policy flow: Putting it all together”](#access-policy-flow-putting-it-all-together)
Putting all these components together, Aembit provides a powerful and flexible solution for managing workload access without the need for static secrets.
The following simplified Access Policy evaluation flow illustrates how all Aembit’s components work together to provide secure workload access:
1. **Request Initiation and Interception** - A Client Workload attempts to connect to a Server Workload.
2. **Identify the Workloads** - Aembit Edge observes the Client Workload’s identity using metadata from your environment—such as Kubernetes service account names, VM identity tokens, or cloud-specific signals.
3. **Match request to an Access Policy** - Aembit Cloud compares the request to existing Access Policies. If no policy matches both workloads, Aembit denies the request.
4. **Verify Identity with Trust Providers** (optional) - Aembit checks with a Trust Provider (like AWS, Azure, or Kubernetes) to verify the Client Workload’s identity. This process removes the need for long-lived secrets by leveraging native cloud or orchestration signals.
5. **Evaluate Access Conditions** (optional) - If the request matches a policy, Aembit checks whether it satisfies any extra conditions. For example, it might require the workload to run in a specific region or during certain hours.
6. **Retrieve Credentials from a Credential Provider** - When the request passes all checks, Aembit contacts the Credential Provider to retrieve the appropriate credential—such as an API key or OAuth token.
7. **Inject the Credential** - Aembit Edge injects the credential directly into the request, typically using an HTTP header. The Client Workload never sees or stores the credential.
The following diagram is a simplified illustration of the Access Policy evaluation flow:

## Additional resources
[Section titled “Additional resources”](#additional-resources)
* [Conceptual overview](/get-started/concepts/)
* [Access Policies](/get-started/concepts/access-policies)
* [Audit and report](/get-started/concepts/audit-report)
* [Administering Aembit](/get-started/concepts/administration)
* [Scaling with Terraform](/get-started/concepts/scaling-terraform)
# Aembit quickstart overview
> Get direct experience with Aembit by following linear quickstart guides.
This section provides Aembit’s quickstart guides of how to quickly set up Aembit. These quickstart guides help you get started quickly, so you can get direct experience with and start using Aembit in your projects.
## How to use Aembit’s quickstart guides
[Section titled “How to use Aembit’s quickstart guides”](#how-to-use-aembits-quickstart-guides)
The quickstart guides are linear, meaning you should follow them in the order. Each guide builds on the previous one, so it’s important to follow them to get the most out of Aembit.
You can find the quickstart guides in the sidebar on the left, or you can use the following links to get started:
1. [Quickstart: Core setup](/get-started/quickstart/quickstart-core) - Get the core Aembit setup running.
2. [Quickstart: Add Access Policy](/get-started/quickstart/quickstart-access-policy) - Add access policy to your core Aembit setup.
# Quickstart: Add an Access Policy to the core setup
> Enhancing the Aembit quickstart guide to set up a Trust Provider, Access Conditions, and reporting
After completing the [Quickstart guide](/get-started/quickstart/quickstart-core) and setting up your sandbox environment, it’s time to enhance your Access Policies by integrating Trust Providers, Access Conditions, and reporting. These features enhance your workload security giving you finer control over how you grant access within your sandbox environment and provide you with insights about those interactions.
To build upon your quickstart foundation, you’ll complete practical steps to implement the following features:
* [Trust Provider](#configure-a-trust-provider) - This verifies workload identities, making sure only authenticated workloads can securely interact with your resources.
* [Access Conditions](#configure-access-conditions) - Enforce detailed rules such as time-based or geo-based restrictions, to tailor access policies to your needs.
* [Reporting](#reporting) - Tools to help you monitor and analyze workload interactions in your sandbox environment, providing insights into policy effectiveness and system health.
With these enhancements, Aembit empowers you to make the most of your sandbox setup and prepare for more advanced scenarios.
## Before you begin
[Section titled “Before you begin”](#before-you-begin)
You must have completed the following *before* starting this guide:
* [Aembit quickstart guide](/get-started/quickstart/quickstart-core) and it’s prerequisites.
## Configure a Trust Provider
[Section titled “Configure a Trust Provider”](#configure-a-trust-provider)
Trust Providers allow Aembit to verify workload identities without relying on traditional credentials or secrets. By using third-party systems for authentication, Trust Providers make sure that only verified workloads can securely interact with your resources. These steps use Docker Desktop Kubernetes deployments.
1. From your Aembit Tenant, go to **Access Policies** and select the Access Policy you created in the quickstart guide.
2. In the top right corner, click **Edit**.
3. In the **Trust Provider** section, hover over **+**, then click **New**.
* **Name** - QuickStart Kubernetes Trust Provider (or another user-friendly name).
* **Trust Provider** - Kubernetes Service Account
4. In the **Match Rules** section, click **+ New Rule**, then enter the following values:
* **Attribute** - `kubernetes.io { namespace }`.
* **Value** - `aembit-quickstart`.
5. Select **Upload Public Key**.
6. Browse for the `.pub` file or copy its contents and paste them into the **Public Key** field:
Obtain the public key specific to your environment.
Use the following locations for your operating system:
* **Windows** - `%USERPROFILE%\AppData\Local\Docker\pki\sa.pub`
* **macOS** - `~/Library/Containers/com.docker.docker/pki/sa.pub`
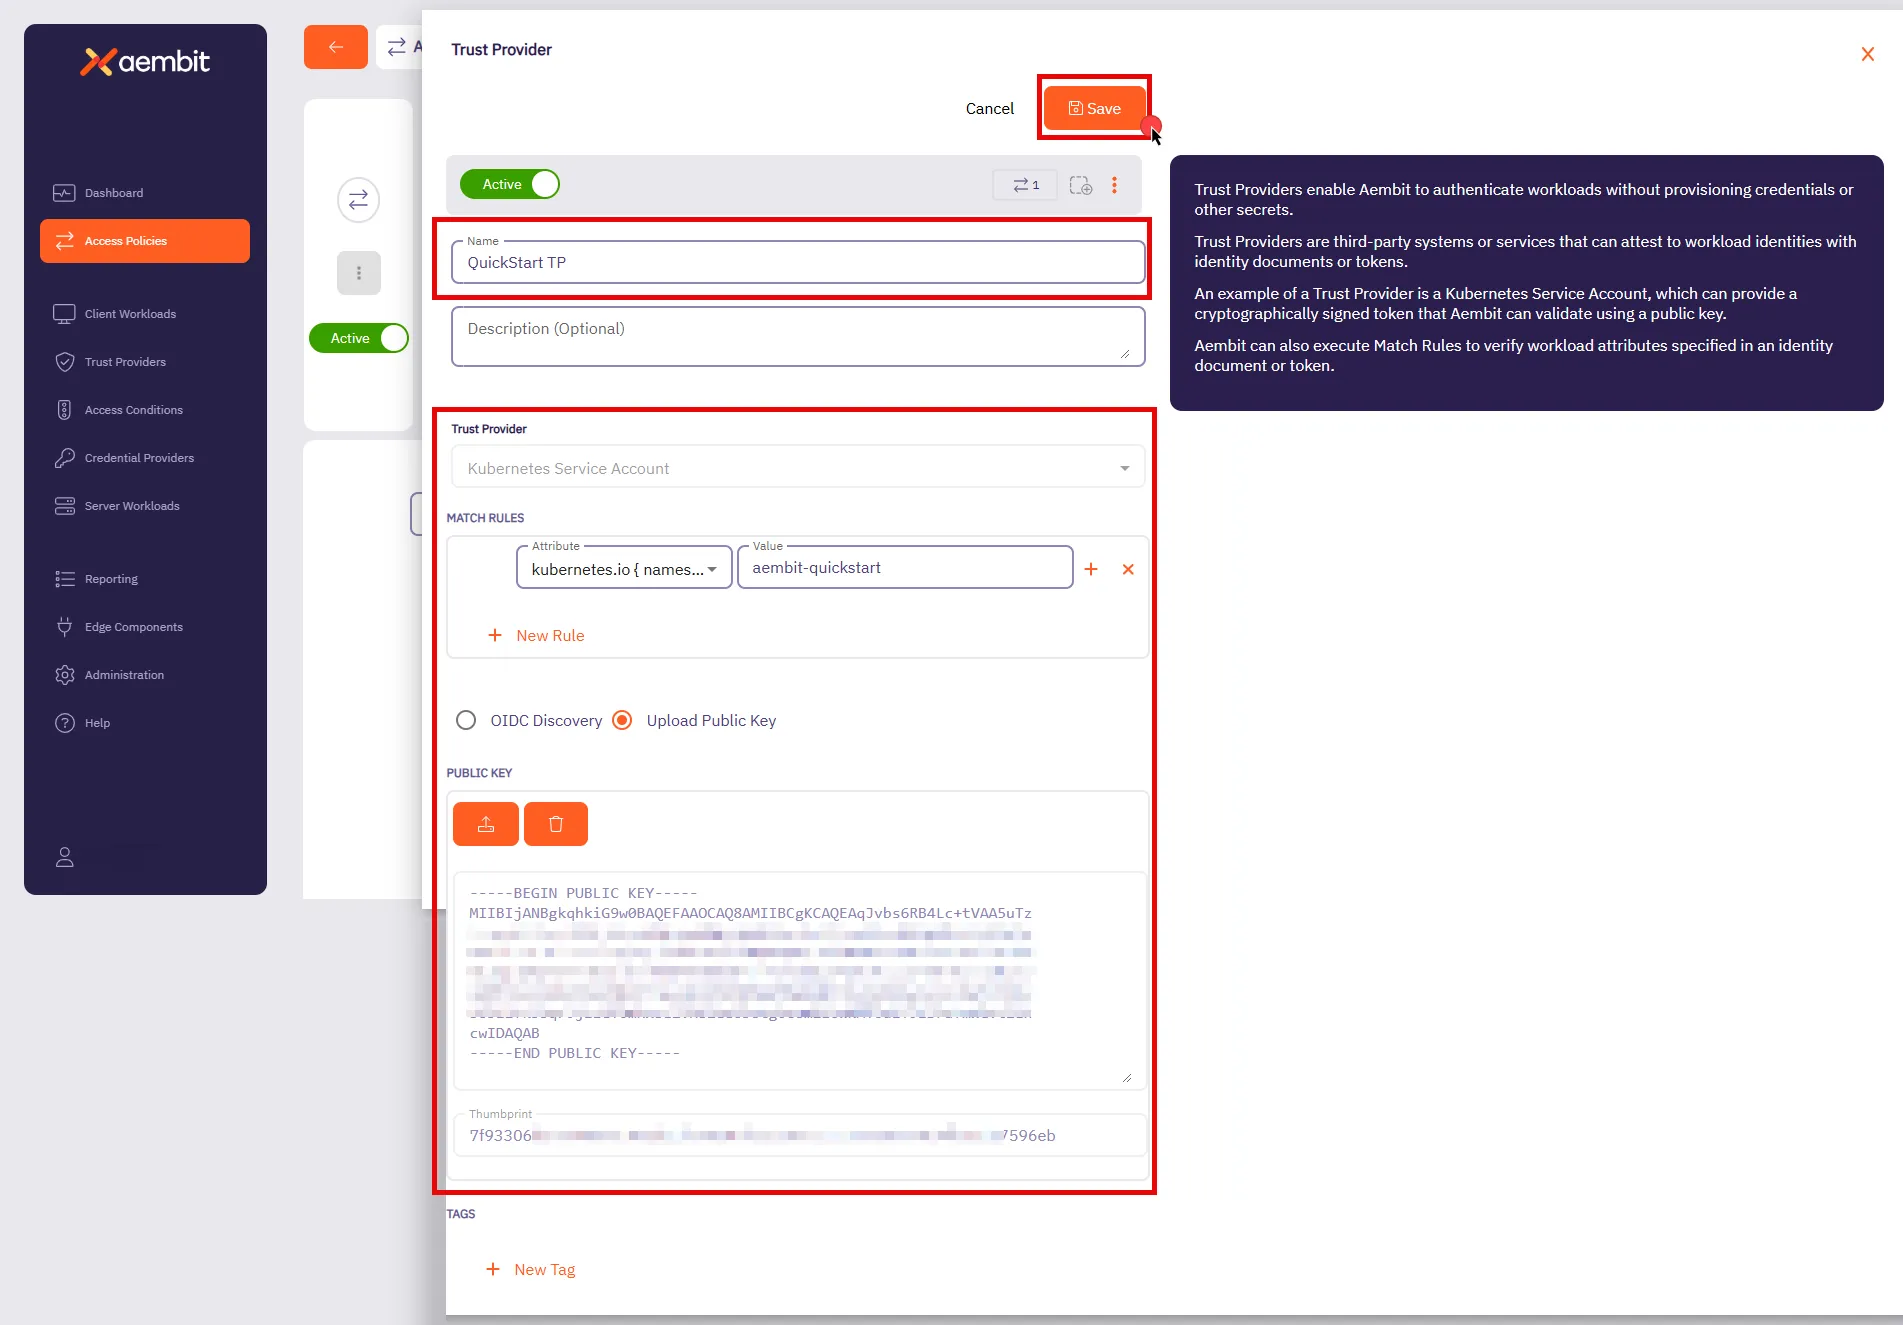
7. Click **Save**.
Aembit displays the **Access Policies** page.
8. Click **Save** in the top right corner to save the Access Policy.
Stay on this page to [Configure Access Conditions](#configure-access-conditions).
By associating this Trust Provider with an Access Policy, Aembit validates workload identities based on the rules you defined.
For example, Aembit automatically authenticates Kubernetes service accounts running in the `aembit-quickstart` namespace and denies accounts from all other namespaces. This makes sure that only workloads within that namespace can access your sensitive resources.
Aembit supports a wide variety of Trust Providers tailored for different environments:
* [Kubernetes Service Account](/user-guide/access-policies/trust-providers/kubernetes-service-account-trust-provider)
* [AWS roles](/user-guide/access-policies/trust-providers/aws-role-trust-provider)
* [Azure Metadata Service](/user-guide/access-policies/trust-providers/azure-metadata-service-trust-provider)
This flexibility allows you to seamlessly integrate Trust Providers that align with your existing infrastructure. For more details on Trust Providers, including advanced configurations and other types, see [Trust Provider Overview](/user-guide/access-policies/trust-providers/add-trust-provider) and related sub-pages.
## Configure Access Conditions
[Section titled “Configure Access Conditions”](#configure-access-conditions)
Access Conditions allow you to define specific rules to control when and how Aembit issues credentials to Server Workloads. Access Conditions strengthen security by making sure Aembit grants access only when the Access Conditions aligns with your organization’s policies.
Paid feature
Access Conditions are a paid feature. To enable this feature, contact [Aembit Support](https://aembit.io/support/).
1. In the top right corner of the **Access Policies** page, click **Edit**.
2. In the **Access Condition** section, hover over **+**, then click **New**.
* **Name** - QuickStart Time Condition (or another user-friendly name).
* **Integration** - Aembit Time Condition
3. In the **Conditions** section, select the appropriate timezone for your condition.
4. Click the **+** icon next to each day you want to include in your Time Condition configuration, such as Monday from 8 AM to 5 PM.
Include your current time
Make sure your current time falls within the period you set so the condition remains in effect while following this guide.
5. Click **Save**.
Aembit displays the **Access Policies** page.
6. Click **Save** in the top right corner to save the Access Policy.
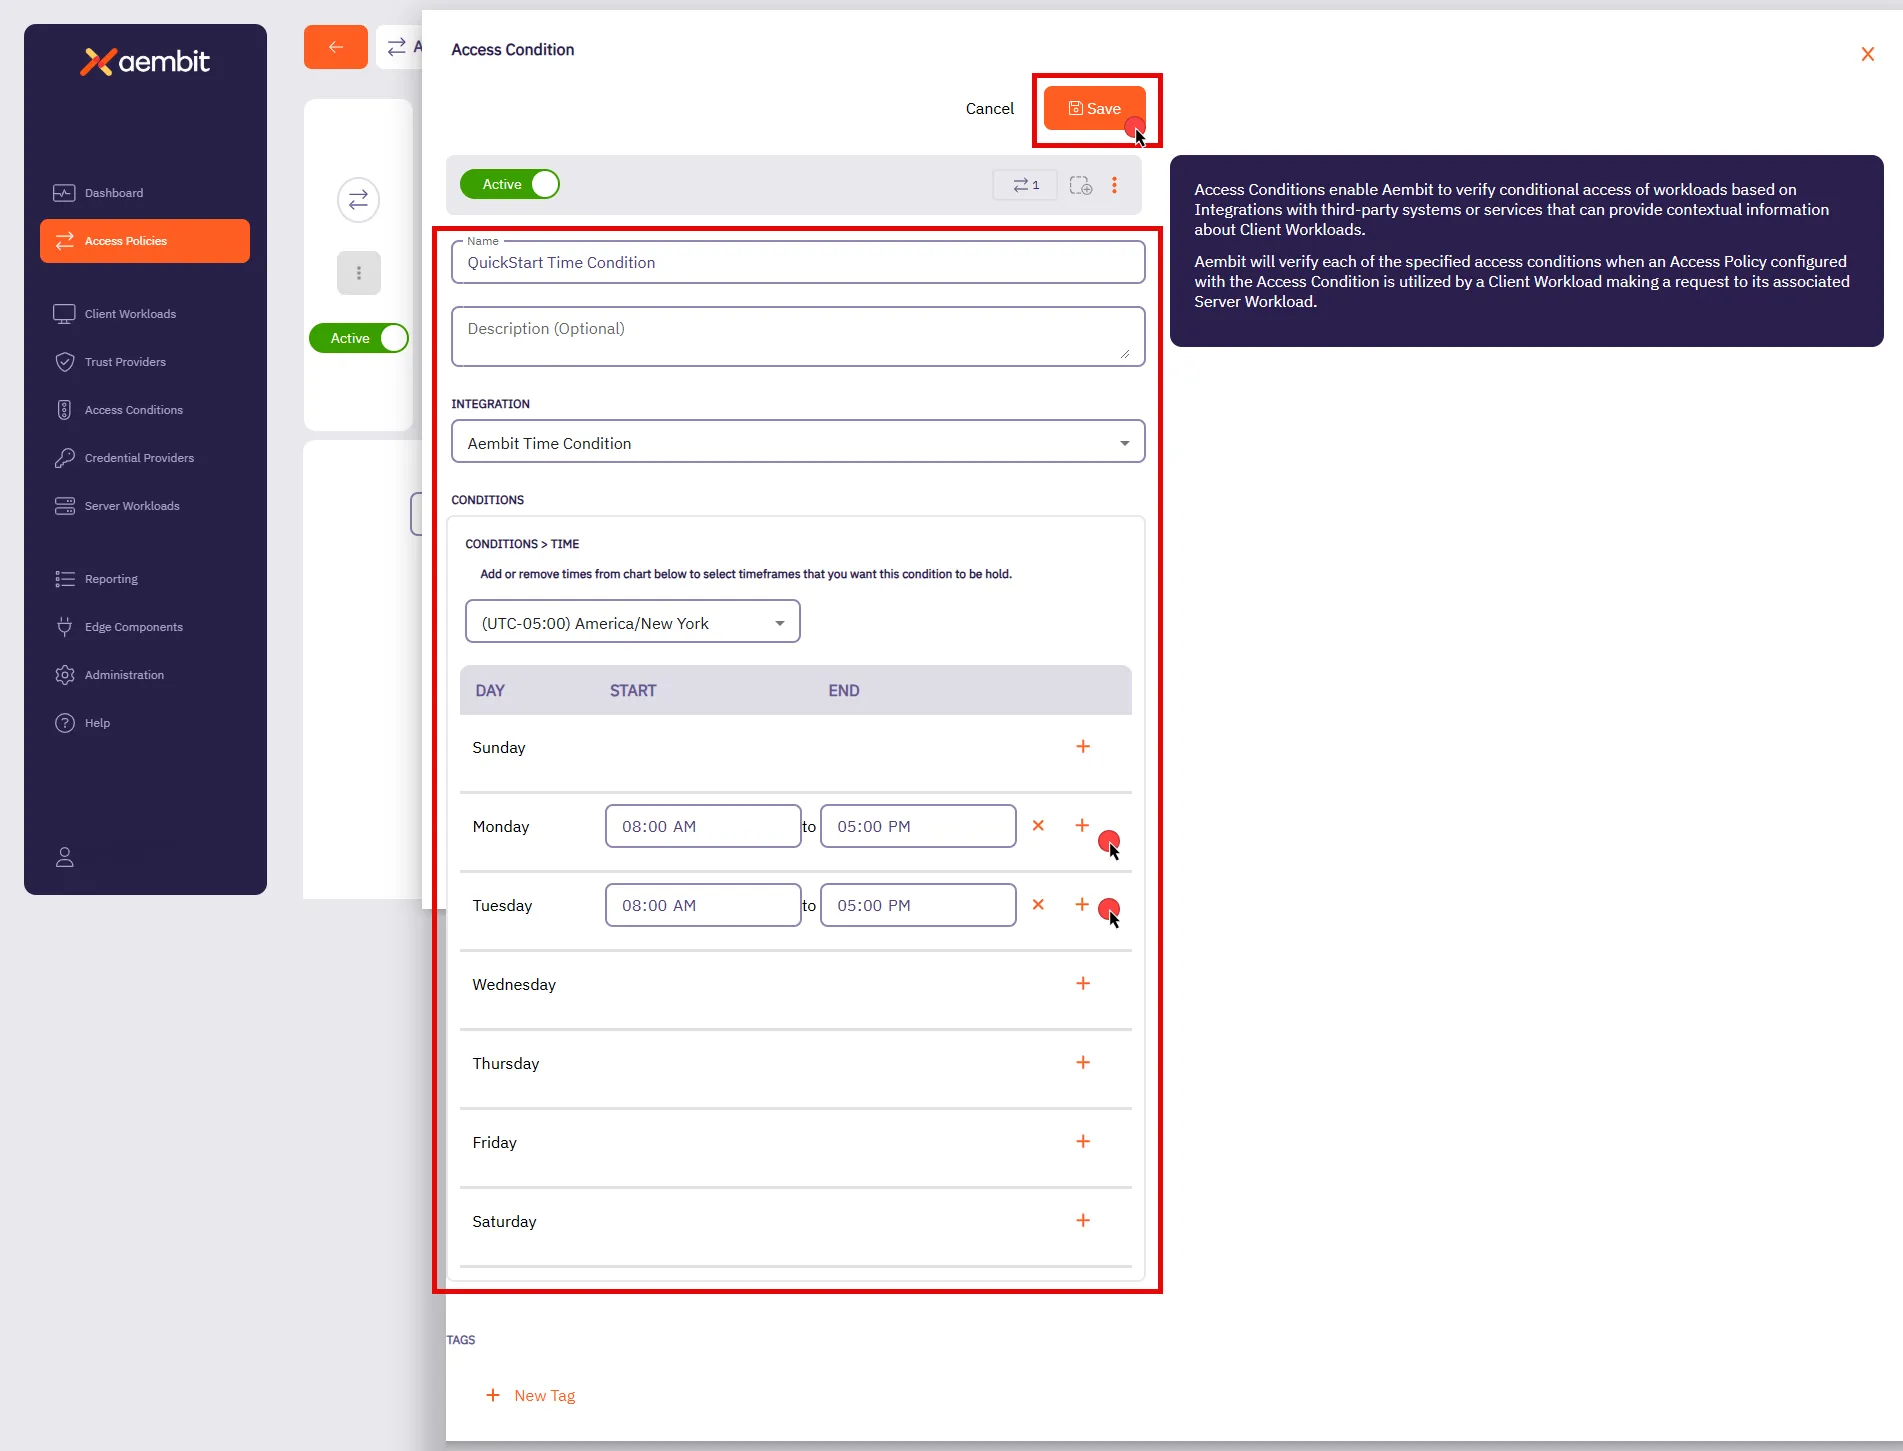
With this configuration, Aembit grants access to the workloads you specified only during the days and timeframes you defined. If the conditional access check fails, Aembit denies access, and an displays an error message on the client workload. Aembit logs this action and detailed information about the failure, including the `accessConditions` field with an `Unauthorized` result, which you can find in the associated logs.
In the next section, [Reporting](#reporting), you’ll see how to review these logs.
Aembit also supports other types of Conditional Access configurations, such as [GeoIP restrictions](/user-guide/access-policies/access-conditions/aembit-geoip) and integrations with third-party vendors such as [CrowdStrike](/user-guide/access-policies/access-conditions/crowdstrike). These options allow you to build comprehensive and flexible access policies suited to your organization’s needs. For more details on Access Conditions, see [Access Conditions Overview](/user-guide/access-policies/access-conditions/) and explore related sub-pages to configure additional types.
## Reporting
[Section titled “Reporting”](#reporting)
Reporting is crucial for maintaining security and operational efficiency. It provides a clear view of access attempts, policy evaluations, and credential usage, enabling you to identify potential issues and maintain compliance.
To access the Reporting Dashboard, in your Aembit Tenant, select **Reporting** from the left sidebar menu. By default, you’ll see the **Access Authorization Events** page, where you can review event details related to workload access attempts.
In the top ribbon menu, there are three key reporting categories:
* **Access Authorization Events** - View event logs for all access attempts. Each event details its evaluation stages, showing which Access Policies Aembit applied, whether they succeeded, and the reason for any failures.
* **Audit Logs** - Track system changes, such as user actions, configuration updates, or policy changes.
* **Workload Events** - Monitor events generated from the traffic between Client Workloads and Server Workloads. These events provide detailed information about all requests and responses, helping you analyze workload interactions comprehensively.
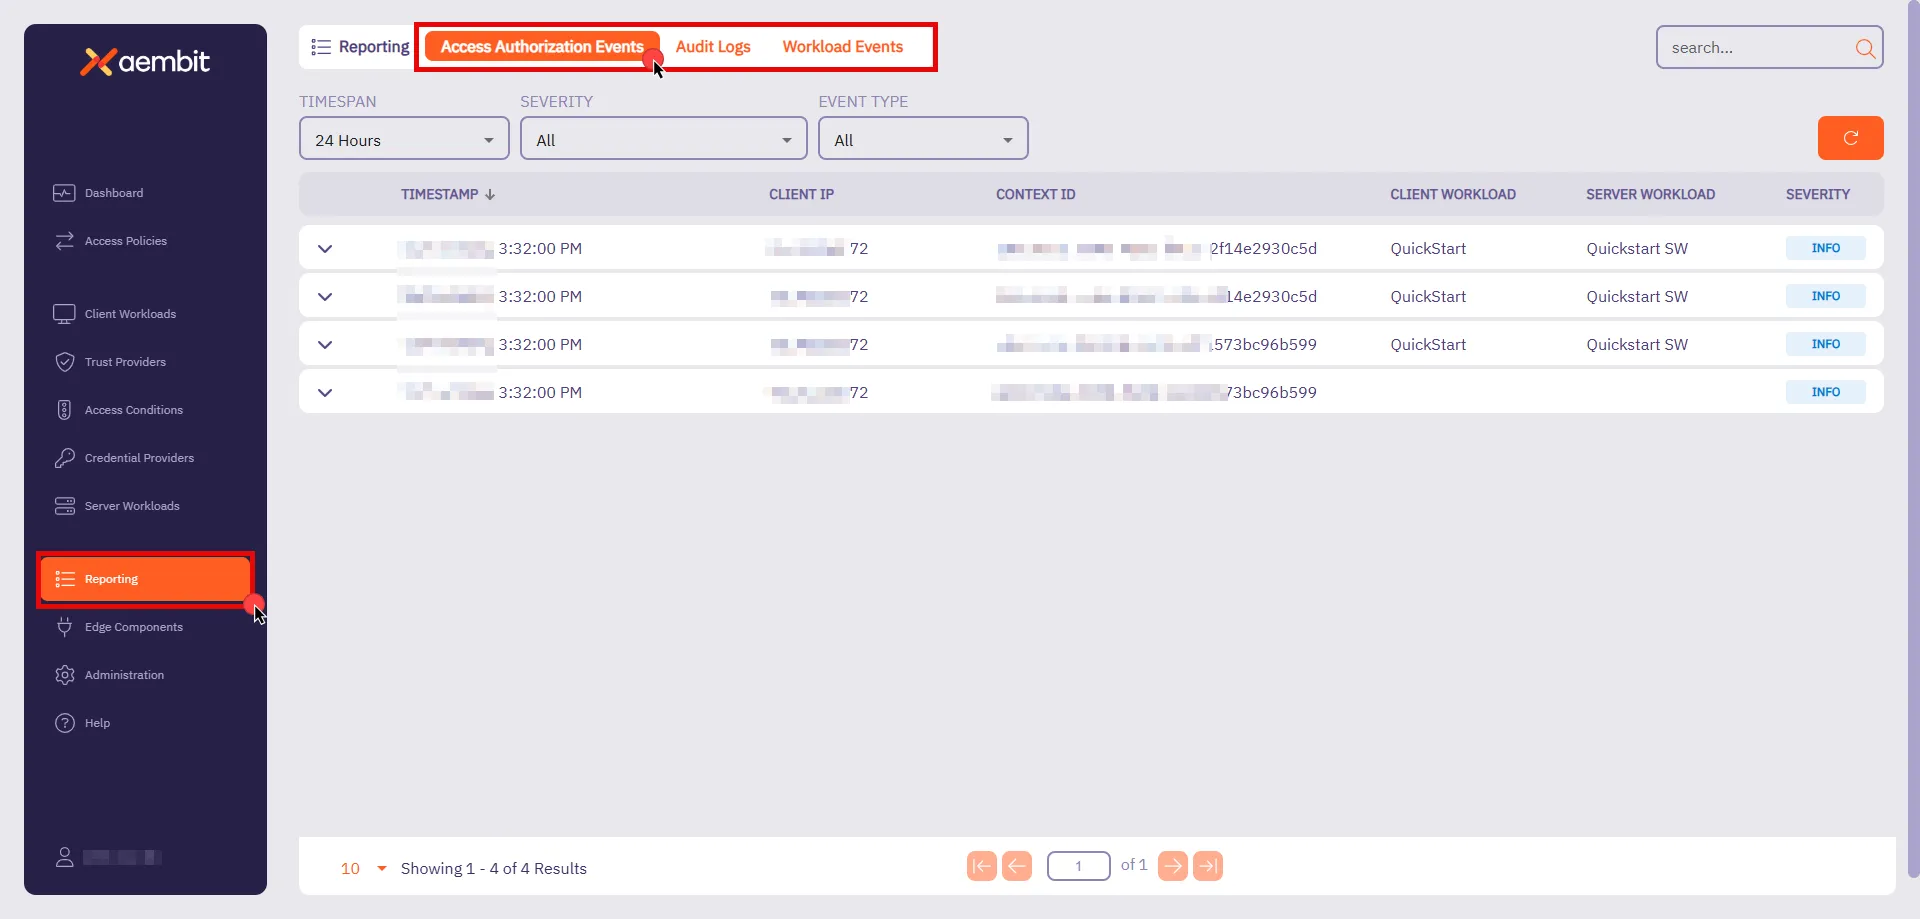
You also have filters available to you to narrow down your view by **Timespan**, **Severity**, and **Event Type**. These filters help you analyze events more efficiently, focusing on specific time periods or issues that require your attention.
For now, you’ll look at **Access Authorization Events**. As they provide essential insight into how Aembit evaluates access requests.
### Access Authorization Events
[Section titled “Access Authorization Events”](#access-authorization-events)
Whenever a Client Workload attempts to access a Server Workload, Aembit generates Access Authorization Events. These events capture access attempts, log how Aembit evaluated access, and display the outcome (granted or denied). The process has three stages:
* **Access Request** - Captures initial request details, including source, target, and transport protocol.
* **Access Authorization** - Evaluates the request against Access Policies, detailing results from Trust Providers, Access Conditions, and Credential Providers.
* **Access Credential** - Shows how Aembit retrieved and injected credentials, or explains any failure reasons.
To review these stages, follow these steps:
1. **Filter by Request** - In the filtering options, locate the **Event Type** and select **Request**. Then, click an event in the list to inspect it.
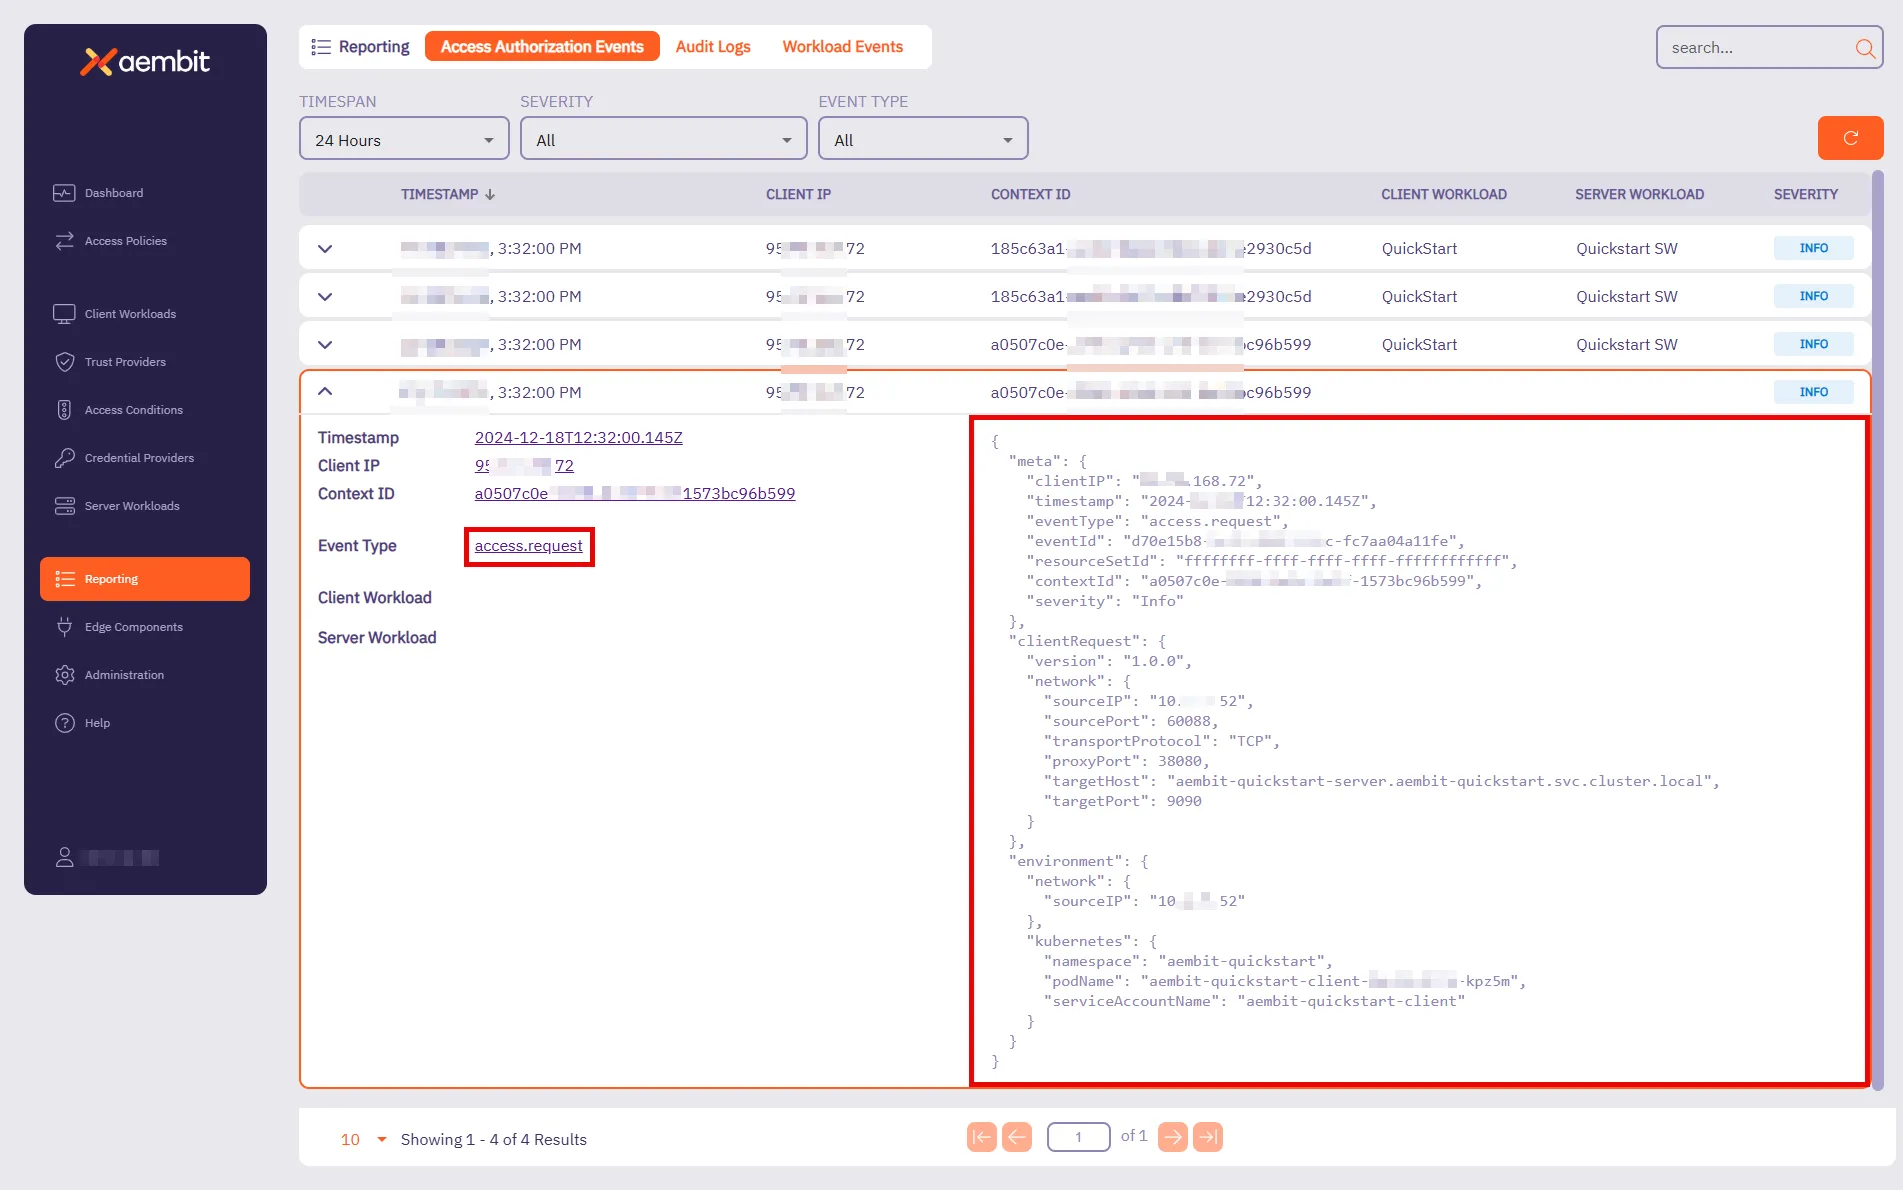
This event provides key details about the connection attempt. It shows when the request happened, where it’s coming from, and which workload made the request. For the quickstart, you should see:
* **Target Host** - `aembit-quickstart-server.aembit-quickstart.svc.cluster.local`
* **Service Account** - `aembit-quickstart-client`
Both should match what you configured in the Access Policy.
2. Filter by **Authorization** - Change the **Event Type** filter to **Authorization** and select an event from the list.
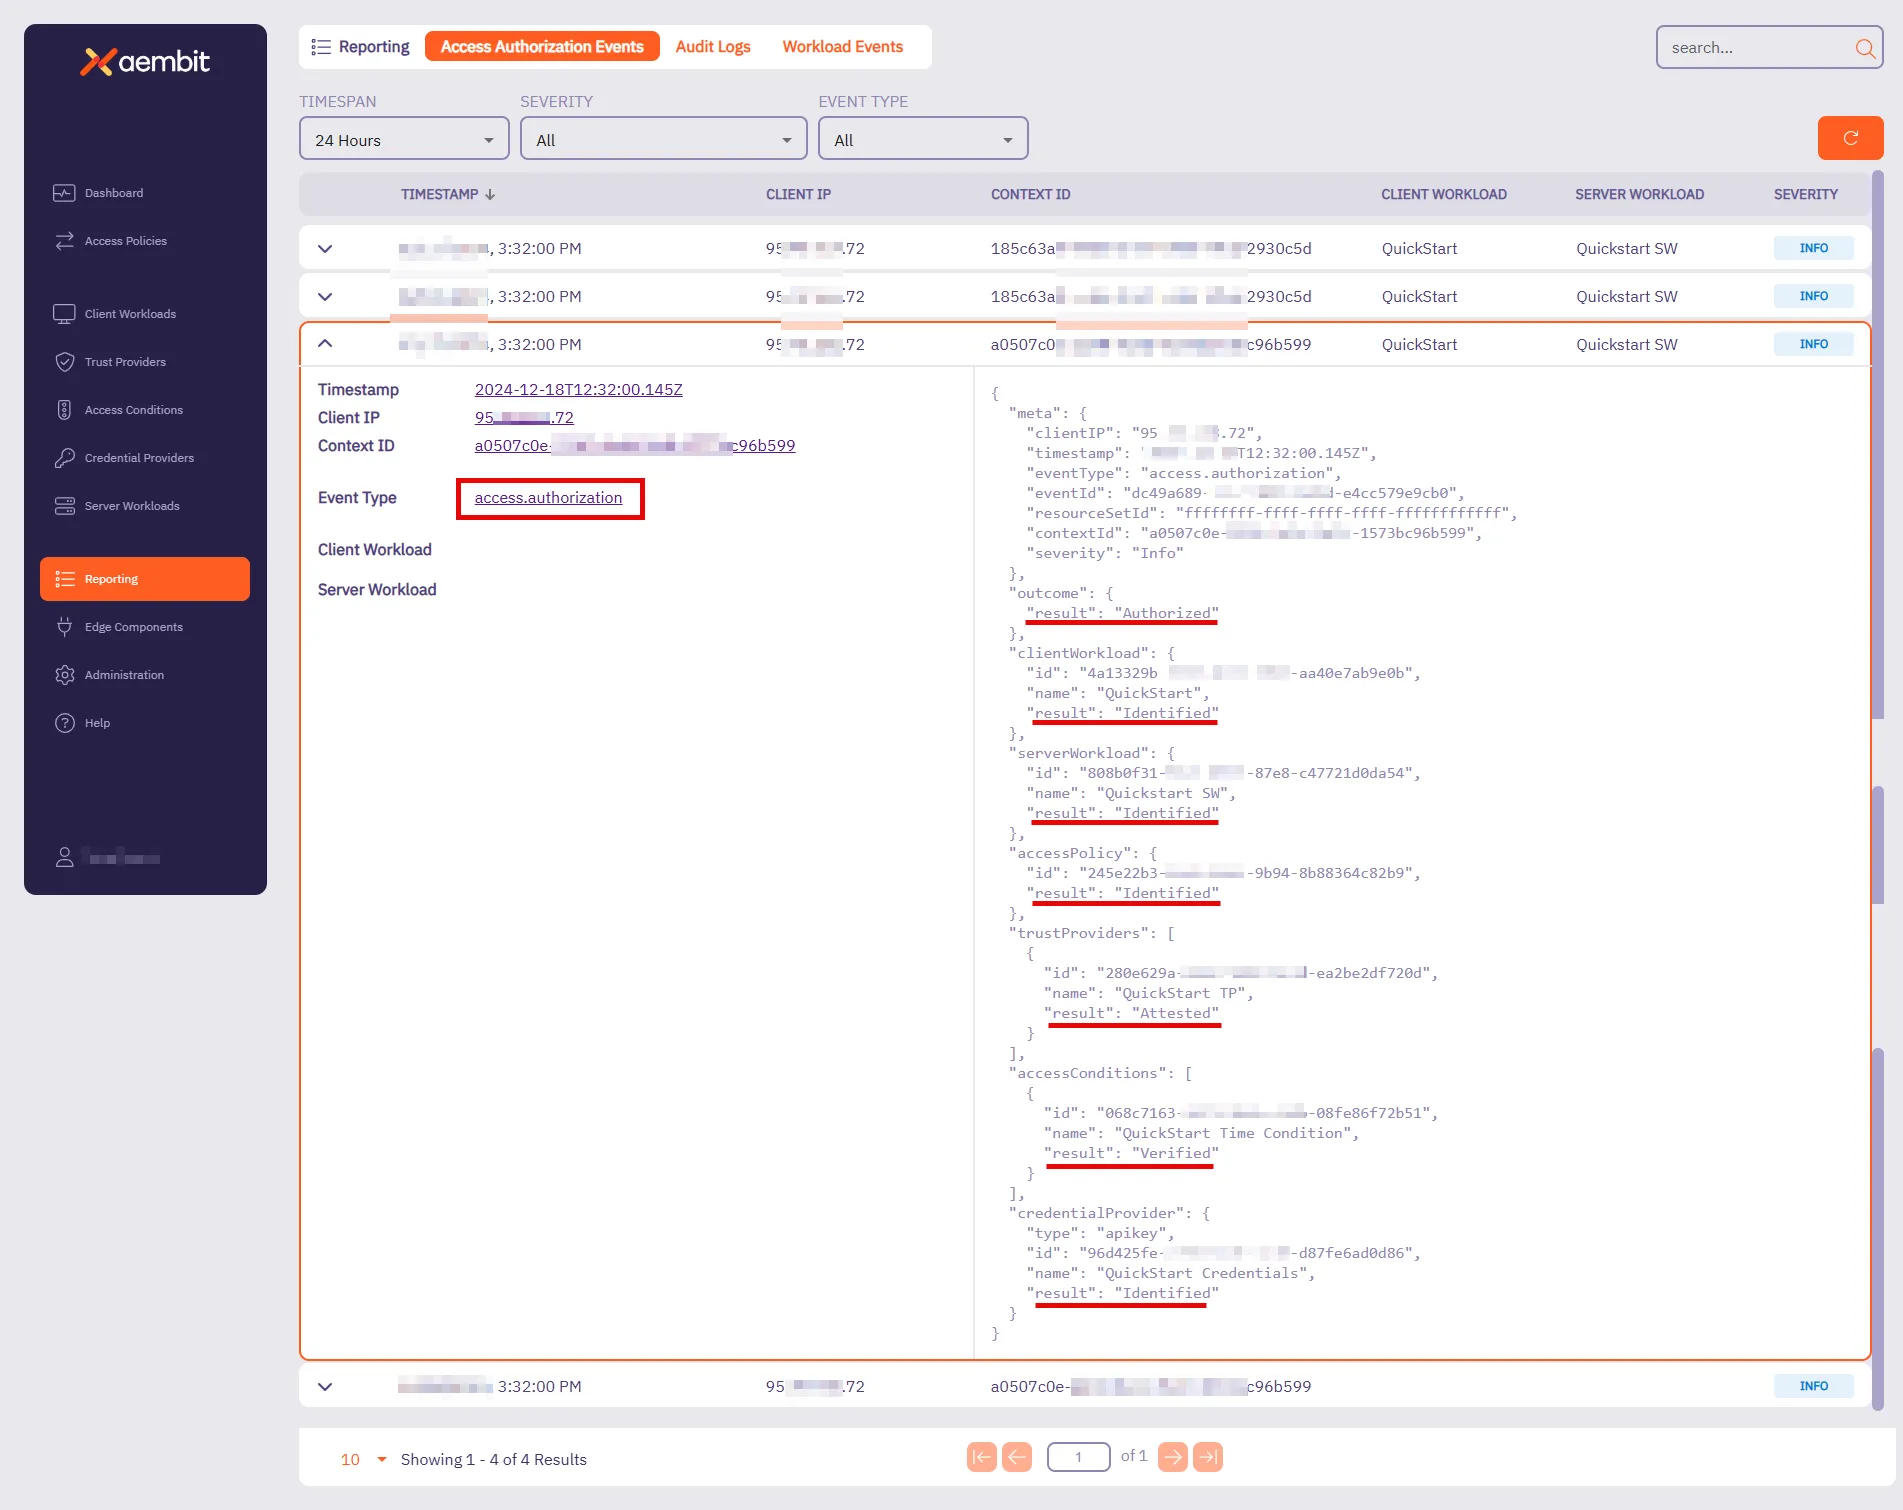
This event shows how Aembit evaluated access against the Access Policy. It displays the result (**Authorized** or **Unauthorized**) and highlights key components that Aembit checked. For the quickstart sandbox environment, you’ll see that Aembit successfully:
* Identified the Client Workload, Server Workload, and Access Policy.
* Attested the Trust Provider.
* Verified the Access Condition.
* Identified the Credential Provider.
When Aembit successfully identifies and verifies these components, Aembit grants access to that Client Workload.
3. **Filter by Credential** - Change the **Event Type** filter to **Credential** and select an event from the list.
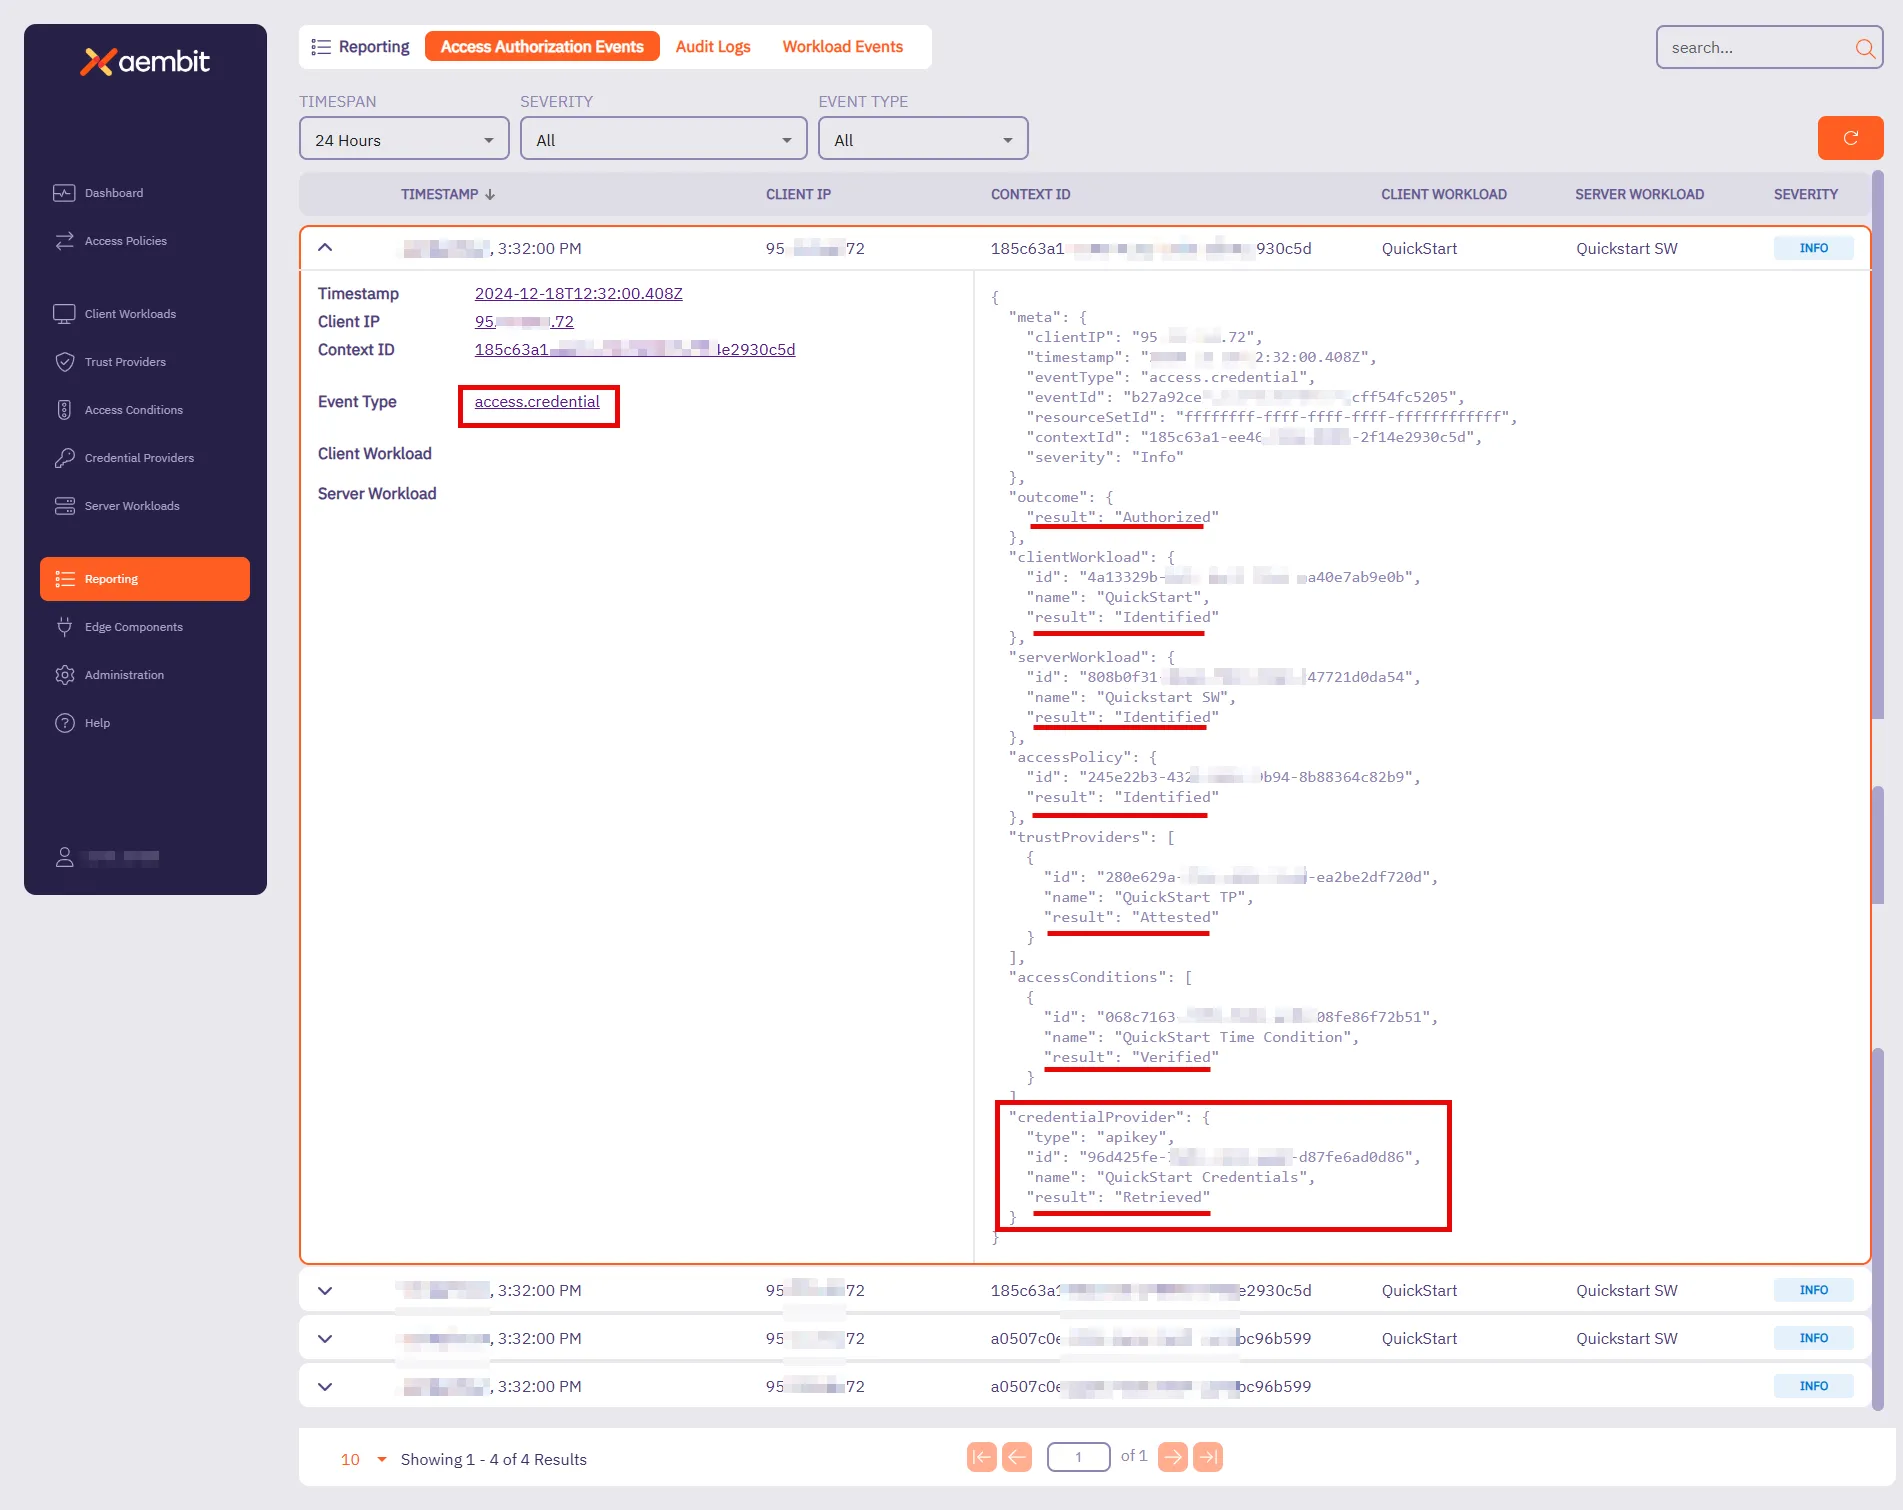
This event tracks how Aembit retrieves credentials to enable access. It shows whether Aembit was successful in retrieving the credential and which Credential Provider Aembit used.
For the quickstart sandbox environment, you’ll see that Aembit successfully:
* Identified the Client Workload, Server Workload, and Access Policy.
* Retrieved the Credential Provider, verifying that the Client Workload had the required credentials for secure access.
At this stage, everything is in place—the request was successfully authorized, credentials were securely retrieved, and the Client Workload can now access the Server Workload.
For more detailed insights into Access Credential Events and other reports, visit the [Reporting](/user-guide/audit-report/) page. These pages provide further guidance on using filters, understanding event data, and troubleshooting potential issues.
Quickstart completed!
Congratulations on completing the quickstart! You now have a solid foundation in Aembit’s key capabilities. This is just the beginning—Aembit has much more to offer! Aembit’s full documentation provides in-depth guides and advanced techniques to help you expand your access policies and strengthen workload identity management.
For your next steps, you can either try configuring Aembit with your real client workloads or explore additional possibilities to tailor it to your needs. In both cases, see the following resources:
* **Server Workload Cookbook** - Offers ready-to-use recipes for popular APIs and services. Explore guides such as [Salesforce REST](/user-guide/access-policies/server-workloads/guides/salesforce-rest) and [GitHub REST](/user-guide/access-policies/server-workloads/guides/github-rest) to learn how to authorize secure access to these resources.
* **Exploring Deployment Models** - Aembit supports diverse deployment environments beyond Kubernetes. For detailed examples and guidance, visit the [Support Matrix](/reference/support-matrix) and explore related sub-pages to learn about configuring deployments for specific environments like [Virtual Machines](/user-guide/deploy-install/virtual-machine/), [AWS Lambda Containers](/user-guide/deploy-install/serverless/aws-lambda-container), and more.
Check out these guides and more to optimize your workloads with confidence!
## Next steps
[Section titled “Next steps”](#next-steps)
* [Core concepts](/get-started/concepts/) - Understand Aembit’s core concepts and how they work together.
* [Aembit User Guide](/user-guide/) - Dive deeper into Aembit’s features and capabilities.
* [Aembit API Guide](/api-guide/) - Access detailed technical documentation.
# Quickstart: Aembit core setup
> Aembit's quickstart core guide - practical experience automating and securing access between workloads
Aembit is a cloud-native, non-human identity and access management platform that provides secure, seamless access management for workloads across diverse environments. It simplifies how organizations control and authorize access between client and Server Workloads, ensuring that only the right workloads can access critical resources at the right time.
Aembit shifts the focus away from long-term credential management by enabling automated, secure access management for workloads connecting to services. By concentrating on managing access rather than secrets, Aembit provides a flexible and security-first approach to non-human identity across a wide range of infrastructures.
## In this guide
[Section titled “In this guide”](#in-this-guide)
This quickstart guide provides a practical introduction to Aembit’s capabilities. Here’s what you’ll do:
1. Set up a sandbox environment with pre-configured client and Server Workloads using Docker Desktop with Kubernetes.
2. Deploy workloads and configure a secure Access Policy between the client and server.
3. Gain practical experience managing automated, secure access between workloads.
**Estimated Time to Complete** - \~15 minutes (if prerequisites are already installed).
By completing this quickstart guide, you’ll have practical experience creating an example of Aembit’s capabilities—ensuring quick results as you implement access management in a real-world environment. Once you are comfortable with these foundational steps, Aembit offers the flexibility to manage access for more complex and scalable workloads across a range of infrastructure setups.
## Before you begin
[Section titled “Before you begin”](#before-you-begin)
Before starting Aembit’s quickstart guide, you must complete the following prerequisites:
1. [Sign up with Aembit](#sign-up-with-aembit) and you can access your Aembit Tenant at `https://.aembit.io`.
2. [Install Docker Desktop and enable Kubernetes](#install-docker-desktop-and-enable-kubernetes).
3. [Install Helm](#install-helm).
Note
The Aembit quickstart guide doesn’t require complex network configurations, such as a static external IP, outbound connection adjustments, or firewall rule changes. Aembit has designed these prerequisites to work securely and seamlessly within your local environment.
### Sign up with Aembit
[Section titled “Sign up with Aembit”](#sign-up-with-aembit)
Visit the [Sign Up page](https://useast2.aembit.io/signup) to create an account and set up your tenant for accessing the platform.
A Tenant in Aembit is your organization’s dedicated workspace within the platform. It isolates your workloads, Access Policies, and configurations, enabling you to manage your environment securely and efficiently.
Your Aembit Tenant ID is a unique identifier for your workspace, which you must use to access your Aembit Tenant at `https://.aembit.io`.
Look for a welcome email from Aembit. It may take a few minutes; check your Junk or Spam folders if you don’t see it.
### Install Docker Desktop and enable Kubernetes
[Section titled “Install Docker Desktop and enable Kubernetes”](#install-docker-desktop-and-enable-kubernetes)
Docker Desktop includes Docker Engine and Kubernetes, making it easier to manage your containerized applications.
1. Download and install Docker Desktop from the [official Docker website](https://docs.docker.com/get-started/get-docker/) for your operating system.
Once installed, open Docker Desktop.
2. Enable Kubernetes by going to **Settings -> Kubernetes** in Docker Desktop and toggling the **Enable Kubernetes** switch to the **On** position.
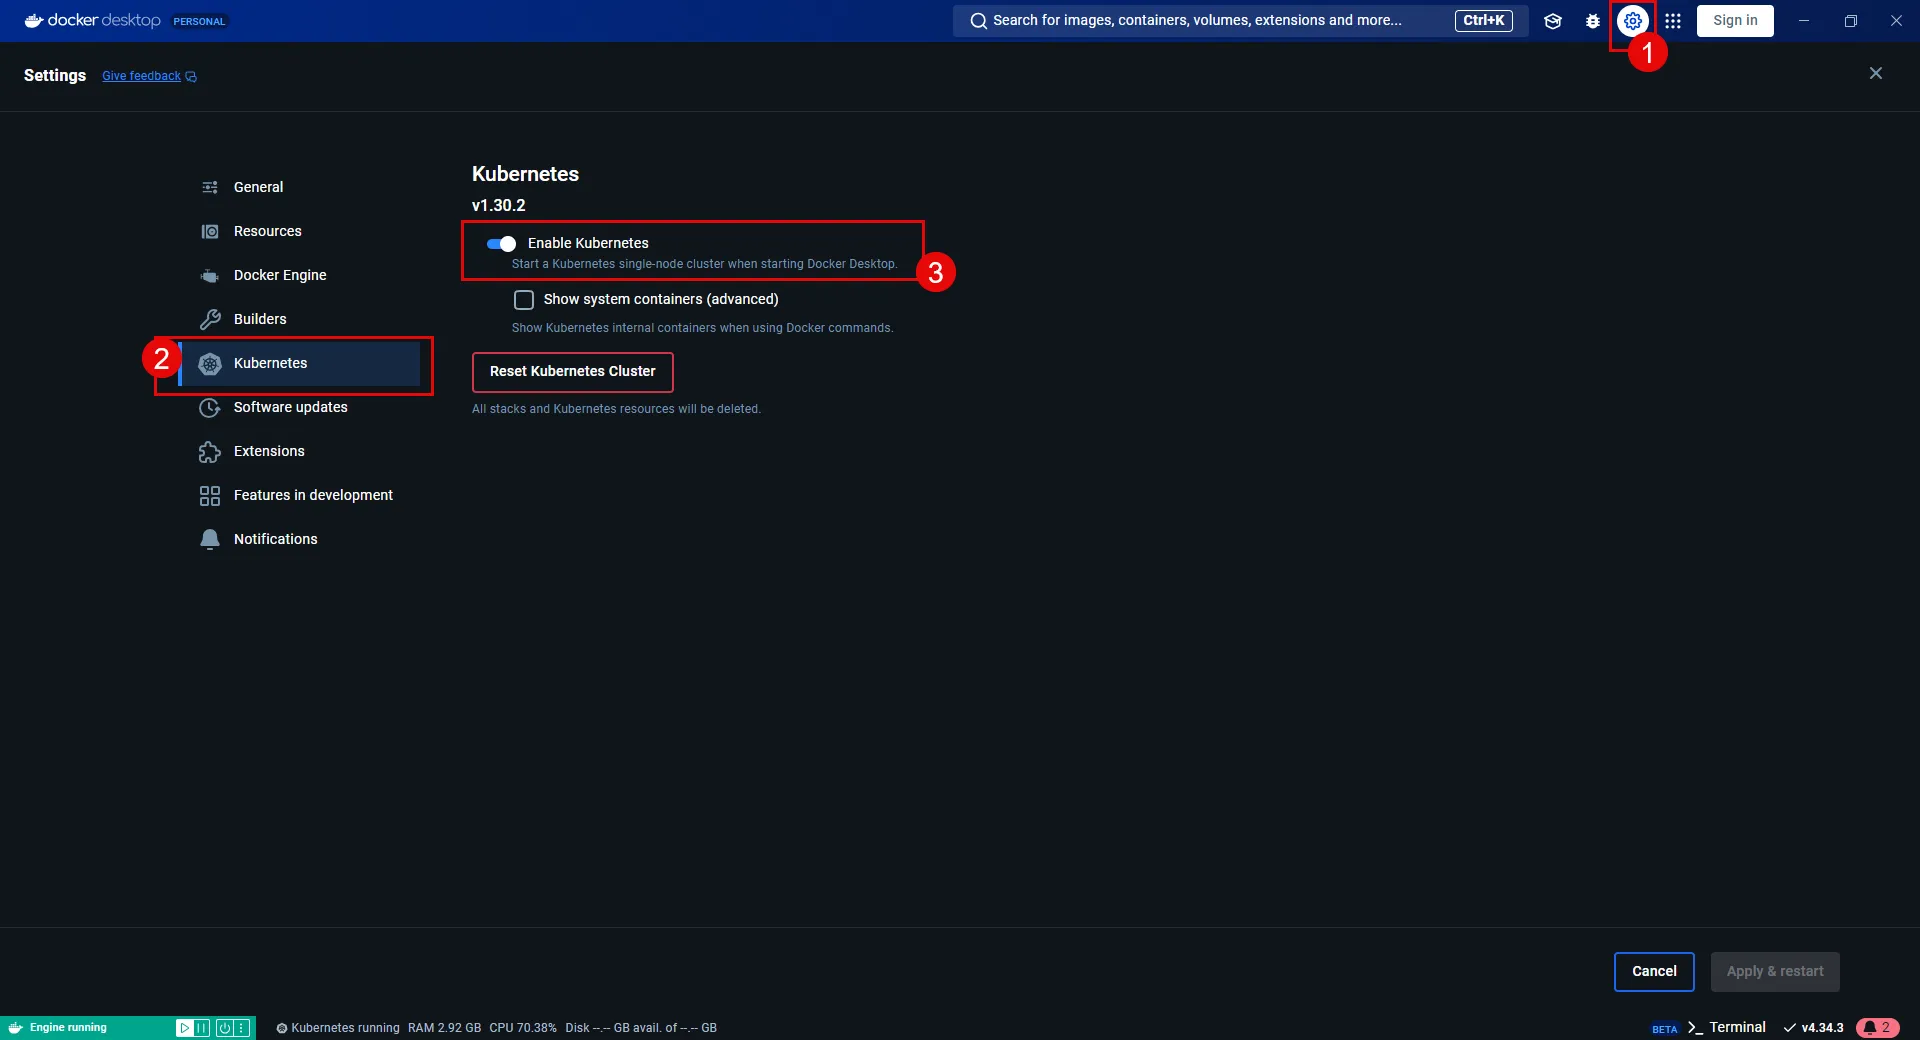
Security best practice
If you get errors or warnings about permissions on your `~/.kube/config` file being too permissive, tighten up the file’s permissions by running the following command:
```shell
chmod 600 ~/.kube/config
```
Locking down permissions on your `~/.kube/config` file is a security best practice since the config file contains sensitive credentials for accessing Kubernetes clusters.
### Install Helm
[Section titled “Install Helm”](#install-helm)
Helm deploys the pre-configured sandbox client and Server Workloads for this quickstart guide. A basic understanding of [Helm commands](https://helm.sh/docs/helm/) is helpful for deploying the sandbox workloads.
Select one of the following tabs for your operating system to install Helm:
* Windows
1. Download the [latest Helm version](https://github.com/helm/helm/releases) for Windows.
2. Run the installer and follow the on-screen instructions.
3. Once installed, open a Command Prompt or PowerShell terminal and verify the installation by running:
```cmd
helm version
```
**Expected Output:**
```cmd
version.BuildInfo{Version:"v3.x.x", GitCommit:"xxxxxxxxxxxxxxxxxxxxxxxxxxxxxxx", GitTreeState:"clean", GoVersion:"go1.x.x"}
```
* macOS
1. Use Homebrew to install Helm:
```shell
brew install helm
```
2. Verify the installation:
```shell
helm version
```
**Expected Output:**
```shell
version.BuildInfo{Version:"v3.x.x", GitCommit:"xxxxxxxxxxxxxxxxxxxxxxxxxxxxxxx", GitTreeState:"clean", GoVersion:"go1.x.x"}
```
* Linux
1. Download and install the latest Helm binary:
```shell
curl -fsSL -o get_helm.sh "https://raw.githubusercontent.com/helm/helm/main/scripts/get-helm-3"
chmod 700 get_helm.sh
./get_helm.sh
```
2. Verify the installation:
```shell
helm version
```
**Expected Output:**
```shell
version.BuildInfo{Version:"v3.x.x", GitCommit:"xxxxxxxxxxxxxxxxxxxxxxxxxxxxxxx", GitTreeState:"clean", GoVersion:"go1.x.x"}
```
With these prerequisites complete, you are ready to deploy the sandbox workloads and configure secure access between workloads.
## Deploying workloads
[Section titled “Deploying workloads”](#deploying-workloads)
Make sure that your environment is ready for deployment by verifying the following:
* [Docker Desktop installed and Kubernetes enabled](#install-docker-desktop-and-enable-kubernetes).
* [Helm installed and configured correctly](#install-helm).
With these steps in place, you are ready to deploy the workloads.
### Install applications
[Section titled “Install applications”](#install-applications)
1. From your terminal, add the Aembit Helm chart repo by running:
```shell
helm repo add aembit https://helm.aembit.io
```
2. Deploy both the client and Server Workloads:
```shell
helm install aembit-quickstart aembit/quickstart \
-n aembit-quickstart \
--create-namespace
```
### Verify deployments
[Section titled “Verify deployments”](#verify-deployments)
After deploying the applications, verify that everything is running correctly using the following commands:
1. Check the Helm release status:
```shell
helm status aembit-quickstart -n aembit-quickstart
```
**Expected Output:**
```shell
NAME: aembit-quickstart
LAST DEPLOYED: Wed Jan 01 10:00:00 2025
NAMESPACE: aembit-quickstart
STATUS: deployed
REVISION: 1
TEST SUITE: None
```
2. List all resources in the namespace:
```shell
kubectl get all -n aembit-quickstart
```
**Expected Output:**
```shell
NAME READY STATUS RESTARTS AGE
pod/aembit-quickstart-client-abcdef 1/1 Running 0 1m
pod/aembit-quickstart-server-abcdef 1/1 Running 0 1m
NAME TYPE CLUSTER-IP EXTERNAL-IP PORT(S) AGE
service/aembit-quickstart-client NodePort 10.109.109.55 8080:30080/TCP 1m
service/aembit-quickstart-server NodePort 10.109.104.236 9090:30090/TCP 1m
```
These outputs help you confirm that you’ve deployed the workloads and services correctly and are functioning as expected.
### Interacting with the applications
[Section titled “Interacting with the applications”](#interacting-with-the-applications)
In this section, you are going to interact with the pre-configured applications. This interaction demonstrates that the Client Workload can connect to the Server Workload but lacks the credentials to authenticate to it.
1. With the client and Server Workloads running, open the [**Client Workload**](http://localhost:30080)
2. Click **Get Data**.
**you’ll receive a failure response** since you haven’t deployed Aembit Edge, nor has Aembit injected the necessary credentials for the Client Workload to access the Server Workload yet.
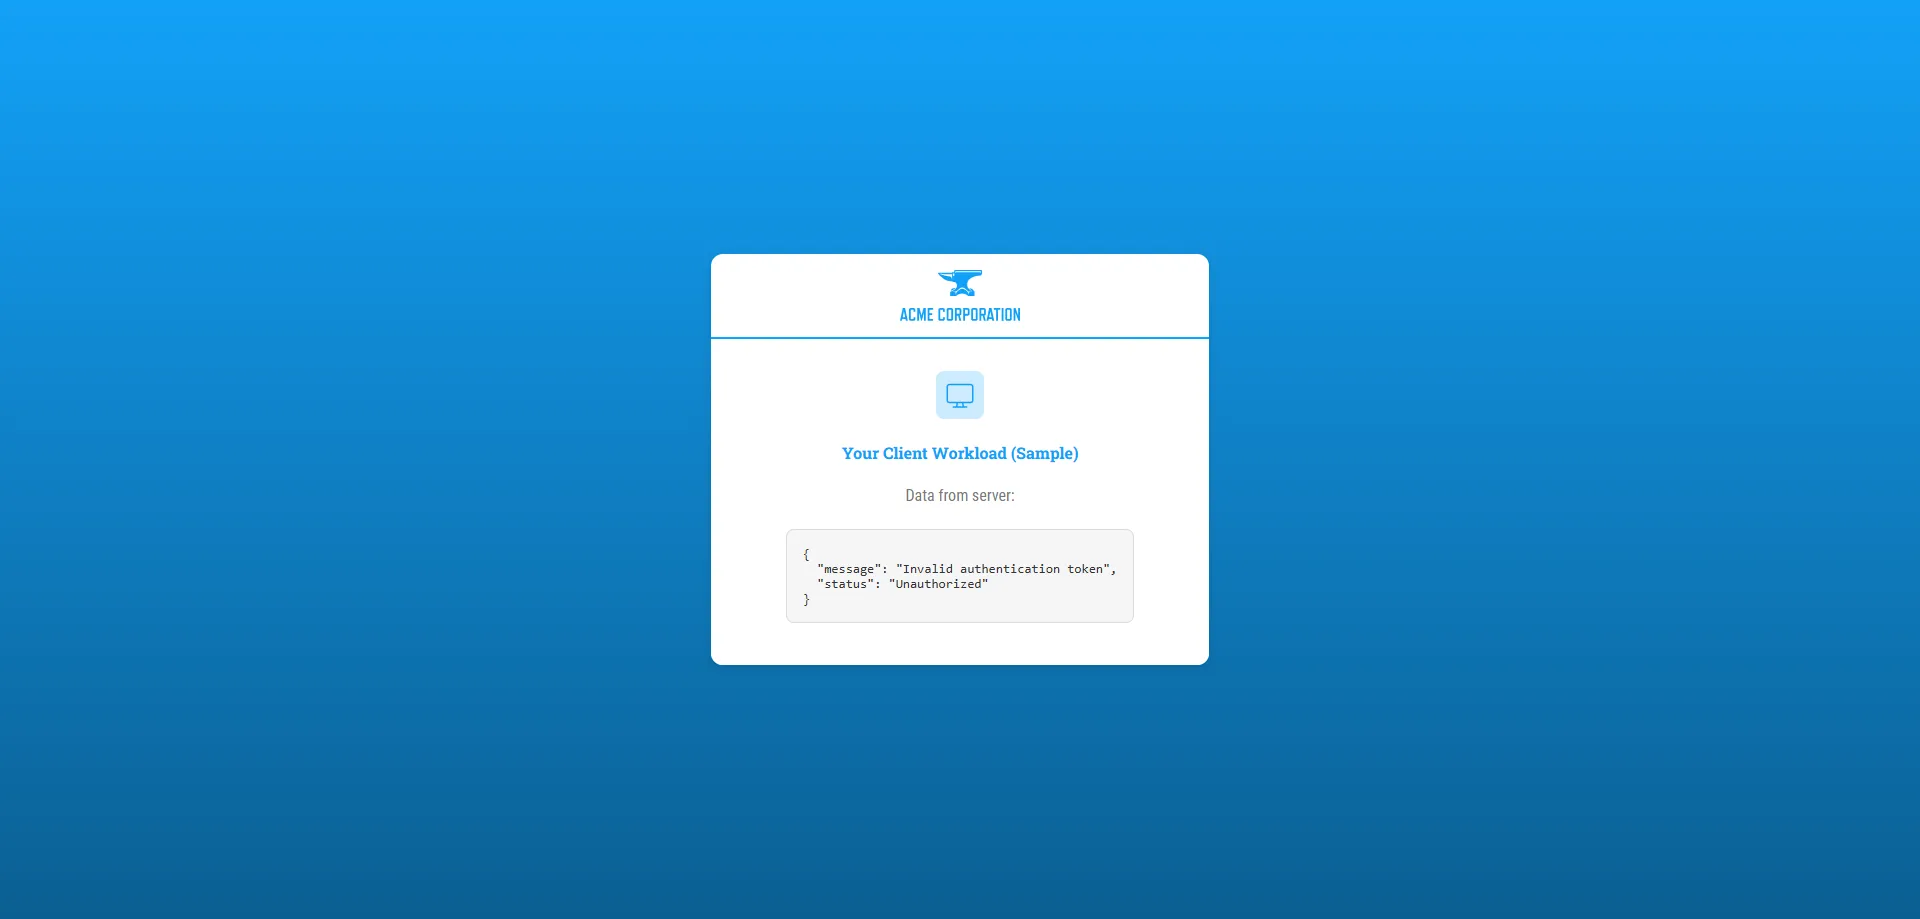
In the next sections, you’ll deploy Aembit Edge. Making it so that Aembit automatically acquires and injects the credential on behalf of the Client Workload so it can then access the Server Workload.
## Deploying Aembit Edge
[Section titled “Deploying Aembit Edge”](#deploying-aembit-edge)
With your workloads deployed, it’s time to integrate Aembit Edge into your system.
Aembit Edge consists of components that customers install within their environment. These components form the core of Aembit’s Workload IAM functionality.
Proceed with deploying Aembit Edge into your environment.
### Create a new Agent Controller
[Section titled “Create a new Agent Controller”](#create-a-new-agent-controller)
The Agent Controller is a helper component that facilitates the registration of other Aembit Edge Components.
1. In your Aembit Tenant, go to **Edge Components** from the left sidebar menu.
2. From the top ribbon menu, select **Deploy Aembit Edge**.
3. Select **Kubernetes** from the list of **Environments**.

4. In the **Prepare Edge Components** section, click to **New Agent Controller**. you’ll see the Agent Controller setup page displayed.
5. Enter a name, such as `Quickstart Agent Controller` (or another user-friendly name).
6. Add an optional description for the controller.
7. For now, ignore the [Trust Provider](/user-guide/access-policies/trust-providers/) section, as you don’t need it for this quickstart guide.
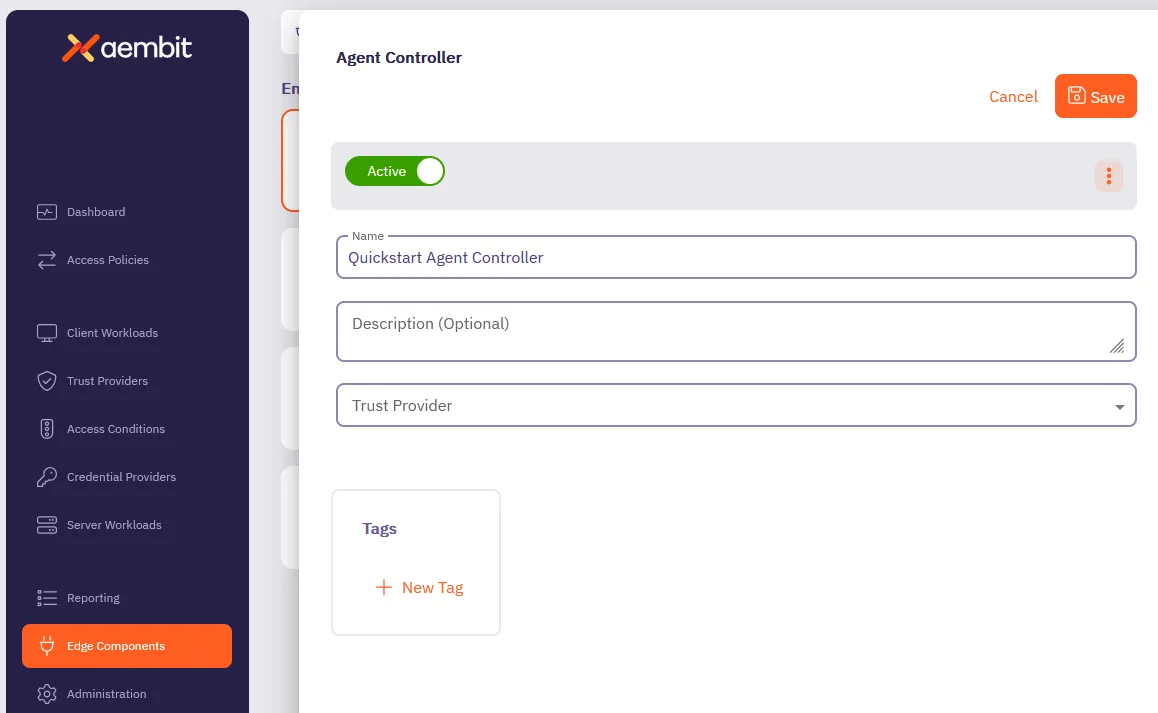
8. Click **Save**.
Once saved, your newly created Agent Controller auto-selects from the list of available Agent Controllers.
This reveals the **Install Aembit Edge Helm Chart** section.
### Deploy the Aembit Edge
[Section titled “Deploy the Aembit Edge”](#deploy-the-aembit-edge)
As part of Aembit Edge, the Agent Proxy is automatically injected within the Client Workload pod. It manages workload identity and securely injects credentials for communication with Server Workloads.
1. In the **Install Aembit Edge Helm Chart** section, make sure that you select the Agent Controller you just created in the dropdown menu.
2. In the **New Agent Controller** section, click **Generate Code** to generate a Device Code.
The Device Code is a temporary one-time-use code, valid for 15 minutes, that you use during installation to authenticate the Agent Controller with your Tenant.
Make sure you complete the next steps quickly before the code expires.
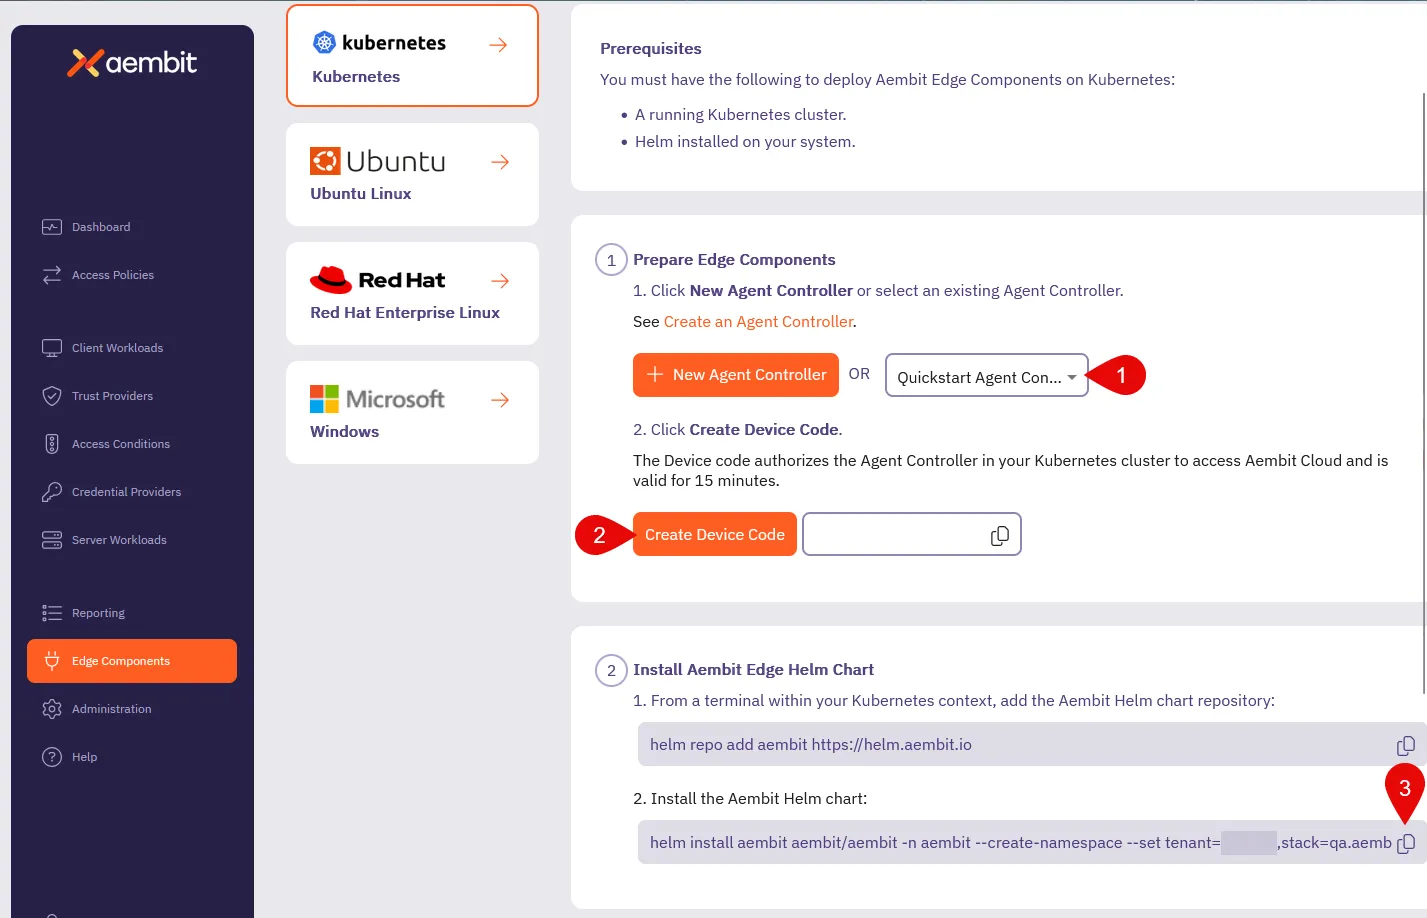
3. Since you already [installed the Aembit Helm repo](#install-applications), go ahead and install the Aembit Helm chart.
*From your terminal*, run the following command, making sure to replace:
* `` with your tenant ID (Find this in the Aembit website URL: `.aembit.io`)
* `` with the code you generated in the Aembit web UI
```shell
helm install aembit aembit/aembit \
--create-namespace \
-n aembit \
--set tenant=,agentController.deviceCode=
```
Tip
To reduce errors, copy the command from the Aembit Web UI for this step, as it populates your `` and `` for you.

Aembit Edge is now deployed in your Kubernetes cluster!
4. Check the current state of quickstart Client pod to confirm it is running without the Agent Proxy container.
The **`READY`** column for the `pod/aembit-quickstart-client-abcdef` should display **`1/1`**, indicating only the Client Workload container is running.
```shell
kubectl get all -n aembit-quickstart
```
**Expected Output:**
```shell
NAME READY STATUS RESTARTS AGE
pod/aembit-quickstart-client-abcdef 1/1 Running 0 1m
pod/aembit-quickstart-server-abcdef 1/1 Running 0 1m
```
5. Restart the quickstart Client pod to include the Agent Proxy in the deployment:
```shell
kubectl delete pods -l app=aembit-quickstart-client -n aembit-quickstart --grace-period=0 --force
```
6. After the pod restarts, verify that the `aembit-quickstart-client` pod now includes two containers: the Client Workload container and the Agent Proxy container.
After the pod restarts, check its state again. **`READY`** column for the `aembit-quickstart-client` pod should now display **`2/2`**, indicating that both the Client Workload container and the Agent Proxy container are running successfully.
```shell
kubectl get all -n aembit-quickstart
```
**Expected Output:**
```shell
NAME READY STATUS RESTARTS AGE
pod/aembit-quickstart-client-abcdef 2/2 Running 0 1m
pod/aembit-quickstart-server-abcdef 1/1 Running 0 1m
```
This step confirms that Aembit has injected Agent Proxy within the Client pod, enabling Aembit to securely manage credentials for communication between Client and Server Workloads.
## Configuring an Access Policy
[Section titled “Configuring an Access Policy”](#configuring-an-access-policy)
[Access Policies](/user-guide/access-policies/) define the conditions for granting Client Workloads access to Server Workloads. Aembit evaluates access by:
1. Verifying if the Client and Server Workloads match the Access Policy.
2. A Trust Provider authenticates the Client Workload’s identity.
3. The Access Policy meets all Access Conditions.
In this quickstart guide, you have omitted configuring a Trust Provider to simplify your first walkthrough. However, Trust Providers are a critical component in securing all production deployments.
They enable Aembit to authenticate workloads without provisioning long-lived credentials or secrets, making sure that Aembit authenticates and authorizes only workloads it trusts.
Once authorized, Aembit delivers the necessary credentials to Agent Proxy, which it then uses to authenticate the Client workload to the Server Workload.
About Client Workload credentials
Aembit never releases credentials directly to Client Workloads. Instead, Aembit inject credentials into the traffic destined for the target Server Workload, providing secure communication.
1. From your Aembit Tenant, click **Access Policies** in the left sidebar menu.
2. Click **+ New** to open the Create New Access Policy page.
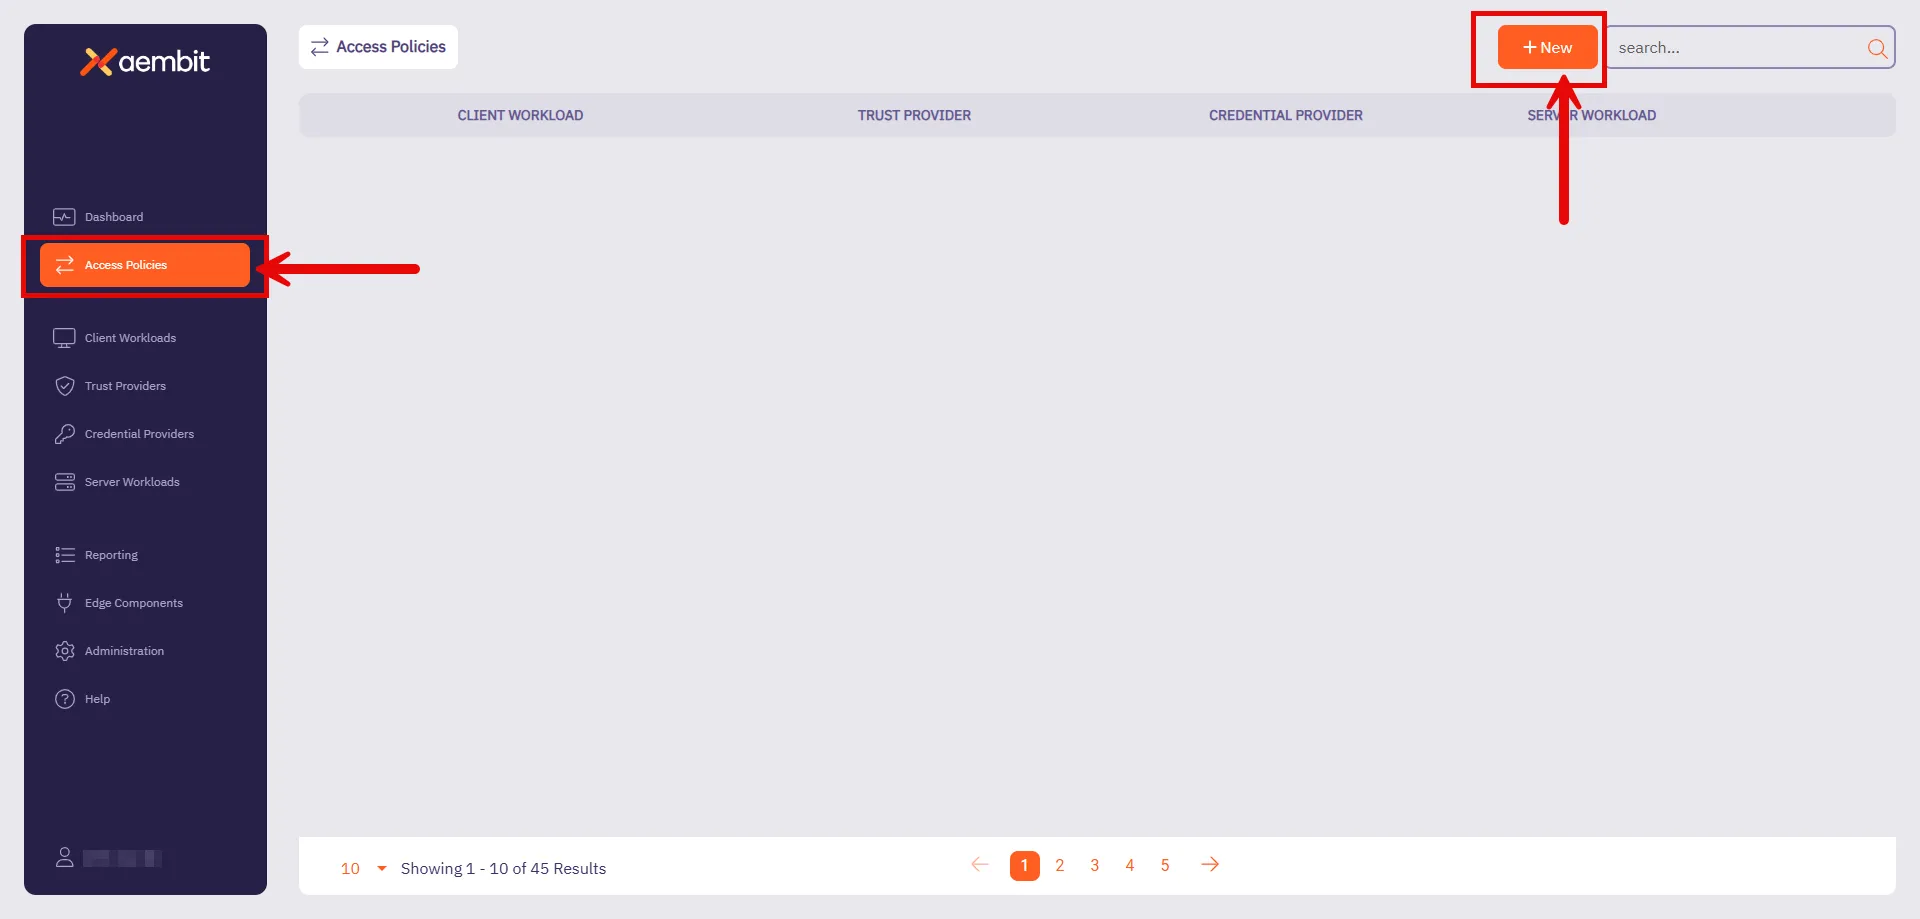
Follow the steps in the following sections to configure each part of the Access Policy.
### Configure a Client Workload
[Section titled “Configure a Client Workload”](#configure-a-client-workload)
[Client Workloads](/user-guide/access-policies/client-workloads/) are software applications that access services provided by Server Workloads. These could be custom apps, CI/CD pipelines, or scripts running without user intervention.
1. On the Access Policy page hover over the Client Workload section, click **New**, and on the Client Workload page:
* **Name** - Quickstart Client (or another user-friendly name).
* **Client Identification** - Kubernetes Pod Name Prefix
* **Value** - `aembit-quickstart-client`
2. Click **Save**.
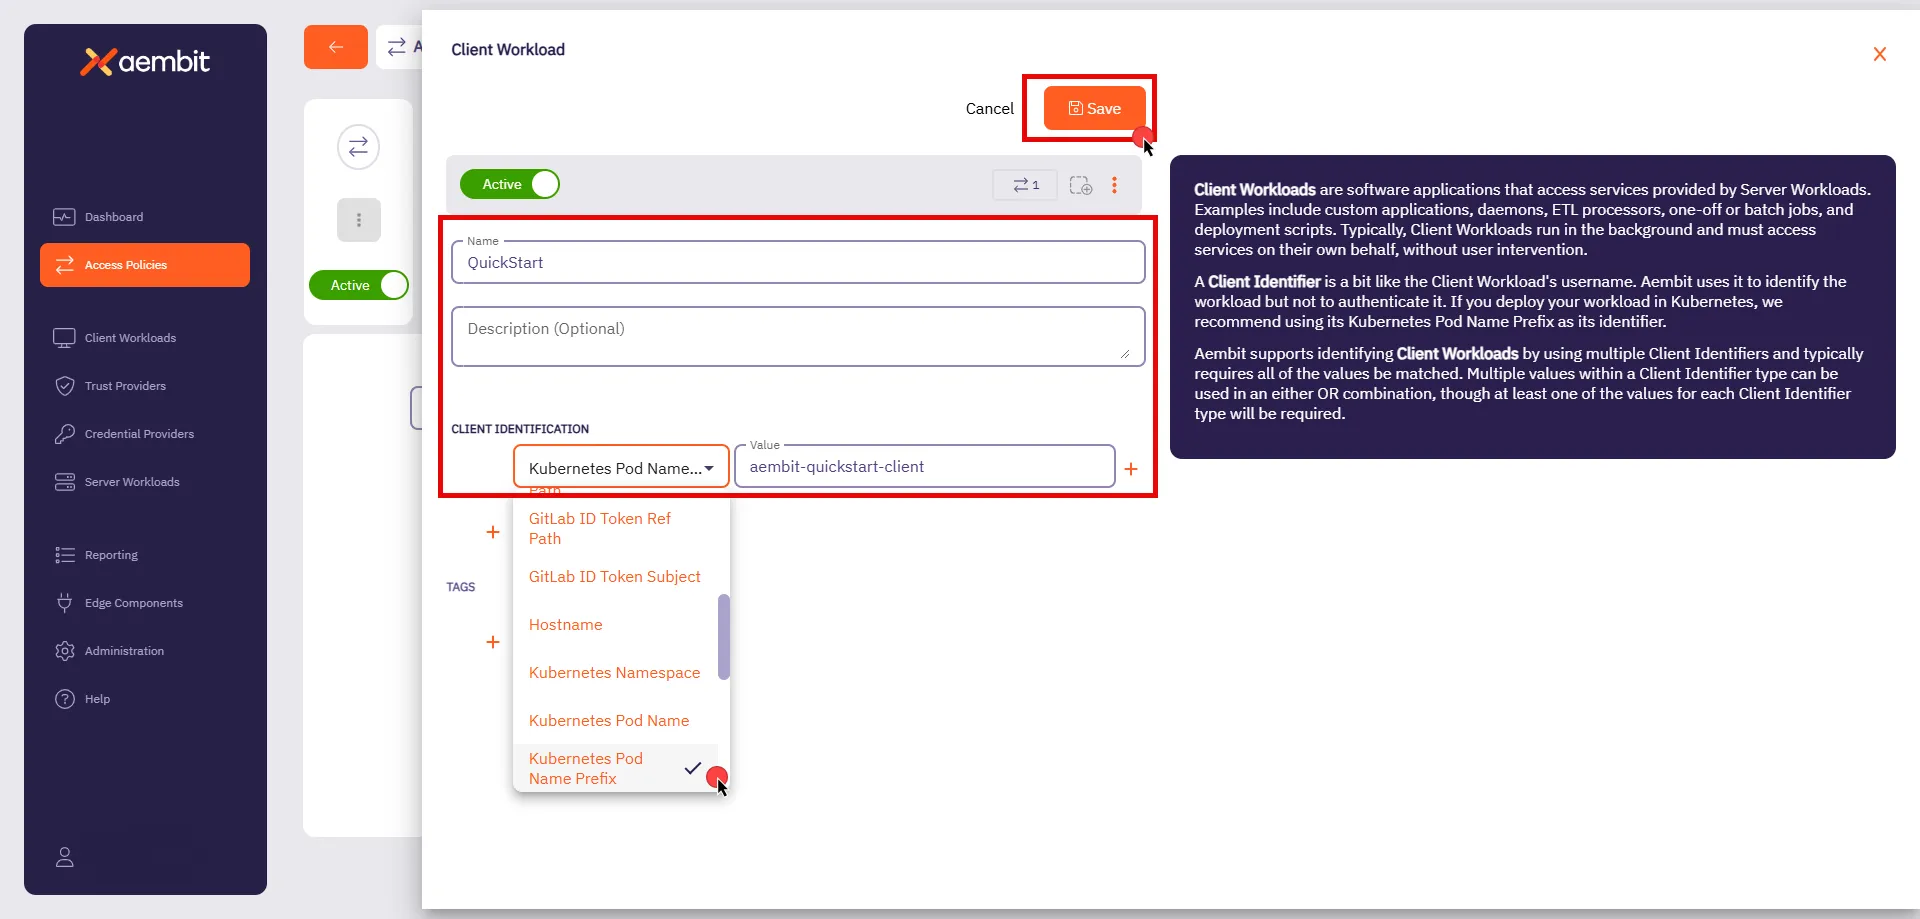
### Configure a Server Workload
[Section titled “Configure a Server Workload”](#configure-a-server-workload)
[Server Workloads](/user-guide/access-policies/server-workloads/guides/) serve requests from Client Workloads and can include APIs, gateways, databases, and more. The configuration settings define the Service Endpoint and Authentication methods, specifying the networking details and Aembit authenticates requests.
1. On the Access Policy page hover over the Server Workload section, click **New**, and on the Server Workload page:
* **Name** - Quickstart Server (or another user-friendly name).
* **Host** - `aembit-quickstart-server.aembit-quickstart.svc.cluster.local`
* **Application Protocol** - HTTP
* **Transport Protocol** - TCP
* **Port** - 9090
* **Forward to Port** - 9090
* **Authentication Method** - HTTP Authentication
* **Authentication Scheme** - Bearer
2. Click **Save**.
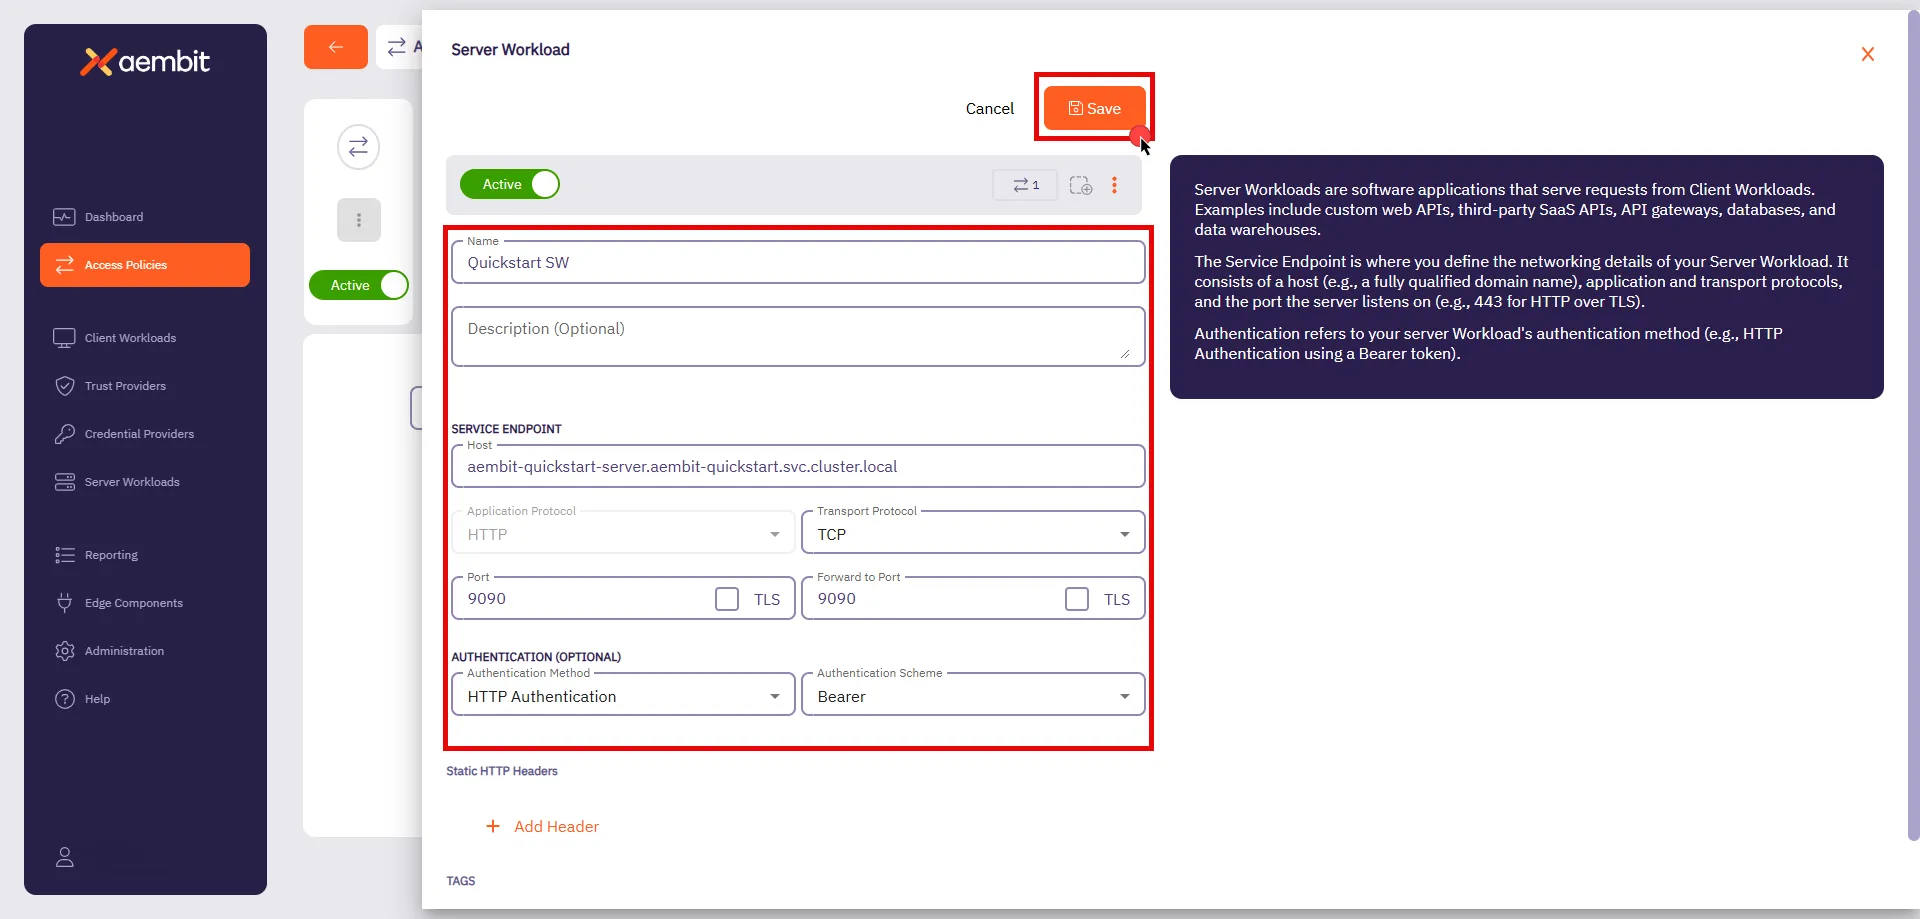
### Configuring a Credential Provider
[Section titled “Configuring a Credential Provider”](#configuring-a-credential-provider)
[Credential Providers](/user-guide/access-policies/credential-providers/) supply the access credentials, such as OAuth tokens or API keys, that allow Client Workloads to authenticate with Server Workloads. Aembit can also request and manage tokens from third-party services.
Security Best Practice
In this QuickStart, you are using the API Key option for simplicity. However, Aembit recommends using short-lived credentials whenever possible to enhance security and reduce exposure to risks associated with long-lived credentials.
1. From your web browser, go to the [sandbox Server Workload](http://localhost:30090).
2. Click **Generate API Key**.
This generates a unique API key you’ll use in later in this section.
Generating more than one key
Avoid clicking the button multiple times, as only one API key (the last generated) remains active at a time. Copy the API key immediately after creating it, as you need it in the next step.
3. Copy the API key.
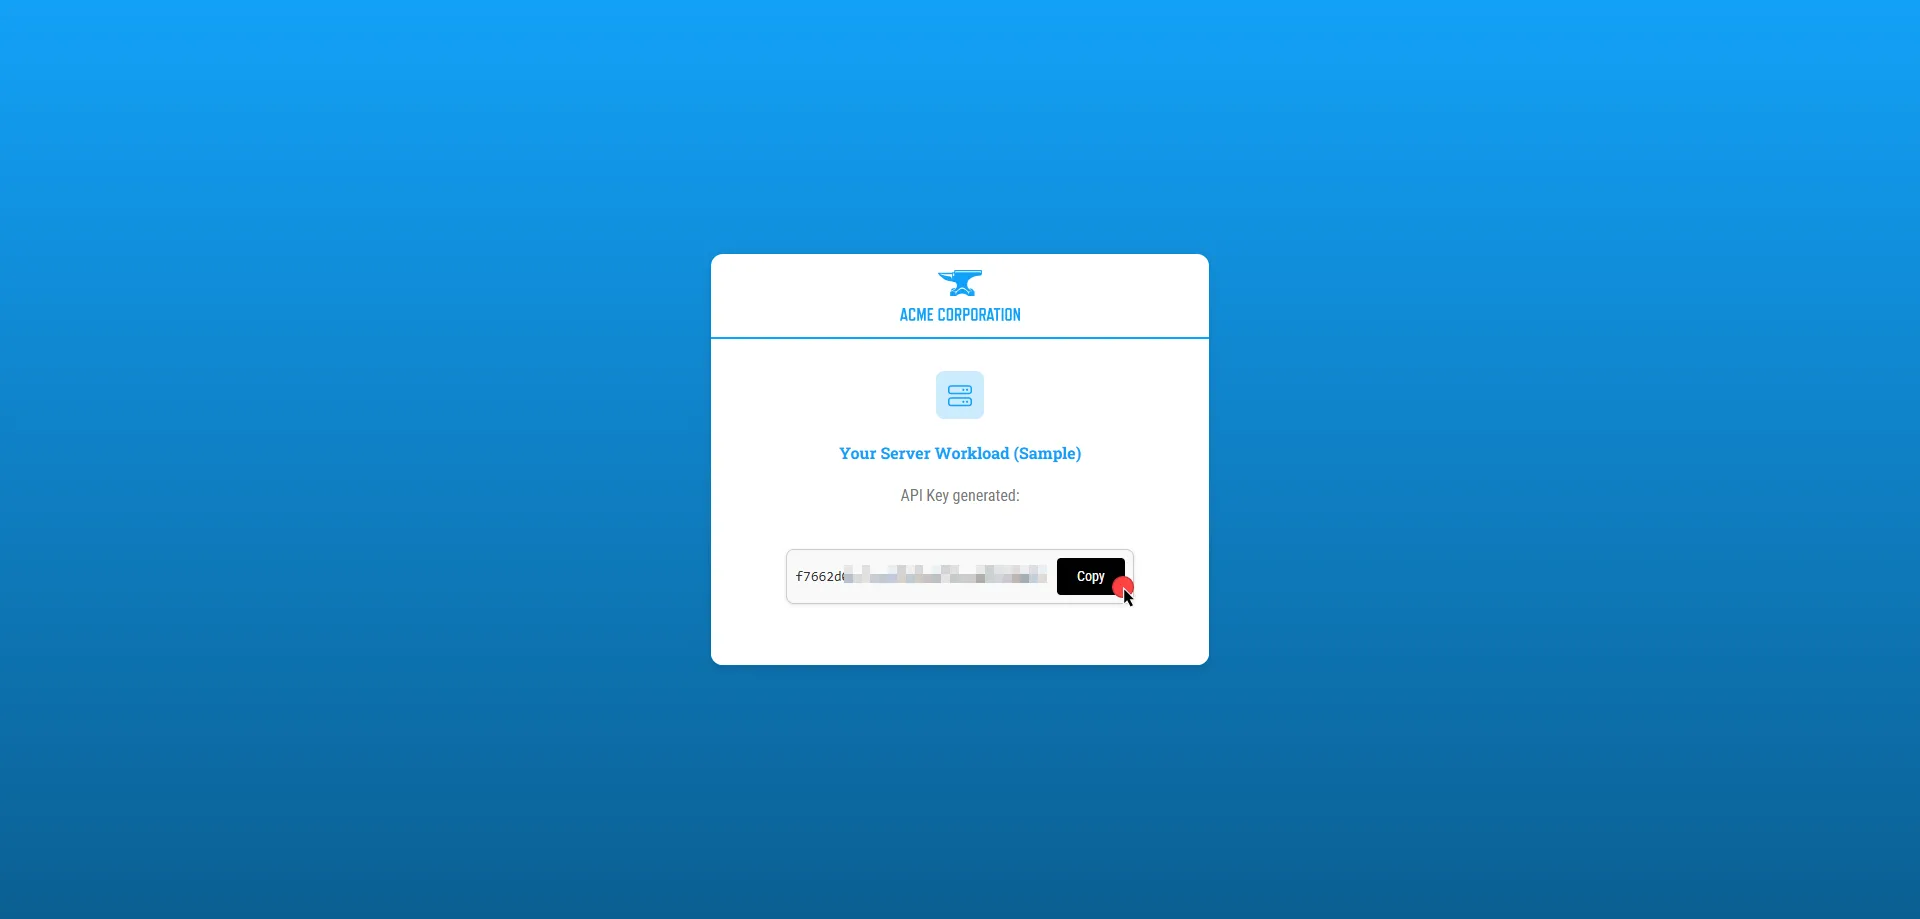
4. After saving your Client Workload on Aembit UI, you’ll return to the Access Policy page. Hover over the Credential Provider section, click **New**, and on the Credential Provider page:
* **Name** - Quickstart API Key (or another user-friendly name)
* **Credential Type** - API Key
* **API Key** - Paste the API key you generated from the Server Workload
5. Click **Save**.
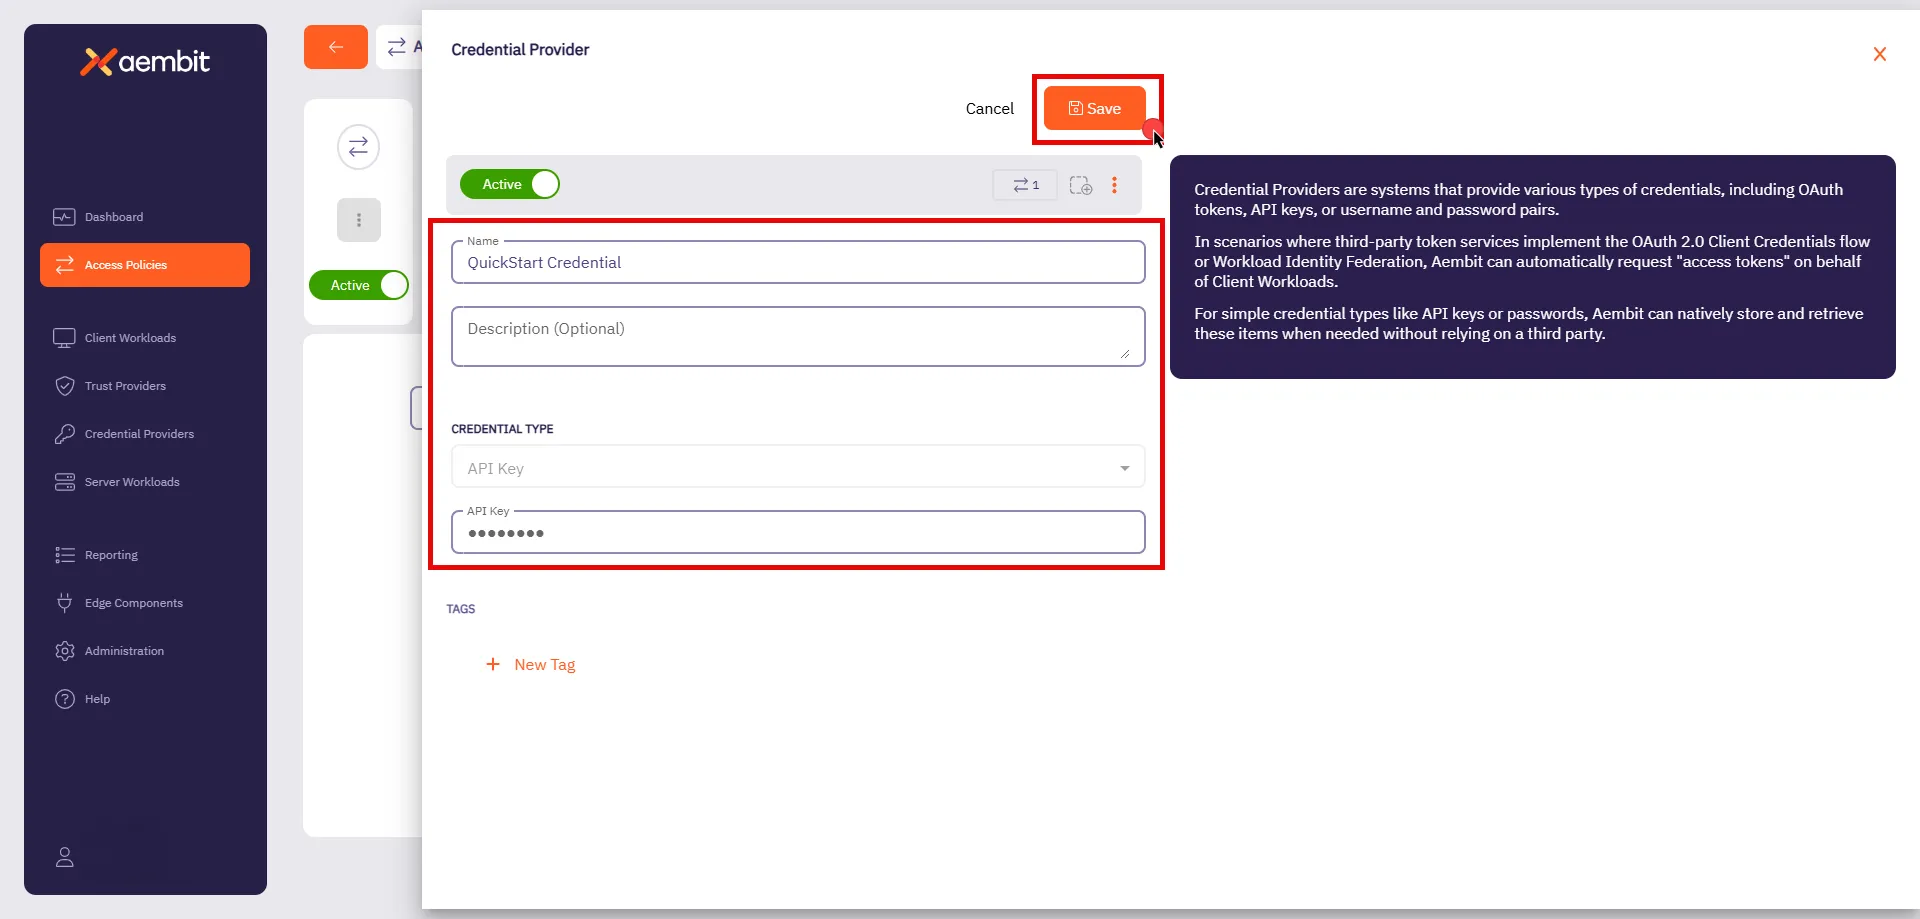
### Finalizing the Access Policy
[Section titled “Finalizing the Access Policy”](#finalizing-the-access-policy)
Once you have configured the Client Workload, Server Workload, and Credential Provider, click **Save & Activate** to complete the process and activate the policy.
## Testing the Access Policy
[Section titled “Testing the Access Policy”](#testing-the-access-policy)
To test your newly configured Access Policy, go to the [sandbox Client Workload](http://localhost:30080) and click **Get Data**. Since you activated the Access Policy and Aembit Edge installed the necessary credential into the request, you should see a successful response.
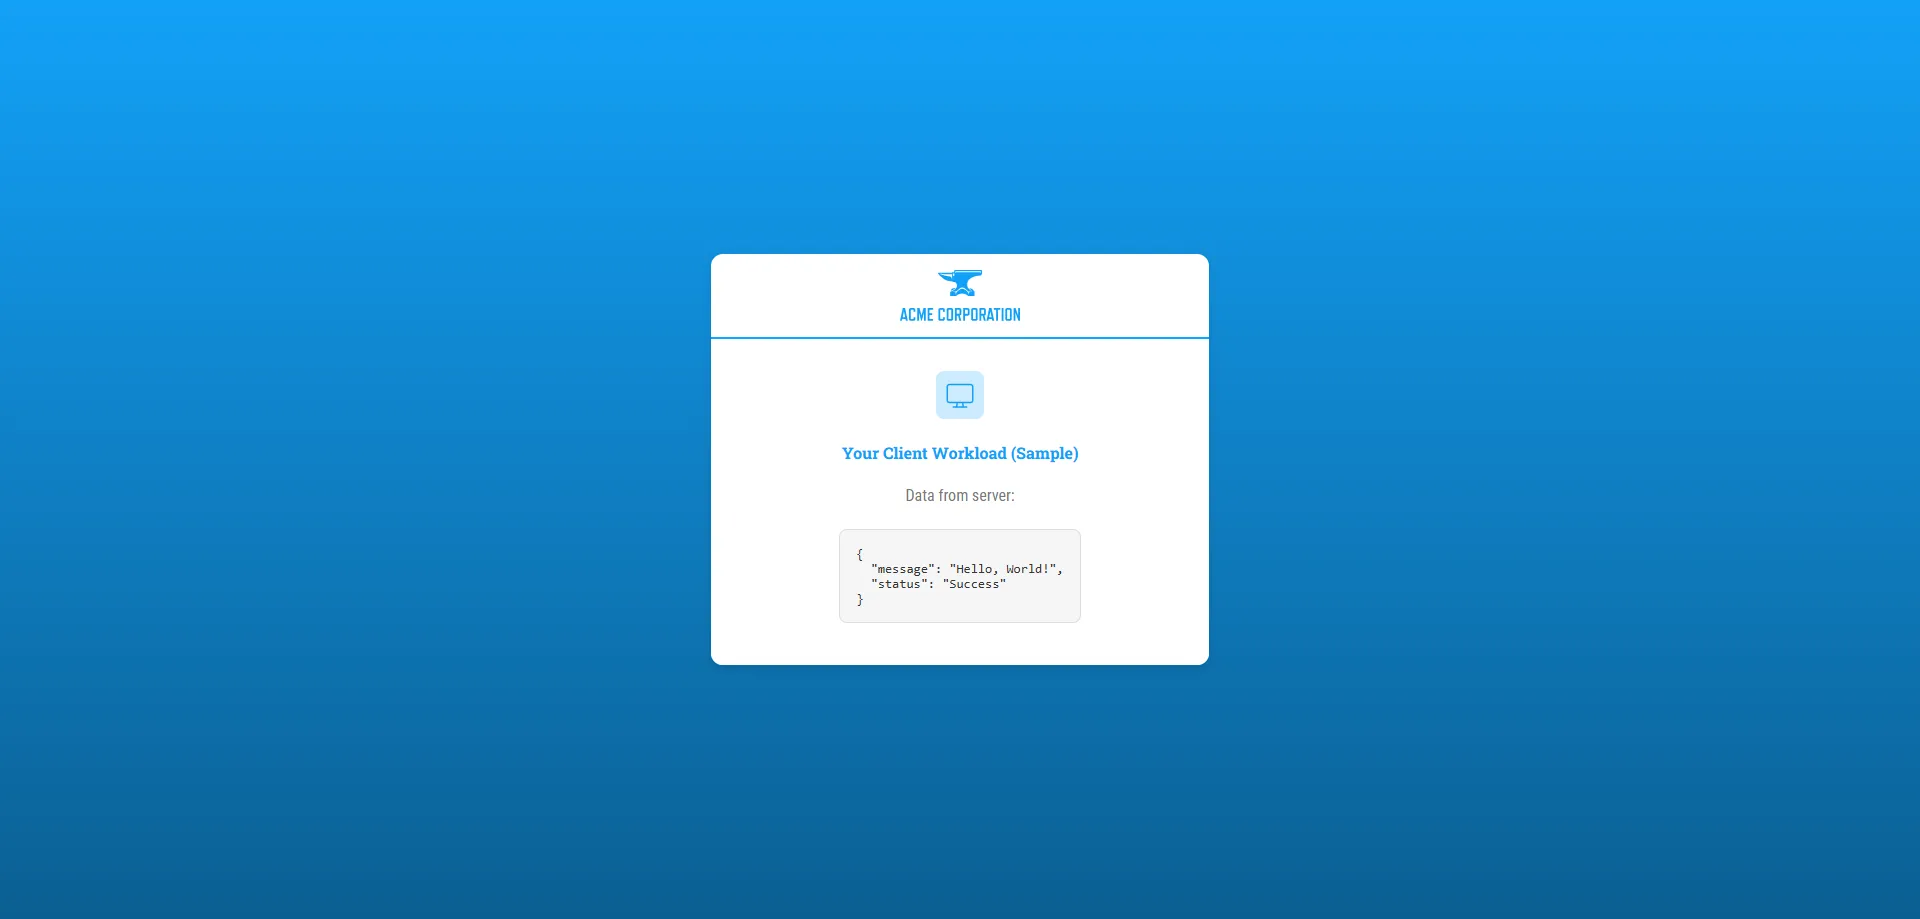
Congratulations! You’ve created a Access Policy that’s securing access between workloads!
With just a few steps, you have deployed workloads, configured an Access Policy, and successfully authenticated requests—all without the complexity of manual credential management.
This quickstart guide is just the foundation of all the features that Aembit has to offer. It supports powerful capabilities for scaling, securing, and managing workload identity across many environments, providing security and efficiency as your needs grow.
#### Troubleshoot
[Section titled “Troubleshoot”](#troubleshoot)
If you encounter any issues or don’t see a successful response, the Aembit Web UI has a useful **Troubleshooter** that can help you identify potential problems:
1. Go to **Access Policies** and select the Access Policy you created for this quickstart guide.
2. Click **Troubleshoot** in the top corner.
This brings up the Troubleshooter with your Access Policy’s Client and Server Workloads already populated.
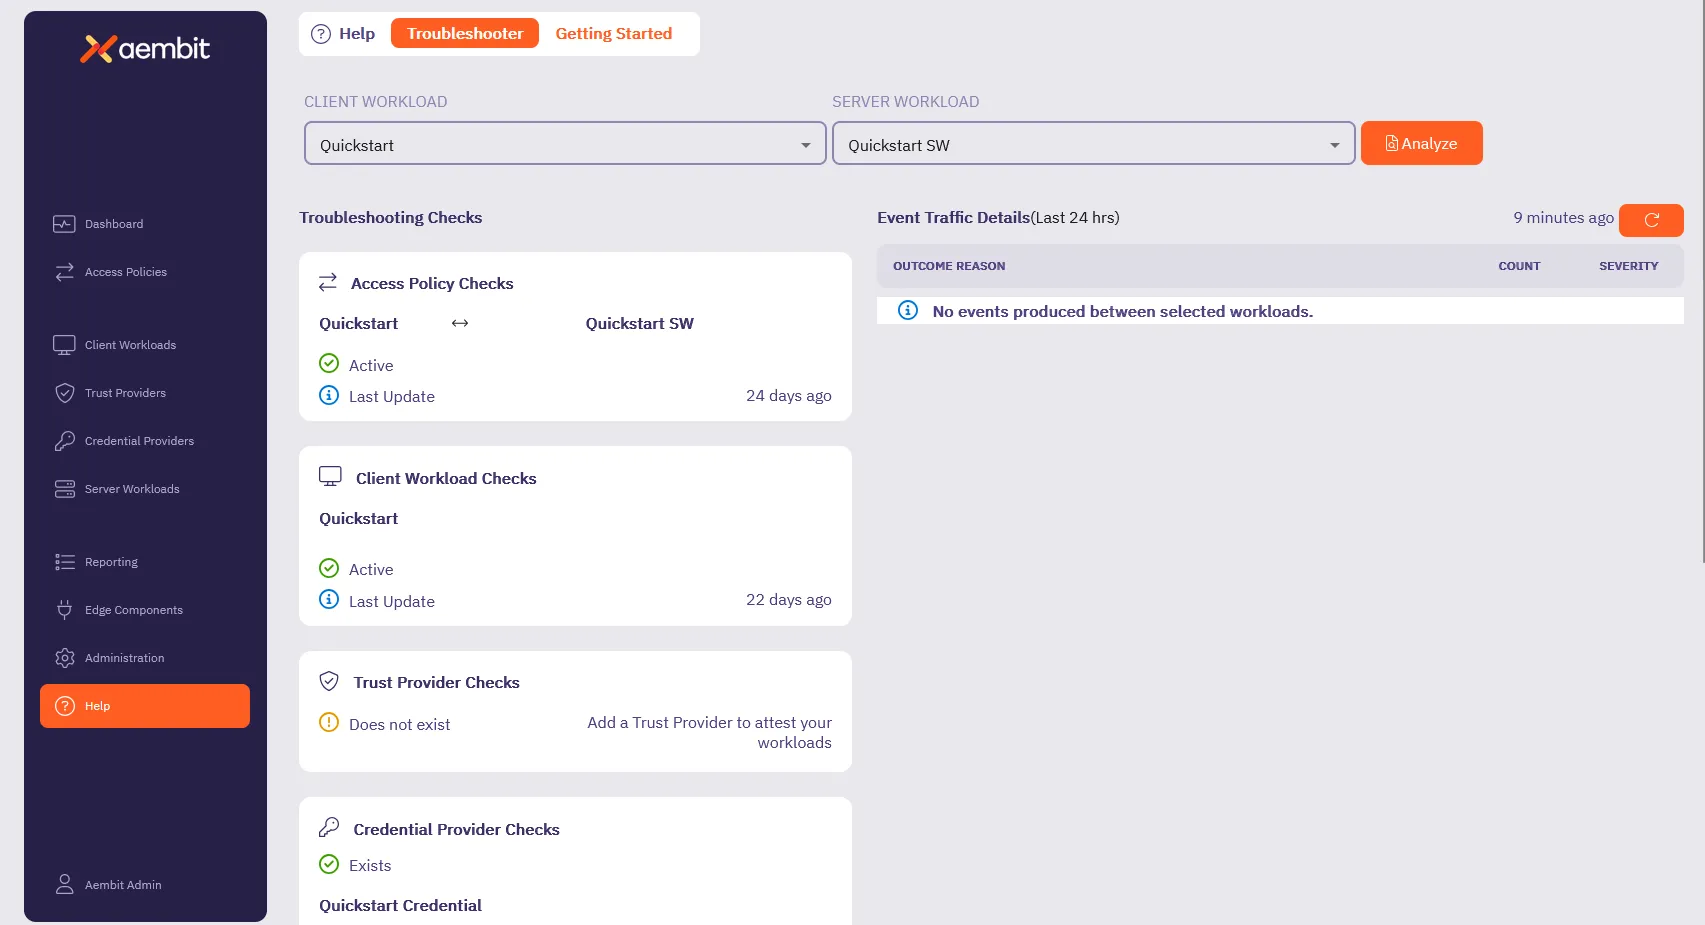
3. Inspect and make sure that the **Access Policy Checks**, **Client Workload Checks**, **Credential Provider Checks** and **Server Workload Checks** are **Active** (they have green checks).
4. For any sections that aren’t Active, go back to the respective section in the quickstart guide and double check your configurations.
Also, make sure all the [Prerequisites](#before-you-begin) are complete.
The Troubleshooter helps diagnose potential issues with your configuration. For more details, visit the [Troubleshooter Tool](/user-guide/troubleshooting/tenant-configuration) page.
Still need help? Please [submit a support request](https://aembit.io/support/) to Aembit’s support team.
## What’s next?
[Section titled “What’s next?”](#whats-next)
Now that you’ve completed the basics, it’s time to explore additional features and capabilities to get the most out of Aembit.
See [Quickstart: Add an Access Policy to the core setup](/get-started/quickstart/quickstart-access-policy) to learn how to:
* **Configure Trust Providers** to enhance workload identity verification and strengthen access control.
* **Set Up Access Conditions** to enforce time-based, geo-based, or custom rules for workload access.
* **Navigate Reporting Tools** to review access events, track policy usage, and analyze workload behavior.
Following the *Quickstart: Access Policy enhancements* page helps you expand beyond the core Aembit setup, guiding you toward features that enhance security, visibility, and scalability.
# Aembit security posture
> Description of ow Aembit approaches, implements, and maintains security
This section covers Aembit’s approach to security, providing information about the security architecture, compliance, and threat modeling.
The following pages provide in-depth information about Aembit’s security posture:
* [Security Architecture](/get-started/security-posture/architecture) - Details of Aembit’s security architecture design
* [Security Compliance](/get-started/security-posture/security-compliance) - Information about Aembit’s compliance with security standards
* [Threat Model](/get-started/security-posture/threat-model) - Analysis of potential threats and how Aembit addresses them
# Aembit software architecture
> Explanation and illustration of Aembit's software architecture
Work in progress
This page is a work in progress. It may contain incomplete or unverified information.
Please check back later for updates.
If you have feedback or suggestions, please fill out the [Aembit New Docs Feedback Survey](https://forms.gle/mfjhV2TtXP1pXAym8).
Thanks for your patience!
# Security compliance
> Overview of Aembit's security posture and compliance
Work in progress
This page is a work in progress. It may contain incomplete or unverified information.
Please check back later for updates.
If you have feedback or suggestions, please fill out the [Aembit New Docs Feedback Survey](https://forms.gle/mfjhV2TtXP1pXAym8).
Thanks for your patience!
# Aembit in your threat model
> How and where Aembit fits into your threat model
Work in progress
This page is a work in progress. It may contain incomplete or unverified information.
Please check back later for updates.
If you have feedback or suggestions, please fill out the [Aembit New Docs Feedback Survey](https://forms.gle/mfjhV2TtXP1pXAym8).
Thanks for your patience!
# Aembit use cases
> This page describes common use cases for Aembit
This section covers common use cases for Aembit, demonstrating how Workload Identity and Access Management can be applied in various scenarios.
The following pages detail specific use cases:
* [CI/CD Pipelines](/get-started/use-cases/ci-cd) - Securing CI/CD pipelines with Aembit
* [Credentials Management](/get-started/use-cases/credentials) - Managing access credentials across workloads
* [Microservices Security](/get-started/use-cases/microservices-security) - Securing communication between microservices
* [Multicloud Environments](/get-started/use-cases/multicloud) - Managing access across multiple cloud environments
* [Third-Party Access](/get-started/use-cases/third-party-access) - Securely connecting to third-party services
# Using Aembit in CI/CD environments
> How Aembit secures NHI access in CI/CD environments
Work in progress
This page is a work in progress. It may contain incomplete or unverified information.
Please check back later for updates.
If you have feedback or suggestions, please fill out the [Aembit New Docs Feedback Survey](https://forms.gle/mfjhV2TtXP1pXAym8).
Thanks for your patience!
# Using Aembit to manage credentials
> How Aembit enables you to centrally manage and control credentials in your environments
Work in progress
This page is a work in progress. It may contain incomplete or unverified information.
Please check back later for updates.
If you have feedback or suggestions, please fill out the [Aembit New Docs Feedback Survey](https://forms.gle/mfjhV2TtXP1pXAym8).
Thanks for your patience!
# Using Aembit to secure your microservices
> How Aembit secures NHI access between microservices
Work in progress
This page is a work in progress. It may contain incomplete or unverified information.
Please check back later for updates.
If you have feedback or suggestions, please fill out the [Aembit New Docs Feedback Survey](https://forms.gle/mfjhV2TtXP1pXAym8).
Thanks for your patience!
# Using Aembit in multicloud environments
> How Aembit secures NHI access in multicloud environments
Work in progress
This page is a work in progress. It may contain incomplete or unverified information.
Please check back later for updates.
If you have feedback or suggestions, please fill out the [Aembit New Docs Feedback Survey](https://forms.gle/mfjhV2TtXP1pXAym8).
Thanks for your patience!
# Using Aembit to secure third-party access
> How Aembit secures third-party access to your environment
Work in progress
This page is a work in progress. It may contain incomplete or unverified information.
Please check back later for updates.
If you have feedback or suggestions, please fill out the [Aembit New Docs Feedback Survey](https://forms.gle/mfjhV2TtXP1pXAym8).
Thanks for your patience!
# Aembit glossary
> Terms and phrases related to Aembit and NHI access and identities
### Access Control
[Section titled “Access Control”](#access-control)
Security concepts
The practice of regulating access to resources or systems based on permissions and authorization policies. Secrets managers implement access control mechanisms to restrict who can view, modify, or retrieve stored secrets, ensuring that only authorized users or applications have access
### API (Application Programming Interface)
[Section titled “API (Application Programming Interface)”](#api-application-programming-interface)
IT concepts
A set of rules and protocols that allows different software applications to communicate with each other. Secrets managers often provide APIs for programmatically accessing and managing secrets, enabling seamless integration with existing workflows and automation tools.
### API Gateway
[Section titled “API Gateway”](#api-gateway)
IT concepts
A server that acts as an intermediary between clients and backend services, providing features such as authentication, authorization, rate limiting, logging, and monitoring. API gateways help enforce security policies and simplify API management.
### API Key
[Section titled “API Key”](#api-key)
Identity types
A unique identifier used to authenticate and authorize access to an API. API keys are commonly issued to developers or applications and included in API requests as a parameter or header.
### Attestation
[Section titled “Attestation”](#attestation)
IAM concepts
The process of formally verifying or confirming the accuracy, authenticity, or compliance of a statement, document, or assertion. In the context of identity and access management (IAM) or cybersecurity, attestation typically involves validating the integrity and validity of various elements such as user identities, access permissions, configurations, or system states.
### Attribute Assertion
[Section titled “Attribute Assertion”](#attribute-assertion)
IAM concepts
Information about a user’s identity or attributes provided by an identity provider to a service provider during the authentication process. Attribute assertions include details such as user ID, email address, roles, or group memberships, which are used to make access control decisions.
### Authentication
[Section titled “Authentication”](#authentication)
IAM concepts
The process of verifying the identity of a user, machine, or application attempting to access a system or resource. Authentication mechanisms may include passwords, biometrics, cryptographic keys, or other factors.
### Authorization
[Section titled “Authorization”](#authorization)
IAM concepts
The process of determining whether a user, machine, or application has permission to access a resource or perform a specific action. Authorization mechanisms enforce access control policies based on predefined rules or roles.
### Backup and Recovery
[Section titled “Backup and Recovery”](#backup-and-recovery)
IT concepts
The process of creating and maintaining backups of password manager data to prevent data loss in case of device failure, accidental deletion, or other unforeseen events. Backup and recovery mechanisms help ensure data availability and integrity.
### Bearer Token
[Section titled “Bearer Token”](#bearer-token)
Identity types
An access token used by non-human clients to authenticate and access protected resources or APIs. Bearer tokens are typically included in API requests as a header and provide temporary authorization without requiring additional authentication mechanisms.
### Bot Identity
[Section titled “Bot Identity”](#bot-identity)
Identity types
An identity assigned to a software robot or bot, typically used to automate tasks or interactions with systems, applications, or APIs. Bot identities may have specific permissions and access rights tailored to their intended tasks.
### Browser Extension
[Section titled “Browser Extension”](#browser-extension)
IT concepts
A software component that extends the functionality of a web browser by adding features or capabilities. Password managers often provide browser extensions to automatically fill login forms, generate strong passwords, and facilitate secure authentication on websites.
### Client Credentials
[Section titled “Client Credentials”](#client-credentials)
Identity types
Credentials used by non-human clients, such as applications or services, to authenticate and access protected resources or APIs. Client credentials typically consist of a client ID and client secret or other authentication tokens.
### CORS (Cross-Origin Resource Sharing)
[Section titled “CORS (Cross-Origin Resource Sharing)”](#cors-cross-origin-resource-sharing)
NHI security threats
A security mechanism that allows web browsers to request resources from a different origin domain. CORS policies, defined by HTTP headers, control which cross-origin requests are allowed and prevent unauthorized access to sensitive data.
### Conditional Access
[Section titled “Conditional Access”](#conditional-access)
Security concepts
Conditional Access enables extra layers of security by allowing access to be granted based on specific conditions such as time of day, location, device type, or security posture. For example, access might be restricted based on the security posture of a device or workload, such as whether it meets certain criteria defined by an integration with security tools like CrowdStrike.
### Credential Harvesting
[Section titled “Credential Harvesting”](#credential-harvesting)
NHI security threats
A technique used by attackers to collect or steal credentials such as passwords, API keys, or access tokens. This can be done through phishing, malware, exposed secrets, or other attack vectors. In workload IAM, credential harvesting poses a major risk, as compromised non-human identities can be used for unauthorized access and lateral movement.
### Credential Provider
[Section titled “Credential Provider”](#credential-provider)
IAM concepts
A Credential Provider is responsible for securely issuing and managing short-lived credentials for workloads. This approach minimizes the risks associated with long-lived credentials and ensures that access to resources is granted only when needed, based on workload identity. Credential Provider can also store long-lived credentials such as API keys.
### Daemon Identity
[Section titled “Daemon Identity”](#daemon-identity)
Identity types
An identity associated with a background process or service running on a computer system, often used for system maintenance, monitoring, or other administrative tasks. Daemon identities may have limited access rights to ensure system security.
### Digital Certificate
[Section titled “Digital Certificate”](#digital-certificate)
Identity types
A digital document used to certify the authenticity of a machine or entity, typically issued by a trusted certificate authority (CA).
### Dynamic Secrets
[Section titled “Dynamic Secrets”](#dynamic-secrets)
IAM concepts
Temporary credentials or keys generated on-demand by secrets managers in response to authentication requests. Dynamic secrets have a limited lifespan and are automatically revoked or rotated after use, reducing the risk of exposure if compromised.
### Encryption
[Section titled “Encryption”](#encryption)
Security concepts
The process of encoding data in such a way that only authorized parties can access and decrypt it. Password managers and vaults use encryption to protect stored passwords and sensitive information, ensuring confidentiality and data security.
### Federated Identity
[Section titled “Federated Identity”](#federated-identity)
IAM concepts
A mechanism that enables users to access multiple systems or services using a single set of credentials, typically managed by an identity provider (IdP). Federated identity allows for seamless authentication and authorization across different domains or organizations.
### Governance
[Section titled “Governance”](#governance)
IAM concepts
In identity and access management, governance refers to the processes and policies used to manage identities, ensure compliance with regulations, and maintain control over user access and privileges. In workload management, it refers to the strategic oversight of system workloads and resources.
### Granularity
[Section titled “Granularity”](#granularity)
Security concepts
Refers to the level of detail in access control. Granular access control policies allow organizations to define fine-grained permissions for users and machines, such as who can access specific workloads or data sets.
### Group Policy
[Section titled “Group Policy”](#group-policy)
IAM concepts
A feature used in IAM systems, especially in Active Directory environments, to manage and configure the settings of user and machine identities across an organization.
### Hashing
[Section titled “Hashing”](#hashing)
Security concepts
In identity management, hashing is used to store and verify credentials like passwords by converting them into a fixed-size string of characters. Hashing algorithms also play a role in managing machine identities securely.
### High Availability (HA)
[Section titled “High Availability (HA)”](#high-availability-ha)
IT concepts
A system design approach and associated service implementation that ensures a certain degree of operational continuity during a given time period. In workload management, HA ensures that critical workloads have minimal downtime, while IAM systems ensure users or machines have continuous access to systems.
### Identity and Access Management (IAM)
[Section titled “Identity and Access Management (IAM)”](#identity-and-access-management-iam)
IAM concepts
A framework for managing and controlling access to resources, systems, and data based on the identities of users, machines, or services.
### Identity Broker
[Section titled “Identity Broker”](#identity-broker)
IAM concepts
An intermediary service or component that facilitates federated authentication and authorization between identity providers and service providers. Identity brokers translate authentication protocols, handle identity mapping, and enforce access control policies across federated systems.
### Identity Federation
[Section titled “Identity Federation”](#identity-federation)
Identity types
The process of establishing trust relationships between identity providers and service providers to enable federated identity management. Identity federation allows users to access resources across different domains or organizations using a single set of credentials.
### Identity Governance and Administration (IGA)
[Section titled “Identity Governance and Administration (IGA)”](#identity-governance-and-administration-iga)
IAM concepts
IGA is the framework and processes used to ensure that the right individuals and machines have the appropriate access to technology resources. It integrates identity lifecycle management (provisioning, deprovisioning) with governance processes (e.g., auditing, role management, policy enforcement) to ensure compliance, security, and efficiency in managing identities.
### Identity Mapping
[Section titled “Identity Mapping”](#identity-mapping)
IAM concepts
The process of correlating user identities across different identity domains or systems. Identity mapping ensures that users are consistently identified and authenticated, regardless of the authentication mechanism or system used.
### Identity Provider (IdP)
[Section titled “Identity Provider (IdP)”](#identity-provider-idp)
IT concepts
A trusted entity responsible for authenticating users and issuing identity tokens or assertions that can be used to access federated services. IdPs manage user identities and credentials, often through techniques like SAML, OAuth, or OpenID Connect.
### Integration
[Section titled “Integration”](#integration)
IT concepts
The process of connecting secrets managers with other systems, applications, or cloud services to automate the retrieval and use of secrets. Secrets managers often provide integrations with popular development frameworks, deployment tools, and cloud platforms to streamline secret management.
### JWT (JSON Web Token)
[Section titled “JWT (JSON Web Token)”](#jwt-json-web-token)
Identity types
A compact, URL-safe means of representing claims to be transferred between two parties, commonly used for secure authentication and authorization in distributed systems.
### Kerberoasting
[Section titled “Kerberoasting”](#kerberoasting)
NHI security threats
Kerberoasting is a post-compromise attack that exploits Kerberos authentication in Active Directory. Attackers use a low-privilege account to request service tickets for accounts with Service Principal Names (SPNs), extract the encrypted ticket data, and attempt to crack the hash offline to obtain plaintext credentials. This technique is commonly used to escalate privileges in Windows environments.
### Key Rotation
[Section titled “Key Rotation”](#key-rotation)
IAM concepts
The process of regularly changing cryptographic keys or credentials to mitigate the risk of unauthorized access and improve security. Secrets managers often automate key rotation to ensure that secrets are regularly updated without disrupting applications or services.
### Least Privilege
[Section titled “Least Privilege”](#least-privilege)
IAM concepts
The principle of providing users, machines, or services with only the minimum level of access necessary to perform their tasks, reducing the risk of unauthorized access and potential security breaches.
### Machine Identity
[Section titled “Machine Identity”](#machine-identity)
Identity types
A unique identifier assigned to a machine or device, typically consisting of cryptographic keys, certificates, or other credentials used for authentication and authorization.
### Machine Learning Identity
[Section titled “Machine Learning Identity”](#machine-learning-identity)
Identity types
An identity associated with a machine learning model or algorithm, used to authenticate and authorize access to data, resources, or computational resources. Machine learning identities enable secure and controlled access to sensitive information and computational resources.
### Machine-to-Machine (M2M) Communication
[Section titled “Machine-to-Machine (M2M) Communication”](#machine-to-machine-m2m-communication)
IAM concepts
Communication between non-human entities, such as machines, devices, or applications, without direct human intervention. M2M communication often relies on secure authentication and authorization mechanisms to ensure data privacy and integrity.
### Master Password
[Section titled “Master Password”](#master-password)
Identity types
A single, strong password used to encrypt and unlock the contents of a password manager or vault. The master password is typically the primary means of authentication and access control for the password manager, so it should be complex and carefully guarded.
### Multi-factor Authentication (MFA)
[Section titled “Multi-factor Authentication (MFA)”](#multi-factor-authentication-mfa)
Security concepts
An authentication method that requires users to provide multiple forms of verification, such as passwords, biometrics, or tokens, to access sensitive resources. Some secrets managers support MFA to enhance security when accessing stored secrets.
### No-code Auth
[Section titled “No-code Auth”](#no-code-auth)
IAM concepts
Ability to allow developers to implement authentication and access controls without needing to write any code for managing secrets or credentials. This simplifies secure access to services by eliminating manual secrets management and enabling centralized access management using identity-based policies.
### Non-human Identity
[Section titled “Non-human Identity”](#non-human-identity)
Identity types
A non-human identity refers to digital identities assigned to machines, applications, services, or other automated processes rather than individual users. These identities allow machines to authenticate and access resources securely, as in microservices or cloud applications.
### OAuth (Open Authorization)
[Section titled “OAuth (Open Authorization)”](#oauth-open-authorization)
IAM concepts
An open standard for authorization that allows third-party applications to access resources on behalf of a user or service, often used to manage workload identity and access to APIs.
### OAuth 2.0
[Section titled “OAuth 2.0”](#oauth-20)
IAM concepts
An authorization framework that enables secure access to resources over HTTP. OAuth 2.0 defines different authorization flows, including authorization code flow, implicit flow, client credentials flow, and resource owner password credentials flow, to accommodate various use cases.
### OpenID Connect
[Section titled “OpenID Connect”](#openid-connect)
IAM concepts
An identity layer built on top of OAuth 2.0 that provides authentication services for web and mobile applications. OpenID Connect allows clients to verify the identity of end-users based on the authentication performed by an authorization server, providing user information as JWTs. It also enables federated identity management by allowing clients to verify user identity based on tokens issued by an identity provider.
### Over-provisioned Account
[Section titled “Over-provisioned Account”](#over-provisioned-account)
NHI security threats
An over-provisioned account has more access privileges than necessary for its role or function. This creates a security risk, as the excess privileges could be exploited by attackers or lead to unintentional access to sensitive systems.
### Password Generator
[Section titled “Password Generator”](#password-generator)
IAM concepts
A tool provided by password managers to create strong, randomized passwords that are difficult to guess or crack. Password generators typically allow users to specify criteria such as length, character types, and special symbols to customize generated passwords.
### Password Manager
[Section titled “Password Manager”](#password-manager)
IAM concepts
A software tool or service designed to securely store, manage, and retrieve passwords and other sensitive information, such as usernames, credit card numbers, and notes. Password managers often encrypt data using strong cryptographic algorithms to protect against unauthorized access.
### Posture Assessment
[Section titled “Posture Assessment”](#posture-assessment)
Security concepts
A posture assessment evaluates the security status or “posture” of an organization’s IT environment. In IAM, it assesses how secure the current configuration of identities, access controls, and policies are, ensuring they adhere to best practices and regulatory requirements.
### Proxy
[Section titled “Proxy”](#proxy)
IT concepts
A proxy is an intermediary that routes requests between a client and a server, often used for security, logging, or anonymization. In IAM, proxies can be used to handle authentication, monitor access, or enforce security policies by intercepting requests before they reach the target service.
### Proxyless
[Section titled “Proxyless”](#proxyless)
IT concepts
In IAM, proxyless refers to an architecture where a client interacts directly with a service or resource without an intermediary (proxy). This can be mean access cloud services using an application programming interface (API).
### Quota
[Section titled “Quota”](#quota)
IT concepts
In IAM and workload management, a quota refers to the predefined limits set on resources that a user, machine, or application can access. For instance, quotas may restrict the number of API calls, storage usage, or the number of machines a user can provision within a cloud environment.
### RBAC (Role-Based Access Control)
[Section titled “RBAC (Role-Based Access Control)”](#rbac-role-based-access-control)
Security concepts
A method of access control where permissions are assigned to roles, and users or entities are assigned to those roles. Password managers may implement RBAC to enforce fine-grained access control and restrict access to sensitive features or data.
### Robotic Process Automation (RPA) Identity
[Section titled “Robotic Process Automation (RPA) Identity”](#robotic-process-automation-rpa-identity)
Identity types
An identity assigned to a software robot or bot used for automating repetitive tasks or workflows. RPA identities enable secure authentication and access control for robotic process automation solutions.
### Role-Based Access Control (RBAC)
[Section titled “Role-Based Access Control (RBAC)”](#role-based-access-control-rbac)
Identity types
A method of access control where permissions are assigned to roles, and users or entities are assigned to those roles, simplifying administration and ensuring consistent access management.
### Rogue Workload
[Section titled “Rogue Workload”](#rogue-workload)
NHI security threats
A rogue workload is an unauthorized or unmanaged workload that operates outside the governance or security policies of an organization. These workloads pose security risks, as they may lack proper identity, access controls, or monitoring, and could expose sensitive resources to threats.
### SAML (Security Assertion Markup Language)
[Section titled “SAML (Security Assertion Markup Language)”](#saml-security-assertion-markup-language)
IAM concepts
An XML-based standard for exchanging authentication and authorization data between identity providers and service providers. SAML enables single sign-on (SSO) and federated identity management across different systems or domains.
### Secret
[Section titled “Secret”](#secret)
Security concepts
Any sensitive piece of information that should be protected from unauthorized access, including passwords, cryptographic keys, tokens, and other credentials used to authenticate users or access resources.
### Secret Rotation
[Section titled “Secret Rotation”](#secret-rotation)
IAM concepts
The process of periodically updating secrets to mitigate the risk of unauthorized access or misuse. Secret rotation is essential for maintaining security hygiene and compliance with industry standards and regulations.
### Secrets Manager
[Section titled “Secrets Manager”](#secrets-manager)
IAM concepts
A centralized service or tool used to securely store, manage, and distribute sensitive information, such as passwords, API keys, cryptographic keys, and other credentials. Secrets managers help organizations improve security by reducing the risk of unauthorized access and data breaches.
### Secret Versioning
[Section titled “Secret Versioning”](#secret-versioning)
IAM concepts
The practice of maintaining multiple versions of secrets to facilitate rollback, auditing, and compliance requirements. Secrets managers often support versioning to track changes over time and ensure that previous versions of secrets remain accessible when needed.
### Service Account
[Section titled “Service Account”](#service-account)
Identity types
An identity used by applications or services to authenticate and authorize their interactions with other services, resources, or APIs. Service accounts are often used in automated processes and workflows.
### Service Identity
[Section titled “Service Identity”](#service-identity)
Identity types
A unique identifier assigned to a service or application workload, typically associated with access control policies and permissions within a computing environment. Service identities enable secure communication and interaction between different components of a system.
### Service Provider (SP)
[Section titled “Service Provider (SP)”](#service-provider-sp)
IAM concepts
A system, application, or service that relies on an identity provider for authentication and authorization. Service providers accept identity tokens or assertions from the IdP to grant access to their resources or functionalities.
### Service-to-Service Authentication
[Section titled “Service-to-Service Authentication”](#service-to-service-authentication)
Security concepts
Authentication mechanism used between services or applications to establish trust and securely exchange information without human involvement. Service-to-service authentication often relies on cryptographic protocols, such as OAuth 2.0, to authenticate and authorize interactions.
### SSH Key
[Section titled “SSH Key”](#ssh-key)
Identity types
Secure Shell (SSH) keys are cryptographic keys used for secure remote access to machines or systems, providing authentication and encryption for communication.
### Single Sign-On (SSO)
[Section titled “Single Sign-On (SSO)”](#single-sign-on-sso)
IAM concepts
A mechanism that allows users to authenticate once and gain access to multiple systems or services without needing to re-authenticate. SSO enhances user experience and productivity while reducing the burden of managing multiple sets of credentials.
### Syncing
[Section titled “Syncing”](#syncing)
IT concepts
The process of synchronizing data between multiple devices or platforms to ensure consistency and accessibility. Password managers often support syncing to enable users to access their passwords and sensitive information across different devices and environments.
### Secretless
[Section titled “Secretless”](#secretless)
IAM concepts
A secretless architecture refers to systems where applications and services authenticate and communicate without the need to manage secrets directly (e.g., passwords, tokens, or API keys). Instead, they rely on dynamically generated, just-in-time mechanisms for identity or access.
### Security Token Service (STS)
[Section titled “Security Token Service (STS)”](#security-token-service-sts)
IAM concepts
STS (such as AWS Security Token Service) is a cloud service that provides temporary, limited-privilege credentials for authenticated users or workloads. These tokens allow access to resources for a specific duration, reducing the need for long-term credentials and improving security.
### Service Account Token
[Section titled “Service Account Token”](#service-account-token)
Identity types
A service account token is a credential used by service accounts (non-human identities) to authenticate with systems and services. These tokens are often used by applications or services running in environments like Kubernetes to access resources without human interaction.
### Software Development Life Cycle (SDLC)
[Section titled “Software Development Life Cycle (SDLC)”](#software-development-life-cycle-sdlc)
IT concepts
SDLC is a structured process for developing software, consisting of phases such as planning, designing, coding, testing, deploying, and maintaining. In IAM, the SDLC is critical for ensuring that identity and access controls are built securely into software products throughout their development.
### Software Development Kit (SDK)
[Section titled “Software Development Kit (SDK)”](#software-development-kit-sdk)
IT concepts
An SDK is a set of tools, libraries, and documentation that enables developers to build software applications for specific platforms or services. In IAM, SDKs are often provided by IAM solutions or cloud providers to allow seamless integration of identity and access management functionality into applications.
### SPIFFE (Secure Production Identity Framework for Everyone)
[Section titled “SPIFFE (Secure Production Identity Framework for Everyone)”](#spiffe-secure-production-identity-framework-for-everyone)
IAM concepts
SPIFFE is an open-source framework for providing secure, cryptographic identities to services and workloads in dynamic, distributed systems like microservices. It defines standards for identity creation, verification, and lifecycle management across different cloud and infrastructure environments.
### SPIRE (SPIFFE Runtime Environment)
[Section titled “SPIRE (SPIFFE Runtime Environment)”](#spire-spiffe-runtime-environment)
IAM concepts
SPIRE is the production-grade implementation of the SPIFFE specification. It is a system that manages, issues, and verifies SPIFFE identities across distributed systems, ensuring workloads are properly authenticated within microservices environments.
### TLS (Transport Layer Security)
[Section titled “TLS (Transport Layer Security)”](#tls-transport-layer-security)
Security concepts
A cryptographic protocol that provides secure communication over a computer network. TLS is commonly used to encrypt API traffic and protect sensitive information from eavesdropping and tampering.
### TLS/SSL Certificate
[Section titled “TLS/SSL Certificate”](#tlsssl-certificate)
Identity types
Transport Layer Security (TLS) or Secure Sockets Layer (SSL) certificates provide secure communication over a network by encrypting data transmitted between machines, often used in web servers, APIs, and other network services.
### Token
[Section titled “Token”](#token)
Identity types
A piece of data used for authentication or authorization, typically issued by an identity provider or authentication service. Tokens may include access tokens, refresh tokens, session tokens, or JWTs, depending on the authentication mechanism and protocol used.
### Token Forging
[Section titled “Token Forging”](#token-forging)
NHI security threats
A technique where attackers create or manipulate authentication tokens to gain unauthorized access to systems or services. By forging tokens, attackers can impersonate legitimate non-human identities, bypass authentication controls, and escalate privileges within an environment. Proper validation, short token lifespans, and cryptographic integrity checks help mitigate this risk.
### Trust Relationship
[Section titled “Trust Relationship”](#trust-relationship)
Security concepts
A mutual agreement or configuration between identity providers and service providers that establishes trust and enables federated identity management. Trust relationships define the rules and protocols for exchanging identity tokens, assertions, and attributes securely.
### Two-Factor Authentication (2FA)
[Section titled “Two-Factor Authentication (2FA)”](#two-factor-authentication-2fa)
Security concepts
An authentication method that requires users to provide two forms of verification to access an account or system. Password managers and vaults often support 2FA to enhance security by requiring an additional factor, such as a code from a mobile app or a hardware token.
### Trust Provider
[Section titled “Trust Provider”](#trust-provider)
IAM concepts
A Trust Provider is a component that verifies the identity of workloads (applications, services) using cryptographically verifiable methods, such as certificates. Trust Providers are used to ensure that only verified and trusted workloads can access sensitive resources or other services.
### Universal Identity and Access Management (IAM)
[Section titled “Universal Identity and Access Management (IAM)”](#universal-identity-and-access-management-iam)
Identity types
Universal IAM refers to a unified approach to identity and access management that spans multiple environments, platforms, and services. This can also unify user and non-human identities. It enables organizations to manage identities and access controls consistently across on-premises, cloud, and hybrid environments, providing seamless identity lifecycle management and access governance.
### Vault
[Section titled “Vault”](#vault)
Identity types
A secure repository or container used to store and manage sensitive information, such as passwords, cryptographic keys, certificates, and API tokens. Vaults employ encryption and access control mechanisms to safeguard stored data from unauthorized access or disclosure.
### Workload
[Section titled “Workload”](#workload)
Identity types
A specific task, application, or process running on a machine or within a computing environment, often associated with cloud-based or distributed systems.
### Workload Identity Federation (WIF)
[Section titled “Workload Identity Federation (WIF)”](#workload-identity-federation-wif)
Identity types
Workload Identity Federation allows workloads running in one environment (e.g., on-premises or a third-party cloud) to authenticate and access resources in another environment (e.g., public cloud) without managing long-term credentials. It typically leverages federated trust models like OIDC (OpenID Connect) for secure authentication.
### X.509
[Section titled “X.509”](#x509)
Identity types
X.509 is a standard defining the format of public key certificates. These certificates are used in cryptographic systems (like SSL/TLS) to securely verify identities through a trusted certificate authority (CA), commonly used in IAM for machine and workload identity verification.
### X.509 Certificate
[Section titled “X.509 Certificate”](#x509-certificate)
Identity types
An X.509 certificate is a digital certificate that uses the X.509 standard to authenticate the identity of machines, applications, or users. It contains a public key, identity information, and is signed by a trusted certificate authority (CA), making it critical for secure communication in networks.
### YAML Ain’t Markup Language (YAML)
[Section titled “YAML Ain’t Markup Language (YAML)”](#yaml-aint-markup-language-yaml)
Identity types
YAML is a human-readable data serialization format used to define configuration data, often in DevOps and cloud environments. In IAM and workload management, YAML is frequently used in configuration files for systems like Kubernetes, where identity and access policies are defined for workloads. Formerly known as Yet Another Markup Language.
### Zero Trust
[Section titled “Zero Trust”](#zero-trust)
Security concepts
A security framework that assumes no entity, either inside or outside the network, should be automatically trusted. It mandates continuous verification of the security status of identities, devices, and network traffic before granting access to resources.
# Aembit LLM resources
> Resources for LLMs to learn about Aembit
Aembit supports the [llms.txt](https://llmstxt.org/) convention for Large Language Models (LLM) to learn about Aembit. This standard provides a way for LLMs to understand the capabilities and features of Aembit, as well as how to interact with it.
Aembit provides the following LLM resources:
* [llms.txt](/llms.txt) - list of available files and directories in the Aembit docs and their descriptions.
* [llms-small.txt](/llms-small.txt) - condensed documentation for Aembit, suitable for LLMs with limited context length.
* [llms-full.txt](/llms-full.txt) - complete documentation for Aembit.
## Aembit Cloud API Resources
[Section titled “Aembit Cloud API Resources”](#aembit-cloud-api-resources)
* [cloud-api-guide-full.txt](/_llms-txt/cloud-api-guide-full.txt) - Condensed, full API documentation for Aembit Cloud.
* [cloud-api-guide-endpoints.txt](/_llms-txt/cloud-api-guide-endpoints.txt) - Condensed, list of API endpoints for Aembit Cloud.
* [cloud-api-guide-schema.txt](/_llms-txt/cloud-api-guide-schema.txt) - Condensed, schema definitions for Aembit Cloud API.
# Aembit reference documentation
> Reference documentation for Aembit features and functionality
This section provides technical reference documentation for Aembit, including supported versions, environment variables, and configuration options.
The following pages are available in the reference section:
* [Edge Component Supported Versions](/reference/edge-components/edge-component-supported-versions)
* [Support Matrix](/reference/support-matrix)
### Edge Components Reference
[Section titled “Edge Components Reference”](#edge-components-reference)
* [Agent Log Level Reference](/reference/edge-components/agent-log-level-reference)
* [Edge Component Environment Variables](/reference/edge-components/edge-component-env-vars)
* [Helm Chart Configuration Options](/reference/edge-components/helm-chart-config-options)
# Edge Component log levels
> A reference page of all available Edge Component AEMBIT_LOG_LEVEL log levels
Aembit’s Edge Component’s such as Agent Controller and Agent Proxy have multiple log levels that you can set using the `AEMBIT_LOG_LEVEL` environment variable. Keep in mind that Agent Controller and Agent Proxy have slightly different values.
See the tables in the following sections for the available log levels and their descriptions:
* [Agent Controller](#agent-controller-log-levels)
* [Agent Proxy](#agent-proxy-log-levels)
To change your Agent Controller’s and Agent Proxy’s log levels, see [Changing log levels](/user-guide/deploy-install/advanced-options/changing-agent-log-levels).
Tip
All log levels are **case-insensitive**, so Aembit treats `ERROR`, `Error`, and `error` the same.
## Agent Controller log levels
[Section titled “Agent Controller log levels”](#agent-controller-log-levels)
The following table contains the *Agent Controller* log levels and their descriptions for when setting the `AEMBIT_LOG_LEVEL` environment variable:
| Log level | Description |
| ---------------- | ---------------------------------------------------------------------------------------------------------------------------------------------------------------------------------------- |
| `fatal` | System is unusable. Critical failures requiring immediate attention, often leading to Agent Controller shutdown. |
| `error` | Function-level failures that impact operations but don’t crash Agent Controller. These indicate significant problems that need attention but allow Agent Controller to continue running. |
| `warning` **\*** | Potentially harmful situations that don’t disrupt core functionality. These highlight issues that could become problems but aren’t blocking operations. \*Default value |
| `information` | Normal operational messages highlighting key events. These track expected Agent Controller behavior and state changes. |
| `debug` | Detailed information useful during development. These messages expose internal Agent Controller state and control flow. |
| `verbose` | Most granular logging, showing all possible detail. These capture every minor operation and state change within Agent Controller. |
## Agent Proxy log levels
[Section titled “Agent Proxy log levels”](#agent-proxy-log-levels)
The following table contains the *Agent Proxy* log levels and their descriptions for when setting the `AEMBIT_LOG_LEVEL` environment variable:
| Log level | Description |
| ------------- | -------------------------------------------------------------------------------------------------------------------------------------------------------------------------------------- |
| `error` | Function-level failures that impact operations but don’t crash the Agent Proxy. These indicate significant problems that need attention but allow the Agent Proxy to continue running. |
| `warn` | Potentially harmful situations that don’t disrupt core functionality. These highlight issues that could become problems but aren’t blocking operations. |
| `info` **\*** | Normal operational messages highlighting significant events in the Agent Proxy’s lifecycle. These track expected Agent Proxy behavior and state changes. \*Default value |
| `debug` | Detailed information useful during development and troubleshooting. These messages expose internal Agent Proxy state and control flow. |
| `trace` | Most granular logging level showing step-by-step execution flow. These capture every minor operation and state change within the Agent Proxy. |
| `off` | Disables all logging output. Aembit records no messages regardless of their severity level. |
# Edge Component environment variables reference
> Reference for environment variables of Edge Components categorized by deployment type
The following sections list and describe the environment variables available for Edge Components:
* [Agent Controller](#agent-controller-environment-variables)
* [Agent Proxy](#agent-proxy-environment-variables)
* [Agent Injector](#agent-injector-environment-variables)
## Agent Controller environment variables
[Section titled “Agent Controller environment variables”](#agent-controller-environment-variables)
Here is a list of all available environment variables for configuring the Agent Controller installer:
### `AEMBIT_AGENT_CONTROLLER_ID` Required
[Section titled “AEMBIT\_AGENT\_CONTROLLER\_ID ”](#aembit_agent_controller_id)
Default - not set
OS-All
Required if not using `AEMBIT_DEVICE_CODE`.
The Agent Controller ID, available in your tenant’s administrative console for each Agent Controller. This ID is utilized for Trust Provider registration. You must provide either this or the `AEMBIT_DEVICE_CODE` environment variable.
*Example*:\
`01234567-89ab-cdef-0123-456789abcdef`
***
### `AEMBIT_DEVICE_CODE` Required
[Section titled “AEMBIT\_DEVICE\_CODE ”](#aembit_device_code)
Default - not set
OS-All
Required if not using `AEMBIT_AGENT_CONTROLLER_ID`.
The device code for the Agent Controller, which can be generated in your tenant’s administrative console and is used for code-based registration. You must provide either this or the `AEMBIT_AGENT_CONTROLLER_ID` environment variable.
*Example*:\
`123456`
***
### `AEMBIT_TENANT_ID` Required
[Section titled “AEMBIT\_TENANT\_ID ”](#aembit_tenant_id)
Default - not set
OS-All
The Aembit Tenant ID that the Agent Controller will register with.
*Example*:\
`123abc`
***
### `AEMBIT_HTTP_PORT_DISABLED`
[Section titled “AEMBIT\_HTTP\_PORT\_DISABLED”](#aembit_http_port_disabled)
Default - `false`
OS-All
When `true`, disables HTTP support in Agent Controller, allowing communication exclusively over HTTPS. When `false`, HTTP is enabled. HTTP traffic uses port 5000 for virtual machine installations and port 80 for container-based deployments.
*Example*:\
`true`
***
### `AEMBIT_KERBEROS_ATTESTATION_ENABLED`
[Section titled “AEMBIT\_KERBEROS\_ATTESTATION\_ENABLED”](#aembit_kerberos_attestation_enabled)
Default - not set
OS-All
When `true`, enables Kerberos-based attestation.
**For Linux:** You must set `KRB5_KTNAME` with the Agent Controller keytab file path. If Kerberos is installed, `KRB5_KTNAME` defaults to `/etc/krb5.keytab`.
**For Windows:** Kerberos information is inherited from the user the Agent Controller runs as.
*Example*:\
`true`
***
### `AEMBIT_LOG_LEVEL`
[Section titled “AEMBIT\_LOG\_LEVEL”](#aembit_log_level)
Default - `information`
OS-All
Set the Agent Controller log level. The supported levels include `fatal`, `error`, `warning`, `information`, `debug`, `verbose`. The log level value is case insensitive. See [Log level reference](/reference/edge-components/agent-log-level-reference#agent-controller-log-levels) for details.
*Example*:\
`verbose`
***
### `AEMBIT_MANAGED_TLS_HOSTNAME`
[Section titled “AEMBIT\_MANAGED\_TLS\_HOSTNAME”](#aembit_managed_tls_hostname)
Default - not set
OS-All
The hostname Agent Proxy uses to connect to the Agent Controller. If set, Aembit uses its own PKI for [Agent Controller TLS](/user-guide/deploy-install/advanced-options/agent-controller/configure-aembit-pki-agent-controller-tls).
This is mutually exclusive with `TLS_PEM_PATH` and `TLS_KEY_PATH`.
*Example*:\
`aembit-agent-controller.example.com`
***
### `AEMBIT_METRICS_ENABLED`
[Section titled “AEMBIT\_METRICS\_ENABLED”](#aembit_metrics_enabled)
Default - `true`
OS-All
Enable Prometheus metrics. This is enabled by default.
*Example*:\
`true`
***
### `AEMBIT_STACK_DOMAIN`
[Section titled “AEMBIT\_STACK\_DOMAIN”](#aembit_stack_domain)
Default - `useast2.aembit.io`
OS-All
The cloud stack to connect to. **Do not set this value unless directed by your Aembit representative.**
***
### `SERVICE_LOGON_ACCOUNT`
[Section titled “SERVICE\_LOGON\_ACCOUNT”](#service_logon_account)
Default - not set
OS-Windows
When set, this runs the Agent Controller as a different user which is useful for High Availability deployments. The name you provide must be the fully qualified sAMAccount name.
*Example*:\
`myDomain\MyServiceAccount$`
***
### `TLS_PEM_PATH`
[Section titled “TLS\_PEM\_PATH”](#tls_pem_path)
Default - not set
OS-All
The path to your TLS certificate file. Allows you to specify your own TLS key and certificate to use with [Agent Controller TLS](/user-guide/deploy-install/advanced-options/agent-controller/configure-aembit-pki-agent-controller-tls).
This must be used along side `TLS_KEY_PATH` and is mutually exclusive with `AEMBIT_MANAGED_TLS_HOSTNAME`.
*Example*:\
`C:\aembit.crt`, `/etc/ssl/certs/aembit.crt`
***
### `TLS_KEY_PATH`
[Section titled “TLS\_KEY\_PATH”](#tls_key_path)
Default - not set
OS-All
The path to your TLS private key file. Allows you to specify your own TLS key and certificate to use with [Agent Controller TLS](/user-guide/deploy-install/advanced-options/agent-controller/configure-aembit-pki-agent-controller-tls).
This must be used along side `TLS_PEM_PATH` and is mutually exclusive with `AEMBIT_MANAGED_TLS_HOSTNAME`.
*Example*:\
`C:\aembit.key`, `/etc/ssl/private/.aembit.key`
## Agent Proxy environment variables
[Section titled “Agent Proxy environment variables”](#agent-proxy-environment-variables)
Here is a list of all available environment variables for configuring the Agent Proxy installer:
### `AEMBIT_AGENT_CONTROLLER` Required
[Section titled “AEMBIT\_AGENT\_CONTROLLER ”](#aembit_agent_controller)
Default - not set
OS-All
The location (scheme, host, and port) of the Agent Controller that the Agent Proxy should use.
*Example*:\
`http://agentcontroller.local:5000`
***
### `AEMBIT_CLIENT_WORKLOAD_PROCESS_IDENTIFICATION_ENABLED`
[Section titled “AEMBIT\_CLIENT\_WORKLOAD\_PROCESS\_IDENTIFICATION\_ENABLED”](#aembit_client_workload_process_identification_enabled)
Default - `false`
OS-Linux
Enable [Process Name](/user-guide/access-policies/client-workloads/identification/process-name) Client Workload identification.
*Example*:\
`false`
***
### `AEMBIT_DEBUG_MAX_CAPTURED_PACKETS_PER_DEVICE`
[Section titled “AEMBIT\_DEBUG\_MAX\_CAPTURED\_PACKETS\_PER\_DEVICE”](#aembit_debug_max_captured_packets_per_device)
Default - not set
OS-Linux
The maximum number of network packets that Agent Proxy monitors per IPv4 network device.
*Example*:\
`2000`
***
### `AEMBIT_DOCKER_CONTAINER_CIDR`
[Section titled “AEMBIT\_DOCKER\_CONTAINER\_CIDR”](#aembit_docker_container_cidr)
Default - not set
OS-Linux
Supports Client Workloads running in Docker Compose on a Virtual Machine. This environment variable specifies the Docker Compose network CIDR that Agent Proxy handles.
*Example*:\
`100.64.0.0/10`
***
### `AEMBIT_HTTP_SERVER_PORT`
[Section titled “AEMBIT\_HTTP\_SERVER\_PORT”](#aembit_http_server_port)
Default - `8000`
OS-All
Specifies the port the Agent Proxy uses to manage HTTP traffic directed to it via the `http_proxy` and `https_proxy` environment variables. If this port conflicts with any Client Workload ports, it can be overridden with this environment variable.
*Example*:\
`8080`
***
### `AEMBIT_KERBEROS_ATTESTATION_ENABLED`
[Section titled “AEMBIT\_KERBEROS\_ATTESTATION\_ENABLED”](#aembit_kerberos_attestation_enabled-1)
Default - not set
OS-Linux
Enable Kerberos-based attestation. This value isn’t set by default. To enable it, set this value to true.
*Example*:\
`true`
***
### `AEMBIT_LOG` (deprecated) / `AEMBIT_LOG_LEVEL`
[Section titled “AEMBIT\_LOG (deprecated) / AEMBIT\_LOG\_LEVEL”](#aembit_log-deprecated--aembit_log_level)
Default - `info`
OS-All
Set the Agent Proxy log level. The supported levels include `error`, `warn`, `info`, `debug`, `trace`, `off`. The log level value is case insensitive. See [Log level reference](/reference/edge-components/agent-log-level-reference#agent-proxy-log-levels) for details.
*Example*:\
`debug`
***
### `AEMBIT_METRICS_ENABLED`
[Section titled “AEMBIT\_METRICS\_ENABLED”](#aembit_metrics_enabled-1)
Default - `true`
OS-All
Enable Prometheus metrics. By default, this is set to `true`.
*Example*:\
`true`
***
### `AEMBIT_METRICS_PORT`
[Section titled “AEMBIT\_METRICS\_PORT”](#aembit_metrics_port)
Default - `9099`
OS-All
The port where Prometheus metrics are exposed.
*Example*:\
`9099`
***
### `AEMBIT_PASS_THROUGH_TRAFFIC_BEFORE_REGISTRATION`
[Section titled “AEMBIT\_PASS\_THROUGH\_TRAFFIC\_BEFORE\_REGISTRATION”](#aembit_pass_through_traffic_before_registration)
Default - `true`
OS-All
When set to true, Agent Proxy operates in Passthrough mode, allowing connections to proceed without credential injection until Aembit Cloud registration completes. When set to false, incoming Client Workloads will be unable to connect until after registration completes. On Kubernetes this has the effect of [delaying pod startup](/user-guide/deploy-install/kubernetes/kubernetes#delaying-pod-startup-until-agent-proxy-has-registered).
*Example*:\
`false`
***
### `AEMBIT_POST_START_MAX_WAIT_SEC` Kubernetes only
[Section titled “AEMBIT\_POST\_START\_MAX\_WAIT\_SEC ”](#aembit_post_start_max_wait_sec)
Default - `60`
OS-All
The maximum number of seconds you permit the Agent Proxy postStart lifecycle hook to run before failing Client Workload pod deployment.
See [Delaying pod startup until the Agent Proxy has registered](/user-guide/deploy-install/kubernetes/kubernetes#delaying-pod-startup-until-agent-proxy-has-registered).
*Example*:\
`100`
***
### `AEMBIT_PRIVILEGED_KEYTAB`
[Section titled “AEMBIT\_PRIVILEGED\_KEYTAB”](#aembit_privileged_keytab)
Default - `false`
OS-Linux
Set the configuration flag to enable the Agent Proxy to access a Kerberos principal located in a keytab file, which is restricted to root-only read permissions. Mandatory if `AEMBIT_KERBEROS_ATTESTATION_ENABLED` is enabled.
*Example*:\
`true`
***
### `AEMBIT_RESOURCE_SET_ID`
[Section titled “AEMBIT\_RESOURCE\_SET\_ID”](#aembit_resource_set_id)
Default - not set
OS-All
Associates Agent Proxy with a specific [Resource Set](/user-guide/administration/resource-sets/).
*Example*:\
`de48ebc2-3587-4cc6-823b-46434991e896`
***
### `AEMBIT_SIGTERM_STRATEGY`
[Section titled “AEMBIT\_SIGTERM\_STRATEGY”](#aembit_sigterm_strategy)
Default - `immediate`
OS-Linux
The strategy used by Agent Proxy to handle the `SIGTERM` signal. Supported values are `immediate`, which exits immediately, and `sigkill`, which ignores the `SIGTERM` signal and waits for a `SIGKILL`. For details on configuring the `AEMBIT_SIGTERM_STRATEGY` environment variable and termination strategies, see [Agent Proxy Termination Strategy](/user-guide/deploy-install/advanced-options/agent-proxy/agent-proxy-termination-strategy).
*Example*:\
`sigkill`
***
### `AEMBIT_STEERING_ALLOWED_HOSTS`
[Section titled “AEMBIT\_STEERING\_ALLOWED\_HOSTS”](#aembit_steering_allowed_hosts)
Default - not set
OS-Linux
A list of comma-separated hostnames for which Agent Proxy should proxy traffic.
*Example*:\
`graph.microsoft.com,google.com`
***
### `CLIENT_WORKLOAD_ID`
[Section titled “CLIENT\_WORKLOAD\_ID”](#client_workload_id)
Default - not set
OS-All
Associate Agent Proxy with the specified Client Workload Id. Aembit uses this in conjunction with [Aembit Client Id](/user-guide/access-policies/client-workloads/identification/aembit-client-id) configuration.
*Example*:\
`7e75e718-7634-480b-9f7b-a07bb5a4f11d`
## Agent Injector environment variables
[Section titled “Agent Injector environment variables”](#agent-injector-environment-variables)
### `AEMBIT_LOG` (deprecated) / `AEMBIT_LOG_LEVEL`
[Section titled “AEMBIT\_LOG (deprecated) / AEMBIT\_LOG\_LEVEL”](#aembit_log-deprecated--aembit_log_level-1)
Default - `info`
OS-All
Set the Agent Injector log level. The supported levels include `error`, `warn`, `info` (default value), `debug`, `trace`, and `off`. See [Log level reference](/reference/edge-components/agent-log-level-reference) for details.
*Example*:\
`warn`
# Edge Component Supported Versions
> Supported versions and release dates for Aembit Edge Components and packages
Aembit Edge Components and packages are frequently updated with feature enhancements, bug fixes, and additional functionality.
The compatibility matrices shown on this page list the supported versions for:
* [Aembit Edge Components](#supported-edge-components-versions)
* [Agent Proxy](#agent-proxy)
* [Agent Controller](#agent-controller)
* [Agent Injector](#agent-injector)
* [Init sidecar container](#init-sidecar-container)
* [Aembit packages](#supported-package-versions)
* [ECS Terraform](#ecs-terraform)
* [Helm Chart](#helm-chart)
* [Lambda Extension](#lambda-extension)
* [Virtual appliance](#virtual-appliance)
## Supported Edge Components versions
[Section titled “Supported Edge Components versions”](#supported-edge-components-versions)
The following matrices list the Agent Proxy, Agent Controller, Agent Injector, and Init Sidecar Container Edge Component versions that Aembit supports along with their release dates.
### Agent Proxy
[Section titled “Agent Proxy”](#agent-proxy)
| Agent Proxy Version | Release Date |
| ------------------------ | ------------ |
| 1.23.3002 | 5/26/2025 |
| 1.22.2905 | 4/21/2025 |
| 1.21.2789 | 4/3/2025 |
| 1.21.2714 | 3/5/2025 |
| 1.21.2696 | 3/3/2025 |
| 1.21.2670 | 2/20/2025 |
| 1.20.2559 (Windows only) | 1/28/2025 |
| 1.19.2439 | 12/26/2024 |
| 1.18.2265 | 10/29/2024 |
| 1.18.2262 | 10/22/2024 |
| 1.17.2255 | 10/8/2024 |
| 1.17.2169 | 9/17/2024 |
| 1.17.2155 | 9/5/2024 |
| 1.16.2139 | 8/27/2024 |
| 1.14.1980 | 6/19/2024 |
| 1.14.1959 | 5/30/2024 |
| 1.14.1913 | 5/14/2024 |
| 1.13.1851 | 4/19/2024 |
| 1.13.1818 | 4/8/2024 |
| 1.12.1699 | 3/12/2024 |
| 1.12.1621 | 2/29/2024 |
| 1.11.1551 | 2/8/2024 |
### Agent Controller
[Section titled “Agent Controller”](#agent-controller)
| Agent Controller Version | Release Date |
| ------------------------ | ------------ |
| 1.23.2160 | 6/2/2025 |
| 1.21.2101 (Windows only) | 4/4/2025 |
| 1.21.1914 | 2/27/2025 |
| 1.19.1752 | 12/26/2024 |
| 1.18.1602 | 10/22/2024 |
| 1.17.1579 | 10/8/2024 |
| 1.17.1533 | 9/30/2024 |
| 1.17.1518 | 9/17/2024 |
| 1.16.1341 (ECS Only) | 7/29/2024 |
| 1.14.1074 | 5/10/2024 |
| 1.12.974 | 3/20/2024 |
| 1.12.927 | 3/12/2024 |
| 1.12.878 | 2/29/2024 |
### Agent Injector
[Section titled “Agent Injector”](#agent-injector)
| Agent Injector Version | Release Date |
| ---------------------- | ------------ |
| 1.23.295 | 5/30/2025 |
| 1.18.259 | 10/23/2024 |
| 1.17.234 | 10/8/2024 |
| 1.17.198 | 9/20/2024 |
| 1.14.190 | 5/30/2024 |
| 1.14.182 | 4/30/2024 |
| 1.9.142 | 10/16/2023 |
| 1.8.137 | 9/27/2023 |
### Init sidecar container
[Section titled “Init sidecar container”](#init-sidecar-container)
| Init Sidecar Container Version | Release Date |
| ------------------------------ | ------------ |
| 1.18.92 | 1/14/2025 |
| 1.14.86 | 5/30/2024 |
| 1.13.77 | 4/19/2024 |
| 1.8.43 | 9/27/2023 |
| 1.7.37 | 8/14/2023 |
| 1.0.30 | 2/10/2023 |
## Supported package versions
[Section titled “Supported package versions”](#supported-package-versions)
The following matrices list the ECS Terraform, Helm Chart, Lambda Layer, Lambda Extension, and Virtual Appliance package versions that Aembit supports along with their release dates.
### ECS Terraform
[Section titled “ECS Terraform”](#ecs-terraform)
| ECS Terraform Version | Release Date |
| --------------------- | ------------ |
| 1.23.3 | 6/2/2025 |
| 1.23.1 | 5/26/2025 |
| 1.23.0 | 5/21/2025 |
| 1.22.1 | 4/21/2025 |
| 1.21.4 | 4/3/2025 |
| 1.21.3 | 3/5/2025 |
| 1.21.1 | 2/27/2025 |
| 1.21.0 | 2/20/2025 |
| 1.20.0 | 12/26/2024 |
| 1.17.4 | 10/08/2024 |
| 1.17.3 | 9/30/2024 |
| 1.17.1 | 9/17/2024 |
| 1.17.0 | 9/5/2024 |
| 1.16.2 | 8/27/2024 |
| 1.16.0 | 8/11/2024 |
| 1.15.0 | 6/19/2024 |
| 1.14.3 | 5/30/2024 |
| 1.14.2 | 5/14/2024 |
| 1.14.1 | 5/10/2024 |
| 1.13.2 | 4/19/2024 |
| 1.13.1 | 4/8/2024 |
| 1.13.0 | 3/20/2024 |
| 1.12.2 | 3/12/2024 |
| 1.12.1 | 2/29/2024 |
| 1.12.0 | 2/8/2024 |
### Helm chart
[Section titled “Helm chart”](#helm-chart)
| Helm Chart Version | Release Date |
| ------------------ | ------------ |
| 1.23.3 | 6/2/2025 |
| 1.23.401 | 5/30/2025 |
| 1.23.394 | 5/26/2025 |
| 1.22.364 | 4/21/2025 |
| 1.21.347 | 4/3/2025 |
| 1.21.331 | 3/5/2025 |
| 1.21.329 | 3/3/2025 |
| 1.21.325 | 2/27/2025 |
| 1.21.318 | 2/20/2025 |
| 1.20.300 | 1/14/2025 |
| 1.20.298 | 12/26/2024 |
| 1.18.294 | 10/29/2024 |
| 1.18.293 | 10/23/2024 |
| 1.17.288 | 10/11/2024 |
| 1.17.282 | 10/08/2024 |
| 1.17.272 | 9/30/2024 |
| 1.17.258 | 9/20/2024 |
| 1.17.254 | 9/17/2024 |
| 1.17.246 | 9/5/2024 |
| 1.16.238 | 8/11/2024 |
| 1.15.220 | 6/19/2024 |
| 1.14.211 | 5/30/2024 |
| 1.14.205 | 5/14/2024 |
| 1.14.204 | 5/10/2024 |
| 1.14.194 | 4/30/2024 |
| 1.13.190 | 4/19/2024 |
| 1.13.181 | 3/19/2024 |
| 1.12.176 | 3/12/2024 |
| 1.12.174 | 2/29/2024 |
| 1.12.164 | 2/9/2024 |
### Lambda Extension
[Section titled “Lambda Extension”](#lambda-extension)
| Lambda Extension Version | Release Dates |
| ------------------------ | ------------- |
| 1.22.74 | 4/21/2025 |
| 1.21.66 | 4/3/2025 |
| 1.21.65 | 3/5/2025 |
| 1.21.64 | 3/3/2025 |
| 1.21.62 | 2/20/2025 |
| 1.19.56 | 12/26/2024 |
| 1.18.53 | 11/22/2024 |
| 1.17.48 | 10/08/2024 |
| 1.17.46 | 9/17/2024 |
| 1.17.45 | 9/5/2024 |
| 1.16.43 | 6/19/2024 |
| 1.14.38 | 6/19/2024 |
| 1.14.37 | 5/31/2024 |
| 1.14.29 | 4/22/2024 |
### Lambda Layer
[Section titled “Lambda Layer”](#lambda-layer)
| Lambda Layer Version | Release Dates |
| -------------------- | ------------- |
| 1.23.112 | 5/26/2025 |
| 1.22.110 | 5/6/2025 |
### Virtual appliance
[Section titled “Virtual appliance”](#virtual-appliance)
| Virtual Appliance Version | Release Dates |
| ------------------------- | ------------- |
| 1.18.64 | 11/14/2024 |
# Edge Component Helm chart configuration options reference
> Reference for Helm chart configuration options when deploying Aembit to Kubernetes
The Aembit Helm Chart includes configuration options that control the behavior of Aembit Edge Components (Agent Controller, Agent Proxy, and Agent Injector):
### `tenant` Required
[Section titled “tenant ”](#tenant)
Default - not set
The Aembit Tenant ID that Edge Components use.
*Example*:\
`123abc`
***
### `agentController.deviceCode` Required
[Section titled “agentController.deviceCode ”](#agentcontrollerdevicecode)
Default - not set
Required if not using `agentController.id`.
Aembit uses device codes for code-based registration of Agent Controllers, which you can generate in your tenant’s Aembit admin console. You must provide either this or the `agentController.id` value.
*Example*:\
`123456`
***
### `agentController.id` Required
[Section titled “agentController.id ”](#agentcontrollerid)
Default - not set
Required if not using `agentController.deviceCode`.
Aembit uses this unique ID for attestation-based registration of Agent Controllers, which you can find in the Aembit admin console. You must provide either this or the `agentController.deviceCode` value.
*Example*:\
`01234567-89ab-cdef-0123-456789abcdef`
***
### `agentController.tls.secretName`
[Section titled “agentController.tls.secretName”](#agentcontrollertlssecretname)
Default - not set
The name of a [Kubernetes TLS secret](https://kubernetes.io/docs/reference/kubectl/generated/kubectl_create/kubectl_create_secret_tls/) containing a private key and certificate used for Agent Controller TLS.
*Example*:\
`aembit_ac_tls`
***
### `agentInjector.filters.namespaces`
[Section titled “agentInjector.filters.namespaces”](#agentinjectorfiltersnamespaces)
Default - not set
This configuration specifies the Kubernetes namespaces where the Agent Project will be injected as a sidecar into Client Workloads.
*Example*:\
`{namespace1, namespace2}`
***
### `agentInjector.env`
[Section titled “agentInjector.env”](#agentinjectorenv)
Default - not set
This allows you to specify a list of environment variables for the Agent Injector. You can pass it to Helm using the `-f ` option (to pass a values file) or directly via `--set "agentInjector.env.AEMBIT_SOME_ENV=some_value"`.
*Example*:\
`AEMBIT_SOME_ENV=some_value`
***
### `agentProxy.trustedCertificates`
[Section titled “agentProxy.trustedCertificates”](#agentproxytrustedcertificates)
Default - not set
A base64 encoded list of PEM-encoded certificates that the Agent Proxy will trust. For more information, please refer to [Trusting Private CA](/user-guide/deploy-install/advanced-options/trusting-private-cas) for more information.
*Example*:\
`L1S2L3S4L5C6R7U8D9F0I1C2A3T4E5`
***
### `agentProxy.env`
[Section titled “agentProxy.env”](#agentproxyenv)
Default - not set
This allows you to specify a list of environment variables for the Agent Proxy. You can pass it to Helm using the `-f ` option (to pass a values file) or directly via `--set "agentProxy.env.AEMBIT_SOME_ENV=some_value"`.
*Example*:\
`AEMBIT_SOME_ENV=some_value`
# Support matrix
> Supported features for each deployment type
The matrices on this page detail the compatible deployment types for [application protocols](#application-protocols) and Aembit features such as [Client Workload Identifiers](#client-workload-identifiers), [Agent Controller Trust Providers](#agent-controller-trust-providers), [Agent Proxy Trust Providers](#agent-proxy-trust-providers), [Conditional Access](#conditional-access) and the [operating systems for VMs](#supported-operating-systems-for-vms) that Aembit supports.
Aembit Edge supports multiple types of deployments:
* Kubernetes
* AWS Elastic Container Service (ECS) Fargate
* Virtual Machines (Linux, Windows, Docker-compose)
* AWS Lambda (function, container)
* Virtual Appliance (VMware)
For Linux Virtual Machines
Aembit supports Client Workloads running directly on the VM or within Docker-compose on the VM. Aembit collects different data from applications running in Docker-compose compared to those running directly on the VM.
## Key
[Section titled “Key”](#key)
| Icon | Meaning |
| ---- | -------------- |
| ✅ | Supported |
| ❌ | Not supported |
| ⚪️ | Not applicable |
## Application protocols
[Section titled “Application protocols”](#application-protocols)
| Application Protocols | Kubernetes | AWS EKS Fargate | AWS ECS Fargate | Virtual Machine (Linux) | Virtual Machine (Windows) | Virtual Appliance | Docker-compose on VMs | AWS Lambda |
| ------------------------------- | ---------- | --------------- | --------------- | ----------------------- | ------------------------- | ----------------- | --------------------- | ---------- |
| HTTP 1.1 | ✅ | ✅ | ✅ | ✅ | ✅ | ✅ | ✅ | ✅ |
| Postgres 3.0 | ✅ | ❌ | ❌ | ✅ | ❌ | ❌ | ✅ | ❌ |
| MySQL 10 | ✅ | ❌ | ❌ | ✅ | ❌ | ❌ | ✅ | ❌ |
| Redis RESP2 | ✅ | ❌ | ❌ | ✅ | ❌ | ❌ | ✅ | ❌ |
| Redis RESP3 | ✅ | ❌ | ❌ | ✅ | ❌ | ❌ | ✅ | ❌ |
| Snowflake SDK (HTTP-based) | ✅ | ✅ | ✅ | ✅ | ✅ | ✅ | ✅ | ✅ |
| Snowflake REST API (HTTP-based) | ✅ | ✅ | ✅ | ✅ | ✅ | ✅ | ✅ | ✅ |
| Amazon Redshift 3.0 | ✅ | ❌ | ❌ | ✅ | ❌ | ❌ | ✅ | ❌ |
## Client Workload Identifiers
[Section titled “Client Workload Identifiers”](#client-workload-identifiers)
| Client Workload Identifiers | Kubernetes | AWS EKS Fargate | AWS ECS Fargate | Virtual Machine (Linux) | Virtual Machine (Windows) | Virtual Appliance | Docker-compose on VMs | AWS Lambda |
| --------------------------- | ---------- | --------------- | --------------- | ----------------------- | ------------------------- | ----------------- | --------------------- | ---------- |
| Aembit Client ID | ✅ | ✅ | ✅ | ✅ | ✅ | ❌ | ✅ | ✅ |
| AWS Account ID | ❌ | ❌ | ❌ | ✅\* | ✅\* | ❌ | ✅\* | ❌ |
| AWS EC2 Instance ID | ❌ | ❌ | ❌ | ✅\* | ✅\* | ❌ | ✅\* | ❌ |
| AWS ECS Task Family | ❌ | ❌ | ✅ | ❌ | ❌ | ❌ | ❌ | ❌ |
| AWS Region | ❌ | ❌ | ❌ | ✅\* | ✅\* | ❌ | ✅\* | ❌ |
| AWS Subscription ID | ❌ | ❌ | ❌ | ✅\* | ✅\* | ❌ | ✅\* | ❌ |
| AWS VM ID | ❌ | ❌ | ❌ | ✅\* | ✅\* | ❌ | ✅\* | ❌ |
| Hostname | ❌ | ❌ | ❌ | ✅ | ✅ | ❌ | ✅ | ❌ |
| Kubernetes Pod name | ✅ | ✅ | ❌ | ❌ | ❌ | ❌ | ❌ | ❌ |
| Kubernetes Pod name prefix | ✅ | ✅ | ❌ | ❌ | ❌ | ❌ | ❌ | ❌ |
| Process Name \*\* | ❌ | ❌ | ❌ | ✅ | ❌ | ❌ | ❌ | ❌ |
| Process User Name \*\* | ❌ | ❌ | ❌ | ✅ | ❌ | ❌ | ❌ | ❌ |
| Source IP | ✅ | ✅ | ✅ | ✅ | ✅ | ✅ | ✅ | ❌ |
| AWS Lambda ARN | ❌ | ❌ | ❌ | ❌ | ❌ | ❌ | ❌ | ✅ |
> \* *These Client Workload identifiers are available for their respective cloud platforms only*.\
> \*\* *Before using the Process Name and Process User Name identifiers, you must enable them in Agent Proxy first.* *See [Process name](/user-guide/access-policies/client-workloads/identification/process-name) for details*
## Agent Controller Trust Providers
[Section titled “Agent Controller Trust Providers”](#agent-controller-trust-providers)
| Trust Providers | Kubernetes | AWS EKS Fargate | AWS ECS Fargate | Virtual Machine | Virtual Appliance | Docker-compose on VMs | AWS Lambda |
| -------------------------- | ---------- | --------------- | --------------- | --------------- | ----------------- | --------------------- | ---------- |
| AWS Role | ❌ | ❌ | ✅ | ❌ | ❌ | ⚪️ | ⚪️ |
| AWS Metadata Service | ✅\* | ❌ | ❌ | ✅\* | ❌ | ⚪️ | ⚪️ |
| Azure Metadata Service | ✅\* | ❌ | ❌ | ✅\* | ❌ | ⚪️ | ⚪️ |
| GCP Identity Token | ✅\* | ❌ | ❌ | ✅\* | ❌ | ⚪️ | ⚪️ |
| Kubernetes Service Account | ✅ | ✅ | ❌ | ❌ | ❌ | ⚪️ | ⚪️ |
| Kerberos | ❌ | ❌ | ❌ | ❌ | ❌ | ⚪️ | ⚪️ |
> \* *Aembit tailors the Trust Providers available in Kubernetes and VM environments specifically for their respective cloud platforms*.
## Agent Proxy Trust Providers
[Section titled “Agent Proxy Trust Providers”](#agent-proxy-trust-providers)
| Trust Providers | Kubernetes | AWS EKS Fargate | AWS ECS Fargate | Virtual Machine (Linux) | Virtual Machine (Windows) | Virtual Appliance | Docker-compose on VMs | AWS Lambda |
| -------------------------- | ---------- | --------------- | --------------- | ----------------------- | ------------------------- | ----------------- | --------------------- | ---------- |
| AWS Role | ❌ | ❌ | ✅ | ✅\*\* | ✅\*\* | ❌ | ❌ | ✅ |
| AWS Metadata Service | ✅\* | ❌ | ❌ | ✅\* | ✅\* | ❌ | ✅\* | ❌ |
| Azure Metadata Service | ✅\* | ❌ | ❌ | ✅\* | ✅\* | ❌ | ✅\* | ❌ |
| GCP Identity Token | ❌ | ❌ | ❌ | ❌ | ❌ | ❌ | ❌ | ❌ |
| Kubernetes Service Account | ✅ | ✅ | ❌ | ❌ | ❌ | ❌ | ❌ | ❌ |
| Kerberos | ❌ | ❌ | ❌ | ✅ | ✅ | ❌ | ✅ | ❌ |
> \* *Aembit tailors the Trust Providers available in Kubernetes and VM environments specifically for their respective cloud platforms*.\
> \*\* *The AWS Role Trust Provider supports only EC2 instances with an attached IAM role*.
## Conditional Access
[Section titled “Conditional Access”](#conditional-access)
| Access Conditions | Kubernetes | AWS EKS Fargate | AWS ECS Fargate | Virtual Machine (Linux) | Virtual Machine (Windows) | Virtual Appliance | Docker-compose on VMs | AWS Lambda |
| ----------------- | ---------- | --------------- | --------------- | ----------------------- | ------------------------- | ----------------- | --------------------- | ---------- |
| CrowdStrike | ❌ | ❌ | ❌ | ✅ | ✅ | ❌ | ✅ | ❌ |
| Wiz | ✅ | ✅ | ❌ | ❌ | ❌ | ❌ | ❌ | ✅ |
| Time | ✅ | ✅ | ✅ | ✅ | ✅ | ✅ | ✅ | ✅ |
| GeoIP | ✅ | ✅ | ✅ | ✅ | ✅ | ✅ | ✅ | ✅ |
## Supported operating systems for VMs
[Section titled “Supported operating systems for VMs”](#supported-operating-systems-for-vms)
The following sections are contain the operating system versions that Aembit supports on VMs
### Linux distributions
[Section titled “Linux distributions”](#linux-distributions)
| Linux Distribution | Version |
| ------------------ | ------- |
| Ubuntu | 20.04 |
| Ubuntu | 22.04 |
| Red Hat | 8.6 |
| Red Hat | 8.9 |
| Red Hat | 9.3 |
### Windows editions
[Section titled “Windows editions”](#windows-editions)
| Windows Edition | Version |
| --------------- | ------- |
| Windows Server | 2019 |
| Windows Server | 2022 |
# Getting support for Aembit
> Overview of Aembit's support process
Work in progress
This page is a work in progress. It may contain incomplete or unverified information.
Please check back later for updates.
If you have feedback or suggestions, please fill out the [Aembit New Docs Feedback Survey](https://forms.gle/mfjhV2TtXP1pXAym8).
Thanks for your patience!
# Aembit User Guide Overview
> How to set up and use Aembit
Welcome to the Aembit User Guide!
Use this guide to help you understand, deploy, and manage Aembit’s Workload Identity and Access Management Platform. This guide contains the following main sections, each focusing on different aspects of Aembit’s functionality and configuration.
## Deploy and install
[Section titled “Deploy and install”](#deploy-and-install)
This section covers how to deploy Aembit Edge Components in different environments and configurations. It provides detailed instructions for setting up Aembit in different infrastructure contexts.
This section includes topics covering:
* [Agent Controller](/user-guide/deploy-install/about-agent-controller/)
* [Agent Proxy](/user-guide/deploy-install/about-agent-proxy/)
* [Kubernetes Deployment](/user-guide/deploy-install/kubernetes/kubernetes/)
* [Virtual Machine Deployment](/user-guide/deploy-install/virtual-machine/)
* [Serverless Deployment](/user-guide/deploy-install/serverless/)
* [Virtual Appliance Deployment](/user-guide/deploy-install/virtual-appliances/)
## Access Policies
[Section titled “Access Policies”](#access-policies)
This section details how to configure and manage access policies, which are the core components that define and enforce workload access controls. You’ll learn how to create and manage the different elements that make up effective access policies.
This section includes topics covering:
* [Client Workloads](/user-guide/access-policies/client-workloads/)
* [Server Workloads](/user-guide/access-policies/server-workloads/guides/)
* [Trust Providers](/user-guide/access-policies/trust-providers/)
* [Credential Providers](/user-guide/access-policies/credential-providers/)
* [Access Conditions](/user-guide/access-policies/access-conditions/)
## Administration
[Section titled “Administration”](#administration)
This section focuses on managing your Aembit Tenant and its administration features. It covers tasks related to user management, roles, and other administrative functions to help you maintain your Aembit environment.
This section includes topics covering:
* [Admin Dashboard](/user-guide/administration/admin-dashboard/)
* [Users Management](/user-guide/administration/users/)
* [Roles](/user-guide/administration/roles/)
* [Resource Sets](/user-guide/administration/resource-sets/)
* [Sign-On Policy](/user-guide/administration/sign-on-policy/)
* [Identity Providers](/user-guide/administration/identity-providers/)
* [Log Streams](/user-guide/administration/log-streams/)
## Audit and report
[Section titled “Audit and report”](#audit-and-report)
This section covers the reporting and auditing capabilities of Aembit. It helps you understand how to monitor access events and activities within your Aembit environment for security and compliance purposes.
This section includes topics covering:
* [Access Authorization Events](/user-guide/audit-report/access-authorization-events/)
* [Audit Logs](/user-guide/audit-report/audit-logs/)
## Reference
[Section titled “Reference”](#reference)
This section provides technical reference materials such as environment variables, configuration options, and compatibility information. It serves as a quick reference guide for specific technical details about Aembit components.
This section includes topics covering:
* [Edge Component Supported Versions](/reference/edge-components/edge-component-supported-versions/)
* [Edge Component Log Level Reference](/reference/edge-components/agent-log-level-reference/)
* [Edge Component Environment Variables Reference](/reference/edge-components/edge-component-env-vars/)
* [Edge Component Helm Chart Configuration Options Reference](/reference/edge-components/helm-chart-config-options/)
* [Support Matrix](/reference/support-matrix/)
## Troubleshooting and support
[Section titled “Troubleshooting and support”](#troubleshooting-and-support)
The Troubleshooting and Support section provides practical guidance for resolving common issues and accessing help when needed because even well-designed systems occasionally encounter problems that require diagnosis and resolution. This section serves as your resource for maintaining operational continuity with Aembit.
This section includes topics covering:
* [Troubleshooting](/user-guide/troubleshooting/)
* [Agent Controller Health](/user-guide/troubleshooting/agent-controller-health)
* [Agent Proxy Debug Network Tracing](/user-guide/troubleshooting/agent-proxy-debug-network-tracing/)
* [Tenant Health Check](/user-guide/troubleshooting/tenant-health-check/)
# Access Policies
> What Aembit Access Policies are and how they work
This section covers Access Policies in Aembit, which are the central component that define which Client Workloads can access which Server Workloads under what conditions, and with what credentials.
The following pages provide information about Access Policies and their components:
* [Client Workloads](/user-guide/access-policies/client-workloads/)
* [Server Workloads](/user-guide/access-policies/server-workloads/)
* [Trust Providers](/user-guide/access-policies/trust-providers/)
* [Credential Providers](/user-guide/access-policies/credential-providers/)
* [Access Conditions](/user-guide/access-policies/access-conditions/)
* [Advanced Options](/user-guide/access-policies/advanced-options/)
# Access Conditions
> This document provides a high-level description of Access Conditions
Access Conditions are rules and conditions used to evaluate an Access Policy and determine whether a Client Workload should be granted access to a service (e.g. a Server Workload).
Whenever a request is received for access to an Access Policy and/or Credential, these Access Conditions validate and verify the request. If validation passes, the request is granted; however, if validation fails, the request is denied.
In order for an Access Condition to validate and verify a request, an existing integration must already be established, and an Access Policy must already have been created.
# Access Conditions for GeoIP Restriction
> This document provides a description on how to setup and configure an Access Condition for a GeoIP Restriction.
#
You may configure an Access Condition to enable GeoIP restrictions. This can be useful if you would like to only grant access to Client Workloads from specific locations. A GeoIP restriction ensures any request received from a locale that is not already specified will be blocked. For example, if you would like to allow requests from a specific country or region, you may simply add an Access Condition for that region or area.
## Creating a GeoIP Access Condition
[Section titled “Creating a GeoIP Access Condition”](#creating-a-geoip-access-condition)
To create a GeoIP Restriction Access Condition, perform the steps listed below.
1. Log into your Aembit Tenant using your login credentials.
2. When your credentials have been authenticated and you are logged into your tenant, you are directed to the main dashboard page. Click on **Access Conditions** in the left sidebar. You will see a list of existing Access Conditions.
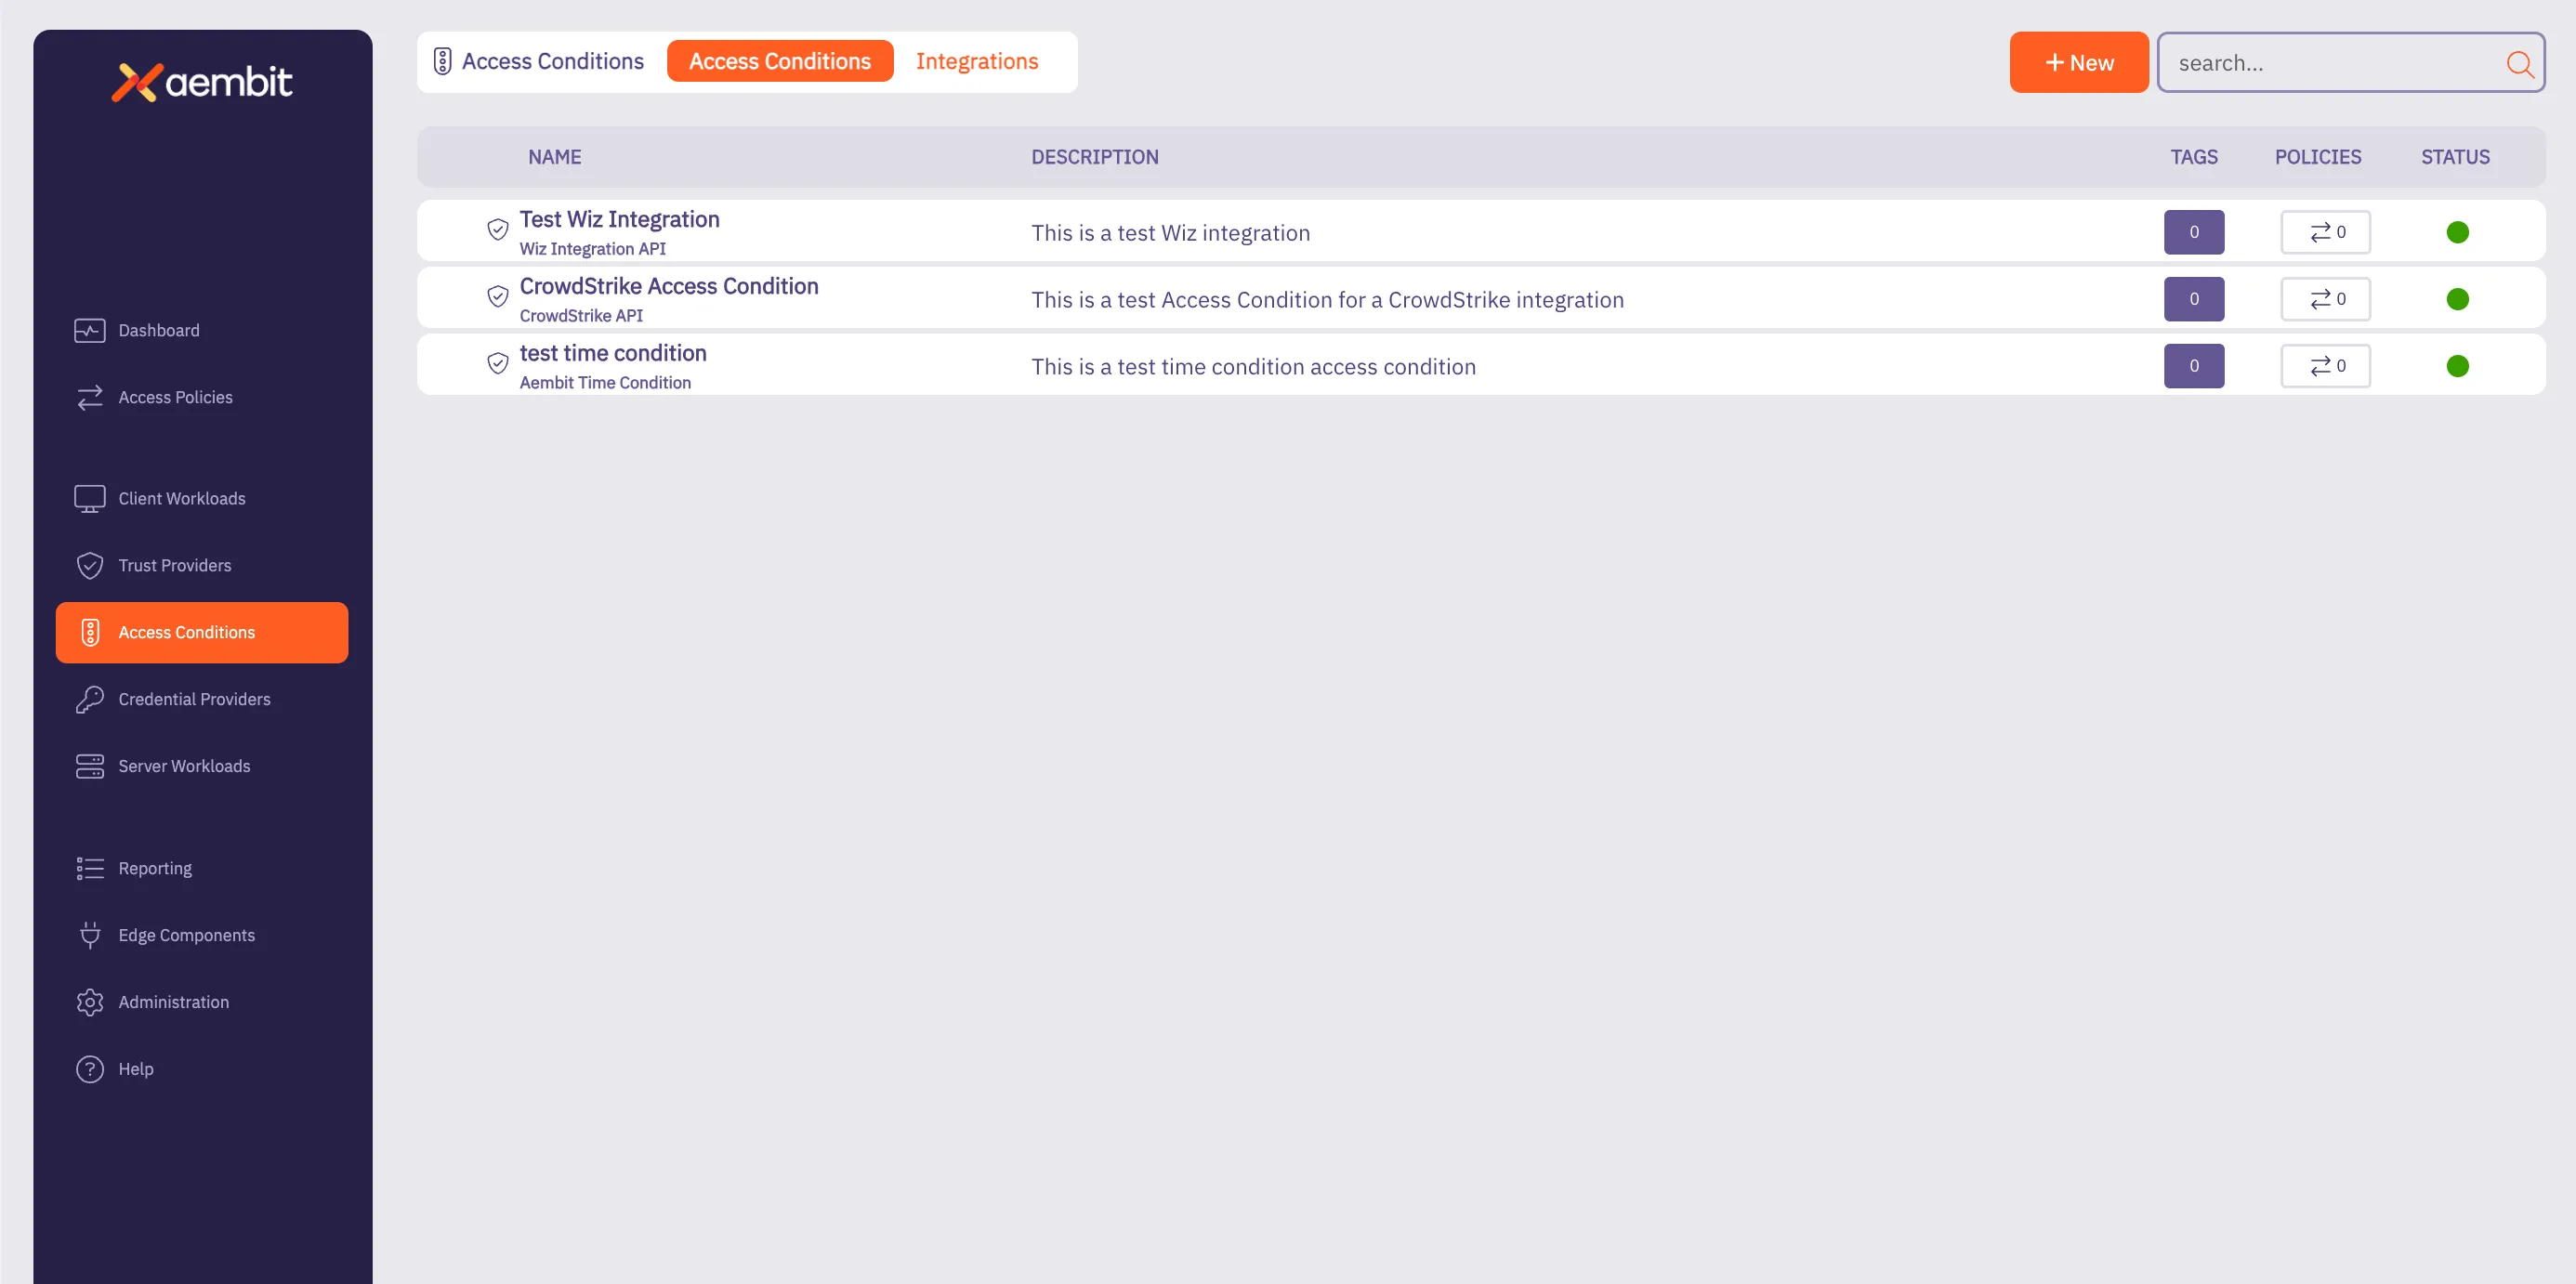
3. Click on the **New Access Condition** button. An Access Condition dialog window appears.
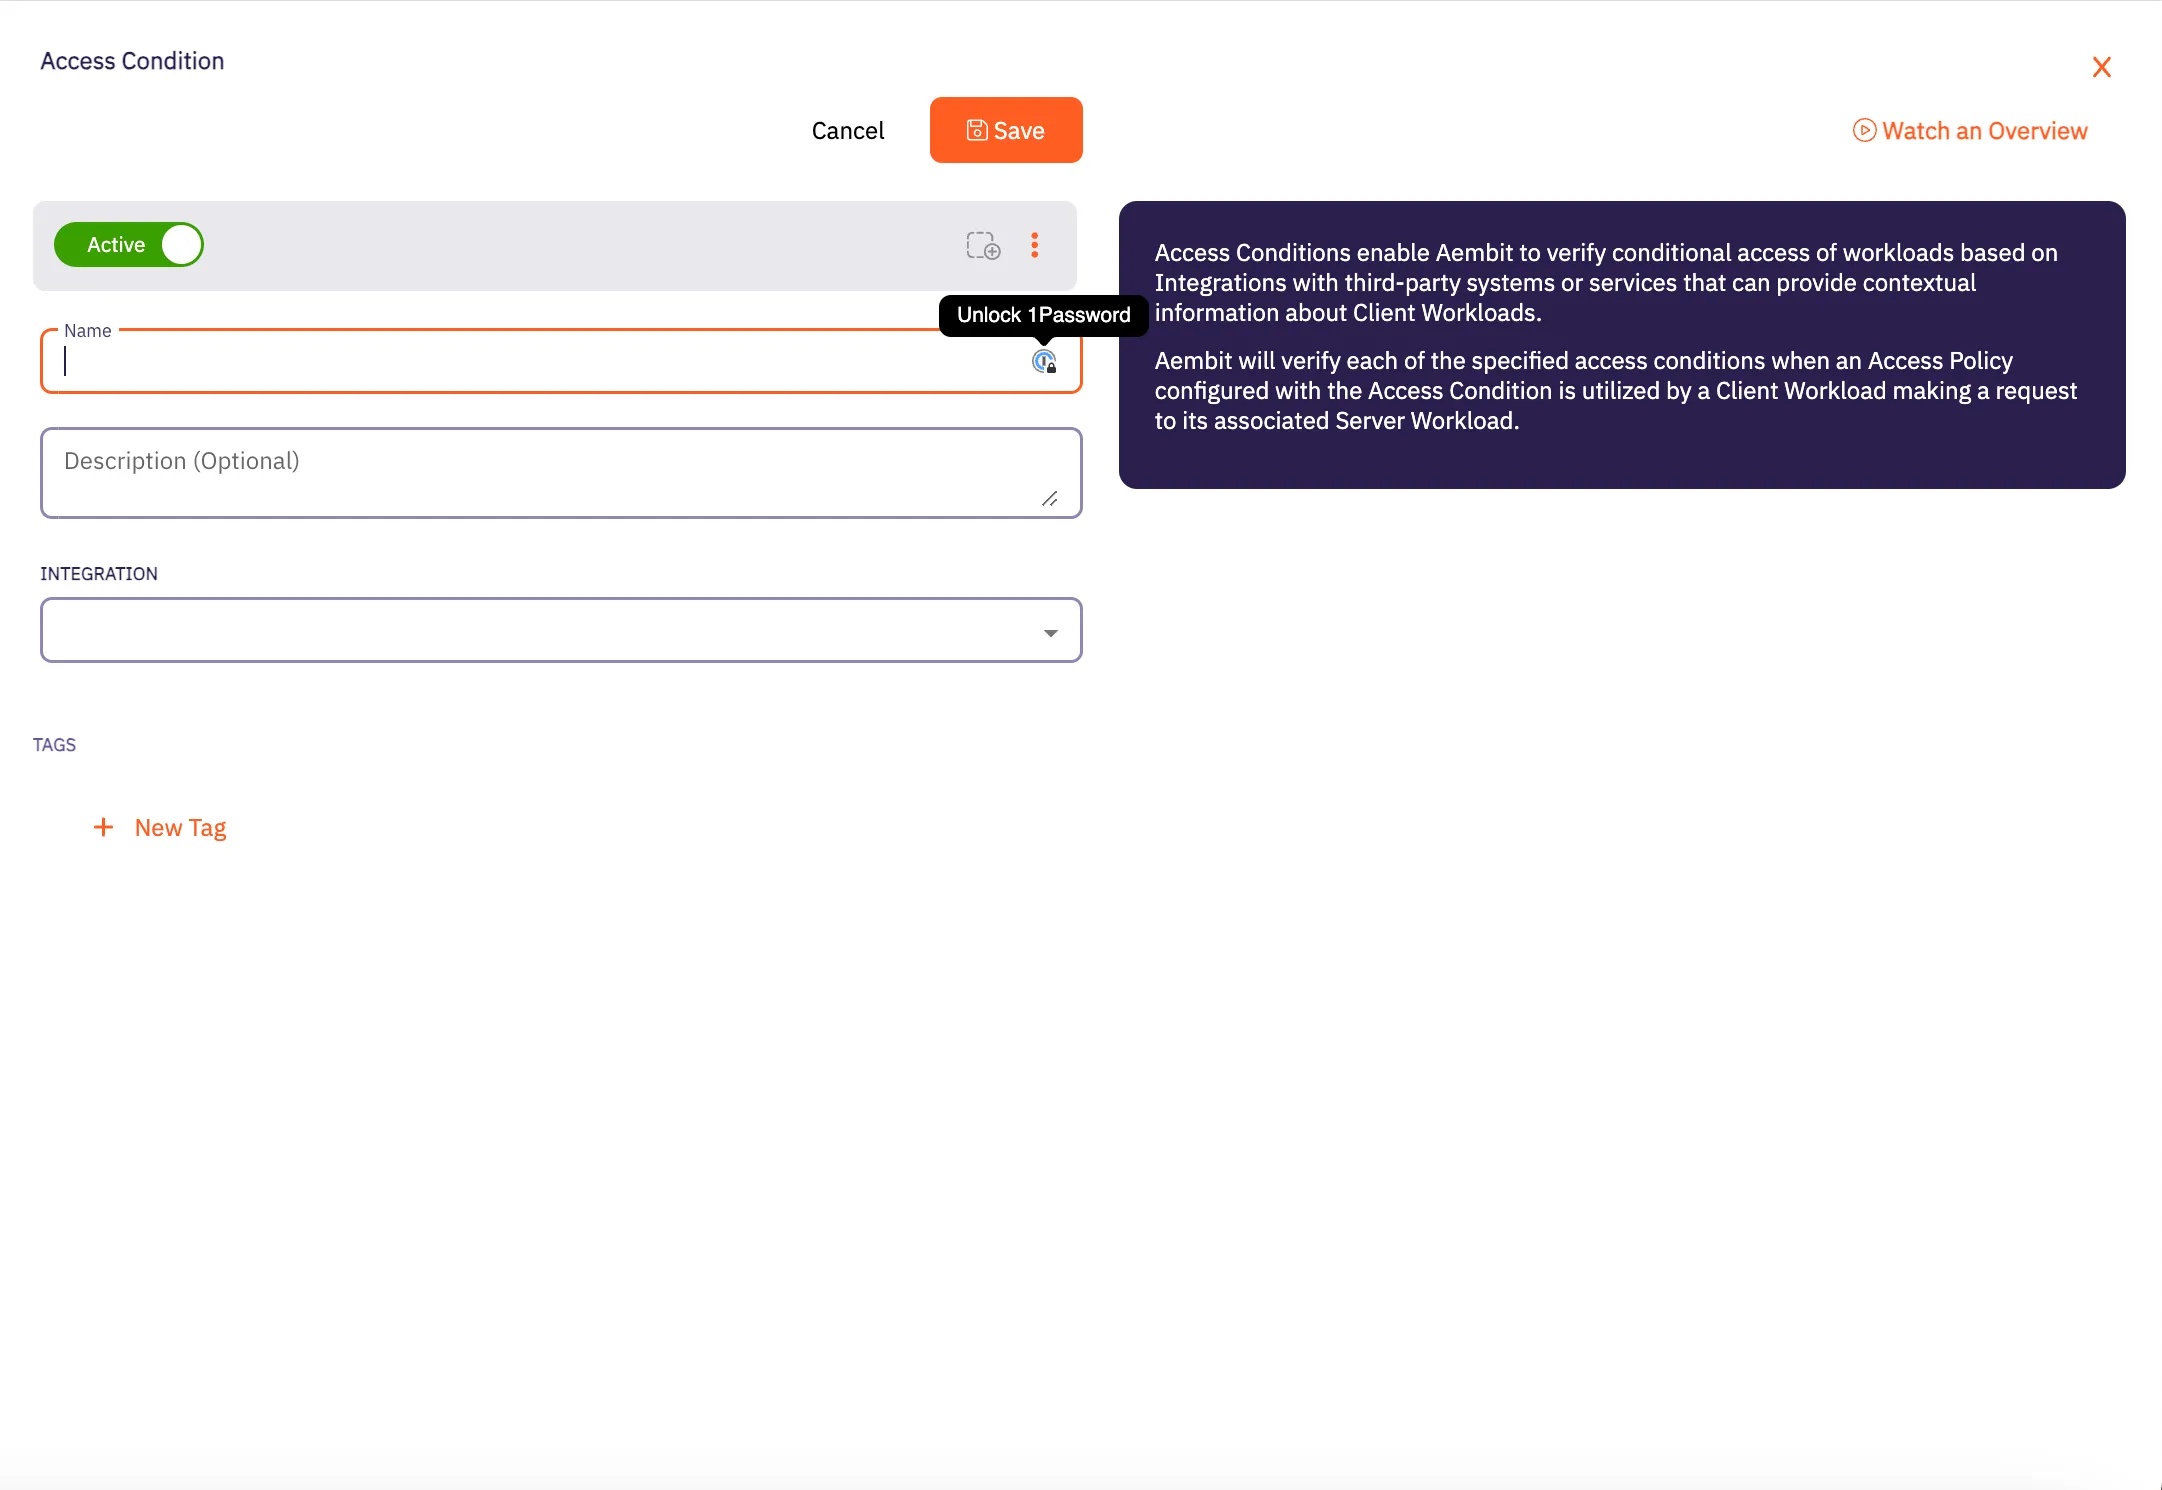
4. In the Access Condition dialog window, enter information in the following fields:
* **Name** - Name of the Access Condition.
* **Description** - An optional text description of the Access Condition.
* **Integration** - A drop-down menu that enables you to select the type of integration you would like to create. Select **Aembit GeoIP Condition** from the drop-down menu.
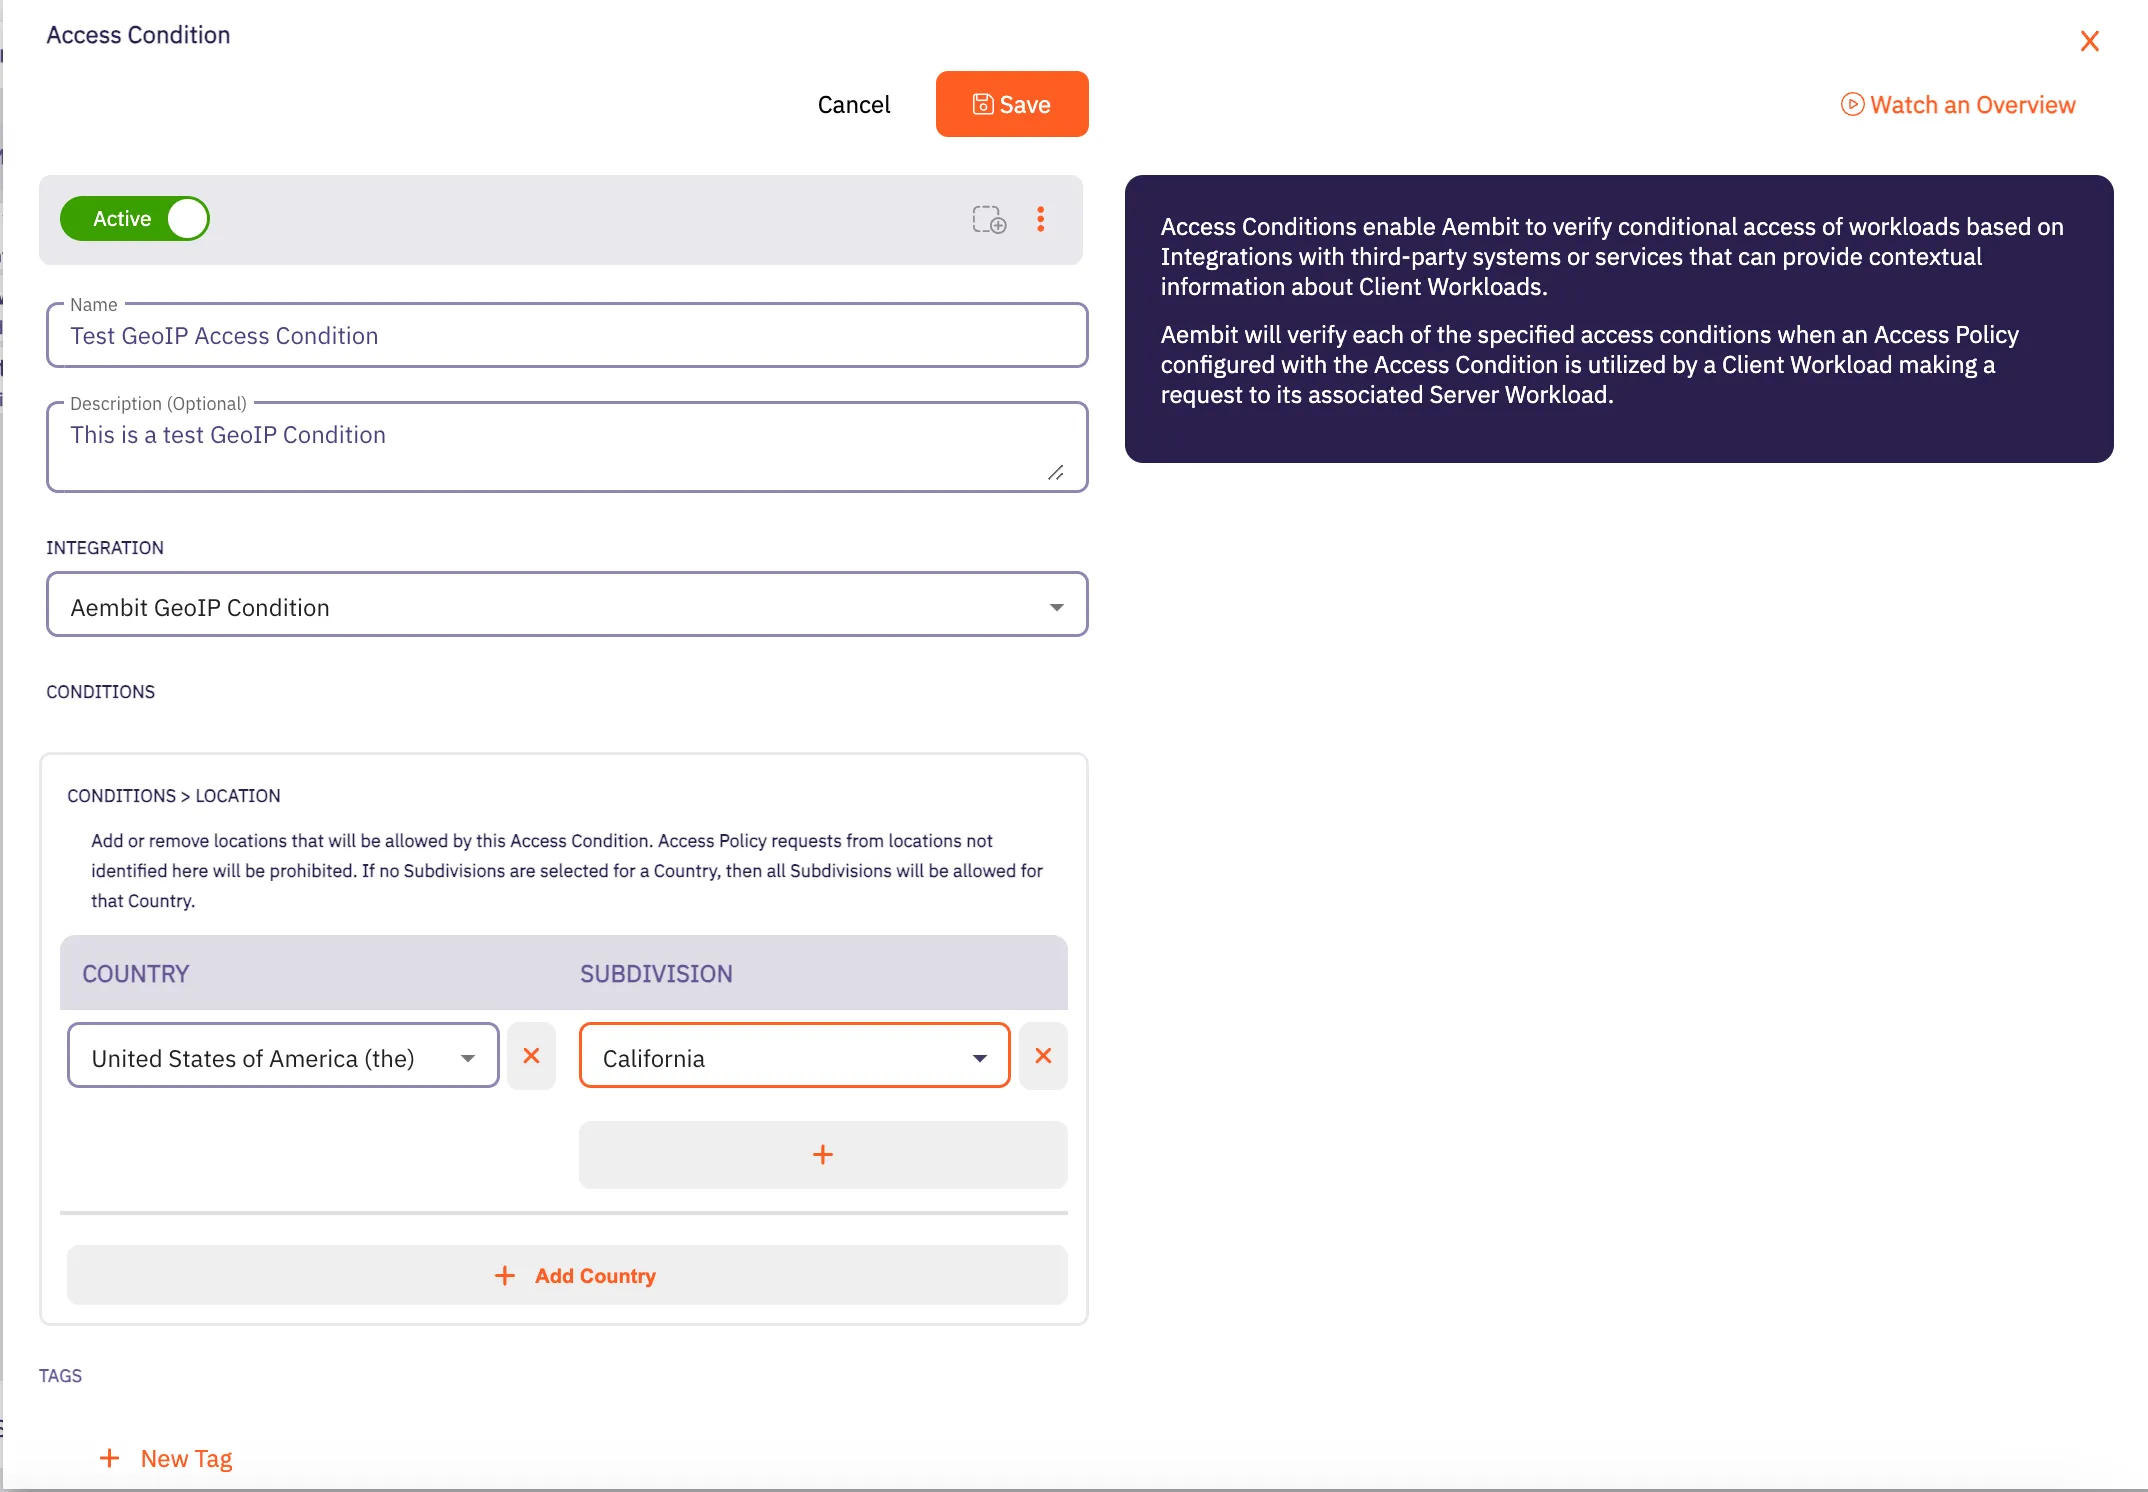
5. In the Conditions -> Location section, click on the **Country** drop-down menu to select the country you would like to use for your Access Condition.
6. After selecting a **Country** from the drop-down menu, you will see an expanded drop-down menu where you may select a **Subdivision** you want to use for that country. A Subdivision may be a region, state, province, or other territory that you would like to use for further Access Condition scoping.
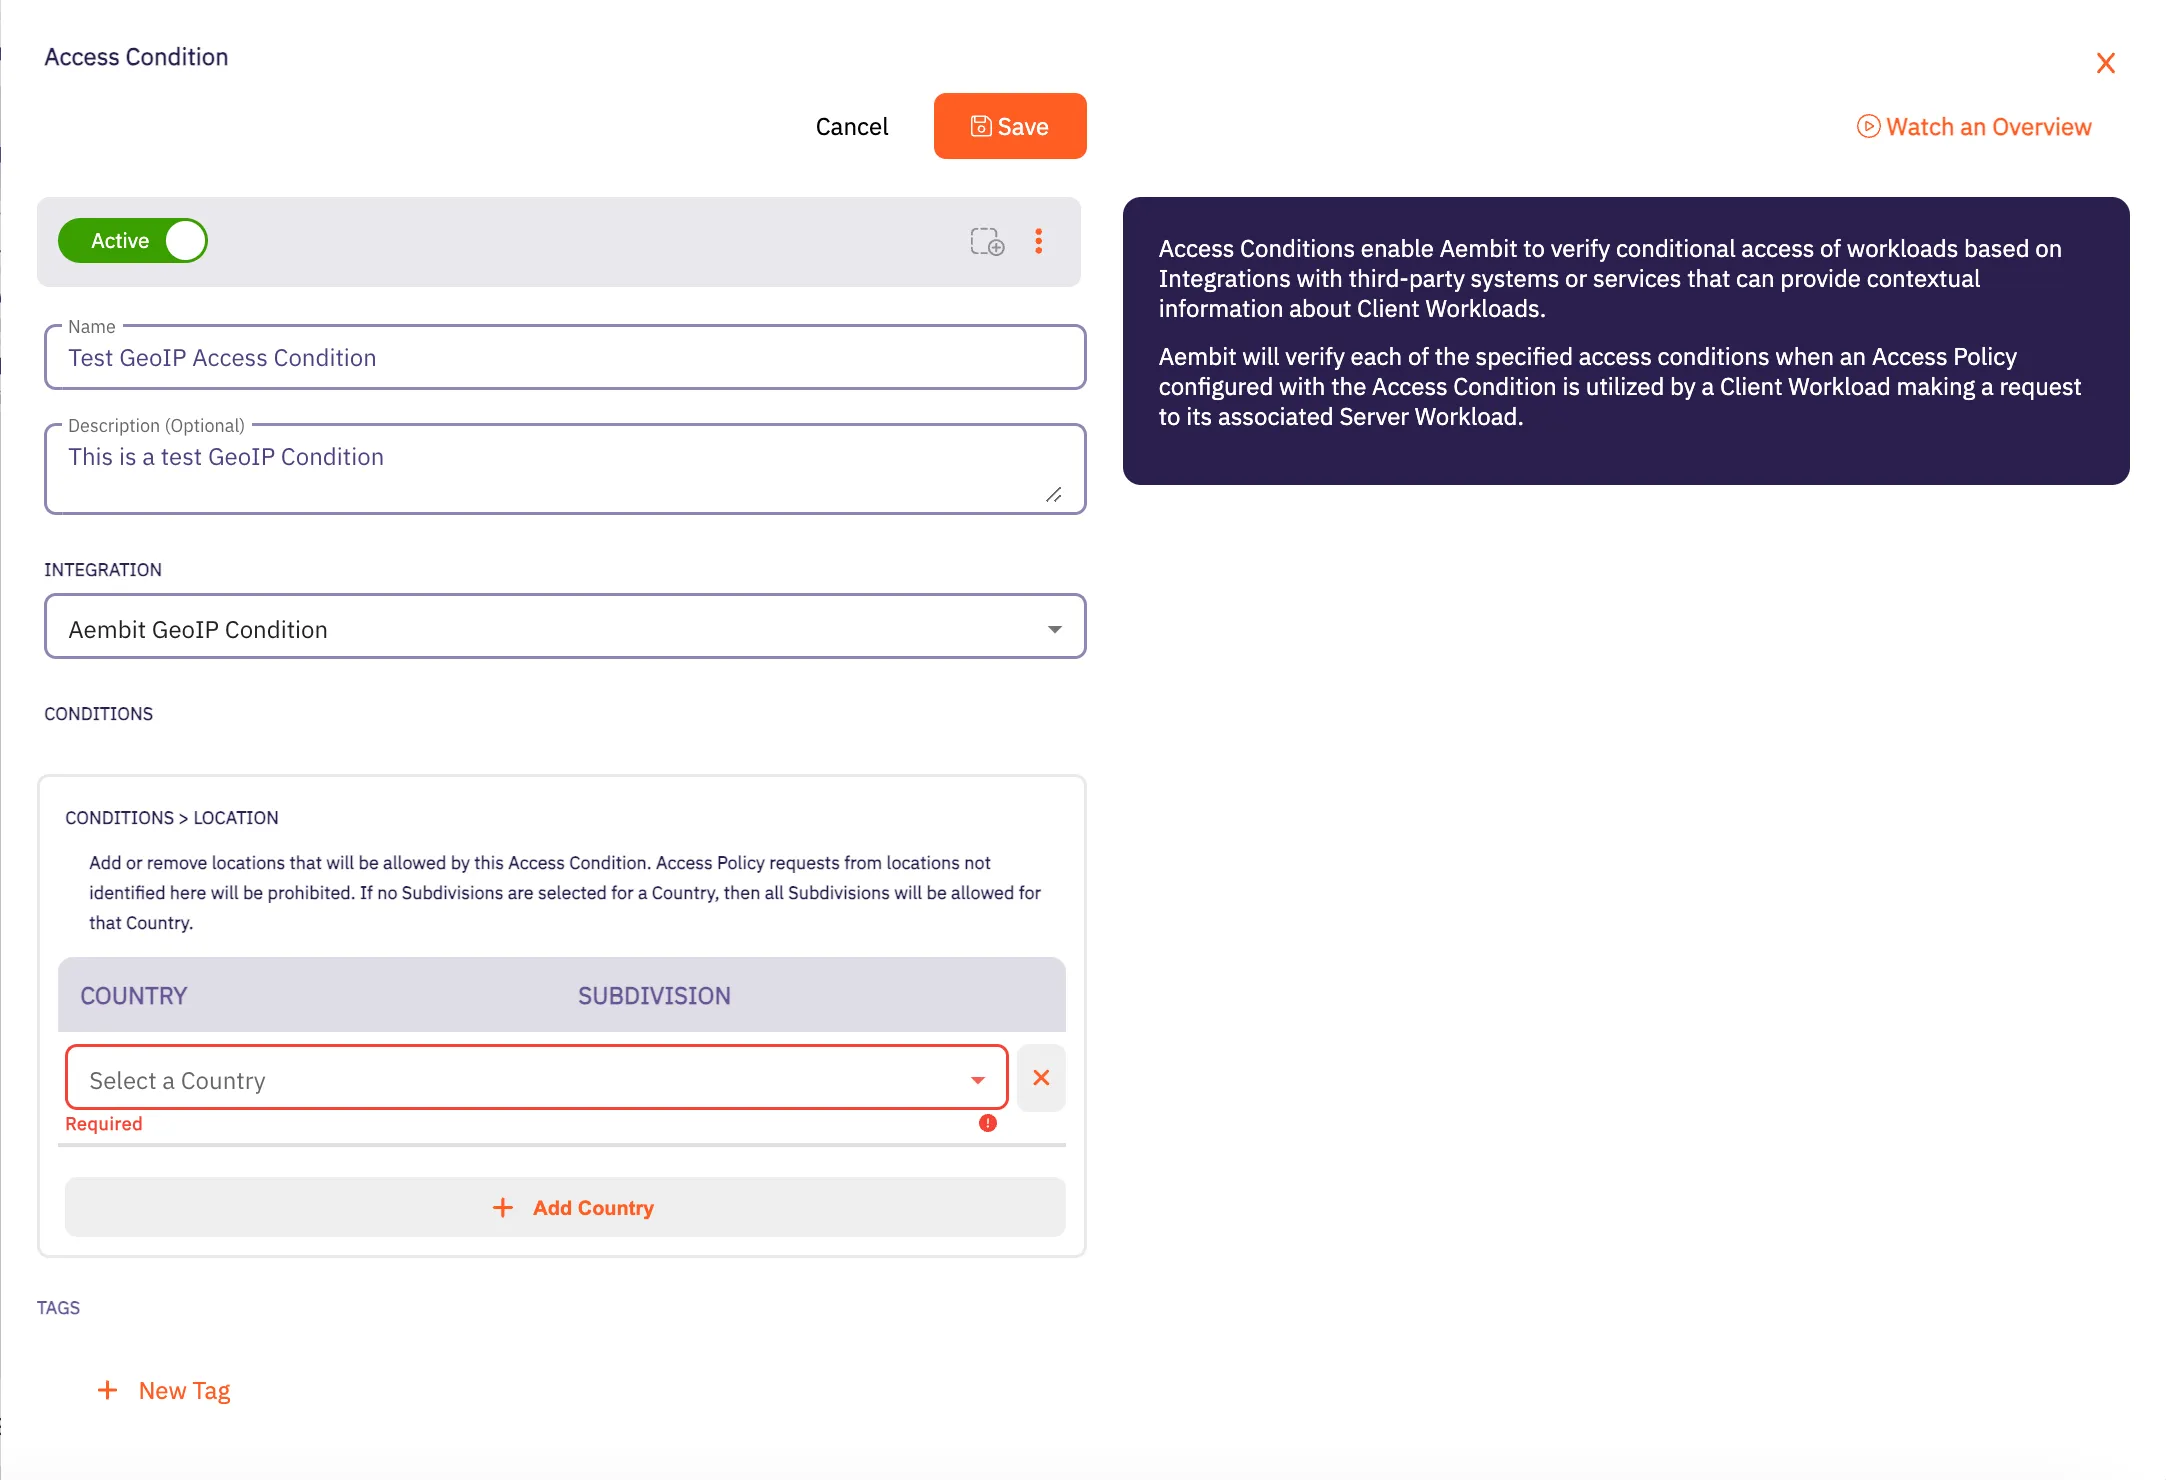
Note
You may select more than one Subdivision for a country by clicking on the **+** icon.
7. Click **Save**. Your new Aembit GeoIP Access Condition now appears on the main Access Conditions page.
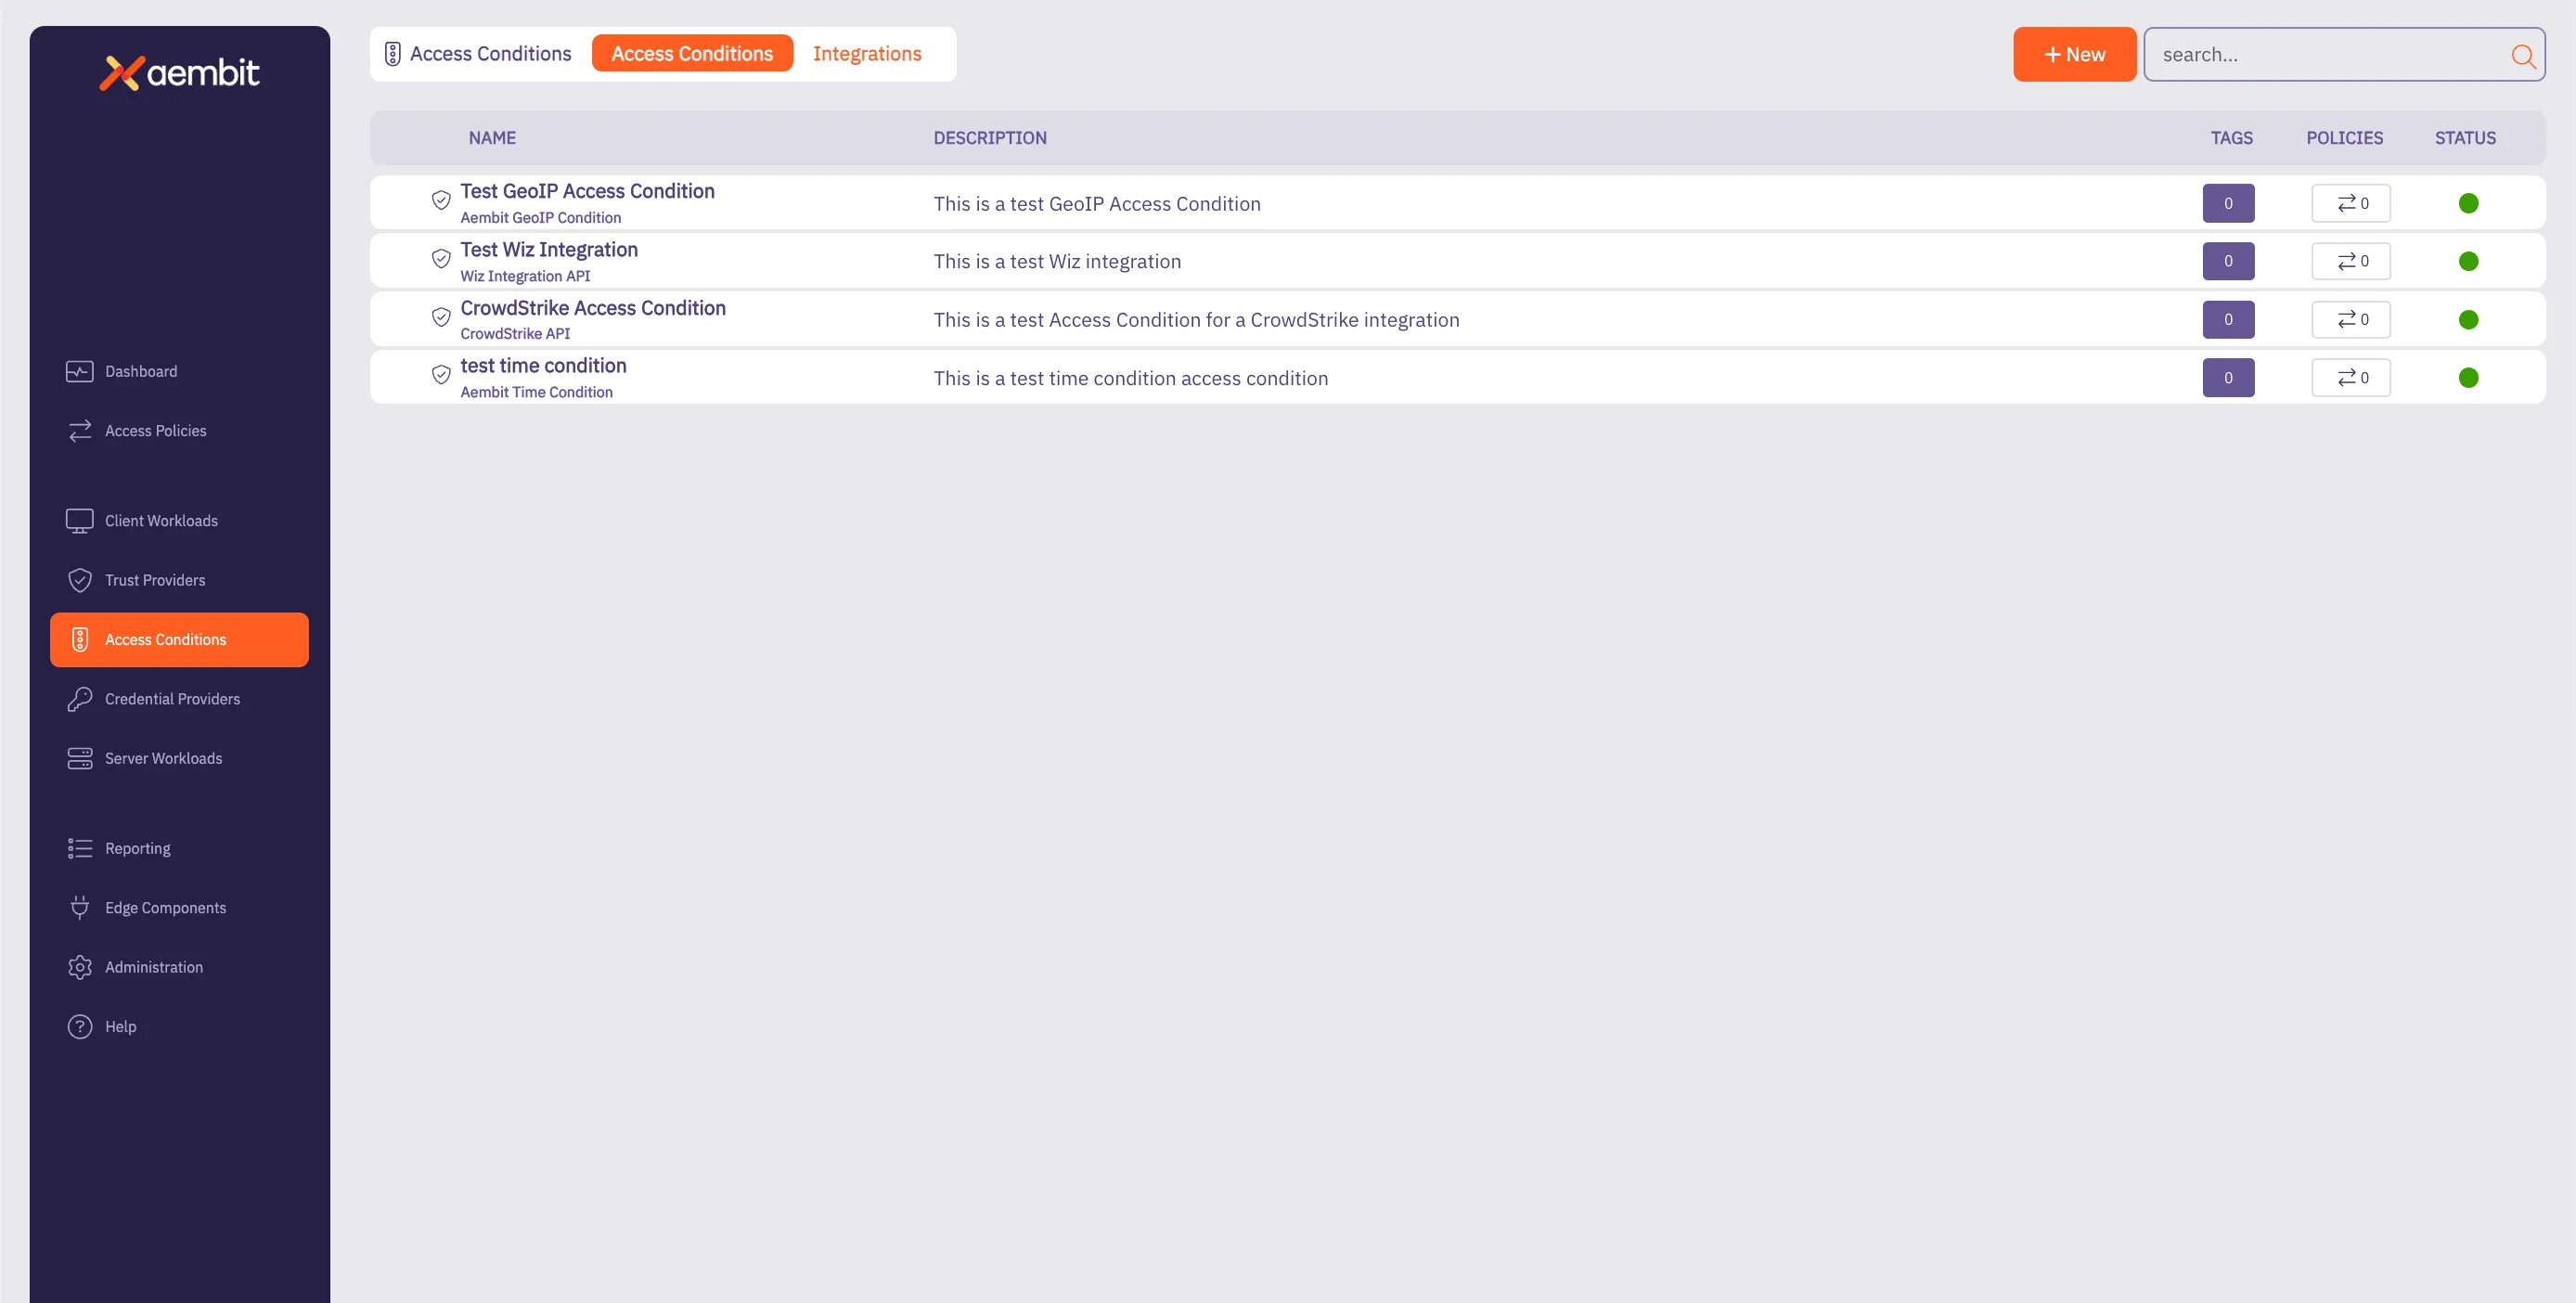
## GeoIP Accuracy Limitations and Best Practices for Cloud Data Centers
[Section titled “GeoIP Accuracy Limitations and Best Practices for Cloud Data Centers”](#geoip-accuracy-limitations-and-best-practices-for-cloud-data-centers)
When configuring GeoIP-based access conditions, it is important to know the limitations in geolocation accuracy, especially for workloads hosted in cloud data centers such as AWS, Azure, Google Cloud, and others. Due to the dynamic and shared nature of cloud infrastructure, geolocation services often provide lower confidence levels for specific subdivisions (e.g., states, provinces) or cities for cloud-based IP addresses.
As a result, Aembit recommends customers limit GeoIP conditions to the country level for workloads in cloud data centers. This approach ensures more reliable geolocation data while still providing geographic-based access control. Using subdivisions or cities for cloud-hosted workloads can result in access failures if the geolocation confidence falls below acceptable thresholds.
# Aembit Time Condition
> This page describes how to create an Access Condition for a specific Time Condition.
## Introduction
[Section titled “Introduction”](#introduction)
One type of Access Condition you may create in your Aembit Tenant is a Time Condition. This is especially useful if you would like to only grant access to Client Workloads during specific periods of time (days/hours).
The section below describes the required steps to setup and configure a Time Condition Access Condition.
## Creating a Time Condition Access Condition
[Section titled “Creating a Time Condition Access Condition”](#creating-a-time-condition-access-condition)
To create a Time Condition Access Condition, perform the steps below.
1. Log into your Aembit Tenant using your login credentials.
2. When your credentials have been authenticated and you are logged into your tenant, you are directed to the main dashboard page. Click on **Access Conditions** in the left sidebar. You will see a list of existing Access Conditions (in this example, no Access Conditions have been created)
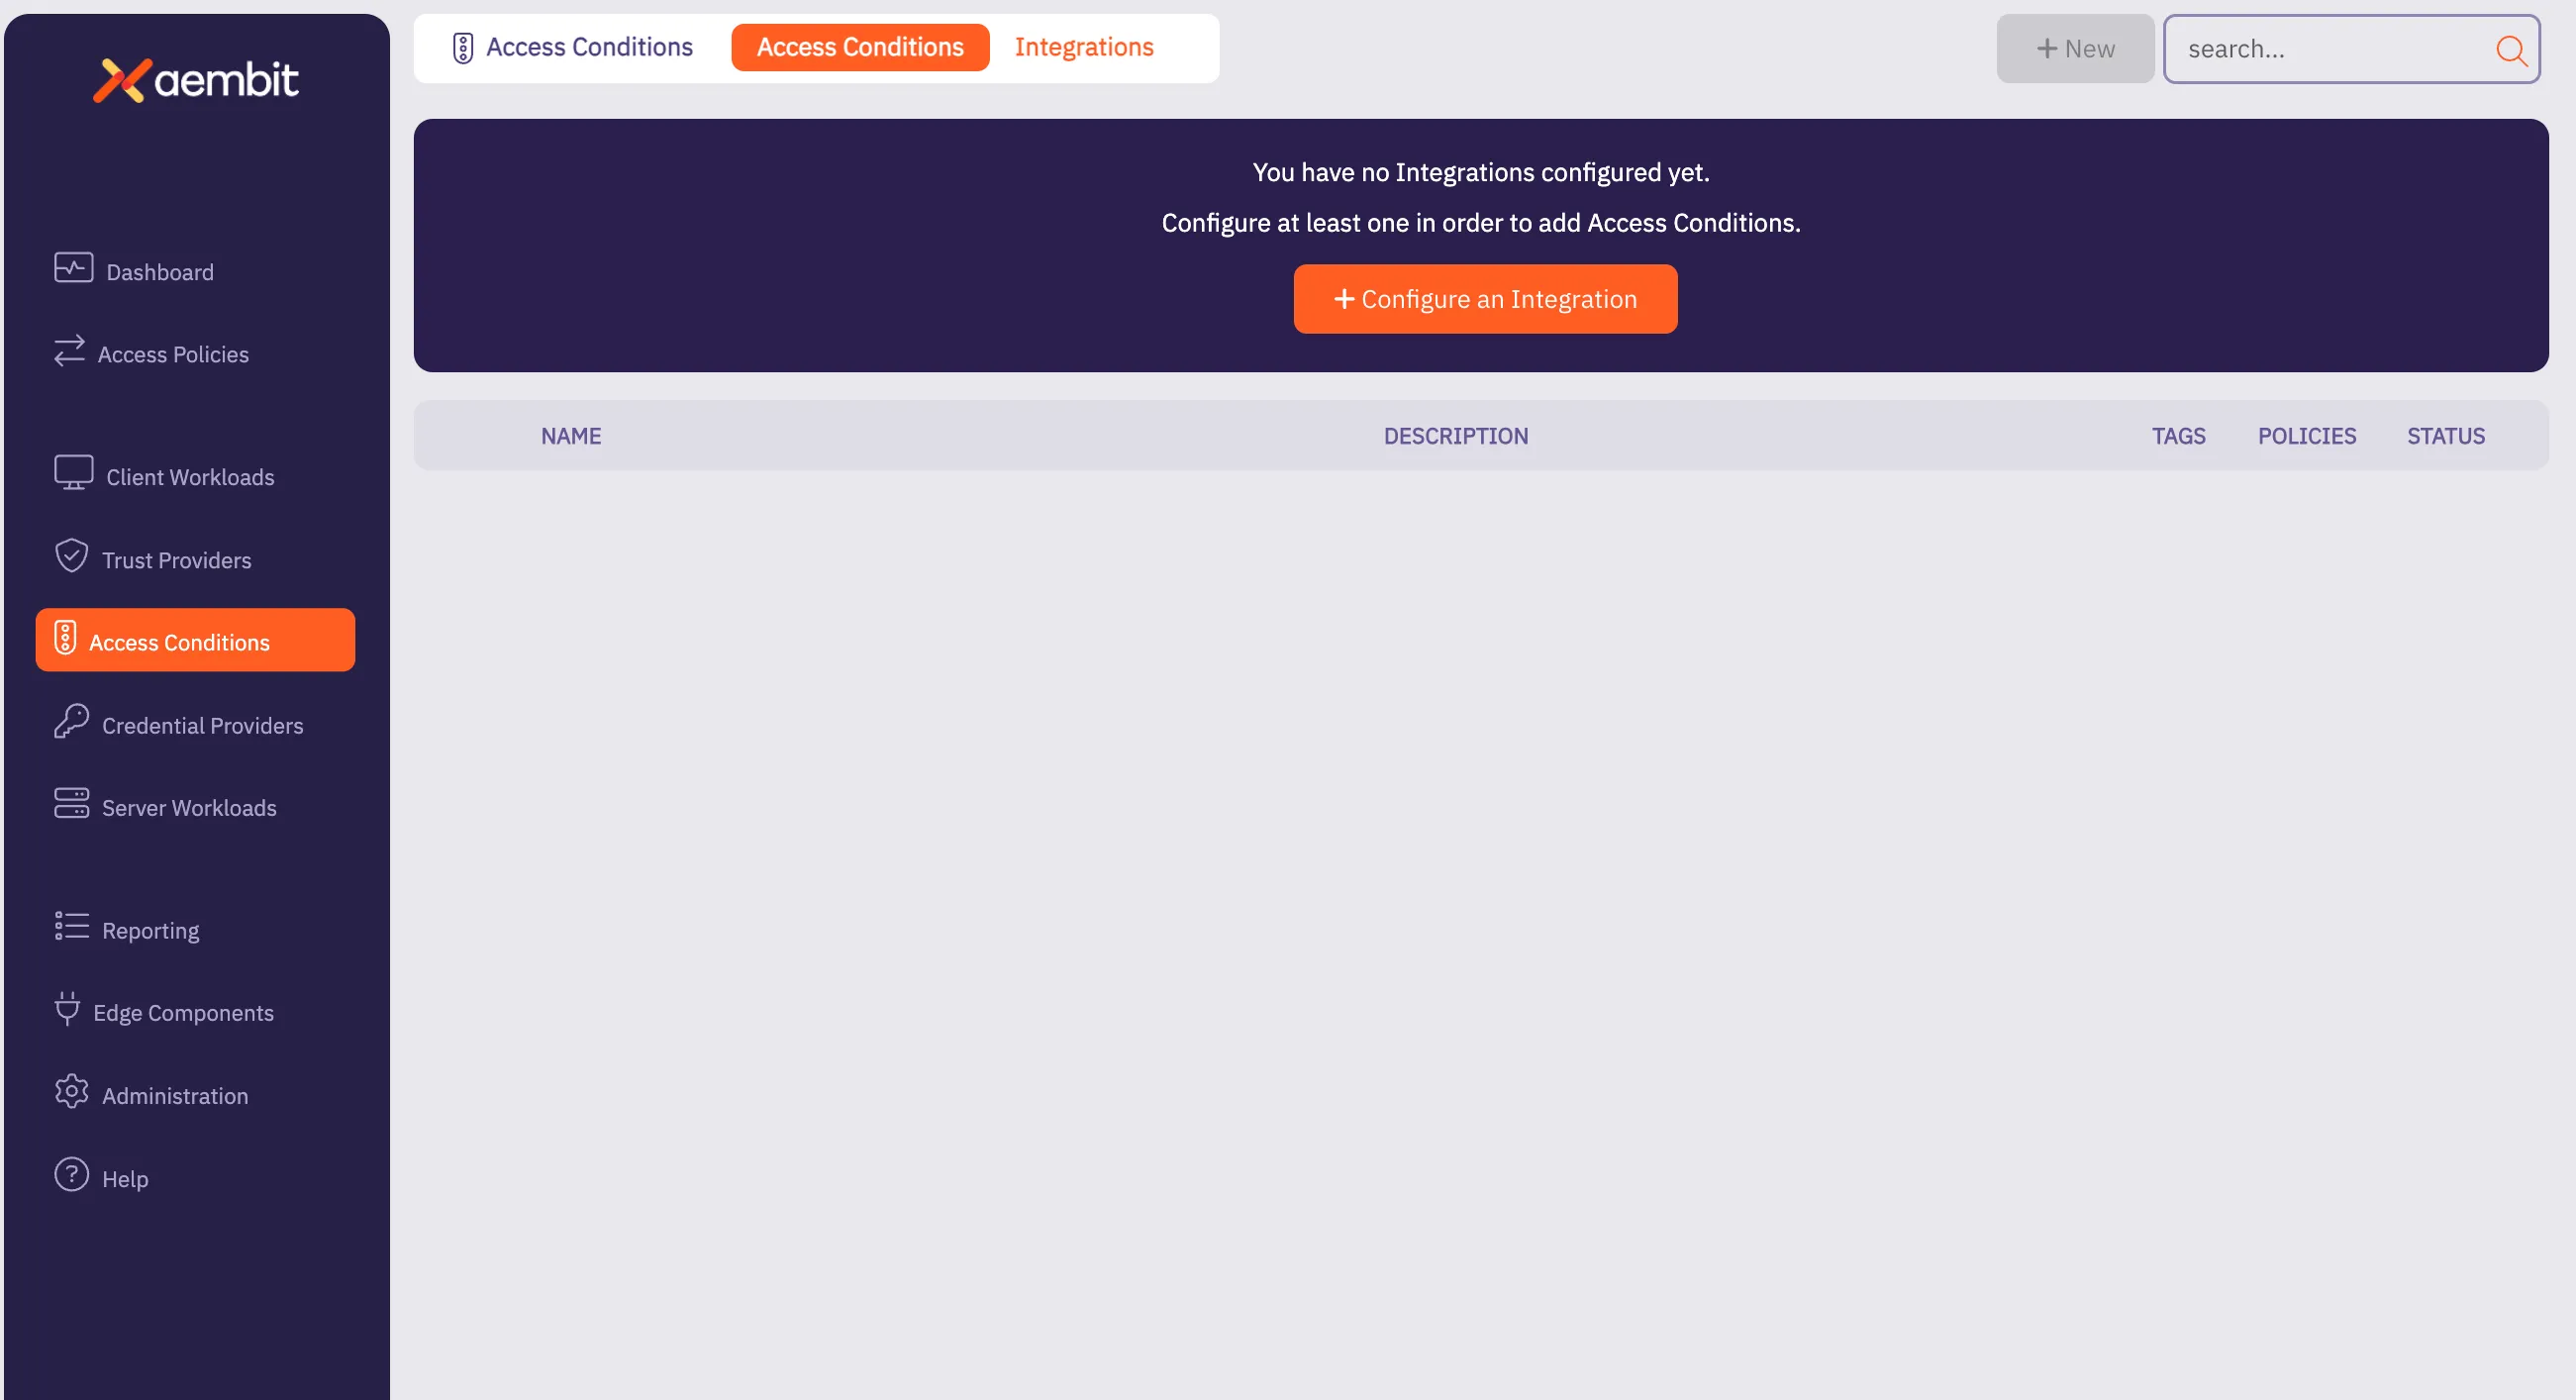
3. Click on the **New Access Condition** button. An Access Condition dialog window appears.

4. In the Access Condition dialog window, enter information in the following fields:
* **Name** - Name of the Access Condition.
* **Description** - An optional text description of the Access Condition.
* **Integration** - A drop-down menu that enables you to select the type of integration you would like to create. Select **Aembit Time Condition** from the drop-down menu.
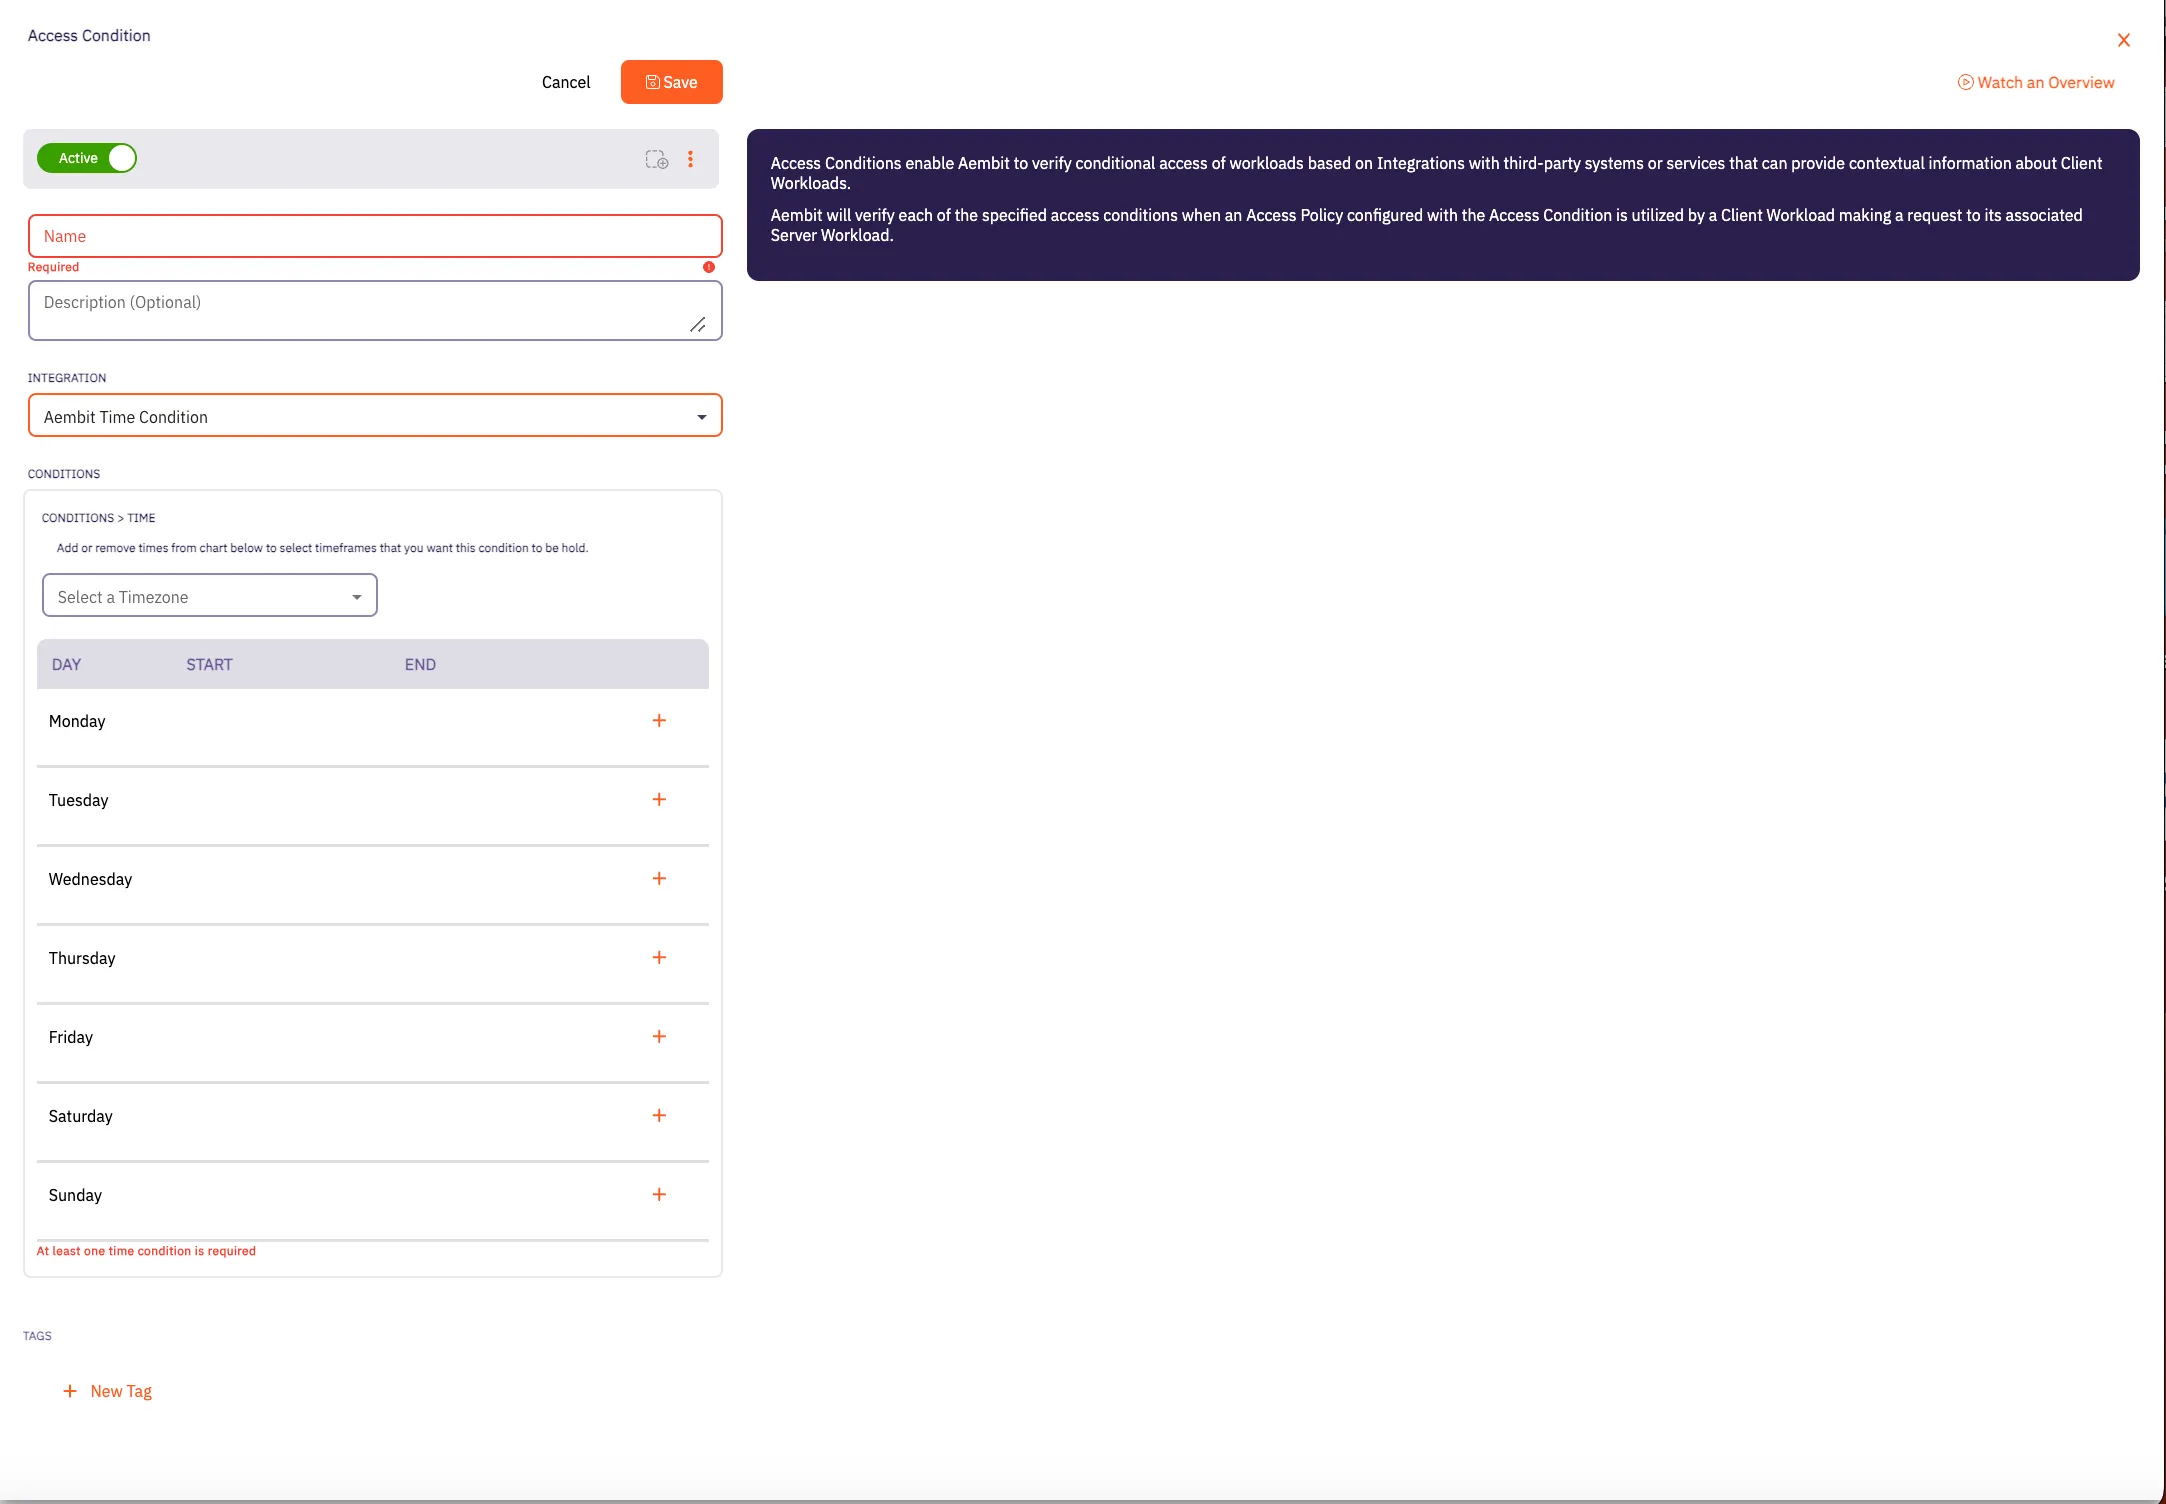
5. In the Conditions section, click on the **Timezone** drop-down menu to select the timezone you would like to use for your Access Condition.
6. Click on the **+** icon next to each day you would like to use in your Time Condition configuration.
Note
At least one time condition is required.
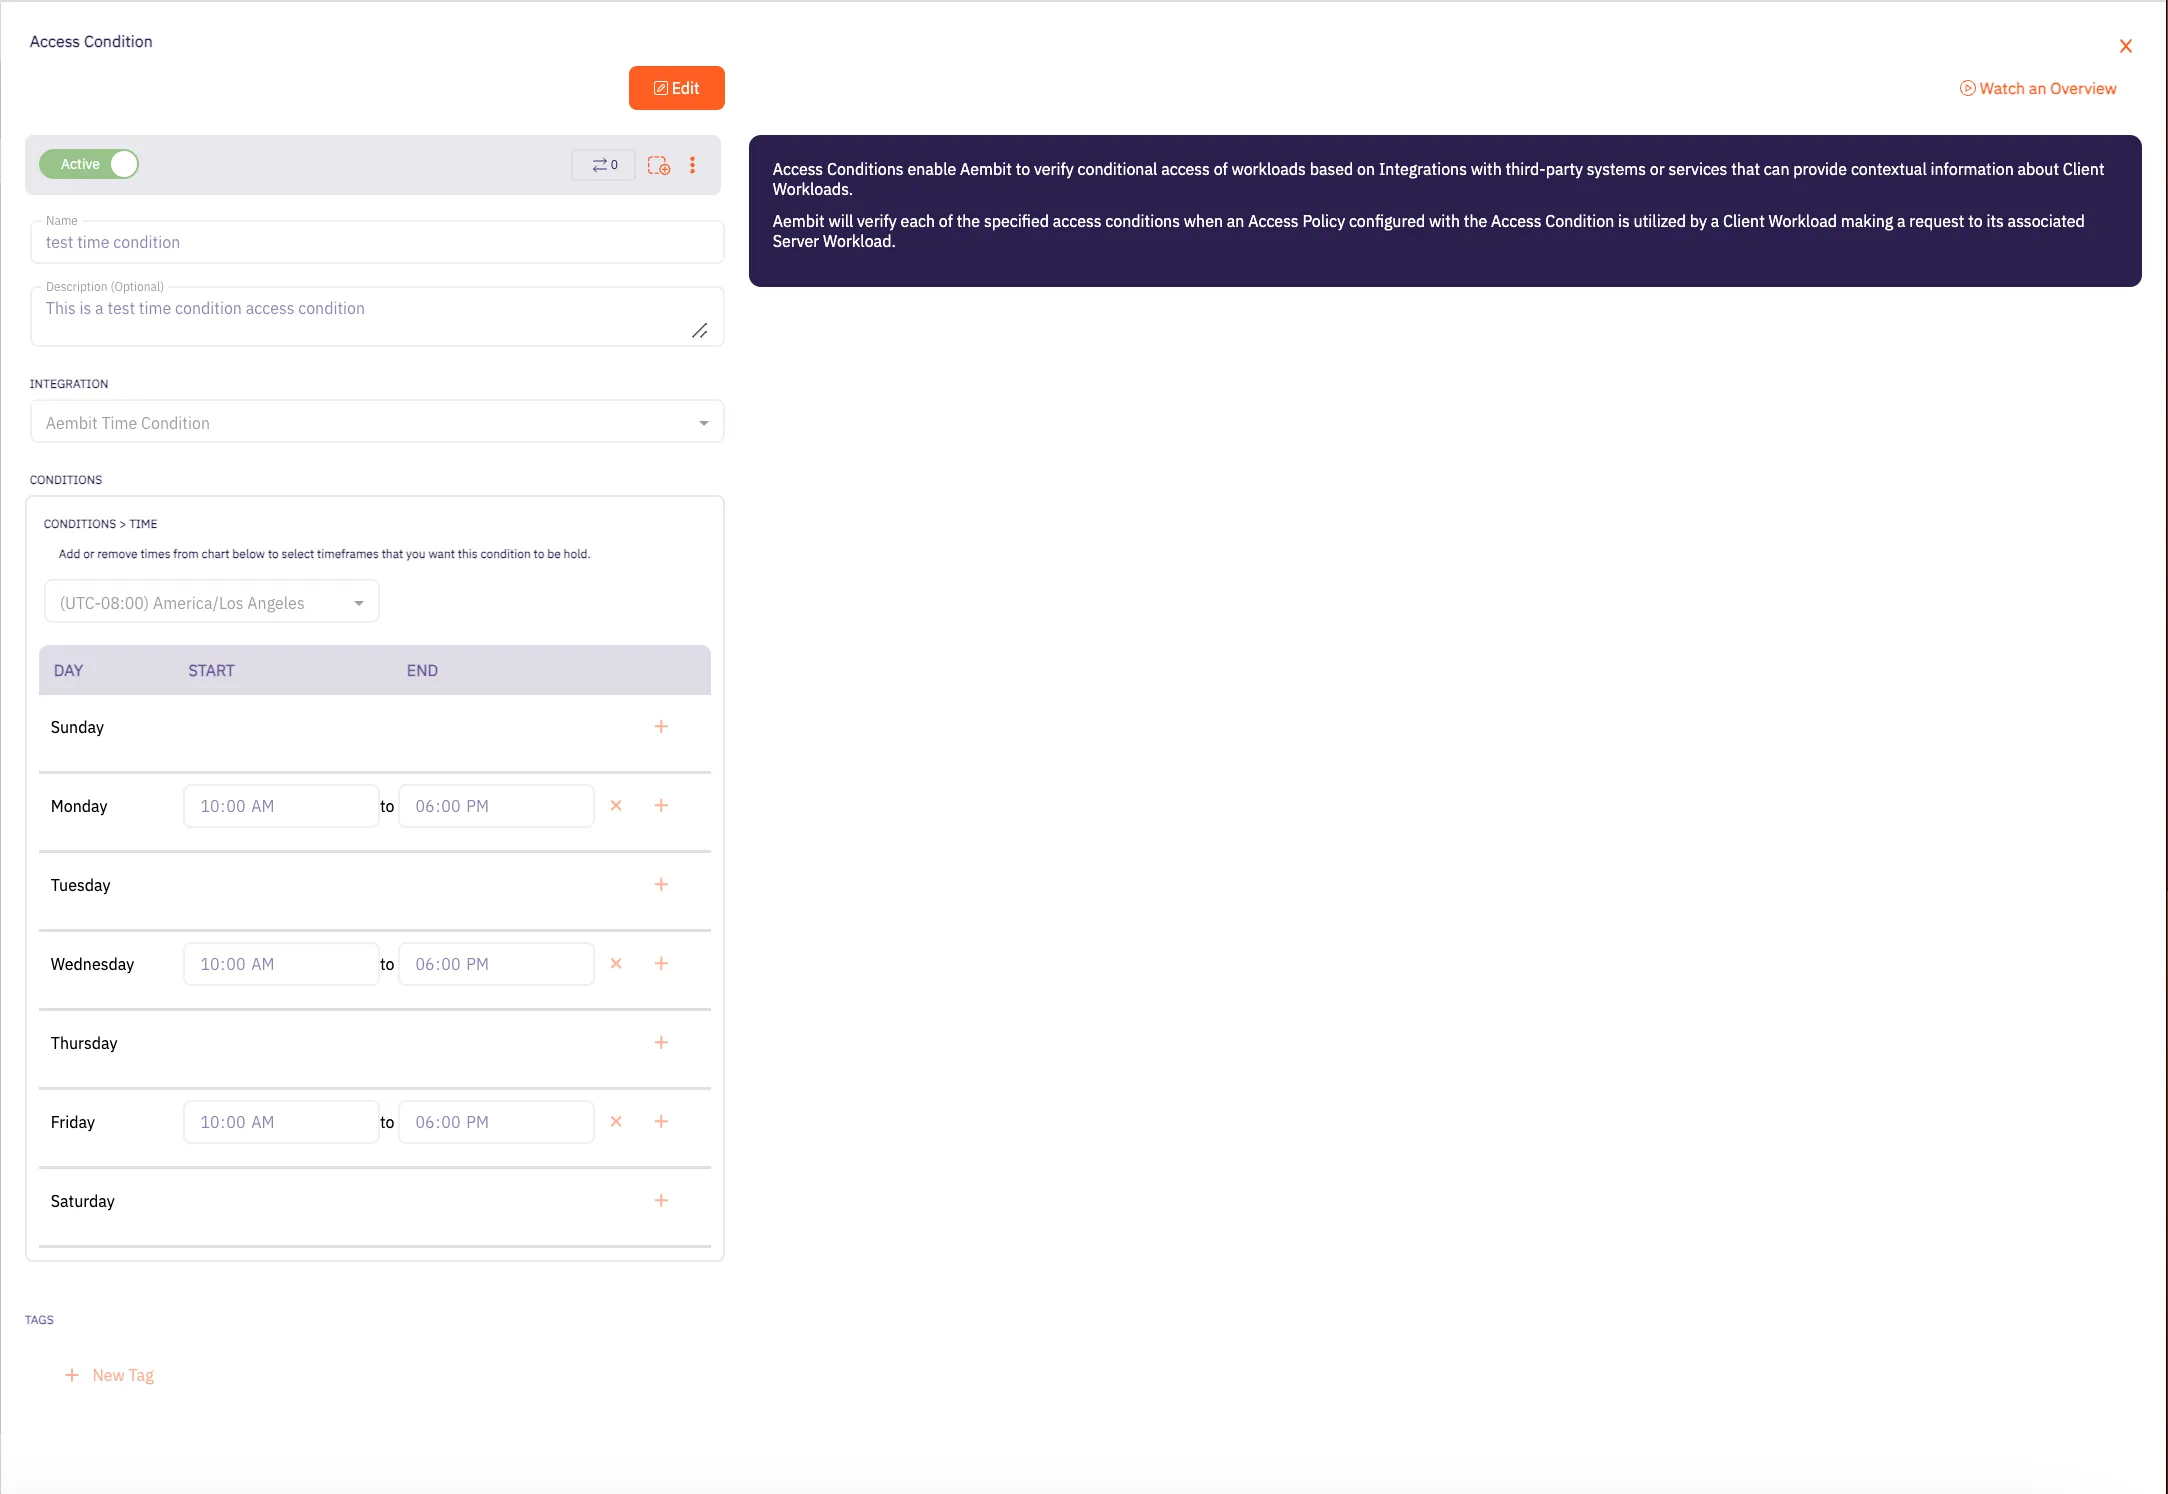
7. Click **Save**. Your new Aembit Time Condition Access Condition now appears on the main Access Conditions page.
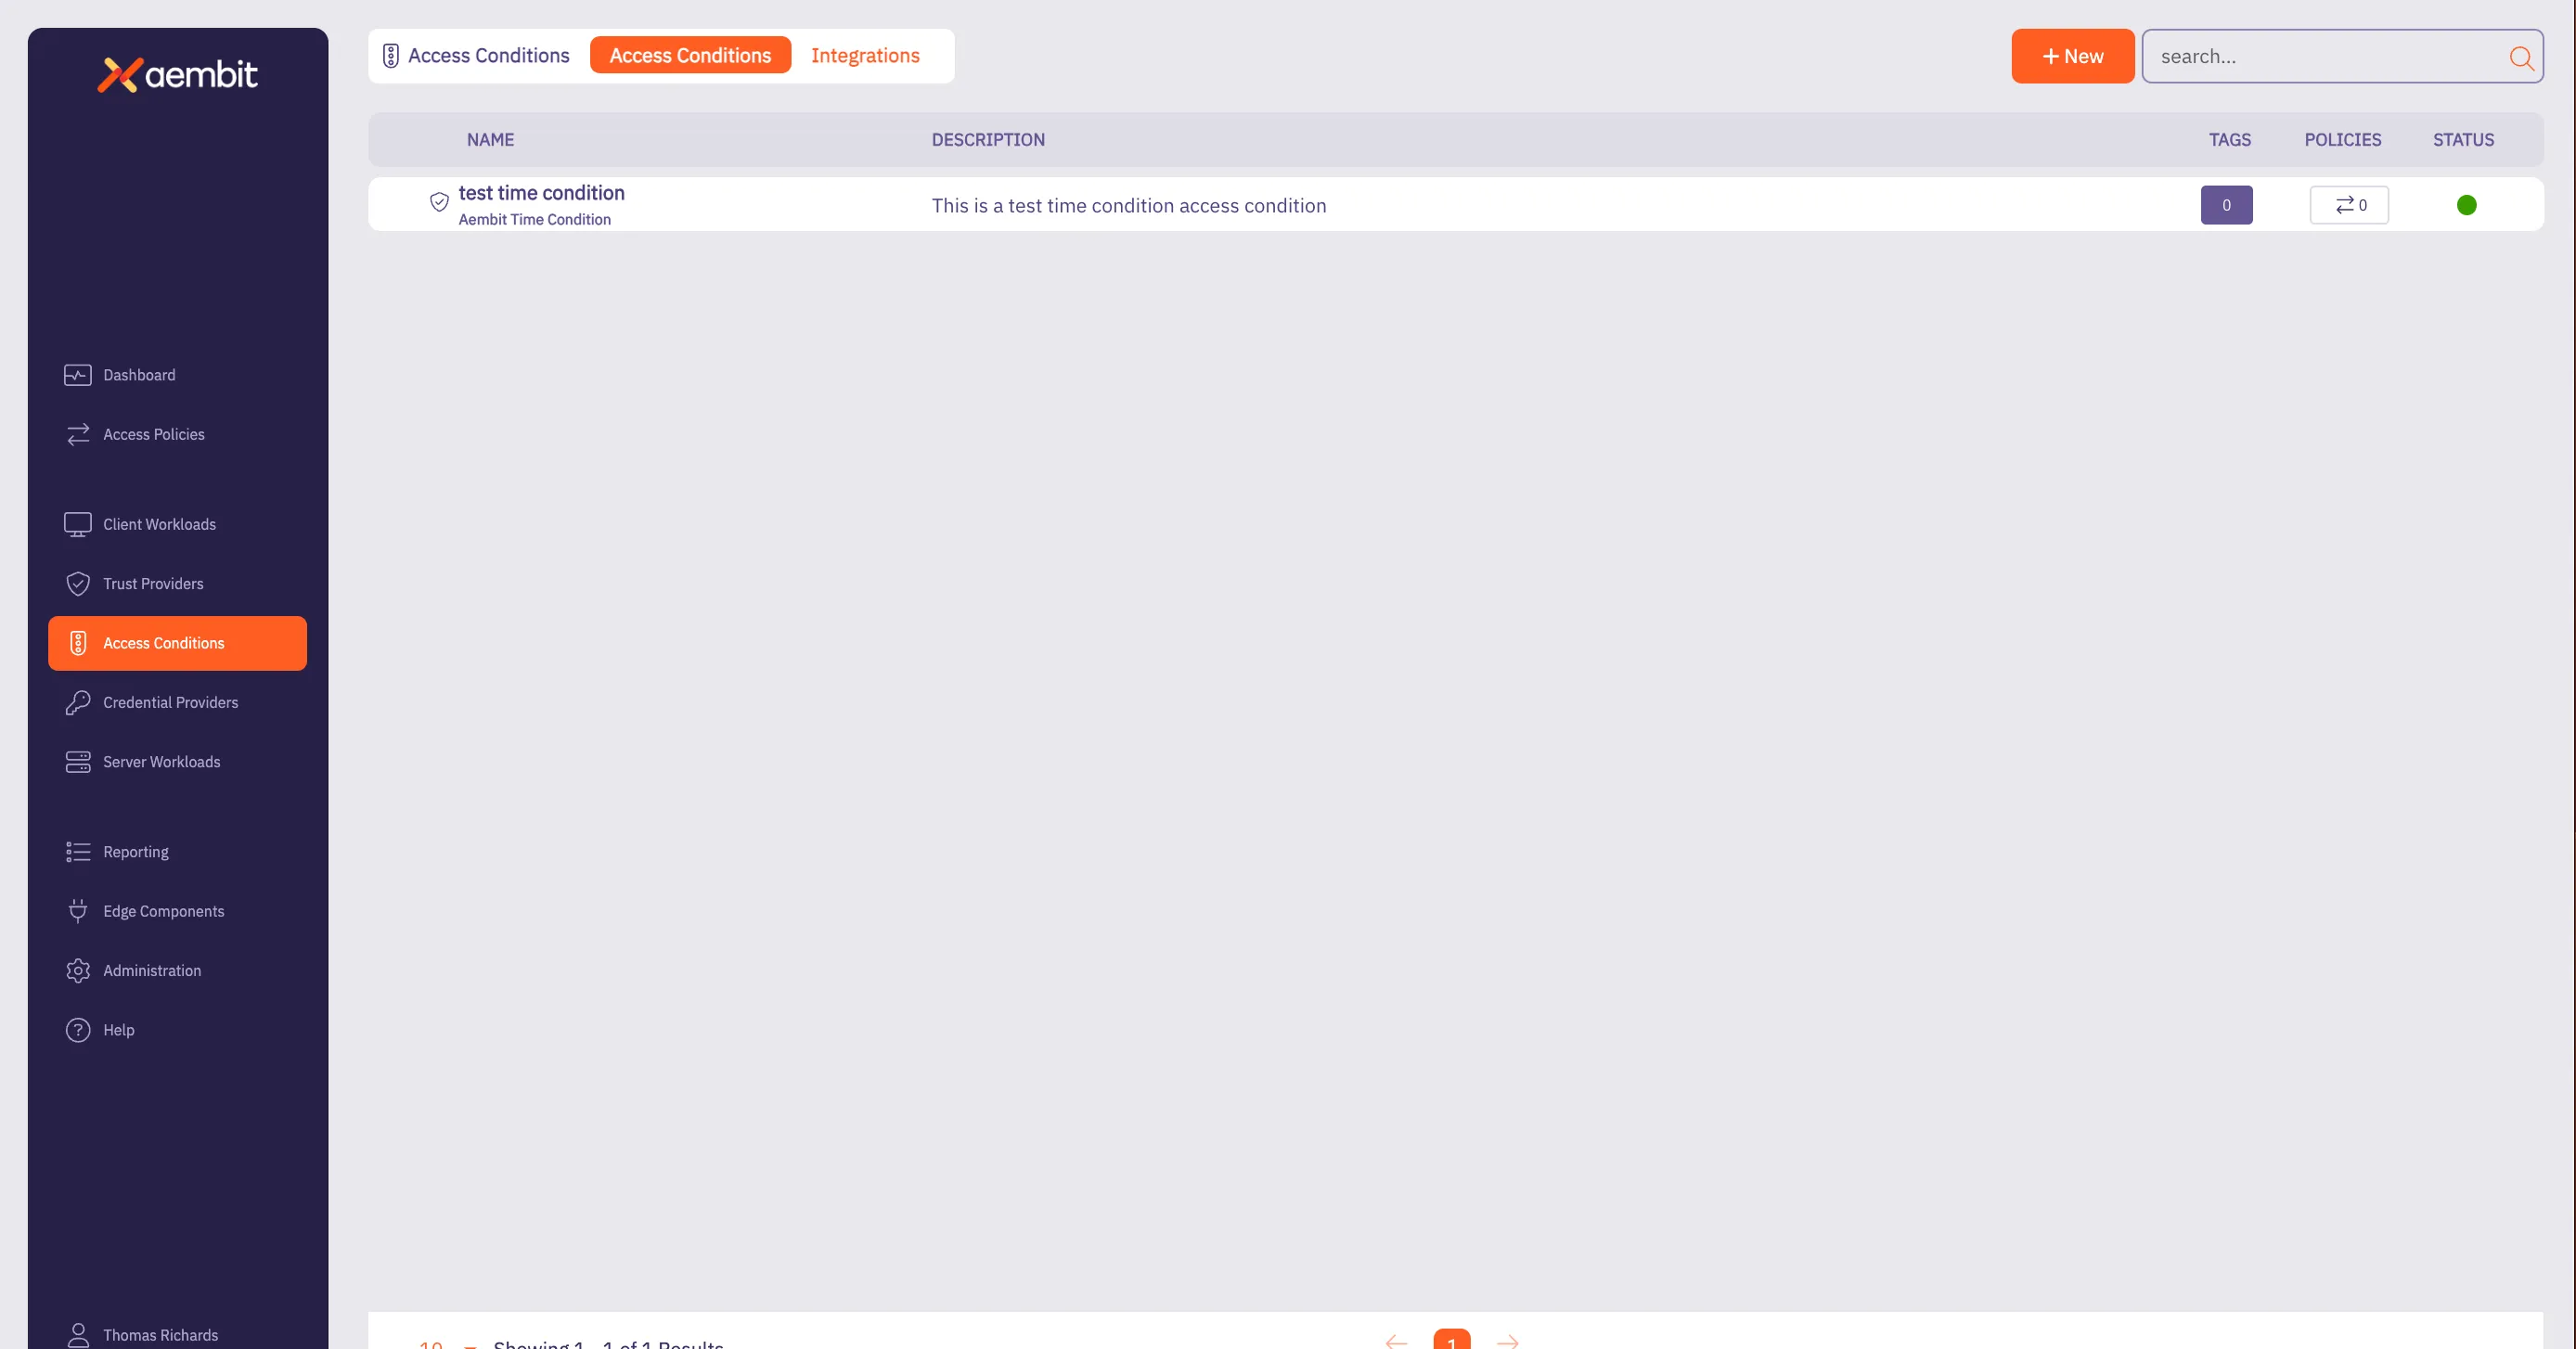
# Access Condition for CrowdStrike
> This page describes how to create an Access Condition for a CrowdStrike integration.
## Introduction
[Section titled “Introduction”](#introduction)
If you have an existing CrowdStrike integration and would like to create an Access Condition for this integration, you may create this Access Condition using your Aembit Tenant.
The section below describes the required steps to setup and configure a Access Condition for a CrowdStrike integration.
## Creating an Access Condition for a CrowdStrike Integration
[Section titled “Creating an Access Condition for a CrowdStrike Integration”](#creating-an-access-condition-for-a-crowdstrike-integration)
To create an Access Condition for a CrowdStrike integration, perform the steps listed below.
1. Log into your Aembit Tenant using your login credentials.
2. When your credentials have been authenticated and you are logged into your tenant, you are directed to the main dashboard page. Click on **Access Conditions** in the left sidebar. You will see a list of existing Access Conditions (in this example, no Access Conditions have been created)

3. Click on the **New Access Condition** button. An Access Condition dialog window appears.

4. In the Access Condition dialog window, enter information in the following fields:
* **Name** - Name of the Access Condition.
* **Description** - An optional text description of the Access Condition.
* **Integration** - A drop-down menu that enables you to select the type of integration you would like to create. Select your CrowdStrike integration from the drop-down menu. In this example, **Test CrowdStrike Condition** is selected.
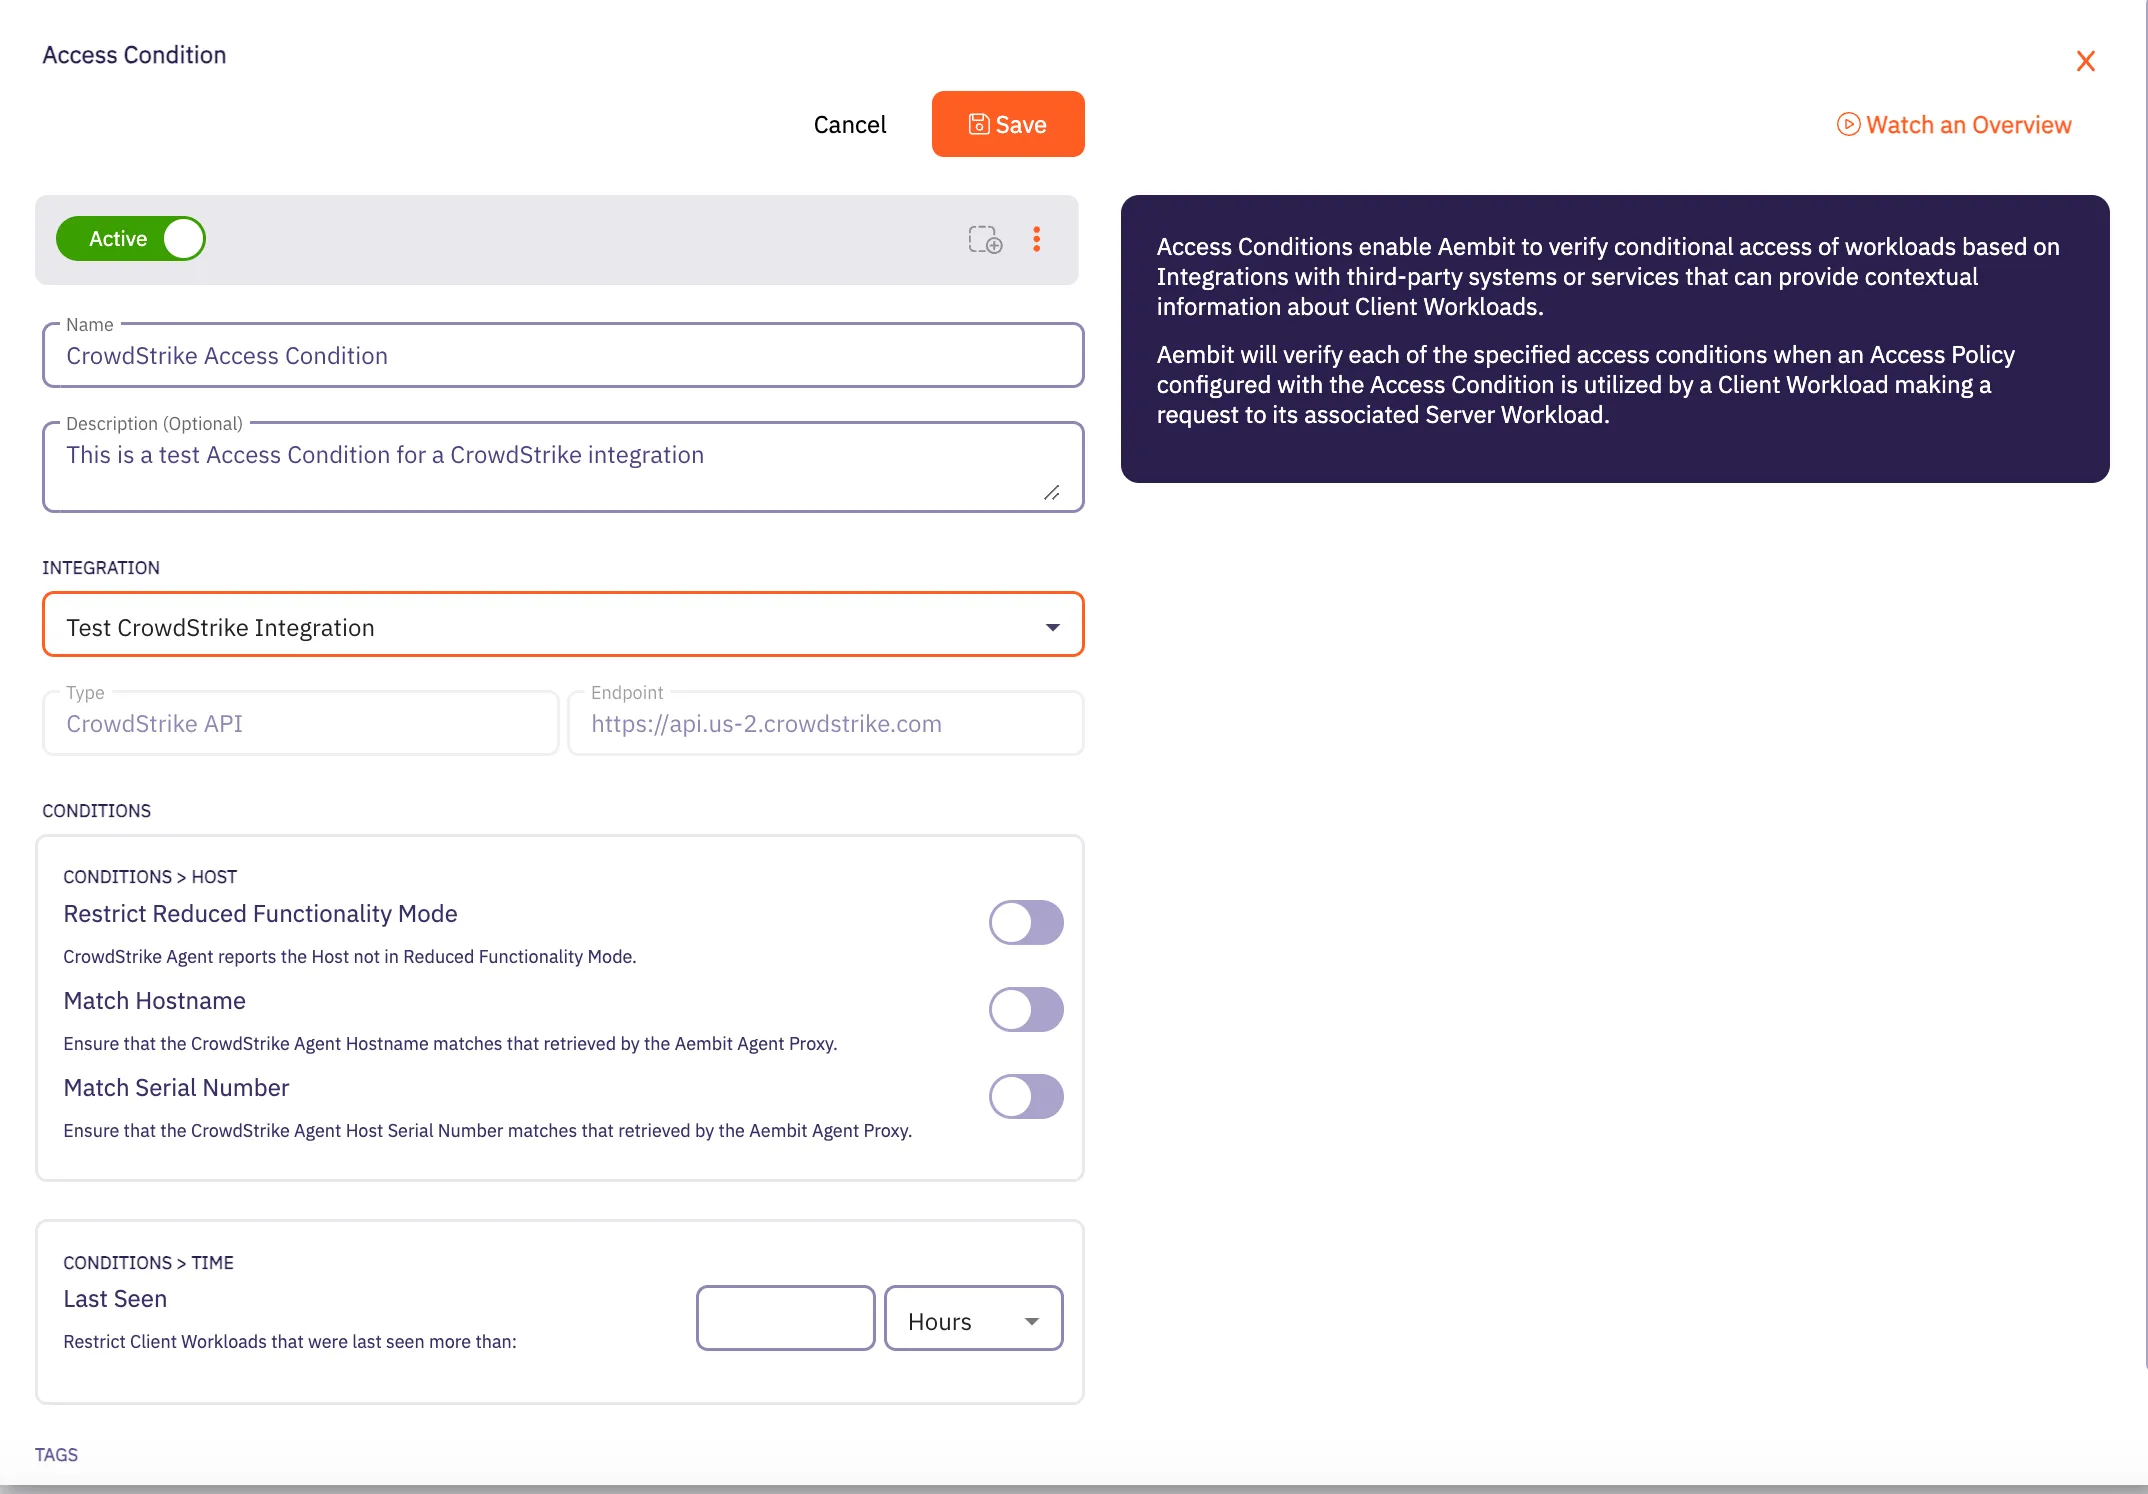
5. In the **Conditions** section, click on the desired toggle buttons you would like to set for the Access Condition. There are three different toggle buttons you may select:
* **Restrict Reduced Functionality Mode** - This toggle ensures the CrowdStrike Agent reports if the Crowdstrike Agent on the Host is not in Reduced Functionality Mode.
* **Match Hostname** - This toggle ensures the CrowdStrike Agent reported HostName matches the Aembit Agent Proxy retrieved HostName.
* **Match Serial Number** - This toggle ensures the CrowdStrike Agent Host Serial Number matches the Aembit Agent Proxy retrieved Host Serial Number.
6. In the **Conditions - Time** section, enter the time period you would like to use to restrict Client Workloads that were last seen prior specified to the time span.
7. When you are finished, Click **Save**. Your new Access Condition for the CrowdStrike integration appears on the main Access Conditions page.

# Access Condition integrations overview
> Overview of Access Condition integrations and how they work
This section covers Access Condition integrations, which allow Aembit to leverage external security platforms to enhance access decisions based on security context.
Access Condition integrations allow you to use security information from third-party platforms when evaluating access requests. This enables you to make more informed access decisions based on security posture, compliance status, and other contextual factors.
The following Access Condition integrations are available:
* [CrowdStrike Integration](/user-guide/access-policies/access-conditions/integrations/crowdstrike) - Use security information from CrowdStrike to inform access decisions
* [Wiz Integration](/user-guide/access-policies/access-conditions/integrations/wiz) - Use security information from Wiz to inform access decisions
# CrowdStrike Integration
> This page describes how to integrate CrowdStrike with Aembit.
Note
The CrowdStrike Integration feature is a paid feature. To enable CrowdStrike integration, please contact Aembit by completing the [Contact Us form](https://aembit.io/contact/).
#
CrowdStrike is a cybersecurity platform that provides cloud workload and endpoint security, threat intelligence, and cyberattack response services to businesses and enterprises.
While Aembit provides workload identity and access management, integrating with a 3rd party service, such as CrowdStrike, enables businesses to prevent Server Workload access from Client Workloads that do not meet an expected state. If the Client Workload environment is not in this state, workload access will not be authorized.
Note
A specific expected state is defined as a configured set of conditions as defined in one or more Aembit access condition rules. For example, in CrowdStrike, this may be when an agent is operating in Reduced Functionality Mode.
## CrowdStrike Falcon Sensor
[Section titled “CrowdStrike Falcon Sensor”](#crowdstrike-falcon-sensor)
The CrowdStrike Falcon Sensor is a lightweight, real-time, threat intelligence application installed on client endpoints that reviews processes and programs to detect suspicious activity or anomalies.
To integrate CrowdStrike Falcon with Aembit Cloud, you will need to:
* create a new API key
* create a new CrowdStrike integration
### Create a new CrowdStrike OAuth2 API Client
[Section titled “Create a new CrowdStrike OAuth2 API Client”](#create-a-new-crowdstrike-oauth2-api-client)
To create a new CrowdStrike OAuth2 API Client:
1. Generate an API key from the CrowdStrike website (for example `https://falcon.us-2.crowdstrike.com/api-clients-and-keys/clients` ). Note that URLs may change over time, therefore, you should always use the latest URLs listed on the CrowdStrike site.
2. In the Create API Client dialog, enter the following information:
* Name
* Description (optional)
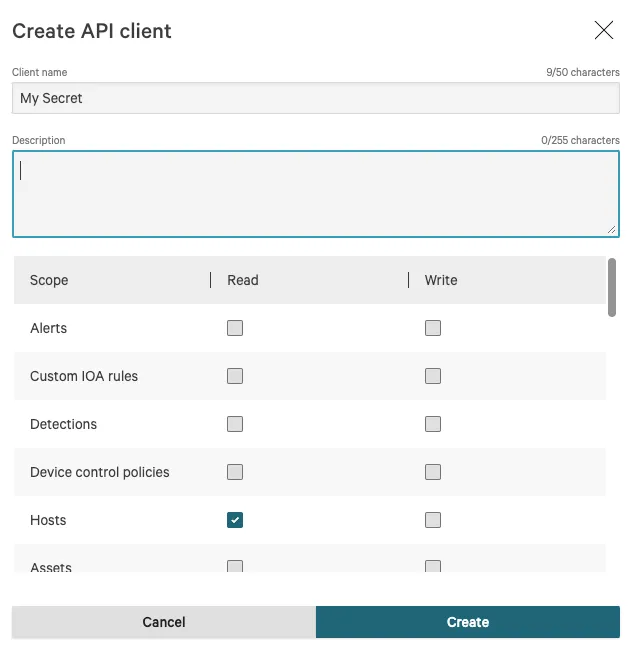
3. Click on the **Hosts** checkbox in the Read column to enable the Hosts -> Read permission.
4. Click the **Create** button to generate your new API client.
5. You will see a dialog appear with the following information:
* Client ID
* Secret
* Base URL
Note
It is important that you copy this information and store it in a safe location. You will need this information later when you configure your CrowdStrike integration in your Aembit Tenant.
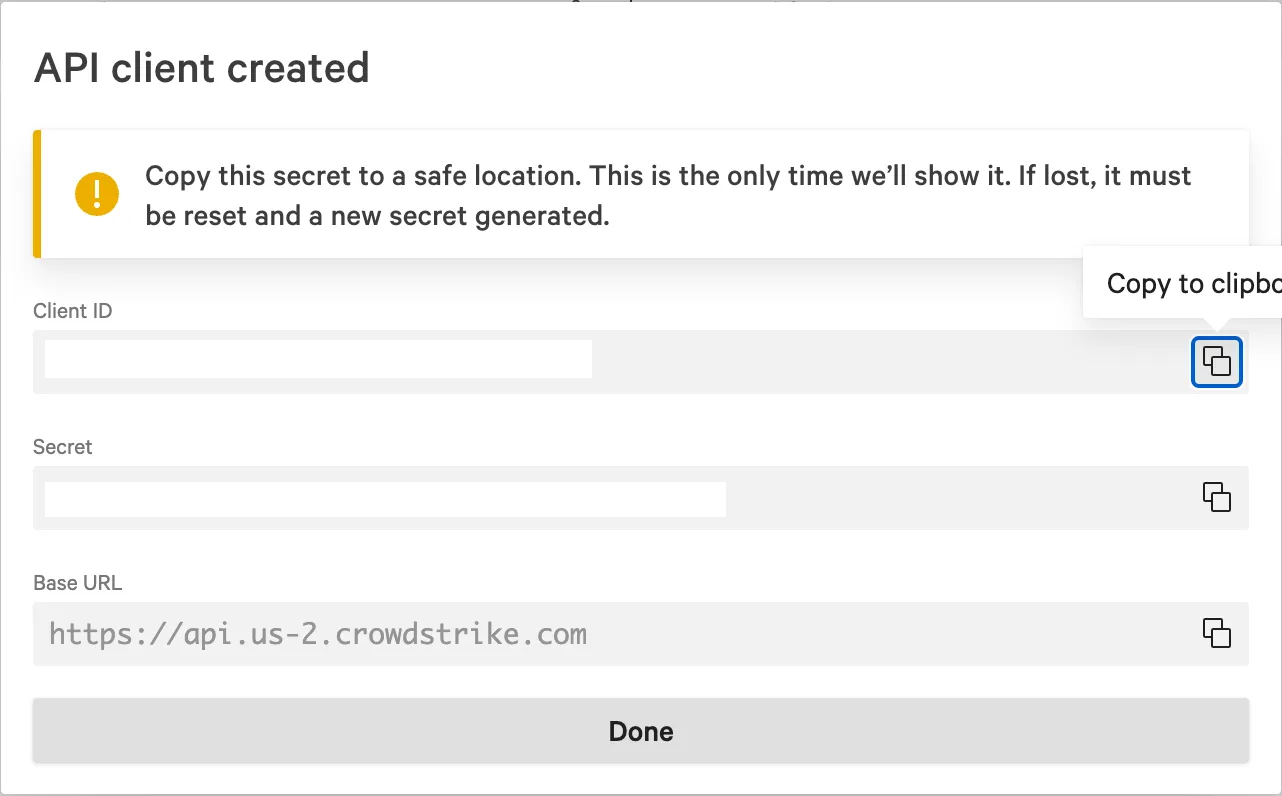
6. Once you have copied the API client information, click **Done** to close the dialog.
Now that you have created your new API client, you will need to add this information to your Aembit Tenant by following the steps described below.
### Create a new CrowdStrike -> Aembit integration
[Section titled “Create a new CrowdStrike -> Aembit integration”](#create-a-new-crowdstrike---aembit-integration)
To integrate CrowdStrike with your Aembit Tenant:
1. Sign into your Aembit Tenant.
2. Click on the **Access Conditions** page in the left sidebar. You should see a list of existing Access Conditions. In this example, there are no existing access conditions.

3. Click on the **Create an Integration** button. The main Integrations page is displayed.

4. Select the **CrowdStrike** Integration tile.
5. On the Aembit Integrations page, configure your CrowdStrike Integration by entering the values you just copied in the fields below.
* **Name** - The name of the Integration you want to create.
* **Description (optional)** - An optional text description for the Integration.
* **Endpoint** - The *Base URL* value taken from the values you copied when generating your CrowdStrike API key.
* **Oauth Token Configuration information** -
* **Token Endpoint** - The endpoint for your token. The value entered should be: *BaseURL + “/oauth2/token”*
* **Client ID** - The *Client ID* value taken from the values you copied when generating your CrowdStrike API key.
* **Client Secret** - The *Client Secret* value taken from the values you copied when generating your CrowdStrike API key.
Note
You can retrieve the correct BaseURL by referring to your [API Client page](https://falcon.us-2.crowdstrike.com/api-clients-and-keys/clients), and additionally, in the [BaseURLs](https://falcon.us-2.crowdstrike.com/documentation/page/a2a7fc0e/crowdstrike-oauth2-based-apis#k9578c40) section of the CrowdStrike API documentation.
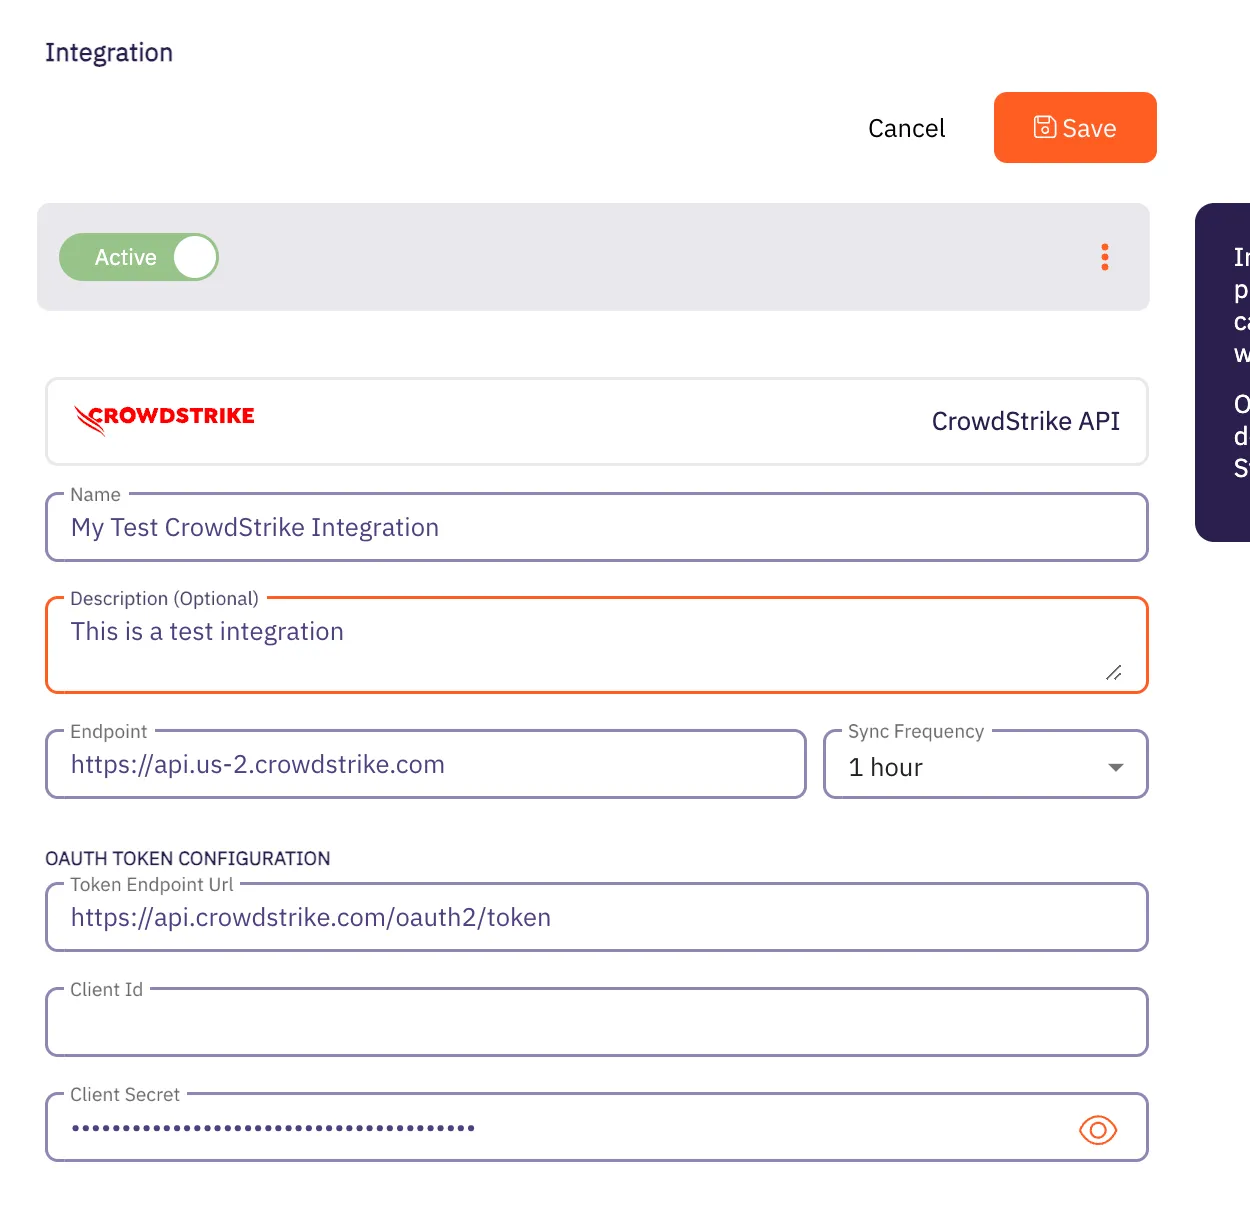
7. Click the **Save** button when finished. Your CrowdStrike Integration is saved and will then appear on the Integrations page.
# Wiz Integration
> This page describes how to integrate Wiz with Aembit.
Note
The Wiz Integration feature is a paid feature. To use the Wiz Integration feature, please contact Aembit by completing the [Contact Us form](https://aembit.io/contact/).
#
The Wiz Cloud Security Platform provides a security analysis service, including inventory enumeration and asset information for identification of customer assets and vulnerabilities. In particular, Wiz provides an Integration API which can be accessed via an OAuth2 Client Credentials Flow and can return an Inventory result set on demand, including Kubernetes Clusters, Deployments, and Vulnerabilities.
## Wiz Integration API
[Section titled “Wiz Integration API”](#wiz-integration-api)
To integrate Wiz with Aembit, you must already have a Wiz API client set up and configured. When setting up your Wiz API client, make sure you request the following information from your Wiz account representative (you will need this information later when integrating with Aembit):
* OAuth2 Endpoint URL
* Client ID
* Client secret
* Audience (this is required and the value is expected to be `wiz-api`)
## Kubernetes/Helm/Agent Proxy Configuration
[Section titled “Kubernetes/Helm/Agent Proxy Configuration”](#kuberneteshelmagent-proxy-configuration)
For the Wiz integration to work correctly, Aembit needs to receive a unique Provider ID that can be compared/matched against the Kubernetes Clusters returned by the Wiz Integration API.
For example, in an AWS EKS Cluster, the output should look similar to the example below:
`arn:aws:eks:region-code:111122223333:cluster/my-cluster`
To use this sample value, update your Aembit Edge Helm Chart deployment with the following parameter values:
* **name** - agentProxy.env.KUBERNETES\_PROVIDER\_ID
* **value** - arn:aws:eks:region-code:111122223333:cluster/my-cluster
These parameters instruct the Aembit Edge Components to configure the Agent Proxy containers with an environment variable named `KUBERNETES_PROVIDER_ID` with the value indicated.
Note
This Wiz integration supports Agent Proxy versions 1.8.1203 and higher.
### Create a new Wiz -> Aembit integration
[Section titled “Create a new Wiz -> Aembit integration”](#create-a-new-wiz---aembit-integration)
Once you have set up your Wiz API client and are ready to integrate Wiz with your Aembit Tenant, follow the steps listed below.
1. Sign into your Aembit Tenant.
2. Click on the **Access Conditions** page in the left sidebar. You should see a list of existing Access Conditions. In this example, there are no existing access conditions.

3. At the top of the page, in the *Access Conditions* tab, select **Integrations**, and then select **New**. An Integrations page appears showing the types of integrations you can create. Currently, there are two integration types available: Wiz or CrowdStrike.

4. Select the **Wiz Integration API** tile. You will see the *Wiz Integration* page.
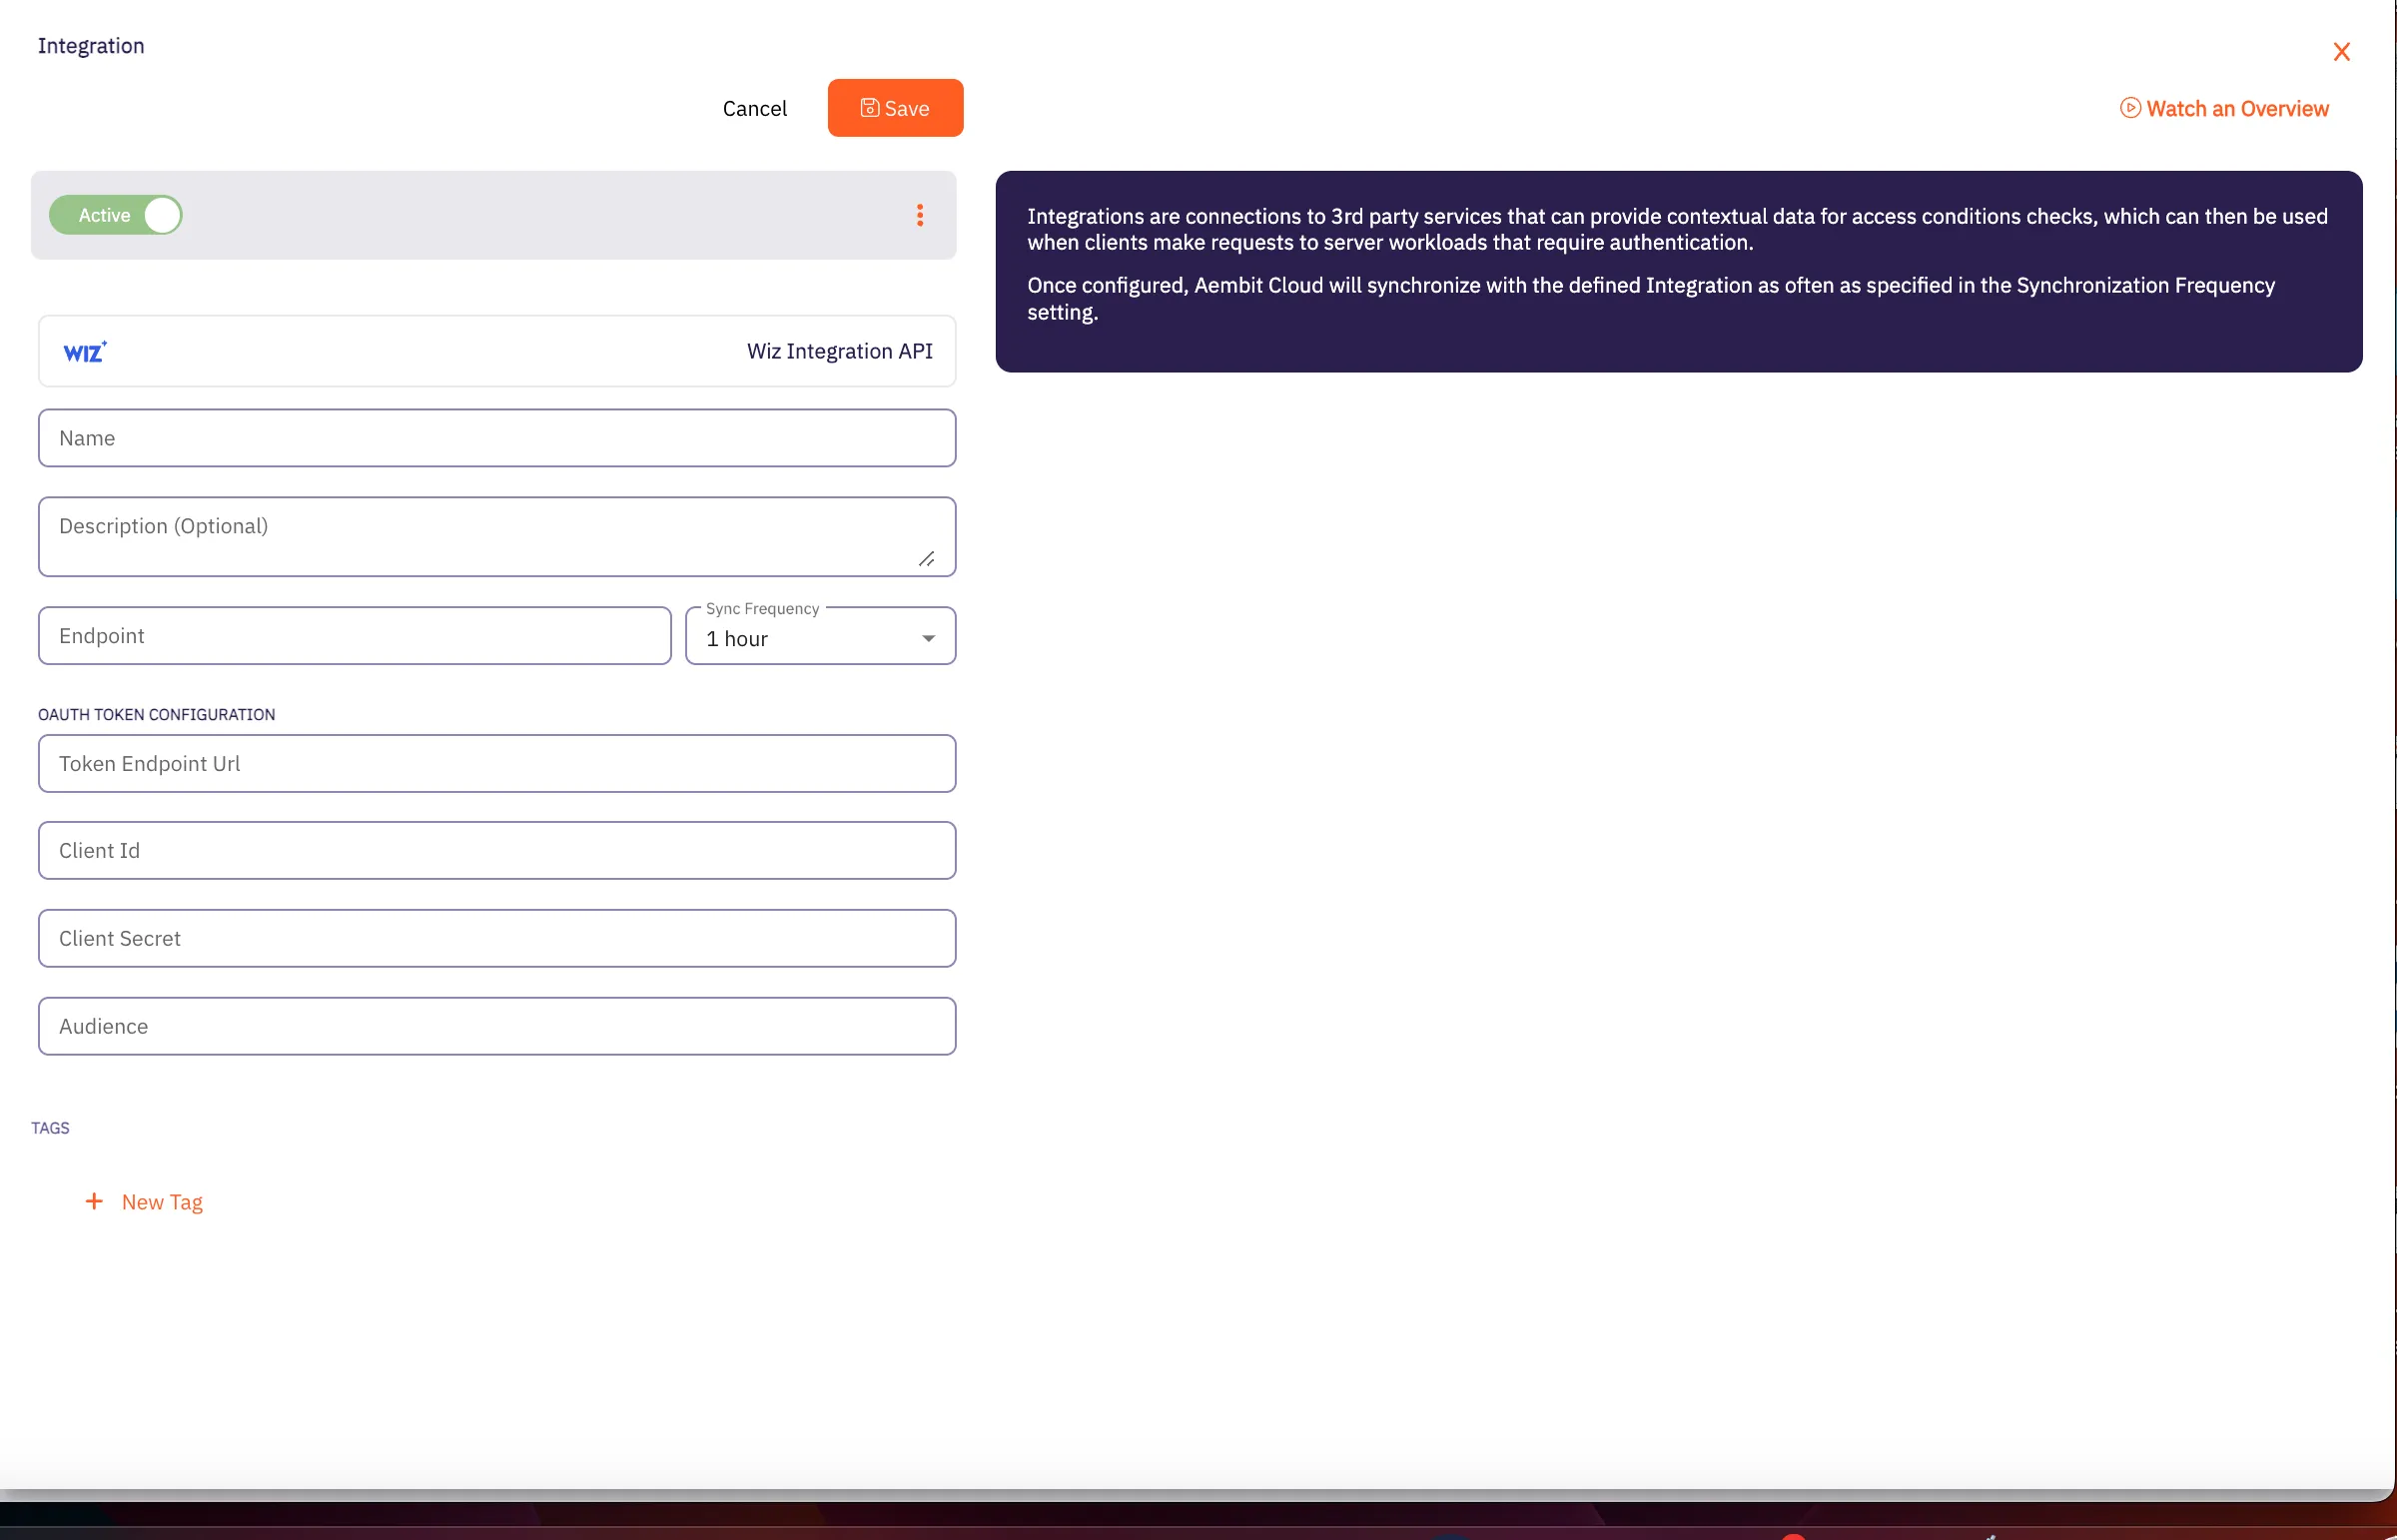
5. On this page, enter the following values from your Wiz API client (these are the values you saved earlier when creating your Wiz API client).
* **Name** - The name of the Integration you want to create.
* **Description (optional)** - An optional text description for the Integration.
* **Endpoint** - The *Base URL* value taken from the values you copied when creating your Wiz API key.
* **Sync Frequency** - The amount of time (interval) between synchronization attempts. This value can be between 5 minutes up to 1 hour.
* **Oauth Token Configuration information** -
* **Token Endpoint** - The endpoint for your token.
* **Client ID** - The *Client ID* value.
* **Client Secret** - The *Client Secret* value.
* **Audience** - This value should be set to `wiz-api` as recommended by the Wiz Integration API documentation.
7. Click the **Save** button when finished. Your Integration is saved and will then appear on the Integrations page.
Note
After the next sync attempt, the status will be updated to show success/failure details.
# Access Condition for Wiz
> This page describes how to create an Access Condition for a Wiz integration.
## Introduction
[Section titled “Introduction”](#introduction)
If you have an existing Wiz integration and would like to create an Access Condition for this integration, you may create this Access Condition using your Aembit Tenant.
The section below describes the required steps to set up and configure an Access Condition for a Wiz integration.
## Creating an Access Condition for a Wiz Integration
[Section titled “Creating an Access Condition for a Wiz Integration”](#creating-an-access-condition-for-a-wiz-integration)
To create an Access Condition for a Wiz integration, perform the steps listed below.
1. Log into your Aembit Tenant using your login credentials.
2. When your credentials have been authenticated and you are logged into your tenant, you are directed to the main dashboard page. Click on **Access Conditions** in the left sidebar. You will see a list of existing Access Conditions (in this example, no Access Conditions have been created)
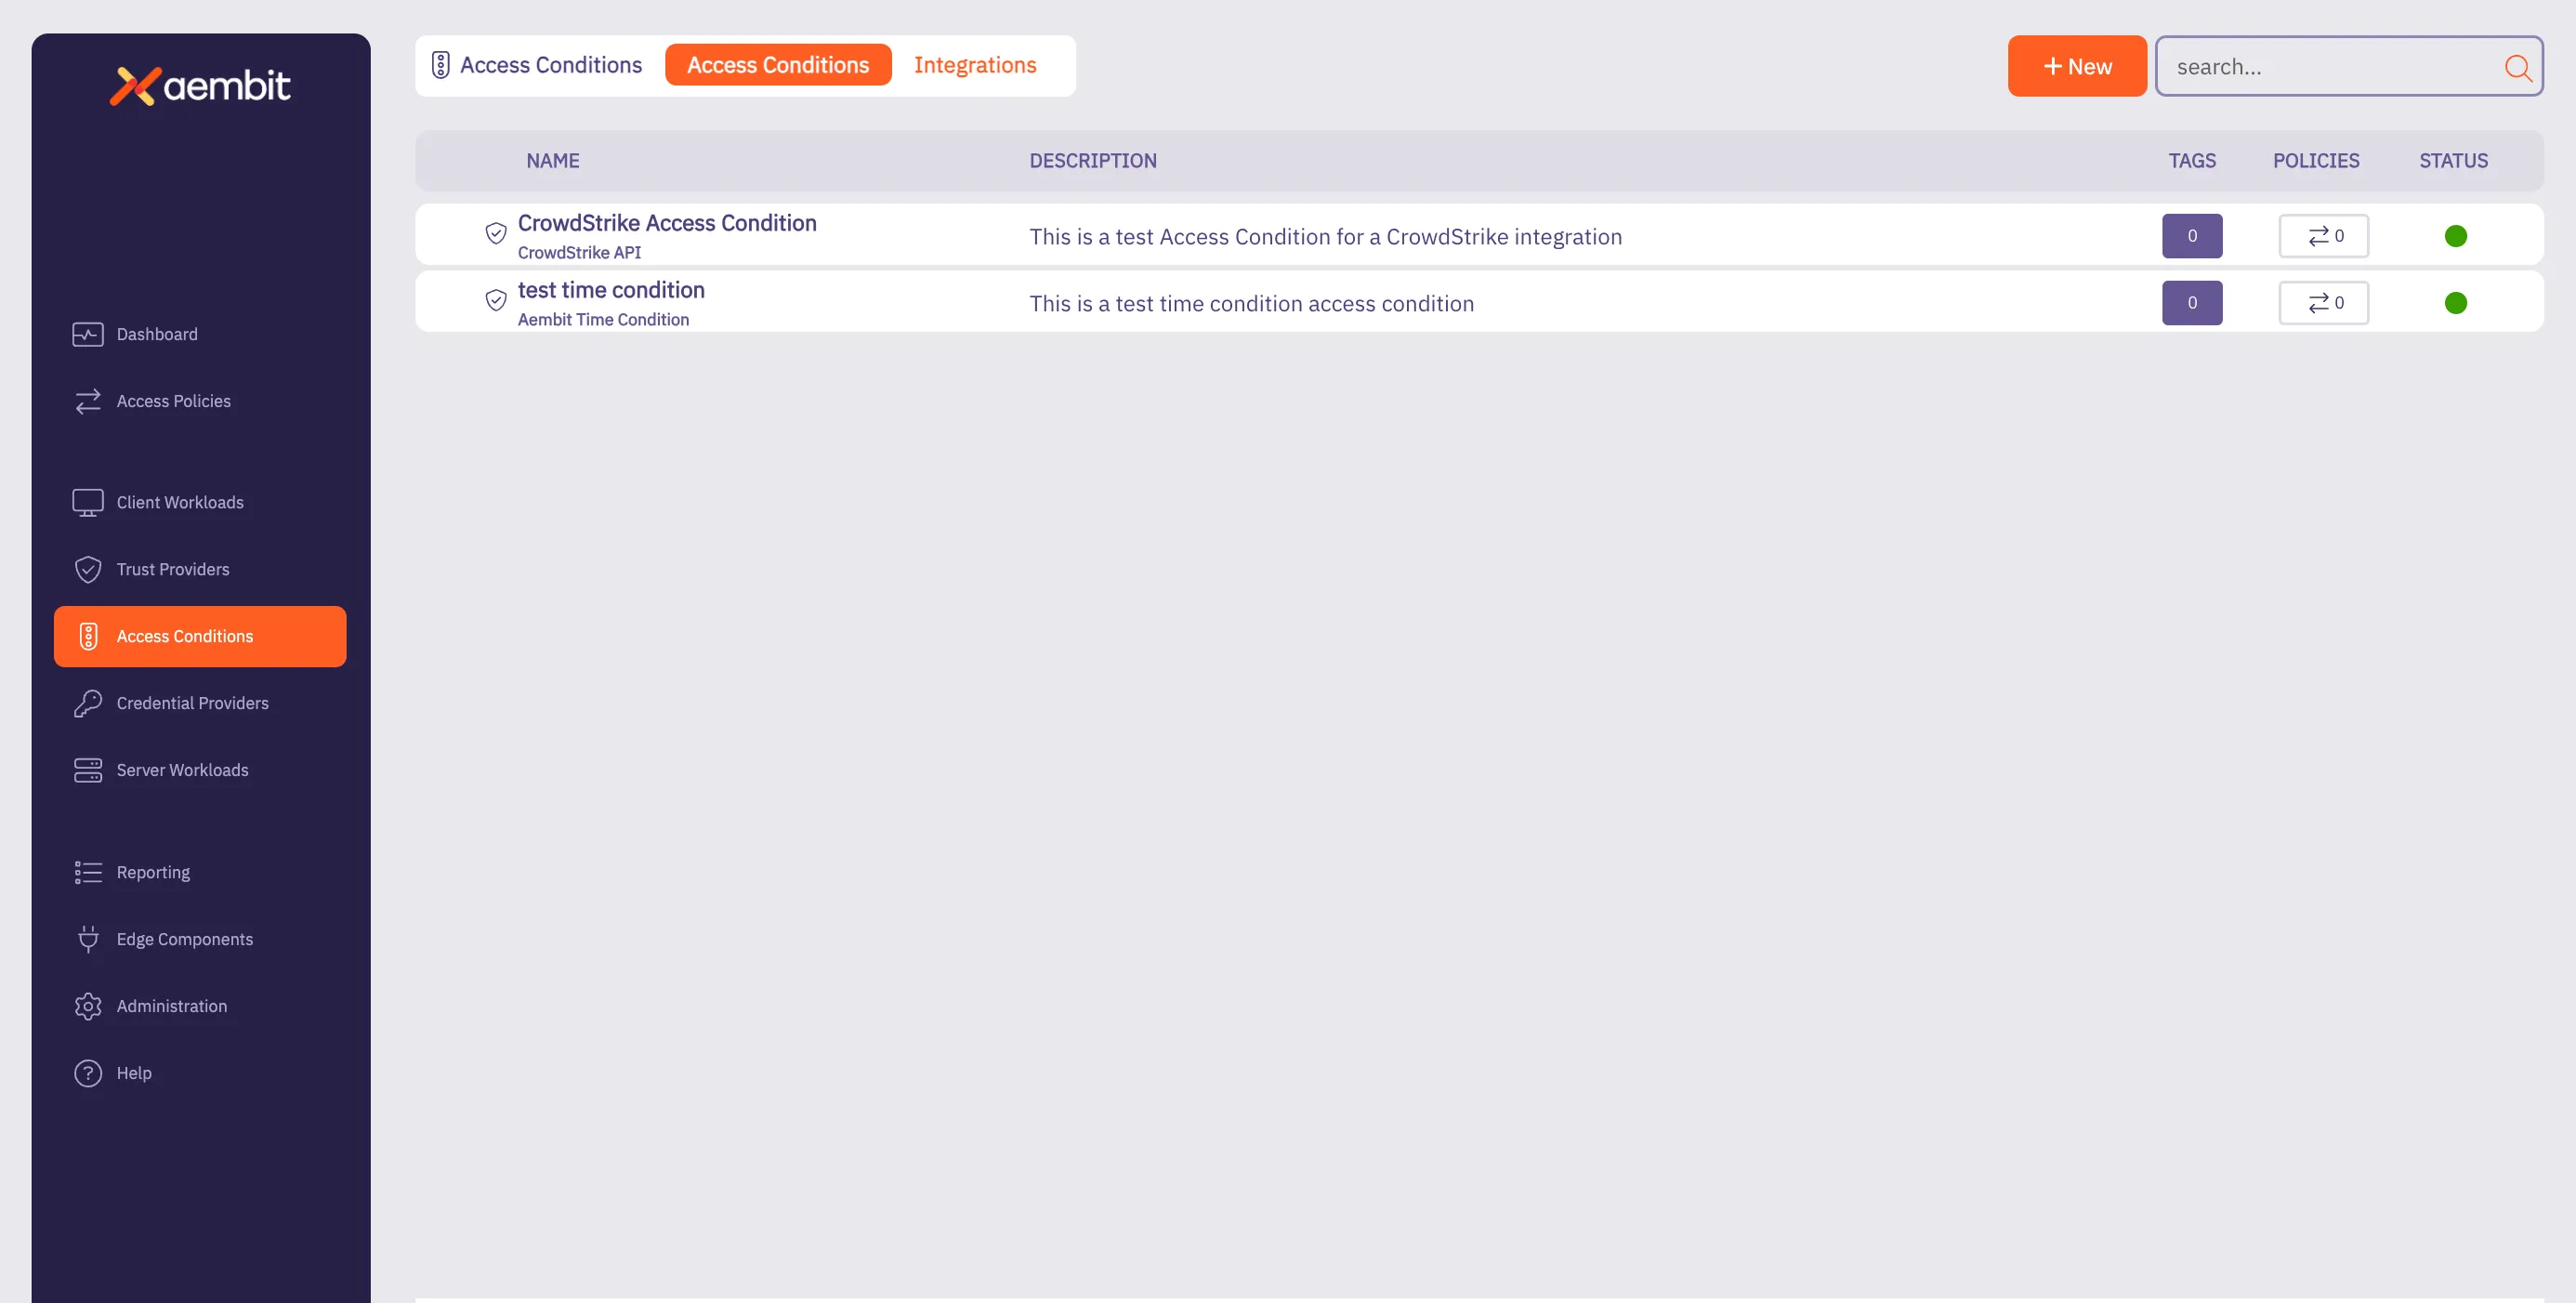
3. Click on the **New Access Condition** button. An Access Condition dialog window appears.
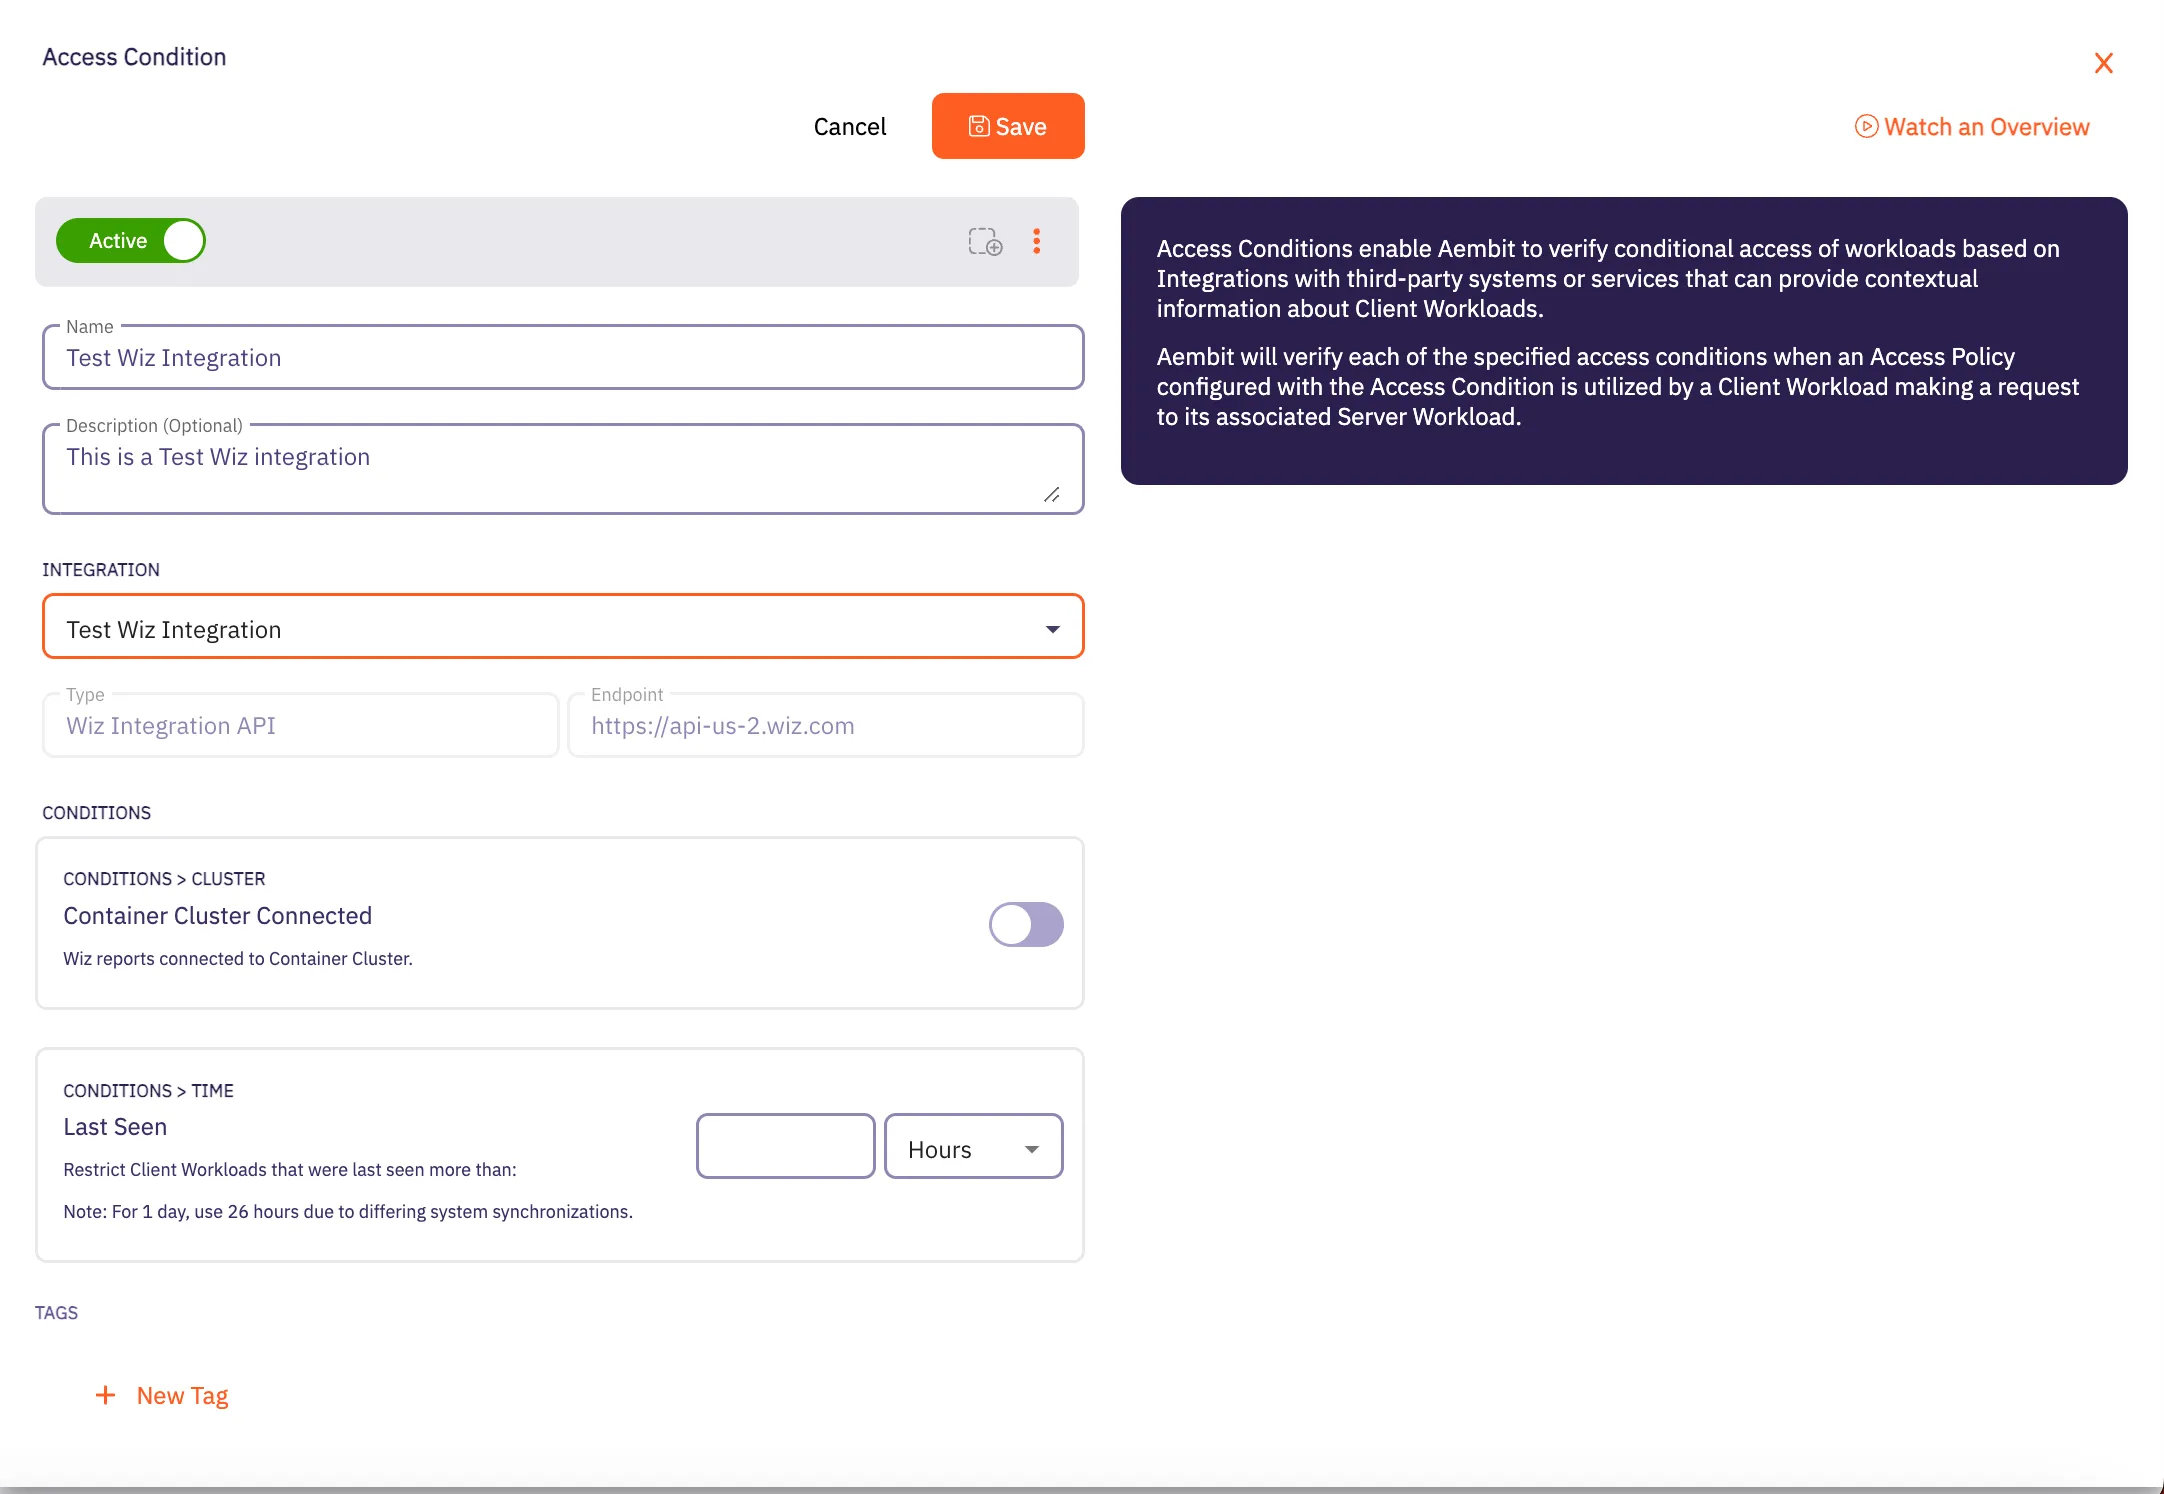
4. In the Access Condition dialog window, enter information in the following fields:
* **Name** - Name of the Access Condition.
* **Description** - An optional text description of the Access Condition.
* **Integration** - A drop-down menu that enables you to select the type of integration you would like to create. Select your existing Wiz integration from the drop-down menu.
5. In the **Conditions** section, click on the **Container Cluster Connected** toggle if you want to block Client Workloads that Wiz reports are not container cluster connected.
6. In the **Conditions - Time** section, enter the duration of time you would like to use for restricting Client Workloads in Kubernetes Clusters that have not been seen recently.
Note
If you would like to have a full day as the time duration, Aembit recommends using 26 hours to handle the different system synchronizations.
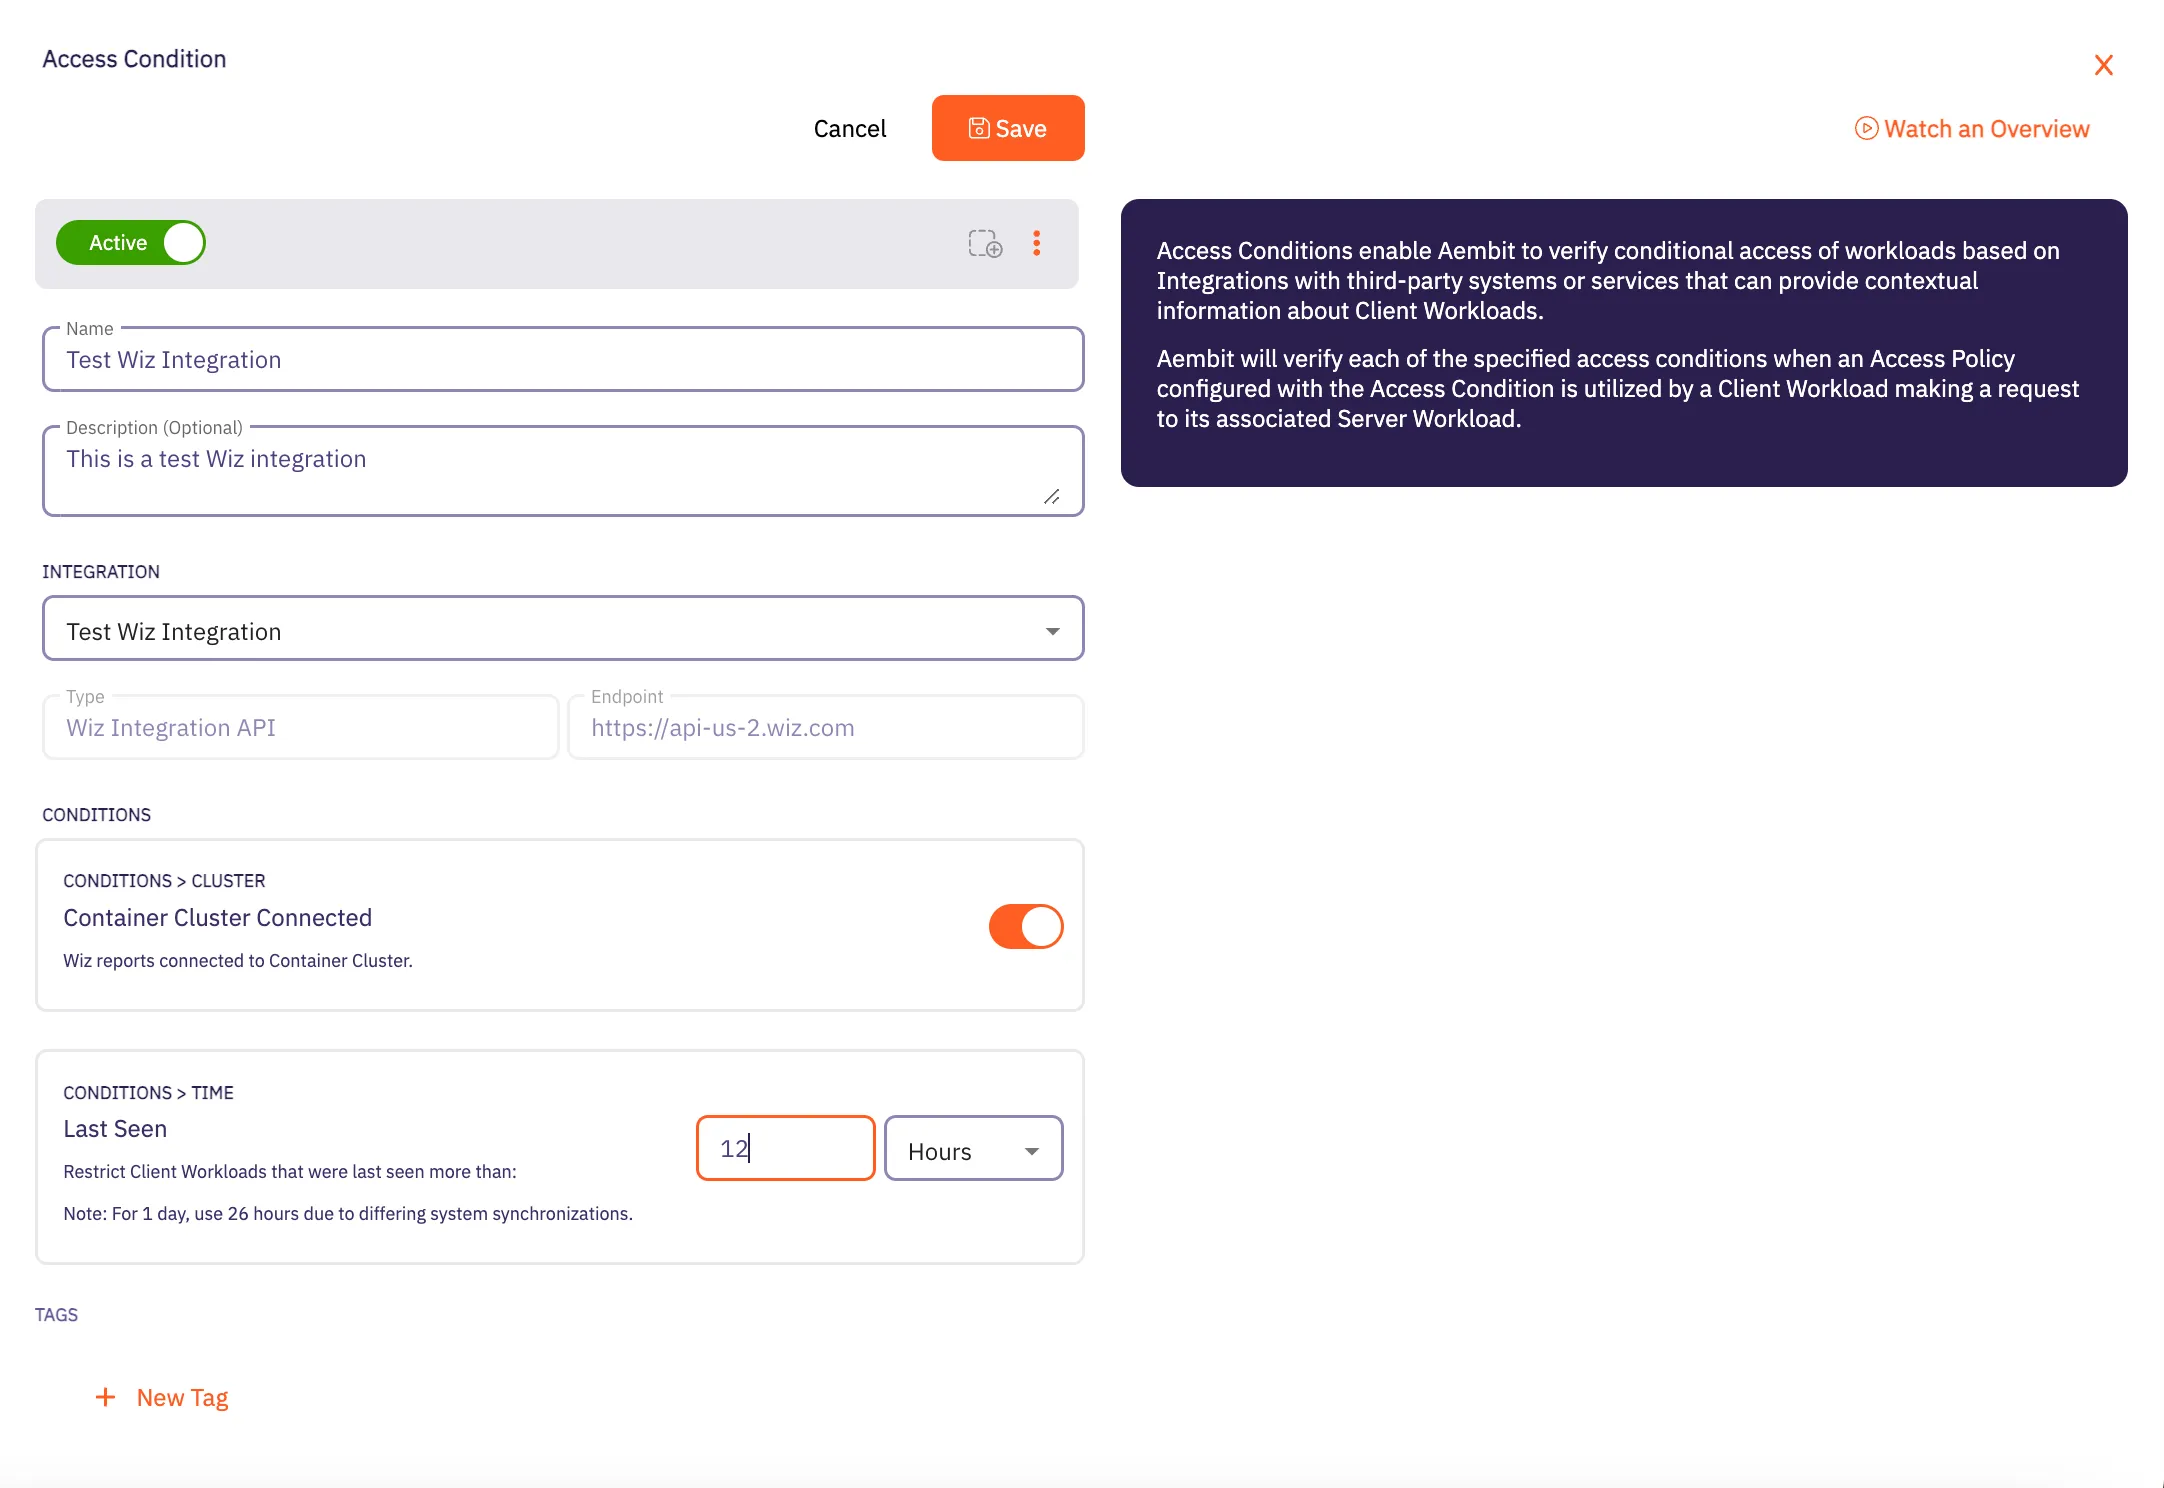
7. When finished, Click **Save**. Your new Access Condition for the Wiz integration will appear on the main Access Conditions page.

# Access Policy advanced options
> Advanced options for Aembit Access Policies
This section covers advanced options for Access Policies in Aembit, providing more sophisticated ways to configure and automate your access policies.
The following pages provide information about advanced Access Policy options:
* [Scaling Aembit with Terraform](/user-guide/access-policies/advanced-options/terraform)
# Scaling Aembit with Terraform
> Information and guides about scaling Aembit with Terraform
Work in progress
This page is a work in progress. It may contain incomplete or unverified information.
Please check back later for updates.
If you have feedback or suggestions, please fill out the [Aembit New Docs Feedback Survey](https://forms.gle/mfjhV2TtXP1pXAym8).
Thanks for your patience!
# Configuration with Terraform
> How to use the Aembit Terraform Provider to configure Aembit Cloud resources
Aembit has released a Terraform Provider in the [Terraform Registry](https://registry.terraform.io/providers/Aembit/aembit/latest) that enables users to configure Aembit Cloud resources in an automated manner.
## Configuration
[Section titled “Configuration”](#configuration)
Configuring the Aembit Terraform provider requires two steps:
1. Create or update the Terraform configuration to include the Aembit provider.
2. Specify the Aembit provider authentication configuration.
a. Aembit recommends using Aembit integrated authentication for dynamic retrieval of the Aembit API Access Token. This can be done by specifying the Aembit Edge SDK Client ID from an appropriately configured Aembit Trust Provider.
b. For development and testing purposes, users can specify an Aembit Tenant ID and Token for short-term access.
Additional details for how to perform each of these steps can be found in the [Provider Documentation](https://registry.terraform.io/providers/Aembit/aembit/latest/docs) section of the Aembit Terraform provider page.
## Resources and Data Sources
[Section titled “Resources and Data Sources”](#resources-and-data-sources)
The Aembit [Terraform Provider](https://registry.terraform.io/providers/Aembit/aembit/latest) enables users to create, update, import, and delete Aembit Cloud resources using terraform manually or via CI/CD workflows. For example, users can configure GitHub Actions or Terraform Workspaces to utilize the Aembit Terraform provider and manage Aembit Cloud resources on demand to best serve their Workload purposes.
Detailed instructions for using the Aembit Terraform Provider can be found in the [Terraform Registry](https://registry.terraform.io/providers/Aembit/aembit/latest/docs).
# Client Workloads
> This document provides a high-level description of Client Workloads
This section covers Client Workloads in Aembit, which are the applications or services that need to access Server Workloads using credentials managed by Aembit.
The following pages provide information about Client Workload identification methods:
* [Aembit Client ID](/user-guide/access-policies/client-workloads/identification/aembit-client-id)
* [AWS Lambda ARN](/user-guide/access-policies/client-workloads/identification/aws-lambda-arn)
* [Multiple Client Workload IDs](/user-guide/access-policies/client-workloads/identification/client-workload-multiple-ids)
* [GitHub ID Token Repository](/user-guide/access-policies/client-workloads/identification/github-id-token-repository)
* [GitHub ID Token Subject](/user-guide/access-policies/client-workloads/identification/github-id-token-subject)
* [GitLab ID Token Namespace Path](/user-guide/access-policies/client-workloads/identification/gitlab-id-token-namespace-path)
* [GitLab ID Token Project Path](/user-guide/access-policies/client-workloads/identification/gitlab-id-token-project-path)
* [GitLab ID Token Ref Path](/user-guide/access-policies/client-workloads/identification/gitlab-id-token-ref-path)
* [GitLab ID Token Subject](/user-guide/access-policies/client-workloads/identification/gitlab-id-token-subject)
* [Hostname](/user-guide/access-policies/client-workloads/identification/hostname)
* [Kubernetes Pod Name Prefix](/user-guide/access-policies/client-workloads/identification/kubernetes-pod-name-prefix)
* [Kubernetes Pod Name](/user-guide/access-policies/client-workloads/identification/kubernetes-pod-name)
* [Process Name](/user-guide/access-policies/client-workloads/identification/process-name)
# Client Workload Identifiers overview
> This page provides a high-level description of Client Workload Identifiers in Aembit.
Client Workload identification is an initial step to recognize the specific software application, script, or automated process that initiates an access request to a Server Workload. This identification is critical because it’s a prerequisite for matching the request to the correct Access Policy and invoking the appropriate Trust Provider for identity attestation. Accurate identification is essential for enforcing the principle of least privilege and preventing misidentification which could lead to security vulnerabilities.
Aembit addresses the need for accurate identification across diverse and heterogeneous environments by offering a variety of methods tailored to different deployment contexts. These methods leverage native identity constructs and environmental evidence available in those platforms.
Examples of Aembit Client Workload identification methods include:
* **Kubernetes** - Using the Pod Name Prefix, the exact Pod Name, or the Kubernetes Service Account under which the container runs.
* **Cloud Platforms (AWS, Azure)** - Using Instance Metadata Attributes (like instance ID or tags), AWS IAM Role ARN, Azure Subscription ID, or Azure VM ID.
* **CI/CD Systems (GitHub Actions, GitLab Jobs)** - Inspecting claims within ephemeral OpenID Connect (OIDC) tokens, such as repository name, subject, namespace path, or project path.
* **Serverless Platforms (AWS Lambda)** - Using the unique AWS Lambda Function ARN.
* **Virtual Machines (VMs)** - Identifying by Hostname, Process Name, or both.
* **Aembit Native** - A unique Aembit Client ID that Aembit assigns for scenarios where other identifiers won’t work.
Aembit supports [configuring multiple identifiers](/user-guide/access-policies/client-workloads/identification/client-workload-multiple-ids) for a single Client Workload definition, to increase its uniqueness when identifying your Client Workloads.
## Available Client Workload identification methods
[Section titled “Available Client Workload identification methods”](#available-client-workload-identification-methods)
Aembit supports a variety of identification methods for Client Workloads, allowing you to choose the most suitable one based on your deployment environment and requirements. Each method provides a unique way to identify workloads, making sure that Aembit applies your Policies accurately.
These methods include identifiers based on cloud provider resources, Kubernetes configurations, and more. The choice of identifier can depend on the specific characteristics of your workloads and the environments in which they operate.
The following sections are the different identification methods available:
### Generic Client Workload Identifiers
[Section titled “Generic Client Workload Identifiers”](#generic-client-workload-identifiers)

[Aembit Client ID ](/user-guide/access-policies/client-workloads/identification/aembit-client-id)Identify workloads by their Aembit Client ID.
→

[Hostname ](/user-guide/access-policies/client-workloads/identification/hostname)Identify workloads by their hostname.
→

[Process Name ](/user-guide/access-policies/client-workloads/identification/process-name)Identify workloads by their process name.
→
### AWS Client Workload Identifiers
[Section titled “AWS Client Workload Identifiers”](#aws-client-workload-identifiers)

[AWS Account ID ](/user-guide/access-policies/client-workloads/identification/aws-account-id)Identify workloads by their AWS Account ID.
→

[AWS EC2 Instance ID ](/user-guide/access-policies/client-workloads/identification/aws-ec2-instance-id)Identify workloads by their AWS EC2 Instance ID.
→

[AWS ECS Task Family ](/user-guide/access-policies/client-workloads/identification/aws-ecs-task-family)Identify workloads by their AWS ECS Task Family.
→

[AWS Lambda ARN ](/user-guide/access-policies/client-workloads/identification/aws-lambda-arn)Identify workloads by their AWS Lambda ARN.
→

[AWS Region ](/user-guide/access-policies/client-workloads/identification/aws-region)Identify workloads by their AWS Region.
→
### Azure Client Workload Identifiers
[Section titled “Azure Client Workload Identifiers”](#azure-client-workload-identifiers)

[Azure Subscription ID ](/user-guide/access-policies/client-workloads/identification/azure-subscription-id)Identify workloads by their Azure Subscription ID.
→

[Azure VM ID ](/user-guide/access-policies/client-workloads/identification/azure-vm-id)Identify workloads by their Azure VM ID.
→
### GitHub Client Workload Identifiers
[Section titled “GitHub Client Workload Identifiers”](#github-client-workload-identifiers)

[GitHub ID Token Repository ](/user-guide/access-policies/client-workloads/identification/github-id-token-repository)Identify workloads by their GitHub ID Token Repository.
→

[GitHub ID Token Subject ](/user-guide/access-policies/client-workloads/identification/github-id-token-subject)Identify workloads by their GitHub ID Token Subject.
→
### GitLab Client Workload Identifiers
[Section titled “GitLab Client Workload Identifiers”](#gitlab-client-workload-identifiers)

[GitLab ID Token Namespace Path ](/user-guide/access-policies/client-workloads/identification/gitlab-id-token-namespace-path)Identify workloads by their GitLab ID Token Namespace Path.
→

[GitLab ID Token Project Path ](/user-guide/access-policies/client-workloads/identification/gitlab-id-token-project-path)Identify workloads by their GitLab ID Token Project Path.
→

[GitLab ID Token Ref Path ](/user-guide/access-policies/client-workloads/identification/gitlab-id-token-ref-path)Identify workloads by their GitLab ID Token Ref Path.
→

[GitLab ID Token Subject ](/user-guide/access-policies/client-workloads/identification/gitlab-id-token-subject)Identify workloads by their GitLab ID Token Subject.
→
### Kubernetes Client Workload Identifiers
[Section titled “Kubernetes Client Workload Identifiers”](#kubernetes-client-workload-identifiers)

[Kubernetes Pod Name Prefix ](/user-guide/access-policies/client-workloads/identification/kubernetes-pod-name-prefix)Identify workloads by their Kubernetes Pod Name Prefix.
→

[Kubernetes Pod Name ](/user-guide/access-policies/client-workloads/identification/kubernetes-pod-name)Identify workloads by their Kubernetes Pod Name.
→
# Aembit Client ID
> This document outlines the Aembit Client ID method for identifying Client Workloads.
#
The Aembit Client ID method serves as a fallback for Client Workload identification when other suitable methods are unavailable. This method entails generating a unique ID by the Aembit Cloud, which is then provisioned to the Client Workload.
## Applicable Deployment Type
[Section titled “Applicable Deployment Type”](#applicable-deployment-type)
This method is suitable for Aembit Edge-based deployments.
## Configuration
[Section titled “Configuration”](#configuration)
### Aembit Cloud
[Section titled “Aembit Cloud”](#aembit-cloud)
1. Create a new Client Workload.
2. Choose “Aembit Client ID” for client identification.
3. Complete the remaining fields.
4. Copy the newly generated ID.
5. Save the Client Workload.
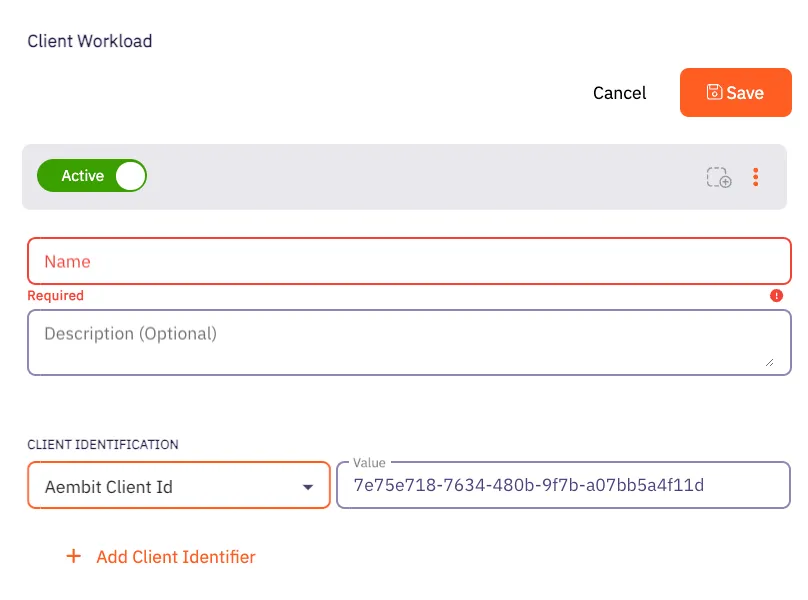
### Client Workload
[Section titled “Client Workload”](#client-workload)
#### Virtual Machine Deployment
[Section titled “Virtual Machine Deployment”](#virtual-machine-deployment)
During Agent Proxy installation, specify the `CLIENT_WORKLOAD_ID` environment variable.
```shell
CLIENT_WORKLOAD_ID= AEMBIT_TENANT_ID= AEMBIT_AGENT_CONTROLLER_ID= ./install
```
#### Kubernetes
[Section titled “Kubernetes”](#kubernetes)
Add the `aembit.io/agent-inject` annotation to your Client Workload.
See the example below:
```yaml
apiVersion: apps/v1
kind: Deployment
metadata:
name: example-app
spec:
replicas: 1
selector:
matchLabels:
app: example-app
template:
metadata:
labels:
app: example-app
annotations:
aembit.io/agent-inject: "enabled"
aembit.io/client-id: "7e75e718-7634-480b-9f7b-a07bb5a4f11d"
```
# AWS Account ID
> How to identify AWS workloads using the AWS Account ID within Aembit
This page explains how to use the **AWS Account ID** identifier to uniquely identify workloads deployed on **AWS**.
## Understanding the AWS Account ID identifier
[Section titled “Understanding the AWS Account ID identifier”](#understanding-the-aws-account-id-identifier)
When you deploy applications to AWS, you use the account ID to isolate and group resources by ownership or environment. Each AWS Account owns the resources associated with it. For more info, see [“View AWS account identifiers](https://docs.aws.amazon.com/accounts/latest/reference/manage-acct-identifiers.html) in the AWS docs.
## Applicable deployment type
[Section titled “Applicable deployment type”](#applicable-deployment-type)
Aembit supports the AWS Account ID identification method for Edge-based deployments on [Virtual Machines](/user-guide/deploy-install/virtual-machine/) deployed to AWS.
## Create a Client Workload with an AWS Account ID identifier
[Section titled “Create a Client Workload with an AWS Account ID identifier”](#create-a-client-workload-with-an-aws-account-id-identifier)
To configure a Client Workload with an AWS Account ID identifier, follow these steps:
1. Log into your Aembit Tenant.
2. Click **Client Workloads** in the left nav pane.
3. Click **New**, revealing the **Client Workload** pop out menu.
4. Enter the **Name** and optional **Description** for the Client Workload.
5. Under **Client Identification**, select **AWS Account ID**.
For **Value**, enter the 12-digit AWS Account ID *without spaces and dashes* where the workload is running.
For example, if your AWS account ID is `1234-5678-9012`, then enter `123456789012` in the **Value** field.
If you don’t know the AWS Account ID or how to find it, see [Find AWS Account ID](#find-aws-account-id).
6. Click **Save**.
Aembit displays the new Client Workload on the **Client Workloads** page.
Client Workload identifier uniqueness
When you identify a Client Workload using a single identifier such as this one in a complex environment, this identifier may not always provide sufficient uniqueness.
To avoid Aembit unintentionally matching something beyond what it’s intended to match, Aembit recommends that you set additional identifiers to compliment this one, creating a Client Workload identity that’s unique across your environment.
See [Using multiple Client Workload identifiers](/user-guide/access-policies/client-workloads/identification/client-workload-multiple-ids) for guidance on combining this identifier with more specific identifiers such as those on the [Client Workload Identifiers overview](/user-guide/access-policies/client-workloads/identification/) page, which includes vendor- and technology-specific identifiers.
## Find AWS account id
[Section titled “Find AWS account id”](#find-aws-account-id)
To find your AWS Account ID in the AWS Console, follow these steps:
Note
You can also find the AWS Account ID in billing settings, IAM dashboard, or by using the AWS CLI.
Be sure to enter the full 12-digit ID *without spaces and dashes*.
1. Open the [AWS Management Console](https://console.aws.amazon.com/).
2. Click the Account Menu that displays your AWS username in the top-right corner.
3. Click the **Copy Account ID** icon next to your 12-digit AWS Account ID.
Use this value in your Aembit configuration, *remembering to enter it without spaces or dashes*.
# AWS EC2 Instance ID
> How to identify AWS workloads using the AWS EC2 Instance ID within Aembit
This page explains how to use the **AWS EC2 Instance ID** identifier to uniquely identify workloads deployed on **AWS**.
## Understanding the AWS EC2 instance ID identifier
[Section titled “Understanding the AWS EC2 instance ID identifier”](#understanding-the-aws-ec2-instance-id-identifier)
When you deploy applications to AWS, you often refer to specific virtual machine instances using their EC2 Instance IDs. AWS assigns a unique identifier to each EC2 instance when it launches. For more info, see [“What is Amazon EC2?”](https://docs.aws.amazon.com/AWSEC2/latest/UserGuide/Using_InstanceStraightToIdentifiers.html) in the AWS docs.
## Applicable deployment type
[Section titled “Applicable deployment type”](#applicable-deployment-type)
Aembit supports the AWS EC2 Instance ID identification method for Edge-based deployments on [Virtual Machines](/user-guide/deploy-install/virtual-machine/) deployed to AWS.
## Create a Client Workload with an AWS EC2 Instance ID identifier
[Section titled “Create a Client Workload with an AWS EC2 Instance ID identifier”](#create-a-client-workload-with-an-aws-ec2-instance-id-identifier)
To configure a Client Workload with an AWS EC2 Instance ID identifier, follow these steps:
1. Log into your Aembit Tenant.
2. Click **Client Workloads** in the left nav pane.
3. Click **New**, revealing the **Client Workload** pop out menu.
4. Enter the **Name** and optional **Description** for the Client Workload.
5. Under **Client Identification**, select **AWS EC2 Instance ID**.
For **Value**, enter the EC2 Instance ID where the workload is running.
For example, if your EC2 Instance ID is `i-0123456789abcdef0`, enter that in the **Value** field.
If you don’t know the EC2 Instance ID or how to find it, see [Find EC2 Instance ID](#find-ec2-instance-id).
6. Click **Save**.
Aembit displays the new Client Workload on the **Client Workloads** page.
## Find EC2 instance ID
[Section titled “Find EC2 instance ID”](#find-ec2-instance-id)
To find your EC2 Instance ID in the AWS Console, follow these steps:
Note
You can also find the EC2 Instance ID using the EC2 dashboard or the AWS CLI.
Be sure to enter the full instance ID exactly as displayed by AWS.
1. **Open the AWS Console**
Go to the [AWS Management Console](https://console.aws.amazon.com/).
2. **Navigate to the EC2 Dashboard**
From the Services menu, choose **EC2**, then click **Instances**.
3. **Locate the Instance ID**
You can find the EC2 Instance ID in the **Instance ID** column for each running instance.
Use this value in your Aembit configuration.
# AWS ECS Task Family
> How to identify AWS ECS Fargate workloads using the task family identifier within Aembit
This page explains how to use the **AWS ECS task family** identifier to uniquely identify workloads deployed on **AWS ECS Fargate**. The task family is a key identifier for defining and managing your ECS tasks.
## Understanding the AWS ECS task family identifier
[Section titled “Understanding the AWS ECS task family identifier”](#understanding-the-aws-ecs-task-family-identifier)
When deploying applications to AWS ECS Fargate, the task family provides a logical grouping and versioning mechanism. Each ECS task definition belongs to a specific task family. Refer to the [official AWS documentation](https://docs.aws.amazon.com/AWSCloudFormation/latest/UserGuide/aws-resource-ecs-taskdefinition.html?utm_source=chatgpt.com) for additional details.
## Applicable deployment type
[Section titled “Applicable deployment type”](#applicable-deployment-type)
Aembit specifically designed the ECS Task Family identification method for Edge-based deployments on [AWS ECS Fargate](/user-guide/deploy-install/serverless/aws-ecs-fargate).
## Create a Client Workload with an AWS ECS task family identifier
[Section titled “Create a Client Workload with an AWS ECS task family identifier”](#create-a-client-workload-with-an-aws-ecs-task-family-identifier)
To configure a Client Workload with an AWS ECS task family identifier, follow these steps:
1. Log into your Aembit Tenant.
2. Click **Client Workloads** in the left nav pane.
3. Click **New**, revealing the **Client Workload** pop out menu.
4. Enter the **Name** and optional **Description** for the Client Workload.
5. Under **Client Identification**, select **AWS ECS Task Family**.
For **Value**, enter the task family name (without the revision) you have configured in AWS ECS.
For example, if the task definition is `my-fargate-app:1` in the AWS ECS Console, enter `my-fargate-app` in the **Value** field.
If you don’t know the task family name or how to find it, see [Find task family name in AWS ECS](#find-task-family-name-in-aws-ecs).
6. Click **Save**.
Aembit displays the new Client Workload on the **Client Workloads** page.
## Find task family name in AWS ECS
[Section titled “Find task family name in AWS ECS”](#find-task-family-name-in-aws-ecs)
To find the task family name in the AWS ECS Console, follow these steps:
Note
You may see the same task family in other locations within the AWS Console.
Keep in mind that a full task definition includes both the task family name and the task definition revision (for example, `my-fargate-app:1`). In your Client Workload configuration in your Aembit Tenant, use only the task family name (for example, `my-fargate-app`).
1. **Open your AWS ECS Console**
Open the AWS Management Console and go to the Elastic Container Service (ECS).
2. **Find your Task Definition**
In the ECS console, go to **Task Definitions** in the left menu.
3. **Locate the Task Family**
The **Task definition** column displays the task family name.
This is the string you’ll use in your Aembit configuration.
# AWS Lambda ARN
> How to identify Client Workloads using AWS Lambda ARN for AWS Lambda deployments
The AWS Lambda ARN Client Workload identification method is applicable only to AWS Lambda deployments. Aembit utilizes the native AWS identifier (Lambda ARN) to identify and distinguish Client Workloads.
## Applicable deployment type
[Section titled “Applicable deployment type”](#applicable-deployment-type)
This method is suitable for Aembit Edge-based deployments.
## Configuration
[Section titled “Configuration”](#configuration)
### Aembit Cloud
[Section titled “Aembit Cloud”](#aembit-cloud)
1. Create a new Client Workload.
2. Choose **AWS Lambda ARN** for client identification.
3. In the **Value** field, enter the AWS Lambda ARN. You must use the following format: `arn:aws:lambda:::function:`
### Using versions
[Section titled “Using versions”](#using-versions)
When working with AWS Lambda ARN, it’s crucial to understand the two types of ARNs: Qualified ARN and Unqualified ARN. Each serves a specific purpose, and understanding their differences is key. For detailed information, refer to the official [AWS Documentation](https://docs.aws.amazon.com/lambda/latest/dg/configuration-versions.html#versioning-versions-using).
**Unqualified ARN** - Used for the latest version of a Lambda function.
Example: `arn:aws:lambda:aws-region:acct-id:function:helloworld`
**Qualified ARN** - Used for a specific version of a Lambda function or [aliases](https://docs.aws.amazon.com/lambda/latest/dg/configuration-aliases.html).
Example:
`arn:aws:lambda:aws-region:acct-id:function:helloworld:42`
If you need to work with a Qualified ARN, you must create a Client Workload that uses a wildcard to handle multiple versions. For instance: `arn:aws:lambda:aws-region:acct-id:function:helloworld:*`.
### Finding the AWS Lambda ARN
[Section titled “Finding the AWS Lambda ARN”](#finding-the-aws-lambda-arn)
You can find the list of Lambda functions via the AWS CLI by executing: `aws lambda list-functions --region us-east-2`
This command will return all the Lambda-related information, including the Lambda ARN, which is available under the `FunctionArn` field.
# AWS Region
> How to identify AWS workloads using the AWS Region within Aembit
This page explains how to use the **AWS Region** identifier to uniquely identify workloads deployed on **AWS**.
## Understanding the AWS Region identifier
[Section titled “Understanding the AWS Region identifier”](#understanding-the-aws-region-identifier)
When you deploy applications to AWS, you use the region to isolate and group resources by geographic location. Each AWS Region contains multiple availability zones and is useful for controlling latency and data residency. For more info, see [“Regions and Availability Zones”](https://aws.amazon.com/about-aws/global-infrastructure/regions_az/) in the AWS docs.
## Applicable deployment type
[Section titled “Applicable deployment type”](#applicable-deployment-type)
Aembit supports the AWS Region identification method for Edge-based deployments on [Virtual Machines](/user-guide/deploy-install/virtual-machine/) deployed to AWS.
## Create a Client Workload with an AWS Region identifier
[Section titled “Create a Client Workload with an AWS Region identifier”](#create-a-client-workload-with-an-aws-region-identifier)
To configure a Client Workload with an AWS Region identifier, follow these steps:
1. Log into your Aembit Tenant.
2. Click **Client Workloads** in the left nav pane.
3. Click **New**, revealing the **Client Workload** pop out menu.
4. Enter the **Name** and optional **Description** for the Client Workload.
5. Under **Client Identification**, select **AWS Region**.
For **Value**, enter the AWS Region where the workload is running.
For example, if your AWS Region is `us-west-2`, enter that in the **Value** field.
If you don’t know the AWS Region or how to find it, see [Find AWS Region](#find-aws-region).
6. Click **Save**.
Aembit displays the new Client Workload on the **Client Workloads** page.
Client Workload identifier uniqueness
When you identify a Client Workload using a single identifier such as this one in a complex environment, this identifier may not always provide sufficient uniqueness.
To avoid Aembit unintentionally matching something beyond what it’s intended to match, Aembit recommends that you set additional identifiers to compliment this one, creating a Client Workload identity that’s unique across your environment.
See [Using multiple Client Workload identifiers](/user-guide/access-policies/client-workloads/identification/client-workload-multiple-ids) for guidance on combining this identifier with more specific identifiers such as those on the [Client Workload Identifiers overview](/user-guide/access-policies/client-workloads/identification/) page, which includes vendor- and technology-specific identifiers.
## Find AWS region
[Section titled “Find AWS region”](#find-aws-region)
To find your AWS Region in the AWS Console, follow these steps:
Note
You can also find the AWS Region in the resource metadata, EC2 dashboard, or by using the AWS CLI.
Be sure to enter the region in its standard format (for example `us-east-1`, `eu-central-1`).
1. Go to the [AWS Management Console](https://console.aws.amazon.com/).
2. Open the service (for example, EC2) that hosts your resource.
3. You’ll see the region in the top-right corner of the Console or in the resource’s details.
Use this value in your Aembit configuration.
# Azure Subscription ID
> How to identify Azure workloads using the Azure Subscription ID within Aembit
This page explains how to use the **Azure Subscription ID** identifier to uniquely identify workloads deployed on **Azure**.
## Understanding the Azure Subscription ID identifier
[Section titled “Understanding the Azure Subscription ID identifier”](#understanding-the-azure-subscription-id-identifier)
When you deploy applications to Azure, you use the Subscription ID to isolate and group resources by ownership or environment. Each Azure Subscription owns the resources associated with it. For more info, see [“Get subscription and tenant IDs in the Azure portal”](https://learn.microsoft.com/en-us/azure/azure-portal/get-subscription-tenant-id) in the Microsoft docs.
## Applicable deployment type
[Section titled “Applicable deployment type”](#applicable-deployment-type)
Aembit supports the Azure Subscription ID identification method for Edge-based deployments on [Virtual Machines](/user-guide/deploy-install/virtual-machine/) deployed to Azure.
## Create a Client Workload with an Azure Subscription ID identifier
[Section titled “Create a Client Workload with an Azure Subscription ID identifier”](#create-a-client-workload-with-an-azure-subscription-id-identifier)
To configure a Client Workload with an Azure Subscription ID identifier, follow these steps:
1. Log into your Aembit Tenant.
2. Click **Client Workloads** in the left nav pane.
3. Click **New**, revealing the **Client Workload** pop out menu.
4. Enter the **Name** and optional **Description** for the Client Workload.
5. Under **Client Identification**, select **Azure Subscription ID**.
For **Value**, enter the Azure Subscription ID where the workload is running.
For example, if your Azure Subscription ID is `11111111-2222-3333-4444-555555555555`, enter that in the **Value** field.
If you don’t know the Azure Subscription ID or how to find it, see [Find Azure Subscription ID](#find-azure-subscription-id).
6. Click **Save**.
Aembit displays the new Client Workload on the **Client Workloads** page.
Client Workload identifier uniqueness
When you identify a Client Workload using a single identifier such as this one in a complex environment, this identifier may not always provide sufficient uniqueness.
To avoid Aembit unintentionally matching something beyond what it’s intended to match, Aembit recommends that you set additional identifiers to compliment this one, creating a Client Workload identity that’s unique across your environment.
See [Using multiple Client Workload identifiers](/user-guide/access-policies/client-workloads/identification/client-workload-multiple-ids) for guidance on combining this identifier with more specific identifiers such as those on the [Client Workload Identifiers overview](/user-guide/access-policies/client-workloads/identification/) page, which includes vendor- and technology-specific identifiers.
## Find Azure Subscription ID
[Section titled “Find Azure Subscription ID”](#find-azure-subscription-id)
To find your Azure Subscription ID in the Azure Portal, follow these steps:
Note
You can also find the Azure Subscription ID in the Subscriptions blade or by using the Azure CLI.
Be sure to enter the full GUID format without spaces.
1. Go to the [Azure Portal](https://portal.azure.com/).
2. Use the search bar to search for **Subscriptions**.
3. You can find the **Subscription ID** listed in the **Subscriptions** table.
Use this value in your Aembit configuration.
# Azure VM ID
> How to identify Azure workloads using the Azure VM ID within Aembit
This page explains how to use the **Azure VM ID** identifier to uniquely identify workloads deployed on **Azure**.
## Understanding the Azure VM ID identifier
[Section titled “Understanding the Azure VM ID identifier”](#understanding-the-azure-vm-id-identifier)
When you deploy applications to Azure, you often identify specific virtual machine instances by their VM IDs. Azure assigns each virtual machine a unique identifier at creation. For more details, see the [“Understand names and instance IDs for Azure Virtual Machine Scale Set VMs](https://learn.microsoft.com/en-us/azure/virtual-machine-scale-sets/virtual-machine-scale-sets-instance-ids) in the Microsoft docs.
## Applicable deployment type
[Section titled “Applicable deployment type”](#applicable-deployment-type)
Aembit supports the Azure VM ID identification method for Edge-based deployments on [Virtual Machines](/user-guide/deploy-install/virtual-machine/) deployed to Azure.
## Create a Client Workload with an Azure VM ID identifier
[Section titled “Create a Client Workload with an Azure VM ID identifier”](#create-a-client-workload-with-an-azure-vm-id-identifier)
To configure a Client Workload with an Azure VM ID identifier, follow these steps:
1. Log into your Aembit Tenant.
2. Click **Client Workloads** in the left nav pane.
3. Click **New**, revealing the **Client Workload** pop out menu.
4. Enter the **Name** and optional **Description** for the Client Workload.
5. Under **Client Identification**, select **Azure VM ID**.
For **Value**, enter the VM ID where the workload is running.
For example, if your Azure VM ID is `12345678-1234-1234-1234-123456789abc`, enter that in the **Value** field.
If you don’t know the Azure VM ID or how to find it, see [Find Azure VM ID](#find-azure-vm-id).
6. Click **Save**.
Aembit displays the new Client Workload on the **Client Workloads** page.
## Find Azure VM ID
[Section titled “Find Azure VM ID”](#find-azure-vm-id)
Locate your Azure VM’s Resource group and VM name using either of the following methods:
### Azure Portal
[Section titled “Azure Portal”](#azure-portal)
1. Go to the [Azure Portal](https://portal.azure.com/).
2. From the left menu or search bar, choose or search for **Virtual Machines**, then select your VM.
3. Copy the **Computer name** and **Resource group** from the Properties tab of the VM details page.
Use these values in your Aembit configuration.
### Azure CLI
[Section titled “Azure CLI”](#azure-cli)
1. Open your terminal or command prompt.
2. Use the following command to get the VM ID:
```plaintext
az vm show --resource-group --name --query vmId --output tsv
```
Use these values in your Aembit configuration.
# Using multiple Client Workload identifiers
> How to use multiple Client Workload identifiers to increase uniqueness across Client Workloads
Aembit supports configuring multiple identifiers for a single Client Workload.
Identifying Client Workloads using multiple identifiers allows you to create highly specific and granular identification criteria for workloads that reside in complex environments that span multiple clouds, networks, and Kubernetes clusters.
By combining different identifiers, such as [Hostname](/user-guide/access-policies/client-workloads/identification/hostname) and [Process Name](/user-guide/access-policies/client-workloads/identification/process-name) on a Virtual Machine, you can uniquely pinpoint a specific application running on a particular machine. This enhanced uniqueness helps Aembit more accurately determine which workloads it must evaluate across complex environments where certain identifiers may be the same.
For example, more generic identifiers like [AWS Account ID](/user-guide/access-policies/client-workloads/identification/aws-account-id) or [Azure Subscription ID](/user-guide/access-policies/client-workloads/identification/azure-subscription-id) may be the same for some of your resources. Using just one of these identifiers would likely cause Aembit to misidentify workloads your environment.
Using multiple identifiers helps reduce the possibility of misidentification or overly permissive matching that might occur if you use only a single, non-unique identifier. This, in turn, strengthens your security posture.
Aembit highly recommends that you leverage multiple identifiers where a single method might be ambiguous, to make sure Aembit can uniquely identify workloads and prevent misidentification.
## How multiple identifiers work
[Section titled “How multiple identifiers work”](#how-multiple-identifiers-work)
When you configure multiple identifiers for a *single* Client Workload, Aembit uses the conditional operators `AND` and `OR`. You can use one or the other or both at the same time.
### The `OR` condition
[Section titled “The OR condition”](#the-or-condition)
When Aembit uses the `OR` condition, it requires only one of the identifiers, providing you extra flexibility. You can have multiple `OR` condition groups for a single Client Workload. This means that Aembit must match *only one* of the identification methods you’ve configured on your Client Workload to the evidence it collected from your runtime environment.
For example, combining a **AWS Account ID** identifier with a **Process Name** identifier for a Virtual Machine workload. In this scenario, Aembit would require *either* the AWS Account ID *or* the Process Name of the requesting Client Workload to match the values you’ve configured in the Client Workload definition for Aembit to consider that definition a match.
### The `AND` condition
[Section titled “The AND condition”](#the-and-condition)
When Aembit uses the `AND` condition, it requires both identifiers, providing you extra security. You can have multiple `AND` condition groups for a single Client Workload. This means that Aembit must match *all* the identification methods you’ve configured on your Client Workload to the evidence it collected from your runtime environment.
For example, combining a **Hostname** identifier with a **Process Name** identifier for a Virtual Machine workload. In this scenario, Aembit would require *both* the Hostname *and* the Process Name of the requesting Client Workload to match the values you’ve configured in the Client Workload definition for Aembit to consider that definition a match.
### Both conditions
[Section titled “Both conditions”](#both-conditions)
When Aembit uses both the `OR` and the `AND` conditions together, you can create sophisticated identification logic that provides both *security and flexibility* for your Client Workload definitions. You can combine multiple `OR` and `AND` condition groups within a single Client Workload configuration. This allows you to define complex matching criteria where some identifiers must all be present (`AND` groups) while providing alternative identification paths (`OR` groups).
You might use this when the same application runs in multiple environments, but you want both scenarios to access the same resources through a single Client Workload definition.
For example, you have two separate AWS Accounts that deploy the same application in one AWS Region on multiple hosts that need to connect to the same resource. You’d configure a Client Workload with the following logic:
(**AWS Account ID-1** `OR` **AWS Account ID-2**) `AND` (**AWS Region** `AND` **Hostname**)
Which would look like the following screenshot when you configure it in your Aembit Tenant:
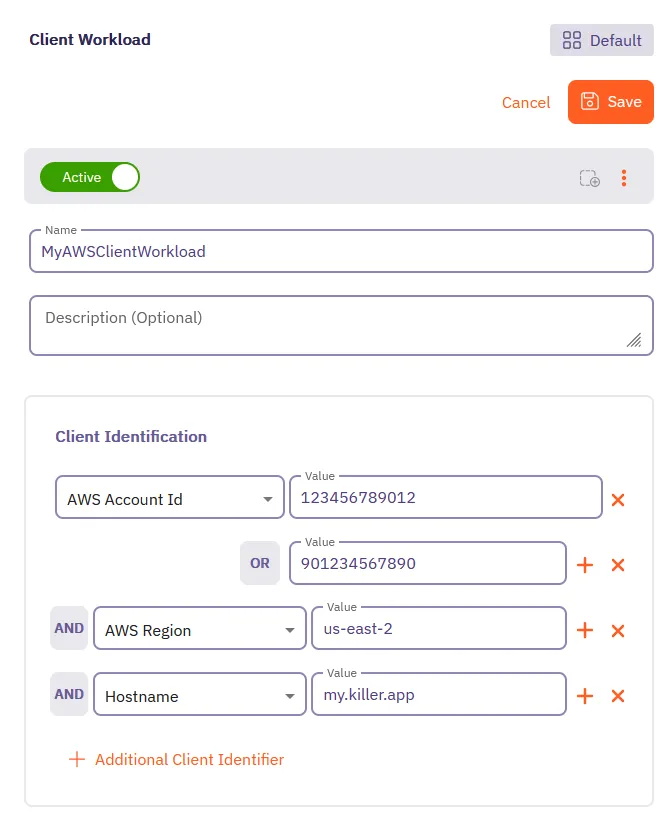
In this scenario, Aembit would consider the Client Workload definition a match when both:
* Either **AWS Account ID-1** `OR` **AWS Account ID-2** match the configured values
* Both the **AWS Region** `AND` **Hostname** match the configured values
This approach enables you to accommodate different deployment scenarios while maintaining strong identity verification.
## Add additional identifiers to a Client Workload
[Section titled “Add additional identifiers to a Client Workload”](#add-additional-identifiers-to-a-client-workload)
To add additional identifiers to a Client Workload, follow these steps:
1. Create a new Client Workload or edit an existing one in your Aembit Tenant.
2. In the **Client Identification** section, click **+ Additional Client Identifier**.
3. Select the identifier type you want to add from the dropdown menu.
4. Enter the value for the identifier.
5. If you want to add another identifier, repeat steps 2-4.
6. Click **Save** to apply the changes to the Client Workload. Aembit displays the updated Client Workload with the new identifiers on the **Client Workloads** page.
# GitHub ID Token Repository
> This page describes how the GitHub ID Token Repository method identifies Client Workloads in Aembit.
This Client Workload identification method is specifically designed for [GitHub Action deployments](/user-guide/deploy-install/serverless/github-actions).
**The GitHub ID Token Repository** identification method allows you to identify GitHub workflows based on their repository origin. Aembit achieves this using the **repository** claim within the OIDC token issued by GitHub Actions.
## Applicable Deployment Type
[Section titled “Applicable Deployment Type”](#applicable-deployment-type)
This method is suitable for GitHub-based CI/CD Workflow deployments.
## Configuration
[Section titled “Configuration”](#configuration)
### Aembit Cloud
[Section titled “Aembit Cloud”](#aembit-cloud)
1. Create a new Client Workload.
2. Choose **GitHub ID Token Repository** for client identification.
3. Identify the repository where your workflow is located. Copy this full repository name and use it in the **Value** field according to the format below.
* **Format** - `{organization}/{repository}` for organization-owned repositories or `{account}/{repository}` for user-owned repositories.
* **Example** - user123/another-project
### Finding the GitHub ID Token Repository:
[Section titled “Finding the GitHub ID Token Repository:”](#finding-the-github-id-token-repository)
* Navigate to your project on GitHub.
* Locate the repository name displayed at the top left corner of the page, in the format mentioned above.
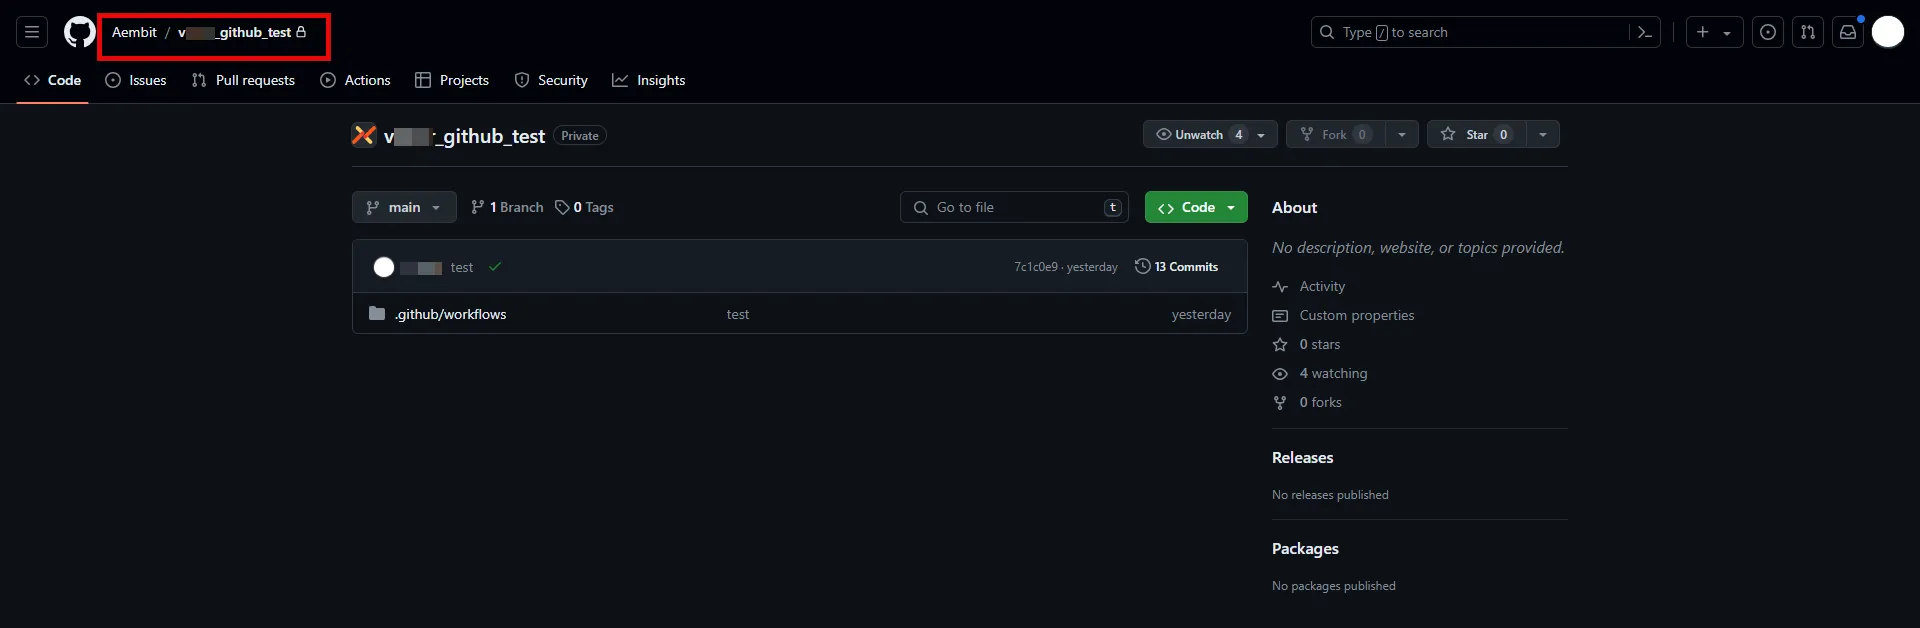
# GitHub ID Token Subject
> This page describes how the GitHub ID Token Subject method identifies Client Workloads in Aembit.
This Client Workload identification method is specifically designed for [GitHub Action deployments](/user-guide/deploy-install/serverless/github-actions).
**The GitHub ID Token Subject** identification method allows you to identify GitHub workflows based on their repository and triggering event. Aembit achieves this using the **subject** claim within the OIDC token issued by GitHub Actions.
## Applicable Deployment Type
[Section titled “Applicable Deployment Type”](#applicable-deployment-type)
This method is suitable for GitHub-based CI/CD Workflow deployments.
## Configuration
[Section titled “Configuration”](#configuration)
### Aembit Cloud
[Section titled “Aembit Cloud”](#aembit-cloud)
1. Create a new Client Workload.
2. Choose **GitHub ID Token Subject** for client identification.
3. Construct a subject manually using the format specified below and use it in the **Value** field.
The GitHub ID Token Subject method provides advanced workflow identification capabilities by allowing you to identify Client Workloads based on repository origin, triggering events (like pull requests), branches, and more. The following example is for a pull request triggered workflow:
* **Format** - repo:`{orgName}/{repoName}`:pull\_request
* **Example** - repo:my-org/my-repo:pull\_request
For more subject claims and examples, refer to the [GitHub OIDC Token Documentation](https://docs.github.com/en/actions/deployment/security-hardening-your-deployments/about-security-hardening-with-openid-connect#example-subject-claims).
### Finding the GitHub ID Token Subject:
[Section titled “Finding the GitHub ID Token Subject:”](#finding-the-github-id-token-subject)
You can reconstruct subject claim as follows:
1. Identify the repository: Navigate to your project on GitHub. Locate the repository name displayed at the top left corner of the page.
2. Determine filtering criteria: Choose the specific element you want to use for precise workflow selection: a deployment environment (e.g., “production”), a triggering event (e.g., “pull\_request” or “push”), or a specific branch or tag name.
3. Combine the information: Assemble the subject using the format: `repo:{organization}/{repository}:`.
Alternatively, you can inspect the GitHub OIDC token to extract the **subject** claim. For further details, please contact Aembit.
# GitLab ID Token Namespace Path
> This page describes how the GitLab ID Token Namespace Path method identifies Client Workloads in Aembit.
#
This Client Workload identification method is specifically designed for [GitLab Jobs deployments](/user-guide/deploy-install/serverless/gitlab-jobs).
**The GitLab ID Token Namespace Path** identification method allows you to identify GitLab jobs based on their project owner. Aembit utilizes the **namespace\_path** claim within the OIDC token issued by GitLab.
## Applicable Deployment Type
[Section titled “Applicable Deployment Type”](#applicable-deployment-type)
This method is suitable for GitLab-based CI/CD Workflow deployments.
## Configuration
[Section titled “Configuration”](#configuration)
### Aembit Cloud
[Section titled “Aembit Cloud”](#aembit-cloud)
1. Create a new Client Workload.
2. Choose **GitLab ID Token Namespace Path** for client identification.
3. Determine whether your workflow resides under a GitLab group or your user account. Copy the group name or username and use it in the **Value** field.
* **Format** - The group or username
* **Example** - my-group
### Finding the GitLab ID Token Namespace Path:
[Section titled “Finding the GitLab ID Token Namespace Path:”](#finding-the-gitlab-id-token-namespace-path)
* Navigate to **Projects** on GitLab.
* If the project is group-owned, go to the **All** tab and locate your project. The Namespace Path is displayed before the slash (/) in the project name.
* If the project is user-based, enter your GitLab username in the **Value** field.
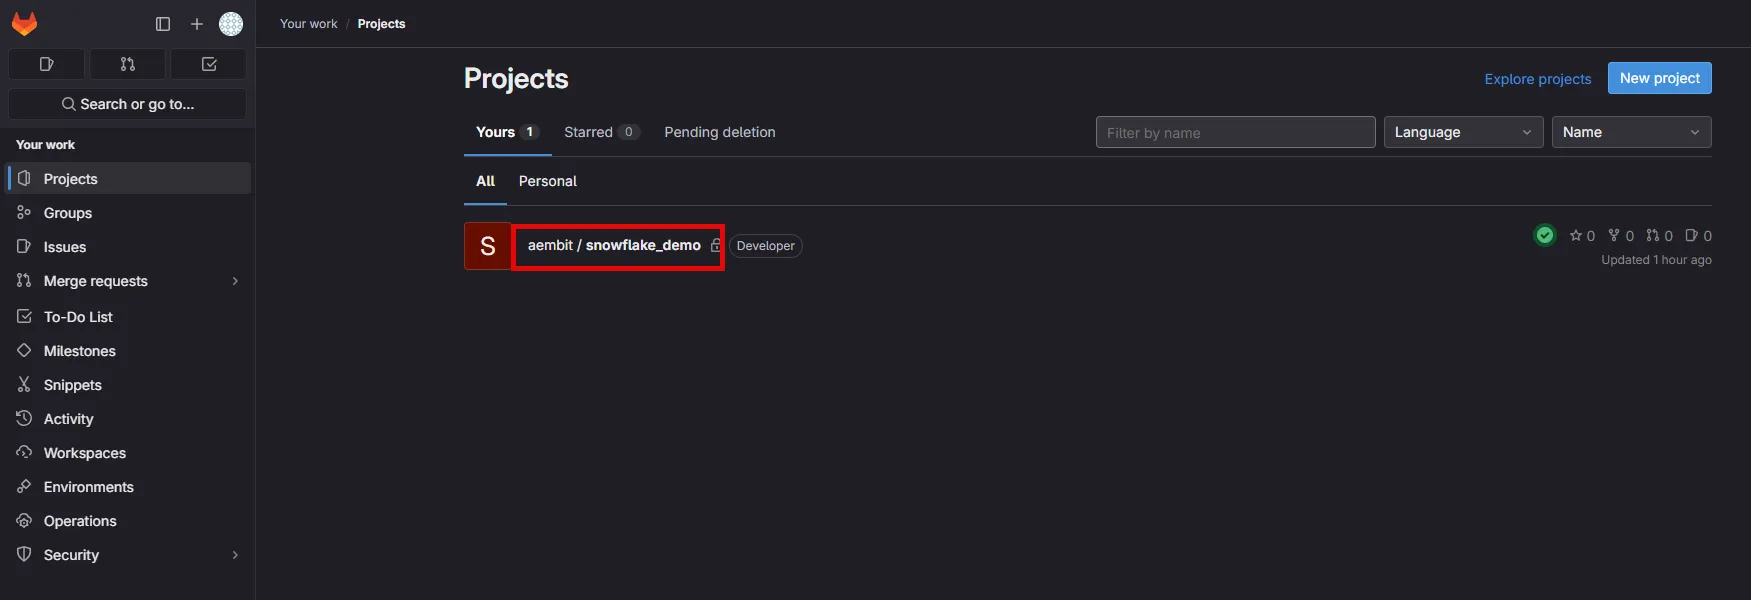
# GitLab ID Token Project Path
> This page describes how the GitLab ID Token Project Path method identifies Client Workloads in Aembit.
#
This Client Workload identification method is specifically designed for [GitLab Jobs deployments](/user-guide/deploy-install/serverless/gitlab-jobs).
**The GitLab ID Token Project Path** identification method allows you to identify GitLab jobs based on their project location. Aembit utilizes the **project\_path** claim within the OIDC token issued by GitLab.
## Applicable Deployment Type
[Section titled “Applicable Deployment Type”](#applicable-deployment-type)
This method is suitable for GitLab-based CI/CD Workflow deployments.
## Configuration
[Section titled “Configuration”](#configuration)
### Aembit Cloud
[Section titled “Aembit Cloud”](#aembit-cloud)
1. Create a new Client Workload.
2. Choose **GitLab ID Token Project Path** for client identification.
3. Identify the project where your workflow is located. Copy the full project path and use it in the **Value** field according to the format below.
* **Format** - `{group}/{project}`
* **Example** - my-group/my-project
### Finding the GitLab ID Token Project Path:
[Section titled “Finding the GitLab ID Token Project Path:”](#finding-the-gitlab-id-token-project-path)
* Navigate to the **Projects** on GitLab and go to the **All** tab. Locate your project and copy the full displayed project path in the format specified above.

# GitLab ID Token Ref Path
> This page describes how the GitLab ID Token Ref Path method identifies Client Workloads in Aembit.
#
This Client Workload identification method is specifically designed for [GitLab Jobs deployments](/user-guide/deploy-install/serverless/gitlab-jobs).
**The GitLab ID Token Ref Path** identification method allows you to identify GitLab jobs based on the triggering branch or tag name. Aembit utilizes the **ref\_path** claim within the OIDC token issued by GitLab.
Combine this method with additional Client Workload identification methods, such as project path for repository identification.
## Applicable Deployment Type
[Section titled “Applicable Deployment Type”](#applicable-deployment-type)
This method is suitable for GitLab-based CI/CD Workflow deployments.
## Configuration
[Section titled “Configuration”](#configuration)
### Aembit Cloud
[Section titled “Aembit Cloud”](#aembit-cloud)
1. Create a new Client Workload.
2. Choose **GitLab ID Token Ref Path** for client identification.
3. Construct a ref path manually using the format specified below and use it in the **Value** field.
* **Format** - `refs/{type}/{name}`, where `{type}` can be either `heads` for branches or `tags` for tags, and `{name}` is the branch name or tag name used in the reference.
* **Example** - refs/heads/feature-branch-1
### Finding the GitLab ID Token Ref Path:
[Section titled “Finding the GitLab ID Token Ref Path:”](#finding-the-gitlab-id-token-ref-path)
You can reconstruct ref path claim as follows:
1. Determine ref type: Identify whether the workflow was triggered by a branch (then ref\_type is heads) or a tag (ref\_type is tags).
2. Get the ref: Find the specific branch name (e.g., main) or tag name (e.g., v1.1.5).Check your workflow configuration or, if accessible, the GitLab UI for triggering event details.
3. Combine the information: Assemble the ref path using the format: `refs/{type}/{name}`.
Alternatively, you can inspect the GitLab OIDC token to extract the **ref\_path** claim. For further details, please contact Aembit.
# GitLab ID Token Subject
> This page describes how the GitLab ID Token Subject method identifies Client Workloads in Aembit.
#
This Client Workload identification method is specifically designed for [GitLab Jobs deployments](/user-guide/deploy-install/serverless/gitlab-jobs).
**The GitLab ID Token Subject** identification method allows you to identify GitLab jobs based on their group, project, and triggering branch or tag. Aembit achieves this using the **subject** claim within the OIDC token issued by GitLab.
Combine this method with additional Client Workload identification techniques, for project path and reference identification.
## Applicable Deployment Type
[Section titled “Applicable Deployment Type”](#applicable-deployment-type)
This method is suitable for GitLab-based CI/CD Workflow deployments.
## Configuration
[Section titled “Configuration”](#configuration)
### Aembit Cloud
[Section titled “Aembit Cloud”](#aembit-cloud)
1. Create a new Client Workload.
2. Choose **GitLab ID Token Subject** for client identification.
3. Construct a subject manually using the format specified below and use it in the **Value** field.
* **Format** - `project_path:{group}/{project}:ref_type:{type}:ref:{branch_name}`, where `type` can be either `branch` (for a branch-triggered workflow) or `tag` (for a tag-triggered workflow).
* **Example** - project\_path:my-group/my-project:ref\_type:branch:ref:feature-branch-1
### Finding the GitLab ID Token Subject:
[Section titled “Finding the GitLab ID Token Subject:”](#finding-the-gitlab-id-token-subject)
You can reconstruct subject claim as follows:
1. Identify the project path: Navigate to the **Projects** on GitLab and go to the **All** tab. Locate your project and copy the full displayed project path (e.g., my-group/my-project).
2. Determine ref type: Identify whether the workflow was triggered by a branch (then ref\_type is branch) or a tag (ref\_type is tag).
3. Get the ref: Find the specific branch name (e.g., main) or tag name (e.g., v1.2.0). Check your workflow configuration or, if accessible, the GitLab UI for triggering event details.
4. Combine the information: Assemble the subject using the format: `project_path:{group}/{project}:ref_type:{type}:ref:{branch_name}`.
Alternatively, you can inspect the GitLab OIDC token to extract the **subject** claim. For further details, please contact Aembit.
# Hostname
> This document describes how the Hostname method identifies Client Workloads in Aembit for Virtual Machine deployments.
#
The Hostname Client Workload identification method is applicable to Virtual Machine deployments and utilizes the hostname of the machine (which can be retrieved by the hostname command) to identify and distinguish Client Workloads.
## Applicable Deployment Type
[Section titled “Applicable Deployment Type”](#applicable-deployment-type)
This method is suitable for Aembit Edge-based deployments.
## Configuration
[Section titled “Configuration”](#configuration)
### Aembit Cloud
[Section titled “Aembit Cloud”](#aembit-cloud)
1. Create a new Client Workload.
2. Choose **Hostname** for client identification.
3. In the **Value** field, enter the hostname of the virtual machine where the Client Workload is running.
### Finding the Hostname
[Section titled “Finding the Hostname”](#finding-the-hostname)
* Open a terminal on your Linux VM.
* Use the `hostname -f` command to retrieve its hostname.
Alternatively, you can often find the hostname in the Virtual Machine’s configuration settings or system information.
### Uniqueness
[Section titled “Uniqueness”](#uniqueness)
Ensure the hostname is unique within your organization to avoid unintentionally matching other Virtual Machines. If necessary, consider combining Hostname with other client identifiers. Please consult the [Client Workload multiple identifiers](/user-guide/access-policies/client-workloads/identification/client-workload-multiple-ids) documentation to enhance uniqueness.
# Kubernetes Pod Name
> This document describes how the Kubernetes Pod Name Prefix method identifies Client Workloads in Aembit.
#
In Kubernetes environments, each pod is assigned a unique name within its namespace. The Kubernetes Pod Name identification method allows you to target a specific individual pod by specifying its exact name. This is particularly useful for managing access for standalone pods that are not part of a deployment or for pods with unique names that need to be individually managed.
## Applicable Deployment Type
[Section titled “Applicable Deployment Type”](#applicable-deployment-type)
This method is suitable for Edge-based deployments.
## Configuration
[Section titled “Configuration”](#configuration)
### Aembit Cloud
[Section titled “Aembit Cloud”](#aembit-cloud)
1. Create a new Client Workload.
2. Choose **Kubernetes Pod Name** for client identification.
3. In the **Value** field, enter the desired pod name.
#### Finding the Pod Name:
[Section titled “Finding the Pod Name:”](#finding-the-pod-name)
* Use the `kubectl get pods` command to list all pods in your cluster.
* Identify the specific pod you want to target and note its exact name.
* Use this exact name as the **Value** in the Client Workload configuration.
# Kubernetes Pod Name Prefix
> This document describes how the Kubernetes Pod Name Prefix method identifies Client Workloads in Aembit.
#
In Kubernetes environments, pods are often dynamically created and assigned unique names. The Kubernetes Pod Name Prefix identification method allows you to target a group of pods belonging to the same deployment by specifying the common prefix of their names. This is particularly useful for managing access for deployments with multiple replicas or deployments that are frequently scaled up or down.
## Applicable Deployment Type
[Section titled “Applicable Deployment Type”](#applicable-deployment-type)
This method is suitable for Edge-based deployments.
## Configuration
[Section titled “Configuration”](#configuration)
### Aembit Cloud
[Section titled “Aembit Cloud”](#aembit-cloud)
1. Create a new Client Workload.
2. Choose **Kubernetes Pod Name Prefix** for client identification.
3. In the **Value** field, enter the desired pod name prefix. This is typically the name of your deployment.
#### Finding the Pod Name Prefix:
[Section titled “Finding the Pod Name Prefix:”](#finding-the-pod-name-prefix)
* Use the `kubectl get pods` command to list all pods in your cluster.
* Identify the pods belonging to your target deployment. Their names will share a common prefix.
* Use this common prefix as the Value in the Client Workload configuration.
#### Uniqueness
[Section titled “Uniqueness”](#uniqueness)
Ensure that the chosen prefix is unique enough to avoid unintentionally matching pods from other deployments. Please consult the [Client Workload multiple identifiers](/user-guide/access-policies/client-workloads/identification/client-workload-multiple-ids) documentation to enhance uniqueness.
# Process Name
> This document describes how the Process Name method identifies Client Workloads in Aembit for Virtual Machine deployments.
The Process Name Client Workload identification method is applicable to Virtual Machine deployments and utilizes the name of the process associated with the Client Workload to identify and distinguish it from other workloads.
## Applicable deployment type
[Section titled “Applicable deployment type”](#applicable-deployment-type)
This method is suitable for Aembit Edge-based deployments.
## Configuration
[Section titled “Configuration”](#configuration)
As of **Agent Proxy** version 1.23.3002, to use this method of client workload identification, you must set the `AEMBIT_CLIENT_WORKLOAD_PROCESS_IDENTIFICATION_ENABLED` to `true`. By default, its value is `false`.
See [Edge Component environment variables reference](/reference/edge-components/edge-component-env-vars) for details.
### Aembit Cloud
[Section titled “Aembit Cloud”](#aembit-cloud)
1. Create a new Client Workload.
2. Choose **Process Name** for client identification.
3. In the **Value** field, enter the exact name of the process that represents the Client Workload.
### Finding the process name
[Section titled “Finding the process name”](#finding-the-process-name)
* Open a terminal on your Linux VM.
* Use system monitoring tools, or commands like `ps` or `top` on the virtual machine, to list running processes and identify the relevant process name.
Alternatively, you can often find the process name in the Client Workload’s configuration files or documentation.
### Uniqueness
[Section titled “Uniqueness”](#uniqueness)
Process name identification is inherently not unique, as processes with the same name could exist on multiple virtual machines. To enhance uniqueness, consider combining Process Name with other client identifiers, such as Hostname. For more information on using multiple identifiers effectively, see [Client Workload multiple identifiers](/user-guide/access-policies/client-workloads/identification/client-workload-multiple-ids) documentation to enhance uniqueness.
# Credential Providers
> This document provides a high-level description of Credential Providers
This section covers Credential Providers in Aembit, which are used to provide access credentials to Client Workloads so they can access Server Workloads securely.
The following pages provide information about different Credential Provider types and how to configure them:
* [Aembit Access Token](/user-guide/access-policies/credential-providers/aembit-access-token)
* [API Key](/user-guide/access-policies/credential-providers/api-key)
* [AWS Security Token Service Federation](/user-guide/access-policies/credential-providers/aws-security-token-service-federation)
* [AWS SigV4](/user-guide/access-policies/credential-providers/aws-sigv4)
* [Azure Entra Workload Identity Federation](/user-guide/access-policies/credential-providers/azure-entra-workload-identity-federation)
* [Google GCP Workload Identity Federation](/user-guide/access-policies/credential-providers/google-workload-identity-federation)
* [JSON Web Token (JWT)](/user-guide/access-policies/credential-providers/json-web-token)
* [Managed GitLab Account](/user-guide/access-policies/credential-providers/managed-gitlab-account)
* [OAuth 2.0 Authorization Code](/user-guide/access-policies/credential-providers/oauth-authorization-code)
* [OAuth 2.0 Client Credentials](/user-guide/access-policies/credential-providers/oauth-client-credentials)
* [Username Password](/user-guide/access-policies/credential-providers/username-password)
* [Vault Client Token](/user-guide/access-policies/credential-providers/vault-client-token)
### Advanced Options
[Section titled “Advanced Options”](#advanced-options)
* [Multiple Credential Providers](/user-guide/access-policies/credential-providers/advanced-options/multiple-credential-providers)
* [Dynamic Claims](/user-guide/access-policies/credential-providers/advanced-options/dynamic-claims)
* [Multiple Credential Providers Terraform](/user-guide/access-policies/credential-providers/advanced-options/multiple-credential-providers-terraform)
### Integrations
[Section titled “Integrations”](#integrations)
* [GitLab Service Account](/user-guide/access-policies/credential-providers/integrations/gitlab)
# About the OIDC ID Token Credential Provider
> This page describes the OIDC ID Token Credential Provider and how it works
The OIDC ID Token Credential Provider enables secure identity token generation and exchange with third-party services.
By leveraging Aembit’s custom Identity Provider (IdP) capabilities, the OIDC ID Token Credential Provider generates JWT-formatted tokens that you can use with different Workload Identity Federation (WIF) solutions.
The Credential Provider supports:
* Custom claims configuration
* Flexible signing algorithms
* Integration with identity brokers (AWS STS, GCP WIF, Azure WIF, Vault, etc.)
See [Create an OIDC ID Token Credential Provider](/user-guide/access-policies/credential-providers/oidc-id-token) to create one.
## Common use cases
[Section titled “Common use cases”](#common-use-cases)
* **Cloud Provider Access** - Securely access to AWS, GCP, or Azure resources using their respective WIF solutions.
* **Vault Integration** - Authenticate with HashiCorp Vault using OIDC tokens.
* **Custom Service Authentication** - Integrate with any service that supports OIDC/JWT authentication.
## How the OIDC ID Token Credential Provider works
[Section titled “How the OIDC ID Token Credential Provider works”](#how-the-oidc-id-token-credential-provider-works)
1. **Token Generation** - Aembit’s custom IdP generates JWT-formatted OIDC tokens and signs them using your Aembit Tenant-specific keys.
2. **Client identification** - Aembit identifies each IdP client configuration using an Aembit-specific Uniform Resource Name (URN) notation as its `client_id` (for example: `aembit:useast2:1ed42e:identity:oidc-idtoken:2821c459-5541-4a59-9add-d69d5b3ae3db`).
:::caution Custom claims
If you’re creating custom claims when configuring an OIDC ID Token Credential Provider, don’t use `client_id` as Aembit reserves the value to identify Client Workloads.
:::
3. **Token Exchange** - The Credential Provider requests tokens from Aembit’s IdP and then exchanges these tokens with external identity brokers to obtain service-specific credentials for the workload.
## Configuration options
[Section titled “Configuration options”](#configuration-options)
The following sections detail the configuration options you have for the OIDC ID Token Credential Provider:
### Claims configuration
[Section titled “Claims configuration”](#claims-configuration)
Aembit’s IdP supports dynamic token generation with the following capabilities:
* **Dynamic Claims** - You can specify Claims at token request time, eliminating the need for pre-configuration.
* **Client Identification** - Aembit identifies each IdP client (such as Aembit Cloud user, Agent Proxy, or Credential Provider-Workload association) using a unique `client_id` value.
* **Token Customization** - Generated tokens follow configurations associated with the specified IdP client, including claims, scopes, and other parameters.
See the list of [Common OIDC claims](#common-oidc-claims) for more info.
#### Subject configuration options
[Section titled “Subject configuration options”](#subject-configuration-options)
The OIDC ID Token Credential Provider offers two methods for configuring the subject claim in OIDC ID tokens:
* **Dynamic subject** - Aembit’s Credential Provider determines the subject value at runtime by evaluating runtime variables and the requesting workload’s identity. This allows Aembit to adapt to different callers, generating appropriate subject values for each.
Use dynamic subjects when you need the token’s subject to accurately reflect the identity of the calling entity, or when different workloads should have different subjects in their tokens.
* **Literal subject** - You provide a fixed, predefined string that Aembit uses as the subject claim in all tokens the OIDC ID Token Credential Provider issues.
Use literal subjects when you’re integrating with a system that expects a specific, unchanging subject value, or when you want to abstract the actual identity of the calling entity.
### Signing configuration
[Section titled “Signing configuration”](#signing-configuration)
Aembit manages signing keys on a per-tenant basis and has the following characteristics:
* uses the signature algorithm that you choose when setting up your IdP client; either **RS256** (default) or **ES256**.
* maintains different sets of keys for each associated signing algorithm.
* makes all keys available via the public JSON Web Key Set (JWKS) interface.
### Identity broker integration
[Section titled “Identity broker integration”](#identity-broker-integration)
The OIDC ID Token Credential Provider supports integration with different identity brokers through configurable options:
* **Endpoint Configuration** -
* You specify the HTTP/S endpoint URL
* You configure custom headers as needed
* **Request Formatting** -
* Aembit formats request bodies as JSON (with XML support planned for future releases)
* **Response Parsing** -
* The Credential Provider parses JSON responses (with XML support planned for future releases)
* You can configure cache lifetime management
## Implementation notes
[Section titled “Implementation notes”](#implementation-notes)
* You also have the option to [manage OIDC ID Token Credential Providers using Terraform](/user-guide/access-policies/credential-providers/oidc-id-token#terraform-configuration).
* The Credential Provider builds on existing WIF Credential Provider capabilities.
* Current JWKS endpoint implementation aligns with industry standards (AWS EKS, Google APIs, Okta, GitHub), which typically use RS256 algorithms.
* Aembit recommends testing when using with identity brokers that may have specific algorithm requirements.
## Common OIDC claims
[Section titled “Common OIDC claims”](#common-oidc-claims)
The following table describes some common OIDC claims and how to configure them:
| Claim | Description | Configuration |
| ---------------- | --------------------------------------------------- | ------------------------------------------------------------------------------------------------------------------------------------------------------------ |
| `iss` | **Issuer** - Identifies Aembit as the OIDC provider | Aembit automatically generates this based on your Aembit Tenant, but you can customize it to match external system requirements. |
| `sub` | **Subject** - Unique identifier for the workload | Configure as **Dynamic** (based on the workload’s identity) or **Literal** (a fixed value you specify). |
| `aud` | **Audience** - Intended recipient of the token | Enter the URI or identifier of your target service (for example, `https://sts.amazonaws.com` for AWS, `https://www.googleapis.com/oauth2/v4/token` for GCP). |
| `exp` | **Expiration** - When the token becomes invalid | Set the **Lifetime** in seconds (for example, `3600` for 1 hour). |
| `iat` | **Issued At** - Token creation time | Automatically set by Aembit when the token upon issuance. |
| `nbf` | **Not Before** - Token validity start time | Automatically set by Aembit when the token upon issuance. |
| `jti` | **JWT ID** - Unique token identifier | Automatically generated by Aembit to prevent replay attacks. |
| `` | Custom arbitrary claims you can define. | Custom claim examples: `role`, `workload_metadata`, `custom_field`. |
:::caution Using custom claims
If you’re creating custom claims when configuring an OIDC ID Token Credential Provider, don’t use `client_id` as Aembit reserves the value to identify Client Workloads.
:::
# Configure Dynamic Claims
> This page describes the dynamic claims feature.
It is important to note that dynamic claims are currently supported when working with Vault, and enables you to make a configuration dynamic in nature (allowing workloads to specify workload-specific claim values outside of the Aembit Tenant UI).
When working with Vault Client Token Credential Providers for your Aembit Tenant, you have the option to enable the dynamic claims feature. With this feature, you can set either a subject claim, or a custom claim, with either literal strings or dynamic values.
### Minimum Versions
[Section titled “Minimum Versions”](#minimum-versions)
To use the dynamic claims feature, the Agent Injector also needs to be updated to the new minimum version/image (currently 1.9.142) so the new `aembit.io/agent-configmap` annotation works properly.
### Literal strings
[Section titled “Literal strings”](#literal-strings)
Literal strings can be placed verbatim into the target claim with no modification or adjustment necessary.
### Dynamic values
[Section titled “Dynamic values”](#dynamic-values)
Aembit Cloud communicates dynamic claim requests to the Agent Proxy following a series of steps which are described below.
1. The template is sent to Agent Proxy.
2. Agent Proxy collects all necessary information and then sends this information to Aembit Cloud.
3. Aembit Cloud replaces template variables with the values provided by Agent Proxy.
The sections below describe how you can support Vault with Aembit dynamic claims.
## Configuring Vault (HashiCorp) Cloud
[Section titled “Configuring Vault (HashiCorp) Cloud”](#configuring-vault-hashicorp-cloud)
To enable dynamic claims, you must first configure your HashiCorp Vault instance, since dynamic claims are only applicable to Vault Client Token Credential Providers. Because dynamic claims support is intended for the credential provider type `Vault client token`, Vault must also be configured to support a matching set of values.
Vault OIDC roles, which are used to log into Vault as part of the Vault client token retrieval, support one or more of the following three bound types:
* bound\_subject
* bound\_audiences
* generically bound claims
For more detailed information on configuring Vault Cloud, please see the [HashiCorp Vault](https://developer.hashicorp.com/vault/docs/auth/jwt#configuration) technical documentation.
## Client Workload Configuration
[Section titled “Client Workload Configuration”](#client-workload-configuration)
If you need to use values from ConfigMap as dynamic claims, you need to configure the `aembit.io/agent-configmap` annotation for the Client Workload.
For the latest release, you can add this new annotation to a deployment similar to the screenshot shown below.
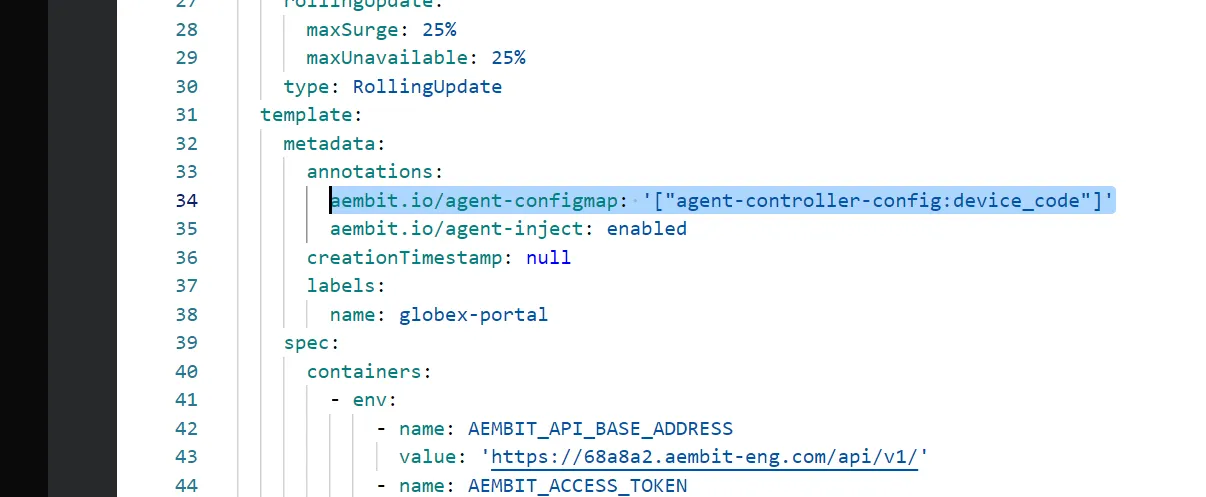
Here is an example Client Workload YAML with this annotation:
```sh
apiVersion: apps/v1
kind: Deployment
metadata:
name: example-app
spec:
replicas: 1
selector:
matchLabels:
app: example-app
template:
metadata:
labels:
app: example-app
annotations:
aembit.io/agent-inject: "enabled"
aembit.io/agent-configmap: '["foo1:bar1", "foo2:bar2"]
```
The Agent Proxy supports Kubernetes ConfigMaps and specific environment variables in dynamic claims.
The following templates are currently supported:
* k8s.configmap.*.*”.
* Make sure to specify the *CONFIGMAP* and *VALUE* (represented by ”*.*”).
* os.environment.*.*.
* Make sure to specify *“K8S\_POD\_NAME”* (represented by *.*).
* os.environment.*.*
* Make sure to specify *CLIENT\_WORKLOAD\_ID* (represented by ”*.*”).
## Client Workload (Kubernetes) Annotations
[Section titled “Client Workload (Kubernetes) Annotations”](#client-workload-kubernetes-annotations)
In order for the Client Workload to retrieve and configure ConfigMap, the Client Workload must be annotated properly. For the latest release, you can add this new annotation to a deployment similar to the screenshot shown below.

## Confirm Aembit Authentication to Vault
[Section titled “Confirm Aembit Authentication to Vault”](#confirm-aembit-authentication-to-vault)
If the Client Workload is able to successfully connect to Vault, this confirms that Aembit authenticated to Vault with the configured and properly injected dynamic claims.
# Configure multiple Credential Providers
> How to configure multiple Credential Providers to map to an Access Policy
While you may only ever need to add a single Credential Provider to an Access Policy, there are use cases where you may need to add multiple Credential Providers to a single Access Policy. To ensure you can perform this task, Aembit has enabled multiple Credential Provider addition and Access Policy mapping functionality.
Note
This functionality is currently limited to use with JSON Web Token (JWT) Credential Providers and Snowflake or HTTP Server Workloads.
## Adding Multiple Credential Providers to an Access Policy
[Section titled “Adding Multiple Credential Providers to an Access Policy”](#adding-multiple-credential-providers-to-an-access-policy)
To add multiple Credential Providers to an Access Policy, follow the steps described below.
1. Log into your Aembit Tenant.
2. Once you are logged into your tenant, click on the **Access Policy** link in the left sidebar. You should see the Access Policy Page displayed.
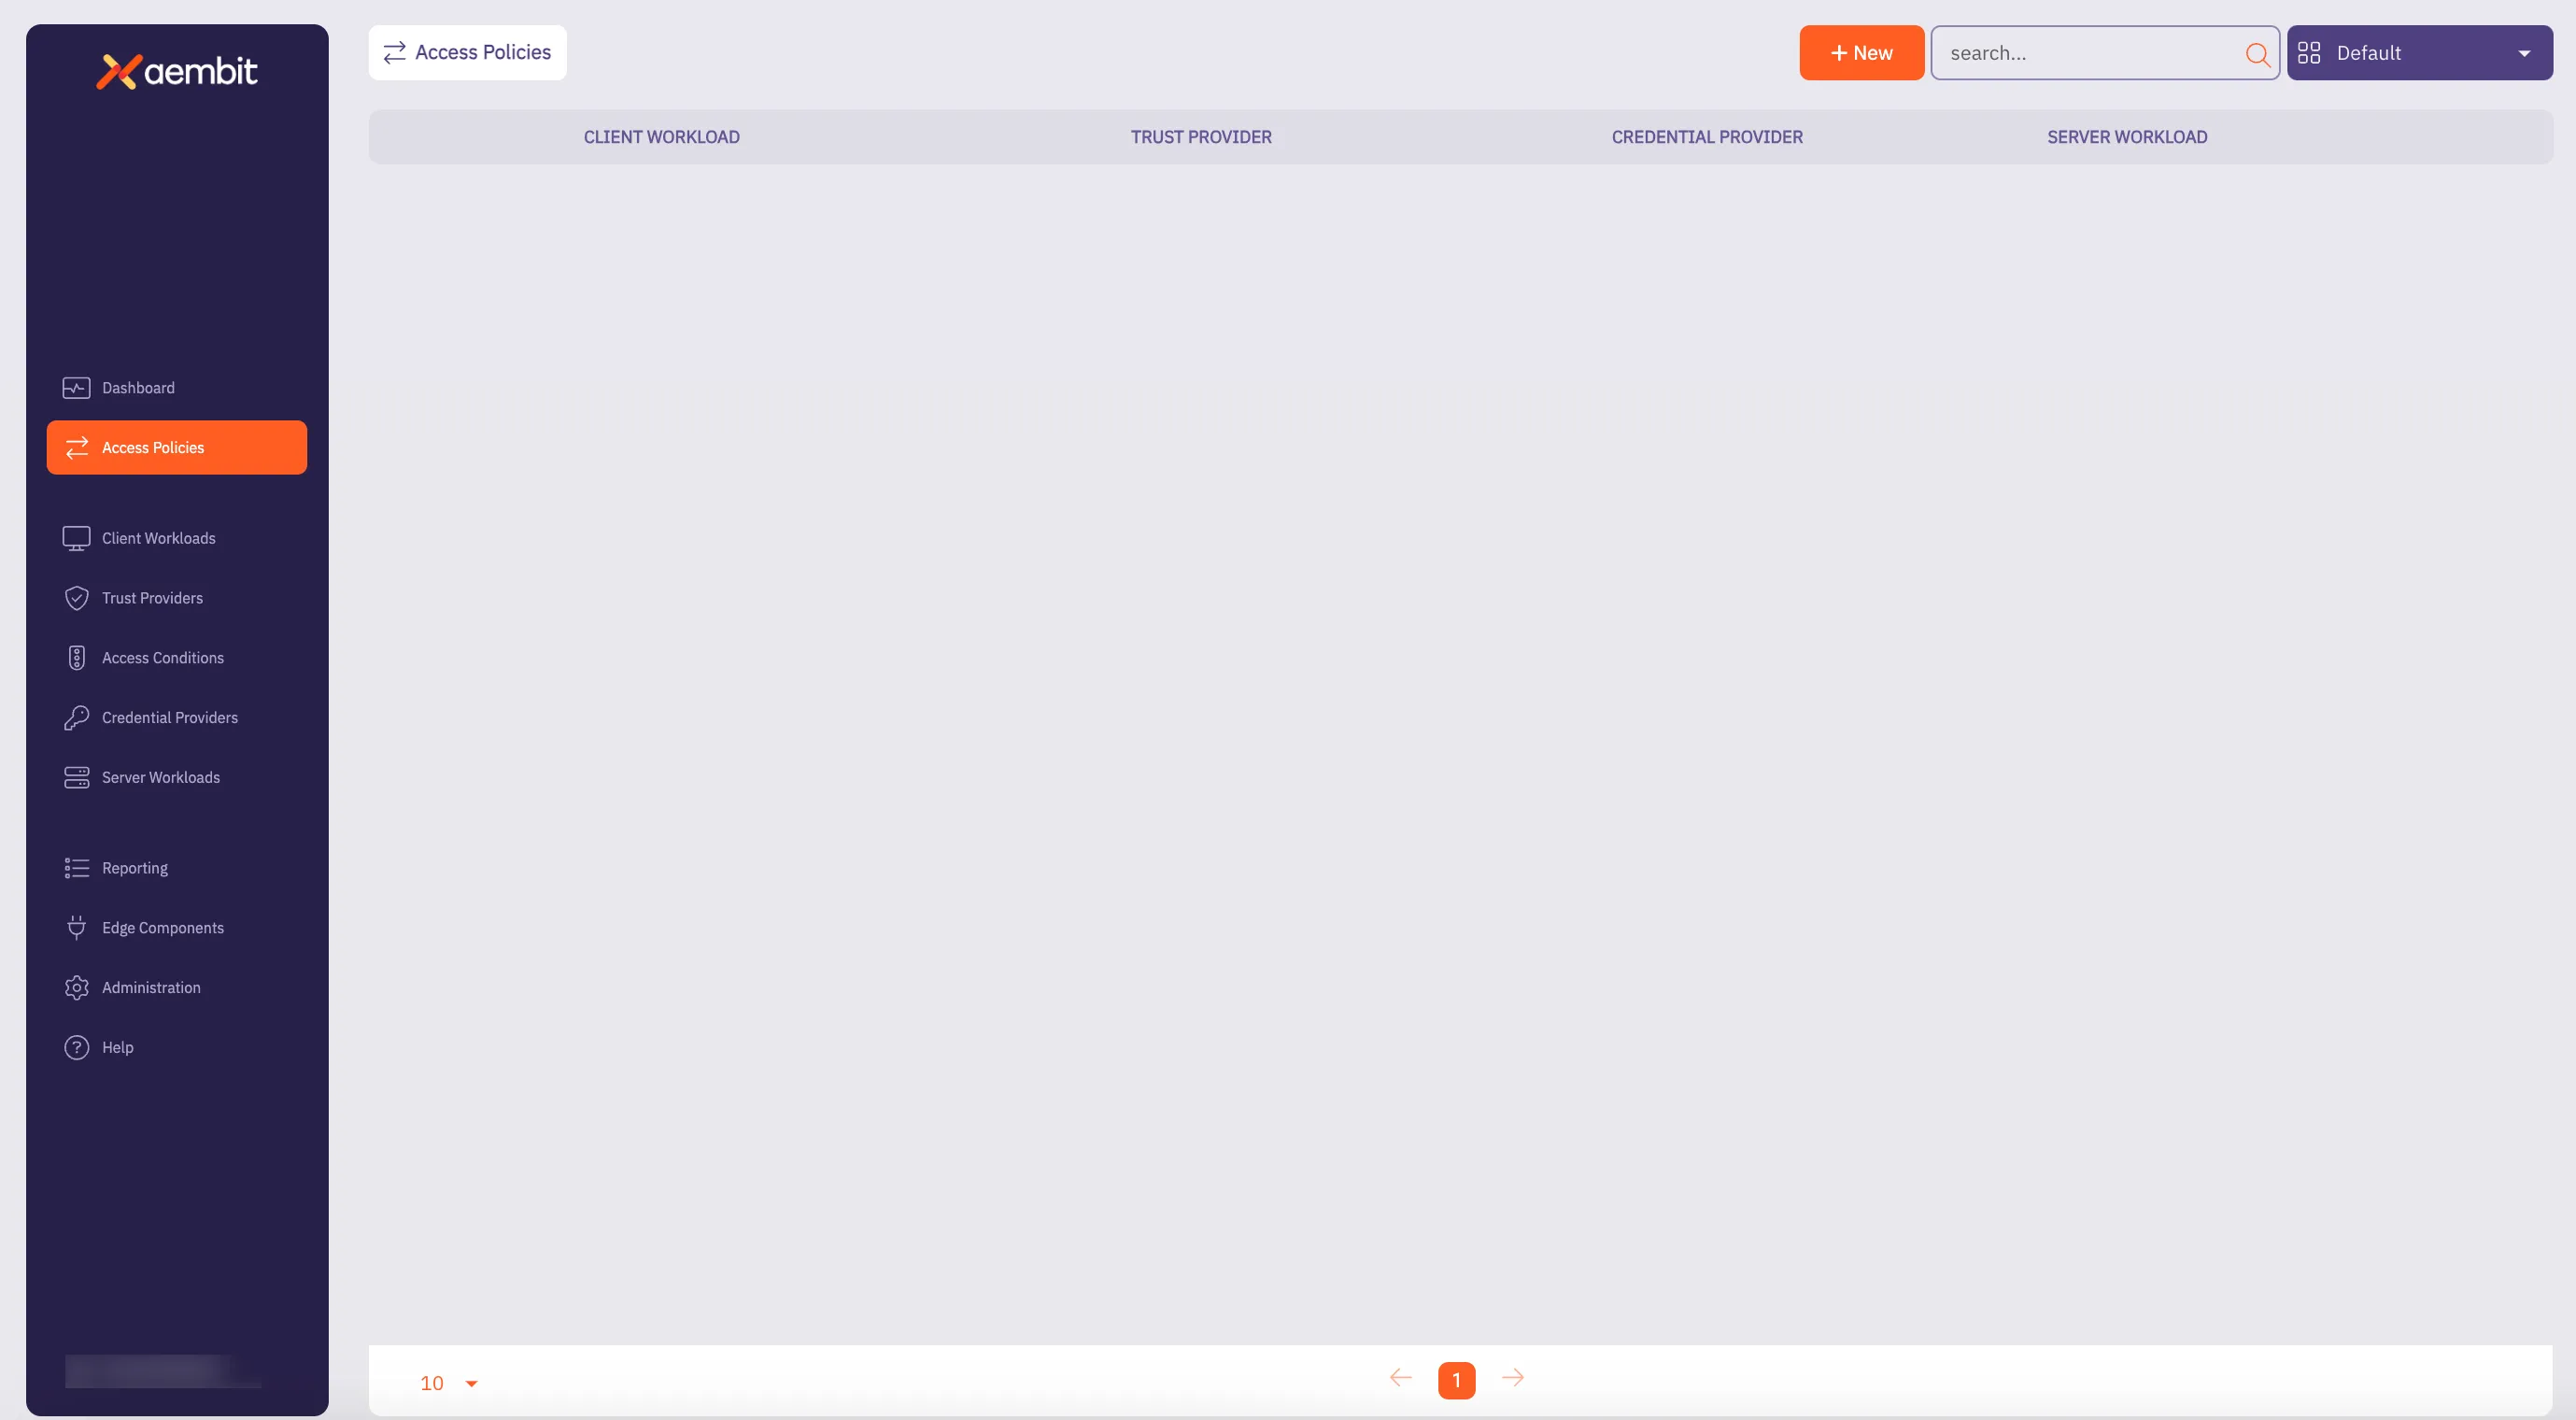
3. Before adding a Credential Provider to an Access Policy, you need to perform the following tasks:
* Add an Access Policy
* Add a Client Workload
* Add a Server Workload
:::note If the Server Workload Application Protocol is **NOT** Snowflake or HTTP, then you are unable to add multiple Credential Providers to an Access Policy. :::
4. Once you have added your Access Policy, Client Workload, and Server Workload, you should now add Credential Providers to the Access Policy by dragging your mouse over the Credential Provider **+** button and selecting either **New** or **Existing**.
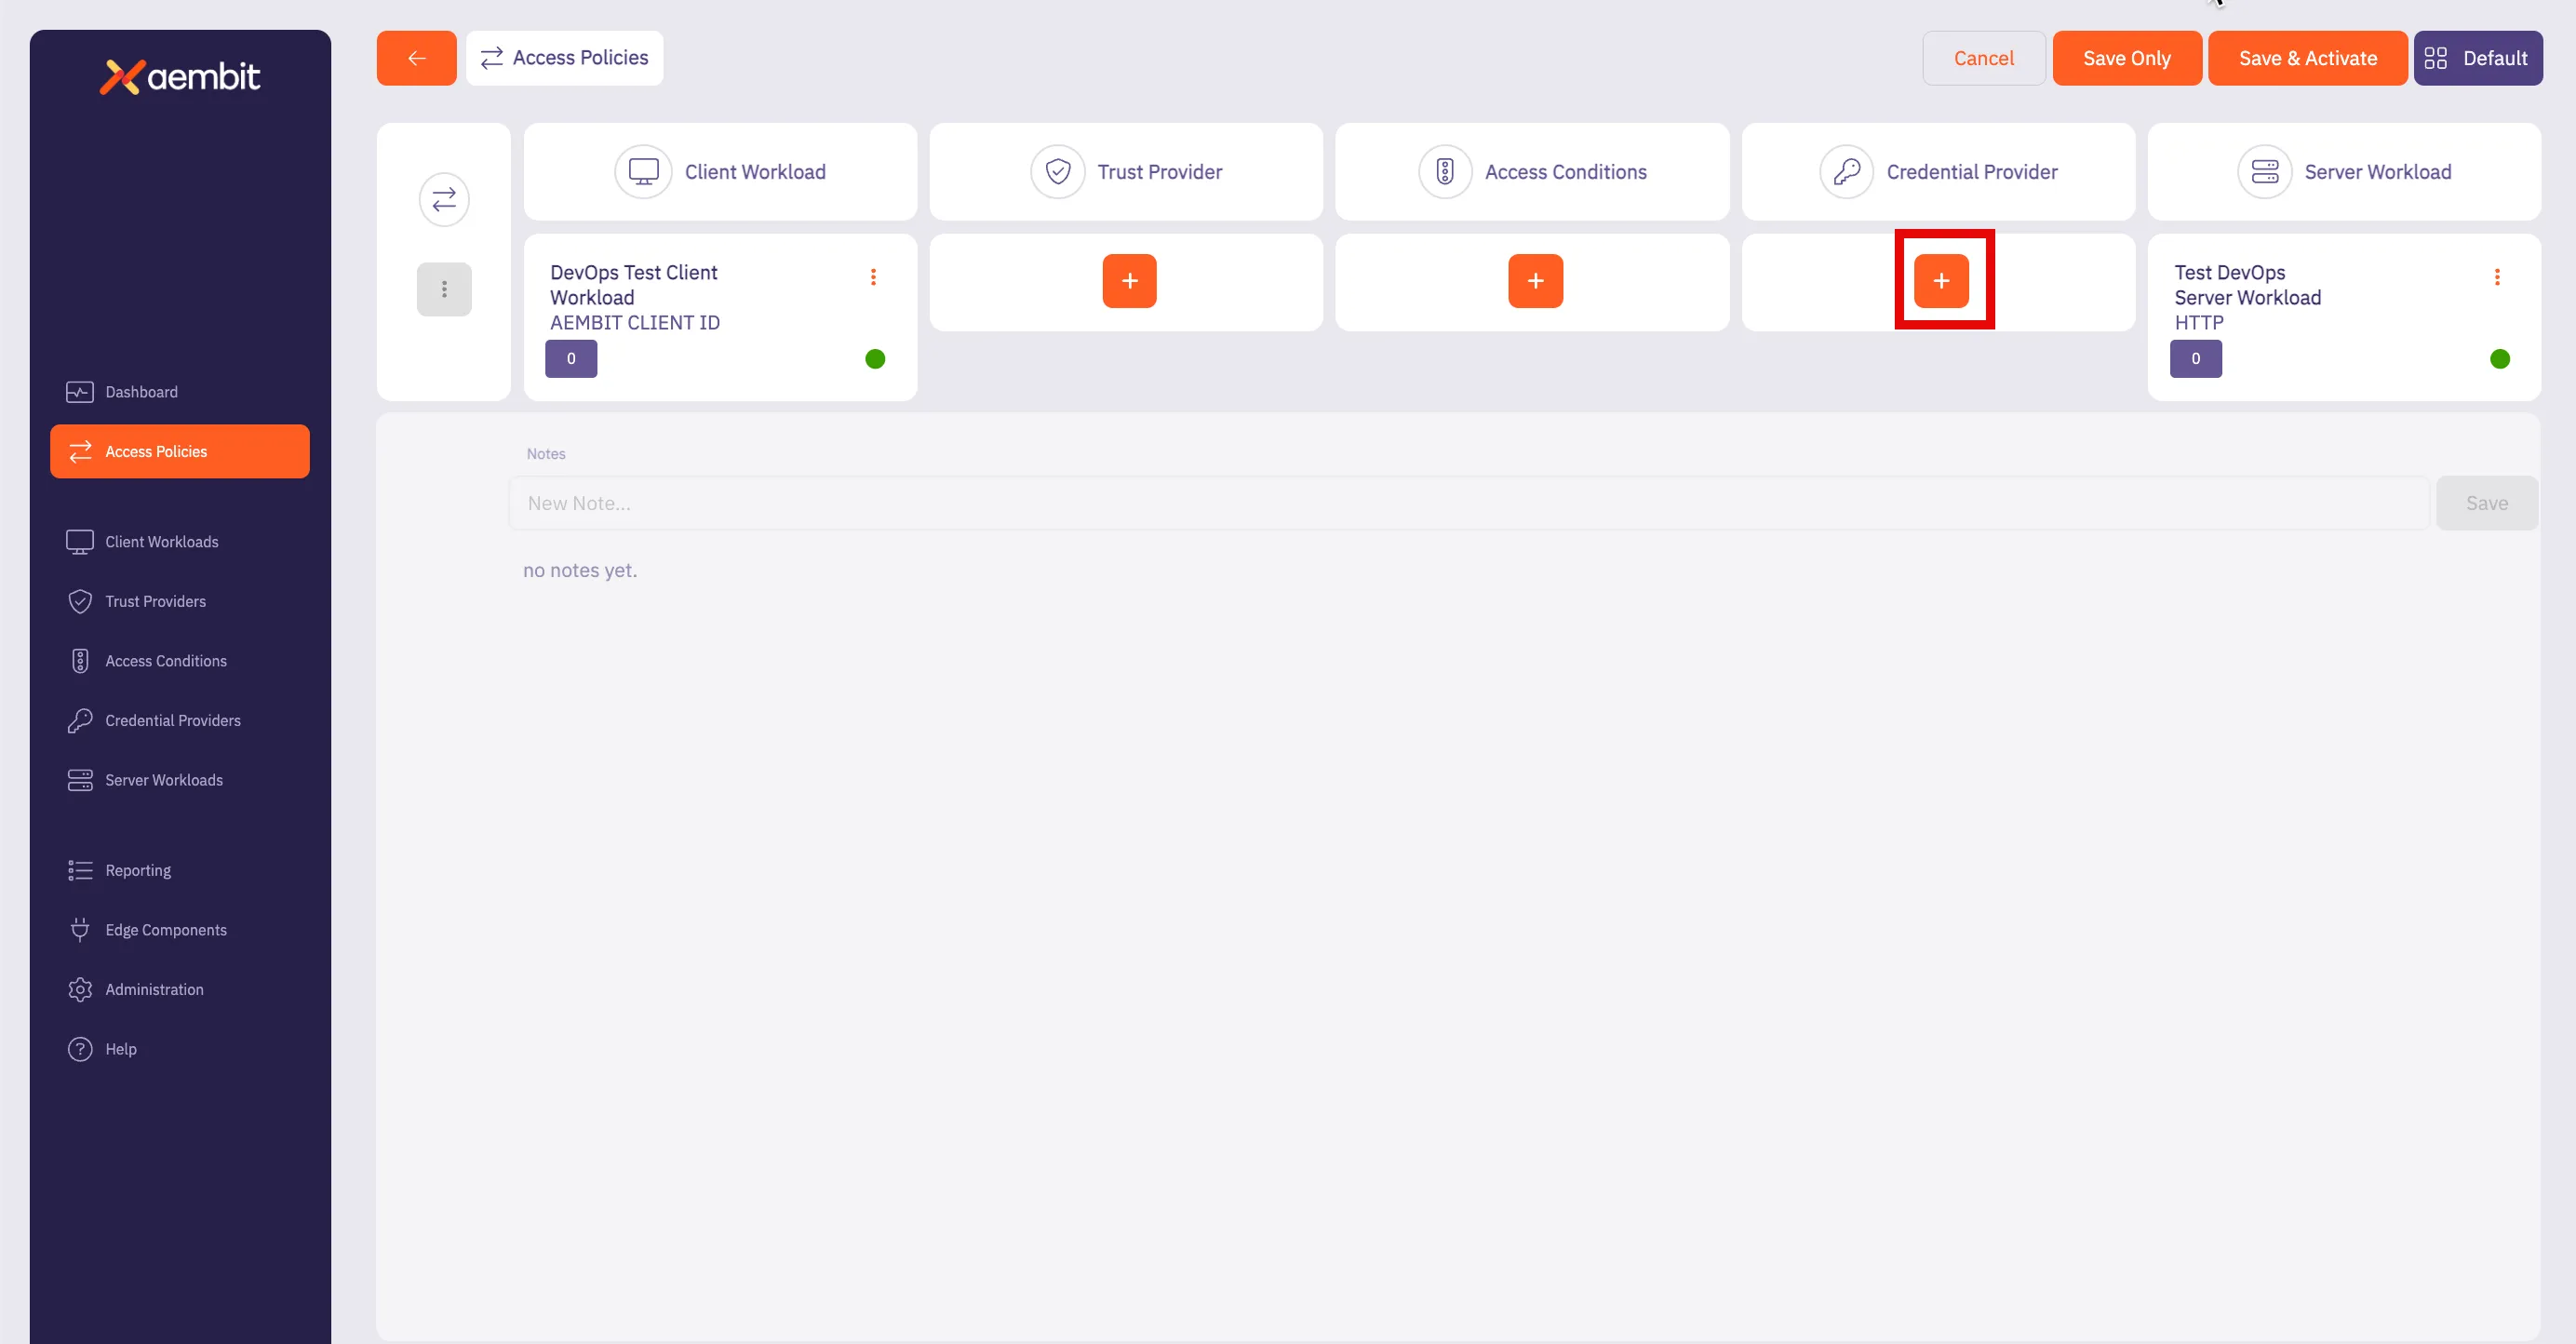
You have 2 options:
* **Existing** - This selection enables you to choose one of your existing Credential Providers.
* **New** - This selection enables you to create a new Credential Provider.
Once you make your selection, the Credential Providers dialog window appears.
5. If you selected **Use Existing**, select the Credential Provider you would like to use for the Access Policy from the list displayed.
6. If you selected **New**, proceed to add your new Credential Provider by completing the fields as prompted in the dialog window.
You should see the following fields displayed:
* **Name** - Credential Provider name
* **Description** - Text description
* **Credential Type** - Select **JSON Web Token**
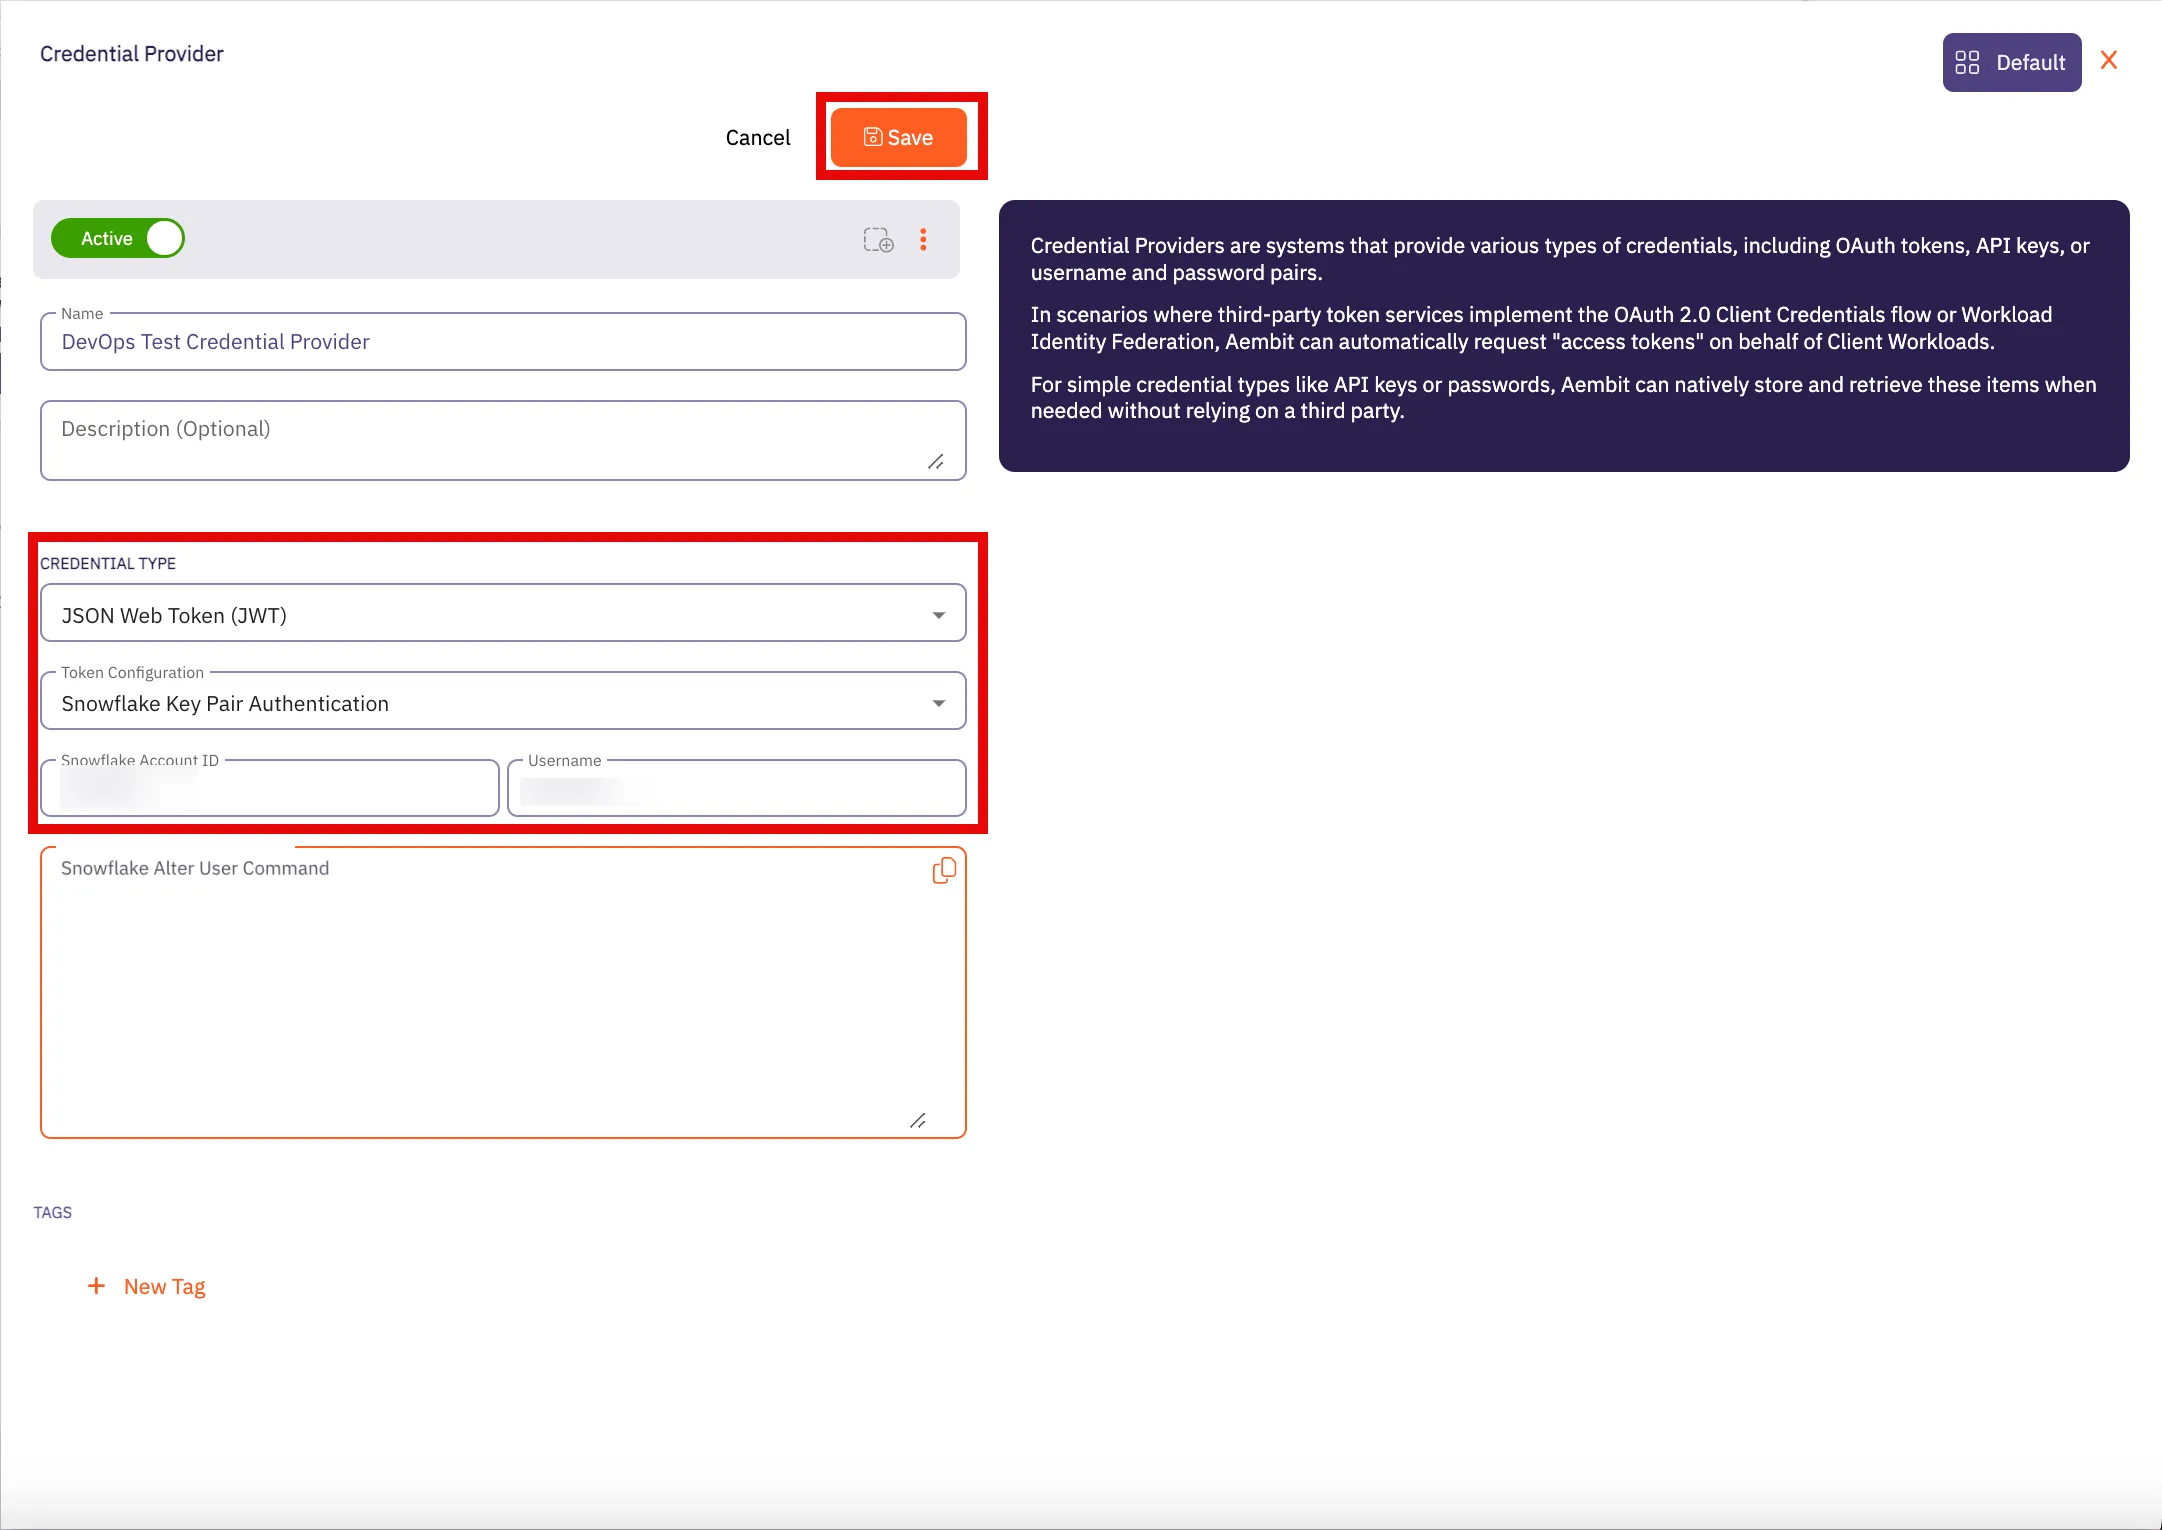
When **JSON Web Token** is selected, the following additional fields appear, enabling you to enter your Snowflake credentials:
* **Token Configuration**
* **Snowflake Account ID**
* **Username**
* **Snowflake Alter User Command**
For more information on how to retrieve this information for your Credential Provider, please see the [JSON Web Token](/user-guide/access-policies/credential-providers/json-web-token) page.
7. When finished, click **Save** to save your Credential Provider.
8. When you return to the Access Policy page, you see the first Credential Provider listed in the Credential Providers column.
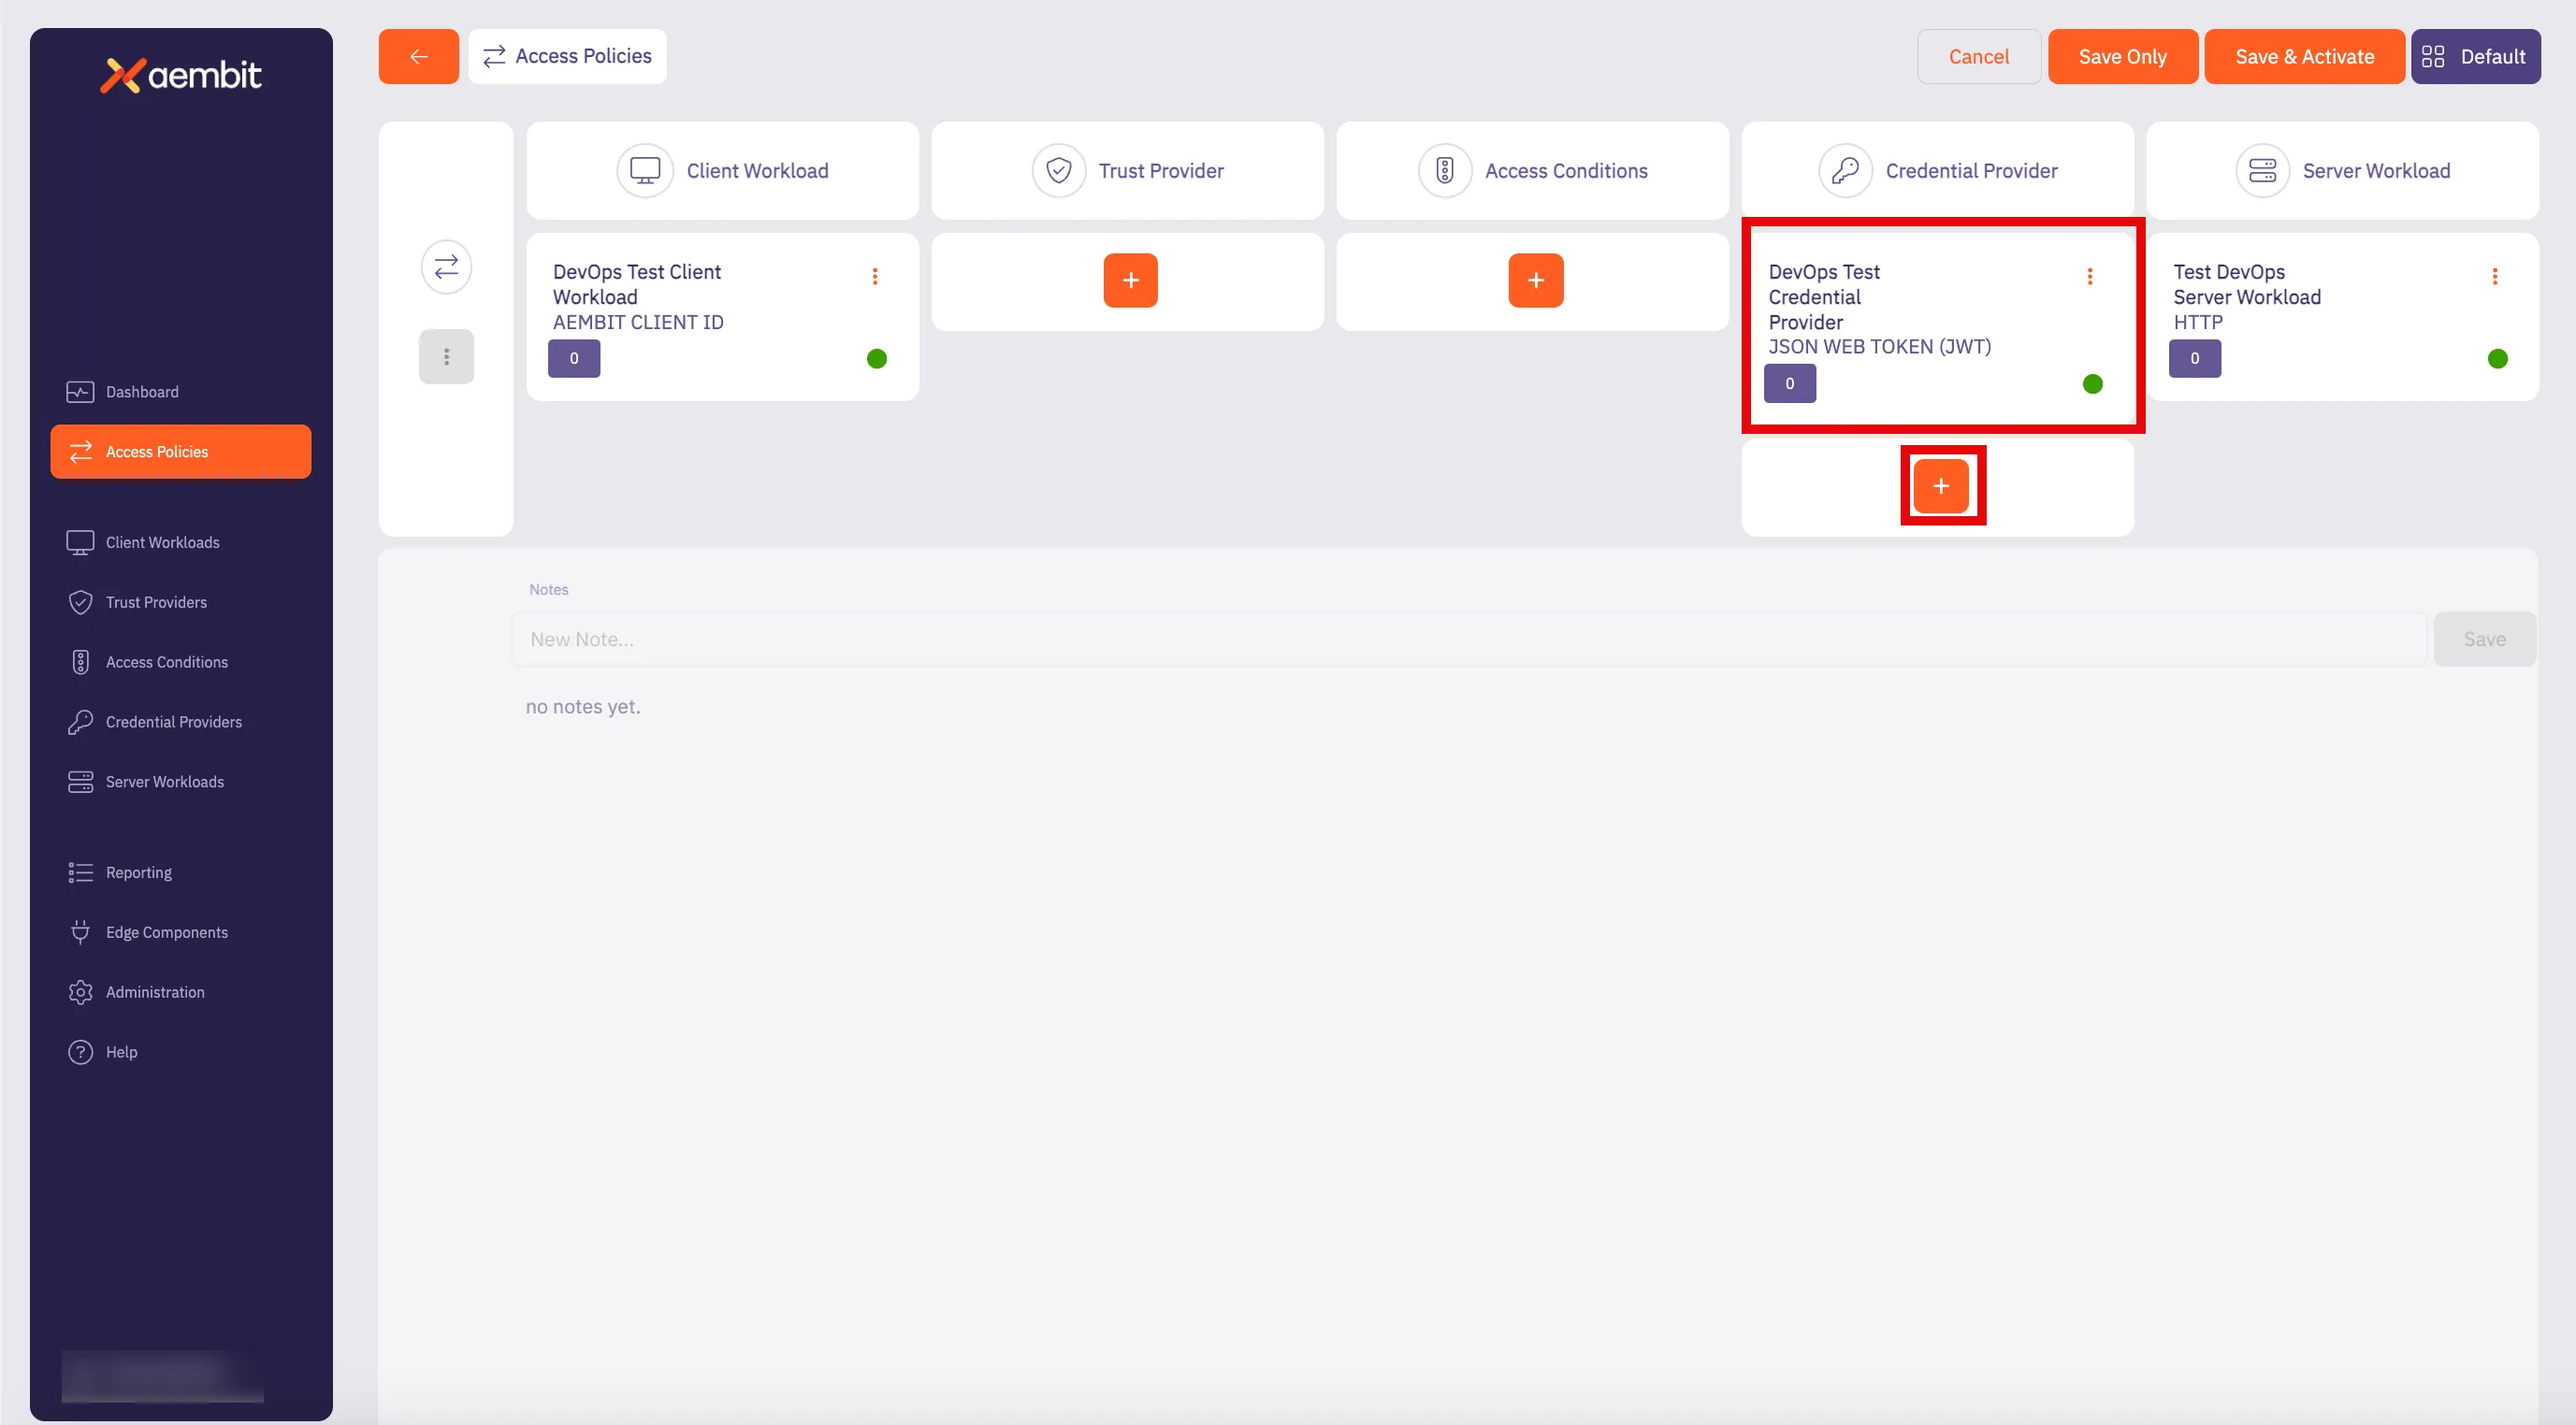
9. Now that you have your first Credential Provider added to the Access Policy, repeat steps 4 - 7 to add additional Credential Providers by navigating to the Credential Provider column and dragging your mouse over the **+** button.
Note
When you add additional Credential Providers to an Access Policy, a dialog window appears stating that when you perform this action, you must also map the Credential Provider to the Access Policy.
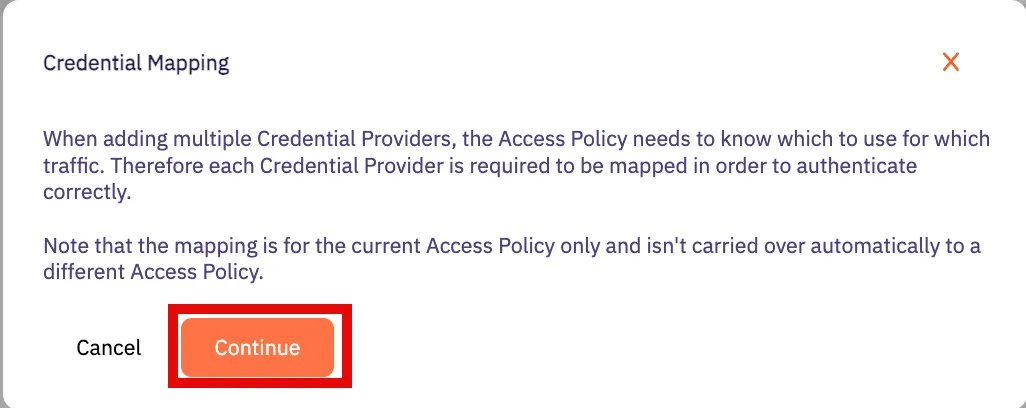
Click **Continue** to add additional Credential Providers to the Access Policy.
### Mapping JWT Credential Providers to a Snowflake Server Workload Access Policy
[Section titled “Mapping JWT Credential Providers to a Snowflake Server Workload Access Policy”](#mapping-jwt-credential-providers-to-a-snowflake-server-workload-access-policy)
After adding at least (2) JWT Credential Providers to an Access Policy, you must then map these Credential Providers to your Access Policy. To map JWT Credential Providers to an Access Policy, follow the steps described below.
1. On the Access Policy page, in the Credential Providers column, you should see a box with the total number of Credential Providers that have been added.
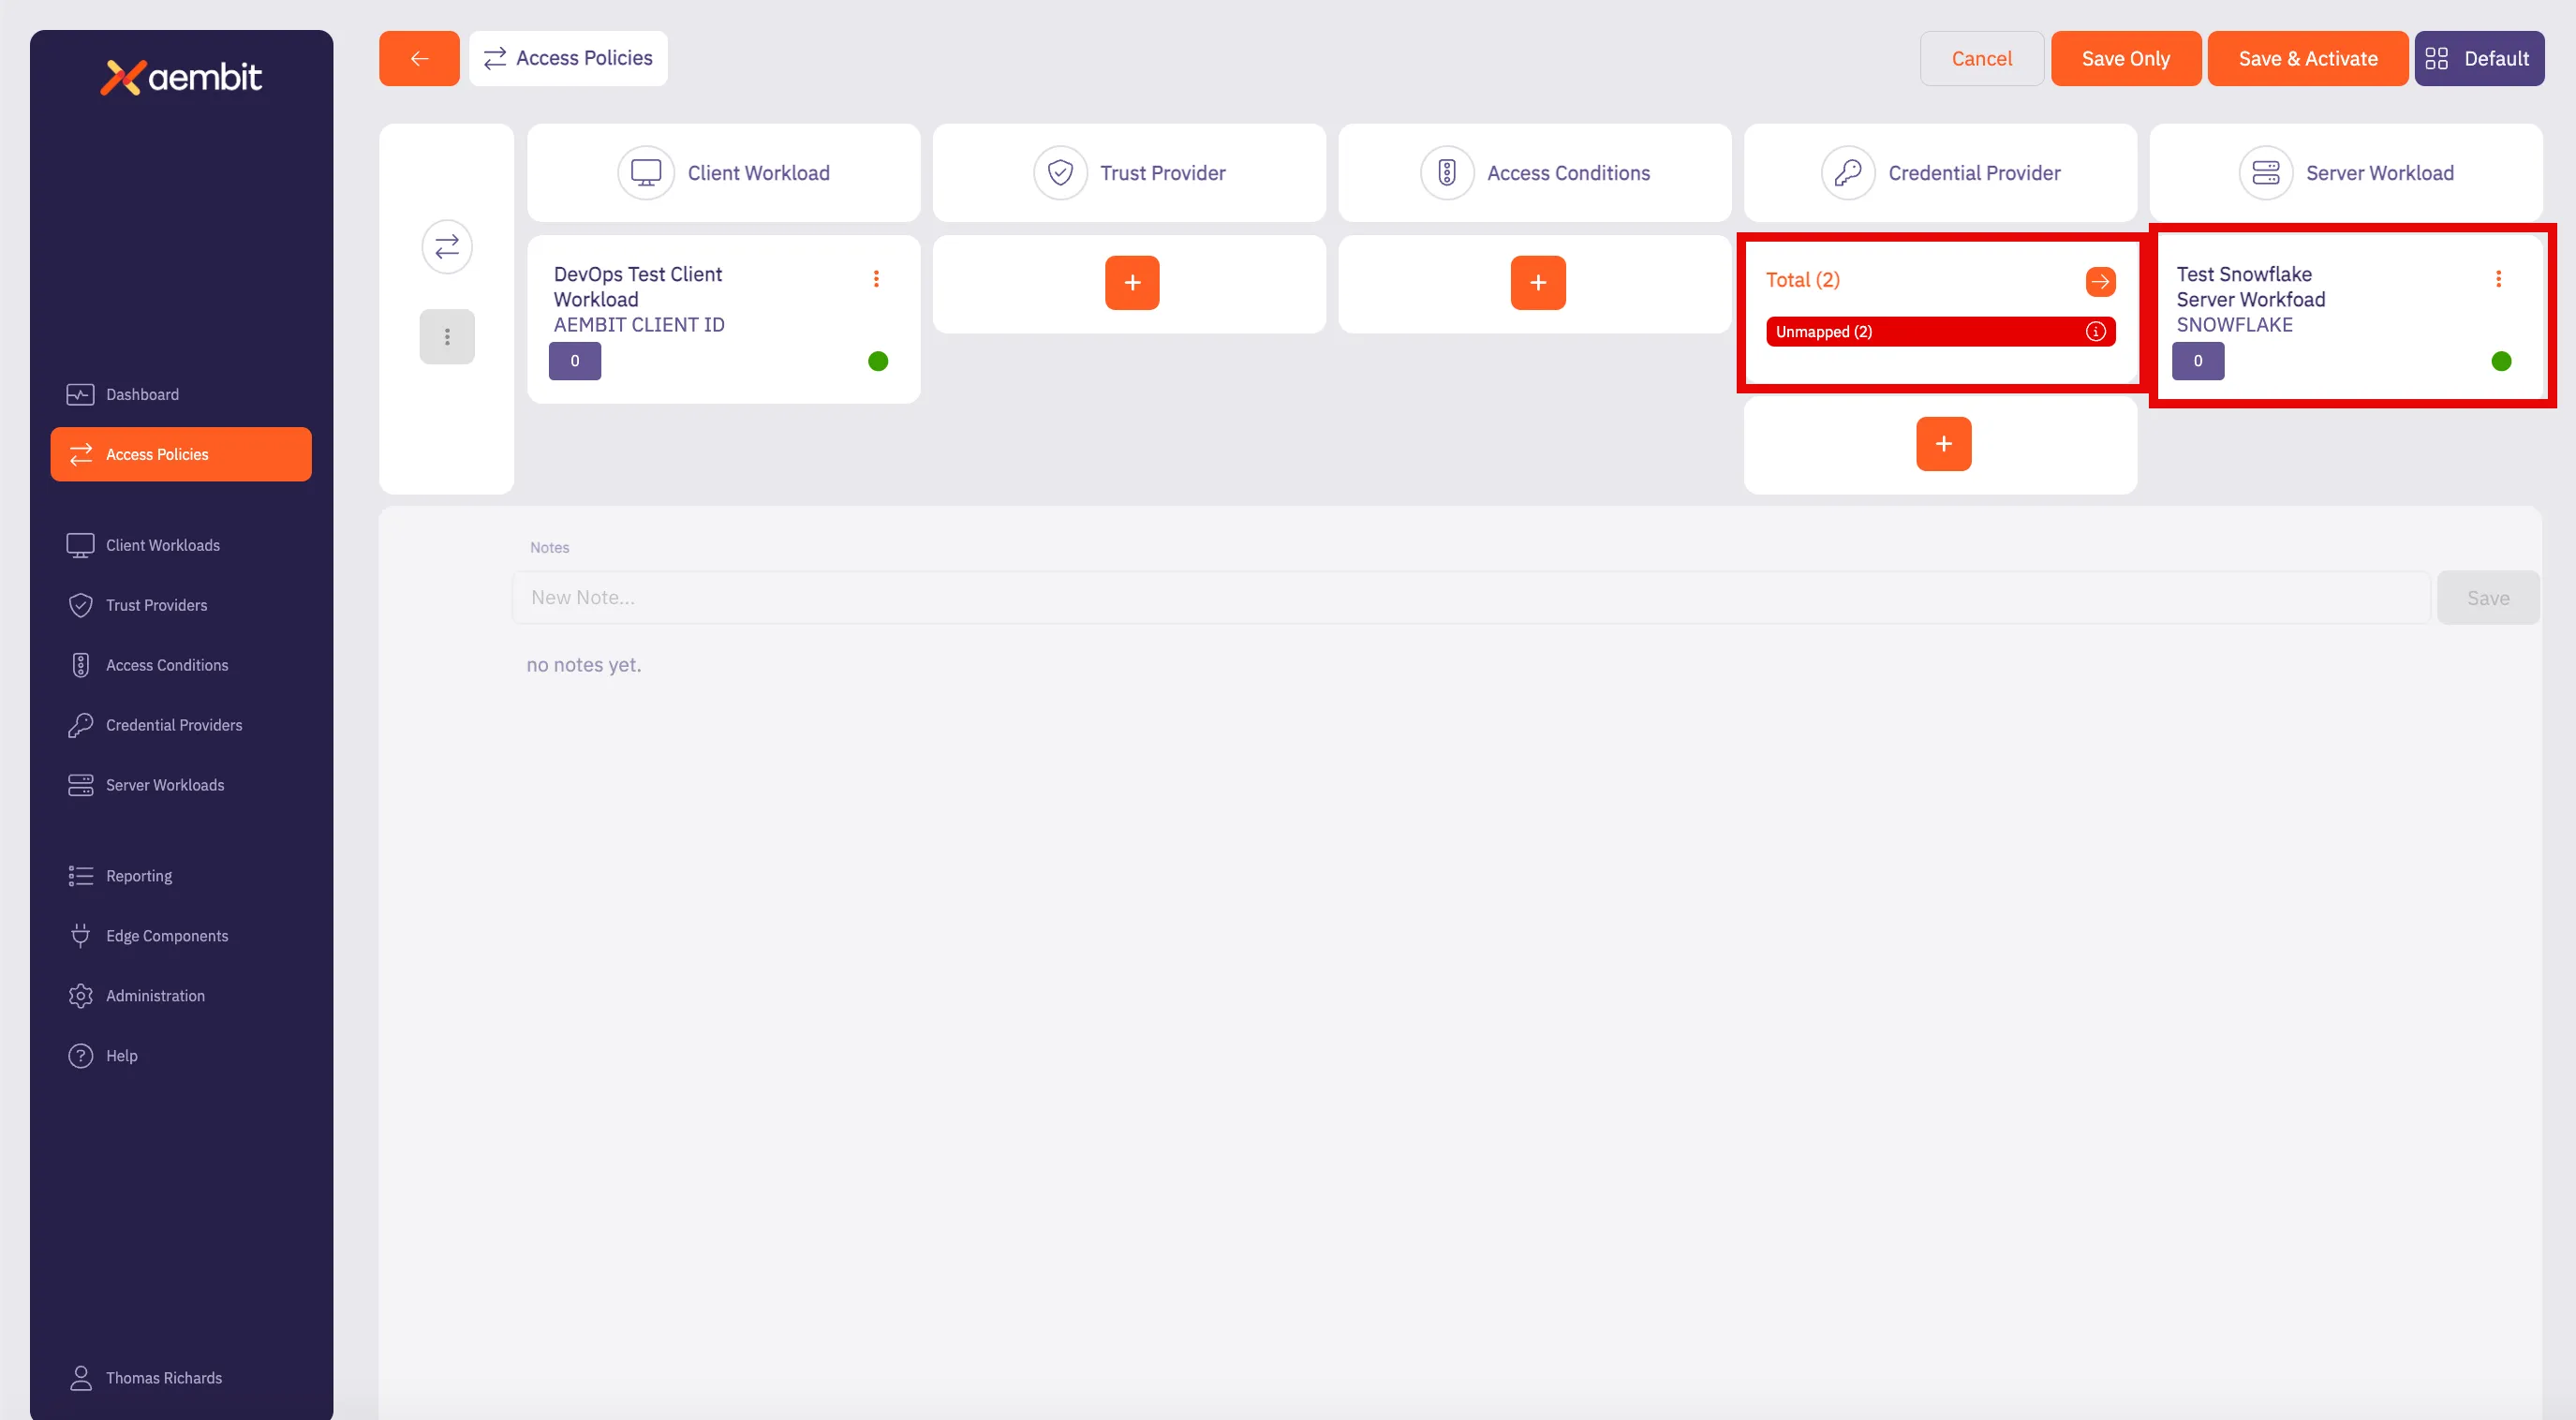
Note
Notice how the box specifies the **Total** number of Credential Providers for the Access Policy (2) and a red line notation with “unmapped.” This means the Credential Providers for the Access Policy are currently “unmapped” and need to be mapped before the Access Policy can be saved.
2. Click on the arrow button to open the Credential Provider Mappings dialog window. In the Credential Provider Mappings dialog window, you see the Credential Providers currently added to the Access Policy with information about each Credential Provider.
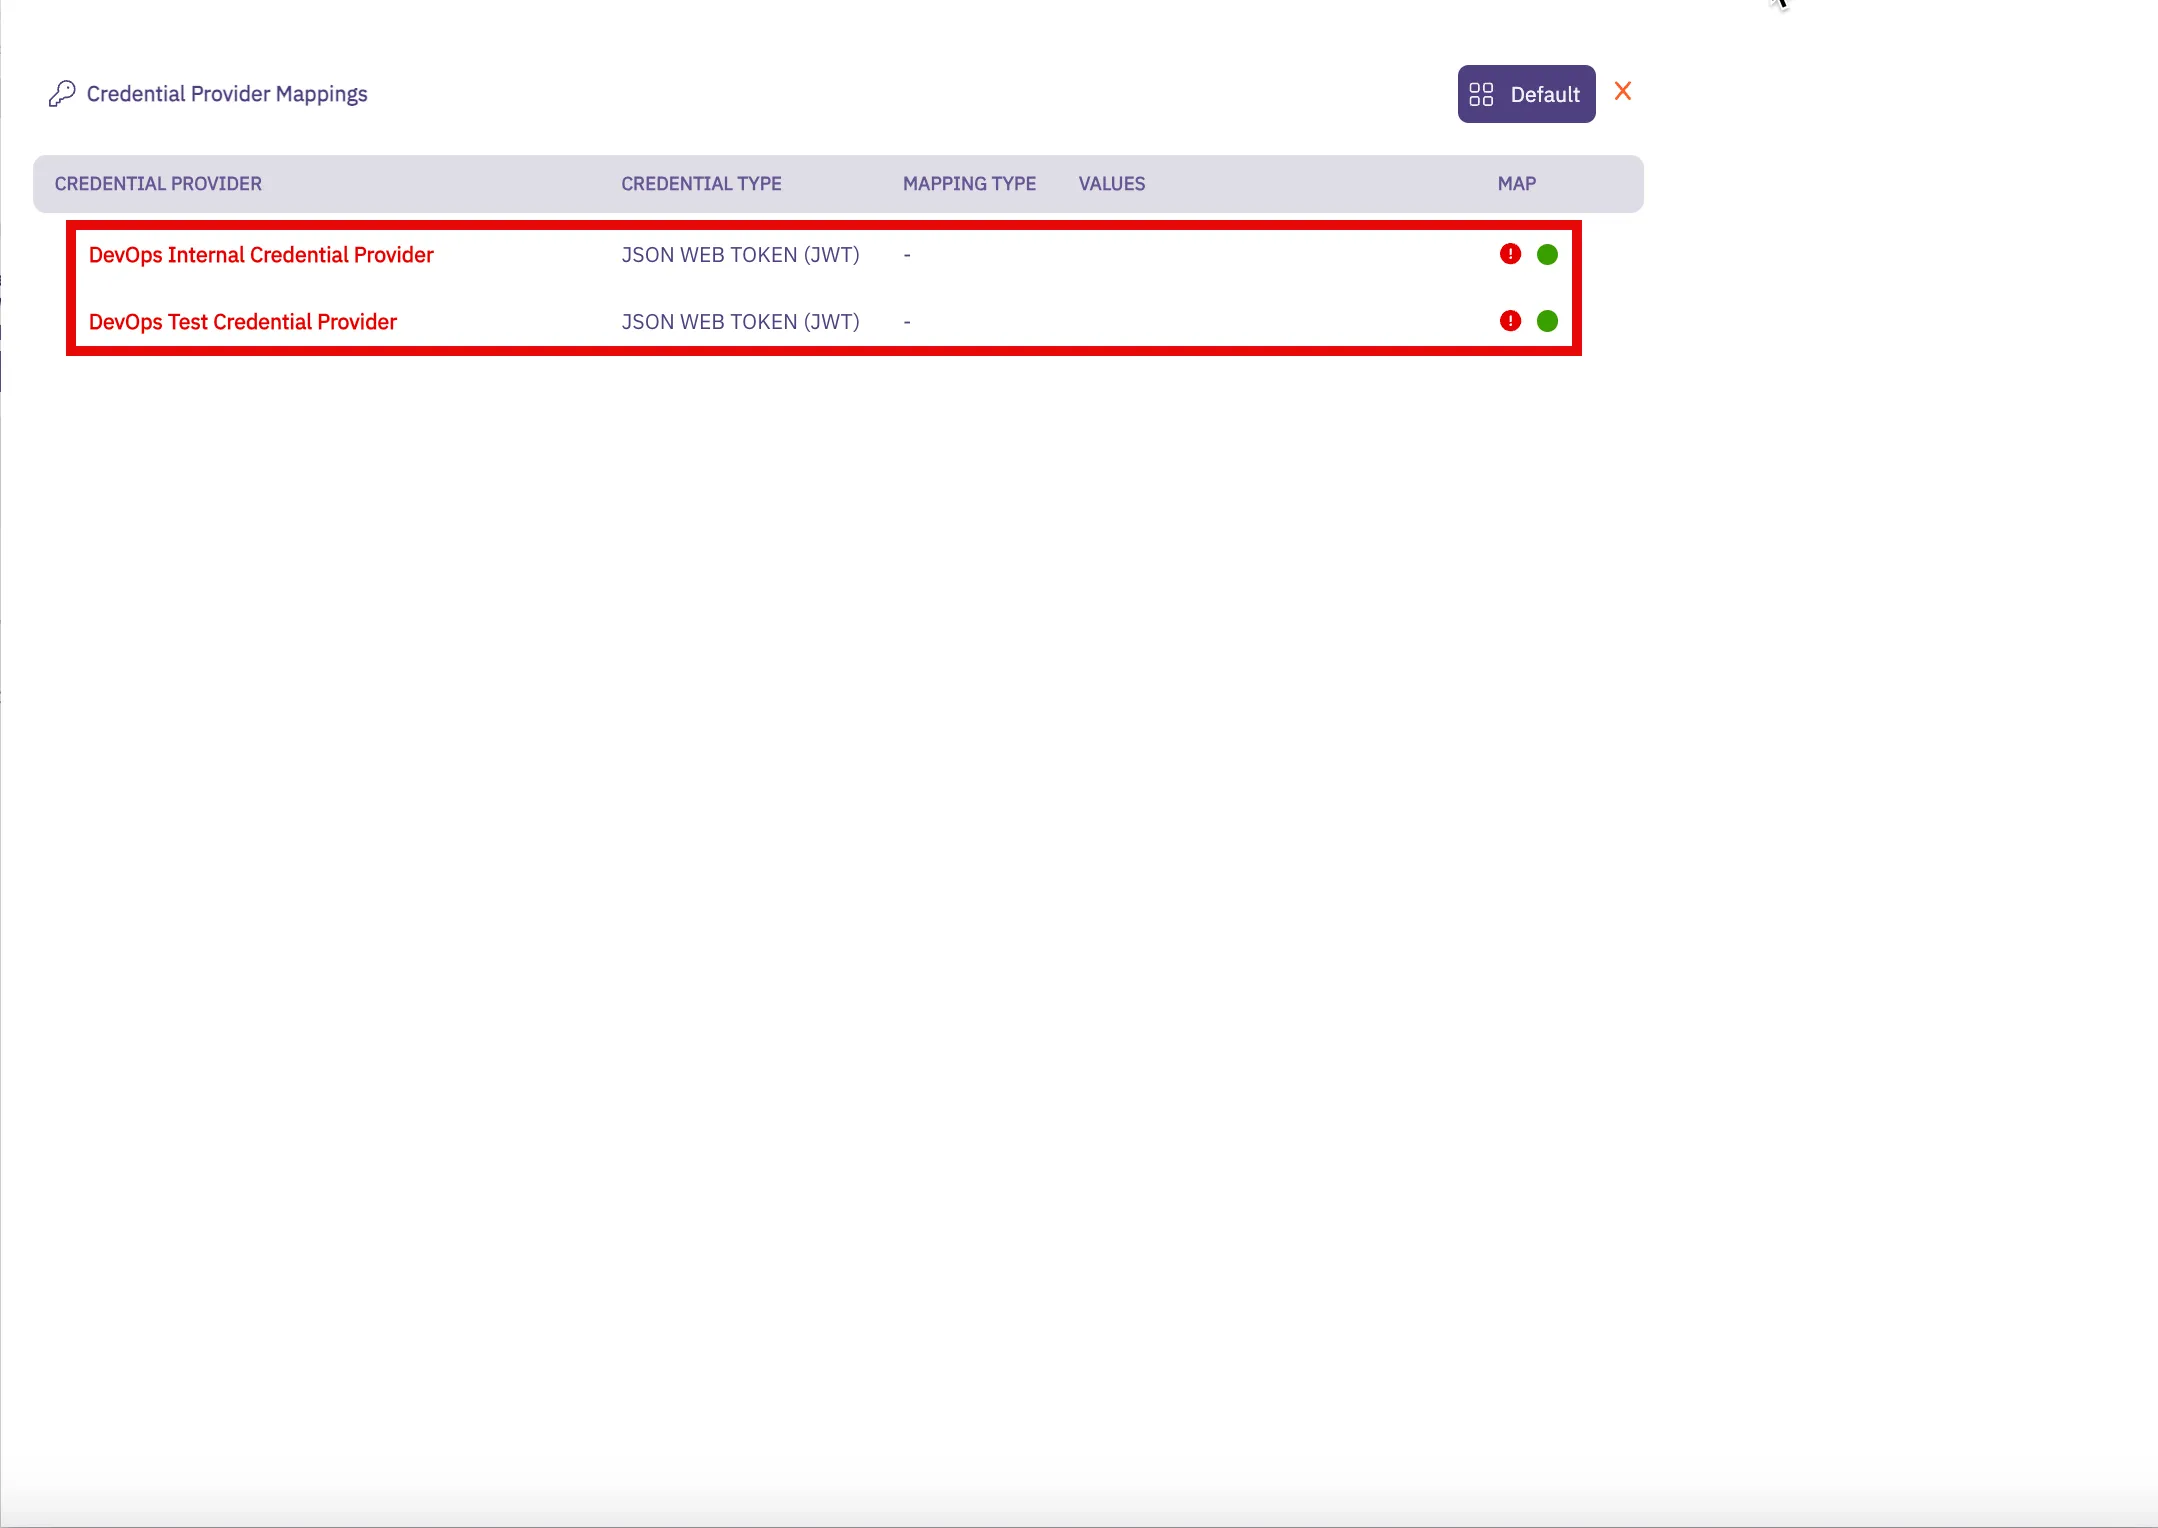
3. Notice that there is a red ”!” icon. This denotes that the Credential Provider currently has no mappings. Hover over the Credential Provider and you see a down arrow appear. Click on the down arrow to open the Credential Provider mapping menu.
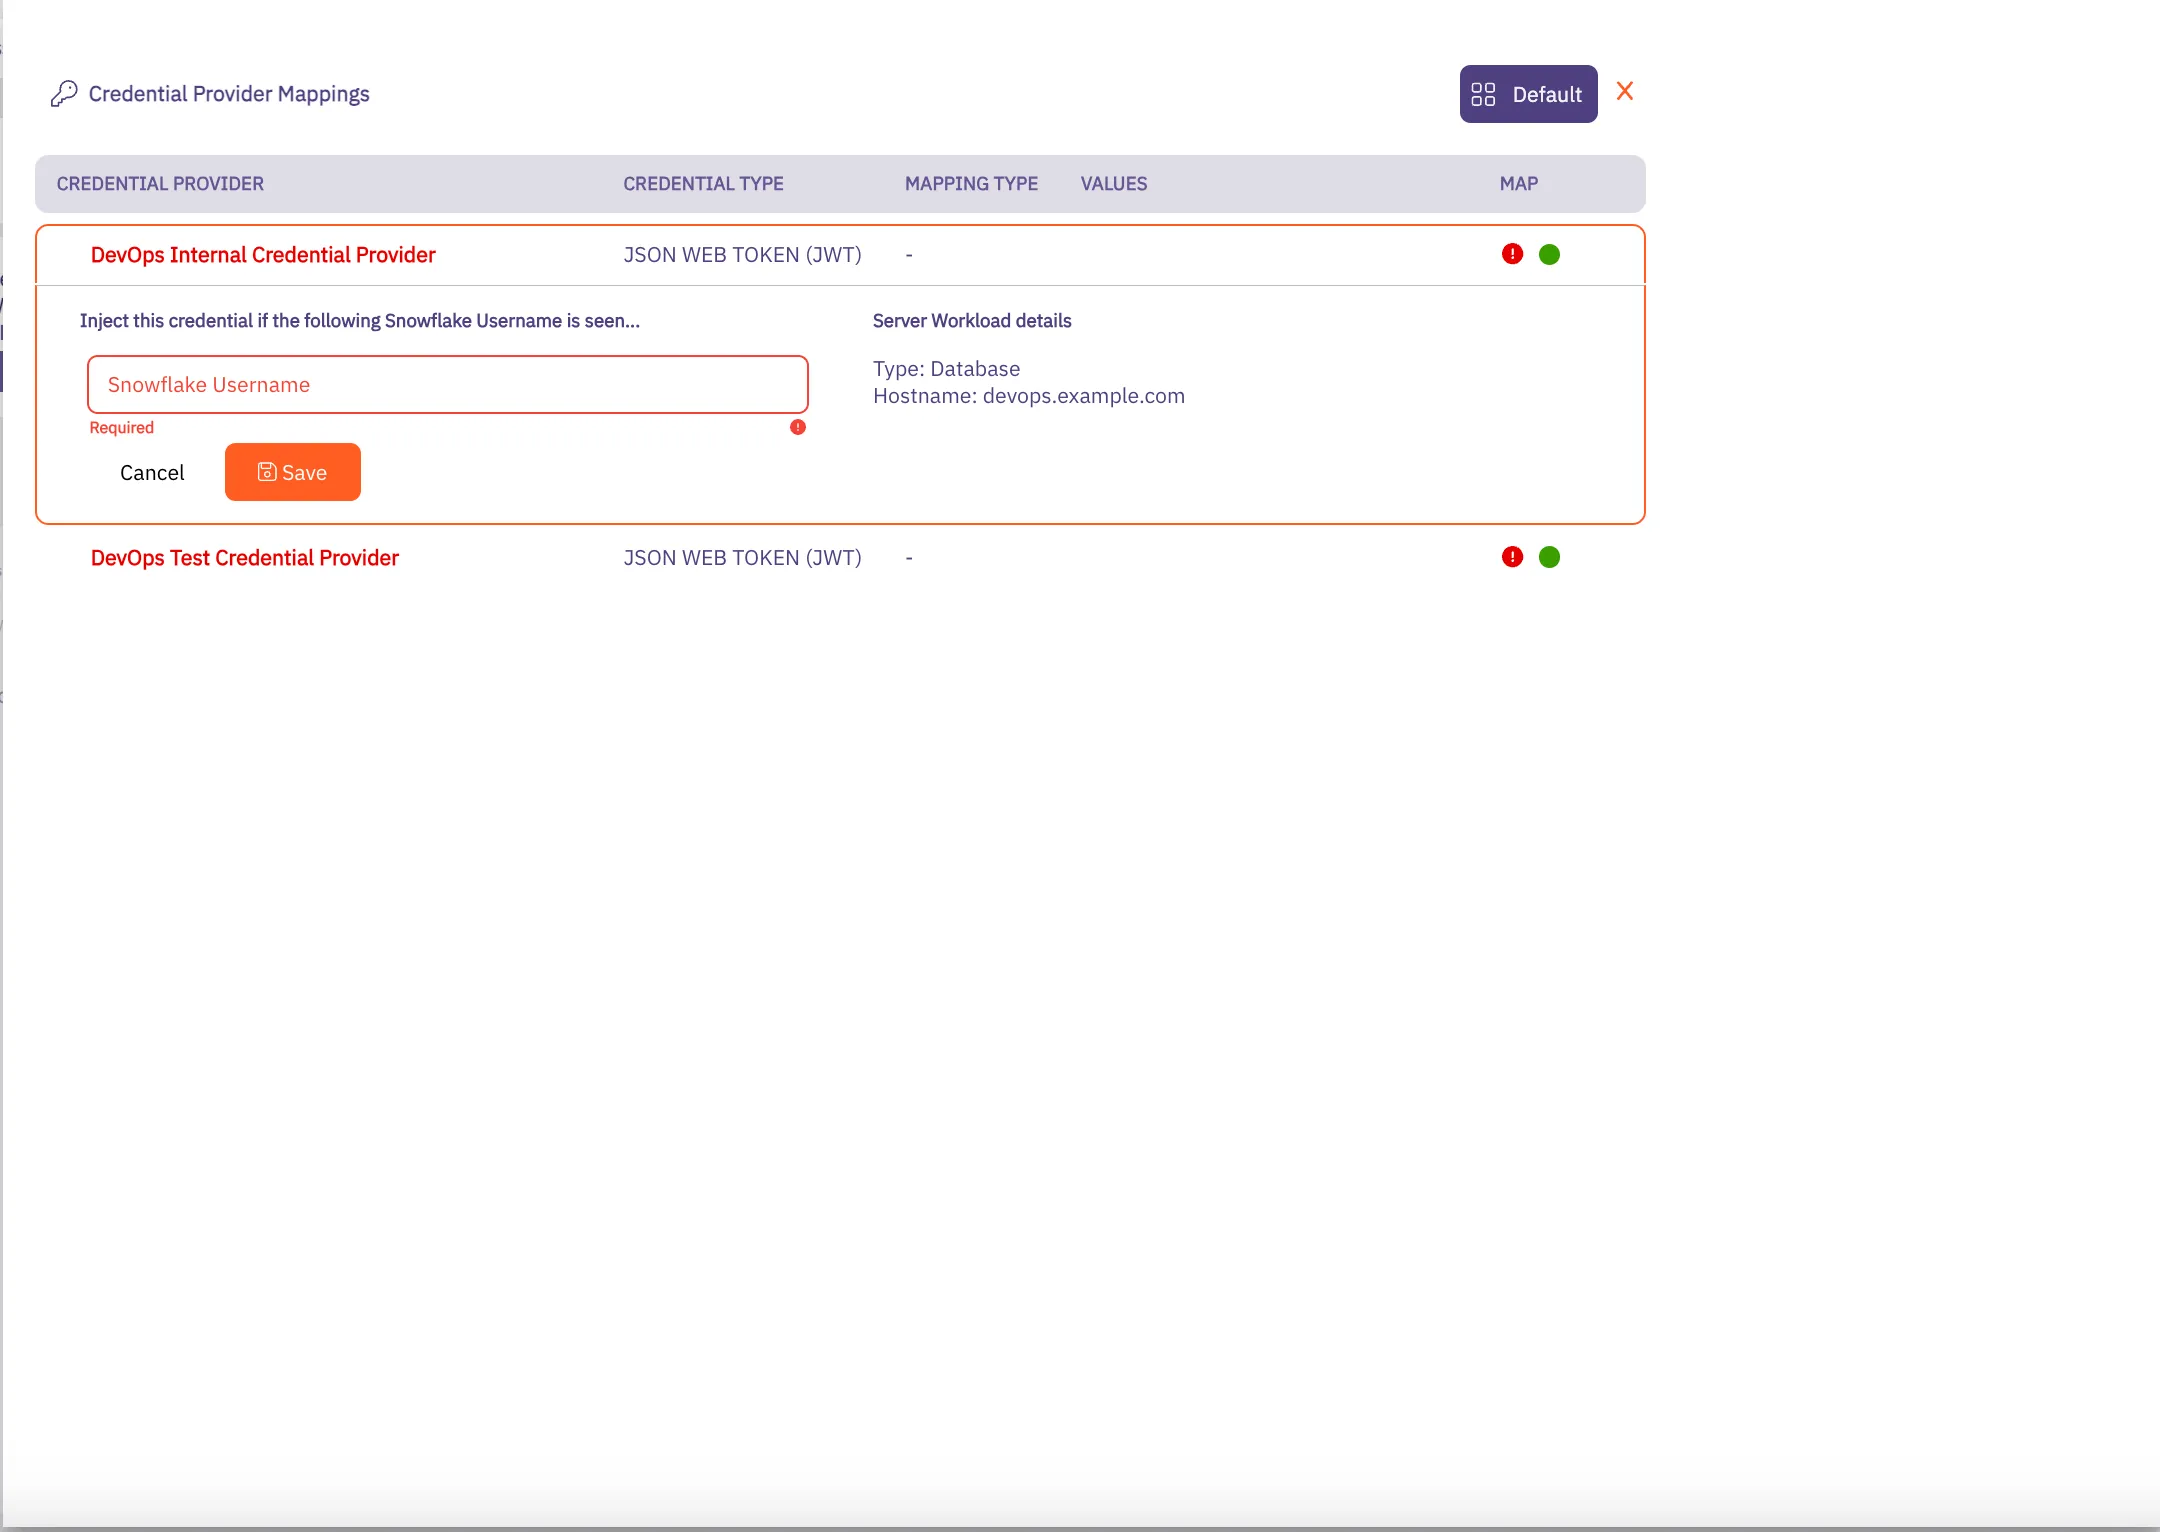
4. In this menu, add any Snowflake Usernames you would like added to the Credential Providers. This means that if the username is included in the connection request from the Client Workload, this Credential Provider will be used for credential injection. Repeat this process as many times as needed for all of your policy-associated Credential Providers.
5. Click **Save** when you are finished adding your mapping values.
Note
When you add Snowflake usernames to a Credential Provider and click **Save**, the red ”!” icon turns to a green checkbox. You also see theses usernames displayed in the Values column.
6. When you return to the Access Policies page, notice that you now see a green “All Mapped” notation in the box for the Credential Providers you just mapped.
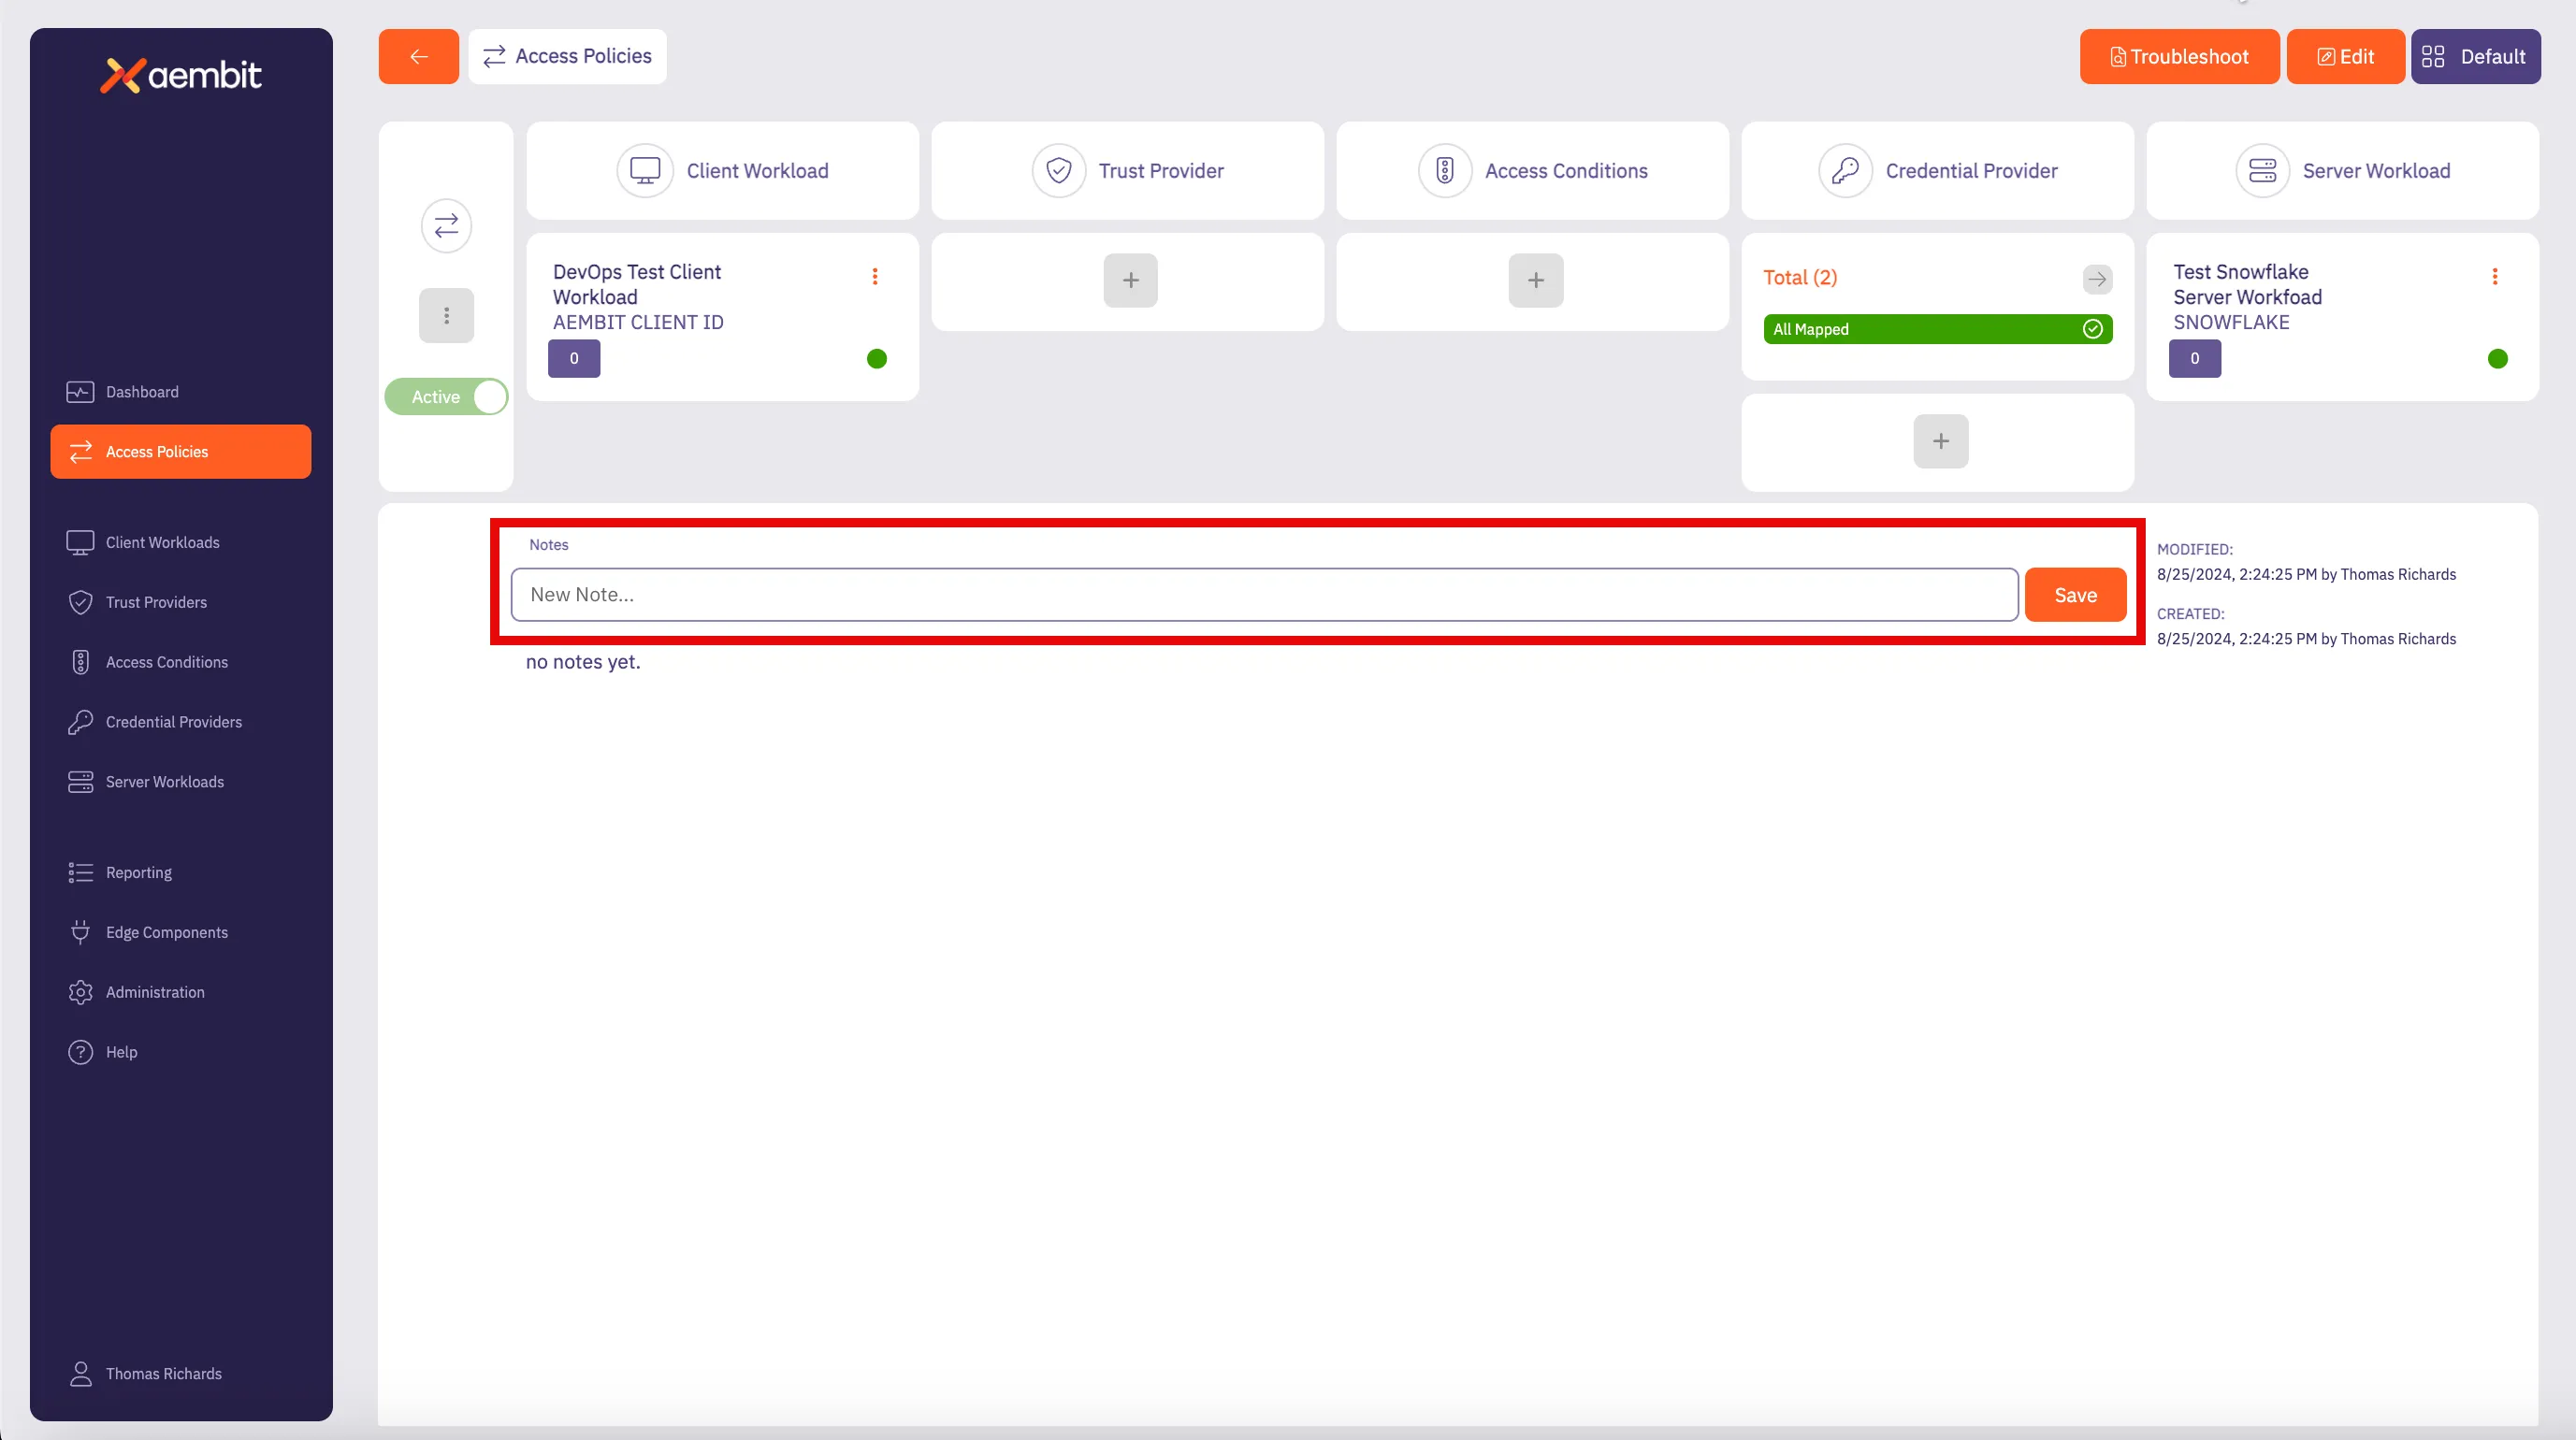
7. Click **Save** to save your selections. If you would like to save, and then also activate the credential mapping, click **Save & Activate**.
Now, when you return to the Access Policy page, if you hover over the Access Policy, you see the Credential Providers that are mapped to that Access Policy.
### Mapping JWT Credential Providers to a HTTP Server Workload Access Policy
[Section titled “Mapping JWT Credential Providers to a HTTP Server Workload Access Policy”](#mapping-jwt-credential-providers-to-a-http-server-workload-access-policy)
After adding at least (2) JWT Credential Providers to an Access Policy, you may then map these Credential Providers to your Access Policy. To map Credential Providers to an Access Policy, follow the steps described below.
1. On the Access Policy page, in the Credential Providers column, you should see a box with the total number of Credential Providers that have been added.

2. Click on the arrow button to open the Credential Provider Mappings dialog window. In the Credential Provider Mappings dialog window, you see the Credential Providers currently added to the Access Policy with information about each Credential Provider.

3. Notice that there is a red ”!” icon. This denotes that the Credential Providers currently have no mappings. Hover over the Credential Provider and you see a down arrow appear. Click on the down arrow to open the Credential Provider menu.
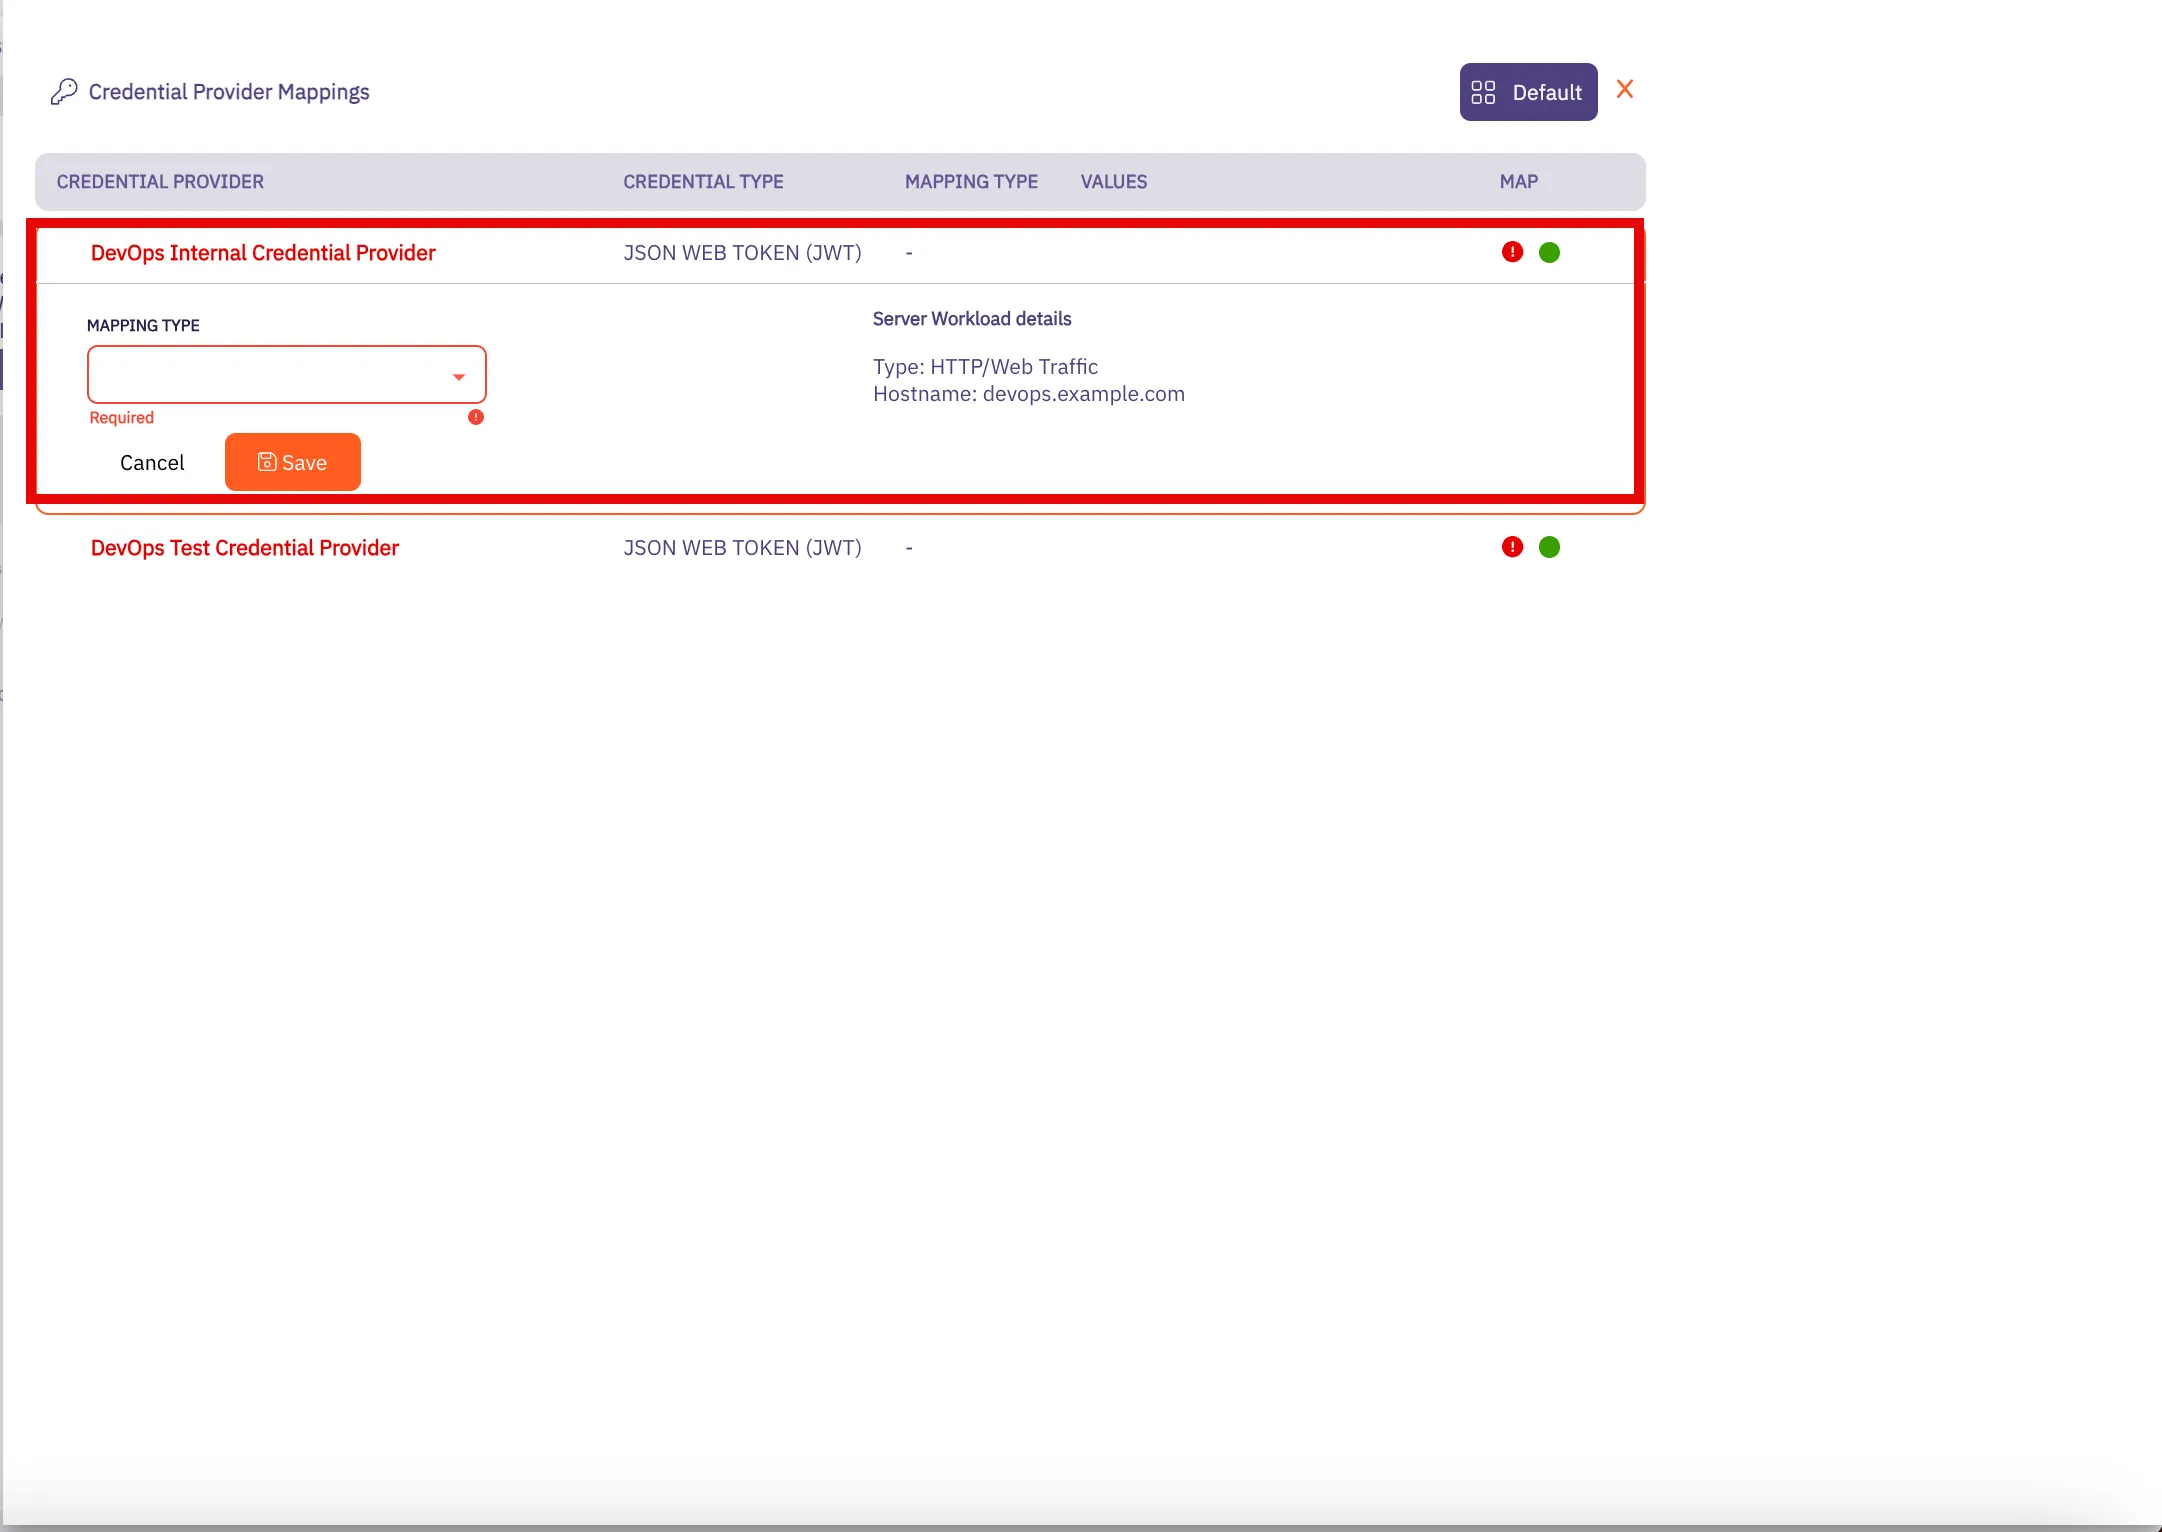
4. In this menu, add the HTTP Header or HTTP Body values you would like used for the Credential Provider mapping. This means that if these HTTP values are included in the connection request from the Client Workload, this Credential Provider will be used for credential injection. Repeat this process as many times as needed for all of your policy-associated Credential Providers.
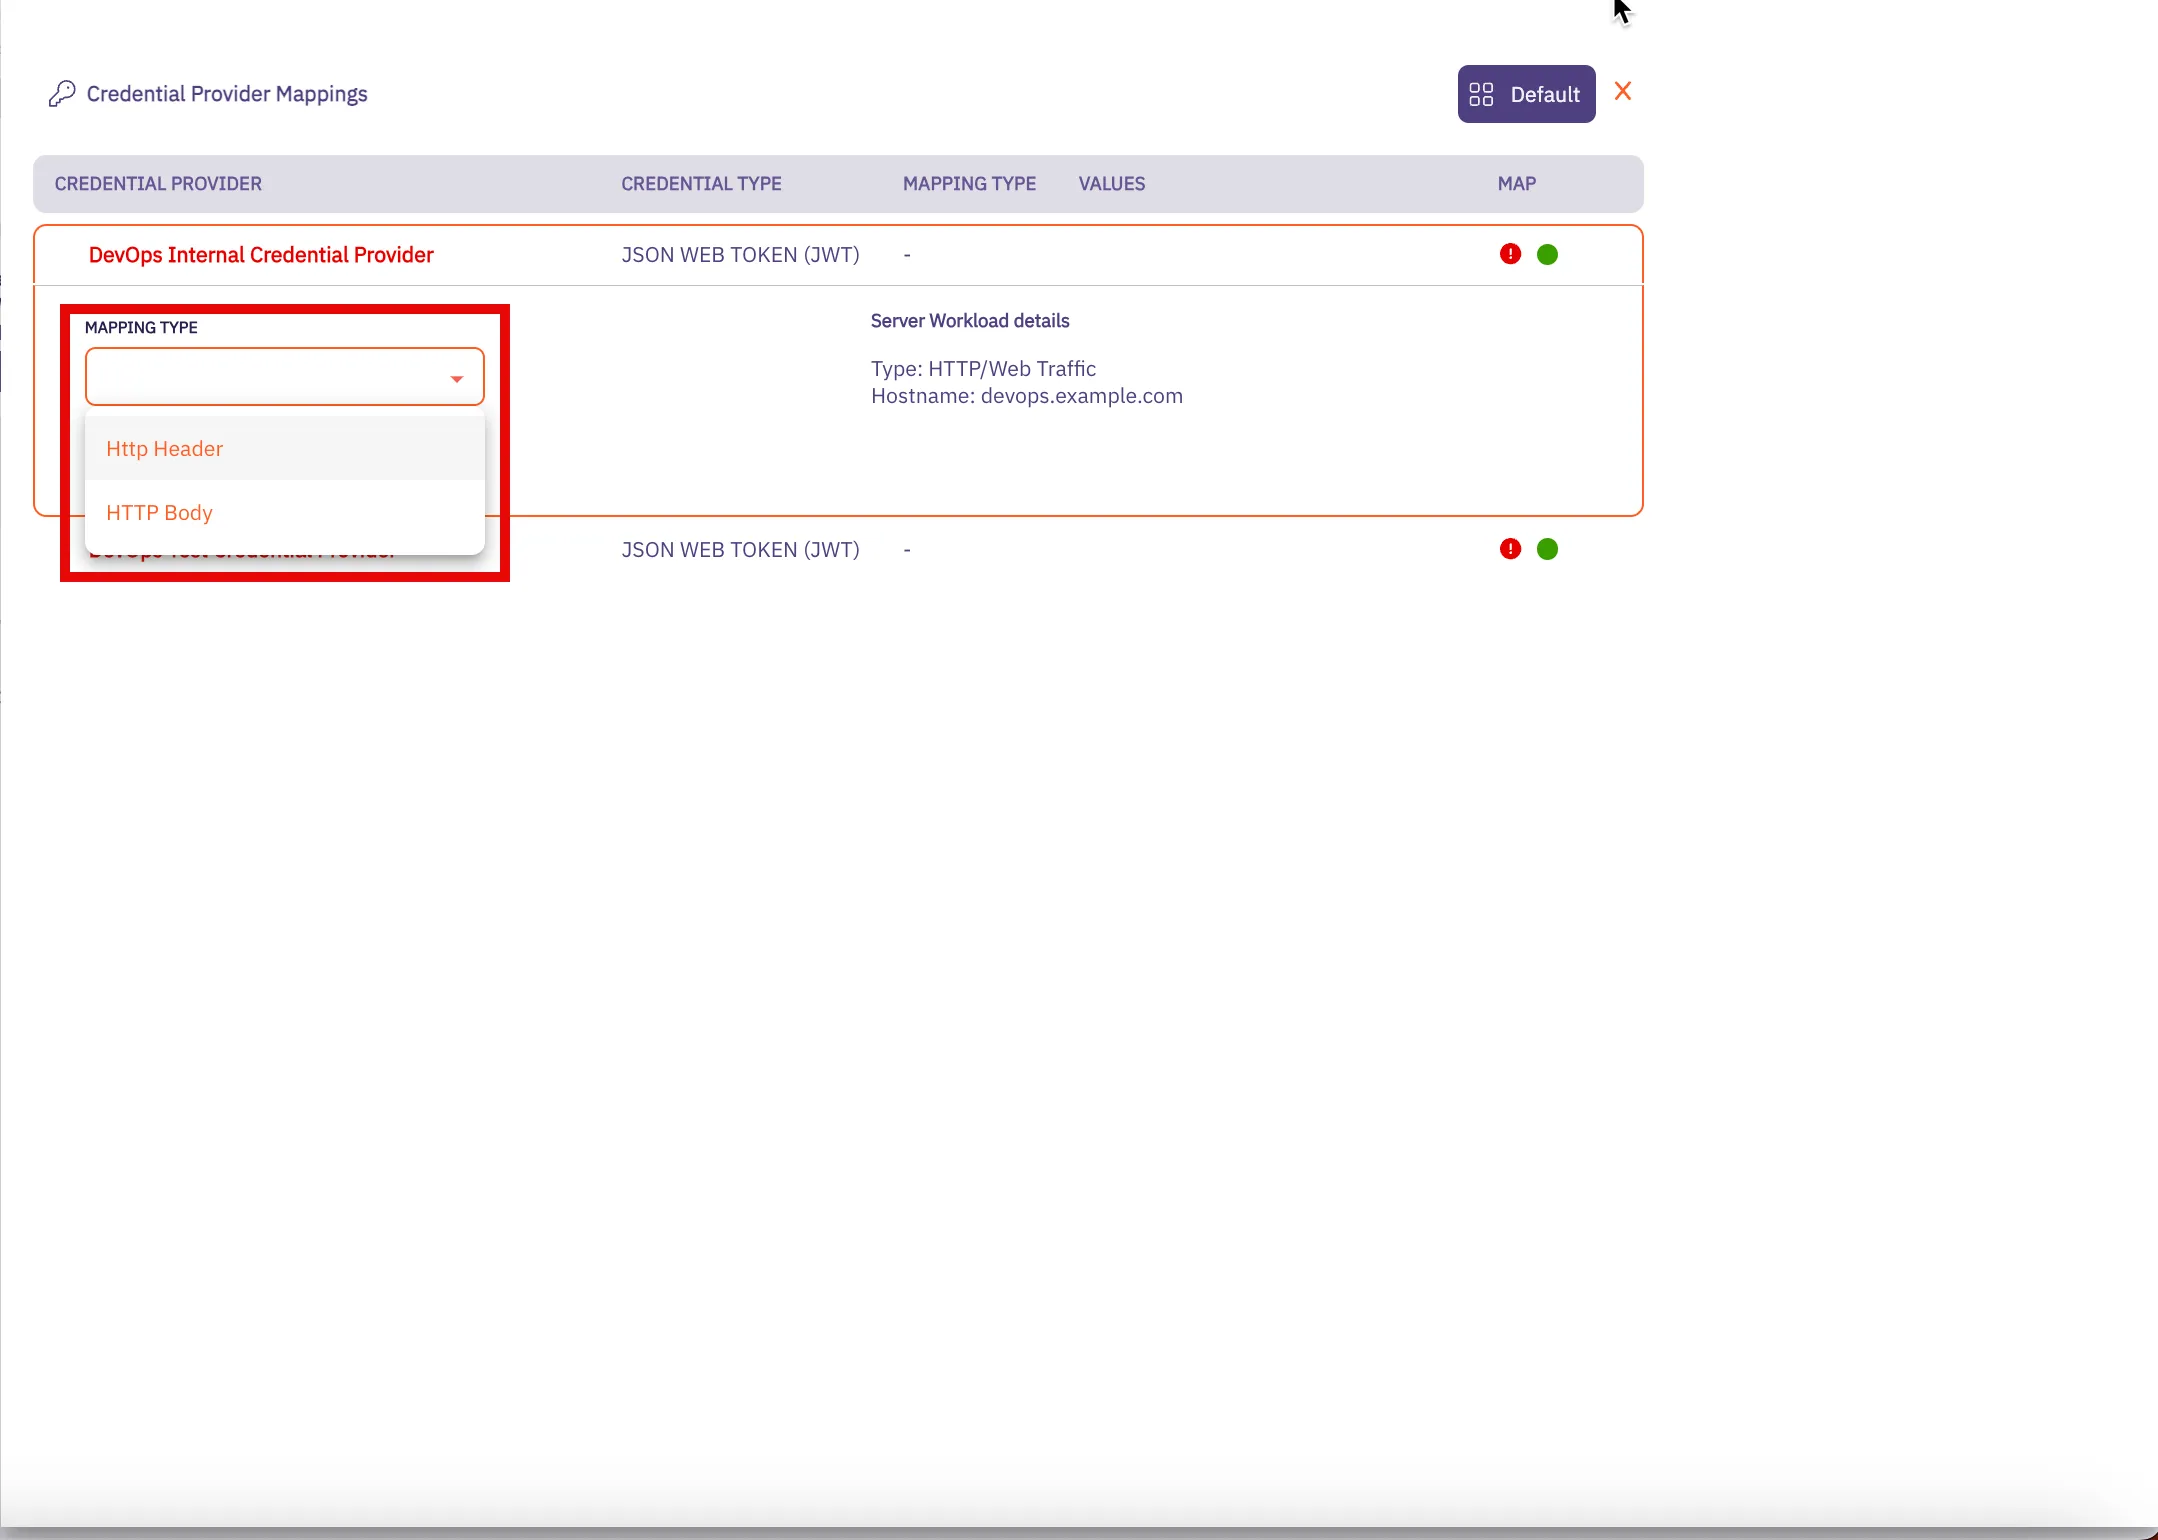
* If you would like to use **HTTP Header** values for your credential mapping, you will see the following dropdown menu:

* If you would like to use **HTTP Body** values for your credential mapping, you will see the following dropdown menu.
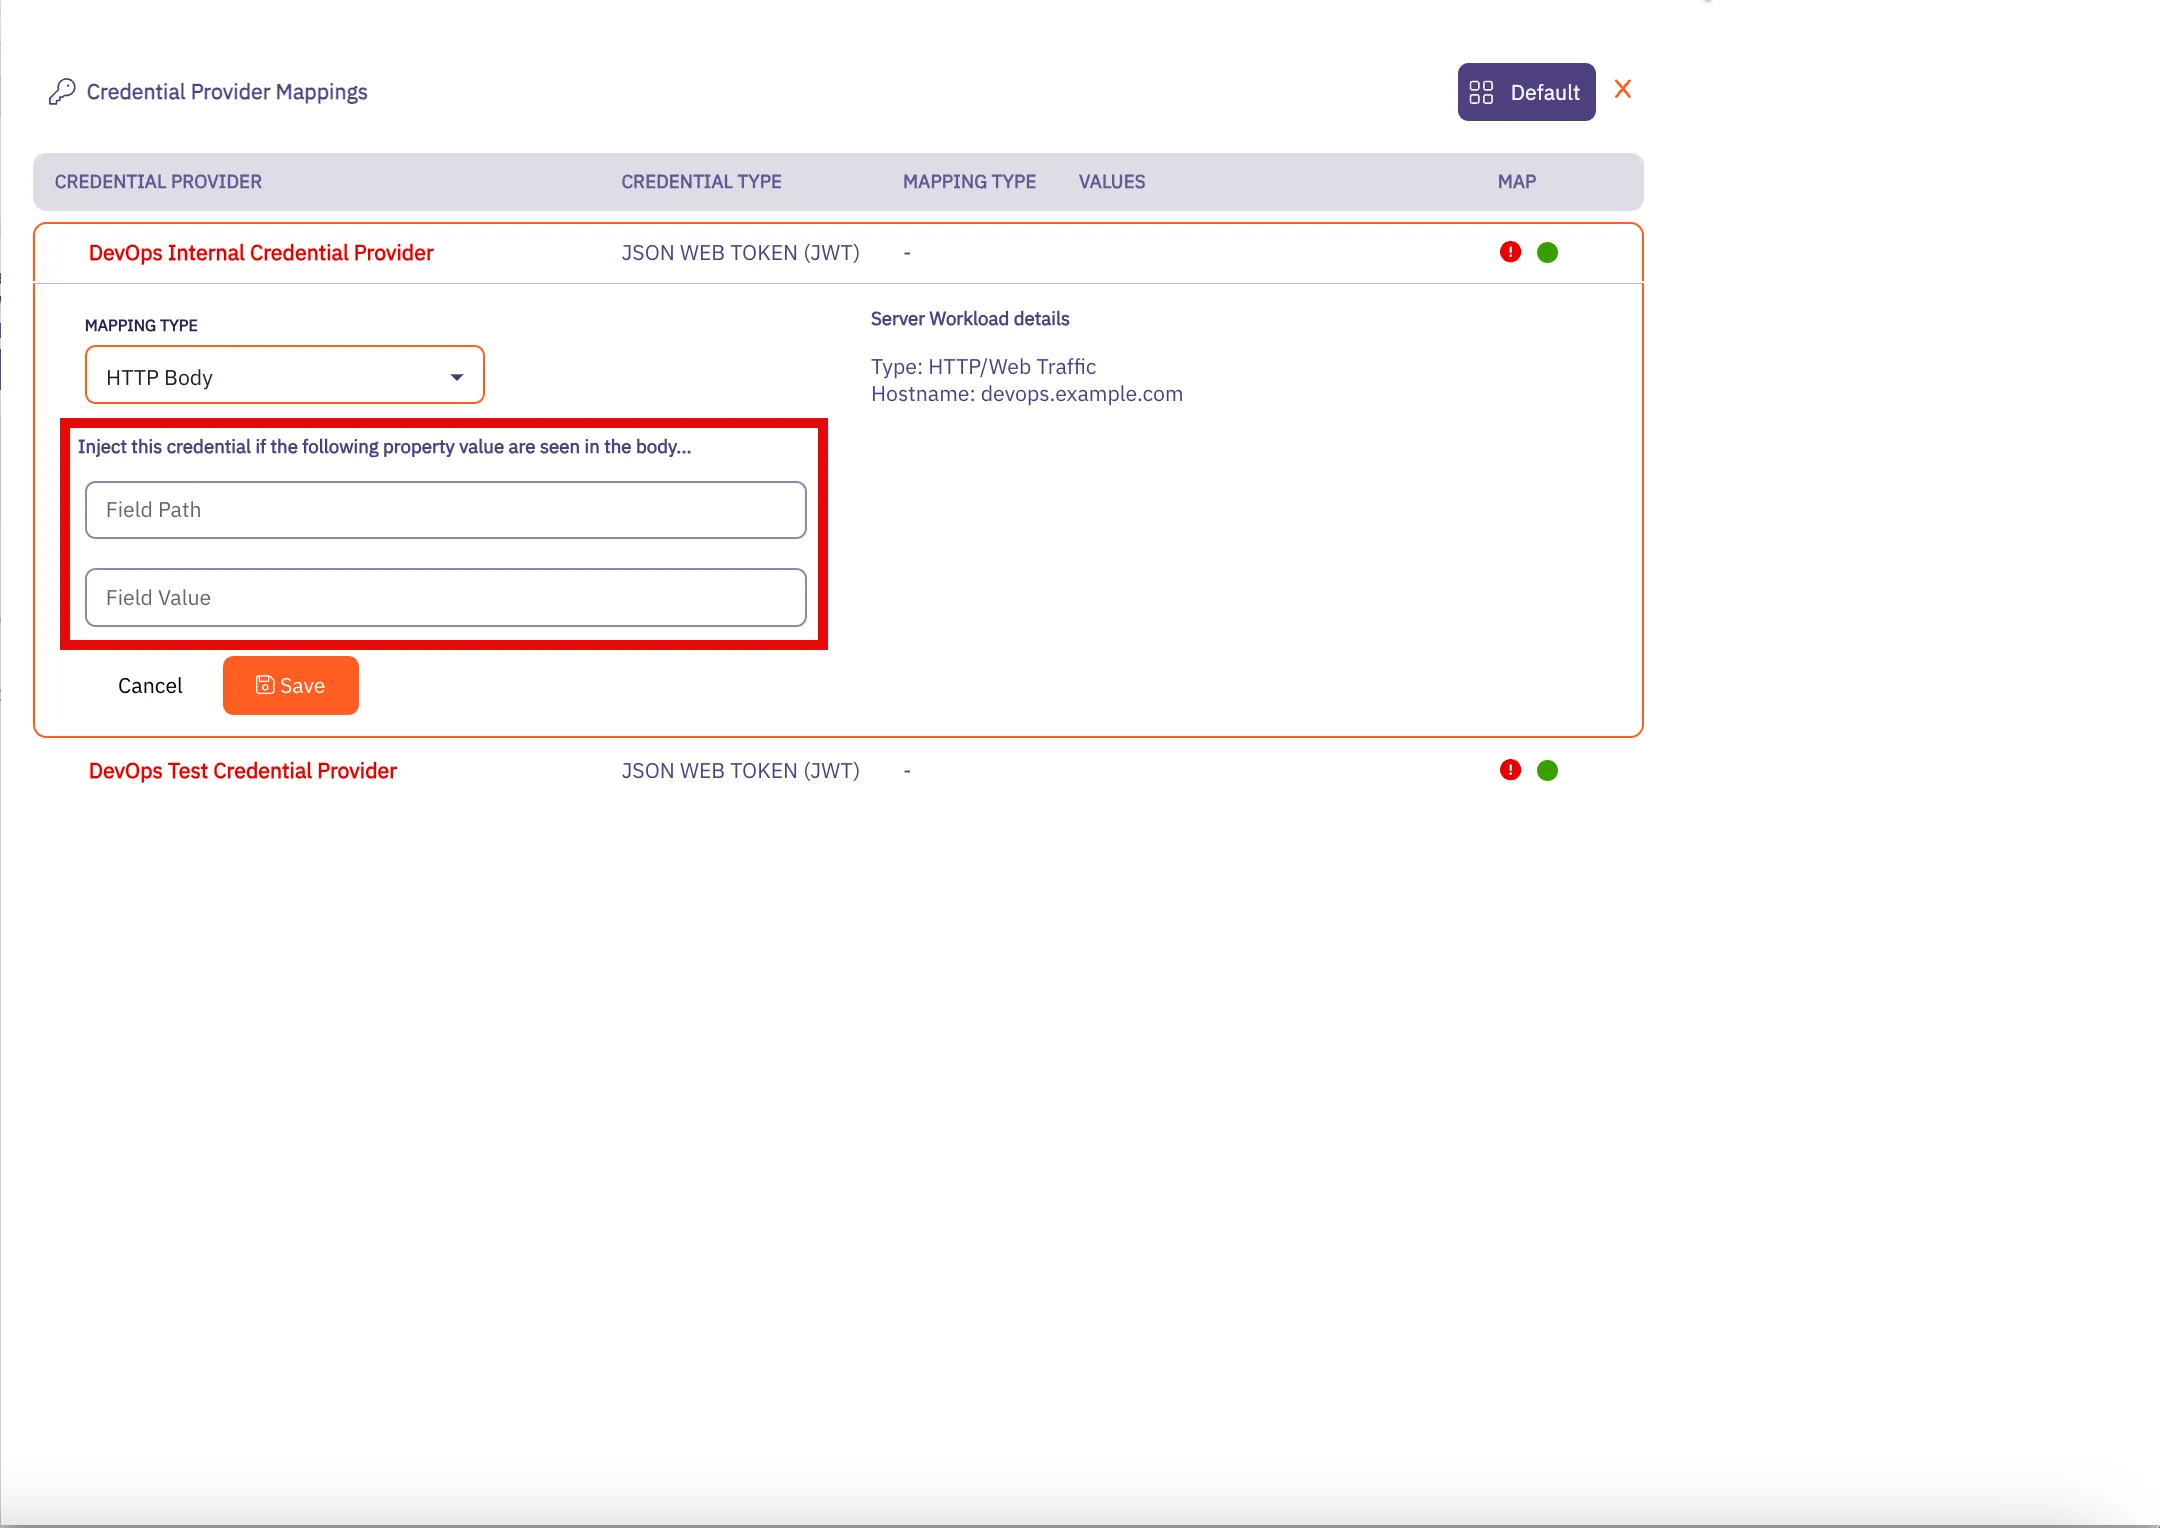
5. Click **Save** when you are finished adding your mapping values. You are directed back to the Credential Provider Mapping page where you see the values you entered for the HTTP Header and HTTP Body fields.
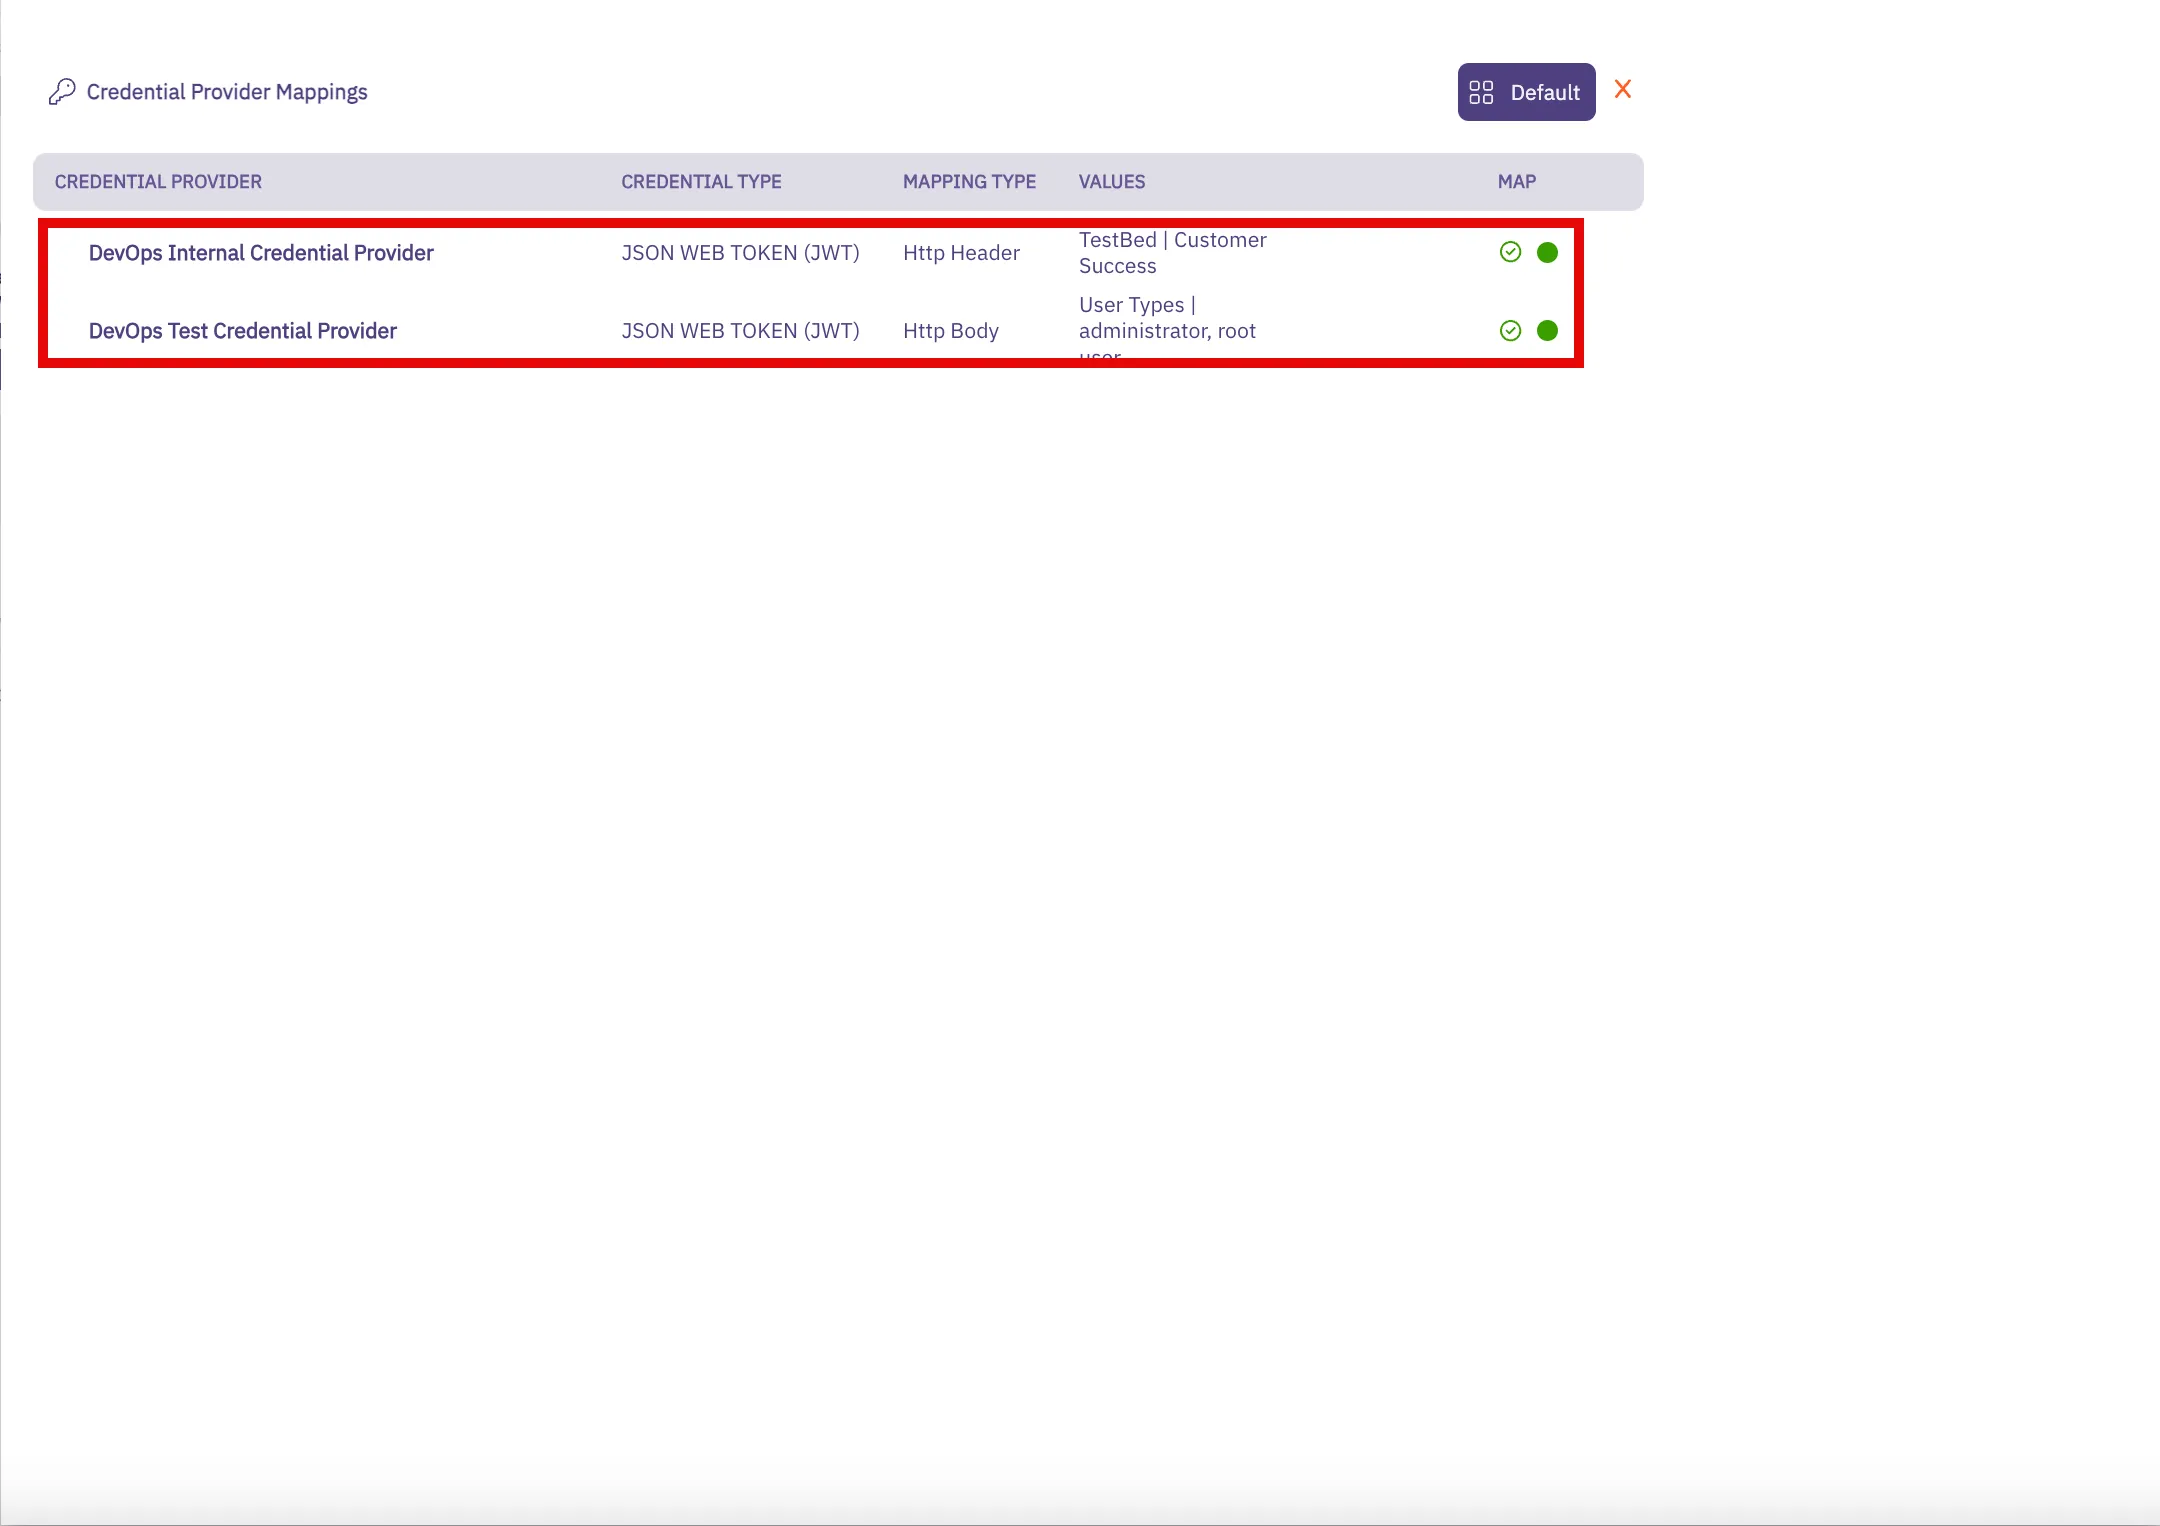
Note
When you add HTTP mapping values for a Credential Provider and click **Save**, the red ”!” icon turns to a green checkbox. You also see theses usernames displayed in the Values column.
6. When you return to the Access Policies page, notice that you now see a green “All Mapped” notation in the box for the Credential Providers you just mapped.
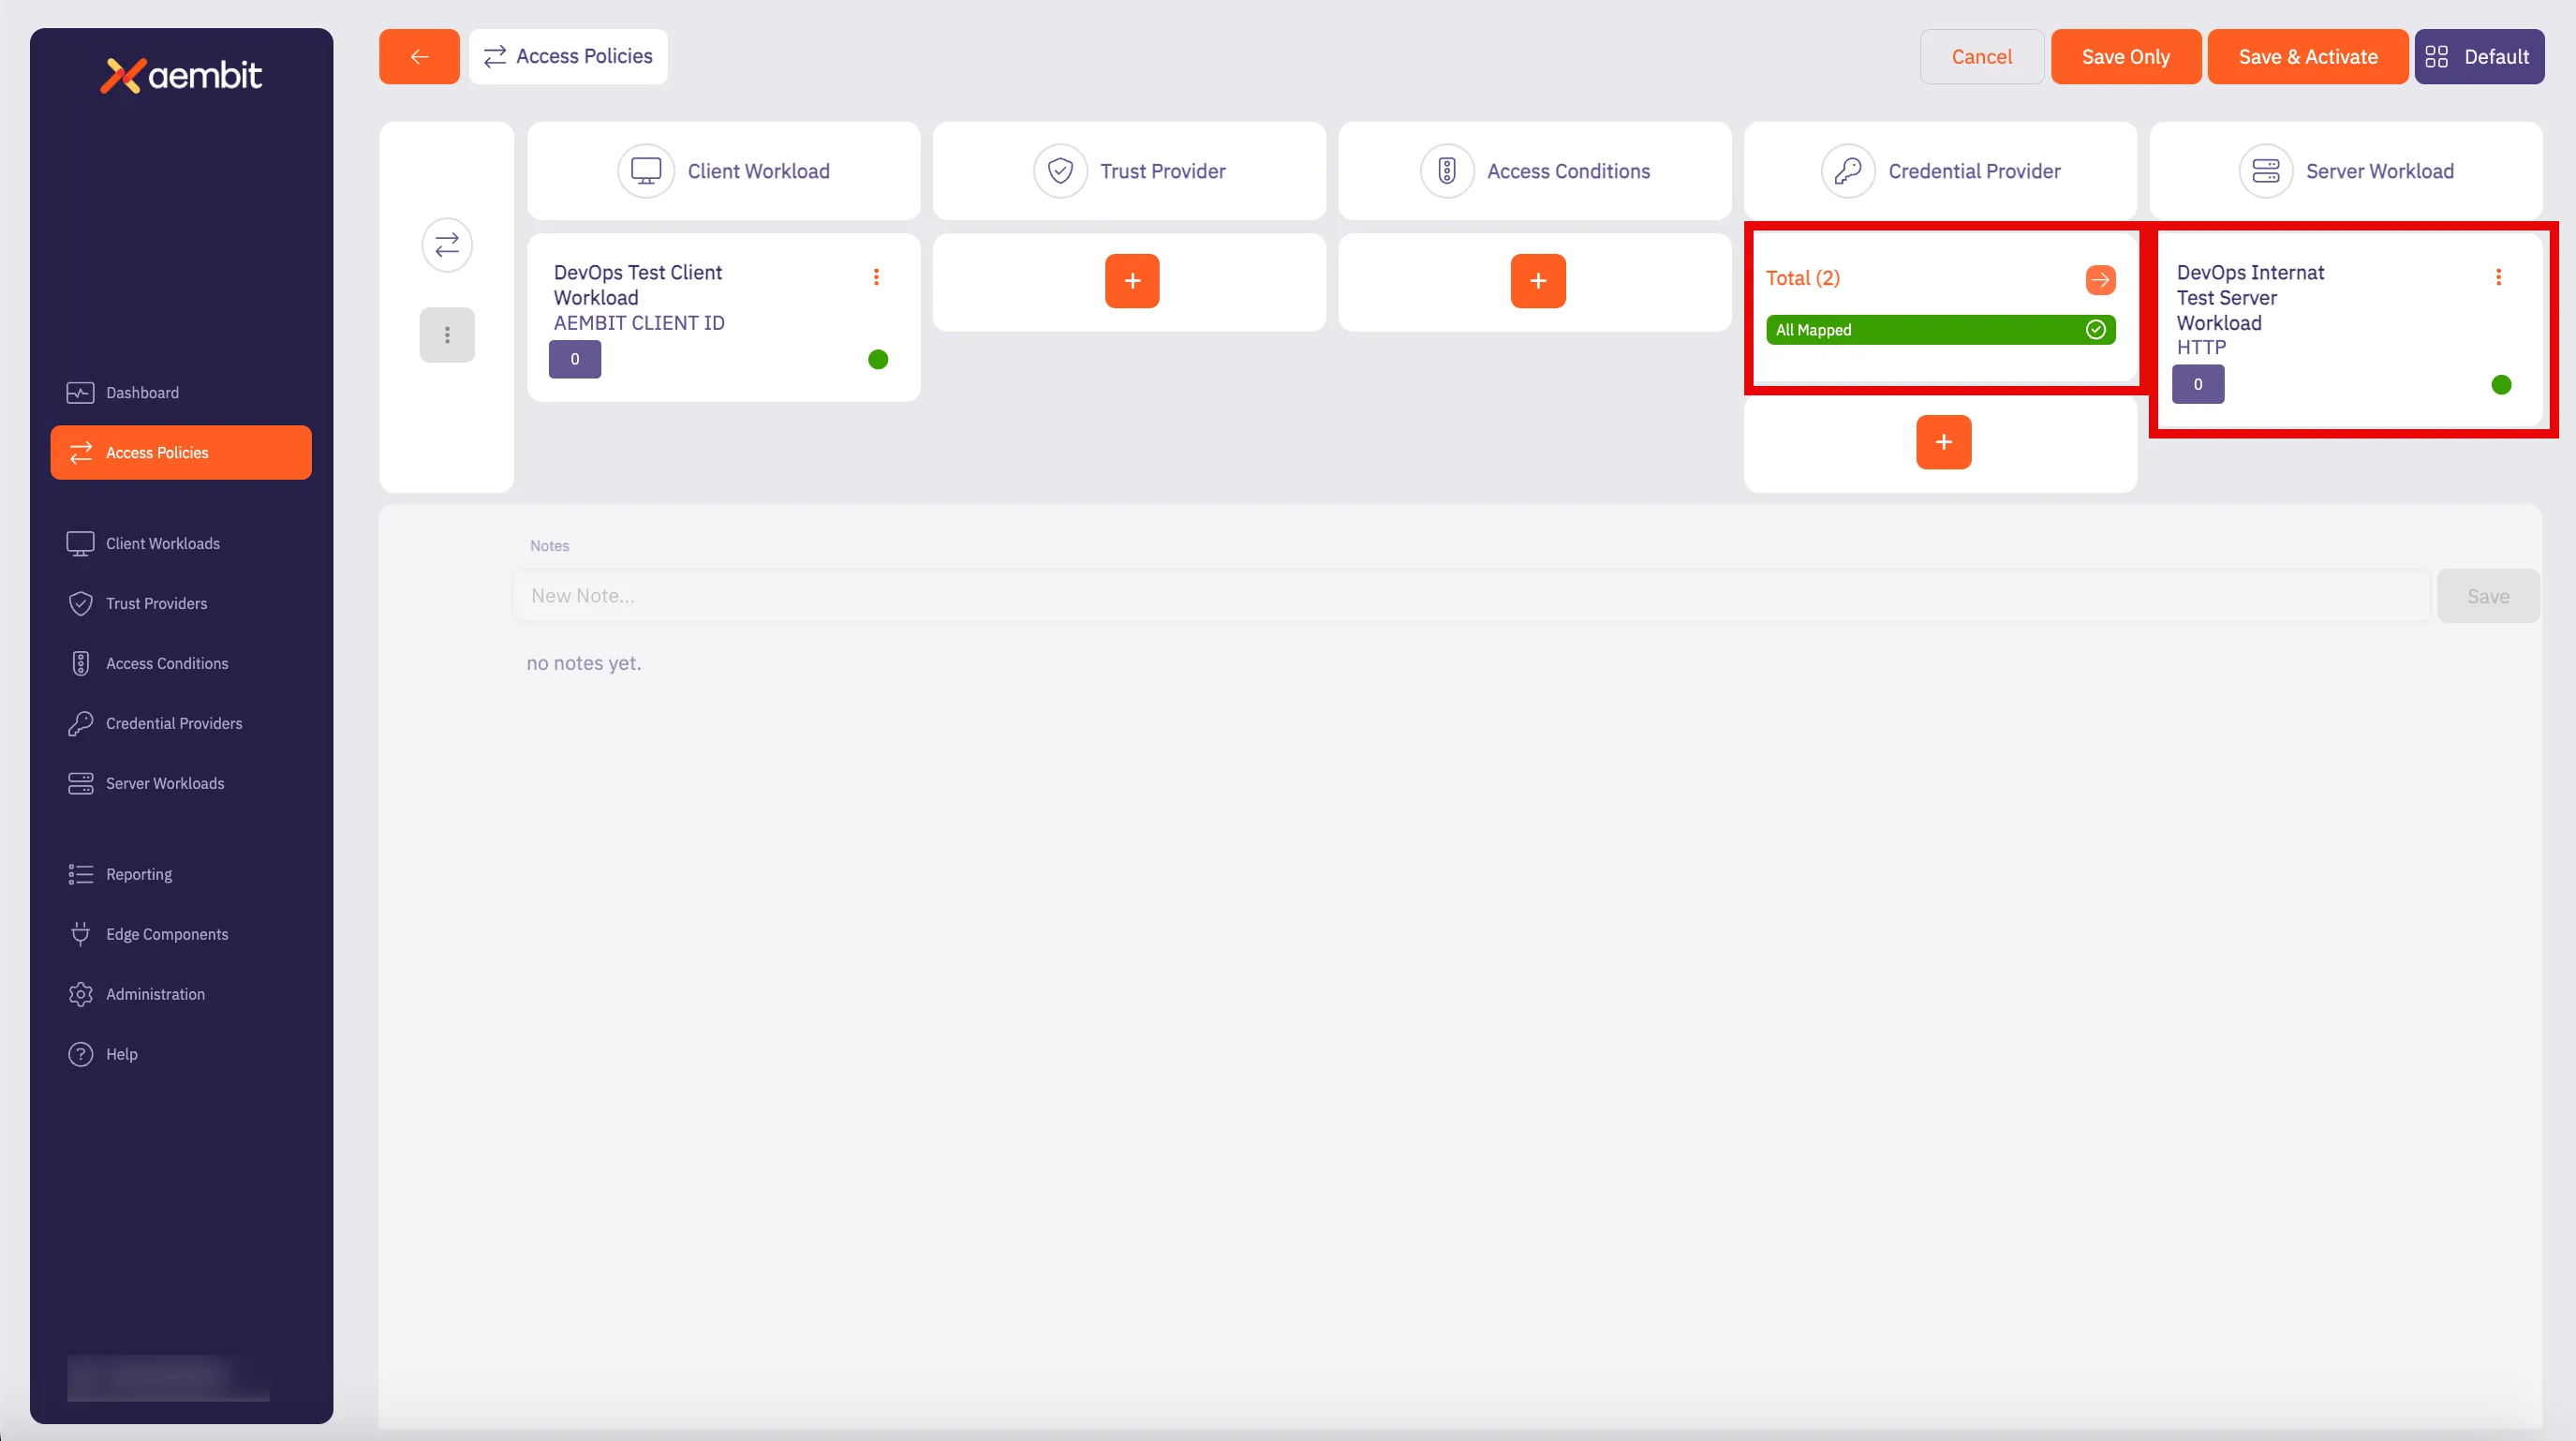
7. Click **Save** to save your selections. If you would like to save, and then also activate the credential mapping, click **Save & Activate**.
Now, when you return to the Access Policy page, if you hover over the Access Policy, you see the Credential Providers that are mapped to that Access Policy.
# Configure multiple Credential Providers with Aembit's Terraform Provider
> How to configure multiple Credential Providers to map to an Aembit Terraform Provider
Aembit supports users who would like to use the Aembit Terraform Provider to manage their Aembit resources, while also supporting single and multiple Credential Providers per Access Policy. The Aembit Terraform Provider enables you to perform Create, Read, Update and Delete (CRUD) operations on these Aembit resources using Terraform directly, or via a CI/CD workflow.
Note
These instructions assume you already have configured the Aembit Terraform Provider. If you have not already performed this configuration, please refer to the [Configuration with Terraform](/user-guide/access-policies/advanced-options/terraform/terraform-configuration) page to configure the Aembit Terraform Provider before continuing on this page.
## Configure an Access Policy with multiple Credential providers
[Section titled “Configure an Access Policy with multiple Credential providers”](#configure-an-access-policy-with-multiple-credential-providers)
To configure your Aembit Access Policies with multiple Credential Providers with the `AccountName` mapping type:
1. Go to your Terraform configuration file(s).
2. In your configuration file, locate the `resource "aembit_access_policy"` section(s). They should look like the example shown below.
```hcl
resource "aembit_access_policy" "test_policy" {
name = "TF First Policy"
is_active = true
client_workload = aembit_client_workload.first_client.id
trust_providers = [
aembit_trust_provider.azure1.id,
aembit_trust_provider.azure2.id
]
access_conditions = [
aembit_access_condition.wiz.id
]
credential_provider = aembit_credential_provider.<*resource_name*>.id,
server_workload = aembit_server_workload.first_server.id
}
```
In the preceding example, notice in the highlighted line for `credential_provider`. Because there is only one Credential Provider configured, this signifies that only one Credential Provider is currently configured for the Access Policy.
3. To add additional Credential Providers to your configuration, go to the `aembit_access_policy` resource in your Terraform configuration file that you want to update and locate the `credential_provider` line.
4. Change the `credential_provider` property to `credential_providers` so you may add multiple Credential Providers.
5. Add your Credential Providers to this section using the following format:
```hcl
credential_providers = [{
credential_provider_id = aembit_credential_provider.<*resource1_name*>.id,
mapping_type = "AccountName",
account_name = "account_name_1"
}, {
credential_provider_id = aembit_credential_provider.<*resource2_name*>.id,
mapping_type = "AccountName",
account_name = "account_name_2"
}, {
credential_provider_id = aembit_credential_provider.<*resource3_name*>.id,
mapping_type = "AccountName",
account_name = "account_name_3"
}]
}
```
Where:
* `credential_provider_id` - The Credential Provider ID.
* `mapping_type` - The Credential Provider mapping type.
* `account_name` - The account name to trigger on for using this Credential Provider if the `mapping_type` value is `AccountName`.
6. When you have finished adding all of your Credential Providers to the Aembit Terraform Provider configuration file, your `aembit_access_policy` resource section should look similar to the example shown below.
```hcl
resource "aembit_access_policy" "multi_cp_second_policy" {
is_active = true
name = "TF Multi CP Second Policy"
client_workload = aembit_client_workload.second_client.id
credential_providers = [{
credential_provider_id = aembit_credential_provider.<*resource1_name*>.id,
mapping_type = "AccountName",
account_name = "account_name_1"
}, {
credential_provider_id = aembit_credential_provider..id,
mapping_type = "AccountName",
account_name = "account_name_2"
}, {
credential_provider_id = aembit_credential_provider..id,
mapping_type = "AccountName",
account_name = "account_name_3"
}]
server_workload = aembit_server_workload.first_server.id
}
```
### Multiple Credential Provider examples
[Section titled “Multiple Credential Provider examples”](#multiple-credential-provider-examples)
The following examples use `HttpHeader` and `HttpBody` Mapping Types to show multiple Credential Providers:
#### HttpHeader Example
[Section titled “HttpHeader Example”](#httpheader-example)
```hcl
resource "aembit_access_policy" "multi_cp_httpheader" {
is_active = true
name = "TF Multi CP HTTP Header"
client_workload = aembit_client_workload.first_client.id
credential_providers = [{
credential_provider_id = aembit_credential_provider.<*resource1_name*>.id,
mapping_type = "HttpHeader",
header_name = "X-Sample-Header-name-1",
header_value = "X-Sample-Header-value-1"
}, {
credential_provider_id = aembit_credential_provider.<*resource2_name*>.id,
mapping_type = "HttpHeader",
header_name = "X-Sample-Header-name-2",
header_value = "X-Sample-Header-value-2"
}]
server_workload = aembit_server_workload.first_server.id
}
```
Where:
* `credential_provider_id` - The Credential Provider ID.
* `mapping_type` - The Credential Provider mapping type.
* `header_name` - The HTTP Header name for which a matching value will trigger this Credential Provider to be used.
* `header_value` - The HTTP Header value for which a matching value will trigger this Credential Provider to be used.
#### HttpBody Example
[Section titled “HttpBody Example”](#httpbody-example)
```hcl
resource "aembit_access_policy" "multi_cp_httpbody" {
is_active = true
name = "TF Multi CP HTTP Body"
client_workload = aembit_client_workload.first_client.id
credential_providers = [{
credential_provider_id = aembit_credential_provider.<*resource1_name*>.id,
mapping_type = "HttpBody",
httpbody_field_path = "x_sample_httpbody_field_path_1",
httpbody_field_value = "x_sample_httpbody_field_value_1"
}, {
credential_provider_id = aembit_credential_provider.<*resource2_name*>.id,
mapping_type = "HttpBody",
httpbody_field_path = "x_sample_httpbody_field_path_2",
httpbody_field_value = "x_sample_httpbody_field_value_2"
}]
server_workload = aembit_server_workload.first_server.id
}
```
Where:
* `credential_provider_id` - The Credential Provider ID.
* `mapping_type` - The Credential Provider mapping type.
* `httpbody_field_path` - The JSON path to a value that triggers this Credential Provider to be used. Note that the `HttpBody` mapping type requires JSON HTTP body content, and this parameter must be specified in JSON path notation.
* `httpbody_field_value` - The JSON path to a value which triggers this Credential Provider to be used.
Note
In these two examples, you can see that different fields need to be configured, based on the `mapping_type` specified in the configuration file.
# Configure an Aembit Access Token Credential Provider
> How to create and use an Aembit Access Token Credential Provider
The Aembit Access Token Credential Provider generates access tokens for authenticating applications and services to the Aembit API.
## Create an Aembit Access Token Credential Provider
[Section titled “Create an Aembit Access Token Credential Provider”](#create-an-aembit-access-token-credential-provider)
To configure an Aembit Access Token Credential Provider, follow the steps described below.
1. Log into your Aembit Tenant. The main Dashboard page is displayed.
2. On the Dashboard page, select the **Credential Providers** tab in the left sidebar. You are directed to the Credential Providers page where you will see a list of existing Credential Providers.
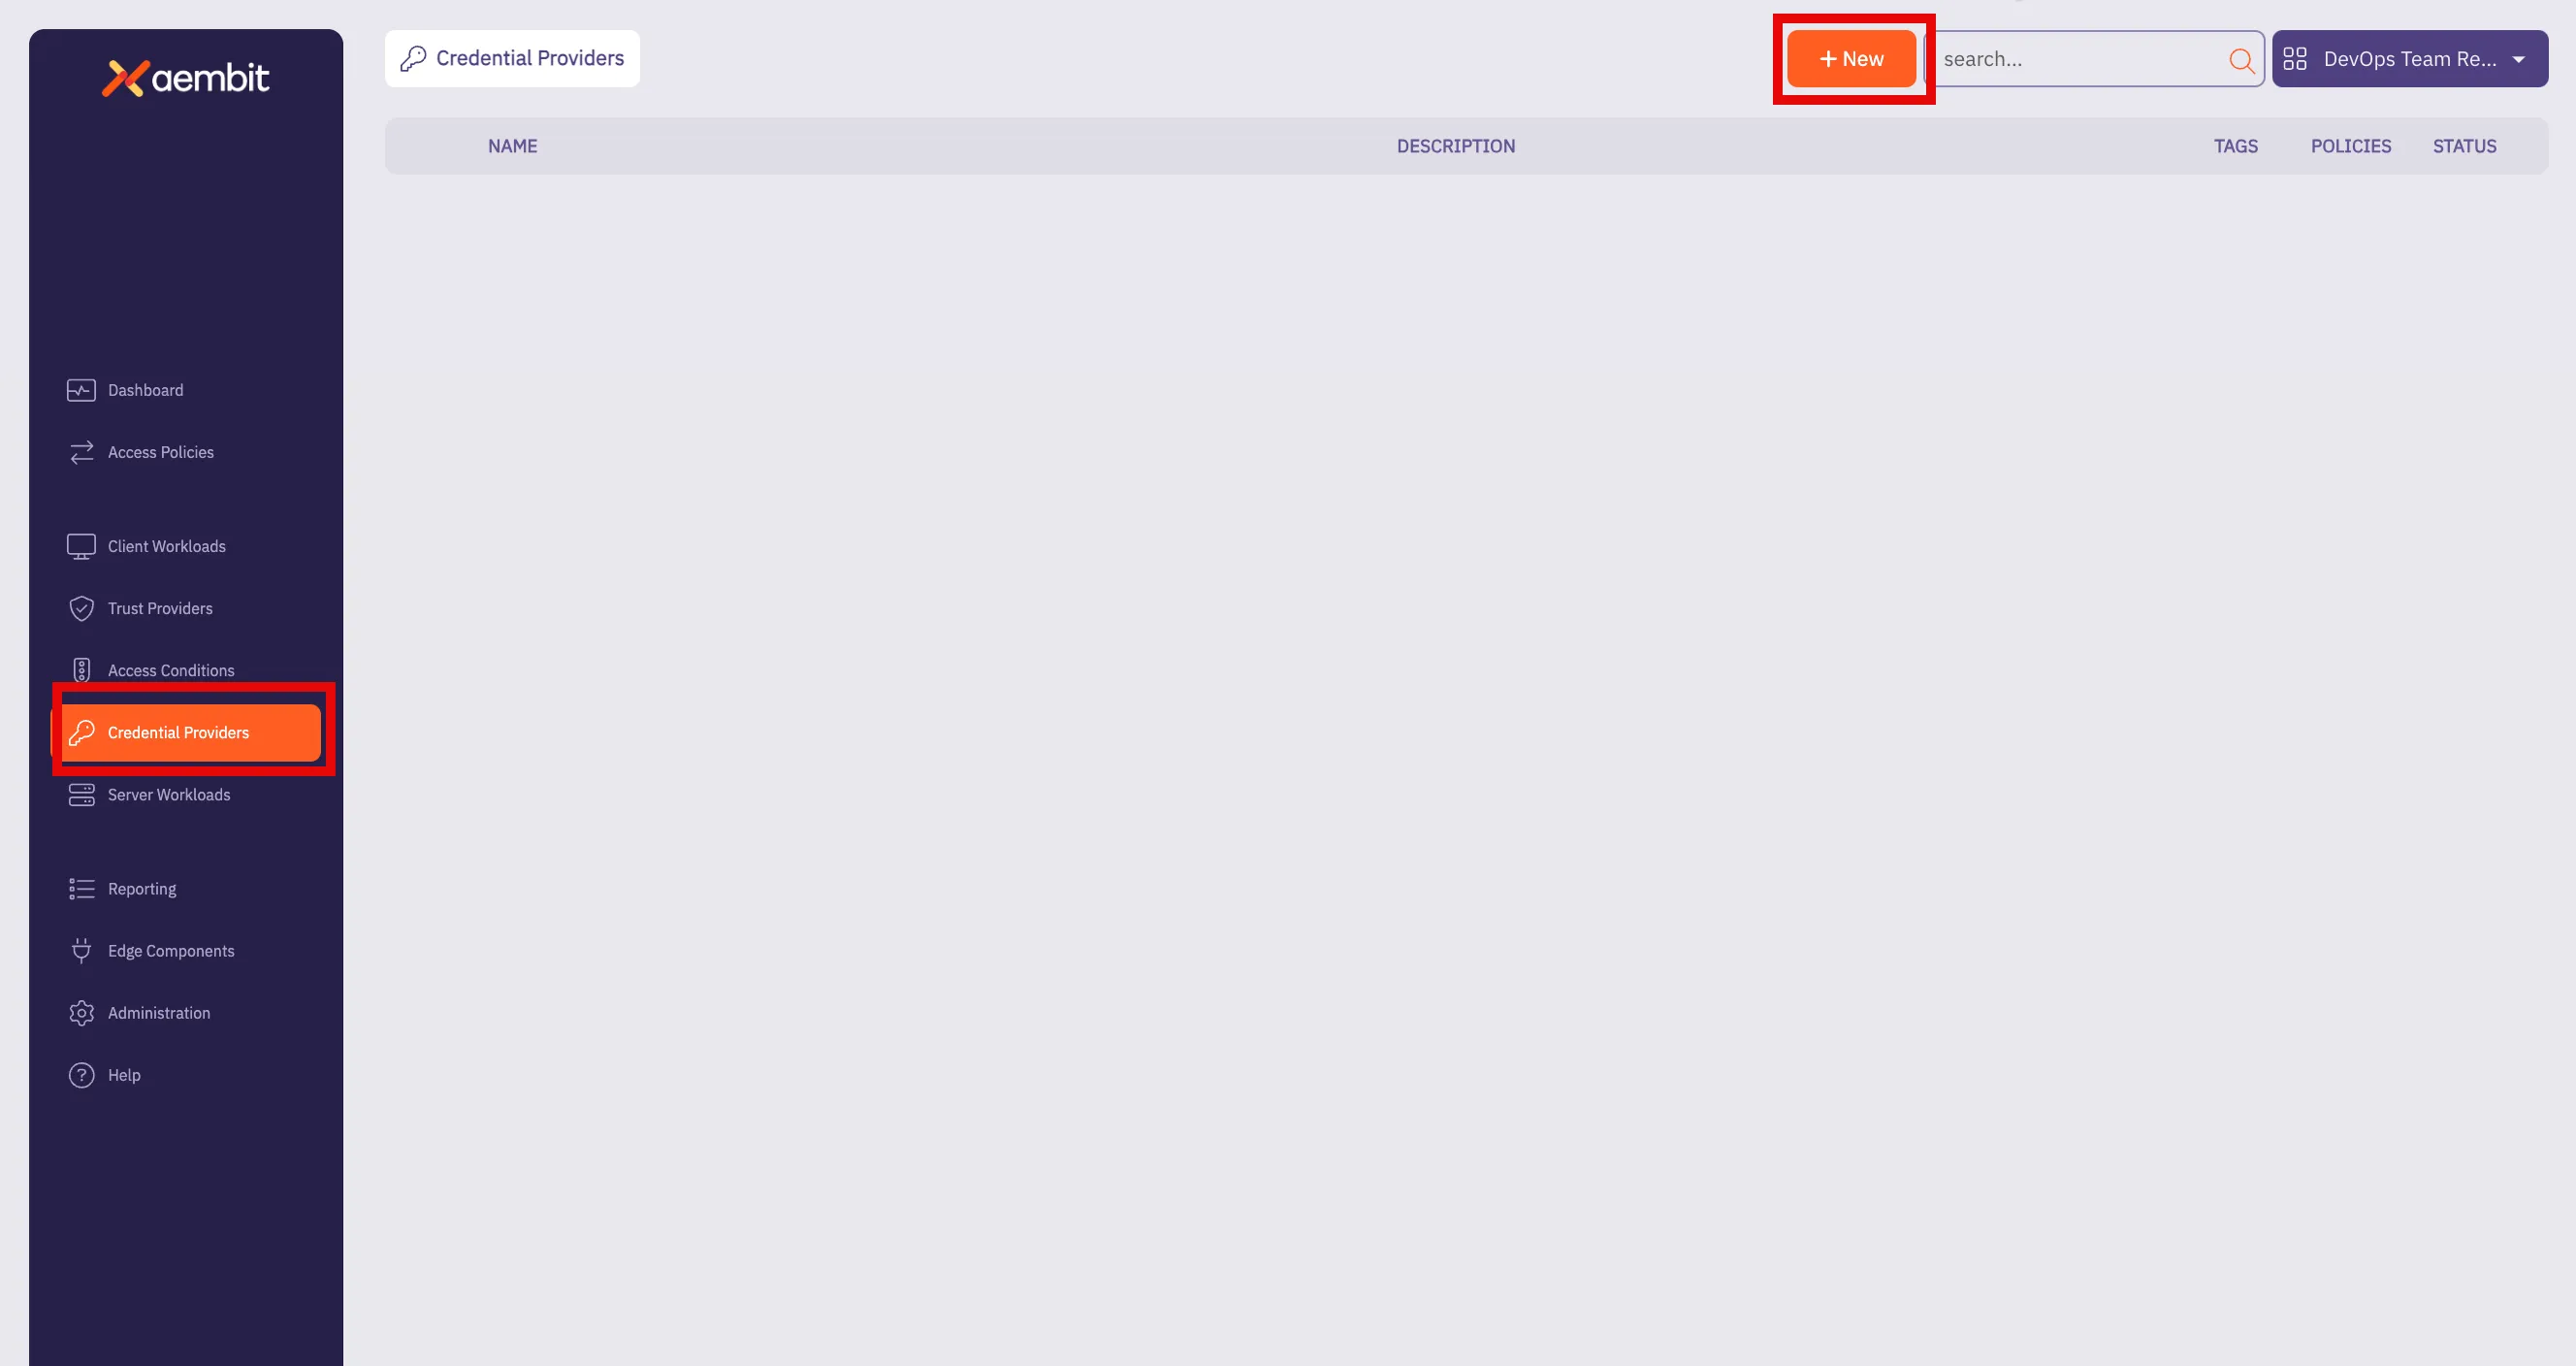
3. Click **+ New** to open the Credential Providers dialog window.
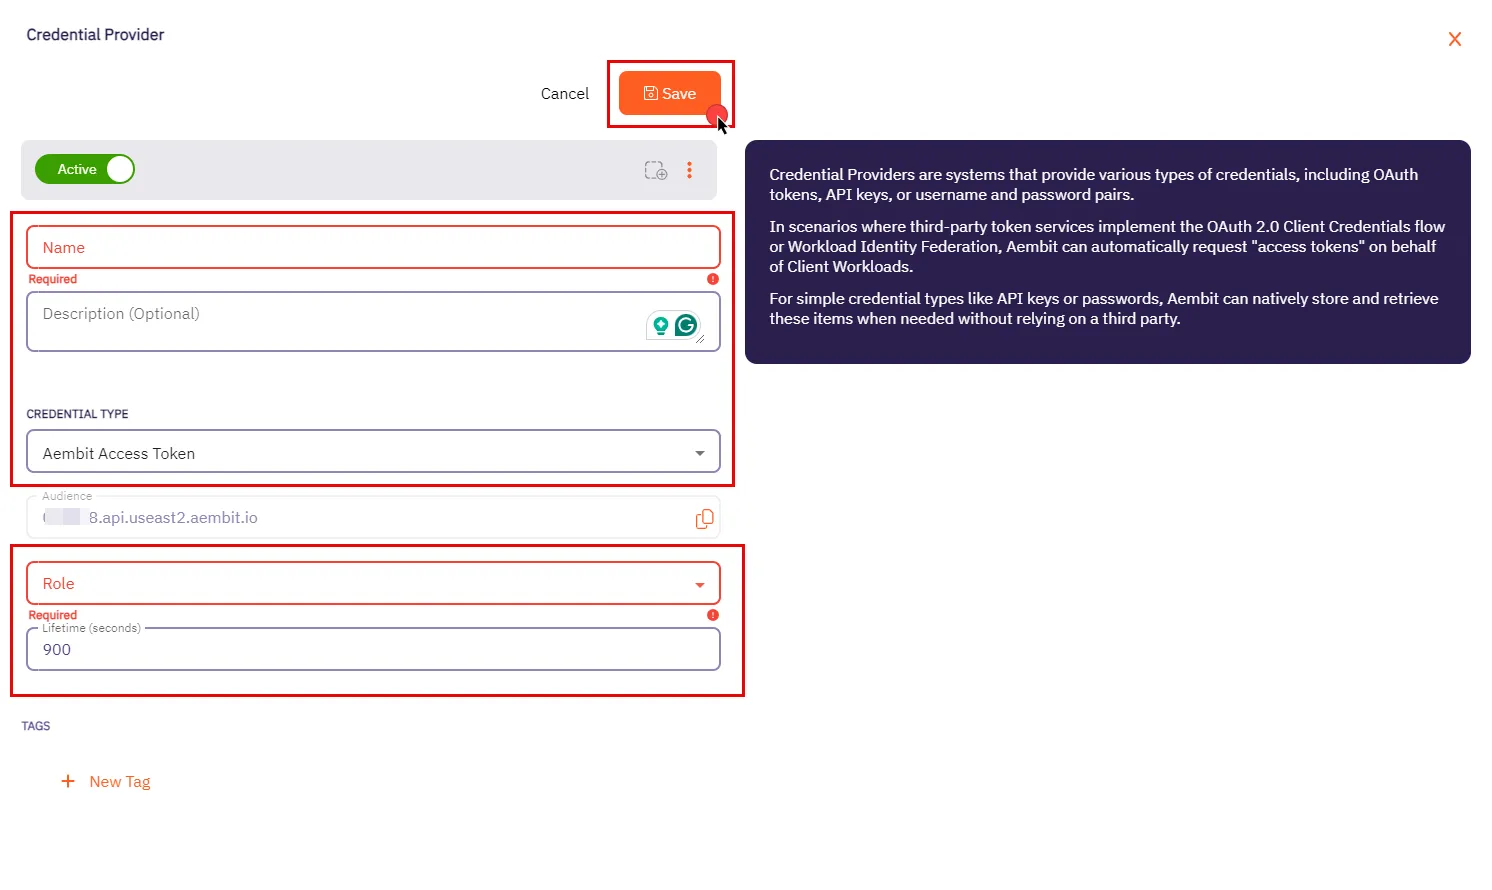
4. In the Credential Providers dialog window, enter the following information:
* **Name** - Name of the Credential Provider.
* **Description** - An optional text description of the Credential Provider.
* **Credential Type** - A dropdown menu that enables you to configure the Credential Provider type. Select **Aembit Access Token**.
* **Audience** - Auto-generated by Aembit, this is a specific endpoint used for authentication within the Aembit API.
* **Role** - A dropdown menu allowing you to select the appropriate user role for access, such as Super Admin, Auditor, or New Role. Be sure to choose a role with the appropriate permissions that align with your Client Workload’s needs. We recommend following the least privilege principle, assigning the role with the minimum permissions required to perform the task.
* **Lifetime** - The duration for which the generated access token remains valid.
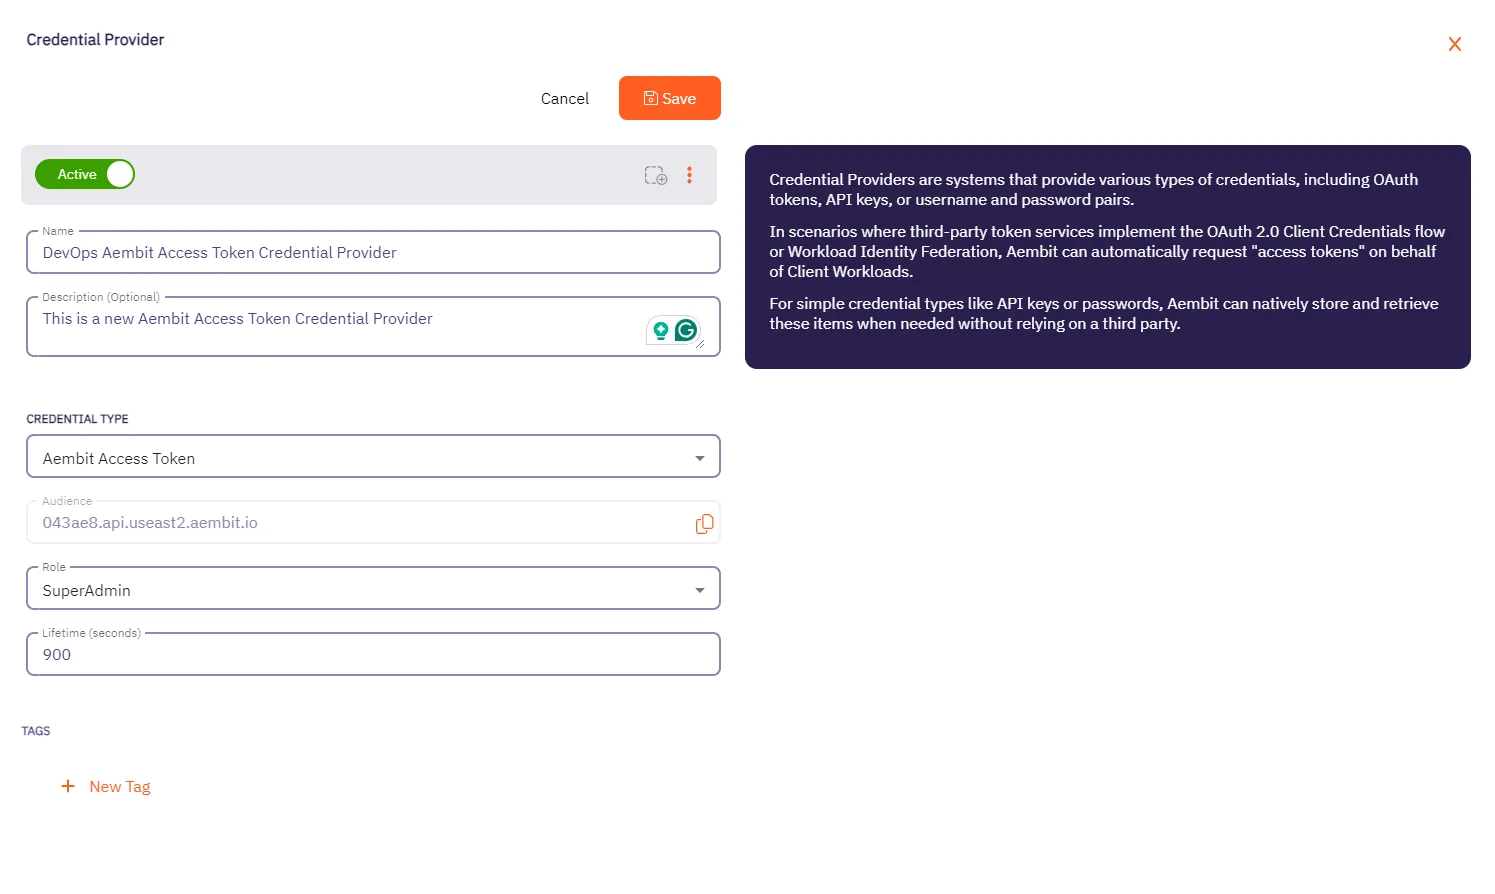
5. When you have finished entering information about your new Aembit Access Token Credential Provider, click **Save**.
6. You are directed back to the Credential Providers page where you will see your new Aembit Access Token Credential Provider.

# Configure an API Key Credential Provider
> How to create and use an API Key Credential Provider
The Application Programming Interface (API) Key credential provider is designed for scenarios where authentication is accomplished using a static API Key.
An API Key is a secret used by workloads to identify themselves when making calls to an API. This API key acts as a security mechanism for controlling access to APIs.
## Credential Provider configuration
[Section titled “Credential Provider configuration”](#credential-provider-configuration)
To configure an API Key Credential Provider, follow the steps outlined below.
1. Log into your Aembit Tenant.
2. Once you are logged into your tenant, select the **Credential Providers** tab in the left sidebar. You are directed to the Credential Providers page displaying a list of existing Credential Providers. In this example, there are no existing Credential Providers.

3. Click **+ New** to open the Credential Providers dialog window.
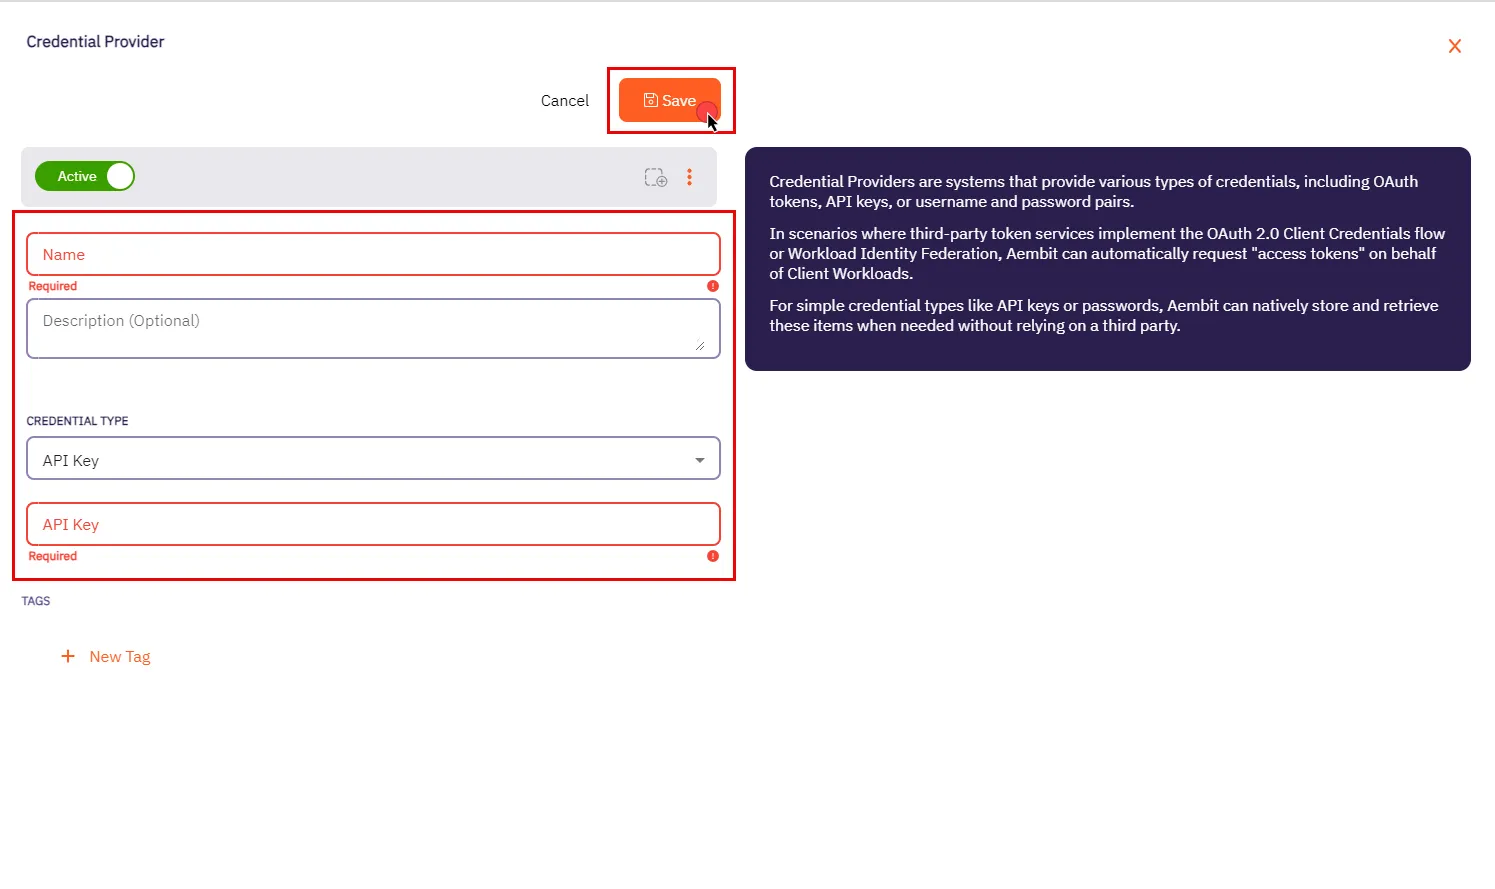
4. In the Credential Providers dialog window, enter the following information:
* **Name** - Name of the Credential Provider.
* **Description** - An optional text description of the Credential Provider.
* **Credential Type** - A dropdown menu that enables you to configure the Credential Provider type. Select **API Key**.
* **API Key** - The authentication key used to access the server workload. API keys are commonly generated by the system or service provider.
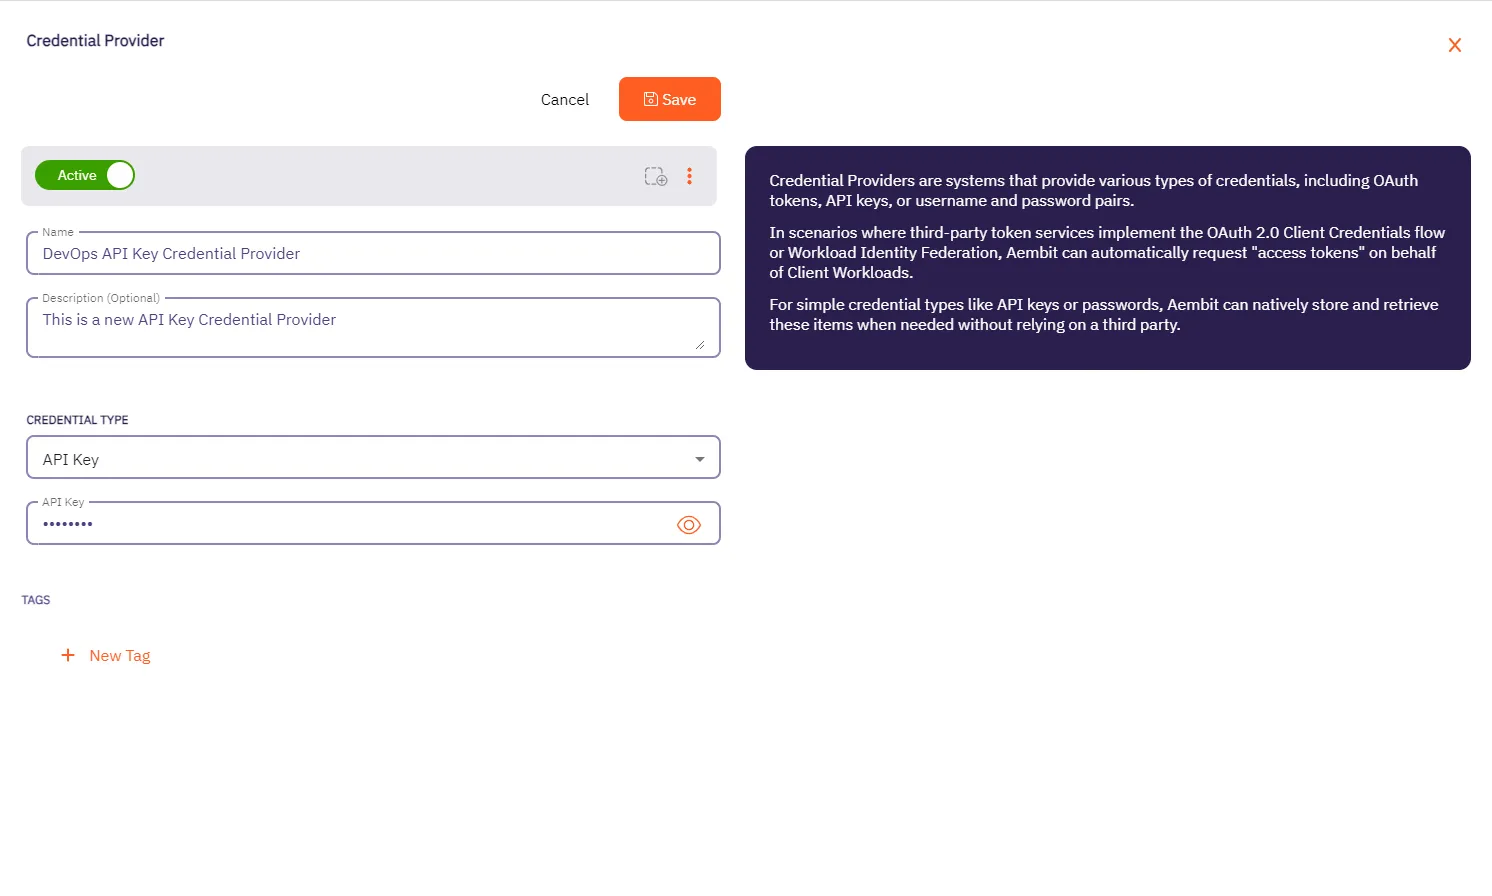
5. Click **Save** when finished. You will be directed back to the Credential Providers page, where you will see your newly created Credential Provider.

# Configure an AWS STS Federation Credential Provider
> How to add and use the AWS Security Token Service (STS) Federation Credential Provider with Server Workloads
AWS offers the AWS Security Token Service (STS), a web service designed to facilitate the request of temporary, restricted-privilege credentials for users.
Aembit’s Credential Provider for AWS STS broadly supports AWS services that use the SigV4 and SigV4a authentication protocol depending if requests are for regional services or global/multi-region services respectively. See [How Aembit uses AWS SigV4 and SigV4a](/user-guide/access-policies/credential-providers/aws-sigv4) for information about SigV4/4a and how Aembit handles SigV4/4a requests.
## Credential Provider configuration
[Section titled “Credential Provider configuration”](#credential-provider-configuration)
To configure an AWS Security Token Service Federation Credential Provider, follow these steps:
1. Log into your Aembit Tenant.
2. In the left sidebar menu, go to **Credential Providers**.
Aembit directs you to the Credential Providers page displaying a list of existing Credential Providers. In this example, there are no existing Credential Providers.

3. Click **+ New**.
This opens the Credential Providers dialog window.
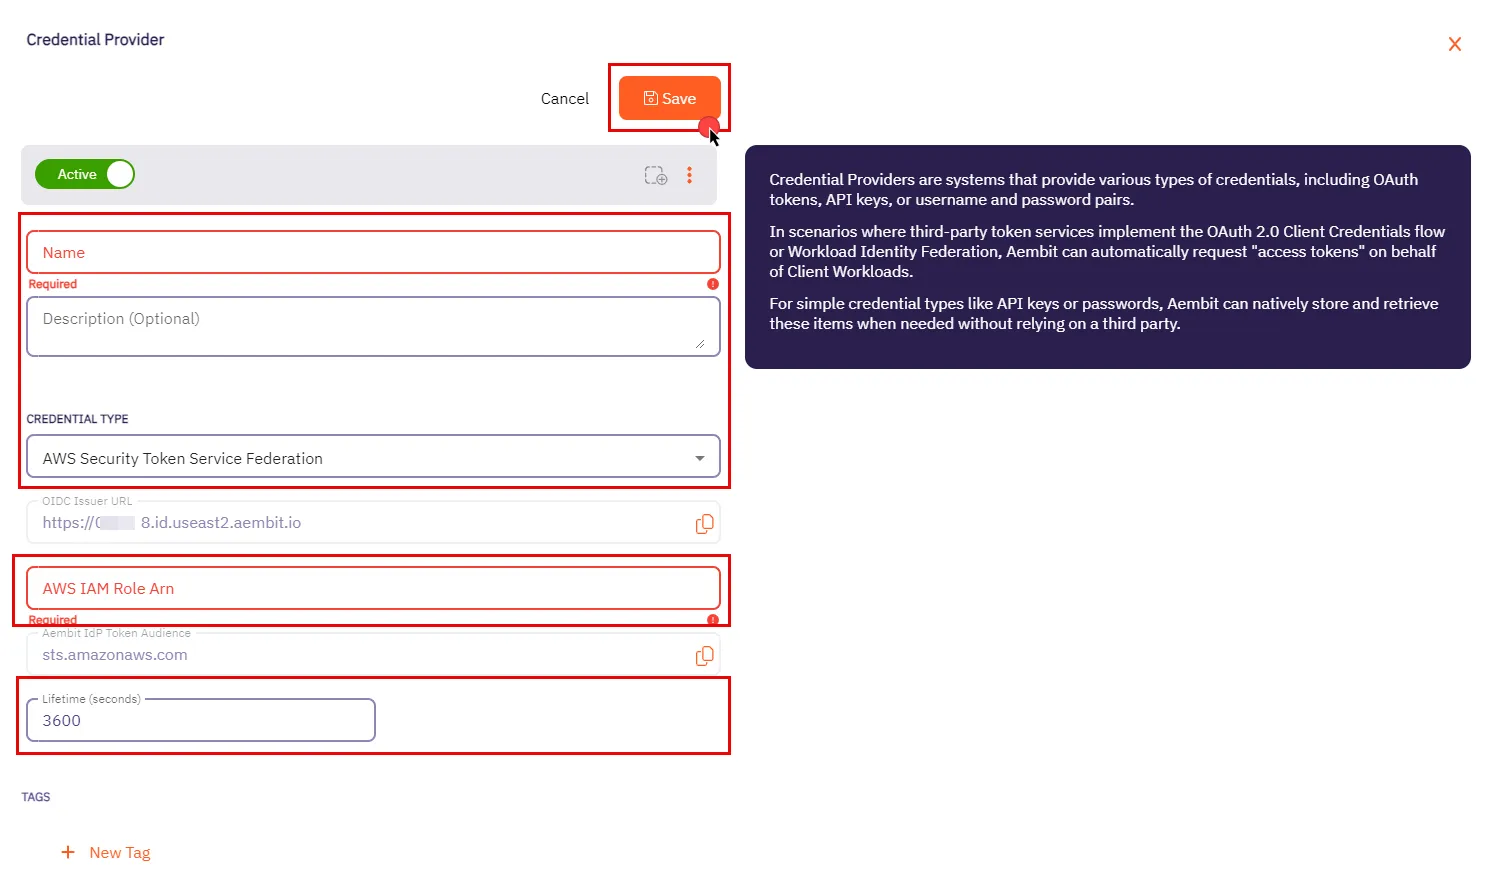
4. In the Credential Providers dialog window, enter the following information:
* **Name** - Name of the Credential Provider.
* **Description** - An optional text description of the Credential Provider.
* **Credential Type** - A dropdown menu that enables you to configure the Credential Provider type. Select **AWS Security Token Service Federation**.
* **OIDC Issuer URL** - OpenID Connect (OIDC) Issuer URL, auto-generated by Aembit, is a dedicated endpoint for OIDC authentication within AWS.
* **AWS IAM Role Arn** - Enter your AWS IAM Role in ARN format, Aembit associates this ARN with the AWS STS credentials request.
* **Aembit IdP Token Audience** - This read-only field specifies the `aud` (Audience) claim value which Aembit uses in the JWT Access Token when requesting credentials from AWS STS.
* **Lifetime (seconds)** - Specify the duration for which AWS STS credentials remain valid, ranging from 900 seconds (15 minutes) to a maximum of 129,600 seconds (36 hours).
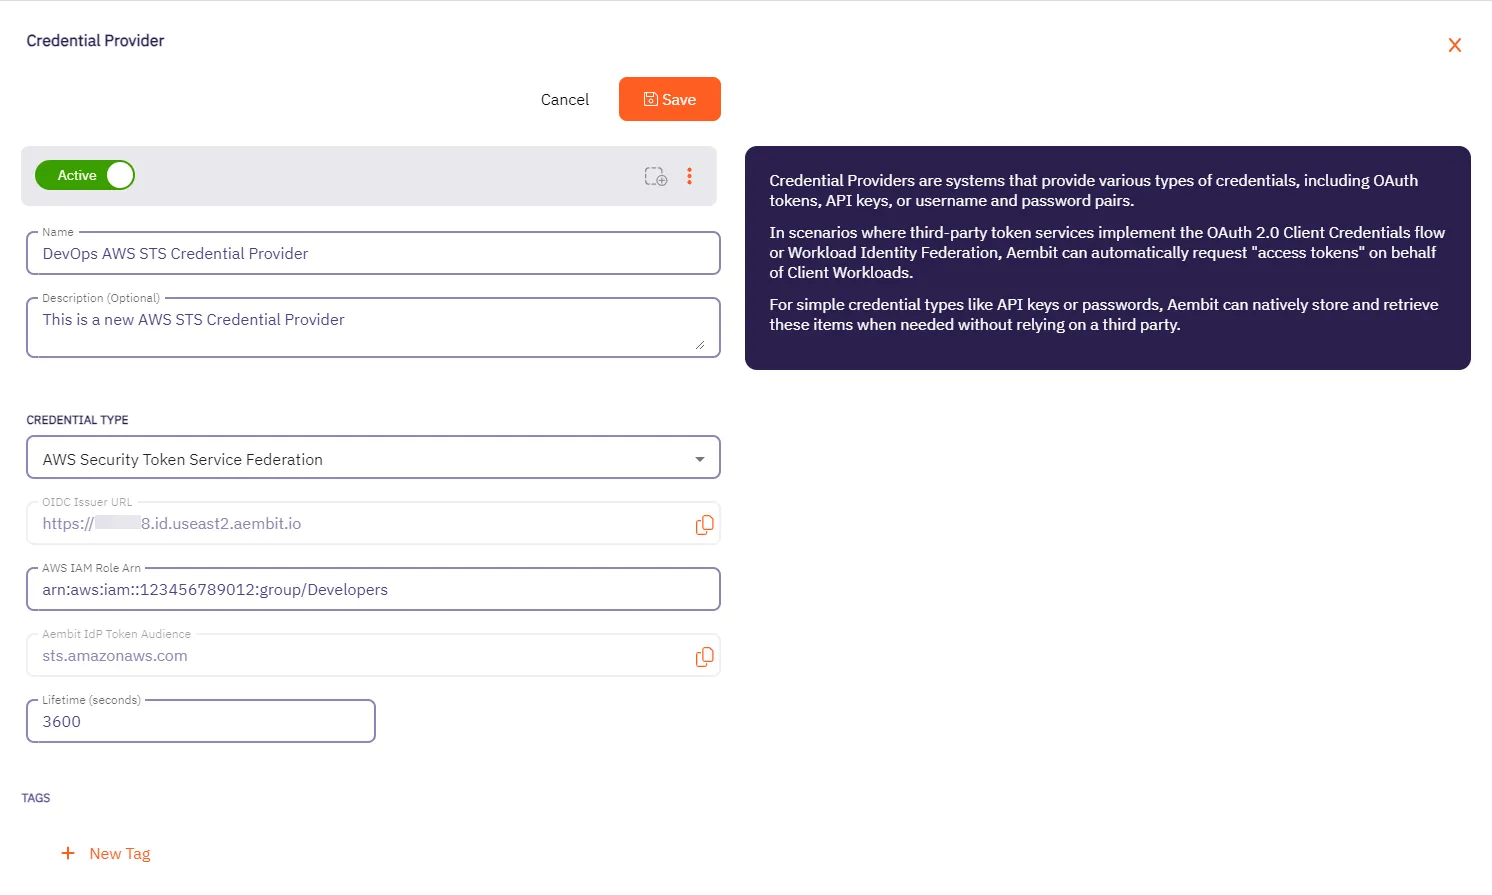
5. Click **Save** when finished. Aembit directs you back to the **Credential Providers** page, where you’ll see your newly created Credential Provider.

## AWS Identity Provider configuration
[Section titled “AWS Identity Provider configuration”](#aws-identity-provider-configuration)
To use the AWS STS Credential Provider, you must configure the AWS Identity Provider and assign it with an IAM role:
1. Within the AWS Console, go to **IAM** > **Identity providers** and select **Add provider**.
2. On the Configure provider screen, complete the steps and fill out the values specified:
* **Provider type** - Select **OpenID Connect**.
* **Provider URL** - Paste in the **OIDC Issuer URL** from the Credential Provider fields.
* Click **Get thumbprint** to configure the AWS Identity Provider trust relationship.
* **Audience** - Paste in the **Aembit IdP Token Audience** from the Credential Provider fields.
* Click **Add provider**.
3. Within the AWS Console, go to **IAM** > **Identity providers** and select the Identity Provider you just created.
4. Click **Assign role** and choose **Use an existing role**.
# How Aembit uses AWS SigV4 and SigV4a
> How Aembit's Credential Provider for AWS STS works with the AWS SigV4 and Sigv4a request signing protocols
AWS Signature Version 4 (SigV4) and Signature Version 4a (SigV4a) are AWS request signing protocols that Aembit uses to sign HTTP requests from Client Workloads to AWS services when using credentials obtained from Aembit’s [AWS Security Token Service (STS) Credential Provider](/user-guide/access-policies/credential-providers/aws-security-token-service-federation). During authentication, SigV4 makes sure a request is authentic, unaltered in transit, and not replayed.
## SigV4 versions
[Section titled “SigV4 versions”](#sigv4-versions)
SigV4 has two versions:
* [SigV4](https://docs.aws.amazon.com/general/latest/gr/signature-version-4.html) is AWS’s standard signing process. It requires that you specify the exact AWS region where you’re sending a request (such as `us-east-1`, `us-east-2`). AWS scopes the signing key and signature to that specific region. AWS requires a new signature if you send the same request to a service in a different region. For most requests to [AWS regional endpoints](https://docs.aws.amazon.com/general/latest/gr/rande.html#regional-endpoints), AWS uses SigV4.
* [SigV4a](https://docs.aws.amazon.com/IAM/latest/UserGuide/reference_sigv.html#how-sigv4a-works) extends SigV4 to support multi-region AWS services, in cases where you route a request across multiple AWS regions. Instead of specifying a single region in the signature, SigV4a uses a region wildcard (\*), allowing the signature to be valid across all AWS regions. For requests to [AWS global service endpoints](https://docs.aws.amazon.com/general/latest/gr/rande.html#global-endpoints) or any service that supports cross-region requests, AWS requires SigV4a.
## SigV4 version selection
[Section titled “SigV4 version selection”](#sigv4-version-selection)
Aembit automatically determines whether to use SigV4 or SigV4a when a Client Workload uses an AWS STS Credential Provider to access AWS services. It works like this:
* When a Server Workload’s hostname includes a region (such as `us-east-1` or `us-east-2`), Aembit uses SigV4, scoping the signature to only that region.
* When the Server Workload’s hostname doesn’t include a region (S3 Multi-Region Access Points or other global AWS services), Aembit uses SigV4a, which allows the signature to work across AWS regions.
Aembit performs this selection automatically based on the hostname structure, following AWS’s standard endpoint formats. You don’t need to make configuration changes to benefit from this and your existing AWS STS Credential Providers automatically gain support for SigV4a where applicable.
## Workload identity and service access separation in AWS
[Section titled “Workload identity and service access separation in AWS”](#workload-identity-and-service-access-separation-in-aws)
When working with Aembit Trust Providers and Credential Providers in AWS environments, it’s important to understand the roles each of these play. Aembit uses Trust Providers to verify who a workload is, and Credential Providers to control what AWS services that workload can access.
1. Trust Providers (like the [AWS Role Trust Provider](/user-guide/access-policies/trust-providers/aws-role-trust-provider)) verify who a workload is by confirming the AWS environment it’s running in and the IAM Role it’s using.
2. Once Aembit verifies the workload’s identity, the [AWS STS Credential Provider](/user-guide/access-policies/credential-providers/aws-security-token-service-federation) retrieves temporary AWS credentials for the workload, tied to the IAM Role verified by the Trust Provider.
3. When the workload makes API requests to AWS services like S3, Lambda, or SQS, Aembit’s Agent Proxy automatically signs those requests using AWS SigV4 for regional services, or SigV4a for global or multi-region services.
This clear separation makes sure that:
* Only attested workloads receive AWS credentials.
* Aembit secures All AWS service access using temporary credentials, eliminating the need for long-lived secrets.
* Aembit automatically applies the correct SigV4 or SigV4a signing process based on the destination service and hostname.
# Configure an Azure Entra WIF Credential Provider
> This page describes the Azure Entra Workload Identity Federation (WIF) Credential Provider and its usage with Server Workloads.
Aembit’s Credential Provider for Microsoft Azure Entra Workload Identity Federation (WIF) enables you to automatically obtain credentials through Aembit as a third-party federated Identity Provider (IdP). This allows you to securely authenticate with Azure Entra to access your Azure Entra registered applications and managed identities. For example, to assign API permissions or app roles to you registered applications or managed identities.
You can configure the Azure Entra Credential Provider using the [Aembit web UI](#configure-a-credential-provider-for-azure-entra) or through the [Aembit Terraform provider](#configure-azure-entra-using-the-aembit-terraform-provider).
## Prerequisites
[Section titled “Prerequisites”](#prerequisites)
To configure an Azure Entra Credential Provider, you must have and do the following:
* Ability to access and manage your Aembit Tenant.
* Ability to access and manage either of the following:
* [Microsoft Entra registered application](https://learn.microsoft.com/en-us/entra/identity-platform/quickstart-register-app)
* [Microsoft Managed Identity](https://learn.microsoft.com/en-us/entra/identity/managed-identities-azure-resources/overview)
* You request only one resource per Azure Entra Credential Provider
See detailed example
Azure’s architecture requires that you request only one resource per Azure Entra Credential Provider.
For example, when you need to access both [Microsoft Graph](http://graph.microsoft.com/) and [Azure Management](http://management.azure.com/), you must configure the following:
* **Two distinct Credential Providers** -
* One requesting the `https://graph.microsoft.com/.default` scope
* Another requesting the `https://management.azure.com/.default` scope
* **Two distinct Server Workloads** -
* One for `graph.microsoft.com`
* Another for `management.azure.com`
* **In your Access Policies, map each Credential Provider to its respective Server Workload**.
* Terraform only:
* You have Terraform installed.
* You have the [Aembit Terraform Provider](https://registry.terraform.io/providers/Aembit/aembit/latest) configured.
## Configure a Credential Provider for Azure Entra
[Section titled “Configure a Credential Provider for Azure Entra”](#configure-a-credential-provider-for-azure-entra)
This section explains how to configure an Azure Entra Credential Provider in the Aembit web UI that requests a single Azure Entra resource. These steps assume you already have a Microsoft Entra registered application (see [Prerequisites](#prerequisites)).
You must configure the Aembit Credential Provider at the same time as the Azure Entra registered application credential.
Tip
It’s best to have your Azure Entra registered application open in the Azure Entra Portal in a different browser window alongside the Aembit web UI while configuring the Credential Provider.
## Create a Credential Provider
[Section titled “Create a Credential Provider”](#create-a-credential-provider)
1. Log in to your Aembit Tenant, and in the left sidebar menu, go to **Credential Providers**.
2. Click **+ New**, which reveals the **Credential Provider** page.
3. Enter a **Name** and optional **Description**.
4. In the **Credential Type** dropdown, select **Azure Entra Identity Federation**, revealing new fields.
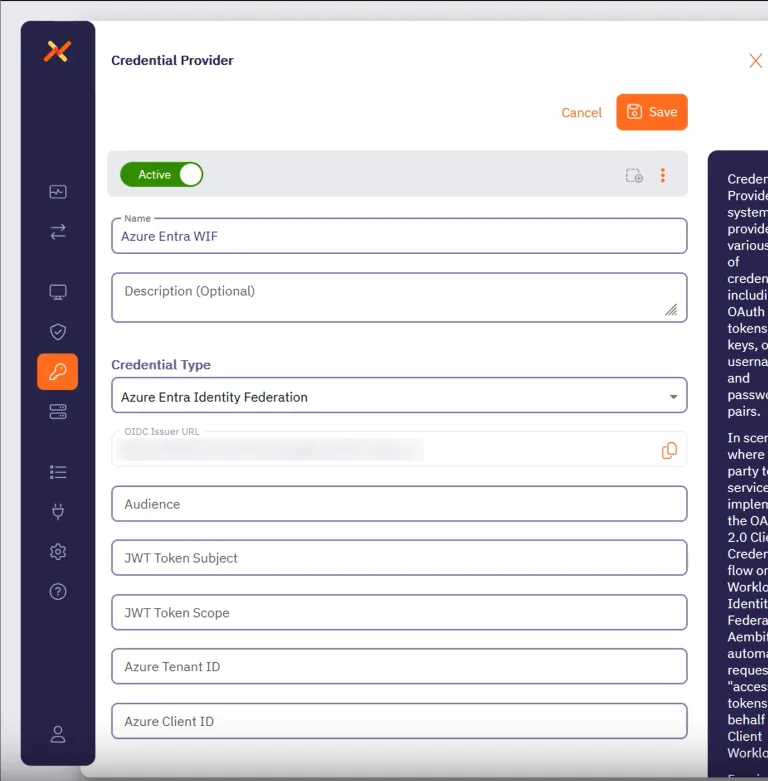
Before filling out these fields, you must add the credential for your Azure Entra registered application in the Azure Entra Portal first.
Keep the Aembit web UI open while you work on the next section.
## Add a credential for your Azure Entra registered app
[Section titled “Add a credential for your Azure Entra registered app”](#add-a-credential-for-your-azure-entra-registered-app)
In the Azure Entra Portal, create a new credential for your registered application:
1. In your Azure Entra Portal, go to **App registrations** and select your registered application from the list.
2. Go to **Manage —> Certificates & secrets** and select the **Federated Credentials** tab.
3. Click **Add credential**, to reveal the **Add a credential** page and fill out the following sections (for quick reference, see the [mappings](#azure-entra-and-credential-provider-ui-value-mappings) section):
4. For **Connect your account** -
* **Federated credential scenario** - Select **Other issuer**
* **Issuer** - From the Aembit Credential Provider page, copy and paste the **OIDC Issuer URL**
* **Type** - Select **Explicit subject identifier**
* **Value** - Enter the desired value (this must match the **JWT Token Subject** value on the Aembit Credential Provider page)
5. For **Credential details** -
* **Name** - Enter the desired name
* **Audience** - Use the default value or optionally change it to the desired value (this must match the **Audience** value on the Aembit Credential Provider page)
Your Aembit Credential Provider UI and Entra registered application credential should look similar to the following example:
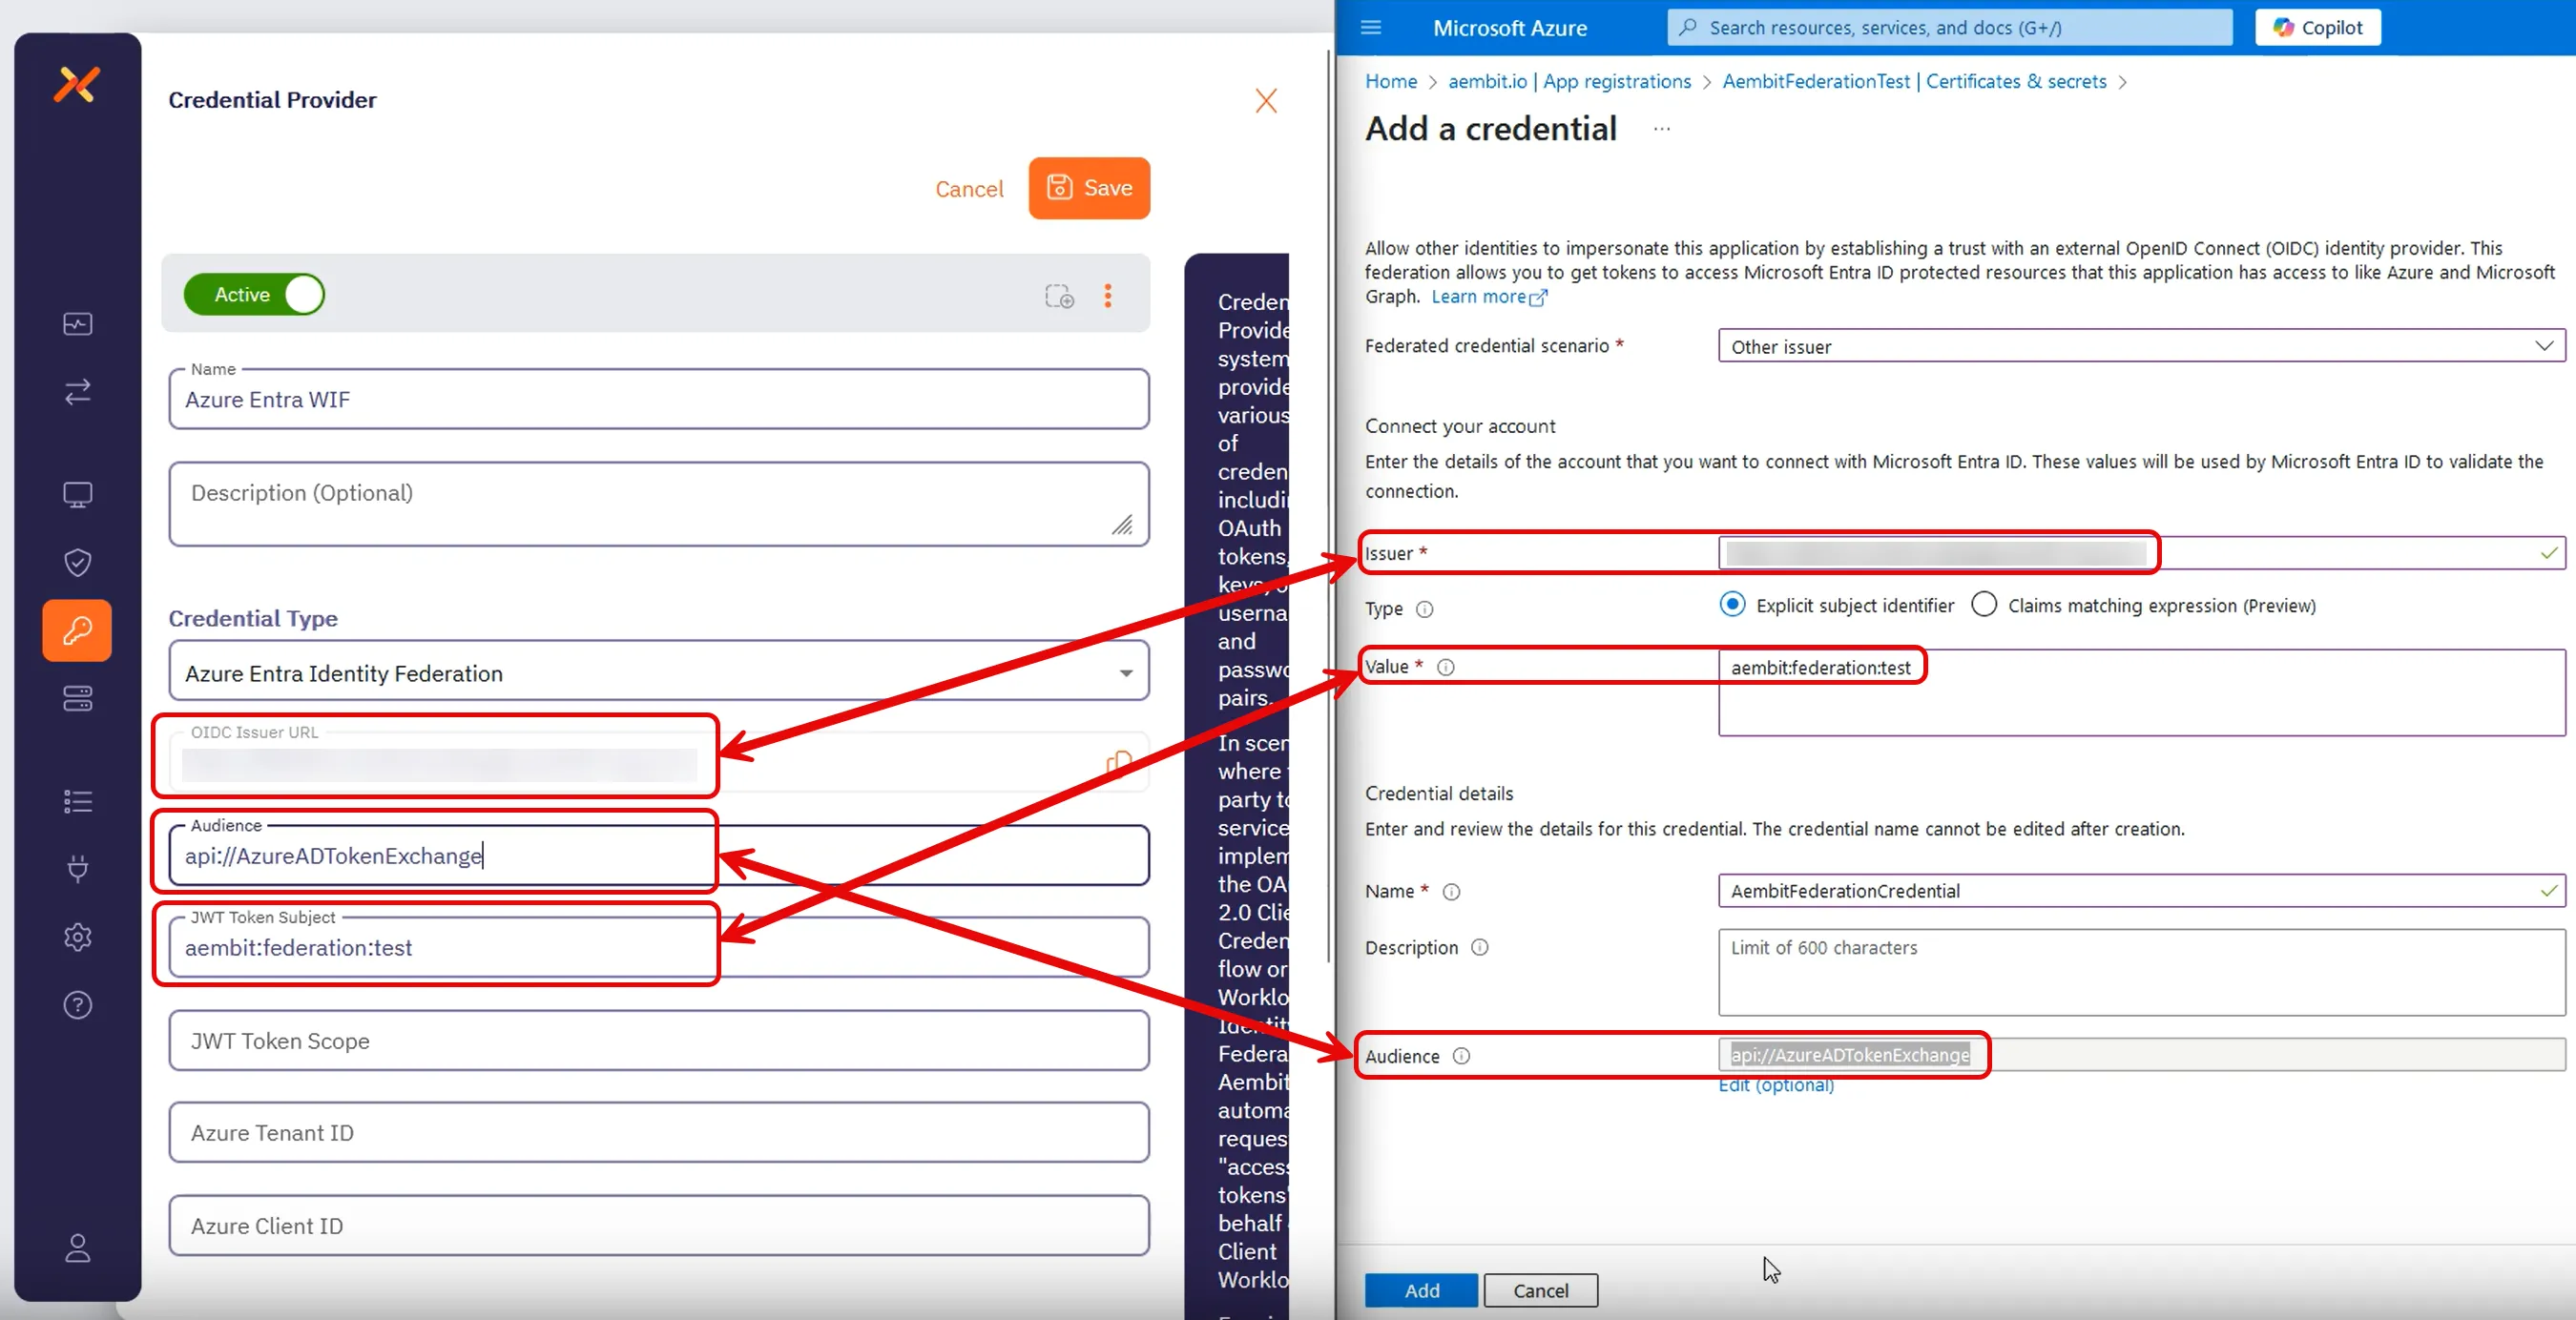
6. Click **Add** and your new credential shows up on the **Federated credentials** tab in Azure Entra.
7. While still on your registered application, go to the **Overview** section.
Keep the Azure Entra Portal open to use it in the next section.
## Complete the Credential Provider in the Aembit web UI
[Section titled “Complete the Credential Provider in the Aembit web UI”](#complete-the-credential-provider-in-the-aembit-web-ui)
Go back to the Aembit web UI, and complete the **Credential Provider** page:
1. For **JWT Token Scope**, enter the scope of the resource you want to request.
For example, for Microsoft Graph, use `https://graph.microsoft.com/.default`.
2. Use the info from your Azure Entra registered application’s **Overview** page to complete the remaining fields for the Aembit Credential Provider (for quick reference, see the [mappings](#azure-entra-and-credential-provider-ui-value-mappings) section):
1. **Azure Tenant ID** - copy and paste the **Directory (tenant) ID**.
2. **Azure Client ID** - copy and paste the **Application (client) ID**.
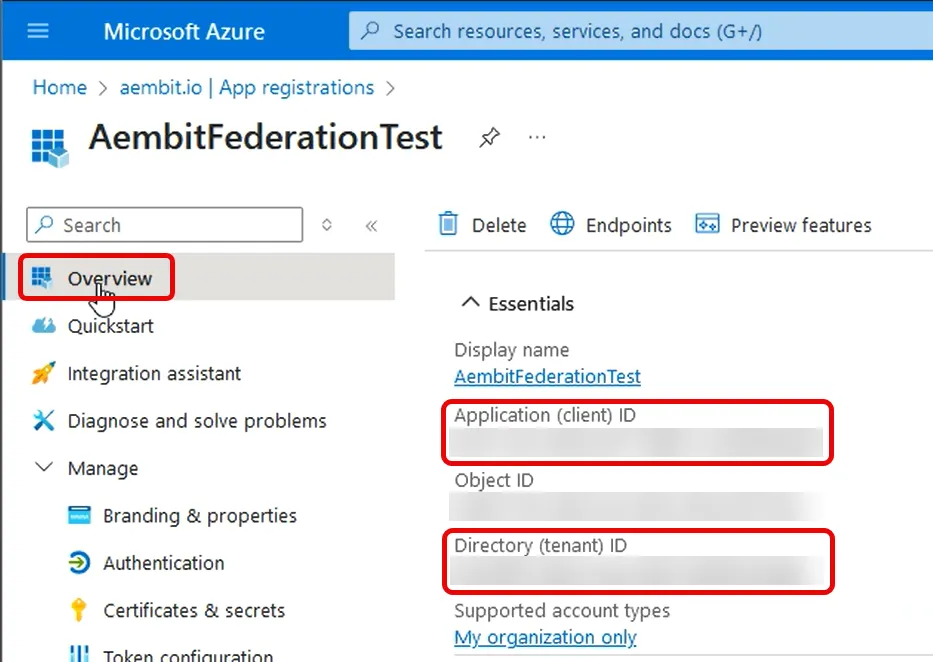
3. Click **Save**.
Your Azure Entra Credential Provider now displays in your list of Credential Providers in the Aembit web UI.
## Verify the connection
[Section titled “Verify the connection”](#verify-the-connection)
To verify the connection between your Aembit Credential Provider and your Azure Entra registered application:
1. On the **Credential Providers** page, select the Credential Provider you just created.
2. Click **Verify**.
After a few moments you should see a green banner display a “Verified Successfully” message.
If you don’t receive a “Verified Successfully” message, go back through the values in your Credential Provider in the Aembit UI and the credential in your Azure Entra registered application to make sure they’re correct.
You’re now ready to use your Credential Provider for Azure Entra Workload Identity Federation with your Server Workloads in an Aembit Access Policy!
## Configure Azure Entra using the Aembit Terraform provider
[Section titled “Configure Azure Entra using the Aembit Terraform provider”](#configure-azure-entra-using-the-aembit-terraform-provider)
To configure an Azure Entra Credential Provider using the [Aembit Terraform Provider](https://registry.terraform.io/providers/Aembit/aembit/latest), follow the steps in this section.
OIDC Issuer URL
When using the Aembit Terraform Provider, you won’t have the OIDC Issuer URL the Azure credential requires until *after* you apply the Terraform configuration successfully.
Make sure you leave the Azure Entra **Add a credential** page open until after you have successfully applied the Terraform configuration. Then copy the value for `oidc_issuer` from the applied Terraform configuration to the **Issuer** field in the **Add a credential** page.
1. Follow the steps to [Add a credential for your Azure Entra registered app](#add-a-credential-for-your-azure-entra-registered-app).
Leaving the **Issuer** blank and stopping before you add the new credential.
Keep this page open as you’ll need some values from it.
2. Create a new Terraform configuration file (such as `azure-wif.tf`) with the following structure:
```hcl
provider "aembit" {
}
resource "aembit_credential_provider" "azureEntra" {
name = ""
is_active = true
azure_entra_workload_identity = {
audience = ""
subject = ""
scope = ""
azure_tenant = ""
client_id = ""
}
}
```
Example Terraform resource file for Microsoft Graph
```hcl
provider "aembit" {
}
resource "aembit_credential_provider" "azureEntra" {
name = "Azure Entra WIF"
is_active = true
azure_entra_workload_identity = {
audience = "api://AzureADTokenExchange"
subject = "aembit:federation:test"
scope = "https://graph.microsoft.com/.default"
azure_tenant = "7f492ad1-25ec-4bfe-9c3a-84b517de8f2c"
client_id = "3d845691-7abc-4def-a123-456789abcdef"
}
}
```
3. Apply the Terraform configuration:
```shell
terraform apply
```
4. After the Terraform apply completes successfully, the Aembit Terraform provider generates an OIDC Issuer URL as the value for `oidc_issuer`.
Run the following command to obtain the value for `oidc_issuer`:
```shell
terraform state show aembit_credential_provider.azureEntra
```
5. Copy the URL from `oidc_issuer` and return to the Azure Portal’s **Add a credential** page.
6. Paste the URL from `oidc_issuer` into the **Issuer** field.
7. Click **Add** and your new credential shows up on the **Federated credentials** tab in Azure Entra.
You’re now ready to use your Credential Provider for Azure Entra Workload Identity Federation with your Server Workloads in an Aembit Access Policy!
## Azure Entra and Credential Provider UI value mappings
[Section titled “Azure Entra and Credential Provider UI value mappings”](#azure-entra-and-credential-provider-ui-value-mappings)
The following table shows how the different value in Azure Entra from your registered application map to the required values to the Aembit Credential Provider web UI and Terraform provider:
| Aembit Credential Provider value | Azure Entra credential value | Azure UI location | Terraform value |
| -------------------------------- | ---------------------------- | ------------------------- | --------------- |
| OIDC Issuer URL | Account Issuer | Registered app credential | Auto-populated |
| Audience | Credential Audience | Registered app credential | `audience` |
| JWT Token Subject | Account Value | Registered app credential | `subject` |
| Azure Tenant ID | Directory (tenant) ID | Your app’s Overview | `azure_tenant` |
| Azure Client ID | Application (client) ID | Your app’s Overview | `client_id` |
# Configure a Google GCP WIF Credential Provider
> How to create a Google GCP Workload Identity Federation (WIF) Credential Provider
Aembit offers the Google Workload Identity Federation (WIF) Credential Provider to integrate with Google GCP Services. This provider allows your Client Workloads to securely authenticate with GCP and obtain short-lived security tokens for accessing GCP services and resources.
## Credential Provider configuration
[Section titled “Credential Provider configuration”](#credential-provider-configuration)
To configure a Google Workload Identity Federation Credential Provider, follow the steps outlined below.
1. Log into your Aembit Tenant.
2. Once you are logged into your tenant, click on the **Credential Providers** tab in the left sidebar. You are directed to the Credential Providers page displaying a list of existing Credential Providers. In this example, there are no existing Credential Providers.

3. Click on the **New** button to open the Credential Providers dialog window.
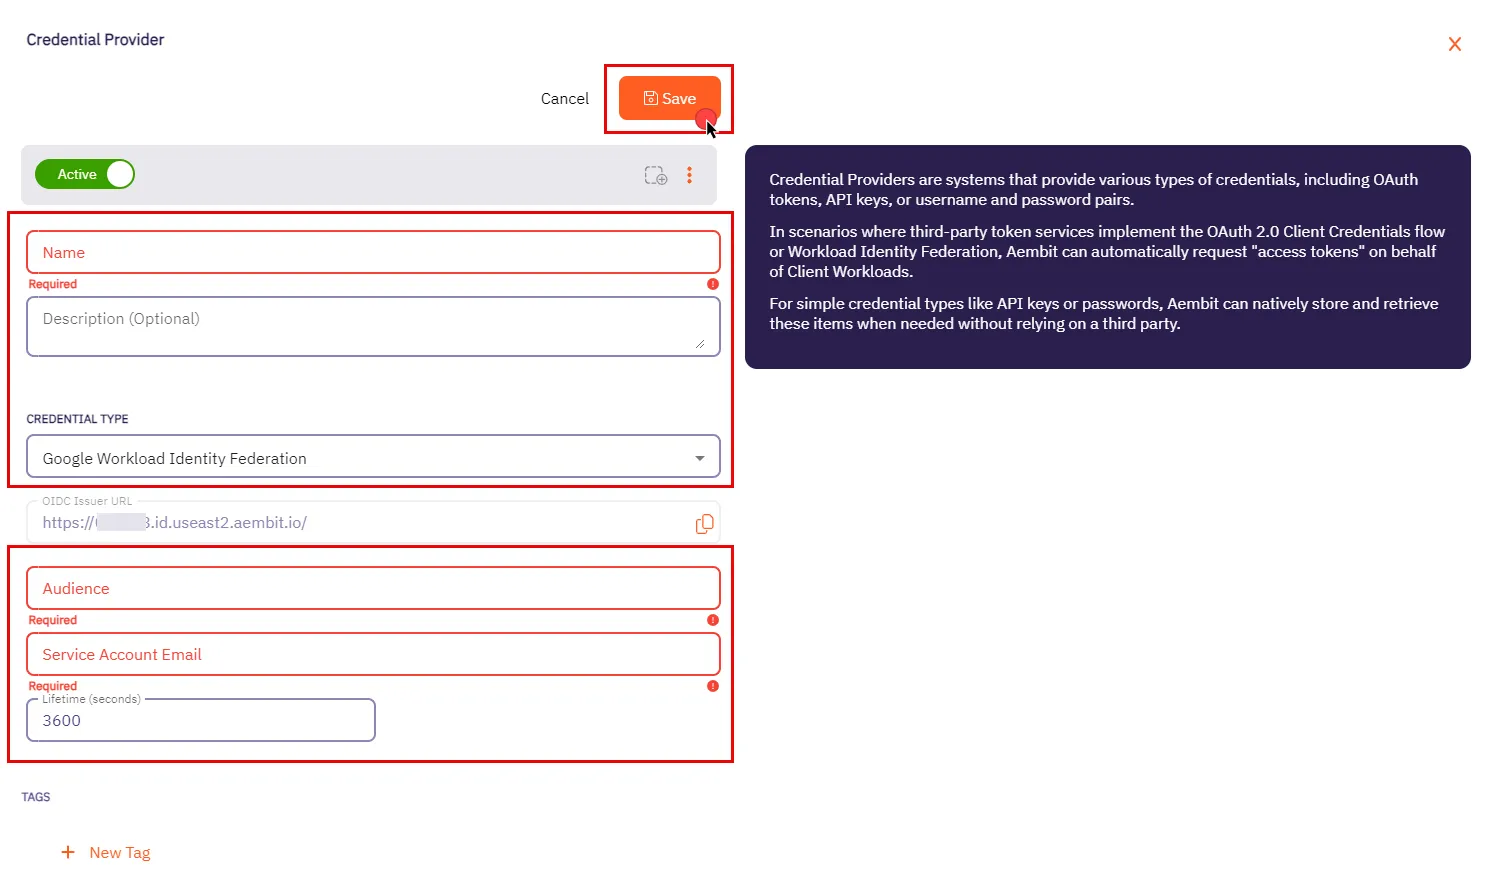
4. In the Credential Providers dialog window, enter the following information:
* **Name** - Name of the Credential Provider.
* **Description** - An optional text description of the Credential Provider.
* **Credential Type** - A dropdown menu that enables you to configure the Credential Provider type. Select **Google Workload Identity Federation**.
* **OIDC Issuer URL** - OpenID Connect (OIDC) Issuer URL, auto-generated by Aembit, is a dedicated endpoint for OIDC authentication with Google Cloud.
* **Audience** - This field specifies the `aud` (Audience) claim that must be present in the OIDC token when requesting credentials from Google Cloud. The value should match either:
* **Default** - Full canonical resource name of the Workload Identity Pool Provider (used if “Default audience” was chosen during setup).
* **Allowed Audiences** - A value included in the configured allowed audiences list, if defined.
Caution
If the default audience was chosen during provider creation, provide the value previously copied from Google Cloud Console, **excluding** the http prefix (e.g., //iam.googleapis…).
* **Service Account Email** - A Service Account represents a Google Cloud service identity, each service account has a unique email address (e.g., `service-account-name@project-id.iam.gserviceaccount.com`) that serves as its identifier. This email is used for granting permissions and enabling interactions with other services.
* **Lifetime (seconds)** - Specify the duration for which credentials remain valid, to a maximum of 1 hour (3,600 seconds).
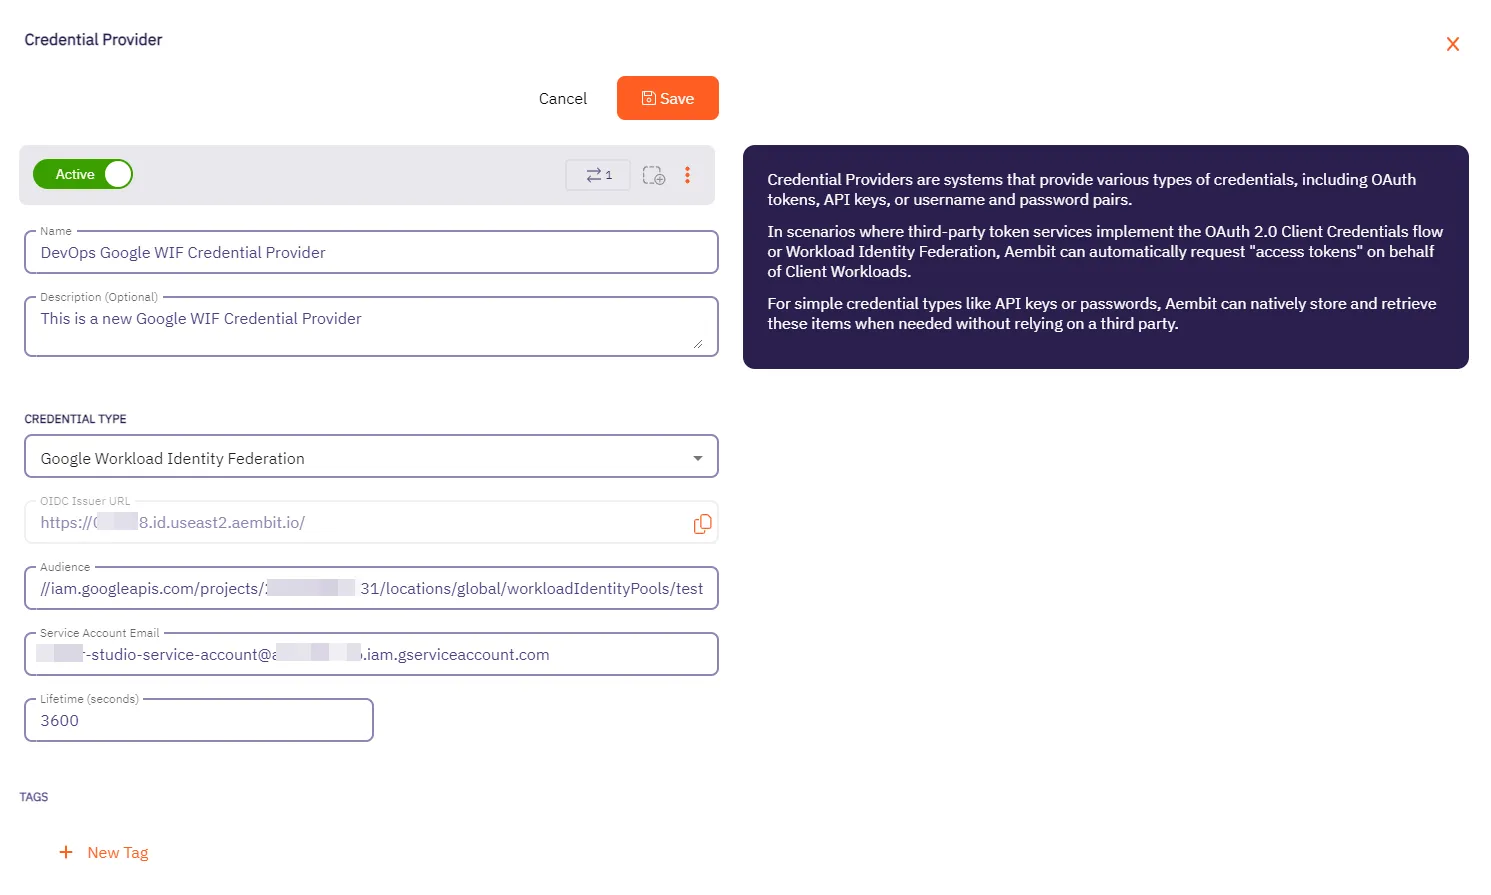
5. Click **Save** when finished. You will be directed back to the Credential Providers page, where you will see your newly created Credential Provider.

Note
For detailed examples on configuring the Workload Identity Federation, please refer to the respective Server Workloads’ credential provider configuration sections, such as the [GCP Bigquery](/user-guide/access-policies/server-workloads/guides/gcp-bigquery#credential-provider-configuration-1) example.
# Credential Provider integrations overview
> An overview of what Credential Provider integrations are and how they work
Aembit Credential Provider Integrations associate a third-party system (such as GitLab) with your Credential Providers to perform credential lifecycle management on your behalf. Credential Providers that use Credential Provider Integrations are responsible for maintaining an always-available credential value, which Aembit injects as part of an Access Policy.
Aembit’s credential lifecycle management capabilities include creating, rotating, and deleting tokens.
## List of Credential Provider Integrations
[Section titled “List of Credential Provider Integrations”](#list-of-credential-provider-integrations)
* [GitLab Service Account](#how-the-gitlab-service-account-integration-works)
## How Credential Provider Integrations work
[Section titled “How Credential Provider Integrations work”](#how-credential-provider-integrations-work)
In general, Credential Provider Integrations use the following process:
1. When you initially create Credential Provider, Aembit creates the third-party account or credential or both and securely stores it in Aembit’s database.
2. Once 80% of the configured Credential Provider’s **Lifetime** expires, Aembit rotates the third-party credential and securely stores the updated credential in Aembit’s database.
3. When properly requested and authorized, Aembit provides the third-party credential from Aembit’s database to the associated Agent Proxy.
If the injected credential fails, Agent Proxy continues to log the existing Workload Events to indicate the failure but doesn’t generate a notification or take explicit action. For example, if you delete a credential on your third-party system, then the Workload fails until Aembit successfully rotates the credential.
4. When you delete a Credential Provider, Aembit deletes the third-party account and credential.
Deleting integrations
You can’t delete a Credential Provider Integration until you delete all its associated Credential Providers.
You can’t change the association between a Credential Provider Integration and a Credential Provider after you create it.
## How the GitLab Service Account integration works
[Section titled “How the GitLab Service Account integration works”](#how-the-gitlab-service-account-integration-works)
This [GitLab Service Account](/user-guide/access-policies/credential-providers/integrations/gitlab) integration uses your GitLab administrator account to connect with your GitLab instance and control credential lifecycle management for each Managed GitLab Account Credential Provider.
When creating a [Managed GitLab Account Credential Provider](/user-guide/access-policies/credential-providers/managed-gitlab-account), you scope it to only access specific GitLab Projects or GitLab Groups. Each provider creates an additional, separate GitLab service account that manages credentials on your behalf. This approach gives you fine-grained control over your GitLab workloads’ credential lifecycle management.
### GitLab subscriptions
[Section titled “GitLab subscriptions”](#gitlab-subscriptions)
Depending on the type of [GitLab plan](https://docs.gitlab.com/subscriptions/choosing_subscription/) you have, you have different choices of how to set up your GitLab Service Account integration.
* For [GitLab.com plans](/user-guide/access-policies/credential-providers/integrations/gitlab), you must use `https://gitlab.com` when creating the integration.
* For [GitLab Dedicated or Self-Managed plans](/user-guide/access-policies/credential-providers/integrations/gitlab-dedicated-self), you must use the URL of your GitLab dedicated or Self-Managed instance’s.
See [GitLab’s plans](https://docs.gitlab.com/subscriptions/choosing_subscription/) for details about GitLab subscription types.
The distinction between the different GitLab plans requires you to use different API calls when creating the GitLab Service Account integration.
### Process flow
[Section titled “Process flow”](#process-flow)
At a high level, the GitLab Service Account Credential Provider Integration works like this:
1. You initially connect Aembit to GitLab using your GitLab administrator account.
2. You create a Credential Provider with Managed GitLab Account integration.
3. Aembit creates a service account for each Credential Provider with your specified access scope.
4. Aembit securely stores credentials in its database.
5. Aembit automatically rotates credentials before expiration.
6. When requested and authorized, Aembit provides credentials to the Agent Proxy.
## Additional resources
[Section titled “Additional resources”](#additional-resources)
* [GitLab.com integration](/user-guide/access-policies/credential-providers/integrations/gitlab)
* [GitLab Dedicated/Self-Managed integration](/user-guide/access-policies/credential-providers/integrations/gitlab-dedicated-self)
# Create a GitLab Service Account Integration for a GitLab.com plan"
> How to create a GitLab Service Account Credential Provider Integration using a GitLab.com plan
The GitLab service account Credential Provider Integration allows you to create a [Managed GitLab Account Credential Provider](/user-guide/access-policies/credential-providers/managed-gitlab-account), which provides credential lifecycle management and rotation capabilities for secure authentication between your GitLab instances and other Client Workloads. This page details everything you need to create a GitLab Service Account Credential Provider Integration.
This integration requires the use of two types of GitLab accounts:
This integration requires the use of a top-level group GitLab account with the `Owner` role that performs the initial authorization for Aembit to start communicating with GitLab.
See [How the GitLab Service Account integration works](/user-guide/access-policies/credential-providers/integrations/#how-the-gitlab-service-account-integration-works) for more details.
## Prerequisites
[Section titled “Prerequisites”](#prerequisites)
* `Owner` role access to [GitLab Admin area](https://docs.gitlab.com/administration/admin_area/) and [REST API](https://docs.gitlab.com/api/rest/)
* A [GitLab Personal Access Token (PAT)](https://docs.gitlab.com/user/profile/personal_access_tokens/) for your [GitLab service account](https://docs.gitlab.com/user/profile/service_accounts/) with the `Owner` role as well as `api` and `self-rotate` [scopes](https://docs.gitlab.com/user/profile/personal_access_tokens/#personal-access-token-scopes)
## Configure a GitLab service account integration
[Section titled “Configure a GitLab service account integration”](#configure-a-gitlab-service-account-integration)
To create a GitLab service account integration, follow these steps:
1. Log into your Aembit Tenant, and go to **Credential Providers -> Integrations** in the left sidebar.
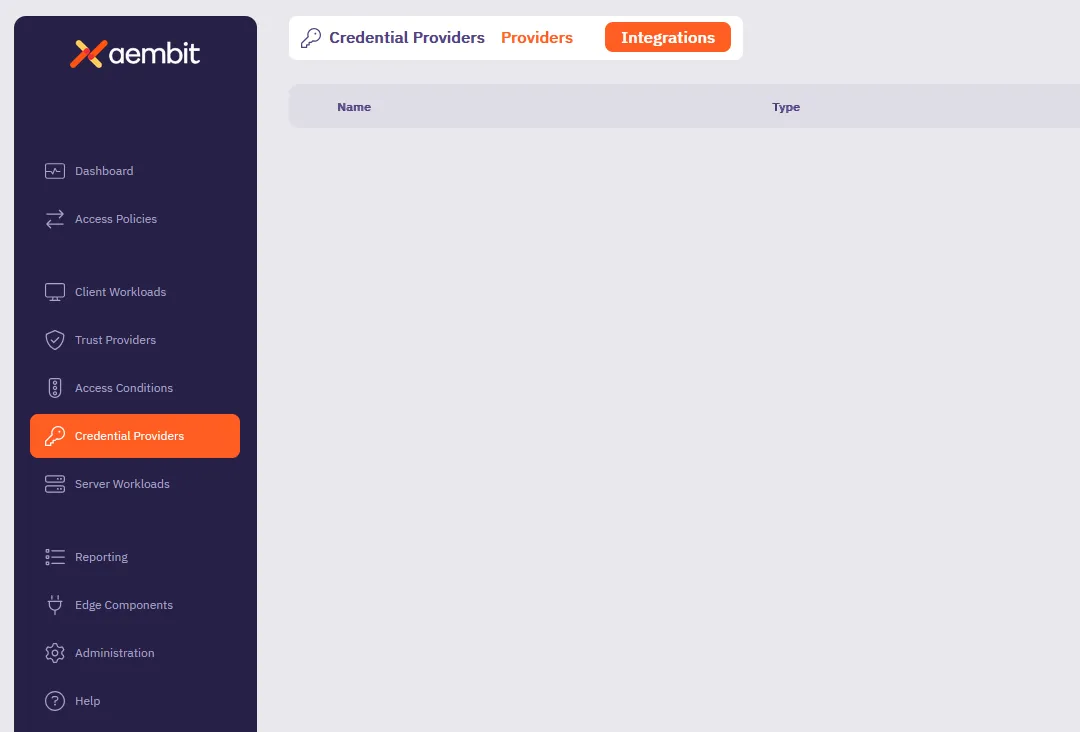
2. (Optional) In the top right corner, select the [Resource Set](/user-guide/administration/resource-sets/) that you want this Credential Provider Integration to reside.
3. Click **+ New**, which displays the **Integration** pop out menu.
4. Select **GitLab Service Account**.
5. Fill out the following fields on the **GitLab Service Account** form:
* **Display Name** - Enter a unique name for this integration.
* **Description** - (Optional) Enter a description.
* **Token Endpoint URL** - Enter `https://gitlab.com`, indicating that you’re using a GitLab.com plan.
See [GitLab subscriptions](/user-guide/access-policies/credential-providers/integrations/#gitlab-subscriptions) for more details.
* **Personal Access Token** - Enter the GitLab Personal Access Token that’s associated with your service account owned by a top-level group which must have `api` and `self-rotate` scopes.
If you don’t already have a GitLab service account with a PAT, see [Create a GitLab service account and PAT](#create-a-gitlab-service-account-and-pat).
The form should look similar to the following screenshot:
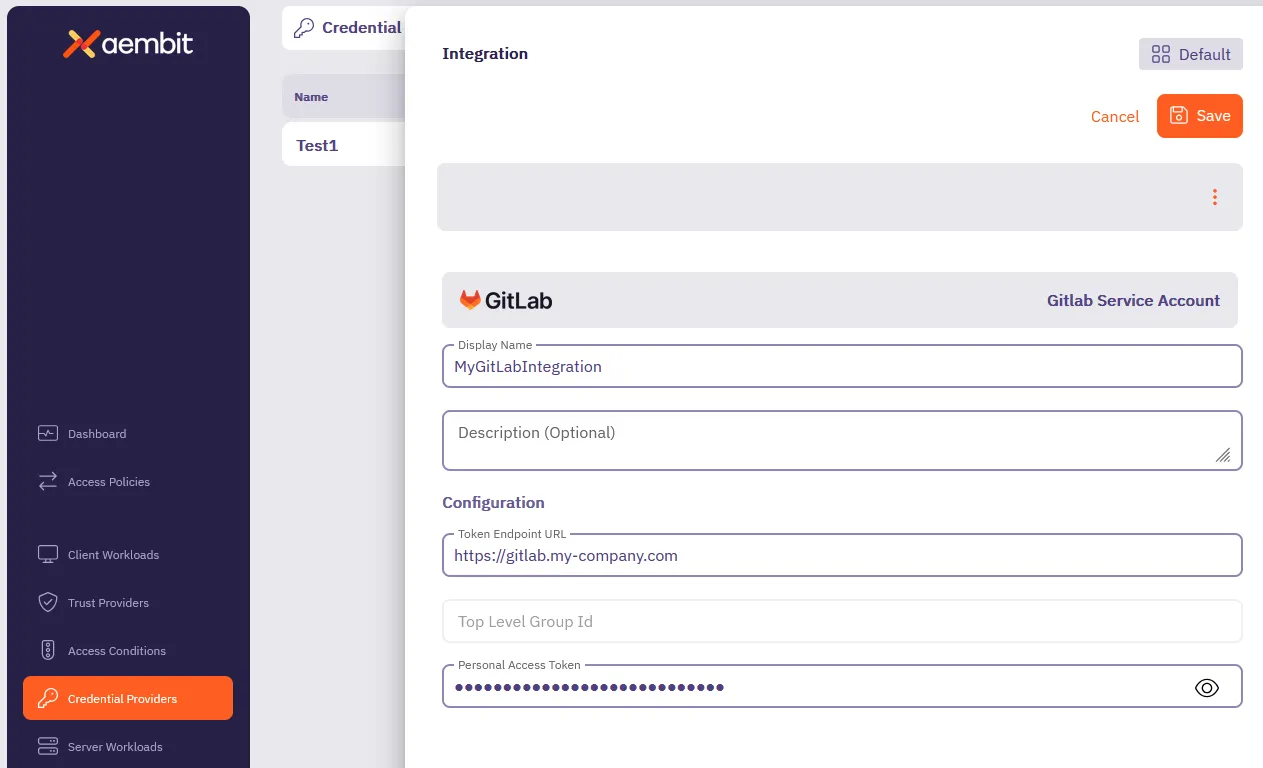
6. Click **Save**.
Aembit displays the new integration in the list of Credential Provider Integrations.
Note
As soon as you successfully create the integration, Aembit rotates the token for the GitLab service account and regularly rotates it as long as the Credential Provider Integration exists.
## Create a GitLab service account and PAT
[Section titled “Create a GitLab service account and PAT”](#create-a-gitlab-service-account-and-pat)
The service account you use for the GitLab Server Account integration must be owned by a top-level group access to GitLab APIs.
To create a GitLab service account and PAT, follow these steps:
Note
GitLab doesn’t provide a way to create service accounts from the Admin area UI, so you must use the API to create the service account. See [GitLab issue #509870](https://gitlab.com/gitlab-org/gitlab/-/issues/509870) for more details.
1. *From your terminal*, enter the following command to create the GitLab service account you want to associate with the integration. Make sure to replace `` with your GitLab API access token and `` with your numeric top-level group ID. For `name` and `username`, you can use the same value for both or follow whatever method you desire.
```shell
curl --header "PRIVATE-TOKEN: " \
-X POST "https://gitlab.com/api/v4/groups//service_accounts" \
--data "name=" \
--data "username="
```
If successful, the response should look similar to the following:
```shell
{"id":12345678,"username":"","name":"","email":""}
```
Record the `id` as you’ll need it in the next step.
2. Create a PAT for the GitLab service account you just created.
Make sure to replace `` with your GitLab API access token, `` with your numeric top-level group ID, and `` with the `user_id` you recorded from the previous step:
```shell
curl --header "PRIVATE-TOKEN: " \
-X POST "https://gitlab.com/api/v4/groups//service_accounts//personal_access_tokens" \
--data "name=" \
--data "scopes[]=api,self_rotate"
```
If successful, the response should look similar to the following:
```shell
{"id":1234,"name":"","revoked":false,"created_at":"2025-03-21T20:18:23.333Z","description":null,"scopes":["api","self_rotate"],"user_id":,"last_used_at":null,"active":true,"expires_at":"2025-03-31","token":""}
```
Record the `token` value as you’ll need it in the final step.
3. Add the new service account you just created to your top-level group:
Make sure to replace `` with your GitLab API access token and `` with the `user_id` you recorded earlier:
```shell
curl --header "PRIVATE-TOKEN: " \
-X POST "https://gitlab.com/api/v4/groups/84110211/members" \
--data "user_id=" \
--data "access_level=50"
```
## Additional resources
[Section titled “Additional resources”](#additional-resources)
* [Managed GitLab Account](/user-guide/access-policies/credential-providers/managed-gitlab-account)
* [Credential Provider Integrations overview](/user-guide/access-policies/credential-providers/integrations/)
* [GitLab Dedicated/Self-Managed integration](/user-guide/access-policies/credential-providers/integrations/gitlab-dedicated-self)
# Create a GitLab Service Account Integration for a Dedicated/Self-Managed instance
> How to create a GitLab Service Account Credential Provider Integration using a GitLab Dedicated or Self-Managed instance
The GitLab service account Credential Provider Integration allows you to create a [Managed GitLab Account Credential Provider](/user-guide/access-policies/credential-providers/managed-gitlab-account), which provides credential lifecycle management and rotation capabilities for secure authentication between your GitLab instances and other Client Workloads. This page details everything you need to create a GitLab Service Account Credential Provider Integration.
This integration requires the use of two types of GitLab accounts:
* A GitLab administrator account that performs the initial authorization for Aembit to start communicating with GitLab.
* A GitLab *service account* that performs credential lifecycle management for the Managed GitLab Account Credential Provider.
See [How the GitLab Service Account integration works](/user-guide/access-policies/credential-providers/integrations/#how-the-gitlab-service-account-integration-works) for more details.
## Prerequisites
[Section titled “Prerequisites”](#prerequisites)
* Administrator access to [GitLab Admin area](https://docs.gitlab.com/administration/admin_area/) and the GitLab [REST API](https://docs.gitlab.com/api/rest/)
* A [GitLab Personal Access Token (PAT)](https://docs.gitlab.com/user/profile/personal_access_tokens/) for your [GitLab service account](https://docs.gitlab.com/user/profile/service_accounts/) with `api` and `self-rotate` [scopes](https://docs.gitlab.com/user/profile/personal_access_tokens/#personal-access-token-scopes)
* The URL of your GitLab Dedicated or GitLab Self-Managed instance (see [GitLab’s plans](https://docs.gitlab.com/subscriptions/choosing_subscription/) for details)\
For example: `gitlab_tenant_name.gitlab-dedicated.com` or `https://gitlab.my-company.com`
## Configure a GitLab service account integration
[Section titled “Configure a GitLab service account integration”](#configure-a-gitlab-service-account-integration)
To create a GitLab service account integration, follow these steps:
1. Log into your Aembit Tenant, and go to **Credential Providers -> Integrations** in the left sidebar.

2. (Optional) In the top right corner, select the [Resource Set](/user-guide/administration/resource-sets/) that you want this Credential Provider Integration to reside.
3. Click **+ New**, which displays the **Integration** pop out menu.
4. Select **GitLab Service Account**.
5. Fill out the following fields on the **GitLab Service Account** form:
* **Display Name** - Enter a unique name for this integration.
* **Description** - (Optional) Enter a description.
* **Token Endpoint URL** - Enter the URL of your GitLab Dedicated or GitLab Self-Managed instance.
See [GitLab subscriptions](/user-guide/access-policies/credential-providers/integrations/#gitlab-subscriptions) for more details.
* **Top Level Group ID** - n/a\
Aembit disables this field when using GitLab Dedicated or Self-Managed instance URLs.
* **Personal Access Token** - Enter the GitLab Personal Access Token that’s associated with your instance-level administrator service account that must have `api` and `self-rotate` scopes.
If you don’t already have a GitLab service account with a PAT, see [Create a GitLab service account and PAT](#create-a-gitlab-service-account-pat).
The form should look similar to the following screenshot:

6. Click **Save**.
Aembit displays the new integration in the list of Credential Provider Integrations.
Note
As soon as you successfully create the integration, Aembit rotates the token for the GitLab service account and regularly rotates it as long as the Credential Provider Integration exists.
## Create a GitLab service account PAT
[Section titled “Create a GitLab service account PAT”](#create-a-gitlab-service-account-pat)
To create a GitLab service account PAT, you must have *Administrator* access to your GitLab Admin area and GitLab APIs.
This process has two main parts:
1. [Create a PAT for your GitLab administrator account](#create-a-gitlab-administrator-account-pat) using the *GitLab UI*.
2. [Create a GitLab service account and PAT](#create-a-gitlab-service-account-and-pat) using both the *GitLab API* and *GitLab UI*.
### Create a GitLab administrator account PAT
[Section titled “Create a GitLab administrator account PAT”](#create-a-gitlab-administrator-account-pat)
To create a PAT for your GitLab administrator account, follow these steps:
1. Log into your GitLab Admin area with an administrator user account.
2. See [Create a personal access token](https://docs.gitlab.com/user/profile/personal_access_tokens/#create-a-personal-access-token) in the GitLab docs to create a PAT for your *administrator user account* (not the service account).
3. Keep the GitLab Admin area UI open, as you need it in the next step.
### Create a GitLab service account and PAT
[Section titled “Create a GitLab service account and PAT”](#create-a-gitlab-service-account-and-pat)
To create a GitLab service account and PAT, follow these steps:
Note
GitLab doesn’t provide a way to create service accounts from the Admin area UI, so you must use the API to create the service account. See [GitLab issue #509870](https://gitlab.com/gitlab-org/gitlab/-/issues/509870) for more details.
1. *From your terminal*, enter the following command to create the GitLab service account you want to associate with the integration. Make sure to replace `` with your GitLab API access token and `` with your GitLab instance URL. For `` and ``, you can use the same value for both or follow whatever method you desire.
```shell
curl --header "PRIVATE-TOKEN: " \
-X POST "/api/v4/service_accounts" \
--data "name=" \
--data "username="
```
2. *From your GitLab Admin area*, go to to **Admin area -> Users** and select the service account you just created.
3. Go to **Access Level**, and change the **Access Level** from **Regular** to **Administrator**.
4. *Back in your terminal*, create a PAT for the GitLab service account you just made **Administrator**.
Make sure to replace `` with your GitLab API access token, `` with your GitLab instance URL, and `` with the same value you used to create the service account:
```shell
curl --header "PRIVATE-TOKEN: " \
-X POST "/api/v4/users//personal_access_tokens" \
--data "scopes[]=api,self_rotate" \
--data "name="
```
If successful, the response should look similar to the following:
```shell
{"id":1234,"name":"token_name","revoked":false,"created_at":"2025-03-21T20:18:23.333Z","description":null,"scopes":["api","self_rotate"],"user_id":36,"last_used_at":null,"active":true,"expires_at":"2025-03-31","token":"your_token"}
```
5. Record the `` value in the response and use it as the **Personal Access Token** in the [Configure a GitLab service account integration](#configure-a-gitlab-service-account-integration) section.
## Additional resources
[Section titled “Additional resources”](#additional-resources)
* [Managed GitLab Account](/user-guide/access-policies/credential-providers/managed-gitlab-account)
* [Credential Provider Integrations overview](/user-guide/access-policies/credential-providers/integrations/)
* [GitLab.com integration](/user-guide/access-policies/credential-providers/integrations/gitlab)
# Configure a JSON Web Token (JWT) Credential Provider
> How to create and use a JSON Web Token (JWT) Credential Provider
A JSON Web Token (JWT), defined by the open standard [RFC 7519](https://datatracker.ietf.org/doc/html/rfc7519), is a compact and self-contained method for securely transmitting information as a JSON object between parties.
It is important to note that Aembit’s current support for JWT generation is specifically tailored for Snowflake.
## Credential Provider configuration
[Section titled “Credential Provider configuration”](#credential-provider-configuration)
To configure a JSON Web Token (JWT) Credential Provider, follow the steps outlined below.
1. Log into your Aembit Tenant.
2. Once you are logged into your tenant, click on the **Credential Providers** tab in the left sidebar. You are directed to the Credential Providers page displaying a list of existing Credential Providers. In this example, there are no existing Credential Providers.

3. Click on the **New** button to open the Credential Providers dialog window.
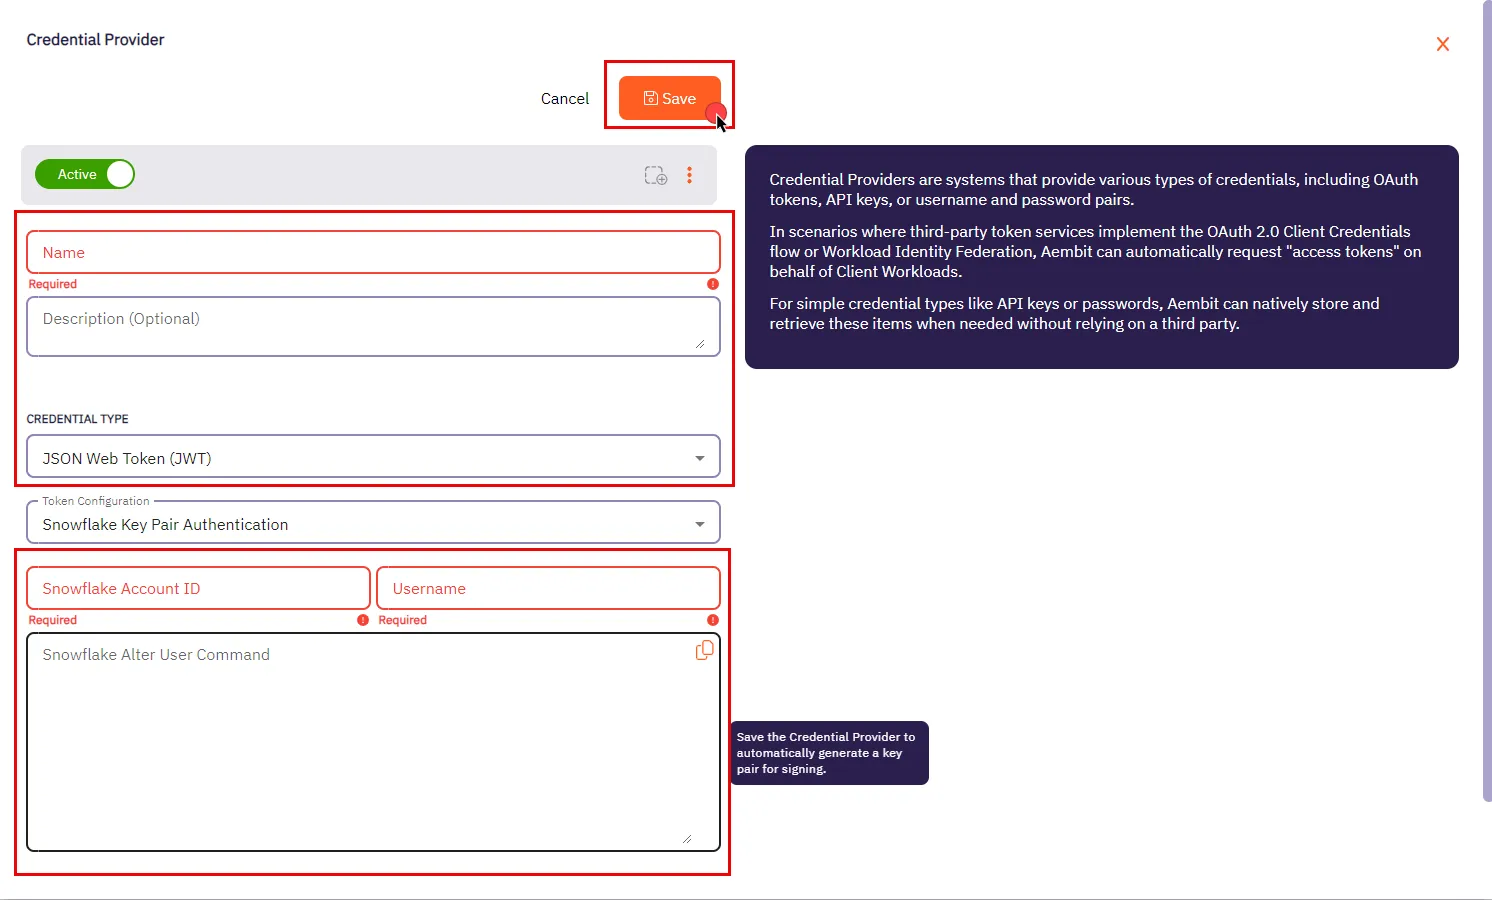
4. In the Credential Providers dialog window, enter the following information:
* **Name** - Name of the Credential Provider.
* **Description** - An optional text description of the Credential Provider.
* **Credential Type** - A dropdown menu that enables you to configure the Credential Provider type. Select **JSON Web Token (JWT)**.
* **Token Configuration** - By default, this field is pre-selected as **Snowflake Key Pair Authentication** for connecting to Snowflake.
* **Snowflake Account ID** - Use this field to input the Snowflake Locator, a unique identifier that distinguishes a Snowflake account within the organization.
* **Username** - The username is your access credential for Snowflake, allowing authentication to access a Server Workload. It is your unique Snowflake username associated with the account.
* **Snowflake Alter User Command** - After saving the Credential Provider, an auto-generated SQL command is produced in this field. This command incorporates a public key, which is essential for establishing trust between your Snowflake account and the JWT tokens issued by Aembit. To execute this command on your Snowflake account, utilize a Snowflake-compatible tool of your choice.
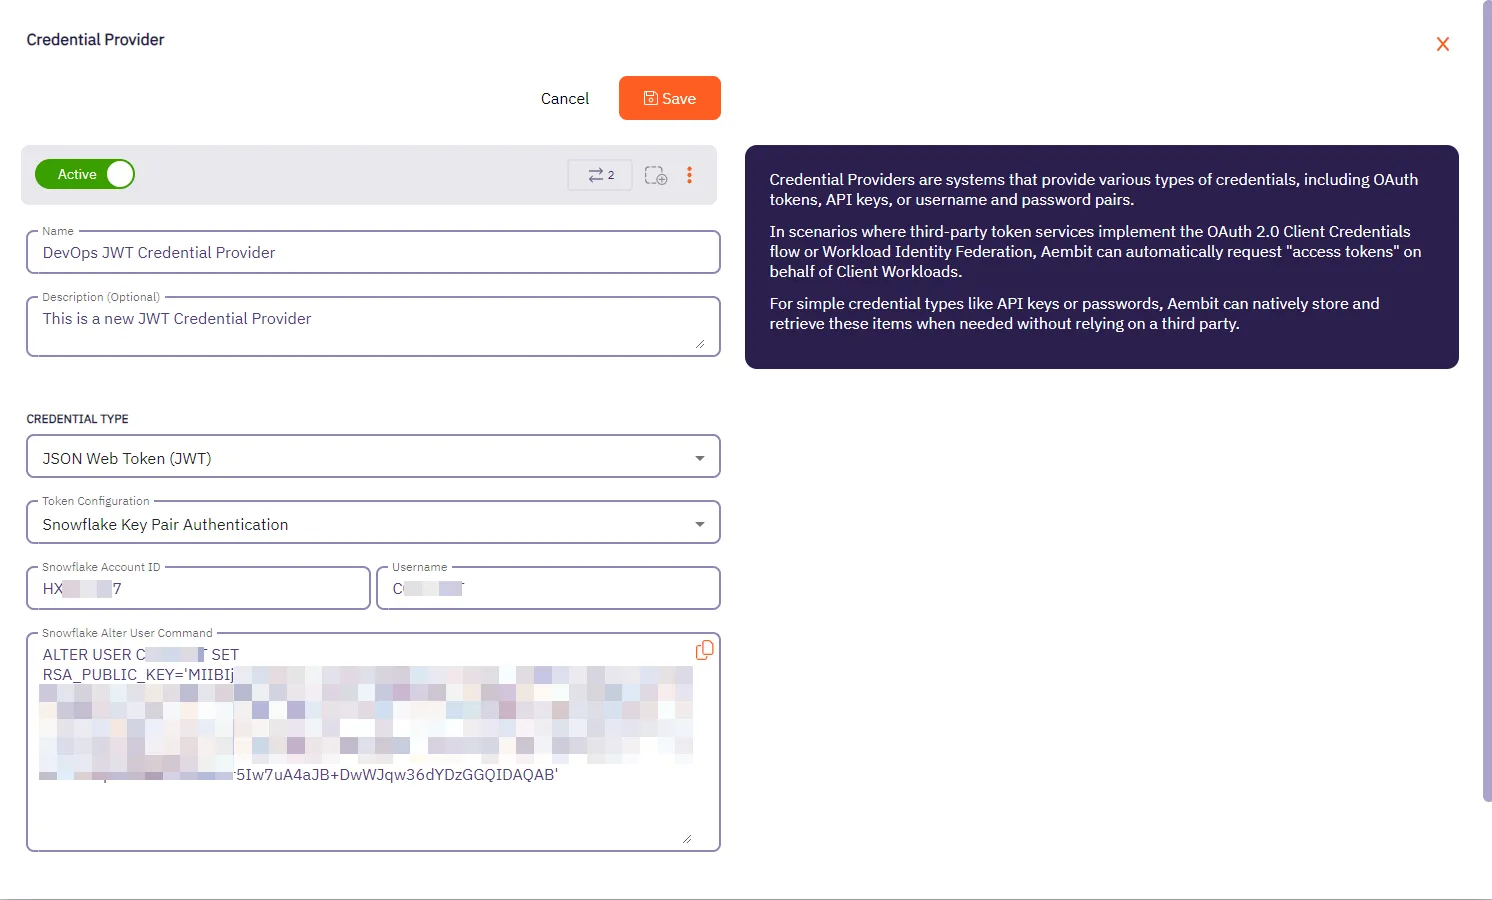
5. Click **Save** when finished. You will be directed back to the Credential Providers page, where you will see your newly created Credential Provider.

# Configure a Managed GitLab Account Credential Provider
> How to create and use a Managed GitLab Account Credential Provider
The Manage GitLab Account Credential Provider uses the [GitLab Service Account Credential Provider Integration](/user-guide/access-policies/credential-providers/integrations/#how-the-gitlab-service-account-integration-works) to allow you to manage the credential lifecycle of your GitLab service accounts.
## Prerequisites
[Section titled “Prerequisites”](#prerequisites)
You must have the following to create a Managed GitLab Account Credential Provider:
* A completed [GitLab Service Account Credential Provider Integration](/user-guide/access-policies/credential-providers/integrations/gitlab)
## Create a Managed GitLab account Credential Provider
[Section titled “Create a Managed GitLab account Credential Provider”](#create-a-managed-gitlab-account-credential-provider)
To create a Managed GitLab Account Credential Provider, follow these steps:
1. Log into your Aembit Tenant, and go to **Credential Providers** in the left sidebar.
2. (Optional) In the top right corner, select the [Resource Set](/user-guide/administration/resource-sets/) that you want this Credential Provider to reside.
3. Click **+ New**, which displays the Credential Provider pop out menu.
4. Enter a **Name** and optional **Description**.
5. Under **Credential Type**, select **Managed GitLab Account**, revealing more fields.
6. Fill out the remaining fields:
1. **Select GitLab Integration** - Select a GitLab Service Account integration you’ve already configured.
Note
If the **Select GitLab Integration** dropdown menu is empty, you either:
* May not have any GitLab Service Account integrations configured yet. See [GitLab Service Account](/user-guide/access-policies/credential-providers/integrations/gitlab) to create one.
* May need to change Resource Sets.
2. **GitLab Group IDs or Paths** - Enter the [group ID](https://docs.gitlab.com/user/group/#access-a-group-by-using-the-group-id) or [group path](https://docs.gitlab.com/user/namespace/#determine-which-type-of-namespace-youre-in). If entering more than one, separate them with commas (for example: `parent-group/subgroup,34,56`).
3. **GitLab Project IDs or Paths** - Enter the [project ID](https://docs.gitlab.com/user/project/working_with_projects/#access-a-project-by-using-the-project-id) or project path. If entering more than one, separate them with commas (`my-project.345678,my-other-project`).
4. **Access Level** - Enter the [GitLab Access Level](https://docs.gitlab.com/api/access_requests/#valid-access-levels) you want your GitLab service account to have.
5. **Scope** - Enter the [GitLab Personal Access Token (PAT) Scopes](https://docs.gitlab.com/user/profile/personal_access_tokens/#personal-access-token-scopes) you want the GitLab service account to have. When entering more than one, separate them with spaces (for example: `api read_user k8s_proxy`).
6. **Lifetime** - Enter the number of days you want credentials to remain active.
The form should look similar to the following screenshot:
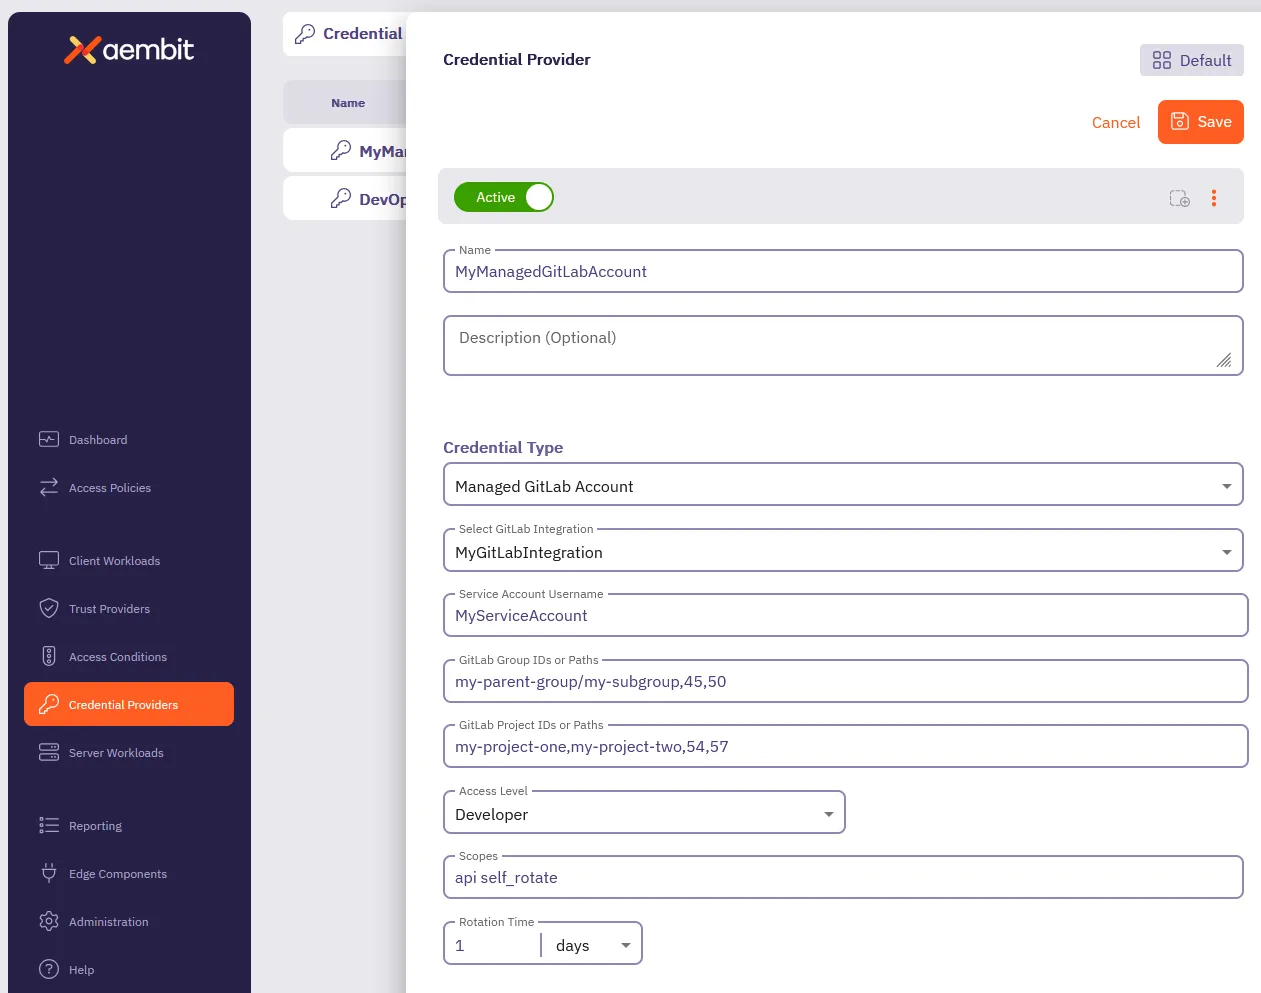
7. Click **Save**.
Aembit displays the new Credential Provider in the list of Credential Providers.
## Verify the Credential Provider
[Section titled “Verify the Credential Provider”](#verify-the-credential-provider)
To verify that you successfully created the Managed GitLab Account Credential Provider and it’s communicating with GitLab:
1. In your Aembit Tenant, go to **Credential Providers**.
2. (Optional) In the top right corner, select the [Resource Set](/user-guide/administration/resource-sets/) that your Credential Provider resides.
3. Select your newly created Credential Provider.
Scroll down to see all the details provided by GitLab for this Service Account.
You should see something similar to the following screenshot:
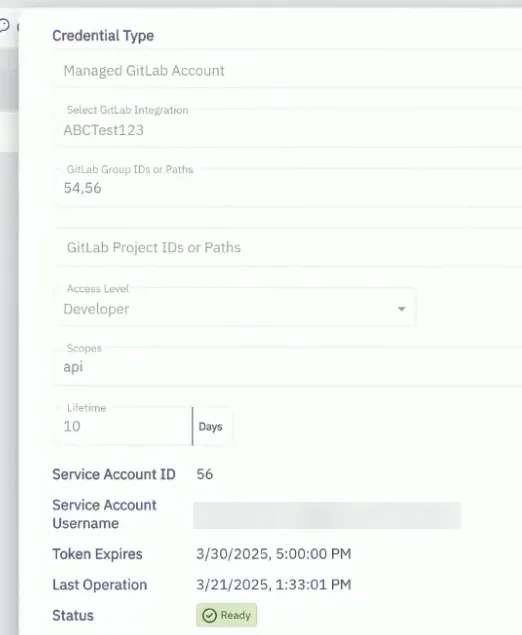
### (Optional) Verify in the GitLab Admin area
[Section titled “(Optional) Verify in the GitLab Admin area”](#optional-verify-in-the-gitlab-admin-area)
To verify that the Managed GitLab Account Credential Provider successfully creates service account in GitLab:
1. Log into your *administrator* GitLab account associated with your GitLab Service Account integration.
2. Go to **Admin area -> Overview -> Users**.
3. Select the service account formatted like this: `Aembit__managed_service_account`.
4. On the **Account** tab, verify that the **Username** and **ID** match the values shown in the Credential Provider in the Aembit UI.
Similar to the following screenshot:

5. On the **Groups and projects** tab, verify that the groups, projects, and access levels match what you entered in the Managed GitLab Account form. GitLab displays these in a table showing Groups with their associated Projects and Access Levels.
Similar to the following screenshot:
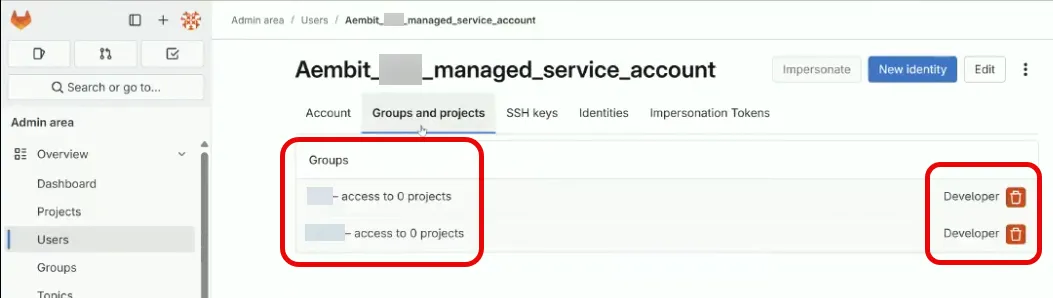
# Configure OAuth 2.0 Authorization Code Credential Provider
> How to create and use an OAuth 2.0 Authorization Code Credential Provider
Many organizations require access to 3rd party SaaS services that have short-lived access tokens generated on demand for authentication to APIs that these 3rd party services provide. Some critical SaaS services that organizations may use, and need Credential Provider support, include:
* Atlassian
* GitLab
* Slack
* Google Workspace
* PagerDuty
Configuring an OAuth 2.0 Authorization Code Credential Provider requires a few steps, including:
1. Create and configure the Credential Provider.
2. Create and configure the 3rd party Application (examples provided in the Server Workload pages).
3. Authorize the Credential Provider to complete the integration.
The sections below describe how you can configure an OAuth 2.0 Authorization Code Credential Provider. For detailed examples on configuring the 3rd party applications, please refer to the respective Server Workload pages, such as the [Atlassian](/user-guide/access-policies/server-workloads/guides/atlassian#oauth-20-authorization-code) example.
## Credential Provider configuration
[Section titled “Credential Provider configuration”](#credential-provider-configuration)
To configure an OAuth 2.0 Authorization Code Credential Provider, follow the steps outlined below.
1. Log into your Aembit Tenant.
2. Once you are logged into your tenant, click on the **Credential Providers** tab in the left sidebar. You are directed to the Credential Providers page displaying a list of existing Credential Providers. In this example, there are no existing Credential Providers.

3. Click on the **New** button to open the Credential Providers dialog window.
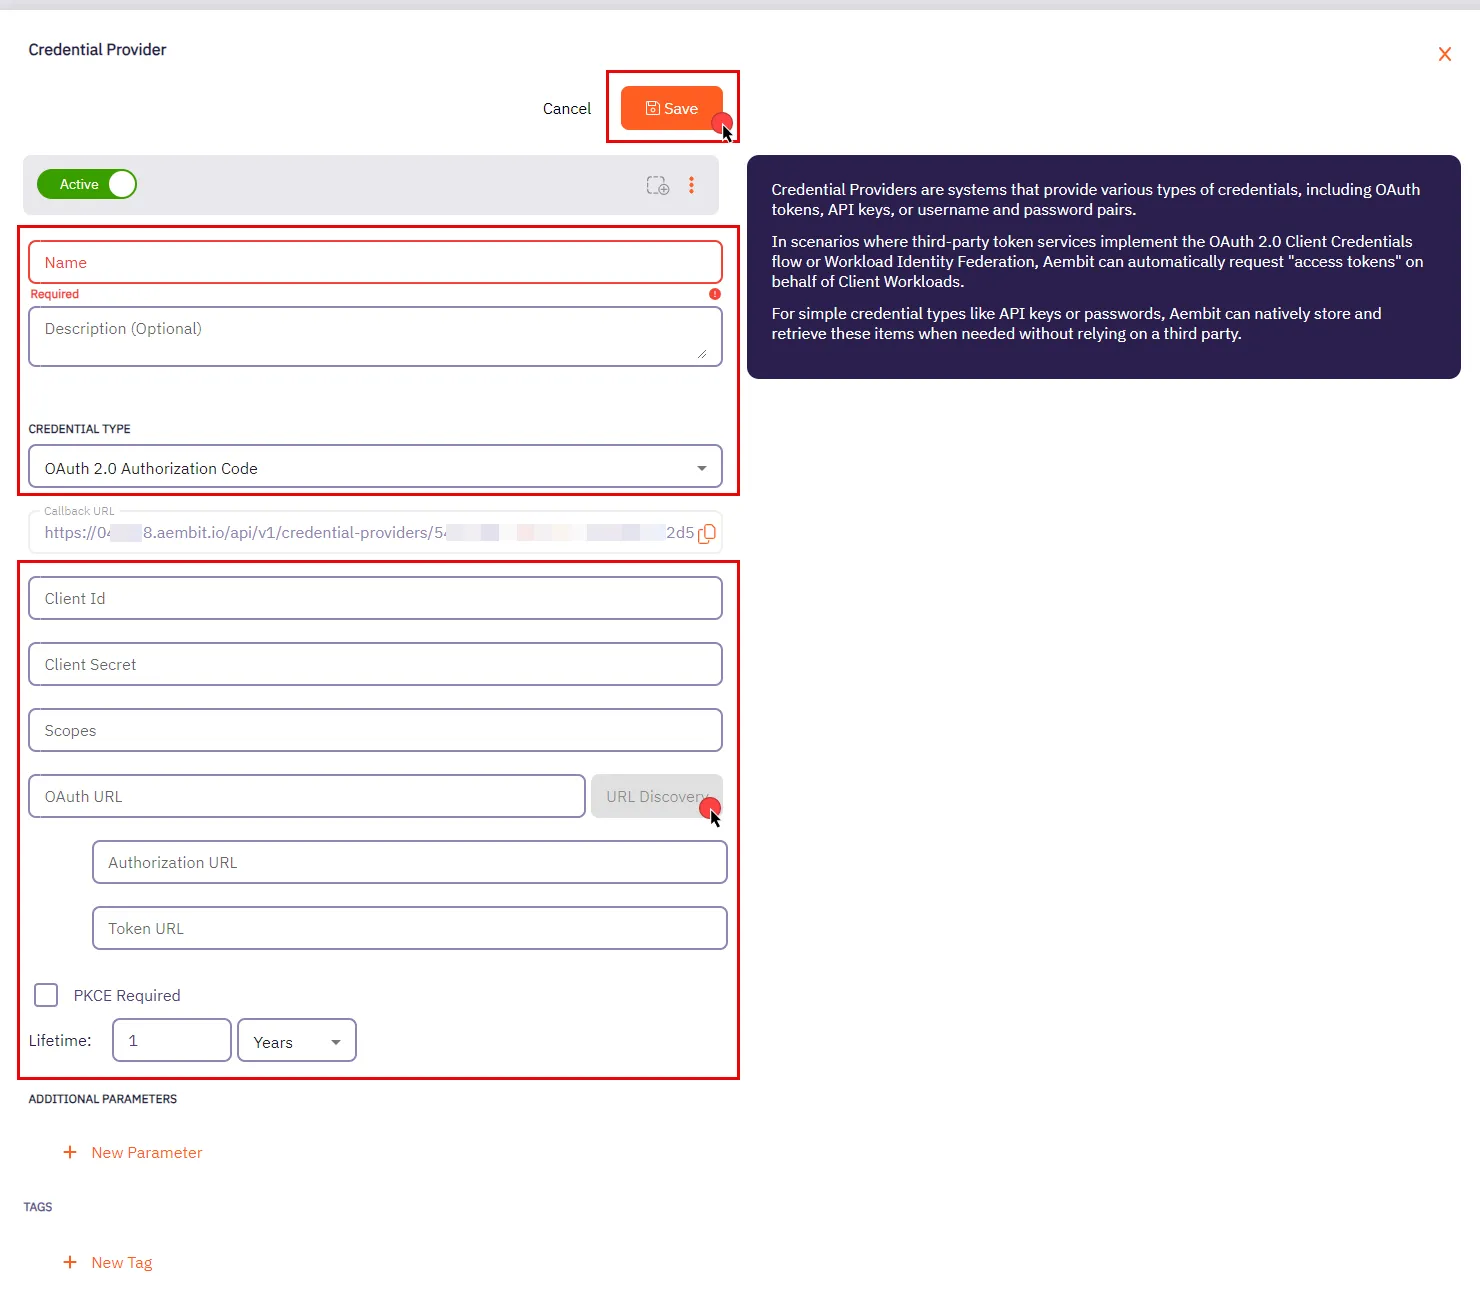
4. In the Credential Providers dialog window, enter the following information:
* **Name** - Name of the Credential Provider.
* **Description** - An optional text description of the Credential Provider.
* **Credential Type** - A dropdown menu that enables you to configure the Credential Provider type. Select **OAuth 2.0 Authorization Code**.
* **Callback URL** - An auto-generated Callback URL from Aembit Admin.
* **Client ID** - The Client ID associated with the Credential Provider.
* **Client Secret** - The Client Secret associated with the Credential Provider.
* **Scopes** - The list of scopes for the Credential Provider. This should be a list of individual scopes separated by spaces.
* **OAuth URL** - The base URL for all OAuth-related requests. Use the **URL Discovery** button next to this field to automatically populate the Authorization URL and Token URL if the correct OAuth URL is provided.
* **Authorization URL** - The endpoint where user is redirected to authenticate and authorize access to your application.
* **Token URL** - The URL where the authorization code is exchanged for an access token.
* **PKCE Required** - Configure Aembit to use PKCE for the 3rd party OAuth integration (recommended).
* **Lifetime** - The lifetime of the retrieved credential. Aembit uses this to send notification reminders to the user prior to the authorization expiring.
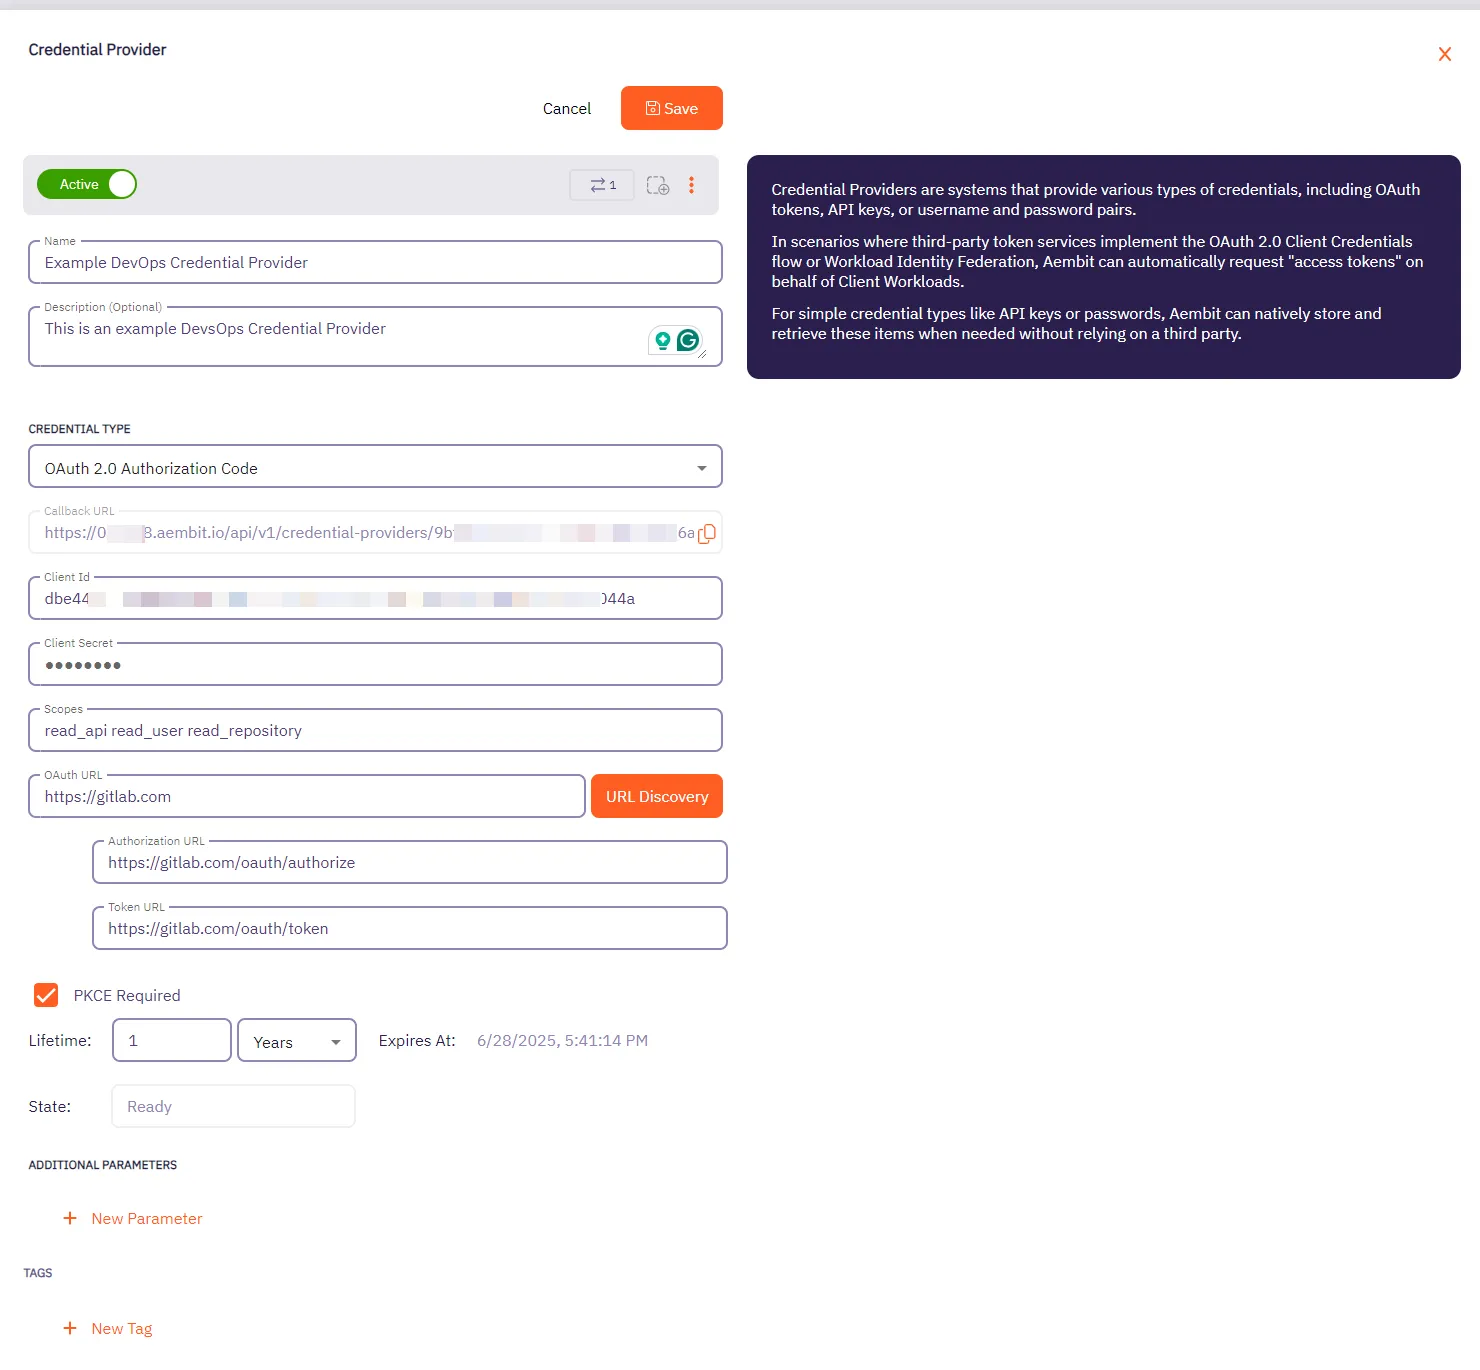
5. Click **Save** when finished. You will be directed back to the Credential Providers page, where you will see your newly created Credential Provider.
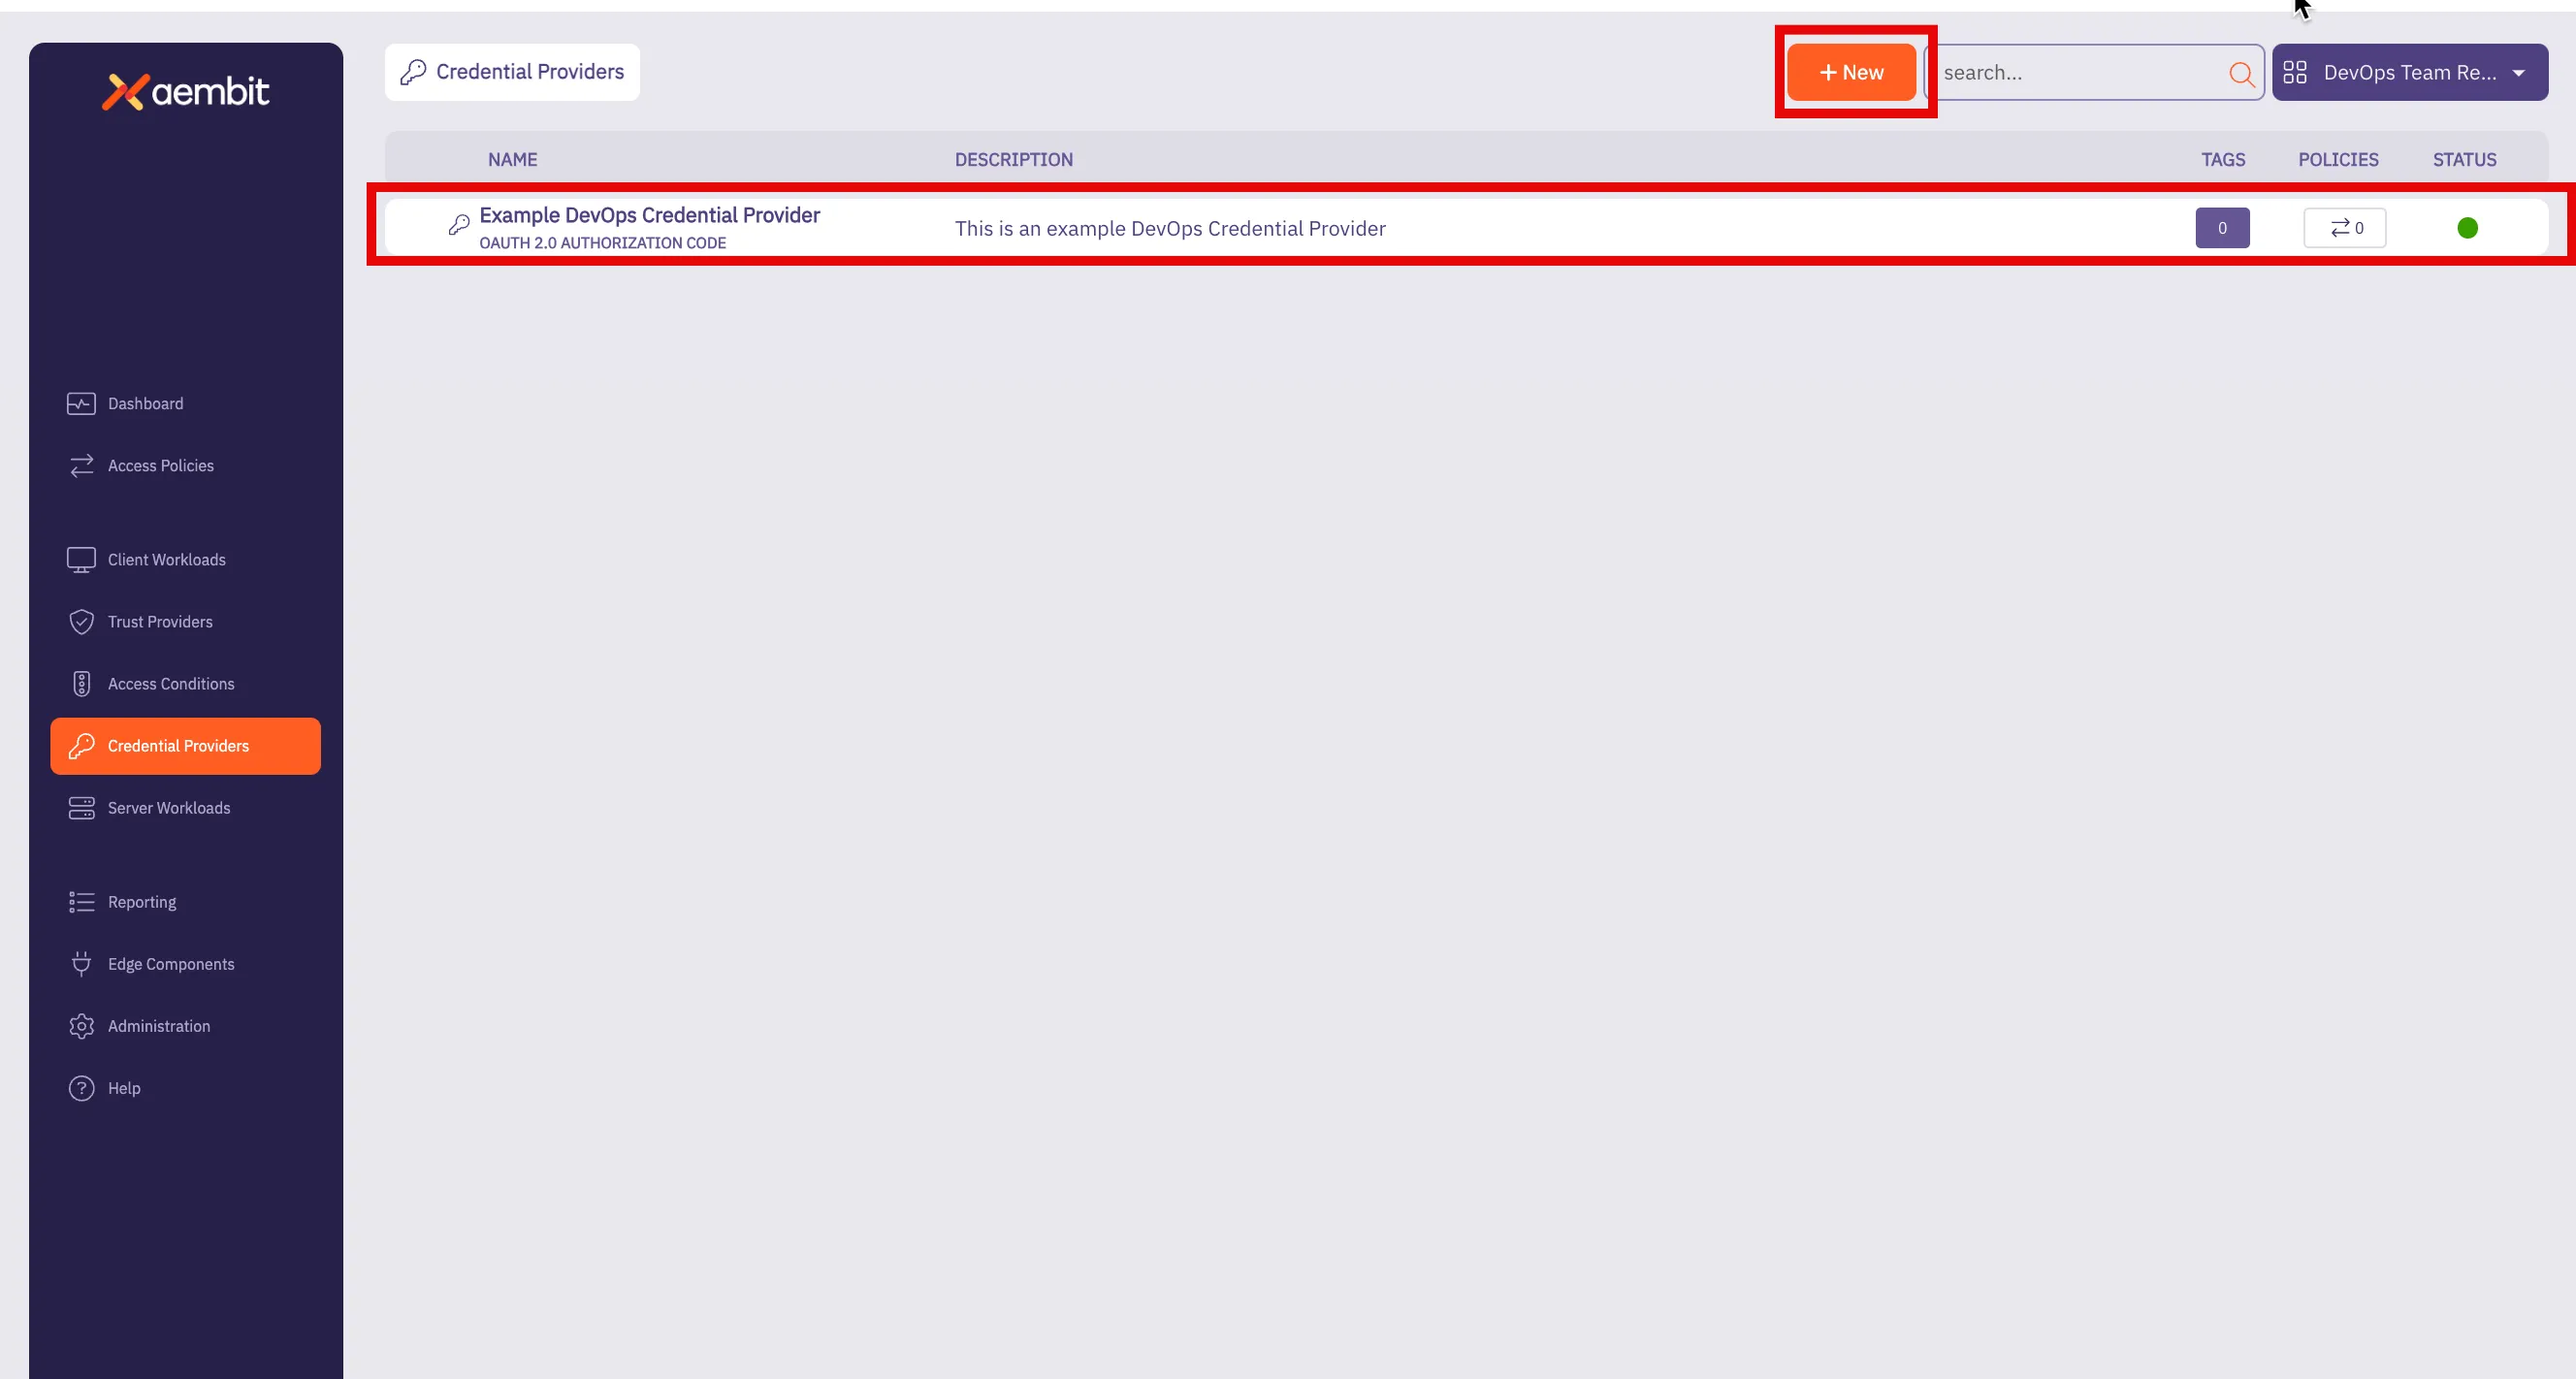
# Configure an OAuth 2.0 Client Credentials Credential Provider
> How to create and use an OAuth 2.0 Client Credentials Credential Provider
The OAuth 2.0 Client Credentials Flow, described in [OAuth 2.0 RFC 6749 (section 4.4)](https://datatracker.ietf.org/doc/html/rfc6749#section-4.4), is a method in which an application can obtain an access token by using its unique credentials such as client ID and client secret.
This process is typically used when an application needs to authenticate itself, without requiring user input, to access protected resources.
## Credential Provider configuration
[Section titled “Credential Provider configuration”](#credential-provider-configuration)
To configure an OAuth 2.0 Client Credentials Credential Provider, follow the steps outlined below.
1. Log into your Aembit Tenant.
2. Once you are logged into your tenant, click on the **Credential Providers** tab in the left sidebar. You are directed to the Credential Providers page displaying a list of existing Credential Providers. In this example, there are no existing Credential Providers.

3. Click on the **New** button to open the Credential Providers dialog window.
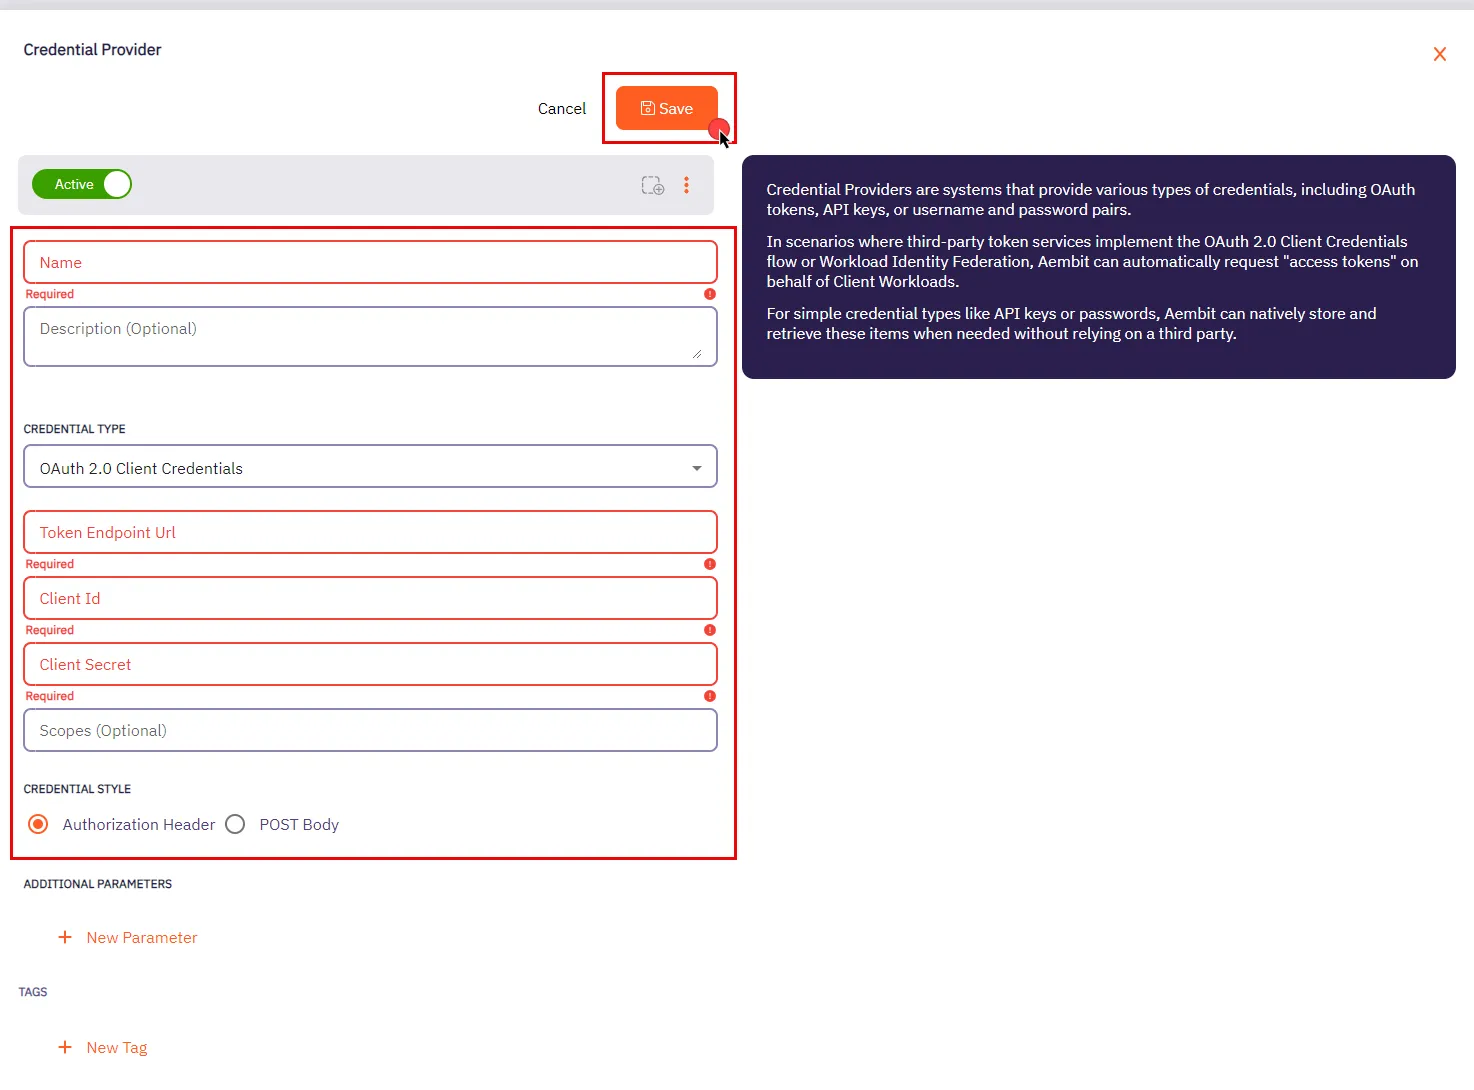
4. In the Credential Providers dialog window, enter the following information:
* **Name** - Name of the Credential Provider.
* **Description** - An optional text description of the Credential Provider.
* **Credential Type** - A dropdown menu that enables you to configure the Credential Provider type. Select **OAuth 2.0 Client Credentials**.
* **Token Endpoint Url** - The Token Endpoint URL is the designated location where an application can obtain an access token through the OAuth 2.0 Client Credentials Flow.
* **Client Id** - The Client ID is a unique identifier assigned to your application upon registration. You can find your application’s Client ID in the respective section provided by the OAuth Server.
* **Client Secret** - The Client Secret is a secret that is only known to the client (application) and the Authorization Server. It is used for secure authentication between the client and the Authorization Server.
* **Scopes (optional)** - OAuth 2.0 allows clients to specify the level of access they require while seeking authorization. Typically, scopes are documented by the server to inform clients about the access required for specific actions.
* **Credential Style** - A set of options that allows you to choose how the credentials are sent to the authorization server when requesting an access token. You can select one of the following options:
* **Authorization Header** - The credentials are included in the request’s Authorization header as a Base64-encoded string. This is the most common and secure method.
* **POST Body** - The credentials are sent in the body of the POST request as form parameters. This method is less common and may be required by certain servers that don’t support the Authorization header.
Make sure to review your Server Workload documentation to determine what is considered the credential style in that specific context.
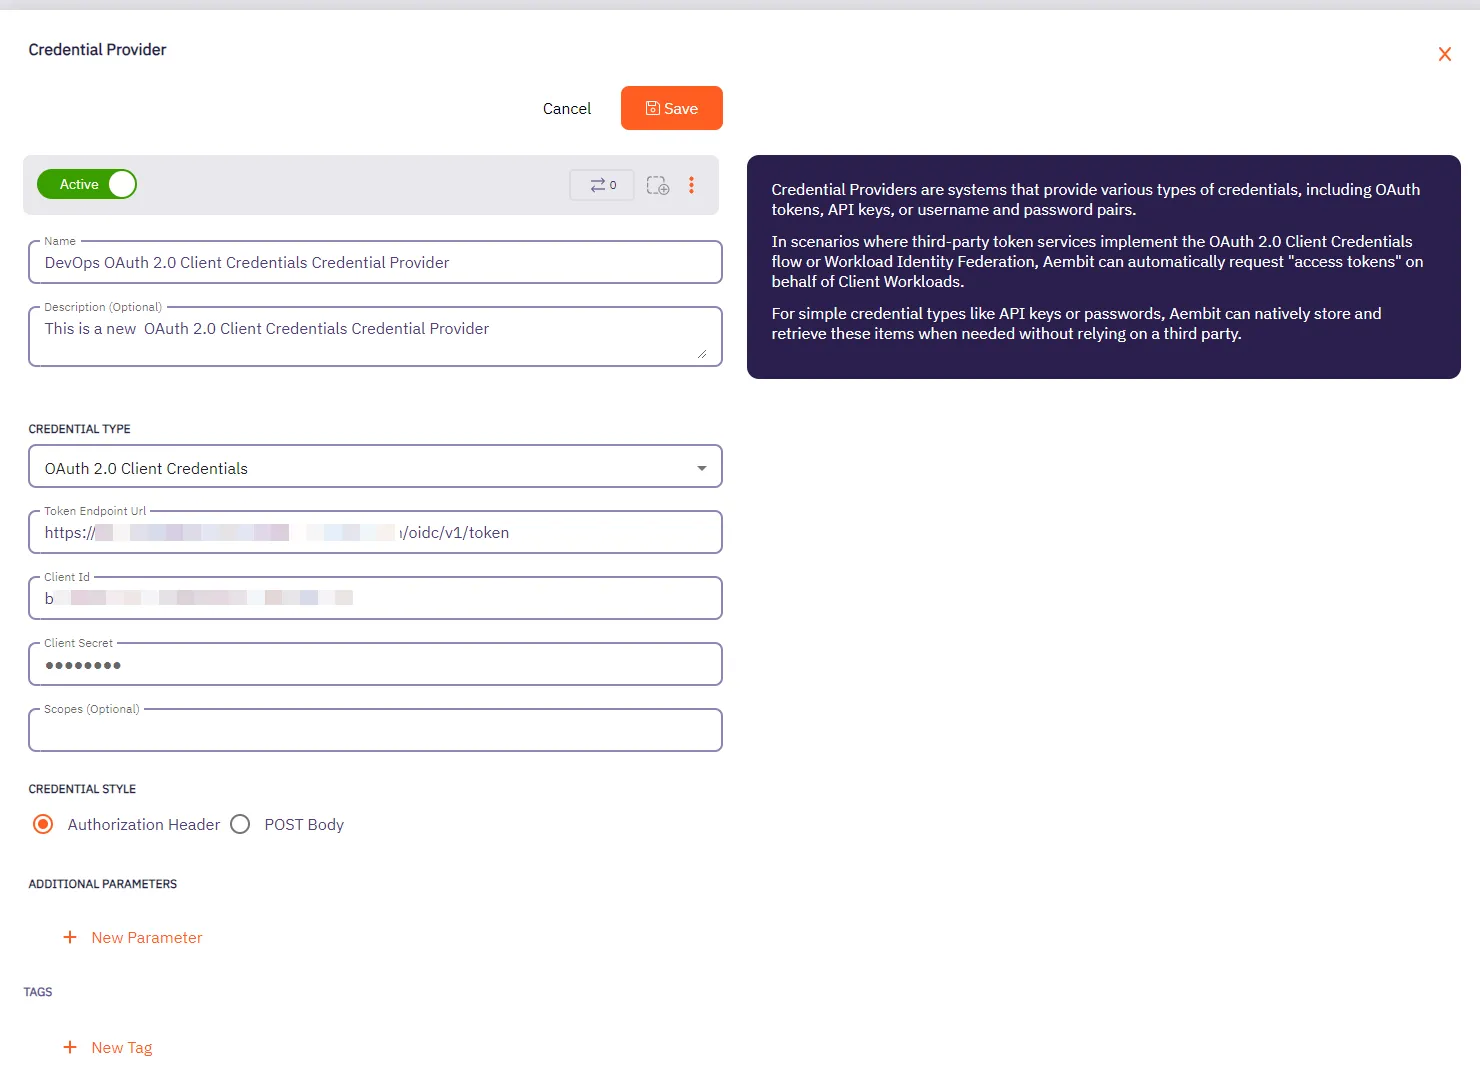
5. Click **Save** when finished. You will be directed back to the Credential Providers page, where you will see your newly created Credential Provider.

# Create an OIDC ID Token Credential Provider
> How to create an OIDC ID Token Credential Provider
The [OIDC ID Token Credential Provider](/user-guide/access-policies/credential-providers/about-oidc-id-token) enables secure identity token generation and exchange with third-party services.
You can configure the following options for your OIDC ID Token Credential Provider:
* custom claims configuration.
* flexible signing algorithms (ES256 and RS256).
* support for Workload Identity Federation (WIF) solutions such as AWS Security Token Service (STS), Google Cloud Platform (GCP) WIF, Azure WIF, Vault, and more.
## Create an OIDC ID Token Credential Provider
[Section titled “Create an OIDC ID Token Credential Provider”](#create-an-oidc-id-token-credential-provider)
To create an OIDC ID Token Credential Provider, follow these steps:
1. Log into your Aembit Tenant, and go to **Credential Providers** in the left sidebar.
2. (Optional) In the top right corner, select the [Resource Set](/user-guide/administration/resource-sets/) that you want this Credential Provider to reside.
3. Click **+ New**, which displays the Credential Provider pop out menu.
4. Enter a **Name** and optional **Description**.
5. Under **Credential Type**, select **OIDC ID Token**, revealing more fields.
6. Fill out the remaining fields:
* **Subject** - Enter the unique identifier for the workload receiving the token.
Choose how Aembit determines the subject claim in your OIDC tokens:
* **Dynamic** - Aembit determines the subject at runtime based on the calling workload’s identity
* **Literal** - Aembit uses a fixed value that as the subject for all tokens
* **Issuer** - The issuer URL identifies who created and signed the token.
This value should match what your relying party expects. Aembit automatically generates this value based on your tenant information.
* **Lifetime** - Specify how long (in seconds) your OIDC tokens remain valid after issuance. Match your security requirements and target system expectations:
* Shorter lifetimes (minutes to hours) increase security
* Longer lifetimes reduce token refresh frequency
* **Signing Algorithm Type** - Select the algorithm Aembit uses to sign your OIDC tokens:
* **RSASSA-PKCS1-v1\_5 using SHA-256** (default) - RS256 Signature with SHA-256 (widely supported)
* **ECDSA using P-256 and SHA-256** - ES256 signature with P-256 curve and SHA-256
* **Audience** - Enter the URI or identifier of the service or API that validates this token. This should match what your target identity broker or service expects.
7. (Optional) For **Custom Claims**, click **New Claim**.
For a list of common custom claims, see [Common OIDC claims](/user-guide/access-policies/credential-providers/about-oidc-id-token#common-oidc-claims).
Then fill out the following:
1. Enter **Claim Name** (for example: `groups`, `email`, `role`, `environment`).
2. For **Value** enter the value based on which type you choose:
* **Literal** - Enter the exact string value to include in the token
* **Dynamic** - Enter an expression or select from available context variables
8. (Optional) Repeat the preceding step for each additional Claim.
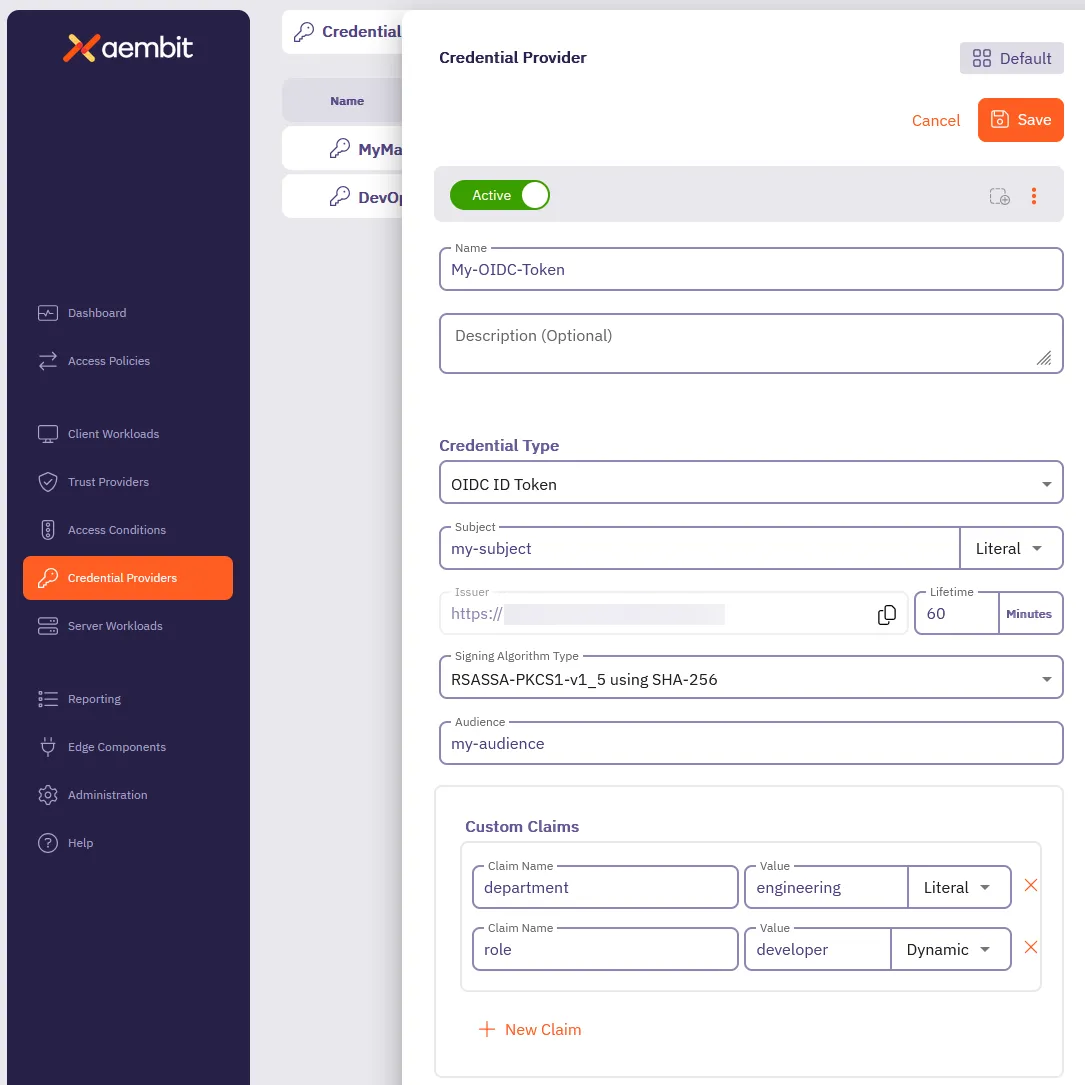
9. Click **Save**.
## Verify your OIDC ID Token Credential Provider
[Section titled “Verify your OIDC ID Token Credential Provider”](#verify-your-oidc-id-token-credential-provider)
To verify an OIDC ID Token is retrievable from the identity provider you configured, follow these steps:
1. In your Aembit Tenant, go to **Credential Providers** in the left sidebar menu.
2. Select the OIDC ID Token from the list of Credential Providers that you want to verify.
This reveals the Credential Provider pop out menu.
3. Click **Verify** at the top.
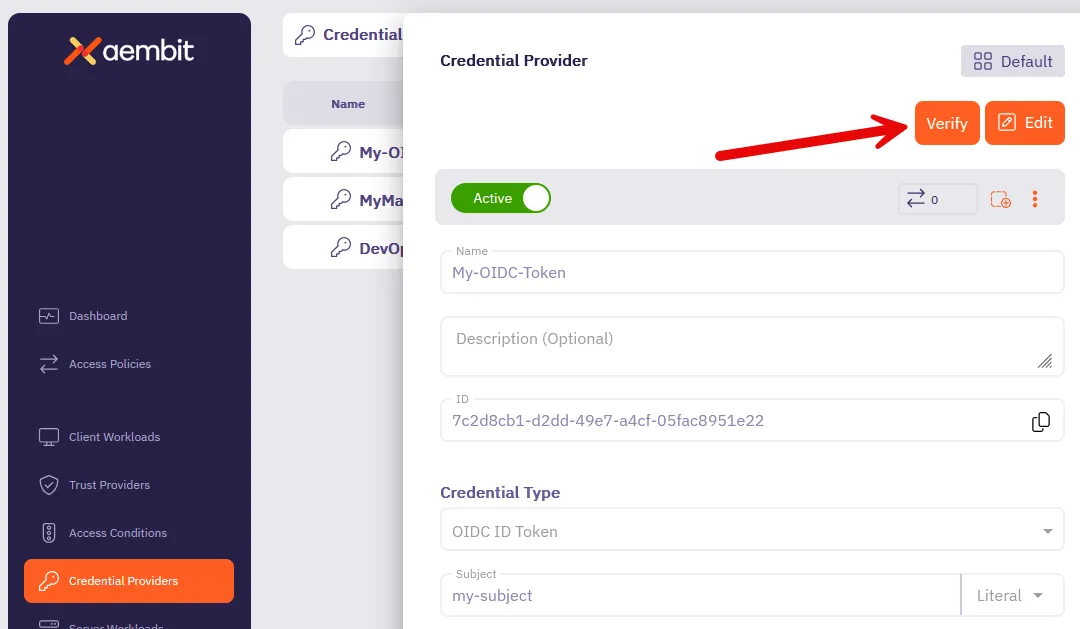
4. When successful, Aembit posts a green notification that says “**Verified successfully**.”
If the verification isn’t successful, double check your configuration to make sure all the values are correct, then try again.
## Terraform configuration
[Section titled “Terraform configuration”](#terraform-configuration)
You can automate the creation and management of your OIDC ID Token Credential Provider using Terraform.
The following is an example
```hcl
resource "aembit_credential_provider" "" {
name = "Example OIDC ID Token"
is_active = true
oidc_id_token = {
subject = "example-subject"
subject_type = "literal" # Options: "literal" or "dynamic"
lifetime_in_minutes = 60
audience = "api.example.com"
algorithm_type = "RS256" # Options: "RS256", "ES256"
custom_claims = [
{
key = "department"
value = "engineering"
value_type = "literal"
},
{
key = "role"
value = "developer"
value_type = "dynamic"
}
]
}
tags = {
environment = "production"
team = "platform"
}
}
```
To create an OIDC ID Token Credential Provider with Terraform, follow these steps:
1. Create a Terraform file (for example, `oidc_provider.tf`) with your configuration
2. Initialize the Terraform environment:
```shell
terraform init
```
3. Review the planned changes:
```shell
terraform plan
```
4. Apply the configuration:
```shell
terraform apply
```
5. [Verify](#verify-your-oidc-id-token-credential-provider) the newly created Credential Provider in the Aembit Tenant UI.
# Configure a Username & Password Credential Provider
> How to create and use a Username & Password Credential Provider
The Username & Password credential provider is tailored for Server Workloads requiring username and password authentication, such as databases and Server Workloads utilizing HTTP Basic authentication.
## Credential Provider configuration
[Section titled “Credential Provider configuration”](#credential-provider-configuration)
To configure a Username & Password Credential Provider, follow the steps outlined below.
1. Log into your Aembit Tenant.
2. Once you are logged into your tenant, click on the **Credential Providers** tab in the left sidebar. You are directed to the Credential Providers page displaying a list of existing Credential Providers. In this example, there are no existing Credential Providers.

3. Click on the **New** button to open the Credential Providers dialog window.
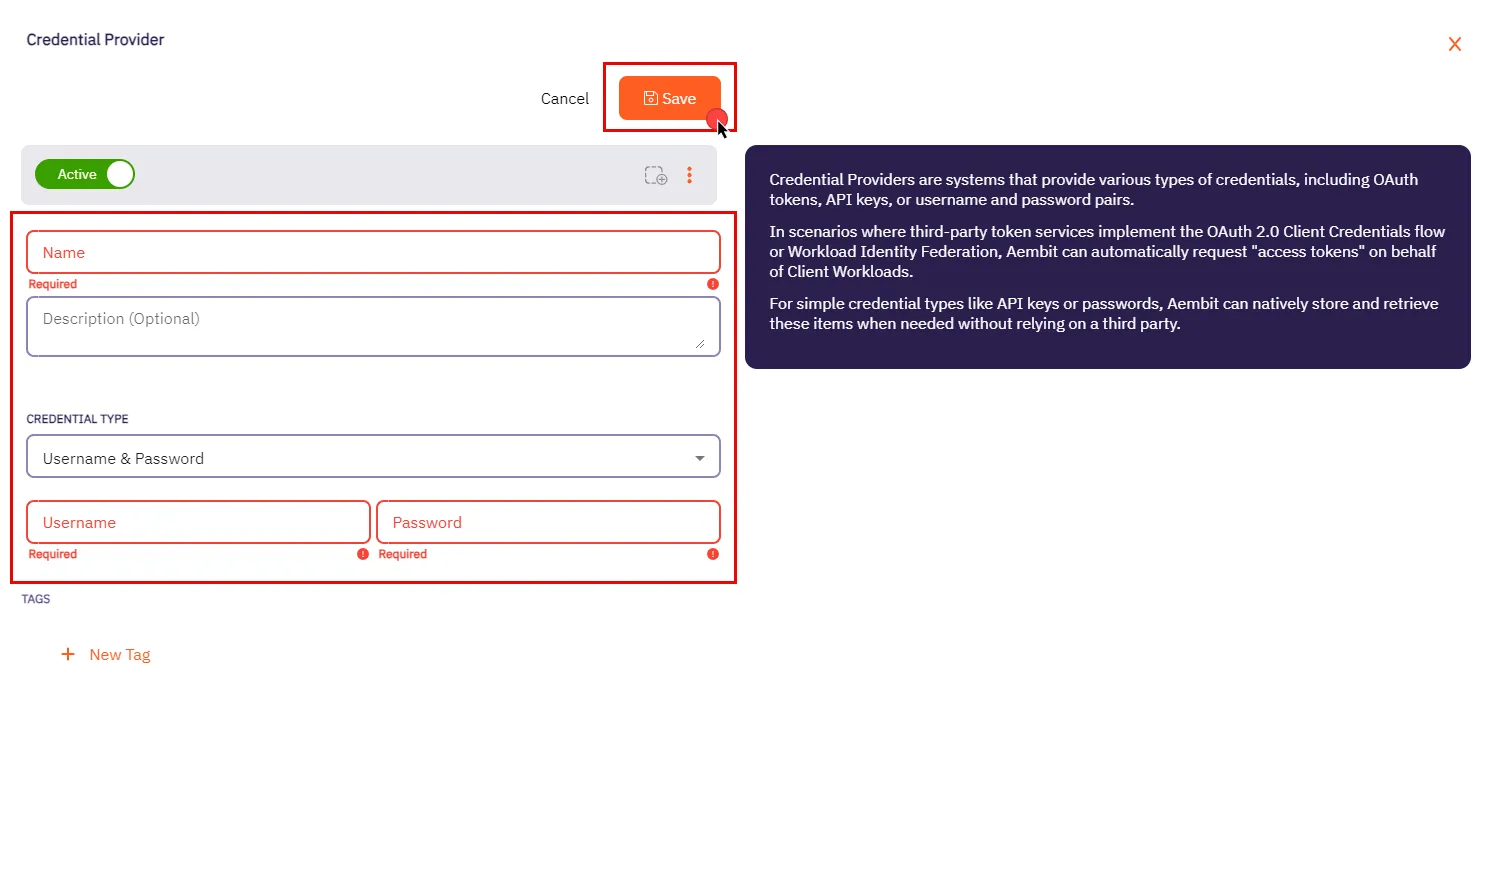
4. In the Credential Providers dialog window, enter the following information:
* **Name** - Name of the Credential Provider.
* **Description** - An optional text description of the Credential Provider.
* **Credential Type** - A dropdown menu that enables you to configure the Credential Provider type. Select **Username & Password**.
* **Username** - The username serves as the access credential associated with the account or system, allowing authentication for accessing the Server Workload.
Depending on the context, the **Username** could take various forms:
* **Email Address** - Use the full email address associated with the account.
* **Master User** - In certain systems, this might be a master user account that has privileged access.
* **Account Username** - This could be a specific username assigned to the account for authentication purposes.
Please make sure to review your Server Workload documentation to determine what is considered a username in that specific context.
* **Password** - The corresponding password for the provided username. Please refer to the specific Server Workload documentation for accurate configuration details.
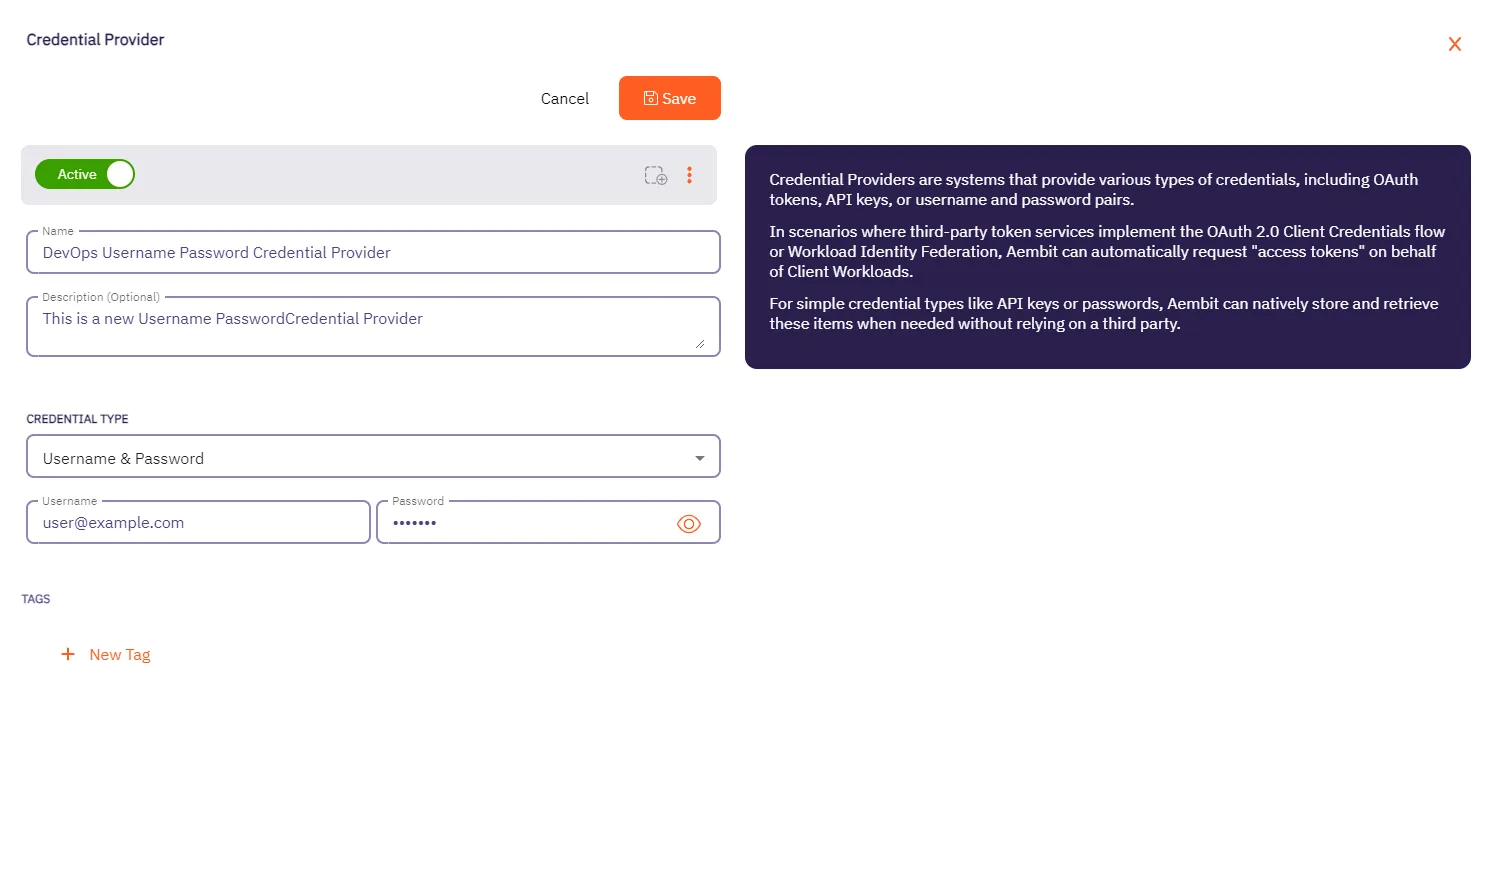
5. Click **Save** when finished. You will be directed back to the Credential Providers page, where you will see your newly created Credential Provider.
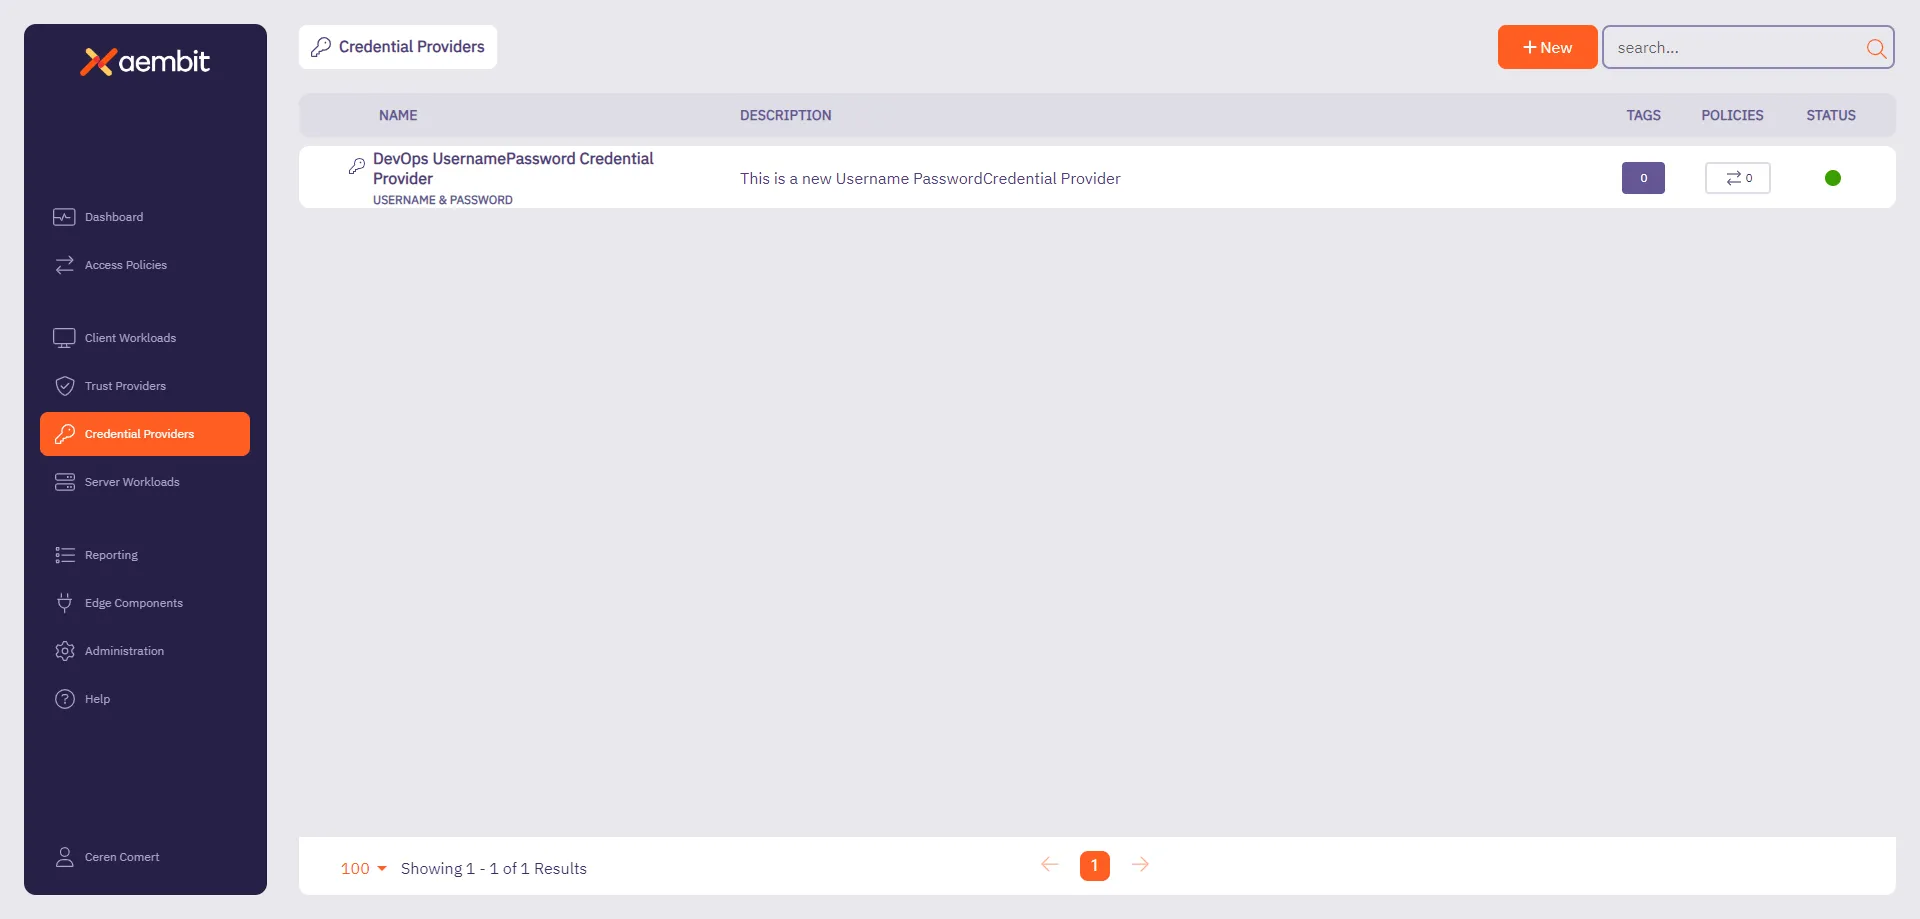
# Configure a HashiCorp Vault Client Token Credential Provider
> How to configure a Credential Provider for HashiCorp Vault Client Token
Aembit’s Credential Provider for HashiCorp Vault (or just Vault) enables you to integrate Aembit with your Vault services.
This Credential Provider allows your Client Workloads to securely authenticate with Vault using OpenID Connect (OIDC) and obtain short-lived JSON Web Tokens (JWTs) for accessing Vault resources.
* **OIDC Issuer URL** - OpenID Connect (OIDC) Issuer URL, auto-generated by Aembit, is a dedicated endpoint for OIDC authentication within HashiCorp Vault.
## Accessing Vault on private networks
[Section titled “Accessing Vault on private networks”](#accessing-vault-on-private-networks)
By default, Aembit handles authentication through Aembit Cloud for Vaults accessible from the cloud.
For Vault instances on private networks, enable **Private Network Access** during configuration to allow your colocated Agent Proxy to handle authentication directly. Note that your Vault Server Workload must still be accessible from the network edge.
Click to see example
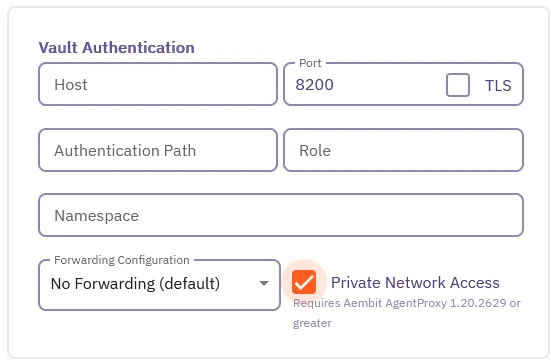
Caution
When enabling Vault Private Network Access, you must use Agent Proxy `v1.21.2670` or higher.
## Configure a Vault Credential Provider
[Section titled “Configure a Vault Credential Provider”](#configure-a-vault-credential-provider)
To configure a Vault Credential Provider, follow these steps:
1. Log in to your Aembit Tenant, and in the left sidebar menu, go to **Credential Providers**.
2. Click **+ New**, which reveals the **Credential Provider** page.
3. In the Credential Providers dialog window, enter the following information:
4. Enter a **Name** and optional **Description**.
5. In the **Credential Type** dropdown, select **Vault Client Token**, revealing new fields.
6. In the **JSON Web Token (JWT)** section, enter a Vault-compatible **Subject** value.
If you [configured Vault Roles](/user-guide/access-policies/server-workloads/guides/hashicorp-vault#configure-vault-role) with `bound_subject`, the **Subject** value needs to match the `bound_subject` value exactly.
7. Define any **Custom Claims** you may have by clicking **+ New Claim**, and entering the **Claim Name** and **Value** for each custom claim you add.
8. Enter the remaining details in the **Vault Authentication** section:
* **Host** - Hostname of your Vault Server.
* **Port** - The port to access the Vault service. Optionally, you may check the **TLS** checkbox to require TLS connections to your Vault service.
* **Authentication Path** - The path to your OIDC authentication configuration in the Vault service.
* **Role** - The access credential associated with the Vault **Authentication Path**.
* **Namespace** - The environment namespace of the Vault service.
* **Forwarding Configuration** - Specify how Aembit should forward requests between Vault clusters or servers.
This setting ensures Aembit’s request handling aligns with your Vault cluster’s forwarding configuration. See Vault configuration parameters for more details about request forwarding in Vault.
For more info, see the [Vault configuration parameters](https://developer.hashicorp.com/vault/docs/configuration) in the official HashiCorp Vault docs.
* **Private Network Access** - Check this if your Vault exists in a private network, or a network that’s accessible only from your Edge deployment (for example, when Vault is behind a regional load-balancer). Otherwise, leave it unchecked for Vaults that are accessible from the cloud. See [Accessing Vault on private networks](#accessing-vault-on-private-networks).
Caution
When enabling Vault Private Network Access, you must use Agent Proxy `v1.21.2670` or higher.
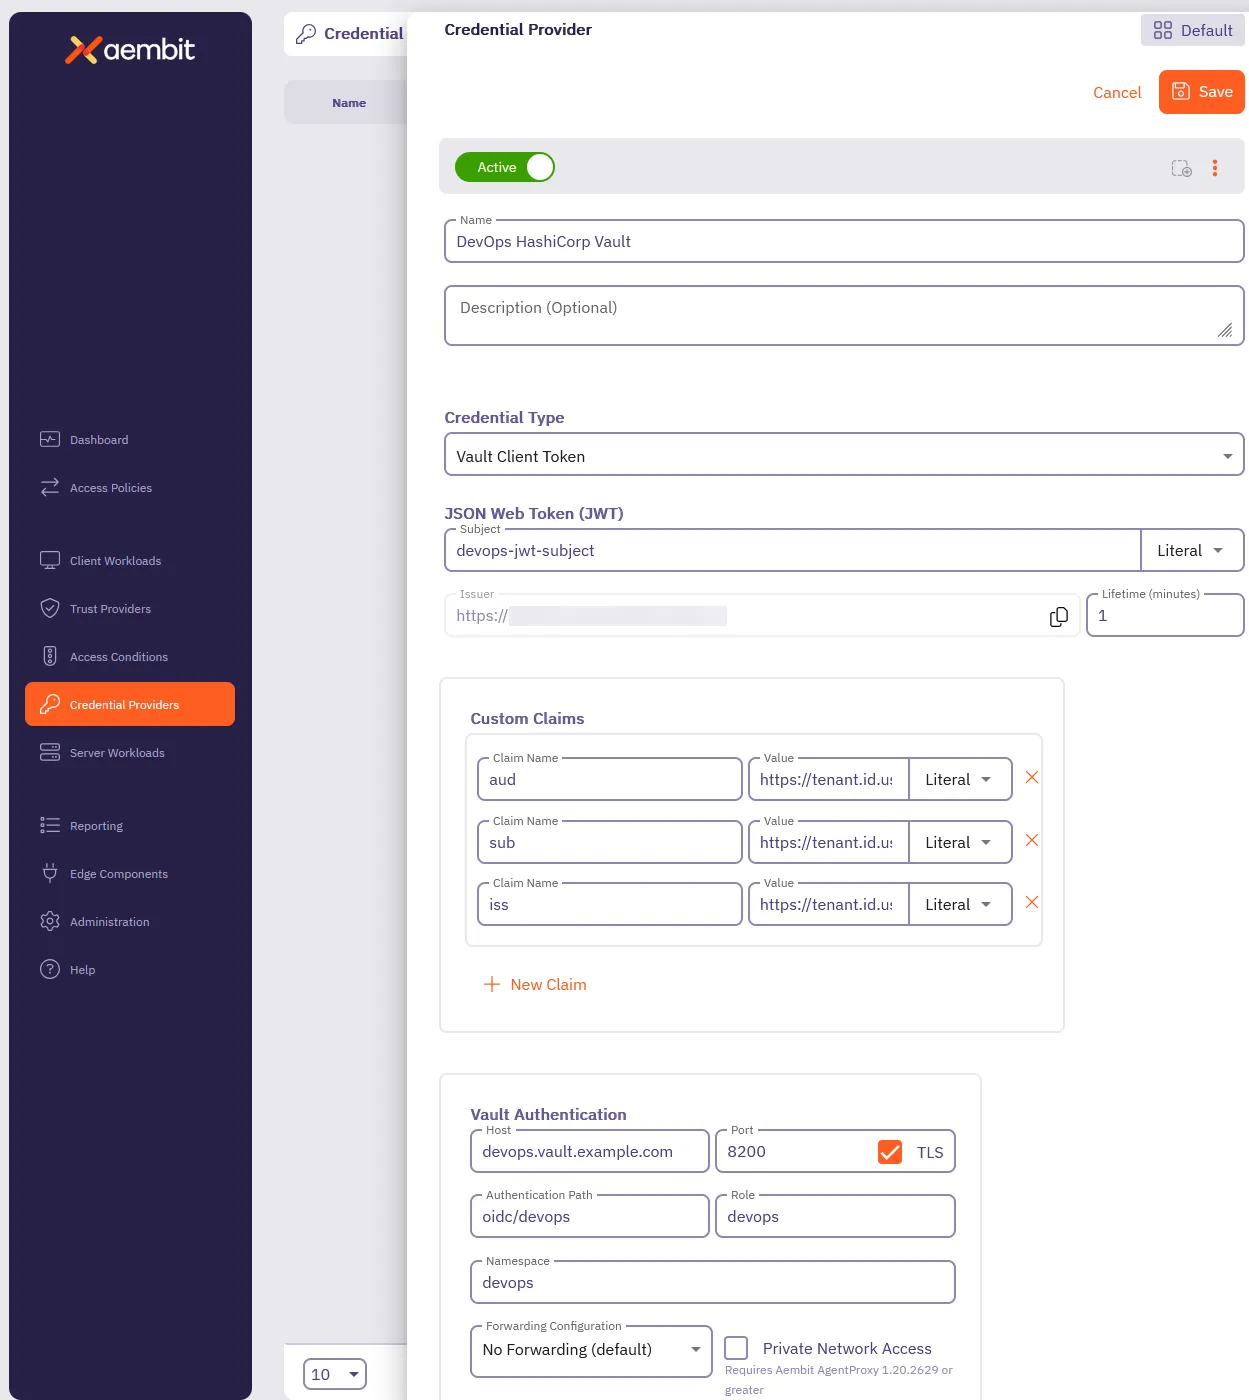
9. Click **Save**.
Aembit displays your new Vault Credential Provider on the **Credential Providers** page.
# Server Workloads
> This document provides a high-level description of Server Workloads
## Server Workloads by category
[Section titled “Server Workloads by category”](#server-workloads-by-category)
The following sections break down the Server Workloads by category. Click on the links below to learn more about each category and its respective Server Workloads.
### AI and machine learning
[Section titled “AI and machine learning”](#ai-and-machine-learning)
* [Claude](/user-guide/access-policies/server-workloads/guides/claude)
* [Gemini](/user-guide/access-policies/server-workloads/guides/gemini)
* [OpenAI](/user-guide/access-policies/server-workloads/guides/openai)
### CI/CD
[Section titled “CI/CD”](#cicd)
* [GitHub REST](/user-guide/access-policies/server-workloads/guides/github-rest)
* [GitLab REST](/user-guide/access-policies/server-workloads/guides/gitlab-rest)
* [SauceLabs](/user-guide/access-policies/server-workloads/guides/saucelabs)
### Cloud platforms and services
[Section titled “Cloud platforms and services”](#cloud-platforms-and-services)
* [Apigee](/user-guide/access-policies/server-workloads/guides/apigee)
* [Microsoft Graph](/user-guide/access-policies/server-workloads/guides/microsoft-graph)
### CRM
[Section titled “CRM”](#crm)
* [Salesforce REST](/user-guide/access-policies/server-workloads/guides/salesforce-rest)
### Data analytics
[Section titled “Data analytics”](#data-analytics)
* [AWS Redshift](/user-guide/access-policies/server-workloads/guides/aws-redshift)
* [Databricks](/user-guide/access-policies/server-workloads/guides/databricks)
* [GCP BigQuery](/user-guide/access-policies/server-workloads/guides/gcp-bigquery)
* [Looker Studio](/user-guide/access-policies/server-workloads/guides/looker-studio)
* [Snowflake](/user-guide/access-policies/server-workloads/guides/snowflake)
### Databases
[Section titled “Databases”](#databases)
* [AWS MySQL](/user-guide/access-policies/server-workloads/guides/aws-mysql)
* [AWS PostgreSQL](/user-guide/access-policies/server-workloads/guides/aws-postgres)
* [Local MySQL](/user-guide/access-policies/server-workloads/guides/local-mysql)
* [Local PostgreSQL](/user-guide/access-policies/server-workloads/guides/local-postgres)
* [Local Redis](/user-guide/access-policies/server-workloads/guides/local-redis)
### Financial services
[Section titled “Financial services”](#financial-services)
* [PayPal](/user-guide/access-policies/server-workloads/guides/paypal)
* [Stripe](/user-guide/access-policies/server-workloads/guides/stripe)
### IT tooling
[Section titled “IT tooling”](#it-tooling)
* [PagerDuty](/user-guide/access-policies/server-workloads/guides/pagerduty)
### Productivity
[Section titled “Productivity”](#productivity)
* [Atlassian](/user-guide/access-policies/server-workloads/guides/atlassian)
* [Box](/user-guide/access-policies/server-workloads/guides/box)
* [Freshsales](/user-guide/access-policies/server-workloads/guides/freshsales)
* [Google Drive](/user-guide/access-policies/server-workloads/guides/google-drive)
* [Slack](/user-guide/access-policies/server-workloads/guides/slack)
### Security
[Section titled “Security”](#security)
* [Aembit](/user-guide/access-policies/server-workloads/guides/aembit)
* [Beyond Identity](/user-guide/access-policies/server-workloads/guides/beyond-identity)
* [GitGuardian](/user-guide/access-policies/server-workloads/guides/gitguardian)
* [HashiCorp Vault](/user-guide/access-policies/server-workloads/guides/hashicorp-vault)
* [KMS](/user-guide/access-policies/server-workloads/guides/kms)
* [Okta](/user-guide/access-policies/server-workloads/guides/okta)
* [Snyk](/user-guide/access-policies/server-workloads/guides/snyk)
# Aembit API
> This page describes how to configure Aembit to enable a Client Workload to authenticate and interact with the Aembit API.
[Aembit](https://aembit.io/) is a Workload Identity and Access Management (IAM) Platform for managing access between workloads—Workload IAM. The Aembit API enables Client Workloads, such as CI/CD tools, to authenticate and interact with Aembit without relying on long-lived secrets. This secret-less authentication is achieved through workload attestation via a Trust Provider. By configuring Client Workloads with the appropriate trust and credential components, Aembit ensures secure, role-based access to your tenant’s API resources.
On this page you can find the Aembit configuration required to work with the Aembit service as a Server Workload using the REST API.
Prerequisites
Before proceeding with the configuration, make sure you have configured your Aembit Tenant.
For more detailed information on how to use the Aembit API, please refer to the [official Aembit documentation](/api-guide/).
## Credential Provider configuration
[Section titled “Credential Provider configuration”](#credential-provider-configuration)
1. Create a new Credential Provider.
* **Name** - Choose a user-friendly name.
* **Credential Type** - [Aembit Access Token](/user-guide/access-policies/credential-providers/aembit-access-token)
* **Audience** - Auto-generated by Aembit, this is a tenant specific server hostname used for authentication and connectivity with the Aembit API. Copy this value for use in the configuration that follows.
* **Role** - Choose a role with the appropriate permissions that align with your Client Workload’s needs. We recommend following the principle of least privilege, assigning the minimum necessary permissions for the task. If needed, you can [create new customer roles](/user-guide/administration/roles/add-roles).
* **Lifetime** - Specify the duration for which the generated access token remains valid.
## Server Workload configuration
[Section titled “Server Workload configuration”](#server-workload-configuration)
1. Create a new Server Workload.
* **Name** - Choose a user-friendly name.
2. Configure the service endpoint:
* **Host** - Enter the previously copied audience value.
* **Application Protocol** - HTTP
* **Port** - 443 with TLS
* **Forward to Port** - 443 with TLS
* **Authentication method** - HTTP Authentication
* **Authentication scheme** - Bearer
## Access Policy
[Section titled “Access Policy”](#access-policy)
This page covers the configuration of the Server Workload and Credential Provider, which are tailored to different types of Server Workloads. To complete the setup, you will need to create an access policy for a Client Workload to access the Aembit Server Workload and associate it with the Credential Provider, Trust Provider, and any optional Access Conditions.
## Client Workload configuration
[Section titled “Client Workload configuration”](#client-workload-configuration)
Aembit now handles the credentials required to access the Aembit API as a Server Workload, eliminating the need for you to manage them directly. You can safely remove any previously used credentials from the Client Workload.
## Required features
[Section titled “Required features”](#required-features)
* The [TLS Decrypt](/user-guide/deploy-install/advanced-options/tls-decrypt/configure-tls-decrypt) feature is required if the Client Workload uses the Agent Proxy to access the Aembit API.
# Apigee
> This page describes how to configure Aembit to work with the Apigee Server Workload.
#
[Google Apigee](https://cloud.google.com/apigee?hl=en) is a full lifecycle API management platform that enables organizations to design, secure, deploy, monitor, and scale APIs. With its comprehensive set of features and scalable architecture, Google Apigee empowers developers to build efficient, reliable, and secure APIs that drive business growth.
Below you can find the Aembit configuration required to work with the Google Apigee service as a Server Workload using the REST APIs.
Aembit supports multiple authentication/authorization methods for Apigee. This page describes scenarios where the Credential Provider is configured for Apigee via:
* [OAuth 2.0 Authorization Code (3LO)](/user-guide/access-policies/server-workloads/guides/apigee#oauth-20-authorization-code)
* [API Key](/user-guide/access-policies/server-workloads/guides/apigee#api-key)
Prerequisites
Before proceeding with the configuration, ensure you have the following:
* An active Google Cloud account
* An existing API Proxy (API Key Method)
* App set up in the Google Apigee platform
If you have not created a proxy before, you can follow the steps in the next section. For more information on creating an API Proxy, please refer to the [official Google documentation](https://cloud.google.com/apigee/docs/api-platform/get-started/get-started).
## OAuth 2.0 Authorization Code
[Section titled “OAuth 2.0 Authorization Code”](#oauth-20-authorization-code)
### Server Workload Configuration
[Section titled “Server Workload Configuration”](#server-workload-configuration)
1. Create a new Server Workload.
* **Name** - Choose a user-friendly name.
2. Configure the Service endpoint:
* **Host** - `apigee.googleapis.com`
* **Application Protocol** - HTTP
* **Port** - 443 with TLS
* **Forward to Port** - 443 with TLS
* **Authentication method** - HTTP Authentication
* **Authentication scheme** - Bearer
### Credential Provider Configuration
[Section titled “Credential Provider Configuration”](#credential-provider-configuration)
1. Sign in to the Google Cloud Console and navigate to the [Credentials](https://console.cloud.google.com/apis/credentials) page. Ensure you are working within a GCP project for which you have authorization.
2. On the **Credentials** dashboard, click **Create Credentials** located in the top left corner and select the **OAuth client ID** option.
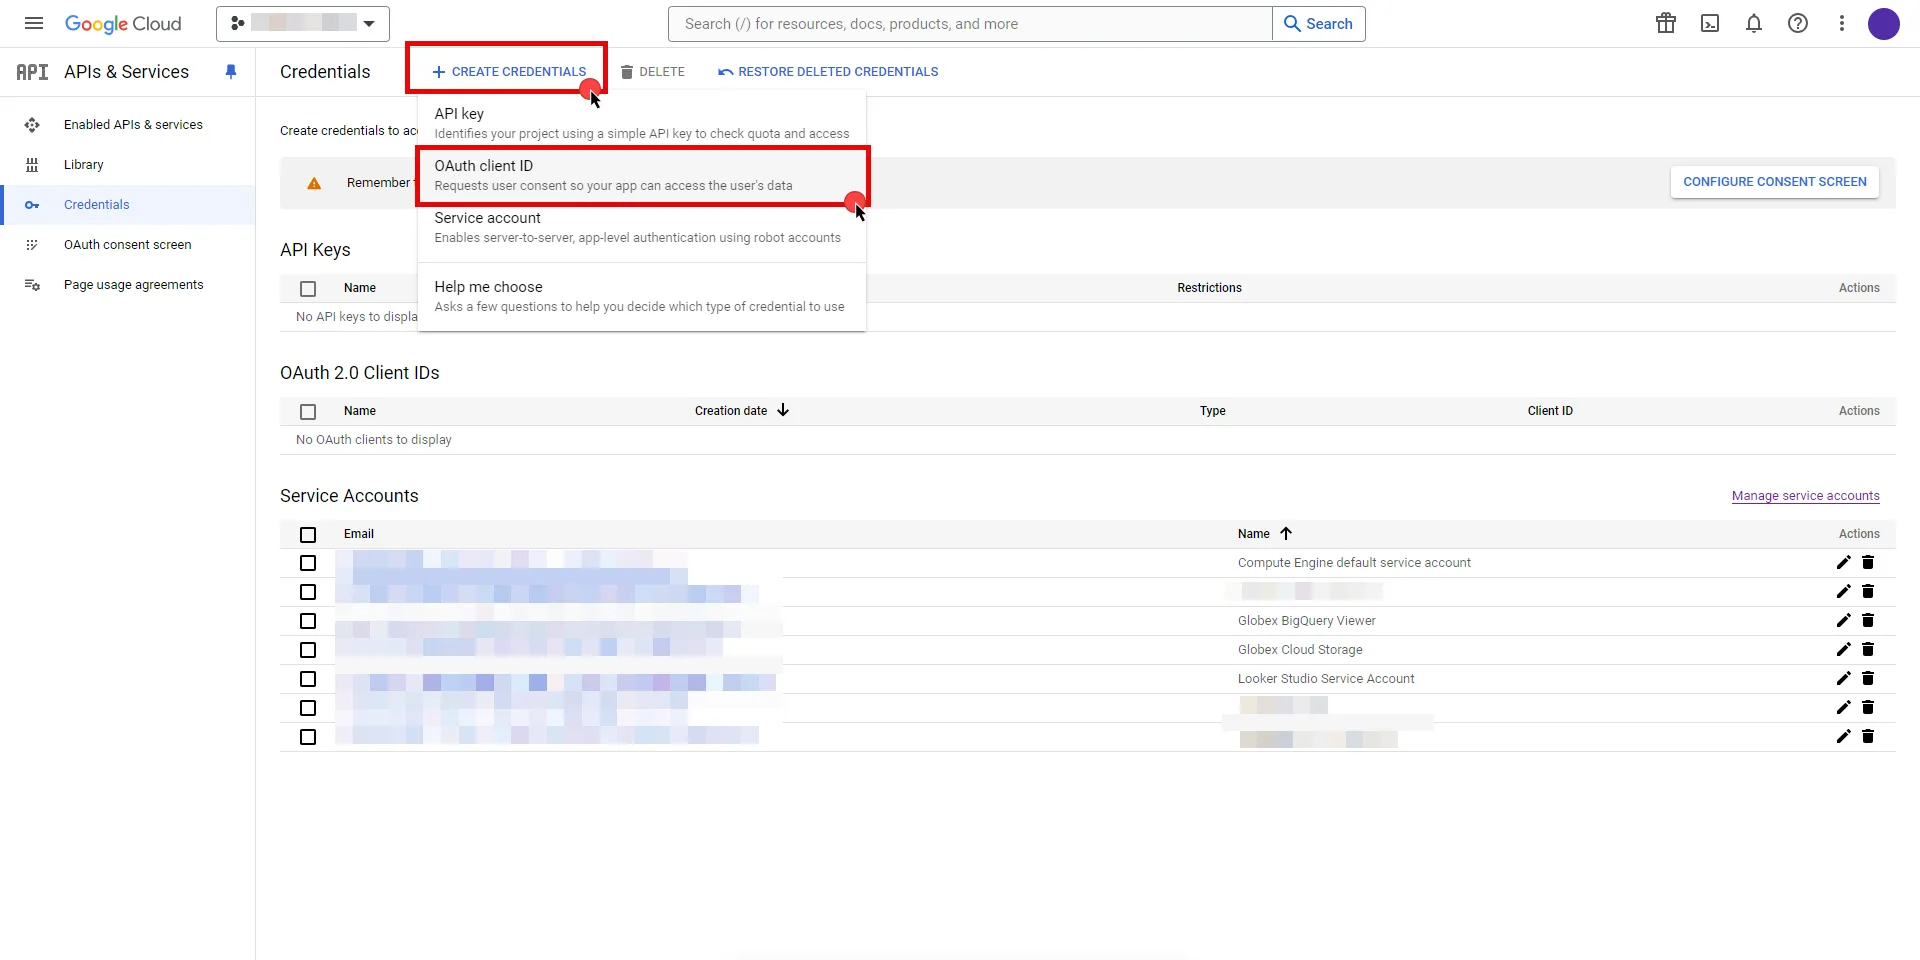
3. If there is no configured Consent Screen for your project, you will see a **Configure Consent Screen** button on the directed page. Click the button to continue.

4. Choose **User Type** and click **Create**.
* Provide a name for your app.
* Choose a user support email from the dropdown menu.
* App logo and app domain fields are optional.
* Enter at least one email for the Developer contact information field.
* Click **Save and Continue**.
* You may skip the Scopes step by clicking **Save and Continue** once again.
* In the **Summary** step, review the details of your app and click **Back to Dashboard**.
5. Navigate back to [Credentials](hhttps://console.cloud.google.com/apis/credentials) page, click **Create Credentials**, and select the **OAuth client ID** option again.
* Choose **Web Application** for Application Type.
* Provide a name for your web client.
* Switch to the Aembit UI to create a new Credential Provider, selecting the OAuth 2.0 Authorization Code credential type. After setting up the Credential Provider, copy the auto-generated **Callback URL**.
* Return to Google Cloud Console and paste the copied URL into the **Authorized redirect URIs** field.
* Click **Create**.
6. A pop-up window will appear. Copy both the **Client ID** and the **Client Secret**. Store them for later use in the tenant configuration.
7. Edit the existing Credential Provider created in the previous steps.
* **Name** - Choose a user-friendly name.
* **Credential Type** - [OAuth 2.0 Authorization Code](/user-guide/access-policies/credential-providers/oauth-authorization-code)
* **Callback URL (Read-Only)** - An auto-generated Callback URL from Aembit Admin.
* **Client Id** - Provide the Client ID copied from Google.
* **Client Secret** - Provide the Secret copied from Google.
* **Scopes** - Enter the scopes you will use for Apigee (e.g. `https://www.googleapis.com/auth/cloud-platform`) A full list of GCP Scopes can be found at [OAuth 2.0 Scopes for Google APIs](https://developers.google.com/identity/protocols/oauth2/scopes).
* **OAuth URL** - `https://accounts.google.com`
Click on **URL Discovery** to populate the Authorization and Token URL fields, which can be left as populated.
* **PKCE Required** - Off
* **Lifetime** - 1 year (A Google Cloud Platform project with an OAuth consent screen configured for an external user type and a publishing status of Testing is issued a refresh token expiring in 7 days).\
Google does not specify a refresh token lifetime for the internal user type selected version; this value is recommended by Aembit. For more information, refer to the [official Google documentation](https://developers.google.com/identity/protocols/oauth2#expiration).
8. Click **Save** to save your changes on the Credential Provider.
9. In Aembit UI, click the **Authorize** button. You will be directed to a page where you can choose your Google account first. Then click **Allow** to complete the OAuth 2.0 Authorization Code flow. You will see a success page and will be redirected to Aembit automatically. You can also verify your flow is complete by checking the **State** value in the Credential Provider. After completion, it should be in a **Ready** state.
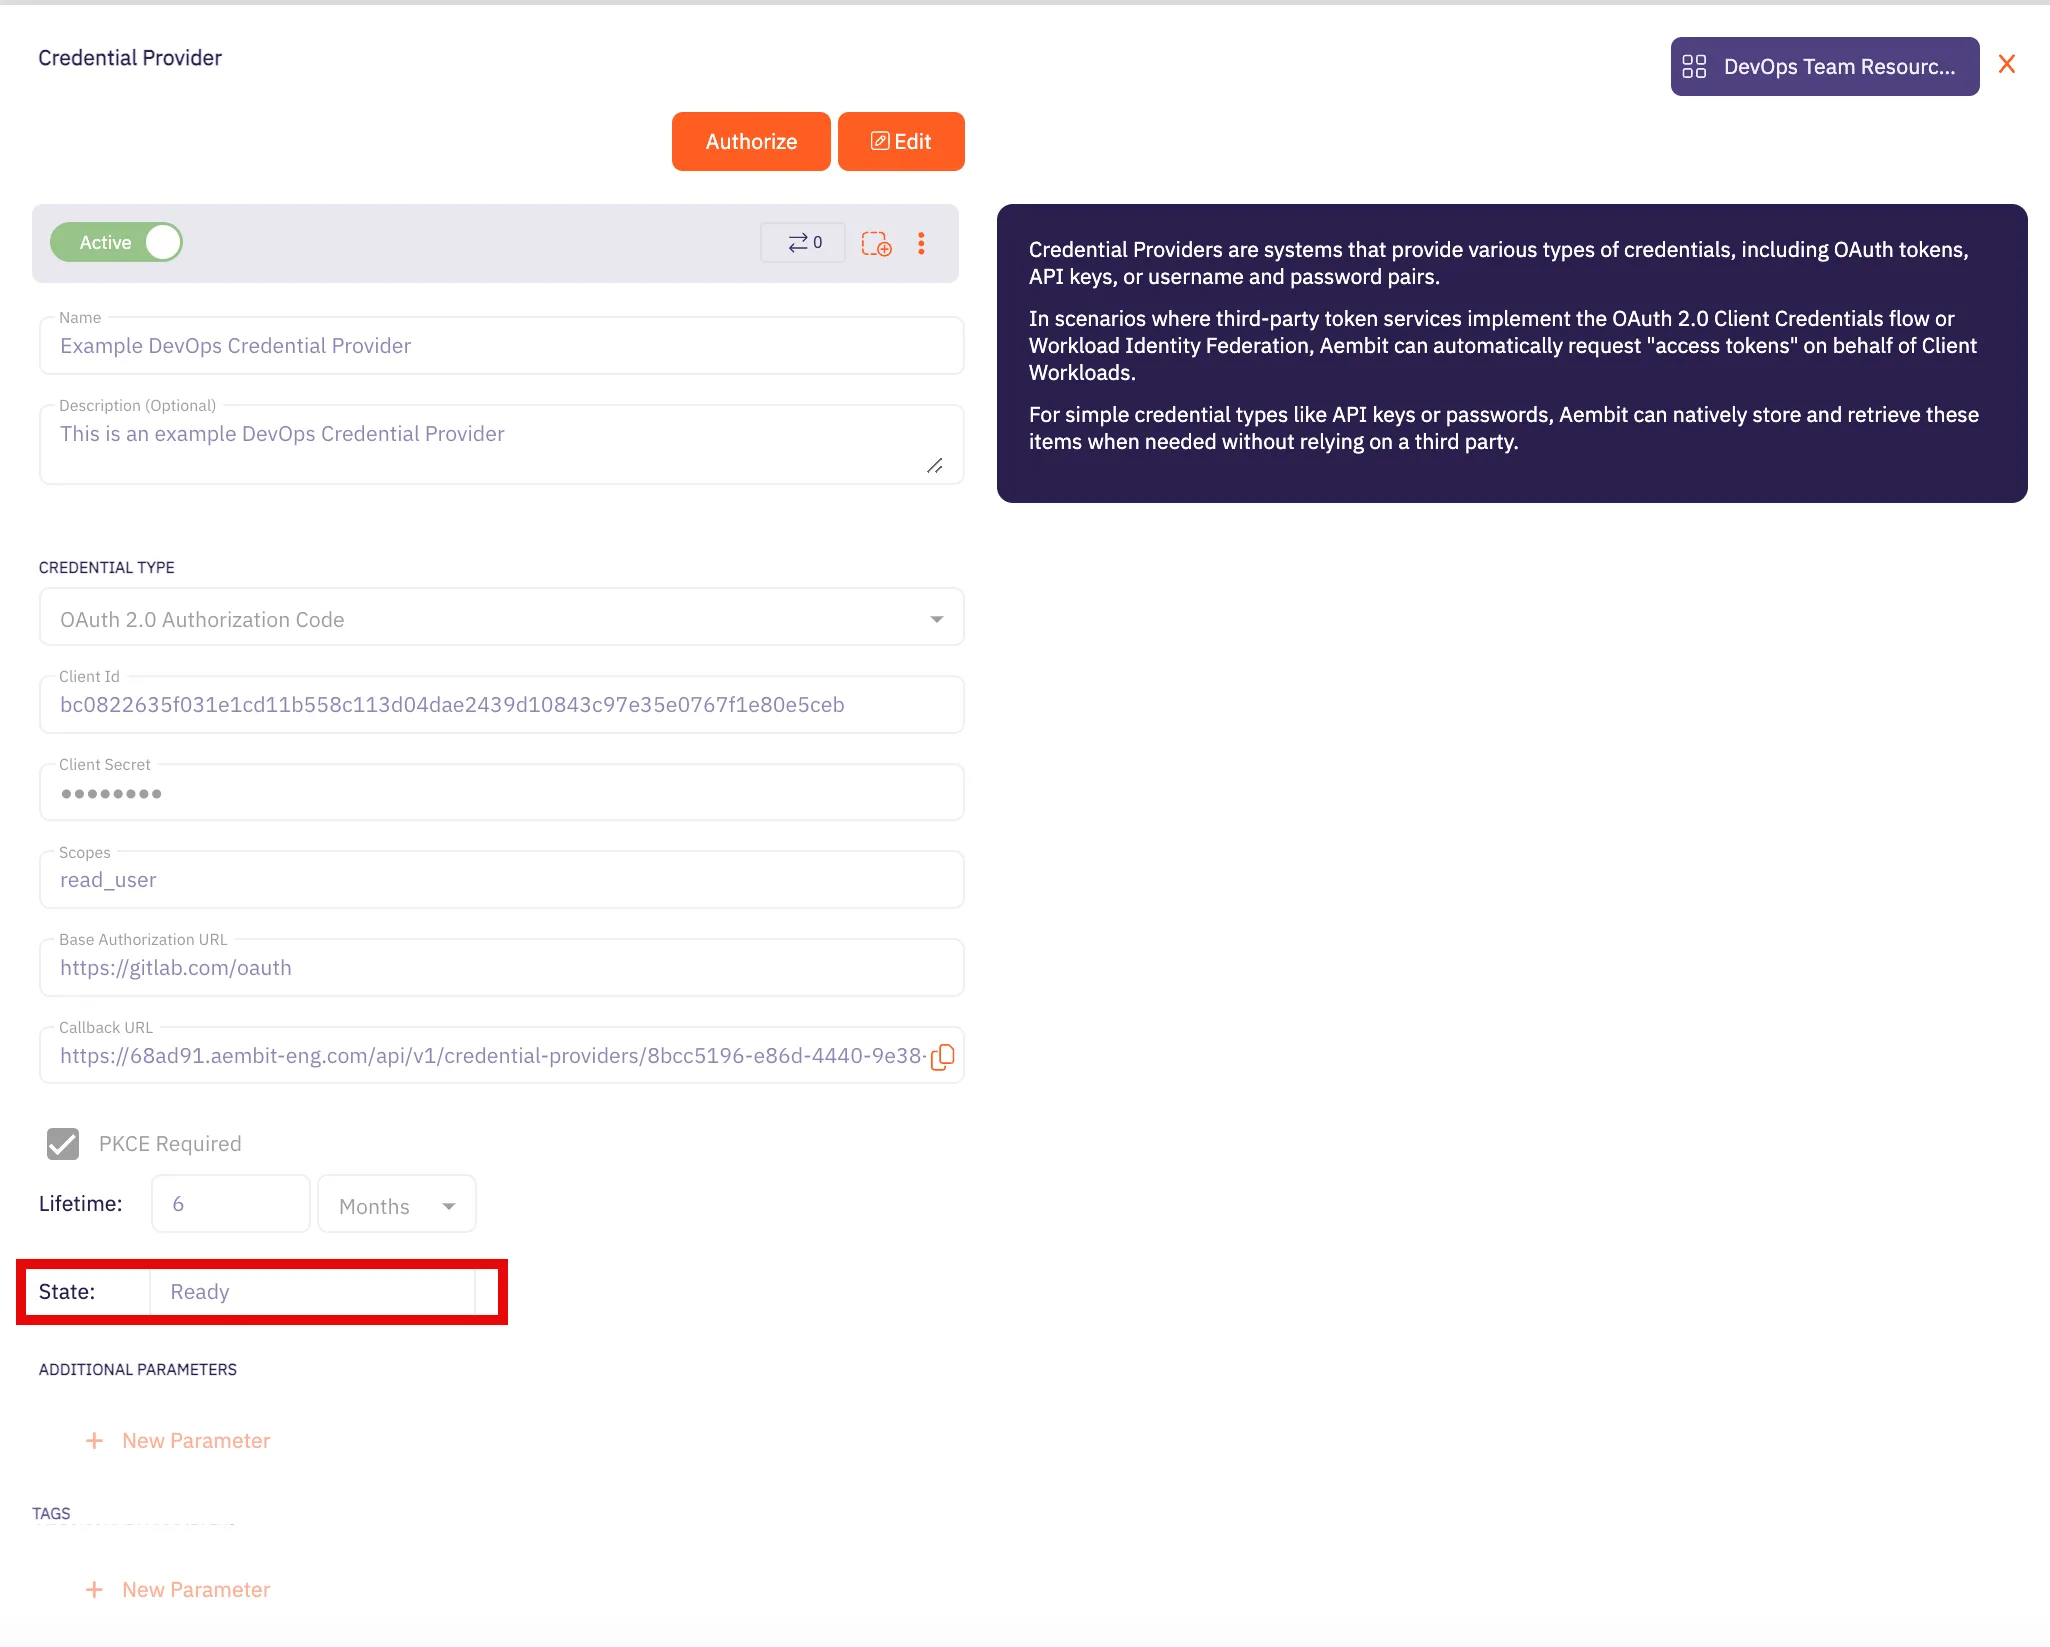
Caution
Once the set lifetime ends, the retrieved credential will expire and no longer be active. Aembit will notify you before this happens. Please ensure you reauthorize your credential before it expires.
## API Key
[Section titled “API Key”](#api-key)
### Create Apigee API Proxy
[Section titled “Create Apigee API Proxy”](#create-apigee-api-proxy)
Note
The provided steps below outline a basic configuration for creating an Apigee API proxy. Keep in mind that Apigee supports various customizations not detailed in these instructions.
1. Navigate to the [Apigee UI in Cloud console](https://console.cloud.google.com/apigee) and sign in with your Google Cloud account.
2. In the left sidebar, select **API Proxies** under the Proxy development section.
3. On the **API Proxies** dashboard, click **Create** in the top left corner.
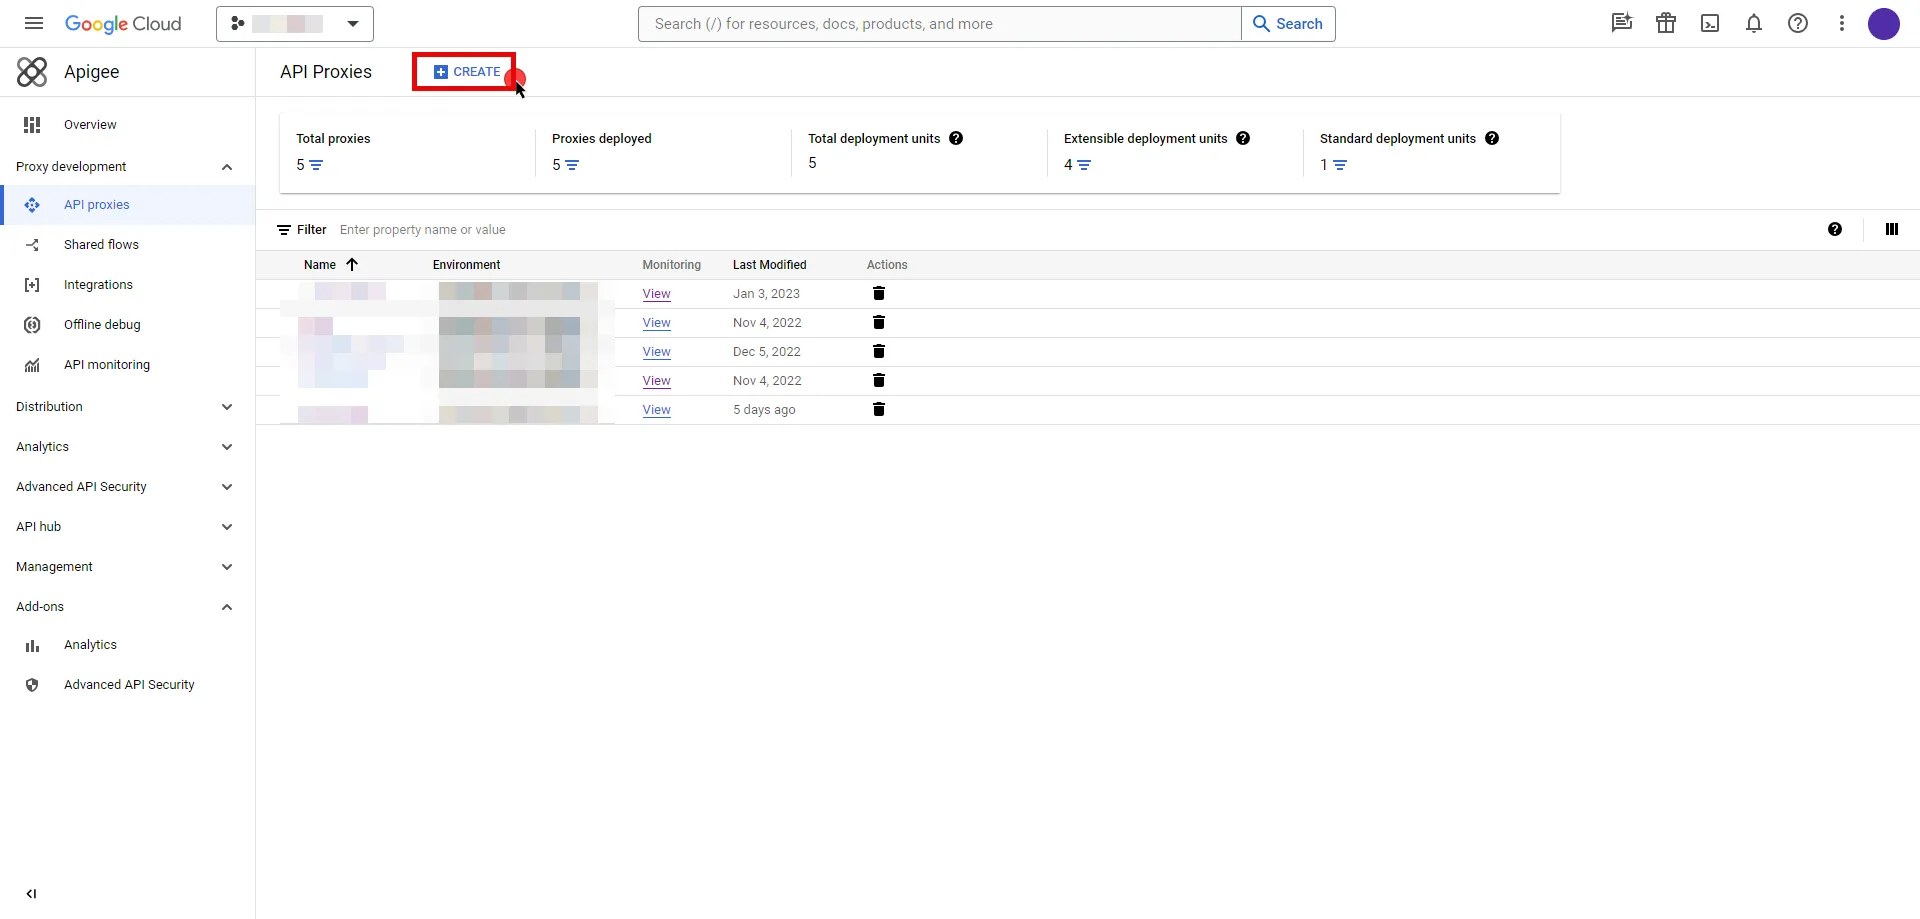
4. You will be prompted to choose a proxy type; keep the default **Reverse proxy** option and provide the any other required information.
5. Once you have configured your proxy, deploy it to make the API proxy active.
### Server Workload Configuration
[Section titled “Server Workload Configuration”](#server-workload-configuration-1)
To locate the environment group hostname for your proxy in the Apigee UI, follow these steps:
* Navigate to the [Apigee UI](https://apigee.google.com/) and sign in with your Google Cloud account.
* In the Apigee UI, go to **Management > Environments > Groups**.
* Identify the row displaying the environment where your proxy is deployed.
* Copy the endpoint for later use in the tenant configuration.
1. Create a new Server Workload.
* **Name** - Choose a user-friendly name.
2. Configure the service endpoint:
* **Host** - `.com` (Provide the endpoint copied from Apigee UI)
* **Application Protocol** - HTTP
* **Port** - 443 with TLS
* **Forward to Port** - 443 with TLS
* **Authentication method** - API Key
* **Authentication scheme** - Query Parameter
* **Query Parameter** - apikey
### Credential Provider Configuration
[Section titled “Credential Provider Configuration”](#credential-provider-configuration-1)
1. Navigate to the [Apigee UI in Cloud console](https://console.cloud.google.com/apigee) and sign in with your Google Cloud account.
2. In the left sidebar, select **Apps** to access a list of your applications.
3. Click on the name of the app to view its details.
4. Within the **Credentials** section, click the icon to **Copy to clipboard** next to **Key** and securely store the key for later use in the tenant configuration.
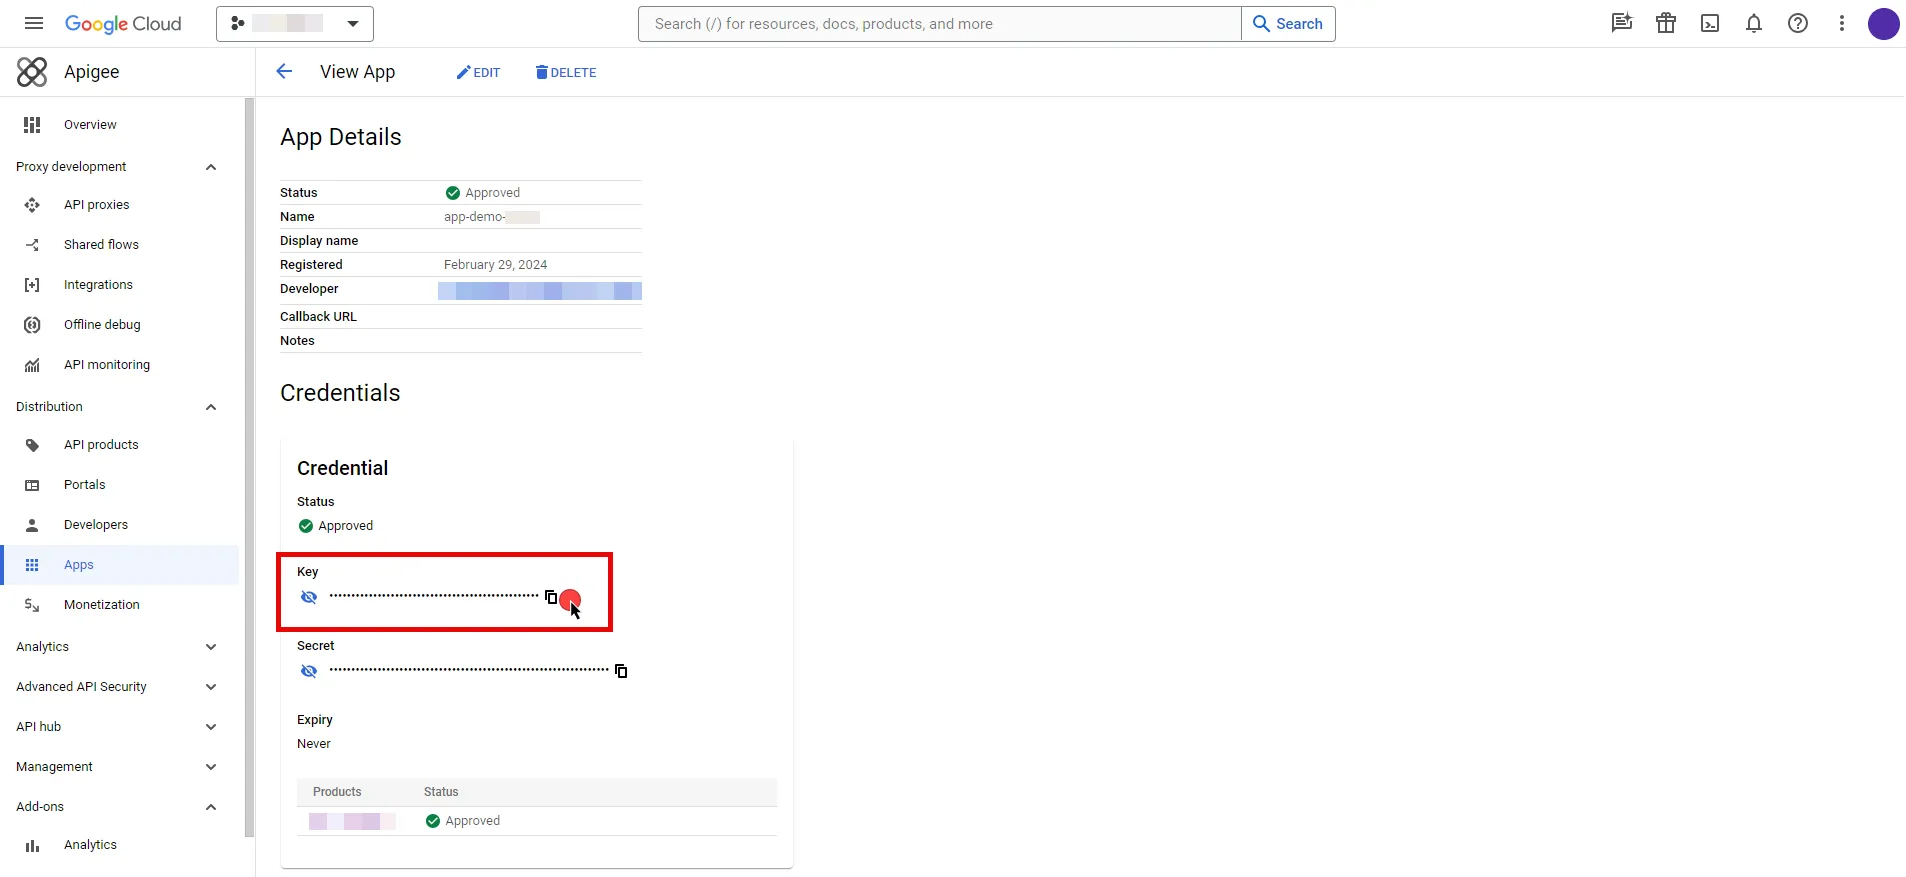
5. Create a new Credential Provider.
* **Name** - Choose a user-friendly name.
* **Credential Type** - [API Key](/user-guide/access-policies/credential-providers/api-key)
* **API Key** - Provide the key copied from Google Cloud Apigee console.
## Client Workload Configuration
[Section titled “Client Workload Configuration”](#client-workload-configuration)
Aembit now handles the credentials required to access the Server Workload, eliminating the need for you to manage them directly. You can safely remove any previously used credentials from the Client Workload.
If you access the Server Workload through an SDK or library, it is possible that the SDK/library may still require credentials to be present for initialization purposes. In this scenario, you can provide placeholder credentials. Aembit will overwrite these placeholder credentials with the appropriate ones during the access process.
## Access Policy
[Section titled “Access Policy”](#access-policy)
* Create an Access Policy for a Client Workload to access the Apigee Server Workload. Assign the newly created Credential Provider to this Access Policy.
## Required Features
[Section titled “Required Features”](#required-features)
* You will need to configure the [TLS Decrypt](/user-guide/deploy-install/advanced-options/tls-decrypt/configure-tls-decrypt) feature to work with the Apigee Server Workload.
# Atlassian
> This page describes how to configure Aembit to work with the Atlassian Server Workload.
#
[Atlassian](https://www.atlassian.com/) is a cloud-based service offering that facilitates collaborative work and project management for teams by providing a suite of tools, which include:
* Jira for project tracking
* Confluence for document collaboration
* Bitbucket for version control; and
* other integrated applications
Below you can find the Aembit configuration required to work with the Atlassian Cloud service as a Server Workload using the Atlassian REST APIs. Aembit supports multiple authentication/authorization methods for Atlassian. This page describes scenarios where the Credential Provider is configured for Atlassian via:
* [OAuth 2.0 Authorization Code (3LO)](/user-guide/access-policies/server-workloads/guides/atlassian#oauth-20-authorization-code)
* [API Key](/user-guide/access-policies/server-workloads/guides/atlassian#api-key)
Prerequisites
Before proceeding with the configuration, you will need to have an Atlassian tenant and related Atlassian Developer account.
## OAuth 2.0 Authorization Code
[Section titled “OAuth 2.0 Authorization Code”](#oauth-20-authorization-code)
### Server Workload Configuration
[Section titled “Server Workload Configuration”](#server-workload-configuration)
1. Create a new Server Workload.
* **Name** - Choose a user-friendly name.
2. Configure the service endpoint:
* **Host** - `.atlassian.net`
* **Application Protocol** - HTTP
* **Port** - 443 with TLS
* **Forward to Port** - 443 with TLS
* **Authentication method** - HTTP Authentication
* **Authentication scheme** - Bearer
### Credential Provider Configuration
[Section titled “Credential Provider Configuration”](#credential-provider-configuration)
1. Log into to the [Atlassian Developer Console](https://developer.atlassian.com/console/myapps/).
2. Click on **Create** and select the **OAuth 2.0 integration** option.
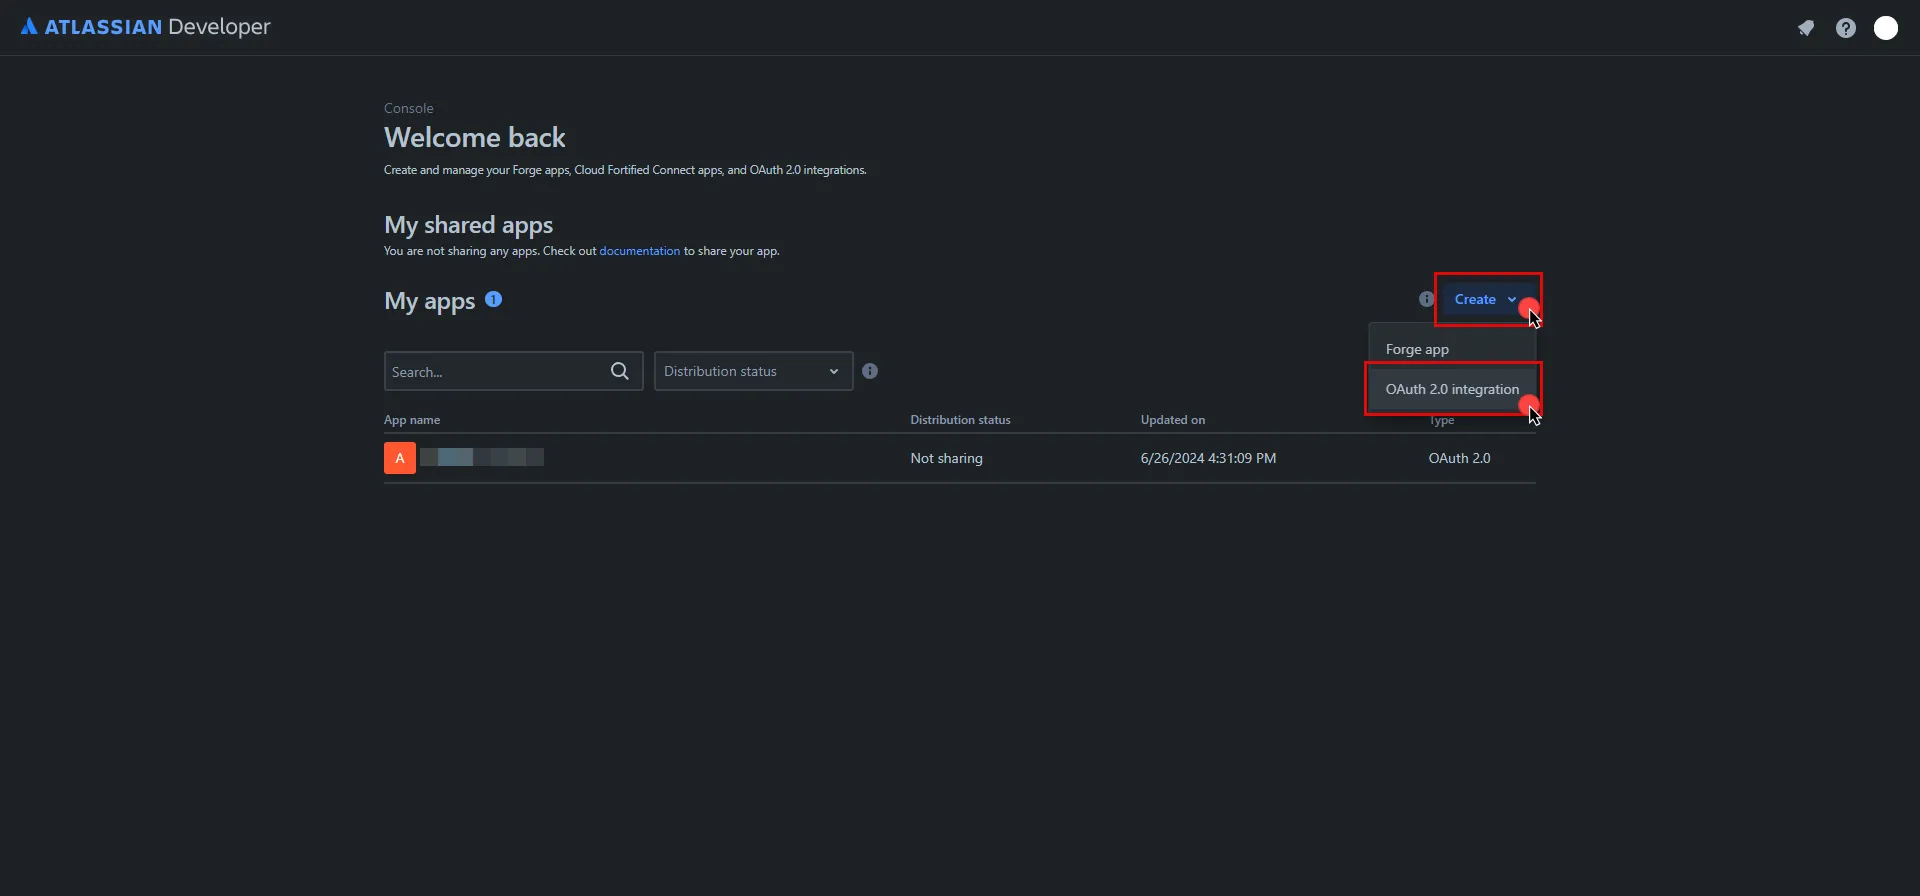
3. Provide a name for your app, check the agreement box, and click **Create** .
4. In the left pane, select **Authorization**, and then click **Add** under the Action column.
5. Switch to the Aembit UI to create a new Credential Provider, selecting the OAuth 2.0 Authorization Code credential type. After setting up the Credential Provider, copy the auto-generated **Callback URL**.
6. Return to Atlassian and paste the copied URL into the **Callback URL** field.
7. In the left pane, select **Permissions**, and then click **Add** under the Action column of the API that best suits your project needs. After clicking **Add**, it will change to **Configure**; click **Configure** to edit.
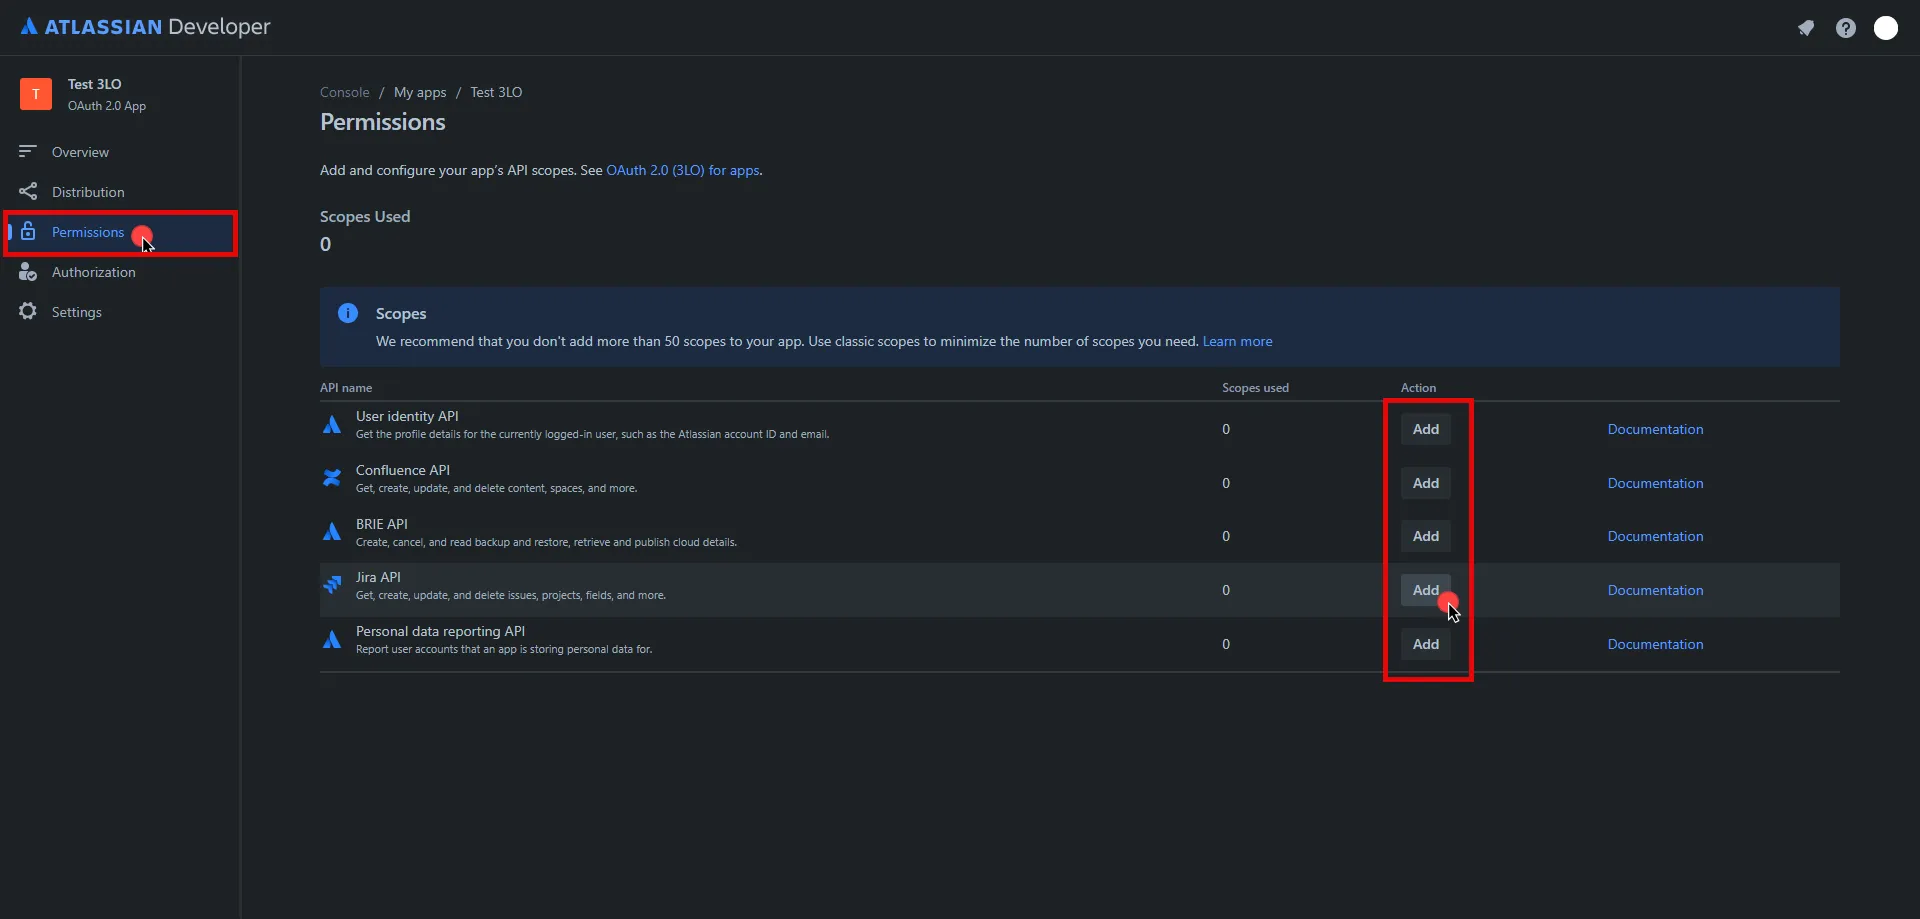
8. On the redirected page, click **Edit Scopes**, add the necessary scopes for your application, and then click **Save** Copy the **Code** version of all selected scopes and save this information for future use.
9. In the left pane, select **Settings**, scroll down to the **Authentication details**, and copy both the **Client ID** and the **Secret**. Store them for later use in the tenant configuration.
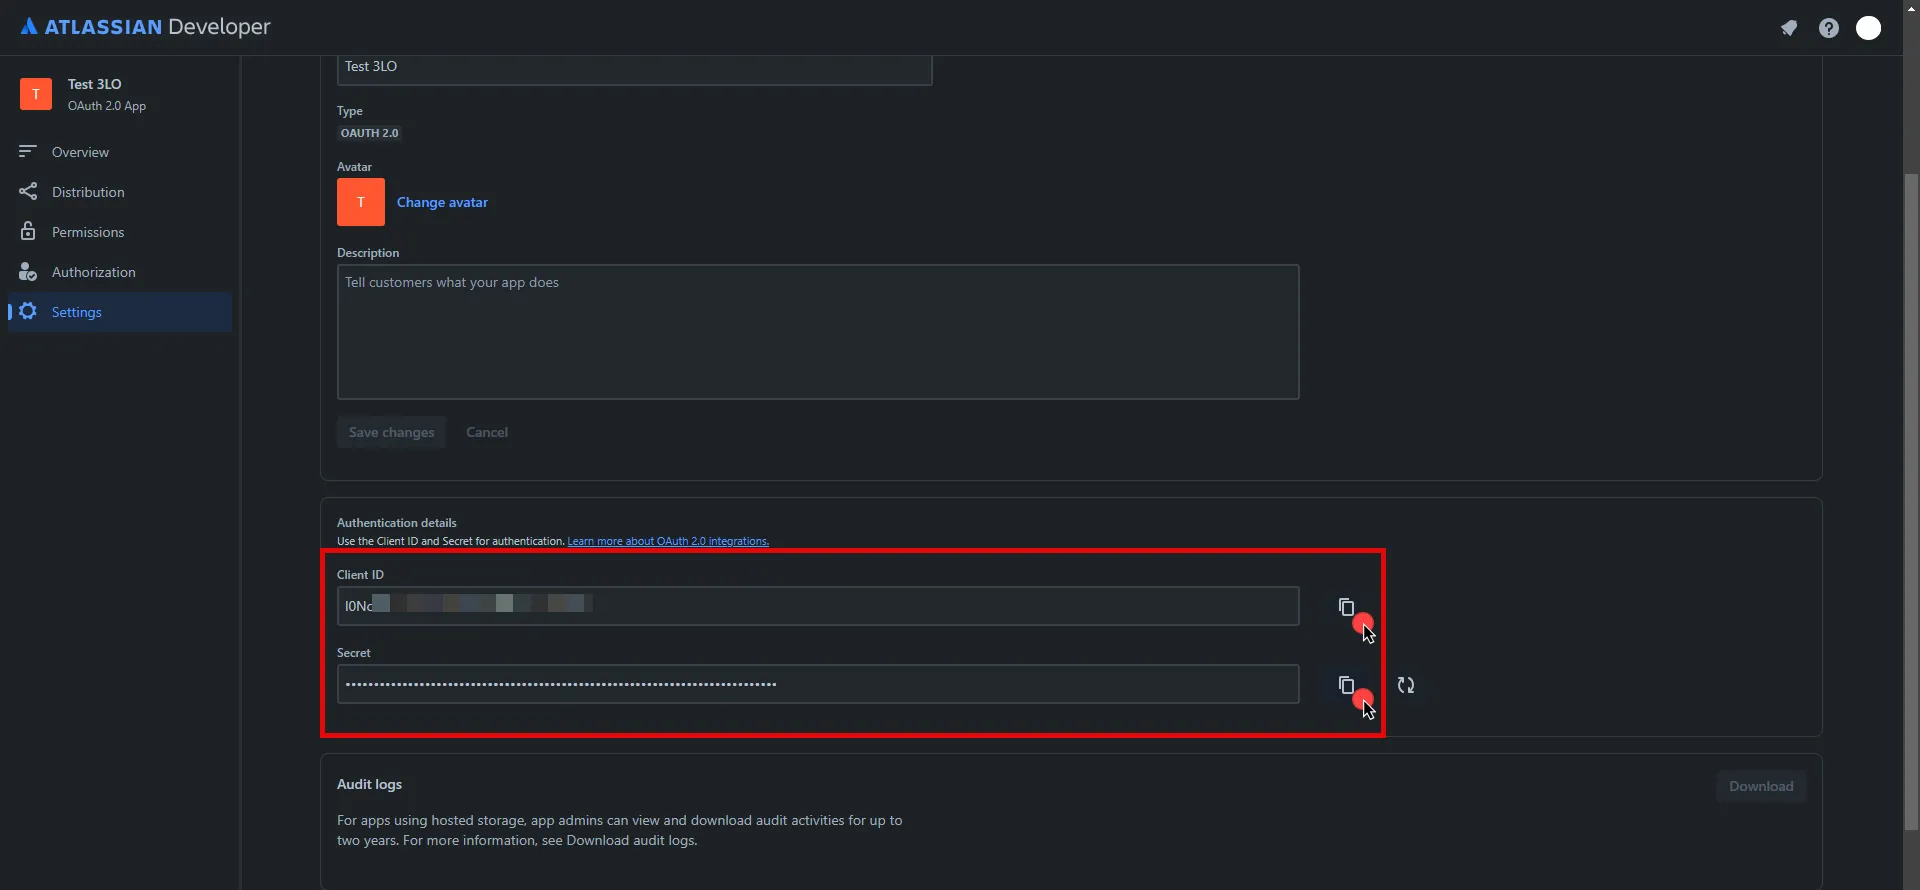
10. Edit the existing Credential Provider created in the previous steps.
* **Name** - Choose a user-friendly name.
* **Credential Type** - [OAuth 2.0 Authorization Code](/user-guide/access-policies/credential-providers/oauth-authorization-code)
* **Callback URL (Read-Only)** - An auto-generated Callback URL from Aembit Admin.
* **Client Id** - Provide the Client ID copied from Atlassian.
* **Client Secret** - Provide the Secret copied from Atlassian.
* **Scopes** - Enter the scopes you use, space delimited. Must include the `offline_access` scope required for the refresh token (e.g. `offline_access read:jira-work read:servicedesk-request`)
* **OAuth URL** - `https://auth.atlassian.com`
Click on **URL Discovery** to populate the Authorization and Token URL fields, which can be left as populated.
* **PKCE Required** - Off (PKCE is not supported by Atlassian, so leave this field unchecked).
* **Lifetime** - 1 year (Absolute expiry time according to Atlassian)\
For more information on rotating the refresh token, please refer to the [official Atlassian documentation](https://developer.atlassian.com/cloud/jira/platform/oauth-2-3lo-apps/#use-a-refresh-token-to-get-another-access-token-and-refresh-token-pair).
11. Click **Save** to save your changes on the Credential Provider.
12. In Aembit UI, click the **Authorize** button. You are be directed to a page where you can review the access request. Click **Accept** to complete the OAuth 2.0 Authorization Code flow. You should see a success page and be redirected to Aembit automatically. You can also verify that your flow is complete by checking the **State** value in the Credential Provider. After completion, it should be in a **Ready** state.

Caution
Once the set lifetime ends, the retrieved credential will expire and no longer be active. Aembit will notify you before this happens. Please ensure you reauthorize your credential before it expires.
## API Key
[Section titled “API Key”](#api-key)
Note
This section is labeled as API Key because, while it requires a username (your Atlassian email) and password, the password is actually an API key. Atlassian uses HTTP Basic Authentication, and we use the Username & Password Credential Provider in Aembit UI to implement this method.
### Server Workload Configuration
[Section titled “Server Workload Configuration”](#server-workload-configuration-1)
1. Create a new Server Workload.
* **Name** - Choose a user-friendly name.
2. Configure the service endpoint:
* **Host** - `.atlassian.net`
* **Application Protocol** - HTTP
* **Port** - 443 with TLS
* **Forward to Port** - 443 with TLS
* **Authentication method** - HTTP Authentication
* **Authentication scheme** - Basic
### Credential Provider Configuration
[Section titled “Credential Provider Configuration”](#credential-provider-configuration-1)
1. Sign into your Atlassian account.
2. Navigate to the [Atlassian account - API Tokens](https://id.atlassian.com/manage-profile/security/api-tokens) page.
3. Click on **Create API token**.
4. In the dialog that appears, enter a memorable and concise label for your token, and then click **Create**.
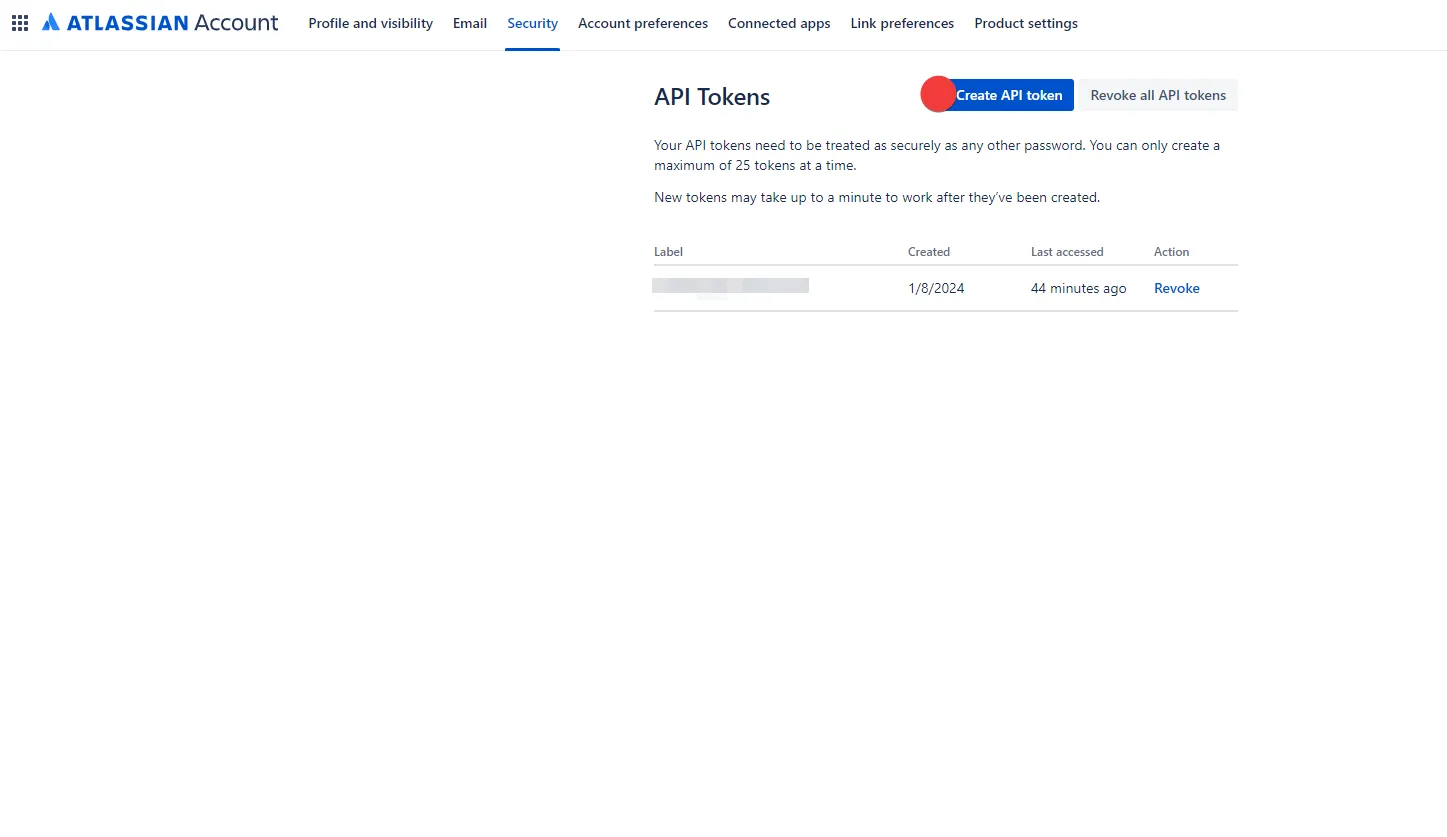
5. Click **Copy to clipboard** and securely store the token for later use in the configuration on the tenant. For more information on how to store your API token, please refer to the [official Atlassian documentation](https://support.atlassian.com/atlassian-account/docs/manage-api-tokens-for-your-atlassian-account/).
6. Create a new Credential Provider.
* **Name** - Choose a user-friendly name.
* **Credential Type** - [Username & Password](/user-guide/access-policies/credential-providers/username-password)
* **Username** - Your email address for the Atlassian account used to create the token.
* **Password** - Provide the token copied from Atlassian.
## Client Workload Configuration
[Section titled “Client Workload Configuration”](#client-workload-configuration)
Aembit now handles the credentials required to access the Server Workload, eliminating the need for you to manage them directly. You can safely remove any previously used credentials from the Client Workload.
If you access the Server Workload through an SDK or library, it is possible that the SDK/library may still require credentials to be present for initialization purposes. In this scenario, you can provide placeholder credentials. Aembit will overwrite these placeholder credentials with the appropriate ones during the access process.
## Access Policy
[Section titled “Access Policy”](#access-policy)
* Create an Access Policy for a Client Workload to access the Atlassian Server Workload. Assign the newly created Credential Provider to this Access Policy.
## Required Features
[Section titled “Required Features”](#required-features)
* You will need to configure the [TLS Decrypt](/user-guide/deploy-install/advanced-options/tls-decrypt/configure-tls-decrypt) feature to work with the Atlassian Server Workload.
# Amazon RDS for MySQL
> This page describes how to configure Aembit to work with the Amazon RDS for MySQL Server Workload.
#
[Amazon RDS for MySQL](https://aws.amazon.com/rds/mysql/) is a robust and fully managed relational database service provided by Amazon Web Services, specifically tailored to streamline the deployment, administration, and scalability of MySQL databases in the cloud.
Below you can find the Aembit configuration required to work with AWS RDS for MySQL as a Server Workload using MySQL-compatible CLI, application, or a library.
## Prerequisites
[Section titled “Prerequisites”](#prerequisites)
Before proceeding with the configuration, ensure you have an AWS tenant (or [sign up](https://portal.aws.amazon.com/billing/signup#/start/email) for one) and an Amazon RDS for MySQL database. If you have not created a database before, you can follow the steps in the next section. For more information on creating an Amazon RDS DB instance, please refer to the [official Amazon documentation](https://docs.aws.amazon.com/AmazonRDS/latest/UserGuide/CHAP_Tutorials.WebServerDB.CreateDBInstance.html).
### Create Amazon RDS MySQL Database
[Section titled “Create Amazon RDS MySQL Database”](#create-amazon-rds-mysql-database)
1. Sign in to the AWS Management Console and navigate to the [Amazon RDS console](https://console.aws.amazon.com/rds/).
2. In the left sidebar, select **Databases**, and then click **Create Database** in the top right corner.
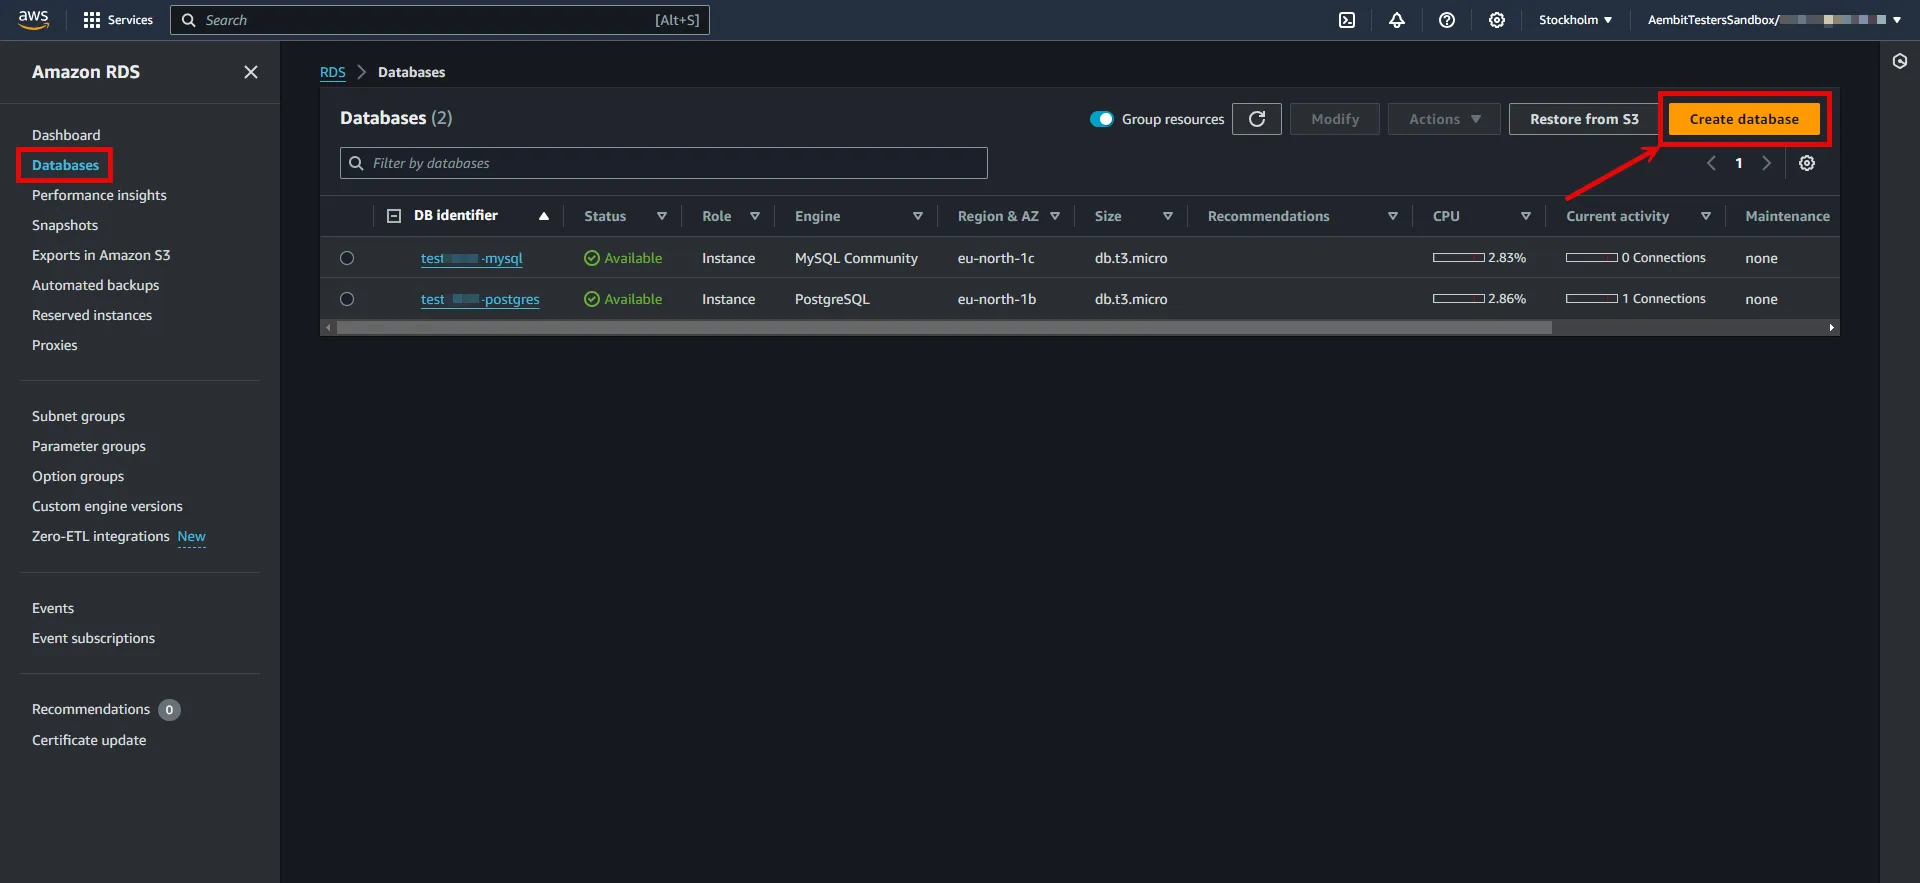
3. Configure the database according to your preferences. Below are key choices:
* Under **Engine options**, choose **MySQL** for the engine type.
* Under **Engine options**, select a version from the **8.0.x** series.
* Under **Settings**, enter a name for the **DB cluster identifier**; this will be used in the endpoint.
* In **Settings**, expand the **Credentials Settings** section. Use the **Master username** and **master password** as Credential Provider details. You can either auto-generate a password or type your own. Save this information for future use.
Note
In this example, we are using the master username and password for demonstration purposes; however, it is advisable to create a dedicated user with appropriate privileges for enhanced security.
* In **Connectivity**, find the **Publicly Accessible** option and set it to **Yes**.
:warning: Setting the **Publicly Accessible** option to **Yes** is done here purely for demonstration purposes. In normal circumstances, it is recommended to keep the RDS instance not publicly accessible for enhanced security.
* In **Connectivity**, ensure the **VPC security group (firewall)** configuration is in place to allow client workload/agent proxy communication.
* In **Connectivity**, expand the **Additional Configuration** section and verify the **Database Port** is set to 3306.
* In **Database authentication**, select **Password authentication**.
* In **Additional configuration**, specify an **Initial database name**.
4. After making all of your selections, click **Create Database**.
## Server Workload Configuration
[Section titled “Server Workload Configuration”](#server-workload-configuration)
To retrieve the connection information for a DB instance in the AWS Management Console:
1. Sign in to the AWS Management Console and navigate to the [Amazon RDS console](https://console.aws.amazon.com/rds/).
2. In the left sidebar, select **Databases** to view a list of your DB instances.
3. Click on the name of the DB instance to view its details.
4. Navigate to the **Connectivity & security** tab and copy the endpoint.
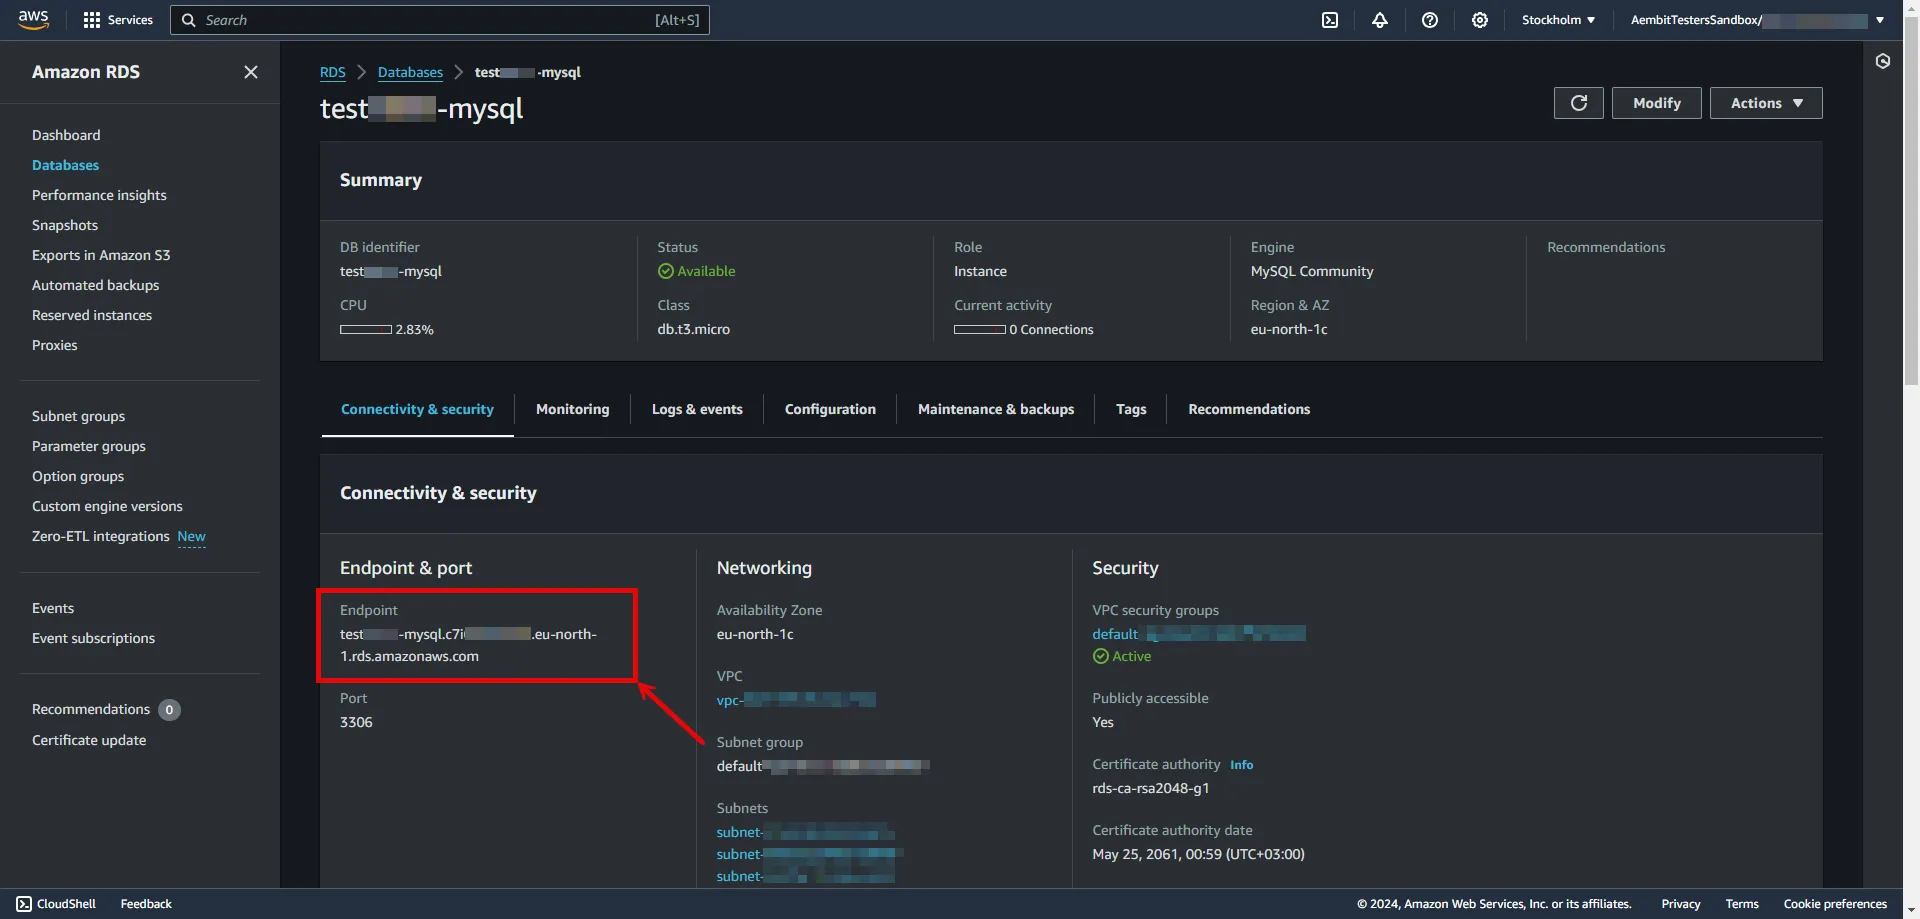
5. Create a new Server Workload.
* **Name** - Choose a user-friendly name.
6. Configure the service endpoint:
* **Host** - `...rds.amazonaws.com` (Provide the endpoint copied from AWS)
* **Application Protocol** - MySQL
* **Port** - 3306
* **Forward to Port** - 3306 with TLS
* **Forward TLS Verification** - Full
* **Authentication method** - Password Authentication
* **Authentication scheme** - Password
## Credential Provider Configuration
[Section titled “Credential Provider Configuration”](#credential-provider-configuration)
1. Create a new Credential Provider.
* **Name** - Choose a user-friendly name.
* **Credential Type** - [Username & Password](/user-guide/access-policies/credential-providers/username-password)
* **Username** - Provide login ID for the master user of your DB cluster.
* **Password** - Provide the Master password of your DB cluster.
## Client Workload Configuration
[Section titled “Client Workload Configuration”](#client-workload-configuration)
Aembit now handles the credentials required to access the Server Workload, eliminating the need for you to manage them directly. You can safely remove any previously used credentials from the Client Workload.
If you access the Server Workload through an SDK or library, it is possible that the SDK/library may still require credentials to be present for initialization purposes. In this scenario, you can provide placeholder credentials. Aembit will overwrite these placeholder credentials with the appropriate ones during the access process.
## Access Policy
[Section titled “Access Policy”](#access-policy)
* Create an access policy for a Client Workload to access the Amazon RDS for MySQL Server Workload and assign the newly created Credential Provider to it.
# Amazon RDS for PostgreSQL
> This page describes how to configure Aembit to work with with the Amazon RDS for PostgreSQL Server Workload.
#
[Amazon RDS for PostgreSQL](https://aws.amazon.com/rds/postgresql) is a fully managed relational database service provided by Amazon Web Services, offering a scalable and efficient solution for deploying, managing, and scaling PostgreSQL databases in the cloud.
Below you can find the Aembit configuration required to work with AWS RDS for PostgreSQL as a Server Workload using PostgreSQL-compatible CLI, application, or a library.
## Prerequisites
[Section titled “Prerequisites”](#prerequisites)
Before proceeding with the configuration, ensure you have an AWS tenant (or [sign up](https://portal.aws.amazon.com/billing/signup#/start/email) for one) and an Amazon RDS for PostgreSQL database. If you have not created a database before, you can follow the steps in the next section. For more information on creating an Amazon RDS DB instance, please refer to the [official Amazon documentation](https://docs.aws.amazon.com/AmazonRDS/latest/UserGuide/CHAP_Tutorials.WebServerDB.CreateDBInstance.html).
### Create Amazon RDS PostgreSQL Database
[Section titled “Create Amazon RDS PostgreSQL Database”](#create-amazon-rds-postgresql-database)
1. Sign in to the AWS Management Console and navigate to the [Amazon RDS console](https://console.aws.amazon.com/rds/).
2. In the left sidebar, select **Databases**, and then click **Create Database** in the top right corner.

3. Configure the database according to your preferences. Below are key choices:
* Under **Engine options**, choose **PostgreSQL** for the engine type.
* Under **Engine options**, select a version **16** or from the **15** series.
* Under **Settings**, enter a name for the **DB cluster identifier**; this will be used in the endpoint.
* In **Settings**, expand the **Credentials Settings** section. Use the **Master username** and **master password** as Credential Provider details. You can either auto-generate a password or type your own. Save this information for future use.
Note
In this example, we are using the master username and password for demonstration purposes; however, it is advisable to create a dedicated user with appropriate privileges for enhanced security.
* In **Connectivity**, find the **Publicly Accessible** option and set it to **Yes**.
:warning: Setting the **Publicly Accessible** option to **Yes** is done here purely for demonstration purposes. In normal circumstances, it is recommended to keep the RDS instance not publicly accessible for enhanced security.
* In **Connectivity**, ensure the **VPC security group (firewall)** configuration is in place to allow client workload/agent proxy communication.
* In **Connectivity**, expand the **Additional Configuration** section and verify the **Database Port** is set to 5432.
* In **Database authentication**, select **Password authentication**.
* In **Additional configuration**, specify an **Initial database name**.
4. After making all of your selections, click **Create Database**.
## Server Workload Configuration
[Section titled “Server Workload Configuration”](#server-workload-configuration)
To retrieve the connection information for a DB instance in the AWS Management Console:
1. Sign in to the AWS Management Console and navigate to the [Amazon RDS console](https://console.aws.amazon.com/rds/).
2. In the left sidebar, select **Databases** to view a list of your DB instances.
3. Click on the name of the DB instance to view its details.
4. Navigate to the **Connectivity & security** tab and copy the endpoint.
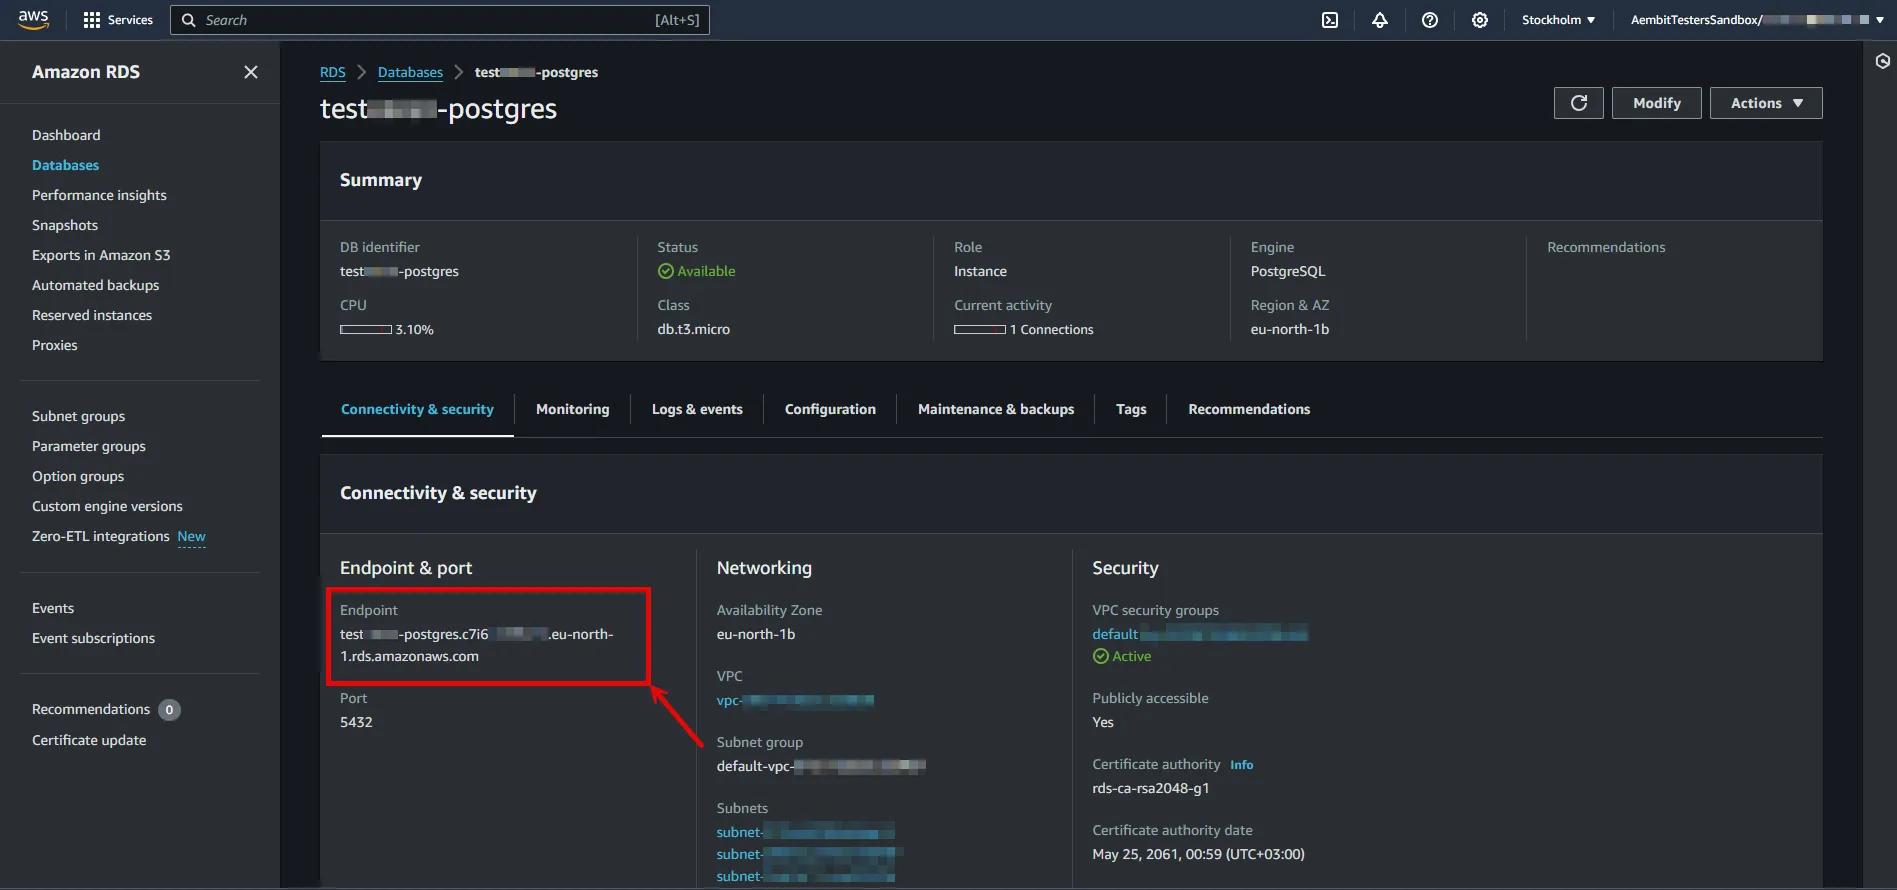
5. Create a new Server Workload.
* **Name** - Choose a user-friendly name.
6. Configure the service endpoint:
* **Host** - `...rds.amazonaws.com` (Provide the endpoint copied from AWS)
* **Application Protocol** - Postgres
* **Port** - 5432
* **Forward to Port** - 5432 with TLS
* **Forward TLS Verification** - Full
* **Authentication method** - Password Authentication
* **Authentication scheme** - Password
## Credential Provider Configuration
[Section titled “Credential Provider Configuration”](#credential-provider-configuration)
1. Create a new Credential Provider.
* **Name** - Choose a user-friendly name.
* **Credential Type** - [Username & Password](/user-guide/access-policies/credential-providers/username-password)
* **Username** - Provide login ID for the master user of your DB cluster.
* **Password** - Provide the Master password of your DB cluster.
## Client Workload Configuration
[Section titled “Client Workload Configuration”](#client-workload-configuration)
Aembit now handles the credentials required to access the Server Workload, eliminating the need for you to manage them directly. You can safely remove any previously used credentials from the Client Workload.
If you access the Server Workload through an SDK or library, it is possible that the SDK/library may still require credentials to be present for initialization purposes. In this scenario, you can provide placeholder credentials. Aembit will overwrite these placeholder credentials with the appropriate ones during the access process.
## Access Policy
[Section titled “Access Policy”](#access-policy)
* Create an access policy for a Client Workload to access the Amazon RDS for PostgreSQL Server Workload and assign the newly created Credential Provider to it.
# Amazon Redshift
> This page describes how to configure Aembit to work with the Amazon Redshift Server Workload.
#
[Amazon Redshift](https://aws.amazon.com/redshift/) is a high-performance, fully managed cloud data warehouse designed for rapid query execution and storage of petabyte-scale datasets. This high-performance solution combines speed and scalability, making it ideal for businesses seeking efficient and flexible analytics capabilities in the cloud.
Below you can find the Aembit configuration required to work with Amazon Redshift as a Server Workload using the AWS or SQL-compatible CLI, application, or a library.
## Prerequisites
[Section titled “Prerequisites”](#prerequisites)
Before proceeding with the configuration, ensure you have an AWS tenant (or [sign up](https://portal.aws.amazon.com/billing/signup#/start/email) for one) and an Amazon Redshift managed cluster. If you have not created a cluster before, you can follow the steps in the next section. For more information on creating Amazon Redshift resources, please refer to the [official Amazon documentation](https://docs.aws.amazon.com/redshift/latest/mgmt/overview.html).
### Create a cluster with Amazon Redshift
[Section titled “Create a cluster with Amazon Redshift”](#create-a-cluster-with-amazon-redshift)
1. Sign in to the AWS Management Console and navigate to the [Amazon Redshift console](https://console.aws.amazon.com/redshiftv2) and choose **Clusters** in the navigation pane.
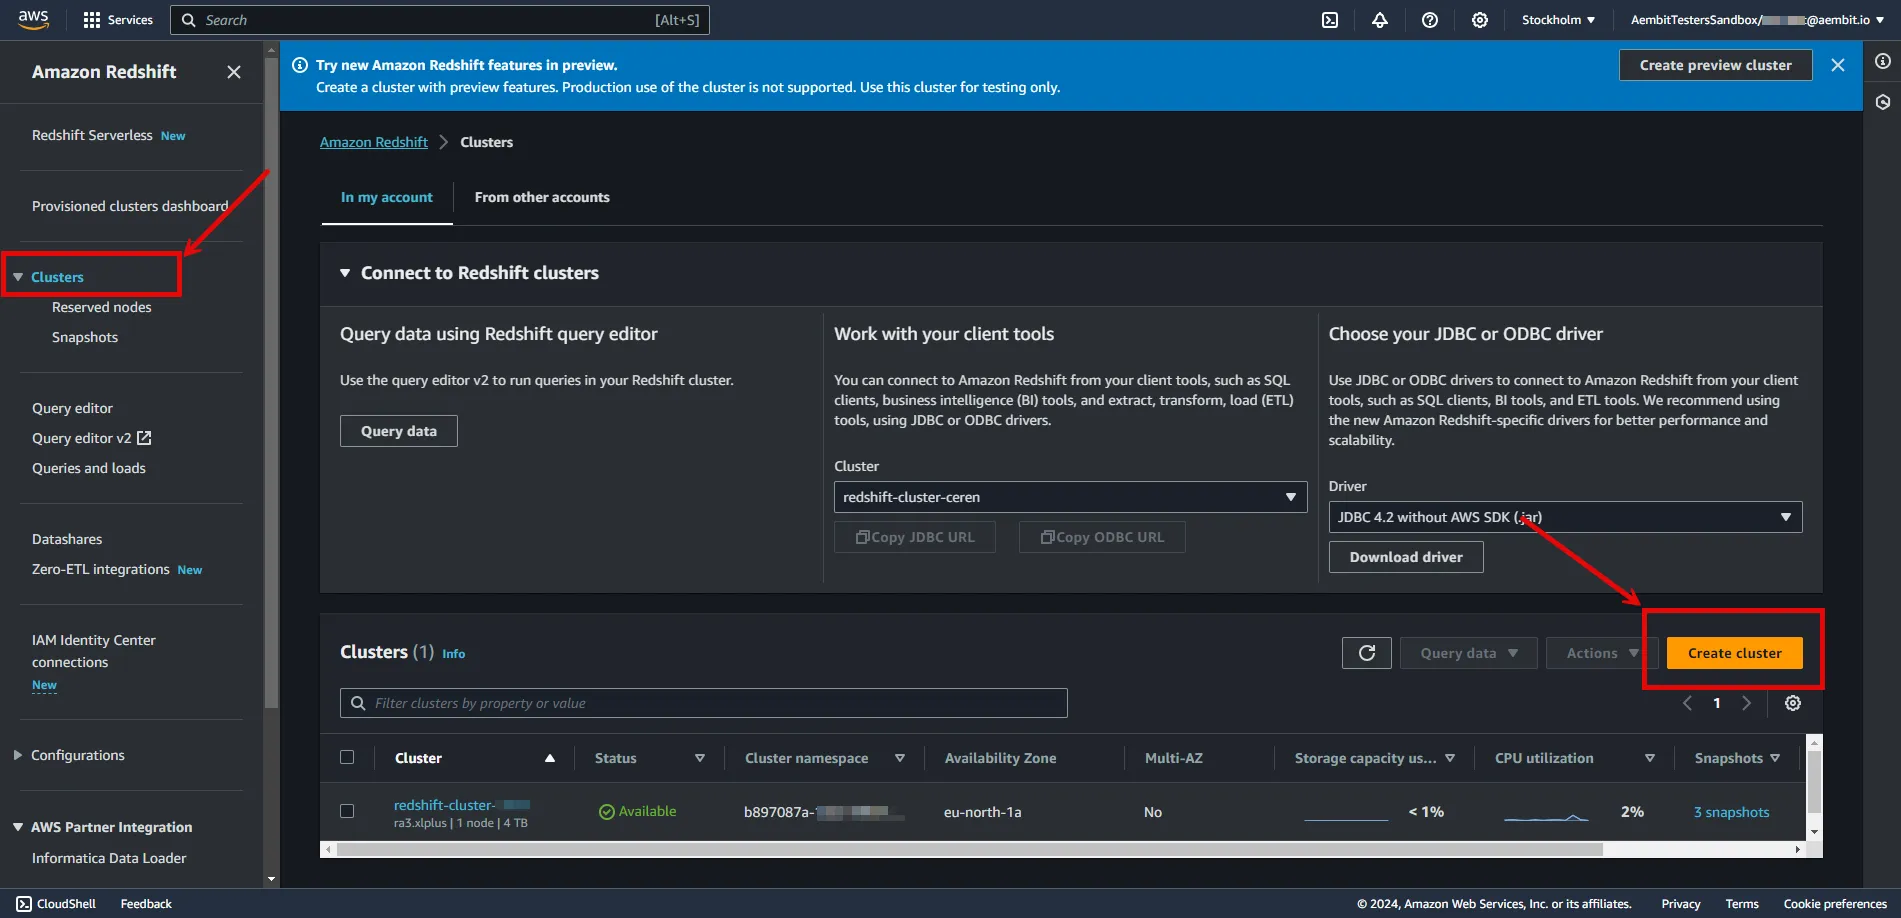
2. Click on **Create Cluster** and configure the cluster according to your preferences. Below are key choices:
* Under **Cluster configuration**, enter a name for the **cluster identifier**; this will be used in the endpoint.
* In **Database configurations**, set an **Admin user name**, and either auto-generate or provide an **Admin password**. Save this information for future use.
Note
In this example, we are using the `admin` username and password for demonstration purposes; however, it is advisable to create a dedicated user with appropriate privileges for enhanced security.
* In **Additional configuration**, you may turn off **Use defaults** and customize settings further.
* In **Network and security**, find the **Publicly Accessible** option and check the box for **Turn on Publicly accessible**.
:warning: Setting the **Publicly Accessible** option to **Yes** is done here purely for demonstration purposes. In normal circumstances, it is recommended to keep the instances not publicly accessible for enhanced security.
* In **Network and security**, ensure the **VPC security group (firewall)** configuration is in place to allow Client Workload/Agent Proxy communication.
* In **Database configurations**, specify a **Database name** and verify the **Database Port** is set to 5439.
3. After making all of your selections, click **Create cluster**.
## Server Workload Configuration
[Section titled “Server Workload Configuration”](#server-workload-configuration)
To retrieve the connection information for a cluster in the Amazon Redshift Console:
1. Sign in to the AWS Management Console and navigate to the [Amazon Redshift console](https://console.aws.amazon.com/redshiftv2).
2. In the left sidebar, select **Clusters** to view your clusters.
3. Click on the name of the cluster to view details.
4. In **General Information** copy the endpoint (excluding port and database name).
5. Create a new Server Workload.
* **Name** - Choose a user-friendly name.
6. Configure the service endpoint:
* **Host** - `...redshift.amazonaws.com` (Provide the endpoint copied from AWS)
* **Application Protocol** - Redshift
* **Port** - 5439
* **Forward to Port** - 5439
* **Authentication method** - Password Authentication
* **Authentication scheme** - Password
## Credential Provider Configuration
[Section titled “Credential Provider Configuration”](#credential-provider-configuration)
1. Create a new Credential Provider.
* **Name** - Choose a user-friendly name.
* **Credential Type** - [Username & Password](/user-guide/access-policies/credential-providers/username-password)
* **Username** - Provide login ID for the admin user of your cluster.
* **Password** - Provide the admin password of your cluster.
## Client Workload Configuration
[Section titled “Client Workload Configuration”](#client-workload-configuration)
Aembit now handles the credentials required to access the Server Workload, eliminating the need for you to manage them directly. You can safely remove any previously used credentials from the Client Workload.
If you access the Server Workload through an SDK or library, it is possible that the SDK/library may still require credentials to be present for initialization purposes. In this scenario, you can provide placeholder credentials. Aembit will overwrite these placeholder credentials with the appropriate ones during the access process.
## Access Policy
[Section titled “Access Policy”](#access-policy)
* Create an access policy for a Client Workload to access the Amazon RDS for MySQL Server Workload and assign the newly created Credential Provider to it.
# Beyond Identity
> This page describes how to configure Aembit to work with the Beyond Identity Server Workload.
#
[Beyond Identity](https://www.beyondidentity.com/) is a passwordless authentication service designed to bolster security measures for various applications and platforms. The Beyond Identity API serves as a developer-friendly interface, enabling seamless integration of advanced cryptographic techniques to eliminate reliance on traditional passwords.
Below you can find the Aembit configuration required to work with the Beyond Identity service as a Server Workload using the Beyond Identity API.
## Prerequisites
[Section titled “Prerequisites”](#prerequisites)
Before proceeding with the configuration, ensure you have the following:
* Beyond Identity tenant.
* An app configured in your Beyond Identity tenant. This can either be a custom application you set up or the built-in **Beyond Identity Management API app**. If you have not configured an app yet, follow the steps outlined in the next section or refer to the [official Beyond Identity documentation](https://developer.beyondidentity.com/docs/add-an-application) for more detailed instructions.
### Add new app in Beyond Identity
[Section titled “Add new app in Beyond Identity”](#add-new-app-in-beyond-identity)
1. Log in to the [Beyond Identity Admin Console](https://console-us.beyondidentity.com/login).
2. Navigate to the left pane, select **Apps**, and then click on **Add an application** from the top-right corner.
3. Configure the app based on your preferences. Below are key choices:
* Enter a name for the **Display Name**.
* Choose **OAuth2** for the Protocol under **Client Configuration**.
* Choose **Confidential** for the Client Type.
* Choose **Disabled** for the PKCE.
* Choose **Client Secret Basic** for the Token Endpoint Auth Method.
* Select **Client Credentials** for the Grant Type.
* Optionally, choose the scopes you intend to use in the **Token Configuration** section under **Allowed Scopes**.
4. After making your selections, click **Submit** to save the new app.
## Server Workload Configuration
[Section titled “Server Workload Configuration”](#server-workload-configuration)
1. Create a new Server Workload.
* **Name** - Choose a user-friendly name.
2. Configure the service endpoint:
* **Host** - `api-us.beyondidentity.com`
* **Application Protocol** - HTTP
* **Port** - 443 with TLS
* **Forward to Port** - 443 with TLS
* **Authentication method** - HTTP Authentication
* **Authentication scheme** - Bearer
## Credential Provider Configuration
[Section titled “Credential Provider Configuration”](#credential-provider-configuration)
1. Log in to the [Beyond Identity Admin Console](https://console-us.beyondidentity.com/login).
2. Navigate to the left pane and select **Apps** to access a list of your applications within your realm.
3. Choose your pre-configured application or use the default **Beyond Identity Management API** app.
4. In the External Protocol tab, copy the **Token Endpoint**. From the Client Configuration section, also copy both the **Client ID** and **Client Secret**. Keep these details stored for later use in the tenant configuration.
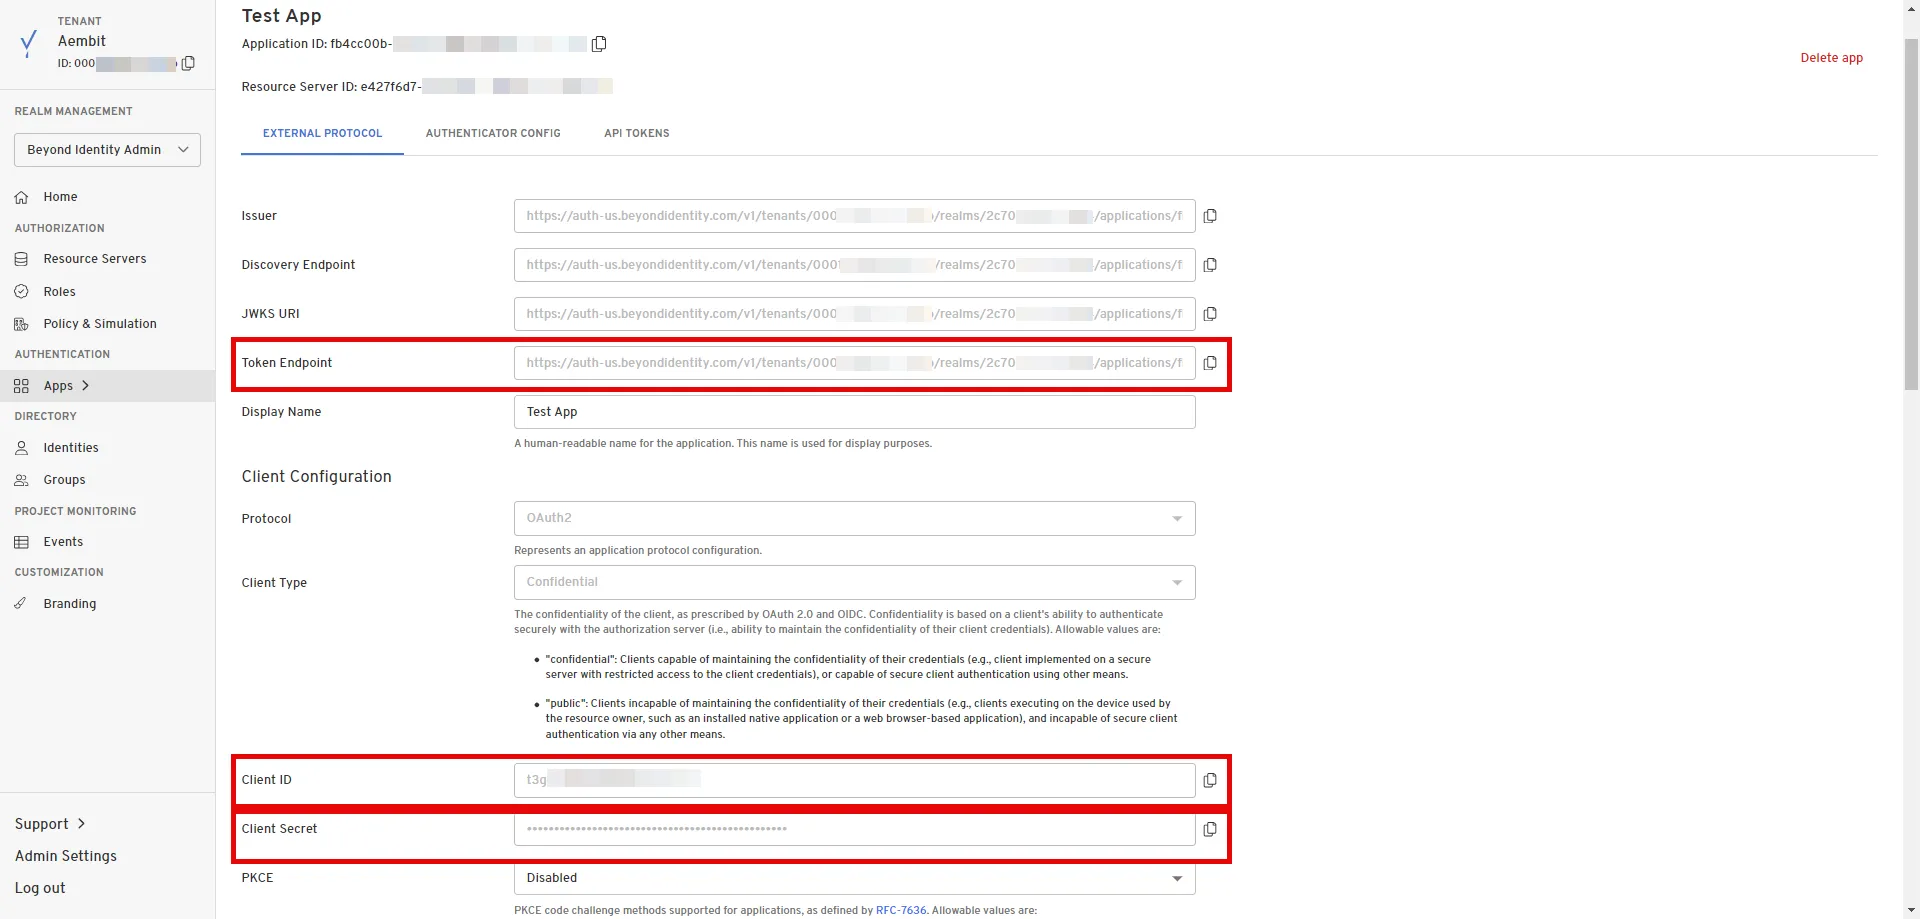
5. Create a new Credential Provider.
* **Name** - Choose a user-friendly name.
* **Credential Type** - [OAuth 2.0 Client Credentials](/user-guide/access-policies/credential-providers/oauth-client-credentials)
* **Token endpoint** - Provide the token endpoint copied from Beyond Identity.
* **Client ID** - Provide the client ID copied from Beyond Identity.
* **Client Secret** - Provide the client secret copied from Beyond Identity.
* **Scopes** - Enter the scopes you use, space delimited. (You can find scopes in the App details, Token Configuration section under **Allowed Scopes**)
## Client Workload Configuration
[Section titled “Client Workload Configuration”](#client-workload-configuration)
Aembit now handles the credentials required to access the Server Workload, eliminating the need for you to manage them directly. You can safely remove any previously used credentials from the Client Workload.
If you access the Server Workload through an SDK or library, it is possible that the SDK/library may still require credentials to be present for initialization purposes. In this scenario, you can provide placeholder credentials. Aembit will overwrite these placeholder credentials with the appropriate ones during the access process.
## Access Policy
[Section titled “Access Policy”](#access-policy)
* Create an Access Policy for a Client Workload to access the Beyond Identity Server Workload. Assign the newly created Credential Provider to this Access Policy.
## Required Features
[Section titled “Required Features”](#required-features)
* You will need to configure the [TLS Decrypt](/user-guide/deploy-install/advanced-options/tls-decrypt/configure-tls-decrypt) feature to work with the Beyond Identity Server Workload.
# Box
> This page describes how to configure Aembit to work with the Box Server Workload.
#
[Box](https://www.box.com/en-gb/home) is a cloud content management and file sharing service designed to help businesses securely store, manage, and share files online. The Box API provides developers with tools to integrate Box’s content management features into their own applications, enabling efficient collaboration and secure file handling.
Below you can find the Aembit configuration required to work with the Box service as a Server Workload using the Box API.
## Prerequisites
[Section titled “Prerequisites”](#prerequisites)
Before proceeding with the configuration, ensure you have the following:
* Box tenant.
* A custom authorized application using Server Authentication in the Box tenant. If you have not created an app yet, follow the steps outlined in the next section or refer to the [official Box Developer documentation](https://developer.box.com/guides/authentication/client-credentials/) for more detailed instructions.
* 2FA enabled on your Box tenant to view and copy the application’s client secret.
### Create New App In Box
[Section titled “Create New App In Box”](#create-new-app-in-box)
1. Log in to the [Box Developer Console](https://app.box.com/developers/console).
2. Navigate to the left pane, select **My Apps**, and then click on **Create New App** in the top-right corner.
3. Choose **Custom App**. A pop-up window will appear. Fill in the name and optional description field, choose the purpose, and then click **Next** to proceed.
4. Select **Server Authentication (Client Credentials Grant)** as the authentication method and click **Create App**.
5. Before the application can be used, a Box Admin must authorize it within the Box Admin Console. Navigate to the **Authorization** tab and click **Review and Submit** to send the request. A pop-up window will appear. Fill in the description field and click **Submit** to send. After your admin [authorizes the app](/user-guide/access-policies/server-workloads/guides/box#authorize-app-as-an-admin), the Authorization Status and Enablement Status should both be green.

6. Go back to the **Configuration** tab and scroll down to the **Application Scopes** section. Choose the scopes that best suit your project needs and click **Save Changes** in the top-right corner.
### Authorize App As an Admin
[Section titled “Authorize App As an Admin”](#authorize-app-as-an-admin)
1. Navigate to the [Admin Console](https://app.box.com/master).
2. In the left panel, click on **Apps**, and then in the right panel, click on **Custom Apps Manager** in the ribbon list to view a list of your Server Authentication Apps.
3. Click the 3-dot-icon of the app that requires authorization.
4. Choose **Authorize App** from the drop-down menu.

5. A pop-up window will appear. Click **Authorize** to proceed.
## Server Workload Configuration
[Section titled “Server Workload Configuration”](#server-workload-configuration)
1. Create a new Server Workload.
* **Name** - Choose a user-friendly name.
2. Configure the service endpoint:
* **Host** - `api.box.com`
* **Application Protocol** - HTTP
* **Port** - 443 with TLS
* **Forward to Port** - 443 with TLS
* **Authentication method** - HTTP Authentication
* **Authentication scheme** - Bearer
## Credential Provider Configuration
[Section titled “Credential Provider Configuration”](#credential-provider-configuration)
1. Log in to the [Box Developer Console](https://app.box.com/developers/console).
2. Navigate to the left pane, select **My Apps**, and then click on the name of the app to view details.
3. In the General Settings tab, copy the **Enterprise ID**.
4. In the Configuration tab, scroll down to the **OAuth 2.0 Credentials** section. Click **Fetch Client Secret** and then copy both the **Client ID** and **Client Secret**. Keep these details stored for later use in the tenant configuration.
5. Create a new Credential Provider.
* **Name** - Choose a user-friendly name.
* **Credential Type** - [OAuth 2.0 Client Credentials](/user-guide/access-policies/credential-providers/oauth-client-credentials)
* **Token endpoint** - `https://api.box.com/oauth2/token`
* **Client ID** - Provide the client ID copied from Box.
* **Client Secret** - Provide the client secret copied from Box.
* **Scopes** - You can leave this field **empty**, as Box will default to your selected scopes on the Developer Console, or specify the scopes, such as `root_readonly`. For more detailed information for scopes, you can refer to the [official Box Developer documentation](https://developer.box.com/guides/api-calls/permissions-and-errors/scopes/#scopes-oauth-2-authorization).
* **Credential Style** - POST Body
**Additional Parameters**
Note
The following parameters are used to authenticate as the application’s **Service Account**. To authenticate as a **Managed User**, refer to the [official Box Developer documentation](https://developer.box.com/guides/authentication/client-credentials/) for additional configuration steps. For security purposes, we recommend using the service account option and collaborating your service account on just the content it needs to access.
* **Name** - box\_subject\_type
* **Value** - enterprise
* **Name** - box\_subject\_id
* **Value** - Provide the enterprise ID copied from Box.
## Client Workload Configuration
[Section titled “Client Workload Configuration”](#client-workload-configuration)
Aembit now handles the credentials required to access the Server Workload, eliminating the need for you to manage them directly. You can safely remove any previously used credentials from the Client Workload.
If you access the Server Workload through an SDK or library, it is possible that the SDK/library may still require credentials to be present for initialization purposes. In this scenario, you can provide placeholder credentials. Aembit will overwrite these placeholder credentials with the appropriate ones during the access process.
## Access Policy
[Section titled “Access Policy”](#access-policy)
* Create an Access Policy for a Client Workload to access the Box Server Workload. Assign the newly created Credential Provider to this Access Policy.
## Required Features
[Section titled “Required Features”](#required-features)
* You will need to configure the [TLS Decrypt](/user-guide/deploy-install/advanced-options/tls-decrypt/configure-tls-decrypt) feature to work with the Box Server Workload.
# Claude
> This page describes how to configure Aembit to work with the Claude Server Workload.
#
[Claude](https://www.anthropic.com/api) is an artificial intelligence platform from Anthropic that allows developers to embed advanced language models into their applications. It supports tasks like natural language understanding and conversation generation, enhancing software functionality and user experience.
Below you can find the Aembit configuration required to work with the Claude service as a Server Workload using the Claude API and Anthropic’s Client SDKs.
## Prerequisites
[Section titled “Prerequisites”](#prerequisites)
Before proceeding with the configuration, ensure you have an Anthropic account and API key. If you have not already generated a key, follow the instructions below. For more details about Claude API, refer to the [official Claude API documentation](https://docs.anthropic.com/en/api/getting-started).
### Create API Key
[Section titled “Create API Key”](#create-api-key)
1. Sign in to your Anthropic account.
2. Navigate to the [API Keys](https://console.anthropic.com/settings/keys) page by clicking the **Get API Keys** button from the dashboard menu.
3. Click the **Create key** button in the top right corner of the page.
4. A pop-up window will appear. Fill in the name field, then click **Create Key** to proceed.
5. Click **Copy** and securely store the key for later use in the configuration on the tenant.
## Server Workload Configuration
[Section titled “Server Workload Configuration”](#server-workload-configuration)
1. Create a new Server Workload.
* **Name** - Choose a user-friendly name.
2. Configure the service endpoint:
* **Host** - `api.anthropic.com`
* **Application Protocol** - HTTP
* **Port** - 443 with TLS
* **Forward to Port** - 443 with TLS
* **Authentication method** - HTTP Authentication
* **Authentication scheme** - Header
* **Header** - x-api-key
## Credential Provider Configuration
[Section titled “Credential Provider Configuration”](#credential-provider-configuration)
1. Create a new Credential Provider.
* **Name** - Choose a user-friendly name.
* **Credential Type** - [API Key](/user-guide/access-policies/credential-providers/api-key)
* **API Key** - Paste the key copied from Anthropic Console.
## Client Workload Configuration
[Section titled “Client Workload Configuration”](#client-workload-configuration)
Aembit now handles the credentials required to access the Server Workload, eliminating the need for you to manage them directly. You can safely remove any previously used credentials from the Client Workload.
If you access the Server Workload through an SDK or library, it is possible that the SDK/library may still require credentials to be present for initialization purposes. In this scenario, you can provide placeholder credentials. Aembit will overwrite these placeholder credentials with the appropriate ones during the access process.
## Access Policy
[Section titled “Access Policy”](#access-policy)
* Create an Access Policy for a Client Workload to access the Claude API Server Workload. Assign the newly created Credential Provider to this Access Policy.
## Required Features
[Section titled “Required Features”](#required-features)
* You will need to configure the [TLS Decrypt](/user-guide/deploy-install/advanced-options/tls-decrypt/configure-tls-decrypt) feature to work with the Claude API Server Workload.
Note
If you are using the SDK, you will need to configure the `SSL_CERT_FILE` environment variable and point it to a file containing the tenant root CA. The specific commands may vary depending on how your application is launched. Below command lines are examples for the Python SDK:
```shell
wget https://.aembit.io/api/v1/root-ca -O tenant.crt
SSL_CERT_FILE=./tenant.crt python3 ./your_app.py
```
# Databricks
> This page describes how to configure Aembit to work with the Databricks Server Workload.
#
[Databricks](https://www.databricks.com/) is a unified data analytics platform built on Apache Spark, designed for scalable big data processing and machine learning. It provides tools for data engineering, data science, and analytics, enabling efficient handling of complex data workloads.
Below you can find the Aembit configuration required to work with the Databricks service as a Server Workload using the Databricks REST API. Aembit supports multiple authentication/authorization methods for Databricks. This page describes scenarios where the Credential Provider is configured for Databricks via:
* [OAuth 2.0 Authorization Code (3LO)](/user-guide/access-policies/server-workloads/guides/databricks#oauth-20-authorization-code)
* [OAuth 2.0 Client Credentials](/user-guide/access-policies/server-workloads/guides/databricks#oauth-20-client-credentials)
* [API Key](/user-guide/access-policies/server-workloads/guides/databricks#api-key)
Prerequisites
Before proceeding with the configuration, ensure you have the following:
* Databricks tenant.
* Workspace in the Databricks tenant. If you have not created a workspace before, you can follow the steps outlined in the subsequent sections or refer to the [official Databricks documentation](https://docs.databricks.com/en/getting-started/onboarding-account.html) for more detailed instructions.
## Create a Workspace in Databricks
[Section titled “Create a Workspace in Databricks”](#create-a-workspace-in-databricks)
Note
The following steps outline the process for creating a workspace in Databricks on AWS. If you are using Google Cloud Platform (GCP) or Microsoft Azure, you can find the corresponding steps by changing the platform option in the top right corner of the Databricks documentation.
1. Sign in to the [Databricks Console](https://accounts.cloud.databricks.com/) and navigate to the **Workspaces** page.
2. Click **Create workspace** located in the top right corner, select the **Quickstart** option, and then click **Next**.
3. In the next step, provide a name for your workspace, choose the AWS region, and then click **Start Quickstart**. This redirects you to the AWS Console.
4. In the AWS Console, you may change the pre-generated stack name if desired. Scroll down, check the acknowledgment box, and then click **Create stack**. The stack creation process may take some time. Once the creation is successfully completed, you receive a confirmation email from Databricks. You can then switch back to the Databricks console. If you do not see your workspace in the list, please refresh the page.
5. Click on the name of the workspace to view details. In the URL field, copy the part after the prefix (e.g., `abc12345` in `https://abc12345.cloud.databricks.com`). This is your Databricks instance name, and is used in future steps.
6. Click **Open Workspace** located in the top right corner to proceed with the next steps in the workspace setup.
## OAuth 2.0 Authorization Code
[Section titled “OAuth 2.0 Authorization Code”](#oauth-20-authorization-code)
### Server Workload Configuration
[Section titled “Server Workload Configuration”](#server-workload-configuration)
1. Create a new Server Workload.
* **Name** - Choose a user-friendly name.
2. Configure the service endpoint:
* **Host** - `.cloud.databricks.com` (Use the Databricks instance name copied in step 5 of the workspace creation process)
* **Application Protocol** - HTTP
* **Port** - 443 with TLS
* **Forward to Port** - 443 with TLS
* **Authentication method** - HTTP Authentication
* **Authentication scheme** - Bearer
### Credential Provider Configuration
[Section titled “Credential Provider Configuration”](#credential-provider-configuration)
1. In your Databricks account console, select **Settings** from the left-hand menu.
2. Navigate to the **App Connections** section in the top menu.
3. Click the **Add Connection** button in the top right corner.
4. Enter the **name** of your app.
5. Switch to the Aembit UI to create a new Credential Provider, selecting the OAuth 2.0 Authorization Code credential type. After setting up the Credential Provider, copy the auto-generated **Callback URL**.
6. Return to Databricks and paste the copied **Callback URL** into the **Redirect URLs** field.
7. Select the scopes for your application based on your specific needs.
Note
To avoid potential issues, do **not** to set the **Access Token TTL** to less than 10 minutes.
8. Once all selections are made, click **Add**.
9. A pop-up window appears. Copy both the **Client ID** and **Client Secret**, and securely store these details for later use in your tenant configuration.
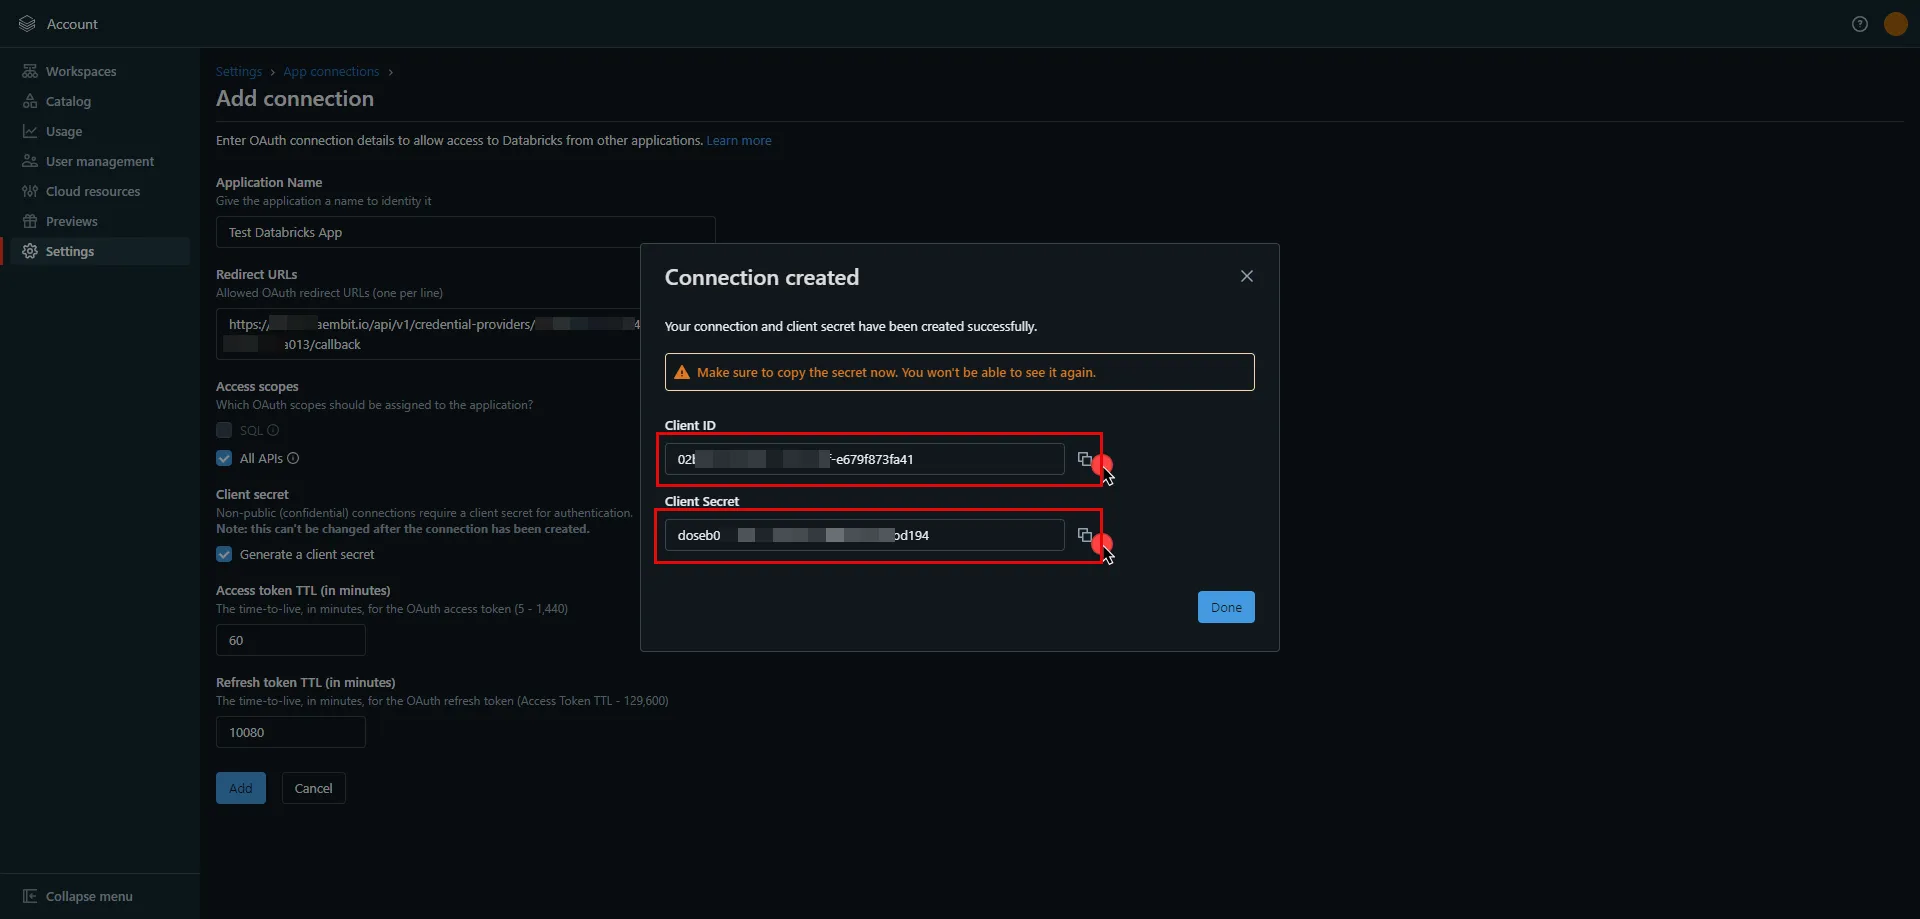
10. Edit the existing Credential Provider created in the previous steps.
* **Name** - Choose a user-friendly name.
* **Credential Type** - [OAuth 2.0 Authorization Code](/user-guide/access-policies/credential-providers/oauth-authorization-code)
* **Callback URL (Read-Only)** - An auto-generated Callback URL from Aembit Admin.
* **Client Id** - Provide the client ID copied from Databricks.
* **Client Secret** - Provide the client secret copied from Databricks.
* **Scopes** - `all-apis offline_access` or `sql offline_access`, depending on your scope selection in the Databricks UI. For more details on scopes and custom OAuth applications, please refer to the [official Databricks documentation](https://docs.databricks.com/en/integrations/enable-disable-oauth.html#enable-custom-app-ui).
* **OAuth URL** -
* For a **workspace-level** OAuth URL, use: `https:///oidc` (Use the Databricks instance name copied in step 5 of the workspace creation process)
* For an **account-level** OAuth URL, use: `https://accounts.cloud.databricks.com/oidc/accounts/`
* In your Databricks account, click on your username in the upper right corner, and in the dropdown menu,copy the part next to Account ID and use it in the previous link. 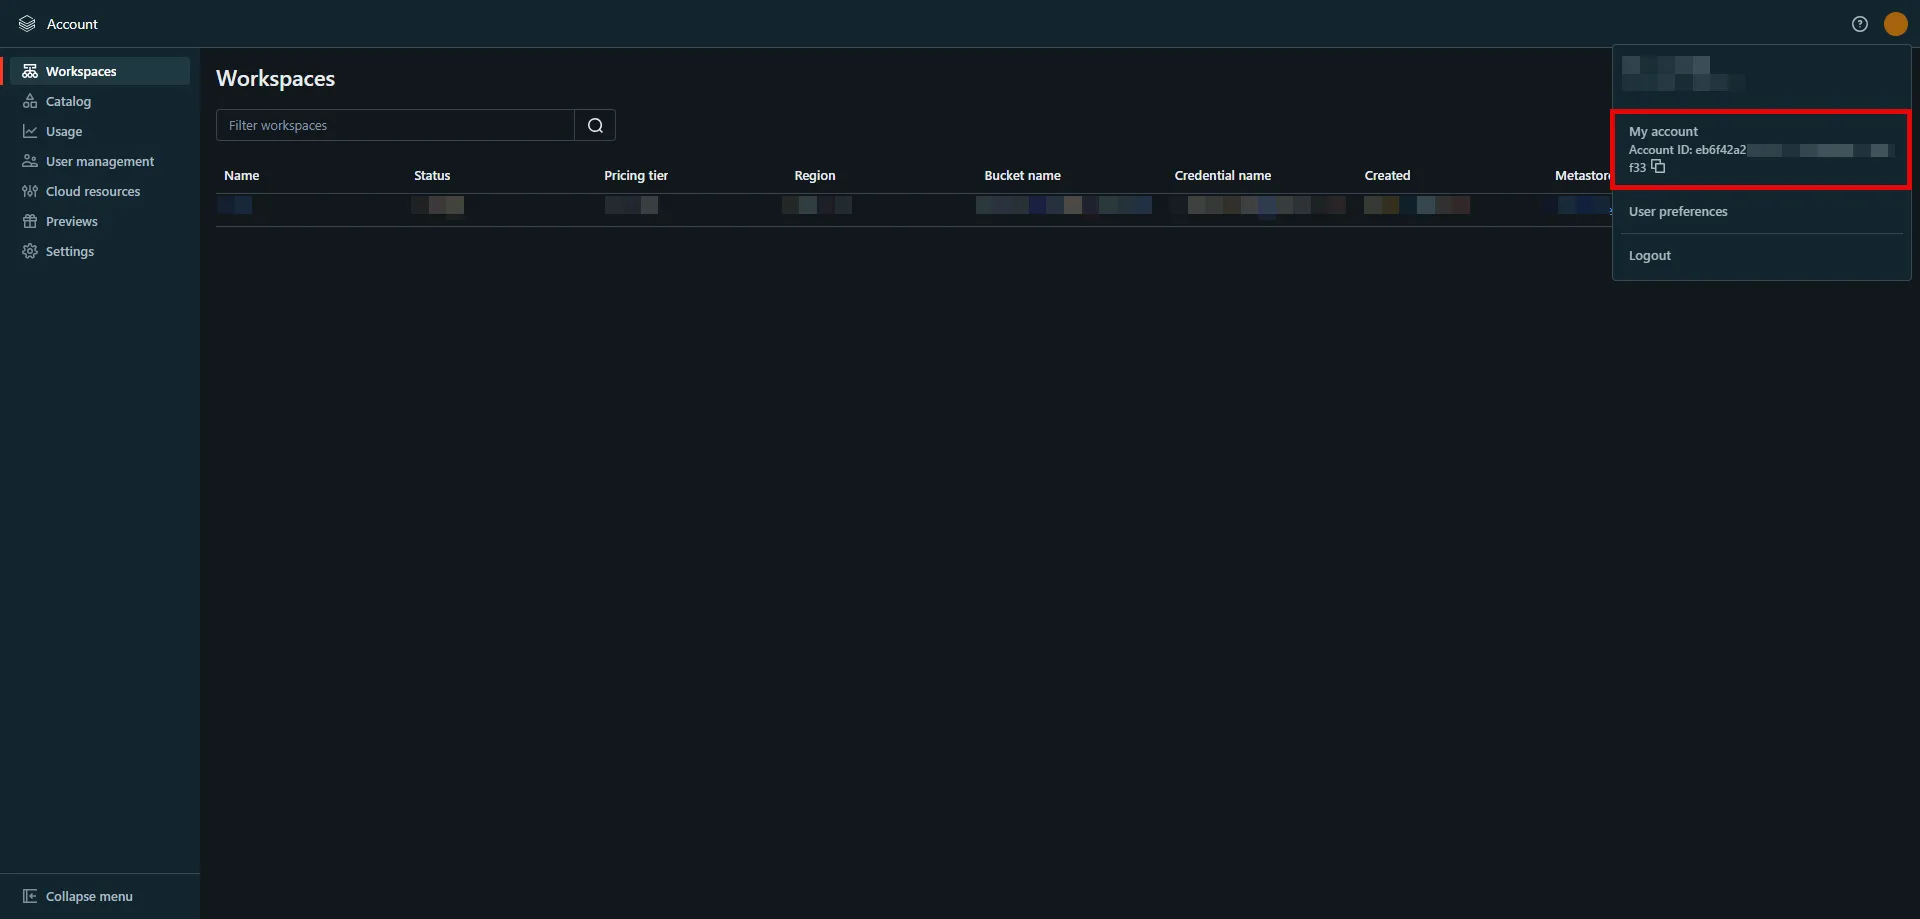
Tip
These two URLs correspond to different levels of OAuth authorization. The level determines the scope of the authorization code:
* **Account-Level** - Use this URL if you need to call both account-level and workspace-level REST APIs across all accounts and workspaces that your Databricks user account has access to.
* **Workspace-Level** - Use this URL if you only need to call REST APIs within a single workspace that your user account has access to.
For more detailed information about these two different levels, please refer to the [official Databricks documentation](https://docs.databricks.com/en/dev-tools/auth/oauth-u2m.html#step-2-generate-an-authorization-code).
Click on **URL Discovery** to populate the Authorization and Token URL fields, which can be left as populated.
* **PKCE Required** - On
* **Lifetime** - 1 year (Databricks does not specify a refresh token lifetime; this value is recommended by Aembit.)
11. Click **Save** to save your changes on the Credential Provider.
12. In the Aembit UI, click the **Authorize** button. You are directed to a page where you can review the access request. Click **Authorize** to complete the OAuth 2.0 Authorization Code flow. You should see a success page and then be redirected to Aembit automatically. You can also verify your flow is complete by checking the **State** value in the Credential Provider. After completion, it should be **Ready**.

Caution
Once the set lifetime ends, the retrieved credential expires and will not work anymore. Aembit will notify you before this happens. Please ensure you reauthorize the credential before it expires.
## OAuth 2.0 Client Credentials
[Section titled “OAuth 2.0 Client Credentials”](#oauth-20-client-credentials)
### Server Workload Configuration
[Section titled “Server Workload Configuration”](#server-workload-configuration-1)
1. Create a new Server Workload.
* **Name** - Choose a user-friendly name.
2. Configure the service endpoint:
* **Host** - `.cloud.databricks.com` (Use the Databricks instance name copied in step 5 of the workspace creation process)
* **Application Protocol** - HTTP
* **Port** - 443 with TLS
* **Forward to Port** - 443 with TLS
* **Authentication method** - HTTP Authentication
* **Authentication scheme** - Bearer
### Credential Provider Configuration
[Section titled “Credential Provider Configuration”](#credential-provider-configuration-1)
1. In your Databricks workspace, click your username in the top right corner, and select **Settings** from the dropdown menu.
2. In the left-hand menu, navigate to **Identity and access**.
3. Next to **Service principals**, click **Manage**.
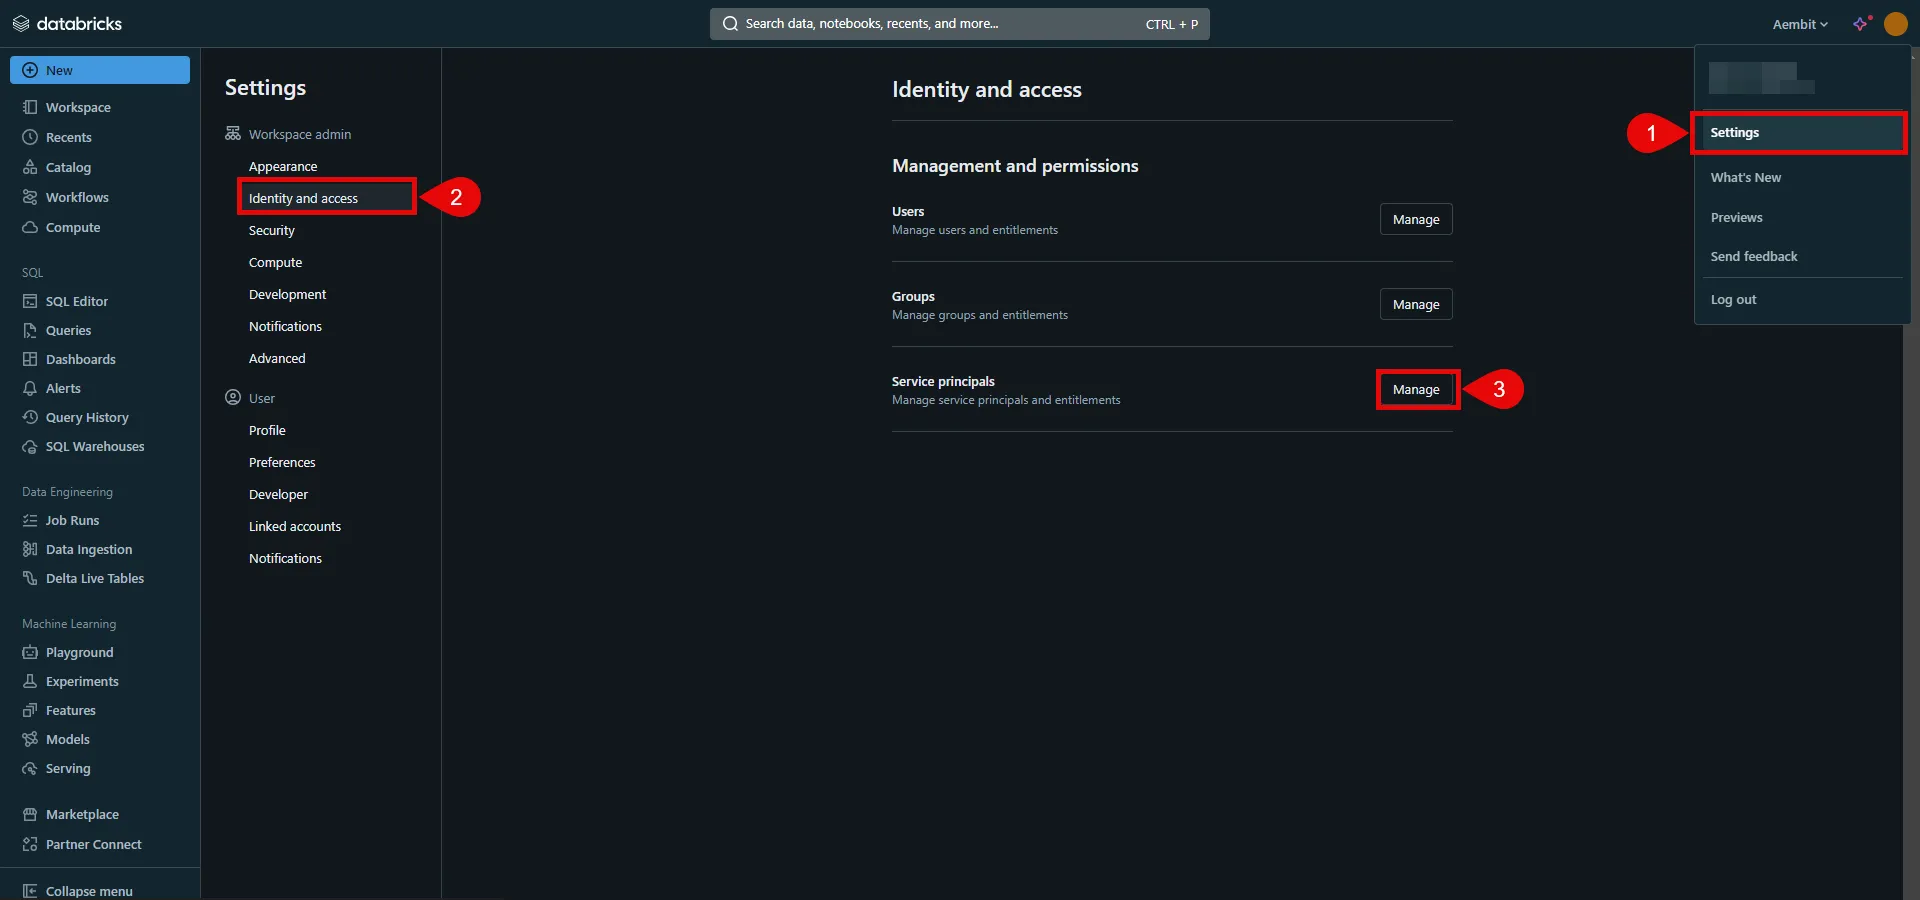
4. Click the **Add service principal** button.
5. If you do not already have a service principal, click **Add New**; otherwise, select the desired service principal from the list and click **Add**.
6. Click on the name of the service principal to view its details.
7. Navigate to the **Permissions** tab and click the **Grant access** button.
8. In the pop-up window, select the User, Group, or Service Principal and assign their role, then click **Save**.
9. Navigate to the **Secrets** tab and click the **Generate secret** button.
10. A pop-up window appears. Copy both the **Client ID** and **Client Secret**, and store these details securely for later use in the tenant configuration.
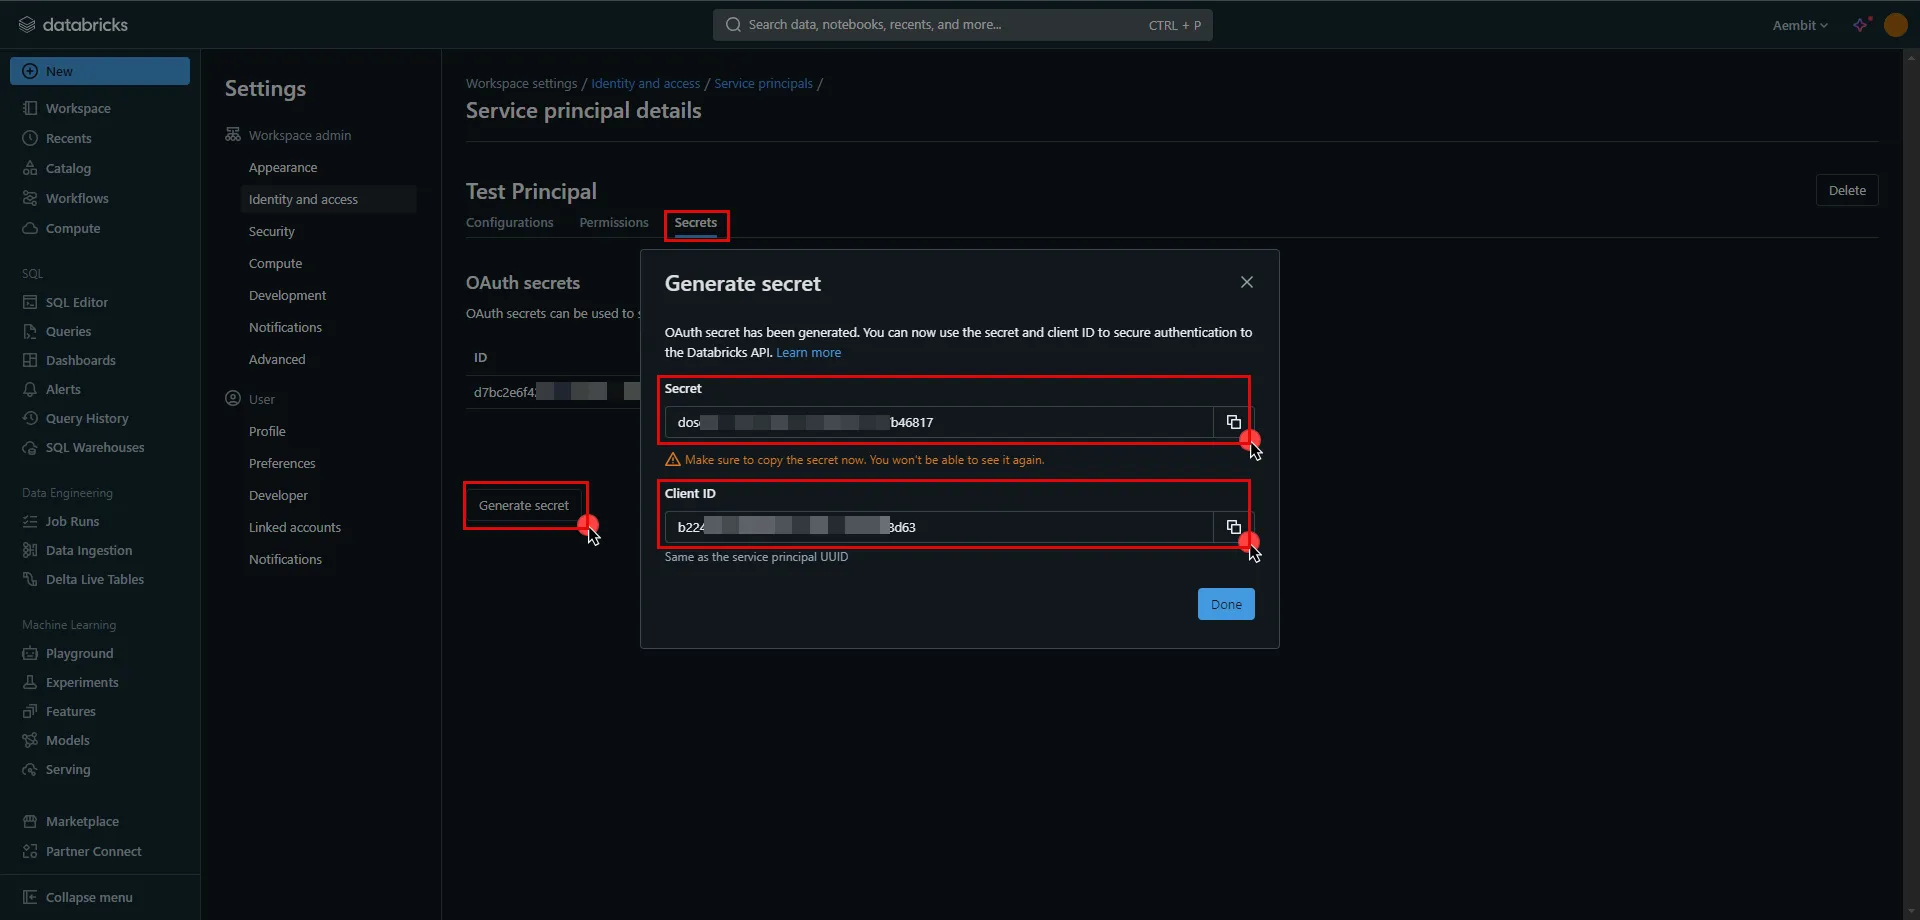
11. Create a new Credential Provider.
* **Name** - Choose a user-friendly name.
* **Credential Type** - [OAuth 2.0 Client Credentials](/user-guide/access-policies/credential-providers/oauth-client-credentials)
* **Token endpoint** -
* For a **workspace-level** endpoint URL, use: `https:///oidc/v1/token` (Use the Databricks instance name copied in step 5 of the workspace creation process)
* For an **account-level** endpoint URL, use: `https://accounts.cloud.databricks.com/oidc/accounts//v1/token`
* In your Databricks account, click on your username in the upper right corner, and in the dropdown menu,copy the part next to Account ID and use it in the previous link. 
Tip
These two URLs correspond to different levels of OAuth authorization. The level determines the scope of the authorization code:
* **Account-Level** - Use this URL if you need to call both account-level and workspace-level REST APIs across all accounts and workspaces that your Databricks user account has access to.
* **Workspace-Level** - Use this URL if you only need to call REST APIs within a single workspace that your user account has access to.
For more detailed information about these two different levels, please refer to the [official Databricks documentation](https://docs.databricks.com/en/dev-tools/auth/oauth-m2m.html#manually-generate-and-use-access-tokens-for-oauth-m2m-authentication).
* **Client ID** - Provide the client ID copied from Databricks.
* **Client Secret** - Provide the client secret copied from Databricks.
* **Scopes** - `all-apis`
* **Credential Style** - Authorization Header
## API Key
[Section titled “API Key”](#api-key)
### Server Workload Configuration
[Section titled “Server Workload Configuration”](#server-workload-configuration-2)
1. Create a new Server Workload.
* **Name** - Choose a user-friendly name.
2. Configure the service endpoint:
* **Host** - `.cloud.databricks.com` (Use the Databricks instance name copied in step 5 of the workspace creation process)
* **Application Protocol** - HTTP
* **Port** - 443 with TLS
* **Forward to Port** - 443 with TLS
* **Authentication method** - HTTP Authentication
* **Authentication scheme** - Bearer
### Credential Provider Configuration
[Section titled “Credential Provider Configuration”](#credential-provider-configuration-2)
1. In your Databricks workspace, click on your username in the top right corner, and select **Settings** from the dropdown menu.
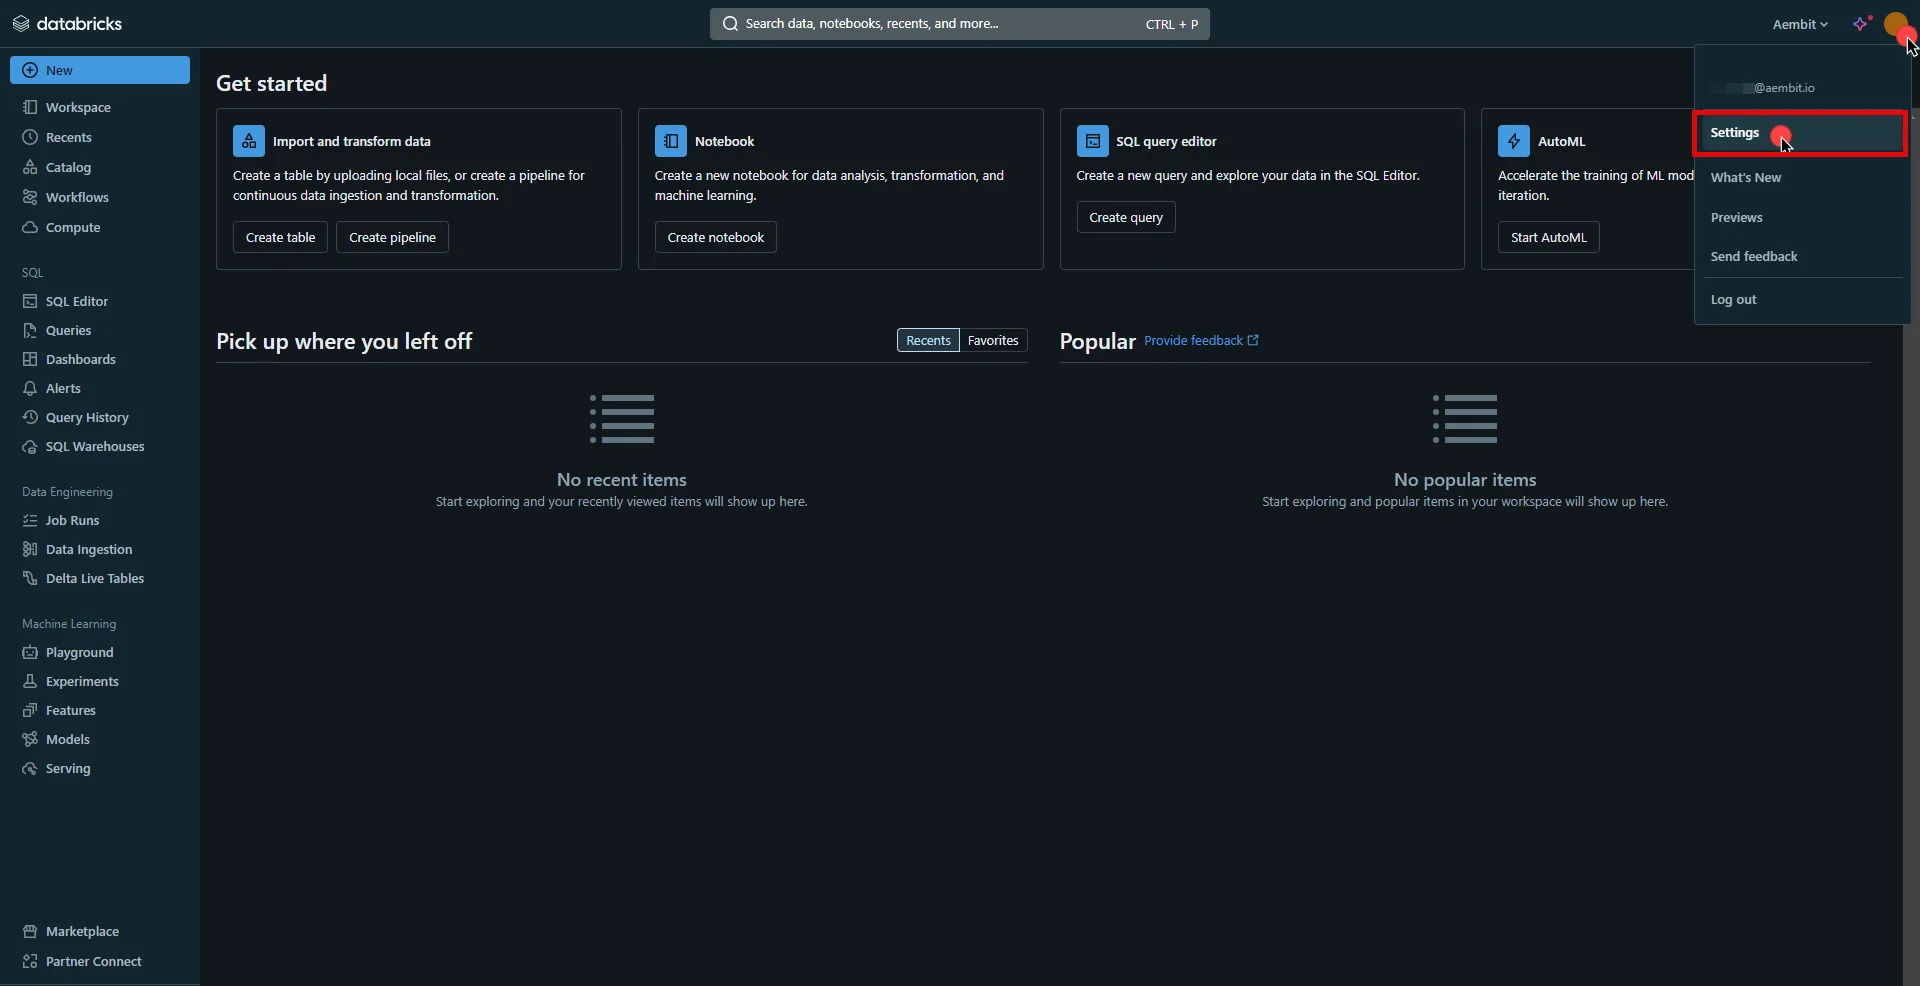
2. In the left-hand menu, navigate to the **Developer** section.
3. Next to **Access tokens**, click **Manage**.
4. Click the **Generate new token** button.
5. Optionally, provide a comment and set a lifetime for your token, then click **Generate**.
6. Click **Copy to clipboard** and securely store the token for later use in the configuration on the tenant.
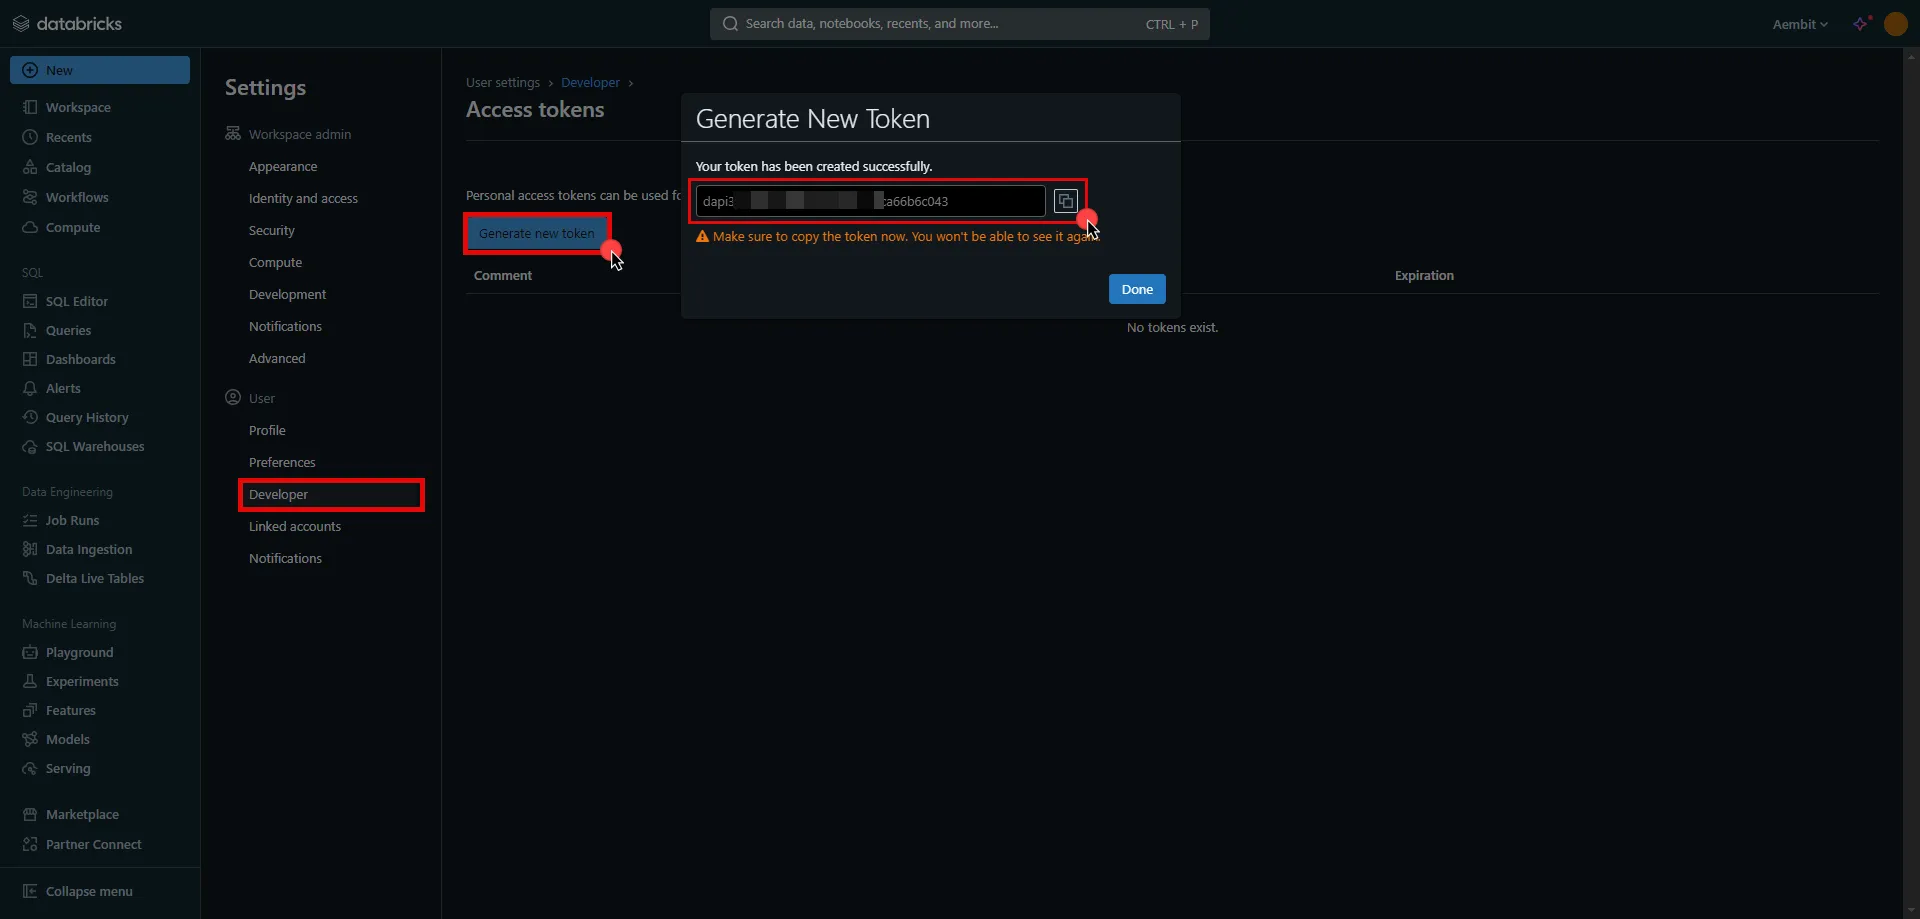
7. Create a new Credential Provider.
* **Name** - Choose a user-friendly name.
* **Credential Type** - [API Key](/user-guide/access-policies/credential-providers/api-key)
* **API Key** - Paste the token copied from Databricks.
## Client Workload Configuration
[Section titled “Client Workload Configuration”](#client-workload-configuration)
Aembit now handles the credentials required to access the Server Workload, eliminating the need for you to manage them directly. You can safely remove any previously used credentials from the Client Workload.
If you access the Server Workload through an SDK or library, it is possible that the SDK/library may still require credentials to be present for initialization purposes. In this scenario, you can provide placeholder credentials. Aembit will overwrite these placeholder credentials with the appropriate ones during the access process.
## Access Policy
[Section titled “Access Policy”](#access-policy)
* Create an Access Policy for a Client Workload to access the Databricks Server Workload. Assign the newly created Credential Provider to this Access Policy.
## Required Features
[Section titled “Required Features”](#required-features)
* You will need to configure the [TLS Decrypt](/user-guide/deploy-install/advanced-options/tls-decrypt/configure-tls-decrypt) feature to work with the Databricks Server Workload.
# Freshsales
> This page describes how to configure Aembit to work with the Freshsales Server Workload.
#
[Freshsales](https://www.freshworks.com/crm/sales/) is a customer relationship management platform that helps businesses manage their sales processes. It offers features like lead tracking, email integration, and sales analytics to streamline workflows and improve customer interactions.
Below you can find the Aembit configuration required to work with the Freshsales service as a Server Workload using the REST API.
## Prerequisites
[Section titled “Prerequisites”](#prerequisites)
Before proceeding with the configuration, you will need to have a Freshsales or Freshsales Suite tenant (or [sign up](https://www.freshworks.com/crm/signup/) for one).
## Server Workload Configuration
[Section titled “Server Workload Configuration”](#server-workload-configuration)
1. Create a new Server Workload.
* **Name** - Choose a user-friendly name.
2. Configure the service endpoint:
* **Host** - `.myfreshworks.com`
* **Application Protocol** - HTTP
* **Port** - 443 with TLS
* **Forward to Port** - 443 with TLS
* **Authentication method** - HTTP Authentication
* **Authentication scheme** - Header
* **Header** - Authorization
## Credential Provider Configuration
[Section titled “Credential Provider Configuration”](#credential-provider-configuration)
1. Sign into your Freshsales account.
2. In the upper-right corner of the page, click your profile photo, then click **Settings**.
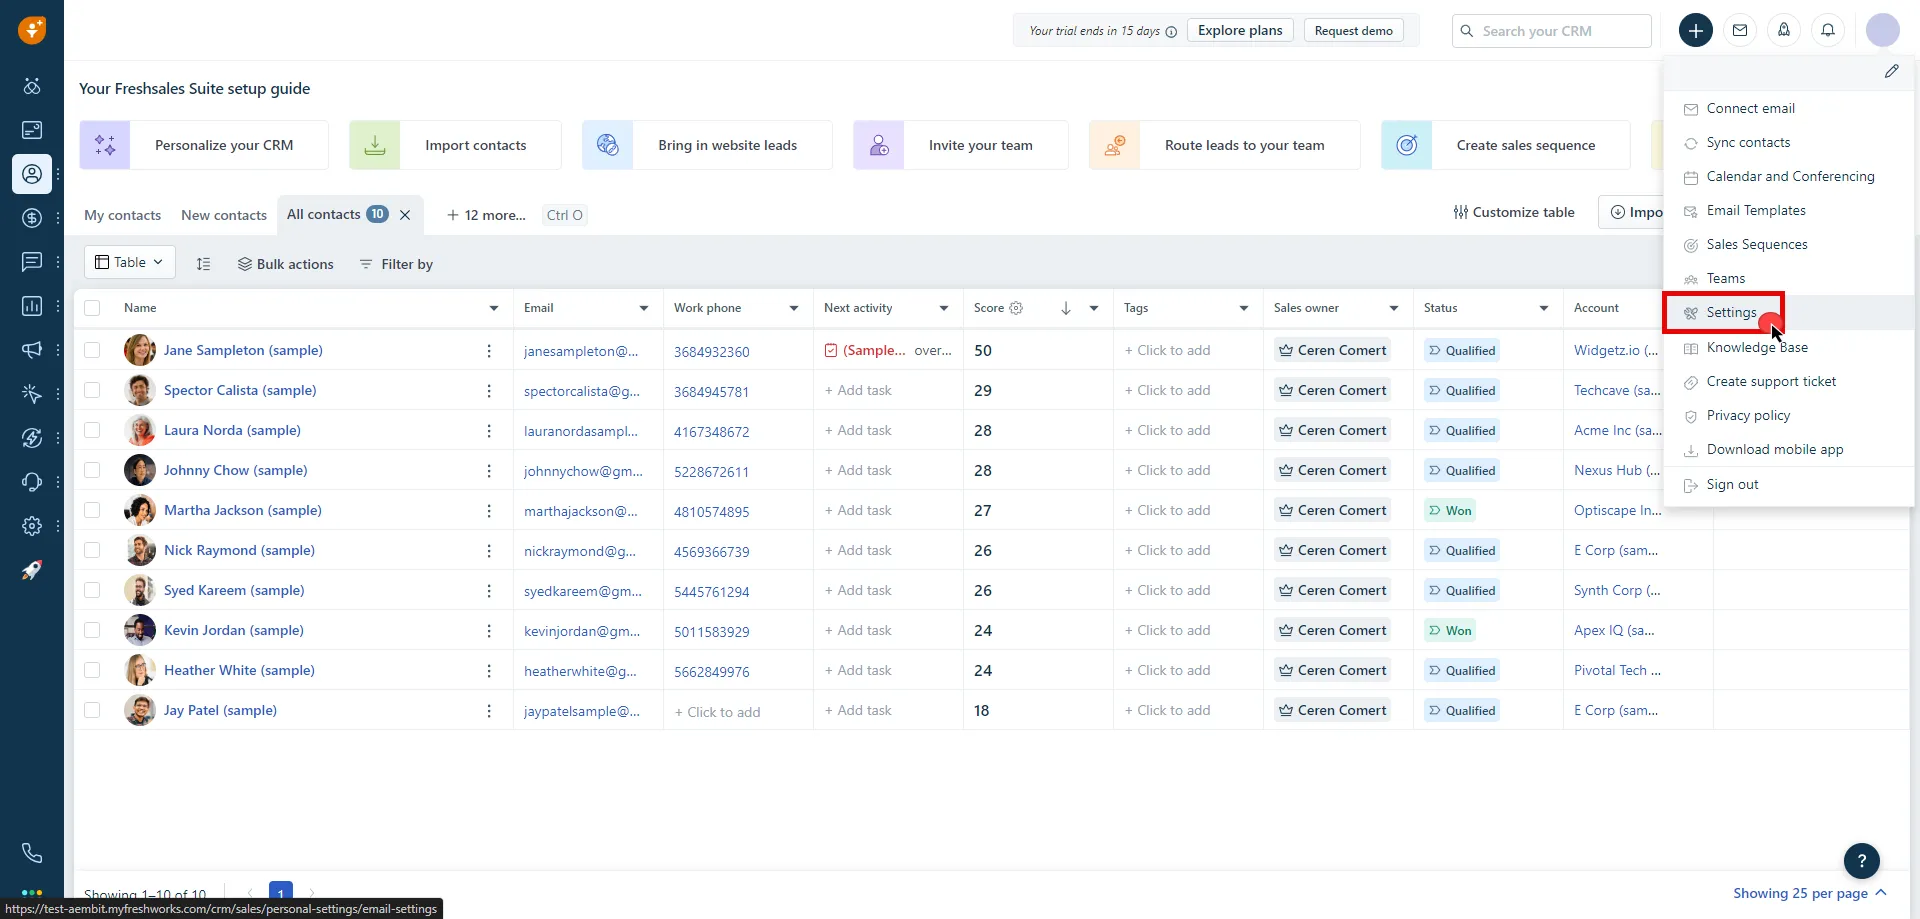
3. Click on the **API Settings** tab.
4. Click **Copy** and securely store the API key for later use in the configuration on the tenant.
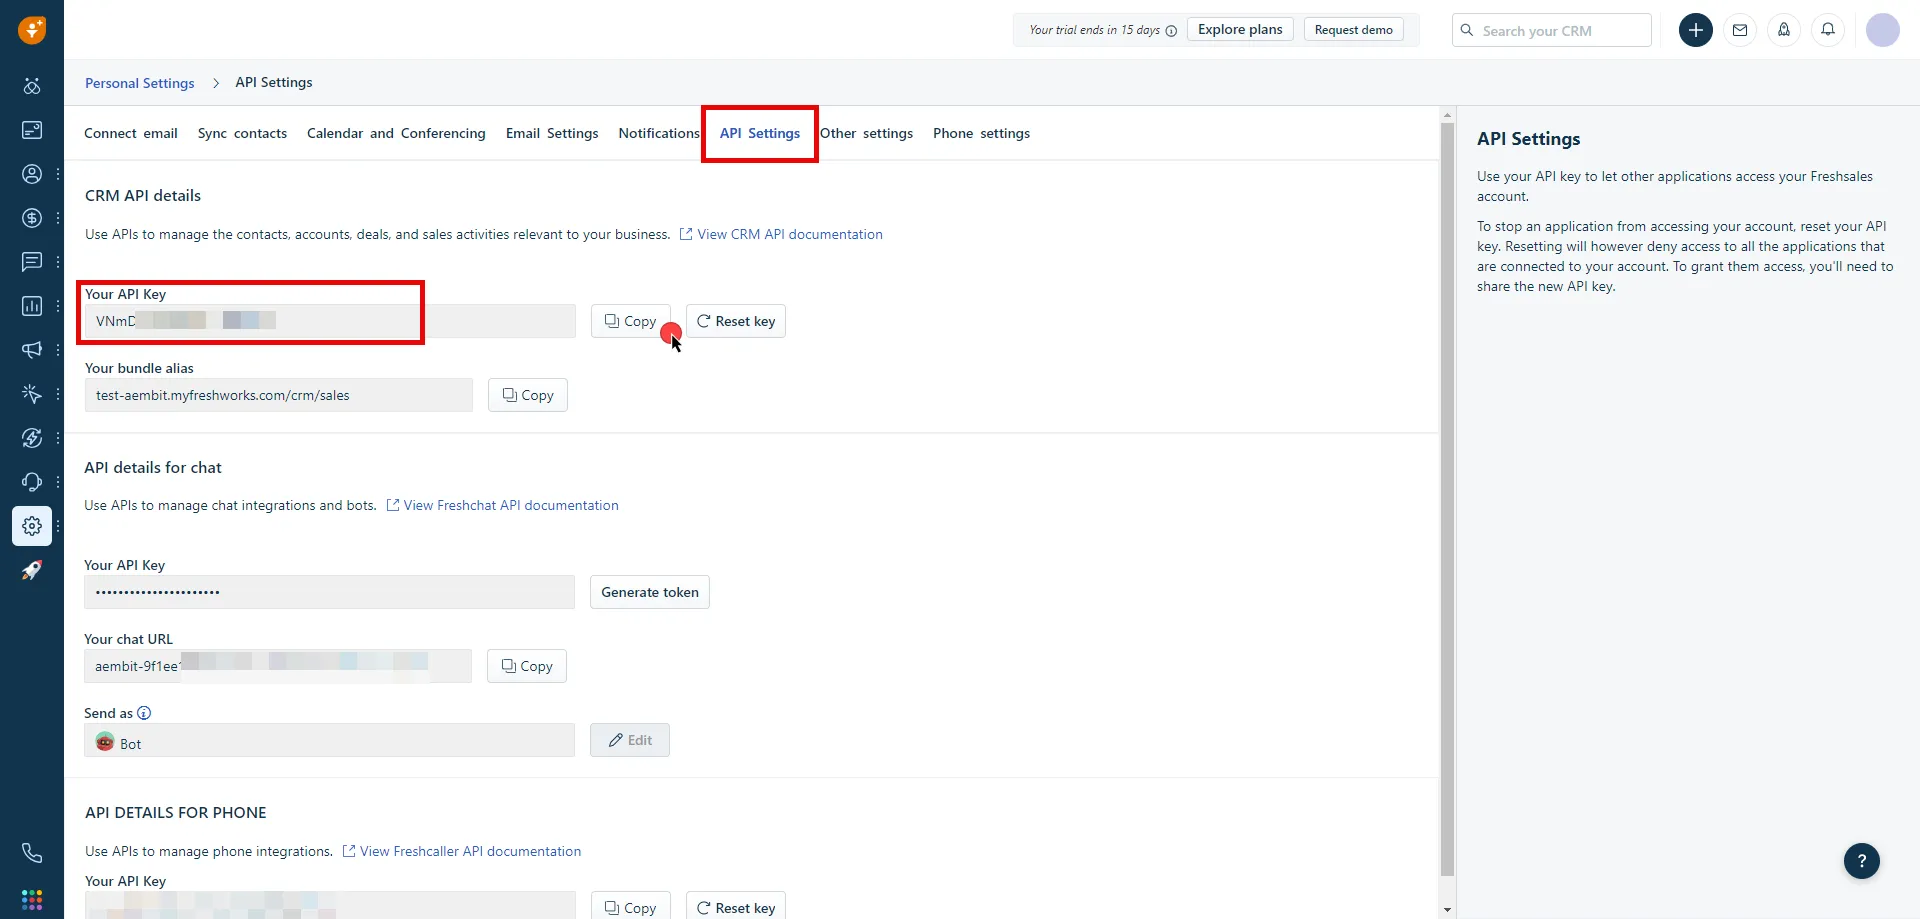
5. Create a new Credential Provider.
* **Name** - Choose a user-friendly name.
* **Credential Type** - [API Key](/user-guide/access-policies/credential-providers/api-key)
* **API Key** - Provide the key copied from Freshsales.
## Client Workload Configuration
[Section titled “Client Workload Configuration”](#client-workload-configuration)
Aembit now handles the credentials required to access the Server Workload, eliminating the need for you to manage them directly. You can safely remove any previously used credentials from the Client Workload.
If you access the Server Workload through an SDK or library, it is possible that the SDK/library may still require credentials to be present for initialization purposes. In this scenario, you can provide placeholder credentials. Aembit will overwrite these placeholder credentials with the appropriate ones during the access process.
## Access Policy
[Section titled “Access Policy”](#access-policy)
* Create an access policy for a Client Workload to access the Freshsales Server Workload and assign the newly created Credential Provider to it.
## Required Features
[Section titled “Required Features”](#required-features)
* You will need to configure the [TLS Decrypt](/user-guide/deploy-install/advanced-options/tls-decrypt/configure-tls-decrypt) feature to work with the Freshsales Server Workload.
# GCP BigQuery
> This page describes how to configure Aembit to work with the GCP BigQuery Server Workload.
#
[Google BigQuery](https://cloud.google.com/bigquery?hl=en), part of Google Cloud Platform, is a data warehousing solution designed for storing, querying, and analyzing large datasets. It offers scalability, SQL-based querying, and integrations with other GCP services and third-party tools.
Below you can find the Aembit configuration required to work with the GCP BigQuery service as a Server Workload using the BigQuery REST API.
Aembit supports multiple authentication/authorization methods for BigQuery. This page describes scenarios where the Credential Provider is configured for BigQuery via:
* [OAuth 2.0 Authorization Code (3LO)](/user-guide/access-policies/server-workloads/guides/gcp-bigquery#oauth-20-authorization-code)
* [Google Workload Identity Federation](/user-guide/access-policies/server-workloads/guides/gcp-bigquery#google-workload-identity-federation)
Prerequisites
Before proceeding with the configuration, ensure you have the following:
* An active Google Cloud account
* A GCP project with BigQuery enabled
* Data available for querying in BigQuery
## OAuth 2.0 Authorization Code
[Section titled “OAuth 2.0 Authorization Code”](#oauth-20-authorization-code)
### Server Workload Configuration
[Section titled “Server Workload Configuration”](#server-workload-configuration)
1. Create a new Server Workload.
* **Name** - Choose a user-friendly name.
2. Configure the Service endpoint:
* **Host** - `bigquery.googleapis.com`
* **Application Protocol** - HTTP
* **Port** - 443 with TLS
* **Forward to Port** - 443 with TLS
* **Authentication method** - HTTP Authentication
* **Authentication scheme** - Bearer
### Credential Provider Configuration
[Section titled “Credential Provider Configuration”](#credential-provider-configuration)
1. Sign in to the Google Cloud Console and navigate to the [Credentials](hhttps://console.cloud.google.com/apis/credentials) page. Ensure that you are working within a GCP project for which you have authorization.
2. On the **Credentials** dashboard, click **Create Credentials** located in the top left corner and select the **OAuth client ID** option.

3. If there is no configured Consent Screen for your project, you will see a **Configure Consent Screen** button on the directed page. Click the button to continue.

4. Choose **User Type** and click **Create**.
* Provide a name for your app.
* Choose a user support email from the dropdown menu.
* App logo and app domain fields are optional.
* Enter at least one email for the Developer contact information field.
* Click **Save and Continue**.
* You may skip the Scopes step by clicking **Save and Continue** once again.
* In the **Summary** step, review the details of your app and click **Back to Dashboard**.
5. Navigate back to [Credentials](hhttps://console.cloud.google.com/apis/credentials) page, click **Create Credentials**, and select the **OAuth client ID** option again.
* Choose **Web Application** for Application Type.
* Provide a name for your web client.
* Switch to the Aembit UI to create a new Credential Provider, selecting the OAuth 2.0 Authorization Code credential type. After setting up the Credential Provider, copy the auto-generated **Callback URL**.
* Return to Google Cloud Console and paste the copied URL into the **Authorized redirect URIs** field.
* Click **Create**.
6. A pop-up window will appear. Copy both the **Client ID** and the **Client Secret**. Store them for later use in the tenant configuration.
7. Edit the existing Credential Provider created in the previous steps.
* **Name** - Choose a user-friendly name.
* **Credential Type** - [OAuth 2.0 Authorization Code](/user-guide/access-policies/credential-providers/oauth-authorization-code)
* **Callback URL (Read-Only)** - An auto-generated Callback URL from Aembit Admin.
* **Client Id** - Provide the Client ID copied from Google.
* **Client Secret** - Provide the Secret copied from Google.
* **Scopes** - Enter the scopes you will use for BigQuery (e.g. `https://www.googleapis.com/auth/bigquery`) A full list of GCP Scopes can be found at [OAuth 2.0 Scopes for Google APIs](https://developers.google.com/identity/protocols/oauth2/scopes).
* **OAuth URL** - `https://accounts.google.com`
Click on **URL Discovery** to populate the Authorization and Token URL fields, which can be left as populated.
* **PKCE Required** - Off
* **Lifetime** - 1 year (A Google Cloud Platform project with an OAuth consent screen configured for an external user type and a publishing status of Testing is issued a refresh token expiring in 7 days).\
Google does not specify a refresh token lifetime for the internal user type selected version; this value is recommended by Aembit. For more information, refer to the [official Google documentation](https://developers.google.com/identity/protocols/oauth2#expiration).
8. Click **Save** to save your changes on the Credential Provider.
9. In Aembit UI, click the **Authorize** button. You will be directed to a page where you can choose your Google account first. Then click **Allow** to complete the OAuth 2.0 Authorization Code flow. You will see a success page and will be redirected to Aembit automatically. You can also verify your flow is complete by checking the **State** value in the Credential Provider. After completion, it should be in a **Ready** state.

Caution
Once the set lifetime ends, the retrieved credential will expire and no longer be active. Aembit will notify you before this happens. Please ensure you reauthorize your credential before it expires.
## Google Workload Identity Federation
[Section titled “Google Workload Identity Federation”](#google-workload-identity-federation)
### Server Workload Configuration
[Section titled “Server Workload Configuration”](#server-workload-configuration-1)
1. Create a new Server Workload.
* **Name** - Choose a user-friendly name.
2. Configure the Service endpoint:
* **Host** - `bigquery.googleapis.com`
* **Application Protocol** - HTTP
* **Port** - 443 with TLS
* **Forward to Port** - 443 with TLS
* **Authentication method** - HTTP Authentication
* **Authentication scheme** - Bearer
### Credential Provider Configuration
[Section titled “Credential Provider Configuration”](#credential-provider-configuration-1)
1. Sign in to the Google Cloud Console and navigate to [Service Accounts](https://console.cloud.google.com/iam-admin/serviceaccounts). Ensure that you are working within a GCP project for which you have authorization.
2. On the **Service Accounts** dashboard, click **Create Service Account** located in the top left corner.
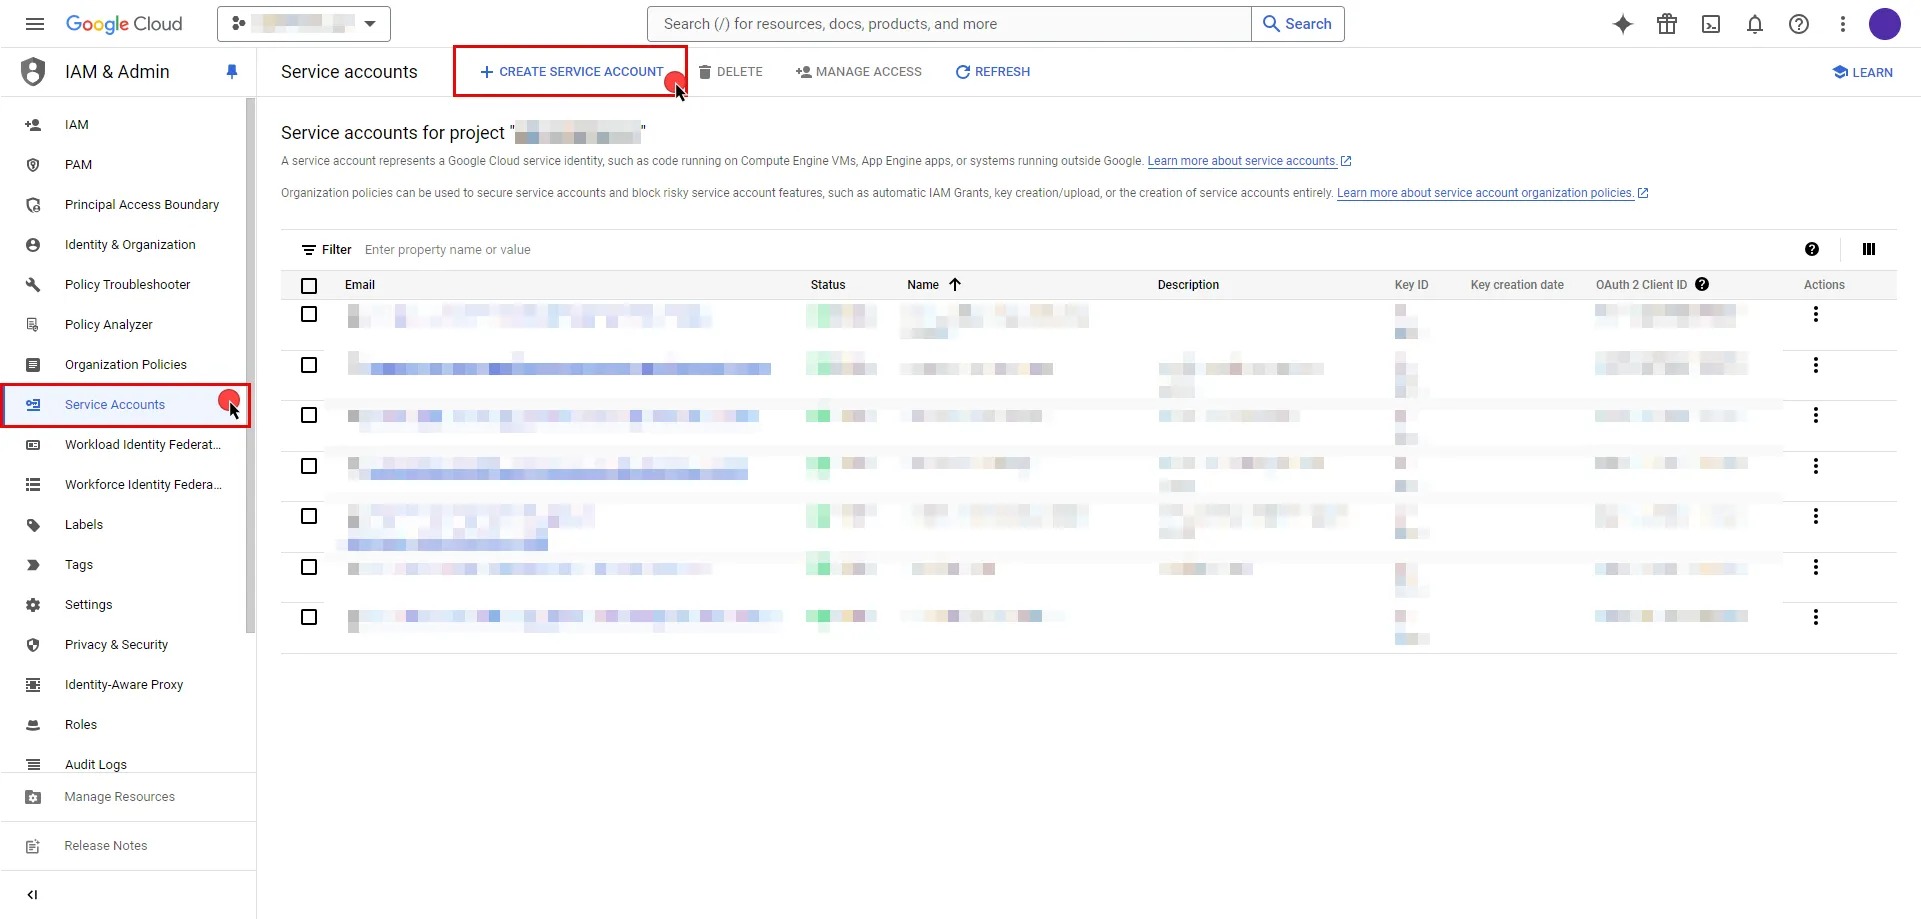
```plaintext
- Provide a name for your service account. The ID will be generated based on the account name, but you have the option to edit it. The description field is optional.
- Click the icon next to **Email address** to copy it and store the address for later.
- Click **Done**.
```
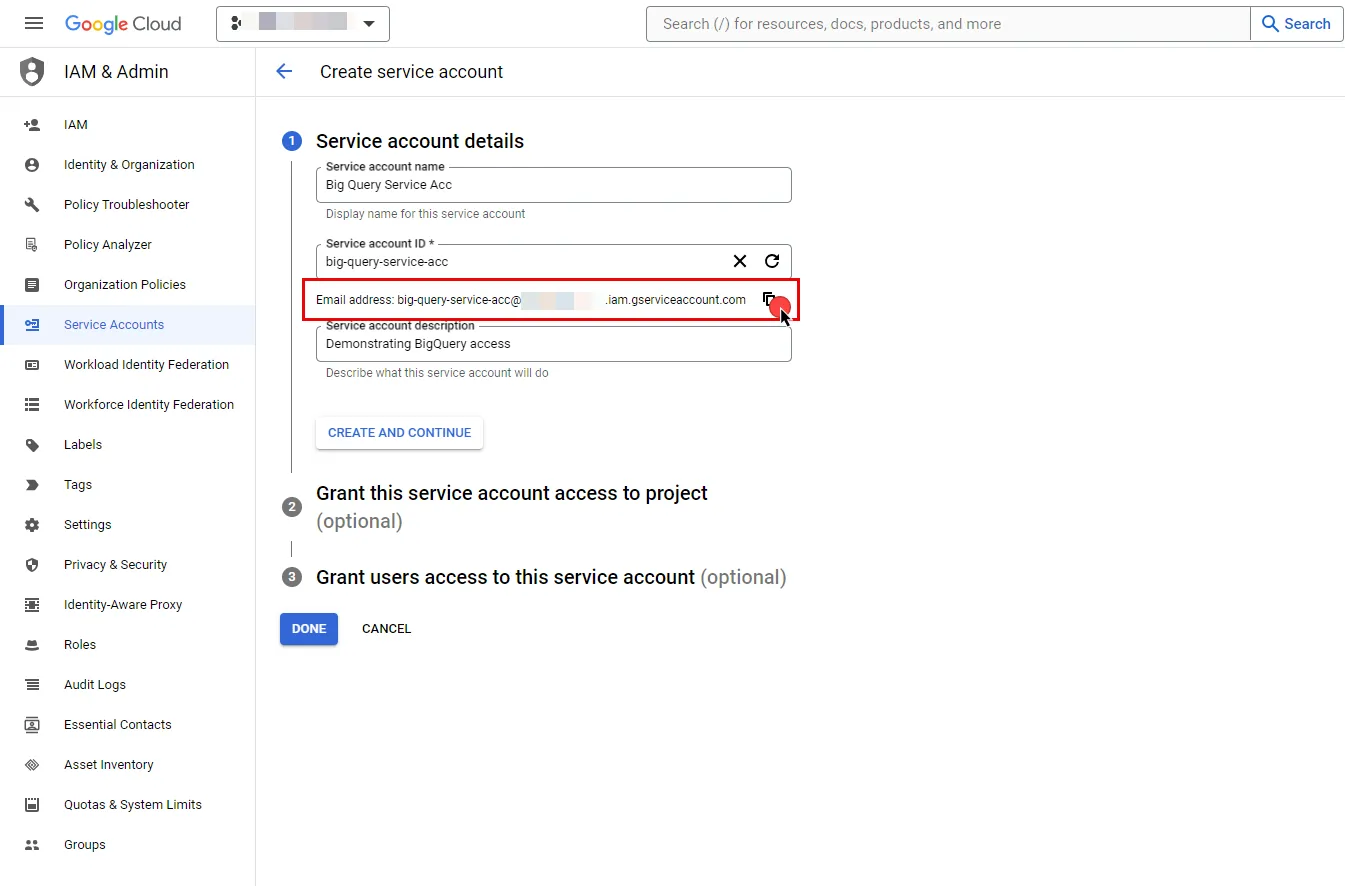
3. In the left sidebar, select **IAM** to access a list of permissions for your project.
4. Click the **Grant Access** button in the ribbon list in the middle of the page.
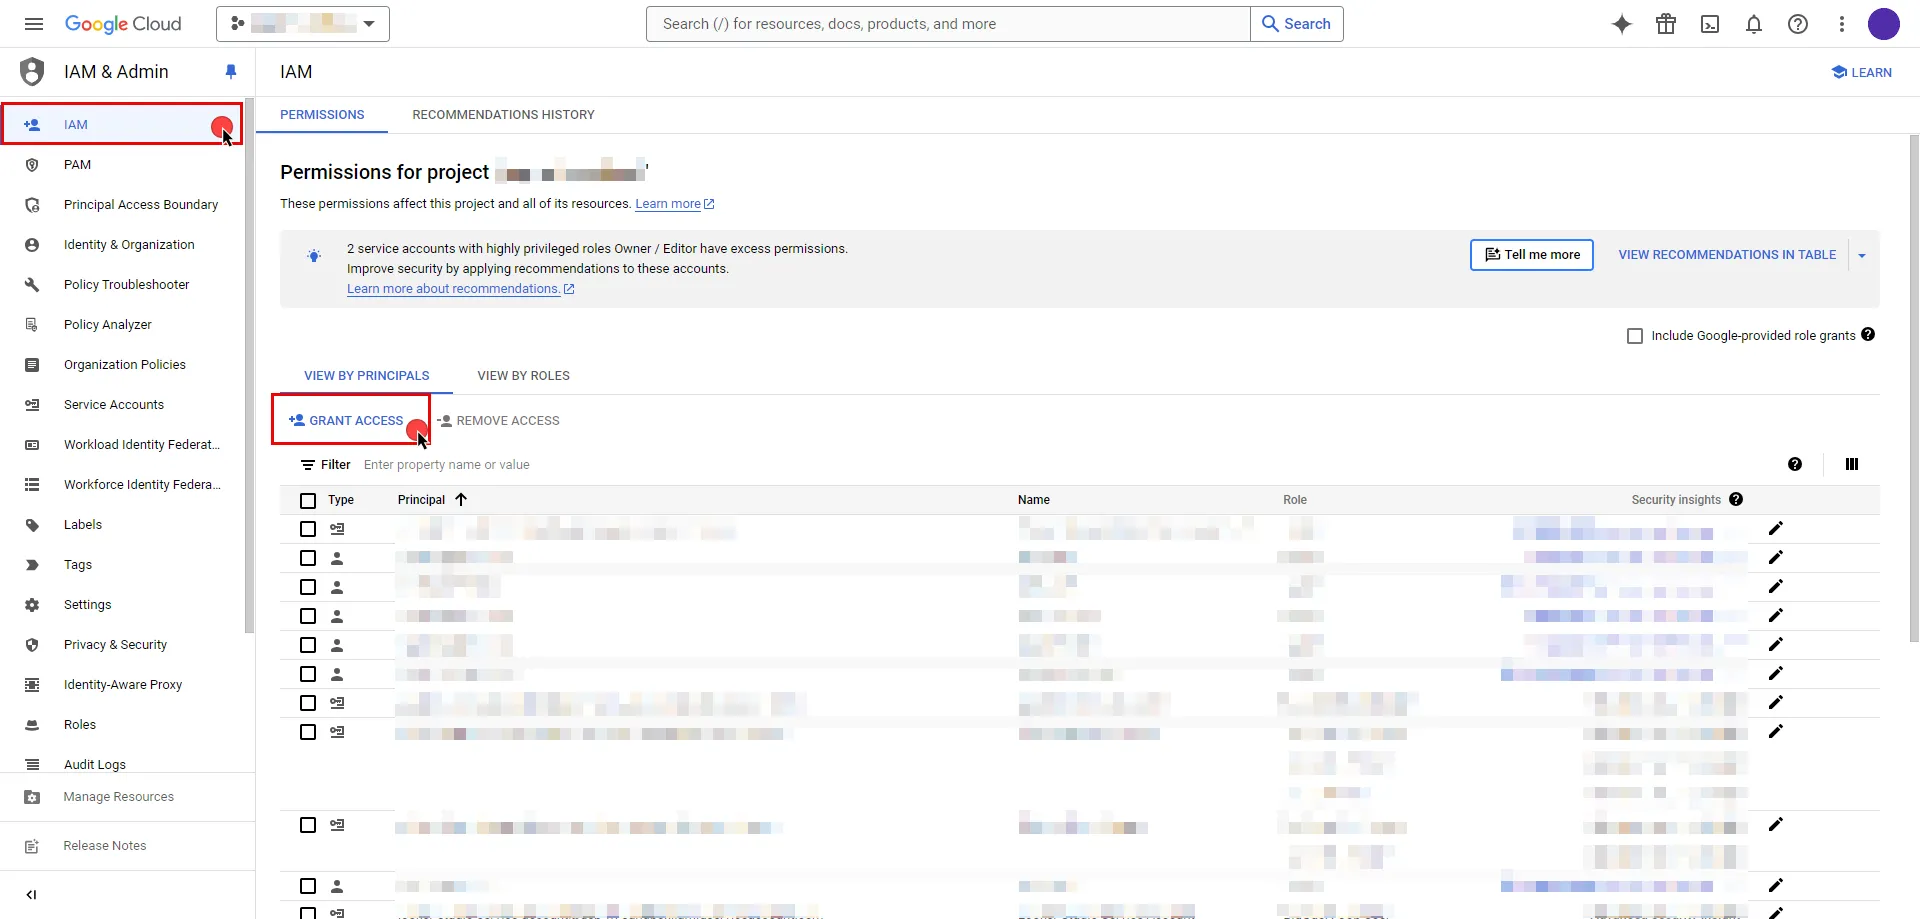
5. In the opened dialog, click **New Principals**, start typing your service account name, and select from the search results.
6. Assign roles to your service account by clicking the dropdown icon, selecting the GCP role that best suits your project needs, and then click **Save**.
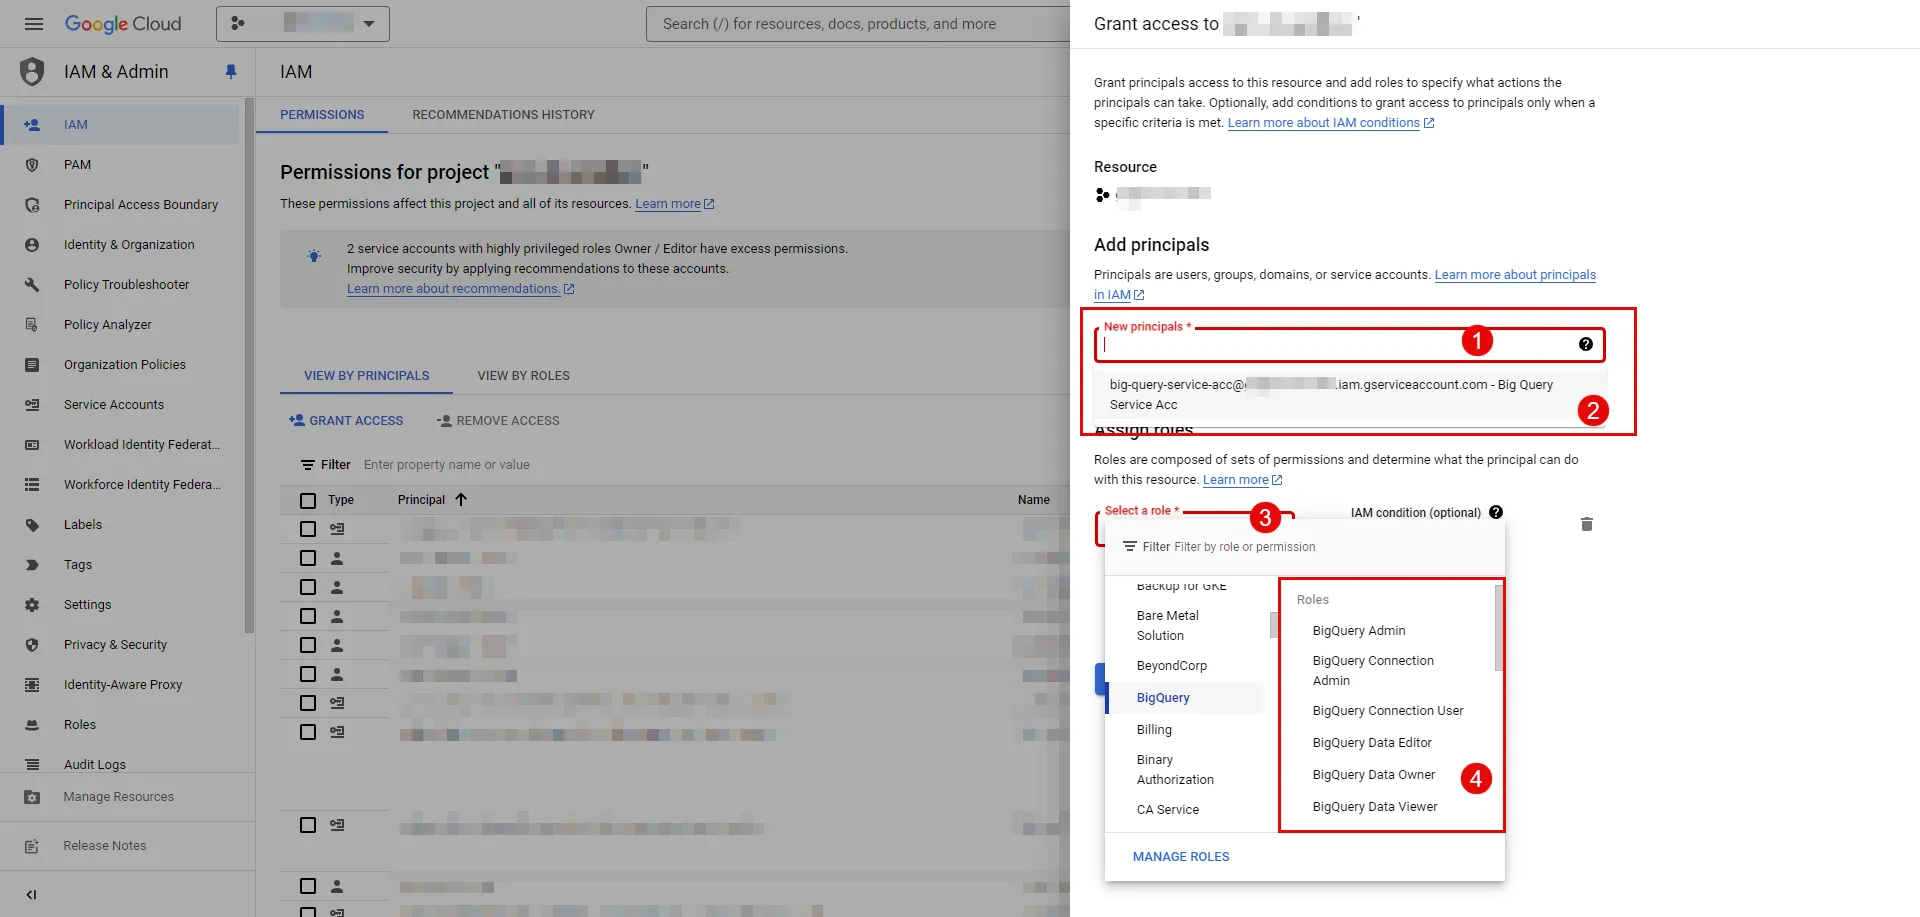
7. In the left sidebar, select [Workload Identity Federation](https://console.cloud.google.com/iam-admin/workload-identity-pools). If this is your first time on this page, click **Get Started**; otherwise, click **Create Pool**.
```plaintext
- Specify a name for your identity pool. The ID will be generated based on the pool name, but you can edit it if needed. The description field is optional; proceed by clicking **Continue**.
- Next, add a provider to the pool. Select **OpenID Connect (OIDC)** as the provider option and specify a name for your provider. Again, the ID will be auto-generated, but you can edit it.
- For the **Issuer(URL)** field, switch to the Aembit UI to create a new Credential Provider, selecting the Google Workload Identity Federation credential type. After setting up the Credential Provider, copy the auto-generated **Issuer URL**, then paste it into the field.
- If you choose to leave the Audiences option set to Default audience, click the **Copy to clipboard icon**next to the auto-generated value and store the address for later use in the tenant configuration, then proceed by clicking **Continue**.

- Specify the provider attribute of **assertion.tenant** in OIDC 1 and click **Save**.
```
8\. To access resources, pool identities must be granted access to a service account. Within the GCP workload identity pool you just created, click the **Grant Access** button located in the top ribbon list.
```plaintext
- In the opened dialog, choose **Grant access using Service Account impersonation** option.
- Then, choose the **Service Account** that you created from the dropdown menu.
- For **Attribute name**, choose **subject** from dropdown menu.
- For **Attribute value**, provide your Aembit Tenant ID. You can find your tenant ID from the URL you use. For example, if the URL is `https://xyz.aembit.io`, then `xyz` is your tenant ID.
- Proceed with clicking to **Save**.

```
9\. Edit the existing Credential Provider created in the previous steps.
* **Name** - Choose a user-friendly name.
* **Credential Type** - [Google Workload Identity Federation](/user-guide/access-policies/credential-providers/google-workload-identity-federation)
* **OIDC Issuer URL (Read-Only)** - An auto-generated OpenID Connect (OIDC) Issuer URL from Aembit Admin.
* **Audience** - Provide the audience value for the provider. The value should match either: **Default** - Full canonical resource name of the Workload Identity Pool Provider (used if “Default audience” was chosen during setup). **Allowed Audiences** - A value included in the configured allowed audiences list, if defined.
* **Service Account Email** - Provide the service account email that was previously copied from Google Cloud Console during service account creation. (e.g., `service-account-name@project-id.iam.gserviceaccount.com`)
* **Lifetime** - Specify the duration for which the credentials will remain valid.
Caution
If the default audience was chosen during provider creation, provide the value previously copied from Google Cloud Console, the part **after** the prefix (e.g., //iam.googleapis…).
## Client Workload Configuration
[Section titled “Client Workload Configuration”](#client-workload-configuration)
Aembit now handles the credentials required to access the Server Workload, eliminating the need for you to manage them directly. You can safely remove any previously used credentials from the Client Workload.
If you access the Server Workload through an SDK or library, it is possible that the SDK/library may still require credentials to be present for initialization purposes. In this scenario, you can provide placeholder credentials. Aembit will overwrite these placeholder credentials with the appropriate ones during the access process.
## Access Policy
[Section titled “Access Policy”](#access-policy)
* Create an Access Policy for a Client Workload to access the GCP BigQuery Server Workload. Assign the newly created Credential Provider to this Access Policy.
## Required Features
[Section titled “Required Features”](#required-features)
* You will need to configure the [TLS Decrypt](/user-guide/deploy-install/advanced-options/tls-decrypt/configure-tls-decrypt) feature to work with the GCP BigQuery Server Workload.
# Gemini (Google)
> This page describes how to configure Aembit to work with the Gemini Server Workload
#
[Gemini](https://ai.google.dev/) is an AI platform that allows developers to integrate multimodal capabilities into their applications, including text, images, audio, and video processing. It supports tasks such as natural language processing, content generation, and data analysis.
Below you can find the Aembit configuration required to work with the Google Gemini service as a Server Workload using the REST API.
## Prerequisites
[Section titled “Prerequisites”](#prerequisites)
Before proceeding with the configuration, ensure you have a Google account and an API key. If you have not already created a key, follow the instructions below. For more details about the Gemini API, refer to the [official Gemini API documentation](https://ai.google.dev/gemini-api/docs/api-key).
### Create API Key
[Section titled “Create API Key”](#create-api-key)
1. Navigate to the [API Keys](https://aistudio.google.com/app/apikey) page and sign in to your Google account.
2. Click the **Create API key** button in the middle of the page.
3. Click the **Got it** button on the Safety Setting Reminder pop-up window.
4. If you do not already have a project in Google Cloud, click **Create API key in new project**. Otherwise, select from your projects and click **Create API key in existing project**.
5. Click **Copy** and securely store the key for later use in your tenant configuration.
## Server Workload Configuration
[Section titled “Server Workload Configuration”](#server-workload-configuration)
1. Create a new Server Workload.
* **Name** - Choose a user-friendly name.
2. Configure the service endpoint:
* **Host** - `generativelanguage.googleapis.com`
* **Application Protocol** - HTTP
* **Port** - 443 with TLS
* **Forward to Port** - 443 with TLS
* **Authentication method** - HTTP Authentication
* **Authentication scheme** - Header
* **Header** - x-goog-api-key
## Credential Provider Configuration
[Section titled “Credential Provider Configuration”](#credential-provider-configuration)
1. Create a new Credential Provider.
* **Name** - Choose a user-friendly name.
* **Credential Type** - [API Key](/user-guide/access-policies/credential-providers/api-key)
* **API Key** - Paste the key copied from Google AI Studio.
## Client Workload Configuration
[Section titled “Client Workload Configuration”](#client-workload-configuration)
Aembit now handles the credentials required to access the Server Workload, eliminating the need for you to manage them directly. You can safely remove any previously used credentials from the Client Workload.
If you access the Server Workload through an SDK or library, it is possible that the SDK/library may still require credentials to be present for initialization purposes. In this scenario, you can provide placeholder credentials. Aembit will overwrite these placeholder credentials with the appropriate ones during the access process.
## Access Policy
[Section titled “Access Policy”](#access-policy)
* Create an Access Policy for a Client Workload to access the Gemini Server Workload. Assign the newly created Credential Provider to this Access Policy.
## Required Features
[Section titled “Required Features”](#required-features)
* You will need to configure the [TLS Decrypt](/user-guide/deploy-install/advanced-options/tls-decrypt/configure-tls-decrypt) feature to work with the Gemini Server Workload.
# GitGuardian
> This page describes how to configure Aembit to work with the GitGuardian Server Workload.
#
[GitGuardian](https://www.gitguardian.com/) is a cybersecurity platform dedicated to safeguarding sensitive information within source code repositories. It specializes in identifying and protecting against potential data leaks, ensuring that organizations maintain the confidentiality of their critical data.
Below you can find the Aembit configuration required to work with the GitGuardian service as a Server Workload using the GitGuardian API.
## Prerequisites
[Section titled “Prerequisites”](#prerequisites)
Before proceeding with the configuration, you will need to have a GitGuardian tenant (or [sign up](https://dashboard.gitguardian.com/auth/signup) for one).
## Server Workload Configuration
[Section titled “Server Workload Configuration”](#server-workload-configuration)
1. Create a new Server Workload.
* **Name** - Choose a user-friendly name.
2. Configure the service endpoint:
* **Host** - `api.gitguardian.com`
* **Application Protocol** - HTTP
* **Port** - 443 with TLS
* **Forward to Port** - 443 with TLS
* **Authentication method** - API Key
* **Authentication scheme** - Header
* **Header** - Authorization
## Credential Provider Configuration
[Section titled “Credential Provider Configuration”](#credential-provider-configuration)
1. Navigate to the [GitGuardian Dashboard](https://dashboard.gitguardian.com/) and sign in with your account.
2. On the left sidebar, choose **API** and then go to **Personal access tokens** in the second left pane to access details.
3. Click on **Create Token** in the top right corner.
4. Provide a name, choose an expiration time, select scopes based on your preferences, and then click **Create token** at the bottom of the modal.

5. Make sure to copy your new personal access token at this stage, as it will not be visible again. For more information on authentication, please refer to the [official GitGuardian API documentation](https://api.gitguardian.com/docs#section/Authentication).
6. Create a new Credential Provider.
* **Name** - Choose a user-friendly name.
* **Credential Type** - [API Key](/user-guide/access-policies/credential-providers/api-key)
* **API Key** - Provide the key copied from GitGuardian and use the format `Token api-key`, replacing `api-key` with your API key.
## Client Workload Configuration
[Section titled “Client Workload Configuration”](#client-workload-configuration)
Aembit now handles the credentials required to access the Server Workload, eliminating the need for you to manage them directly. You can safely remove any previously used credentials from the Client Workload.
If you access the Server Workload through an SDK or library, it is possible that the SDK/library may still require credentials to be present for initialization purposes. In this scenario, you can provide placeholder credentials. Aembit will overwrite these placeholder credentials with the appropriate ones during the access process.
## Access Policy
[Section titled “Access Policy”](#access-policy)
* Create an access policy for a Client Workload to access the GitGuardian Server Workload and assign the newly created Credential Provider to it.
## Required Features
[Section titled “Required Features”](#required-features)
* You will need to configure the [TLS Decrypt](/user-guide/deploy-install/advanced-options/tls-decrypt/configure-tls-decrypt) feature to work with the GitGuardian Server Workload.
# GitHub REST
> This page describes how to configure Aembit to work with the GitHub REST API Server Workload.
#
[GitHub](https://github.com/) is a cloud-based platform for code hosting and version control using Git. Its REST API enables programmatic interaction with GitHub’s features, allowing for custom tool development and automation.
Below you can find the Aembit configuration required to work with the GitHub service as a Server Workload using the GitHub REST API.
Aembit supports multiple authentication/authorization methods for GitHub. This page describes scenarios where the Credential Provider is configured for GitHub via:
* [OAuth 2.0 Authorization Code (3LO)](#oauth-20-authorization-code)
* [API Key](/user-guide/access-policies/server-workloads/guides/github-rest#api-key)
Prerequisites
Before proceeding with the configuration, ensure you have the following:
* A GitHub account
* A personal access token (API Key Method)
* A GitHub app (OAuth 2.0 Authorization Code Method)
If you have not created a token or an app before, you can follow the steps outlined in the subsequent sections. For detailed information on authenticating with different flows, please refer to the [official GitHub documentation](https://docs.github.com/en/rest/authentication/authenticating-to-the-rest-api?apiVersion=2022-11-28).
## OAuth 2.0 Authorization Code
[Section titled “OAuth 2.0 Authorization Code”](#oauth-20-authorization-code)
### Server Workload Configuration
[Section titled “Server Workload Configuration”](#server-workload-configuration)
1. Create a new Server Workload.
* **Name** - Choose a user-friendly name.
2. Configure the service endpoint:
* **Host** - `api.github.com`
* **Application Protocol** - HTTP
* **Port** - 443 with TLS
* **Forward to Port** - 443 with TLS
* **Authentication method** - HTTP Authentication
* **Authentication scheme** - Bearer
### Credential Provider Configuration
[Section titled “Credential Provider Configuration”](#credential-provider-configuration)
1. Sign in to your GitHub account.
2. In the upper-right corner of any page, click your profile photo, then click **Settings**.
3. Navigate to **Developer settings** in the left-hand menu, and choose **Github Apps**.
4. On the right side, click on the **New GitHub App** button.
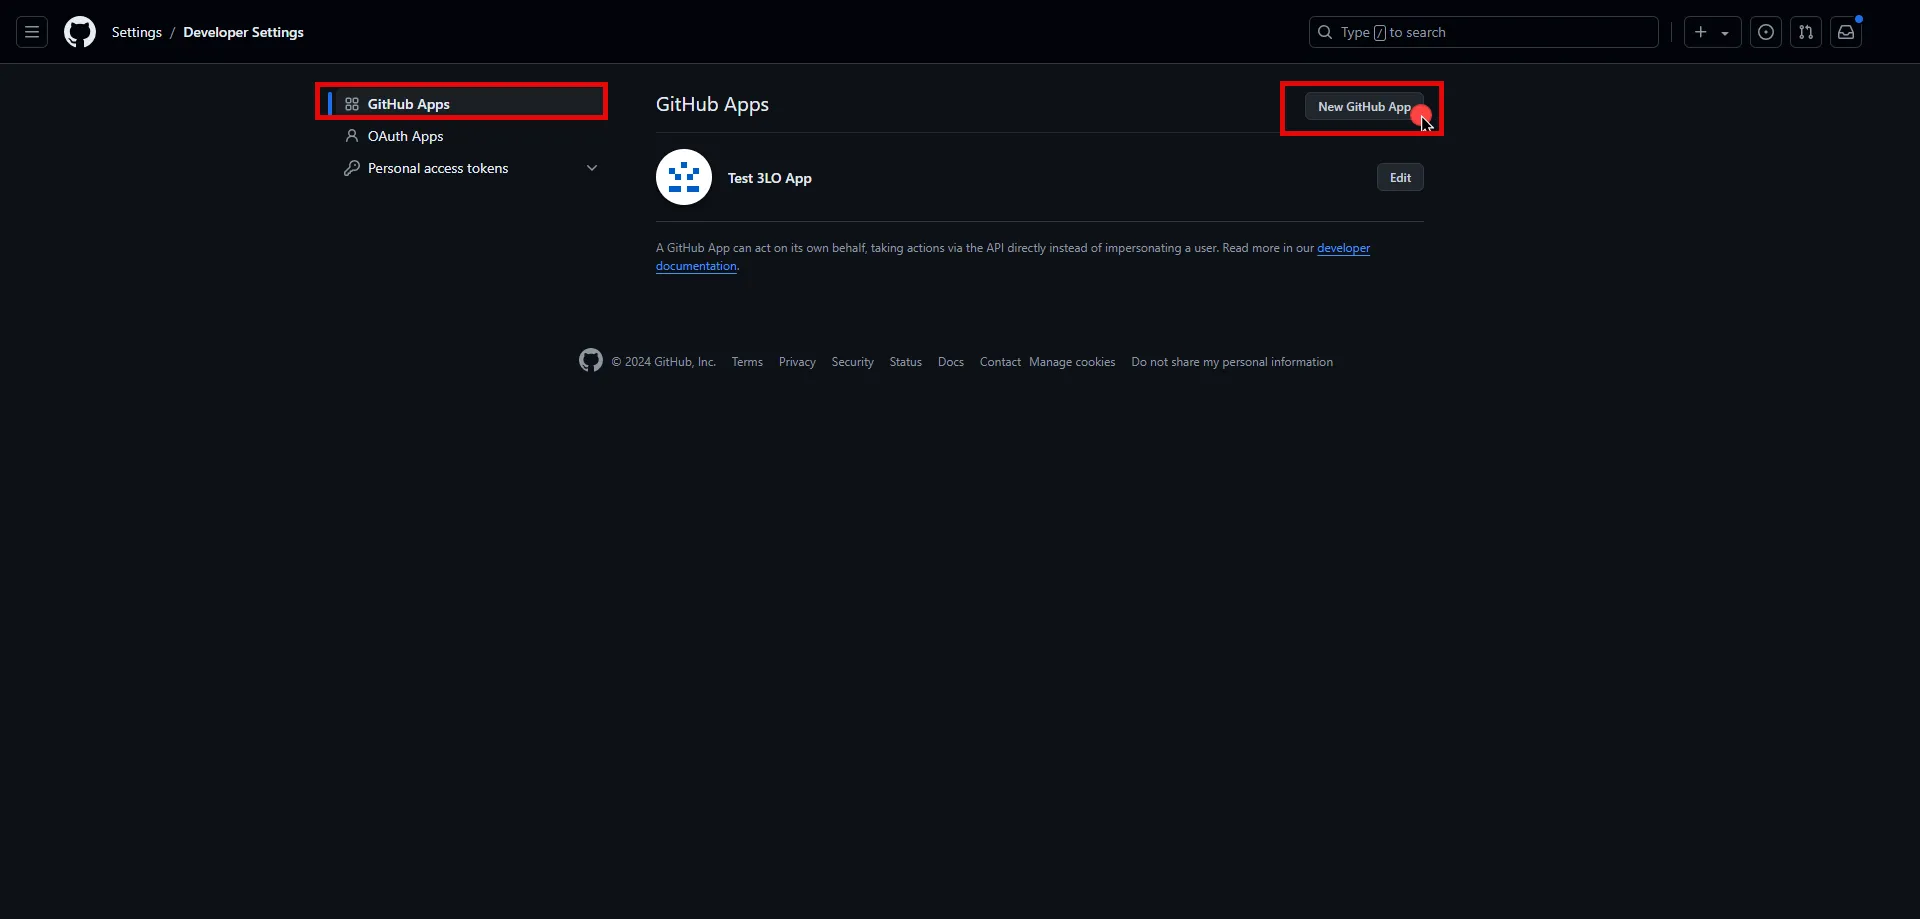
5. Provide a name for your app, and optionally type a description of your app.
6. For the **Homepage URL**, enter the full URL of your Aembit Tenant (e.g., `https://xyz.aembit.io`,).
7. Switch to the Aembit UI to create a new Credential Provider, selecting the OAuth 2.0 Authorization Code credential type. After setting up the Credential Provider, copy the auto-generated **Callback URL**.
8. Return to GitHub and under **Callback URL**, paste the copied URL.
9. Check the **Request user authorization** box and uncheck the **webhook**.
10. Under the **Permissions** section, expand the drop-down menus and select the permissions (scopes) for your application depending on your needs.
11. Choose the installation area for this app, then click on **Create Github App**.
12. Copy the **Client ID**, then click **Generate a new client secret**, and copy the **Client Secret**. Securely store the token for later use in the configuration on the tenant.
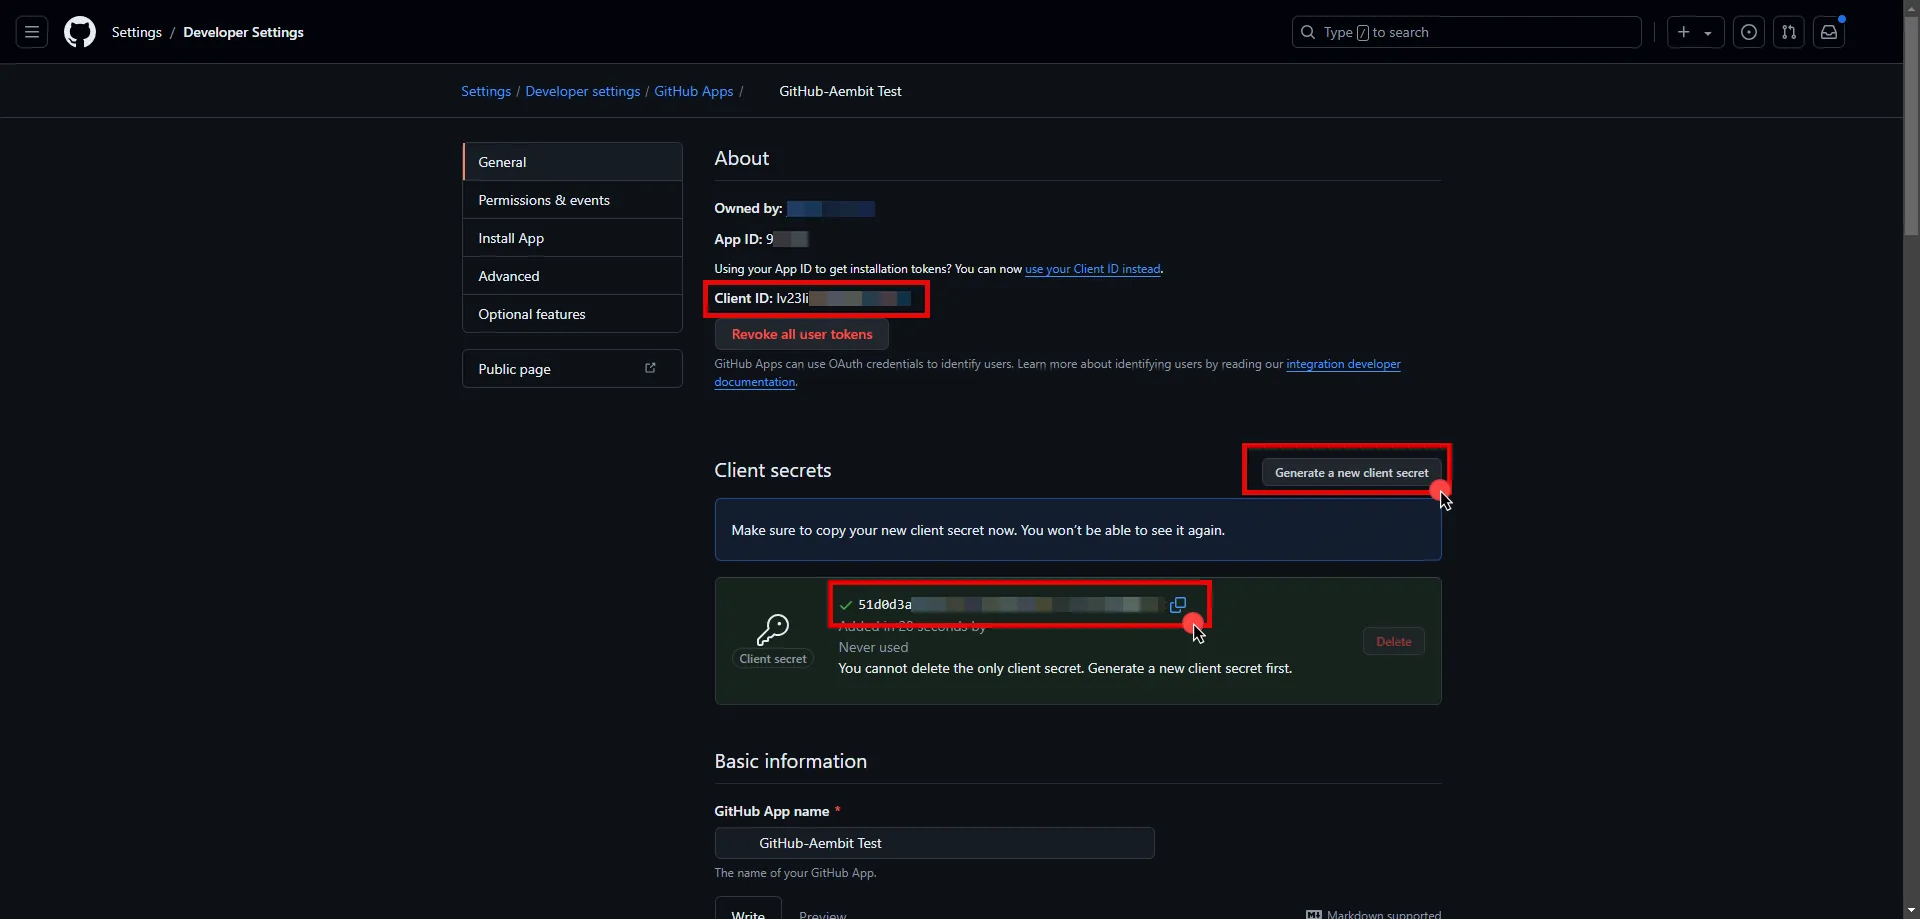
13. Edit the existing Credential Provider created in the previous steps.
* **Name** - Choose a user-friendly name.
* **Credential Type** - [OAuth 2.0 Authorization Code](/user-guide/access-policies/credential-providers/oauth-authorization-code)
* **Callback URL (Read-Only)** - An auto-generated Callback URL from Aembit Admin.
* **Client Id** - Provide the Client ID copied from GitHub.
* **Client Secret** - Provide the Secret copied from GitHub.
* **Scopes** - You can leave this field empty by entering a single whitespace, as GitHub will default to your selected scopes for the app.
* **OAuth URL** - `https://github.com`
* **Authorization URL** - `https://github.com/login/oauth/authorize`
* **Token URL** - `https://github.com/login/oauth/access_token`
* **PKCE Required** - Off (PKCE is not supported by Github, so leave this field unchecked).
* **Lifetime** - 6 Months
14. Click **Save** to save your changes on the Credential Provider.
15. In the Aembit UI, click the **Authorize** button. You are be directed to a page where you can review the access request. Click **Authorize** to complete the OAuth 2.0 Authorization Code flow. You should see a success page and be redirected to Aembit automatically. You can also verify your flow is complete by checking the **State** value in the Credential Provider. After completion, it should be in a **Ready** state.

Caution
Once the set lifetime ends, the retrieved credential will expire and no longer be active. Aembit will notify you before this happens. Please ensure you reauthorize your credential before it expires.
## API Key
[Section titled “API Key”](#api-key)
### Server Workload Configuration
[Section titled “Server Workload Configuration”](#server-workload-configuration-1)
1. Create a new Server Workload.
* **Name** - Choose a user-friendly name.
2. Configure the service endpoint:
* **Host** - `api.github.com`
* **Application Protocol** - HTTP
* **Port** - 443 with TLS
* **Forward to Port** - 443 with TLS
* **Authentication method** - HTTP Authentication
* **Authentication scheme** - Bearer
### Credential Provider Configuration
[Section titled “Credential Provider Configuration”](#credential-provider-configuration-1)
1. Sign in to your GitHub account.
2. In the upper-right corner of any page, click your profile photo, then click **Settings**.
3. Navigate to **Developer settings** in the left-hand menu.
4. Under **Personal access tokens**, choose **Fine-grained tokens**.
5. On the right side, click on the **Generate new token** button.
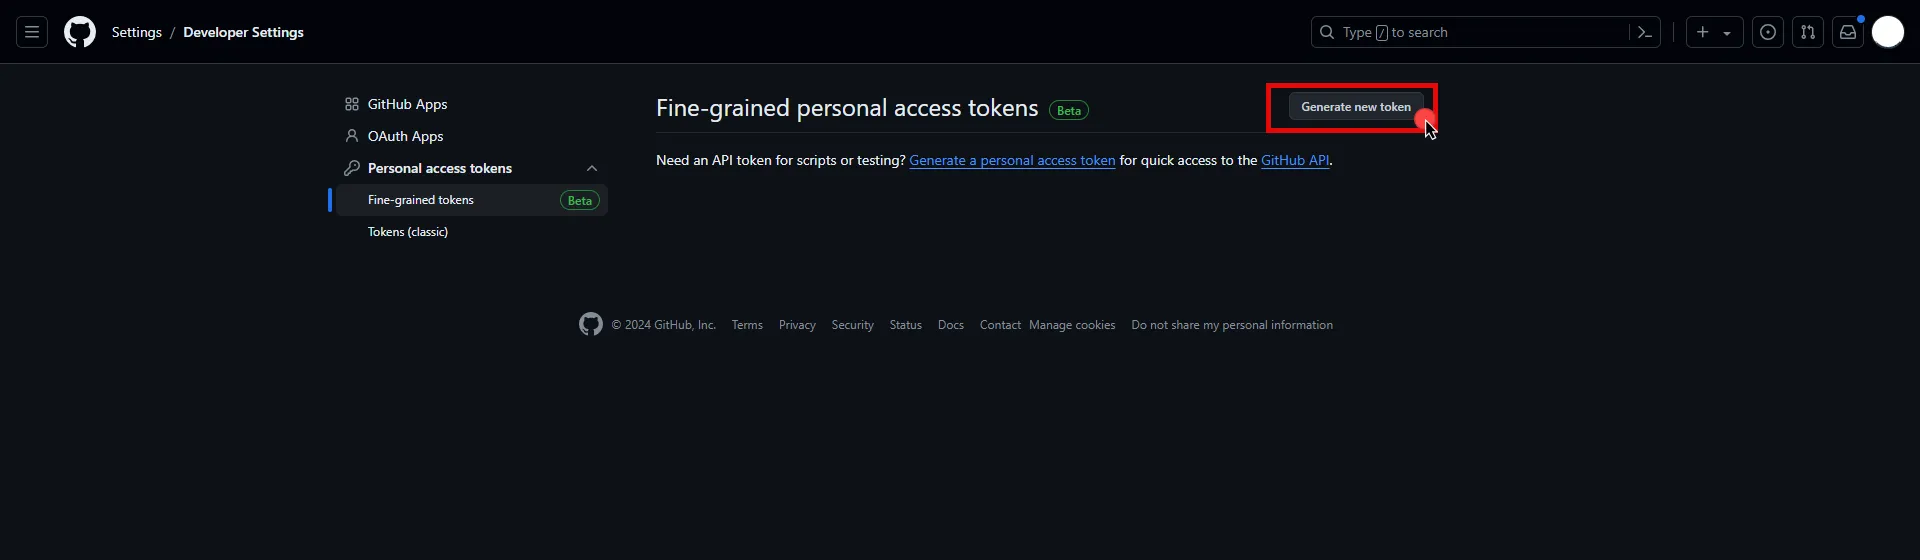
6. Provide a name, expiration date, and description for your token. Choose the resource owner and repository access type.
7. Under the **Permissions** section, expand the drop-down menu and select the permissions (scopes) for your application depending on your needs.
8. After making all of your selections, click on **Generate Token**.
9. Click **Copy to clipboard** and securely store the token for later use in the configuration on the tenant.
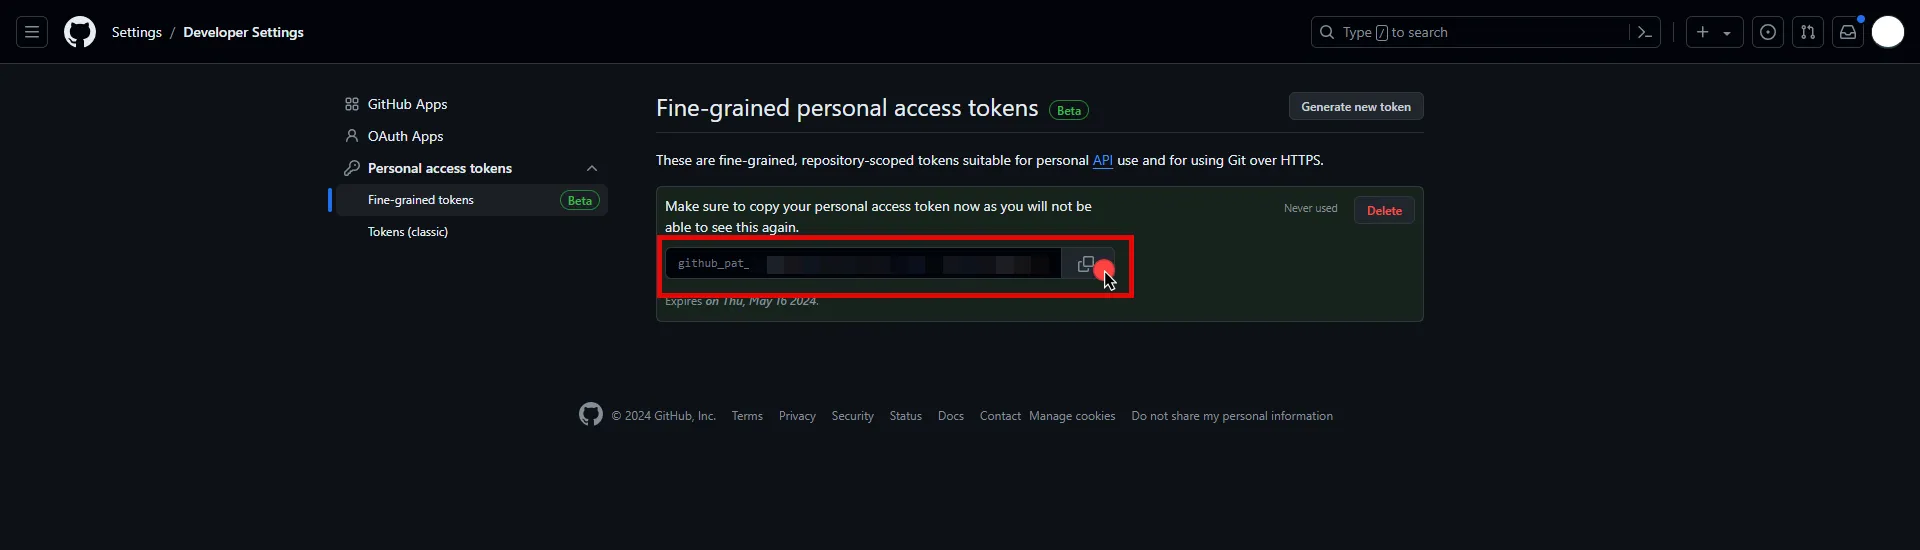
Note
The following configuration steps also work with classic personal access tokens; however, fine-grained tokens are recommended as they offer more granular permissions and improved security.
10. Create a new Credential Provider.
* **Name** - Choose a user-friendly name.
* **Credential Type** - [API Key](/user-guide/access-policies/credential-providers/api-key)
* **API Key** - Paste the token copied from GitHub.
## Client Workload Configuration
[Section titled “Client Workload Configuration”](#client-workload-configuration)
Aembit now handles the credentials required to access the Server Workload, eliminating the need for you to manage them directly. You can safely remove any previously used credentials from the Client Workload.
If you access the Server Workload through an SDK or library, it is possible that the SDK/library may still require credentials to be present for initialization purposes. In this scenario, you can provide placeholder credentials. Aembit will overwrite these placeholder credentials with the appropriate ones during the access process.
## Access Policy
[Section titled “Access Policy”](#access-policy)
* Create an Access Policy for a Client Workload to access the GitHub REST API Server Workload. Assign the newly created Credential Provider to this Access Policy.
## Required Features
[Section titled “Required Features”](#required-features)
* You will need to configure the [TLS Decrypt](/user-guide/deploy-install/advanced-options/tls-decrypt/configure-tls-decrypt) feature to work with the GitHub REST API Server Workload.
# GitLab REST
> This page describes how to configure Aembit to work with the GitLab REST API Server Workload.
#
[GitLab](https://gitlab.com/) is a cloud-based DevOps lifecycle tool that provides a Git repository manager with features like CI/CD, issue tracking, and more. Its REST API allows for programmatic access to these features, enabling the development of custom tools and automation.
Below you can find the Aembit configuration required to work with the GitLab service as a Server Workload using the GitLab REST API.
Prerequisites
Before proceeding with the configuration, you must have a GitLab tenant (or [sign up](https://gitlab.com/users/sign_up) for one) and a user, group, or instance level owned application. If you have not generated an application yet, follow the configuration steps below. For detailed information on how to create a new application, please refer to the [official GitLab documentation](https://docs.gitlab.com/ee/integration/oauth_provider.html).
## Server Workload Configuration
[Section titled “Server Workload Configuration”](#server-workload-configuration)
1. Create a new Server Workload.
* **Name** - Choose a user-friendly name.
2. Configure the service endpoint:
* **Host** - `gitlab.com`
* **Application Protocol** - HTTP
* **Port** - 443 with TLS
* **Forward to Port** - 443 with TLS
* **Authentication method** - HTTP Authentication
* **Authentication scheme** - Bearer
## Credential Provider Configuration
[Section titled “Credential Provider Configuration”](#credential-provider-configuration)
1. Sign in to your GitLab account.
2. In the upper-left corner of any page, click your profile photo, then click **Edit Profile**.
3. Navigate to **Applications** in the left-hand menu.
4. On the right side, click on the **Add new application** button.
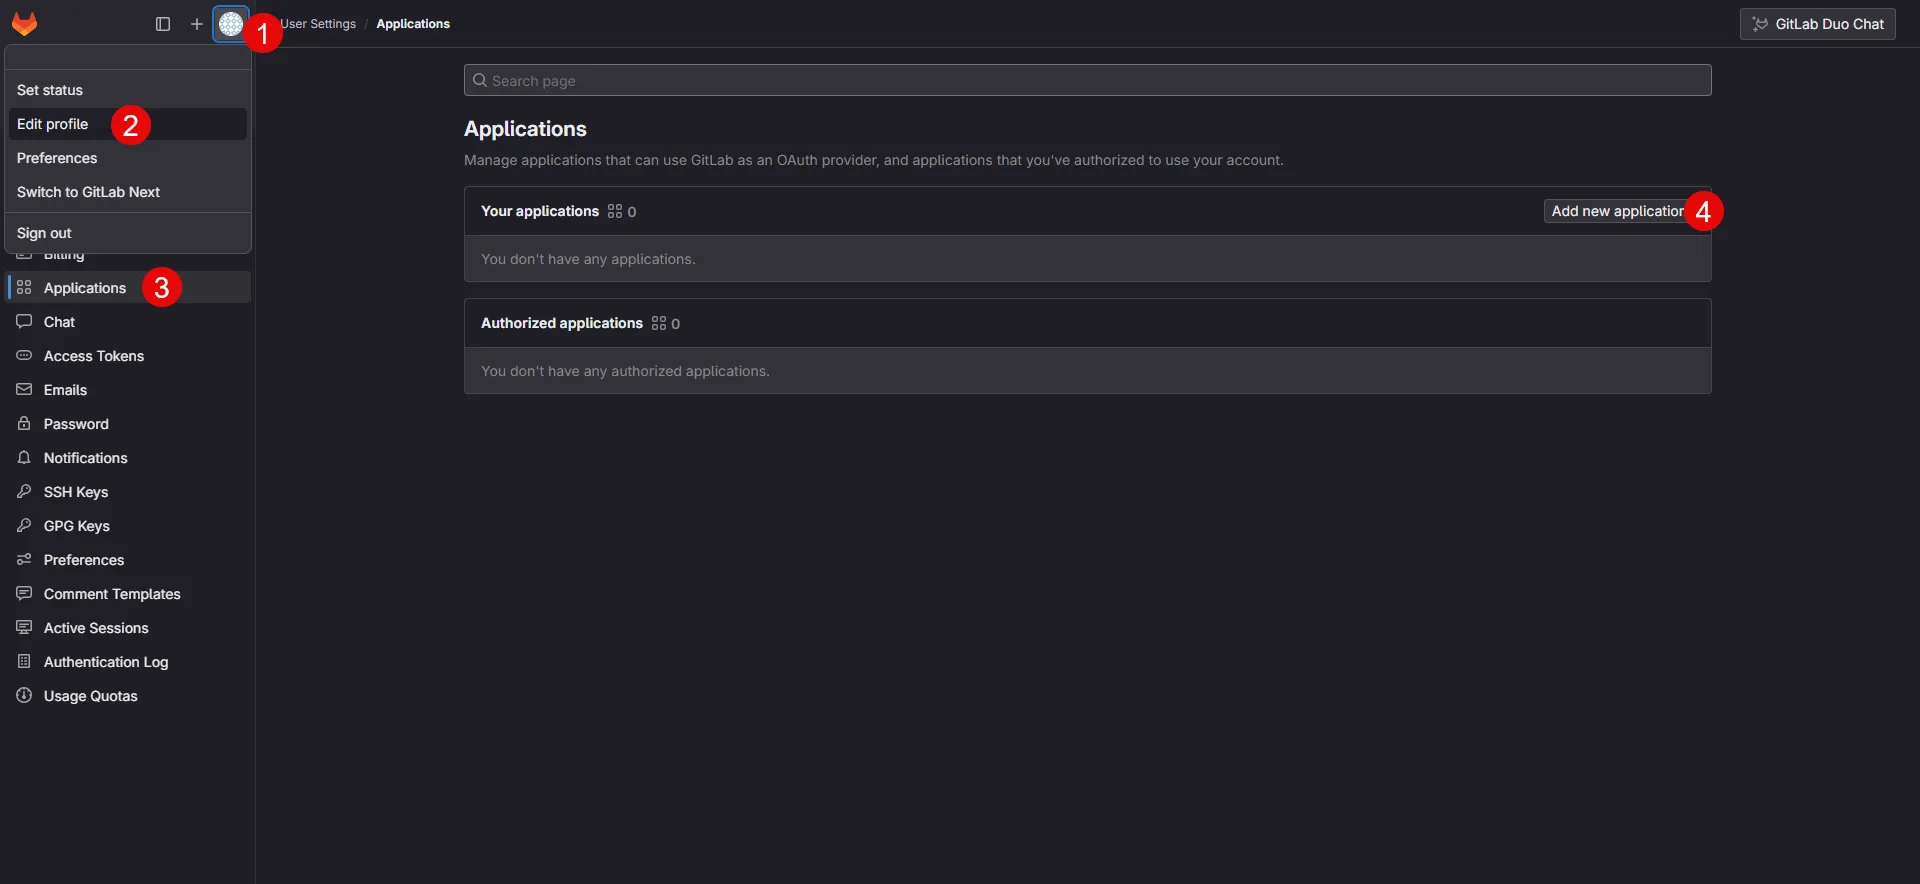
5. Provide a name for your app.
6. Switch to the Aembit UI to create a new Credential Provider, selecting the OAuth 2.0 Authorization Code credential type. After setting up the Credential Provider, copy the auto-generated **Callback URL**.
7. Return to GitLab and paste the copied URL into the **Redirect URI** field.
8. Check the **Confidential** box, and select the scopes for your application depending on your needs.
9. After making all of your selections, click on **Save application**.
10. On the directed page, copy the **Application ID**, **Secret** and **Scopes**, and store them for later use in the tenant configuration.
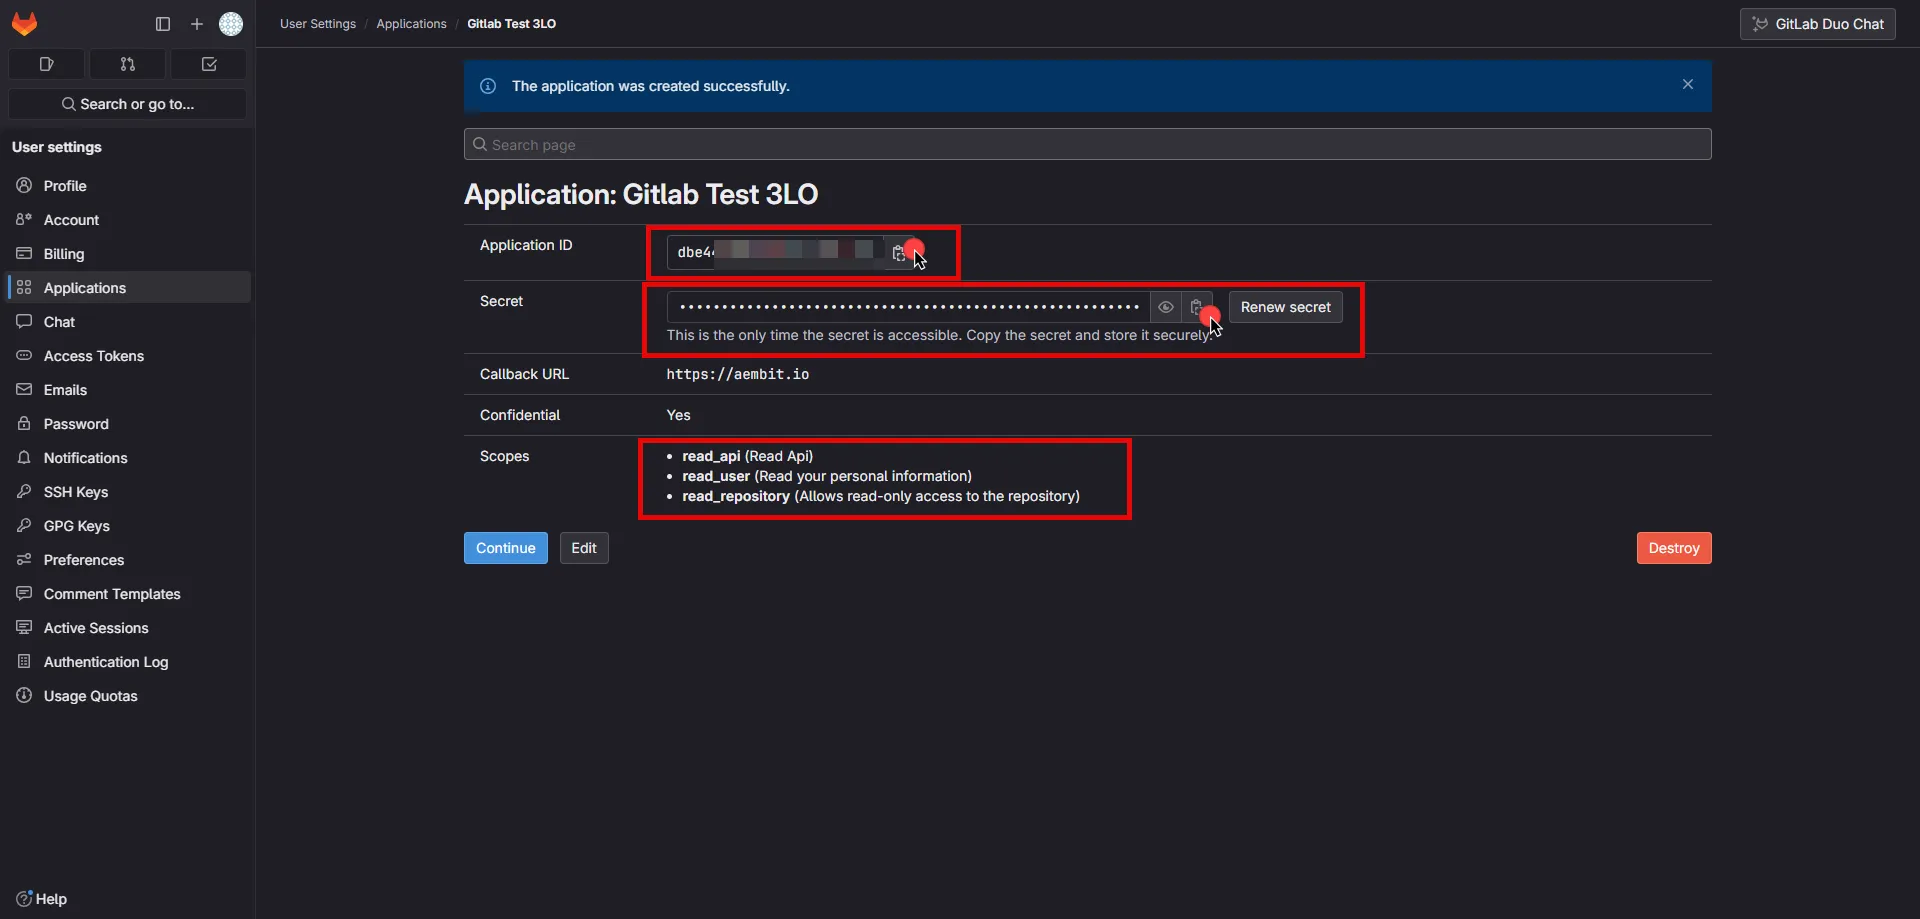
11. Edit the existing Credential Provider created in the previous steps.
* **Name** - Choose a user-friendly name.
* **Credential Type** - [OAuth 2.0 Authorization Code](/user-guide/access-policies/credential-providers/oauth-authorization-code)
* **Callback URL (Read-Only)** - An auto-generated Callback URL from Aembit Admin.
* **Client Id** - Provide the Application ID copied from GitLab.
* **Client Secret** - Provide the Secret copied from GitLab.
* **Scopes** - Enter the scopes you use, space-delimited (e.g. `read_api read_user read_repository`).
* **OAuth URL** - `https://gitlab.com`
Click on **URL Discovery** to populate the Authorization and Token URL fields, which can be left as populated.
* **PKCE Required** - On
* **Lifetime** - 1 year (GitLab does not specify a refresh token lifetime; this value is recommended by Aembit.)
12. Click **Save** to save your changes on the Credential Provider.
13. In Aembit UI, click the **Authorize** button. You are directed to a page where you can review the access request. Click **Authorize** to complete the OAuth 2.0 Authorization Code flow. You should see a success page and be redirected to Aembit automatically. You can also verify your flow is complete by checking the **State** value in the Credential Provider. After completion, it should be in a **Ready** state.

Caution
Once the set lifetime ends, the retrieved credential will expire and no longer be active. Aembit will notify you before this happens. Please ensure you reauthorize your credential before it expires.
## Client Workload Configuration
[Section titled “Client Workload Configuration”](#client-workload-configuration)
Aembit now handles the credentials required to access the Server Workload, eliminating the need for you to manage them directly. You can safely remove any previously used credentials from the Client Workload.
If you access the Server Workload through an SDK or library, it is possible that the SDK/library may still require credentials to be present for initialization purposes. In this scenario, you can provide placeholder credentials. Aembit will overwrite these placeholder credentials with the appropriate ones during the access process.
## Access Policy
[Section titled “Access Policy”](#access-policy)
* Create an Access Policy for a Client Workload to access the GitLab REST API Server Workload. Assign the newly created Credential Provider to this Access Policy.
## Required Features
[Section titled “Required Features”](#required-features)
* You will need to configure the [TLS Decrypt](/user-guide/deploy-install/advanced-options/tls-decrypt/configure-tls-decrypt) feature to work with the GitLab REST API Server Workload.
# Google Drive
> This page describes how to configure Aembit to work with the Google Drive Server Workload.
#
[Google Drive](https://www.google.com/drive/), part of Google Workspace, is a cloud-based storage solution designed for storing, sharing, and collaborating on files.
Below you can find the Aembit configuration required to work with the Google Drive service as a Server Workload using the Google Drive API.
Prerequisites
Before proceeding with the configuration, ensure you have the following:
* An active Google Cloud account
* A GCP project with Google Drive enabled
### Server Workload Configuration
[Section titled “Server Workload Configuration”](#server-workload-configuration)
1. Create a new Server Workload.
* **Name** - Choose a user-friendly name.
2. Configure the Service endpoint:
* **Host** - `www.googleapis.com`
* **Application Protocol** - HTTP
* **Port** - 443 with TLS
* **Forward to Port** - 443 with TLS
* **Authentication method** - HTTP Authentication
* **Authentication scheme** - Bearer
### Credential Provider Configuration
[Section titled “Credential Provider Configuration”](#credential-provider-configuration)
1. Sign in to the Google Cloud Console and navigate to the [Credentials](hhttps://console.cloud.google.com/apis/credentials) page. Ensure you are working within a GCP project for which you have authorization.
2. On the **Credentials** dashboard, click **Create Credentials** located in the top left corner and select the **OAuth client ID** option.

3. If there is no configured Consent Screen for your project, you see a **Configure Consent Screen** button on the directed page. Click the button to continue.

4. Choose **User Type** and click **Create**.
* Provide a name for your app.
* Choose a user support email from the dropdown menu.
* App logo and app domain fields are optional.
* Enter at least one email for the Developer contact information field.
* Click **Save and Continue**.
* You may skip the Scopes step by clicking **Save and Continue** once again.
* In the **Summary** step, review the details of your app and click **Back to Dashboard**.
5. Navigate back to [Credentials](hhttps://console.cloud.google.com/apis/credentials) page, click **Create Credentials**, and select the **OAuth client ID** option again.
* Choose **Web Application** for Application Type.
* Provide a name for your web client.
* Switch to the Aembit UI to create a new Credential Provider, selecting the OAuth 2.0 Authorization Code credential type. After setting up the Credential Provider, copy the auto-generated **Callback URL**.
* Return to Google Cloud Console and paste the copied URL into the **Authorized redirect URIs** field.
* Click **Create**.
6. A pop-up window appears. Copy both the **Client ID** and the **Client Secret**. Store them for later use in the tenant configuration.
7. Edit the existing Credential Provider created in the previous steps.
* **Name** - Choose a user-friendly name.
* **Credential Type** - [OAuth 2.0 Authorization Code](/user-guide/access-policies/credential-providers/oauth-authorization-code)
* **Callback URL (Read-Only)** - An auto-generated Callback URL from Aembit Admin.
* **Client Id** - Provide the Client ID copied from Google.
* **Client Secret** - Provide the Secret copied from Google.
* **Scopes** - Enter the scopes you will use for Google Drive. (e.g. `https://www.googleapis.com/auth/drive`) A full list of GCP Scopes can be found at [OAuth 2.0 Scopes for Google APIs](https://developers.google.com/identity/protocols/oauth2/scopes#drive).
* **OAuth URL** - `https://accounts.google.com`
Click on **URL Discovery** to populate the Authorization and Token URL fields, which can be left as populated.
* **PKCE Required** - Off
* **Lifetime** - 1 year (This value is recommended by Aembit. For more information, please refer to the [official Google documentation](https://developers.google.com/identity/protocols/oauth2#expiration).)
8. Click **Save** to save your changes on the Credential Provider.
9. In Aembit UI, click the **Authorize** button. You are directed to a page where you can choose your Google account first. Then click **Allow** to complete the OAuth 2.0 Authorization Code flow. You should see a success page and be redirected to Aembit automatically. You can also verify your flow is complete by checking the **State** value in the Credential Provider. After completion, it should be in a **Ready** state.

Caution
Once the set lifetime ends, the retrieved credential expires and no longer be active. Aembit notifies you before this happens. Please ensure you reauthorize your credential before it expires.
## Client Workload Configuration
[Section titled “Client Workload Configuration”](#client-workload-configuration)
Aembit now handles the credentials required to access the Server Workload, eliminating the need for you to manage them directly. You can safely remove any previously used credentials from the Client Workload.
If you access the Server Workload through an SDK or library, it is possible that the SDK/library may still require credentials to be present for initialization purposes. In this scenario, you can provide placeholder credentials. Aembit will overwrite these placeholder credentials with the appropriate ones during the access process.
## Access Policy
[Section titled “Access Policy”](#access-policy)
* Create an Access Policy for a Client Workload to access the Google Drive Server Workload. Assign the newly created Credential Provider to this Access Policy.
## Required Features
[Section titled “Required Features”](#required-features)
* You will need to configure the [TLS Decrypt](/user-guide/deploy-install/advanced-options/tls-decrypt/configure-tls-decrypt) feature to work with the Google Drive Server Workload.
# HashiCorp Vault
> This page describes how to configure Aembit to work with the HashiCorp Vault Server Workload.
#
[HashiCorp Vault](https://www.vaultproject.io/) is a secrets management platform designed to secure, store, and control access to sensitive data and cryptographic keys.
Below you can find the Aembit configuration required to work with the HashiCorp Vault service as a Server Workload using the a Vault CLI, or HTTP API.
## Prerequisites
[Section titled “Prerequisites”](#prerequisites)
Before proceeding with the configuration, ensure you have the following:
* Vault Cluster (self-hosted or HCP tenant).
* An OIDC authentication method enabled in your Vault cluster. If you have not already set this up, follow the steps outlined in the next section or refer to the [official HashiCorp Vault documentation](https://developer.hashicorp.com/vault/tutorials/auth-methods/oidc-auth) for more detailed instructions.
### Configure Vault
[Section titled “Configure Vault”](#configure-vault)
1. Log in to your Vault cluster.
2. In the left pane, select **Authentication methods**, and then click on **Enable new method** from the top-right corner.
3. Choose the **OIDC** radio-button and click **Next**.
4. Choose a name for the **Path**. The `oidc/` format is the Hashicorp recommended format. Then click on **Enable Method**.
5. In the Configuration page, configure the OIDC according to your preferences. Below are key choices:
* For the **OIDC discovery URL** field, navigate to Aembit UI, create a new Credential Provider, choose **Vault Client Token**, and copy the auto-generated Issuer URL. Paste it into Vault’s **OIDC discovery URL** field. Make sure not to include a slash at the end of the URL.
* If you do not set a **Default Role** for the Vault Authentication method, make sure to include a role name for configuration in the Aembit Credential Provider.
6. After making all your configurations, click **Save**.
### Configure Vault Role
[Section titled “Configure Vault Role”](#configure-vault-role)
After completing the configuration on Vault, creating a Vault Role for the associated Vault Authentication Method is essential. To do this, navigate to the Vault CLI shell icon (>\_) to open a command shell, and within the terminal, execute the following command:
```shell
$ vault write auth/$AUTH_PATH/role/$ROLE_NAME \
bound_audiences="$AEMBIT_ISSUER" \
user_claim="$USER_CLAIM" \
token_policies="$POLICY_VALUE" \
role_type="jwt"
```
:warning: Before running the command, ensure you have replaced the variables (e.g. `$AUTH_PATH`, `$ROLE_NAME`, etc.) with your desired values and `$AEMBIT_ISSUER` with the Issuer URL copied from the Aembit Credential Provider.
## Credential Provider Configuration
[Section titled “Credential Provider Configuration”](#credential-provider-configuration)
1. Create a new Credential Provider.
* **Name** - Choose a user-friendly name.
* **Credential Type** - [Vault Client Token](/user-guide/access-policies/credential-providers/vault-client-token)
JSON WEB TOKEN (JWT)
* **Subject** - Test (In this example, ‘Test’ is used as a value, but this field can accept any Vault-compatible subject value.)
* **Issuer (Read-Only)** - An auto-generated OpenID Connect (OIDC) Issuer URL from Aembit Edge, used during Vault method configuration.
CUSTOM CLAIMS
* **Claim Name** - vault\_user
* **Value** - empty (In this example, ‘empty’ is used as a value, but this field can accept any string input.)
VAULT AUTHENTICATION
* **Host** - Hostname of your Vault Cluster (e.g. `vault-cluster-public-vault-xyz.abc.hashicorp.cloud`)
* **Port** - 8200 with TLS is recommended. Please use the configuration which matches your Vault cluster.
* **Authentication Path** - Provide the path name of your OIDC Authentication method (e.g. oidc/path).
* **Role** - If you did not set the **Default Role** previously, a role name must be provided here; otherwise optional.
* **Namespace** - Provide the **namespace** used in Vault. You can find it at the bottom left corner of the page. (optional)
* **Forwarding Configuration** - No Forwarding (default)
### Configuration-Specific Fields
[Section titled “Configuration-Specific Fields”](#configuration-specific-fields)
Depending on your Vault Role configuration, ensure that the Credential Provider includes the following values:
* **Subject** - If using a `bound_subject` configuration for your Vault Role, this value must match that configuration.
CUSTOM CLAIMS
* **Claim Name** - aud
* **Value** - This value should match the configuration in your Vault role’s `bound_audiences` setting.
## Server Workload configuration
[Section titled “Server Workload configuration”](#server-workload-configuration)
1. Create a new Server Workload.
* **Name** - Choose a user-friendly name.
2. Configure the Service endpoint:
* **Host** - Hostname of your Vault Cluster (e.g. `vault-cluster-public-vault-xyz.abc.hashicorp.cloud`)
* **Application Protocol** - HTTP
* **Port** - 8200 with TLS is recommended. Please use the configuration which matches your Vault cluster.
* **Forward to Port** - 8200 with TLS is recommended. Please use the configuration which matches your Vault cluster.
* **Authentication method** - HTTP Authentication
* **Authentication scheme** - Header
* **Header** - X-Vault-Token
## Client Workload Configuration
[Section titled “Client Workload Configuration”](#client-workload-configuration)
Aembit now handles the credentials required to access the Server Workload, eliminating the need for you to manage them directly. You can safely remove any previously used credentials from the Client Workload.
If you access the Server Workload through an SDK or library, it is possible that the SDK/library may still require credentials to be present for initialization purposes. In this scenario, you can provide placeholder credentials. Aembit will overwrite these placeholder credentials with the appropriate ones during the access process.
## Access Policy
[Section titled “Access Policy”](#access-policy)
* Create an access policy for a Client Workload to access the HashiCorp Vault Server Workload and assign the newly created Credential Provider to it.
## Required Features
[Section titled “Required Features”](#required-features)
* You will need to configure the [TLS Decrypt](/user-guide/deploy-install/advanced-options/tls-decrypt/configure-tls-decrypt) feature to work with the HashiCorp Vault Server Workload.
# AWS Key Management Service (KMS)
> This page describes how to configure Aembit to work with the AWS KMS server workload.
#
[Amazon Key Management Service](https://aws.amazon.com/kms/) is a service that enables you to create and control the encryption keys used to secure your data. This service integrates seamlessly with other AWS services, allowing you to easily encrypt and decrypt data, manage access to keys, and audit key usage.
Below you can find the Aembit configuration required to work with AWS KMS as a Server Workload using the AWS CLI, AWS SDK, or other HTTP-based client.
## Prerequisites
[Section titled “Prerequisites”](#prerequisites)
* You will need an AWS IAM role configured to access AWS KMS resources.
## Server Workload Configuration
[Section titled “Server Workload Configuration”](#server-workload-configuration)
1. Create a new Server Workload.
* **Name** - Choose a user-friendly name.
2. Configure the service endpoint:
* **Host** - `kms.us-east-1.amazonaws.com` (substitute **us-east-1** with your preferred region)
* **Application Protocol** - HTTP
* **Port** - 443 with TLS
* **Forward to Port** - 443 with TLS
* **Authentication method** - HTTP Authentication
* **Authentication scheme** - AWS Signature v4
## Credential Provider Configuration
[Section titled “Credential Provider Configuration”](#credential-provider-configuration)
1. Create a new Credential Provider.
* **Name** - Choose a user-friendly name.
* **Credential Type** - [AWS Security Token Service Federation](/user-guide/access-policies/credential-providers/aws-security-token-service-federation)
* **OIDC Issuer URL** - Copy and securely store for later use in AWS Identity Provider configuration.
* **AWS IAM Role Arn** - Provide the IAM Role Arn.
* **Aembit IdP Token Audience** - Copy and securely store for later use in AWS Identity Provider configuration.
2. Create an AWS IAM Role to access KMS and trust Aembit.
* Within the AWS Console, go to **IAM** > **Identity providers** and select **Add provider**.
* On the Configure provider screen, complete the steps and fill out the values specified:
* **Provider type** - Select **OpenID Connect**
* **Provider URL** - Paste in the **OIDC Issuer URL** from the previous steps.
* Click **Get thumbprint** to configure the AWS Identity Provider trust relationship.
* **Audience** - Paste in the **Aembit IdP Token Audience** from the previous steps.
* Click **Add provider**.
* Within the AWS Console, go to **IAM** > **Identity providers** and select the Identity Provider you just created.
* Click the **Assign role** button and choose **Use an existing role**.
## Client Workload Configuration
[Section titled “Client Workload Configuration”](#client-workload-configuration)
Aembit now handles the credentials required to access the Server Workload, eliminating the need for you to manage them directly. You can safely remove any previously used credentials from the Client Workload.
If you access the Server Workload through an SDK or library, it is possible that the SDK/library may still require credentials to be present for initialization purposes. In this scenario, you can provide placeholder credentials. Aembit will overwrite these placeholder credentials with the appropriate ones during the access process.
## Access Policy
[Section titled “Access Policy”](#access-policy)
* Create an access policy for a Client Workload to access the KMS Server Workload and assign the newly created Credential Provider to it.
## Required Features
[Section titled “Required Features”](#required-features)
* You will need to configure the [TLS Decrypt](/user-guide/deploy-install/advanced-options/tls-decrypt/configure-tls-decrypt) feature to work with the KMS Server Workload.
* If you are using [AWS CLI](https://aws.amazon.com/cli/) to access KMS, you will need to set the environment variable `AWS_CA_BUNDLE` to point to the above certificate.
# Local MySQL
> This page describes how to configure Aembit to work with the local MySQL Server Workload.
#
[MySQL](https://www.mysql.com/) is a powerful and widely-used open-source relational database management system, commonly used for local development environments and applications of various scales, while providing a intense foundation for efficient data storage, retrieval, and management.
Below you can find the Aembit configuration required to work with MySQL as a Server Workload using the MySQL-compatible CLI, application, or a library.
## Prerequisites
[Section titled “Prerequisites”](#prerequisites)
Before proceeding with the configuration, ensure you have access to a Kubernetes cluster. Modify the example YAML file according to your specific configurations, and then deploy it to your Kubernetes cluster.
### Example MySQL Yaml File
[Section titled “Example MySQL Yaml File”](#example-mysql-yaml-file)
Note
This example does not use TLS and is shown here for demonstration purposes only. It is strongly recommended to use TLS in production settings.
```yaml
apiVersion: apps/v1
kind: Deployment
metadata:
name: mysql
spec:
selector:
matchLabels:
app: mysql
strategy:
type: Recreate
template:
metadata:
labels:
app: mysql
spec:
containers:
- image: mysql:5.7.44
name: mysql
args: ["--ssl=0"]
env:
- name: MYSQL_ROOT_PASSWORD
value: ""
- name: MYSQL_DATABASE
value:
ports:
- containerPort: 3306
name: mysql
---
# Service
apiVersion: v1
kind: Service
metadata:
name: mysql
annotations:
spec:
type: NodePort
ports:
- name: mysql
port: 3306
targetPort: 3306
selector:
app: mysql
```
:warning: Before running the command, ensure you have replaced the master password and database name in the configuration file with your desired values.
Use the following command to deploy this file to your Kubernetes cluster.
`kubectl apply -f ./mysql.yaml`
## Server Workload Configuration
[Section titled “Server Workload Configuration”](#server-workload-configuration)
1. Create a new Server Workload.
* **Name** - Choose a user-friendly name.
2. Configure the service endpoint:
* **Host** - `mysql.default.svc.cluster.local`
* **Application Protocol** - MySQL
* **Port** - 3306
* **Forward to Port** - 3306
* **Authentication method** - Password Authentication
* **Authentication scheme** - Password
## Credential Provider Configuration
[Section titled “Credential Provider Configuration”](#credential-provider-configuration)
1. Create a new Credential Provider.
* **Name** - Choose a user-friendly name.
* **Credential Type** - [Username & Password](/user-guide/access-policies/credential-providers/username-password)
* **Username** - Provide the database login ID for the MySQL master user.
* **Password** - Provide the master password associated with the MySQL database credentials.
## Client Workload Configuration
[Section titled “Client Workload Configuration”](#client-workload-configuration)
Aembit now handles the credentials required to access the Server Workload, eliminating the need for you to manage them directly. You can safely remove any previously used credentials from the Client Workload.
If you access the Server Workload through an SDK or library, it is possible that the SDK/library may still require credentials to be present for initialization purposes. In this scenario, you can provide placeholder credentials. Aembit will overwrite these placeholder credentials with the appropriate ones during the access process.
## Access Policy
[Section titled “Access Policy”](#access-policy)
* Create an access policy for a Client Workload to access the MySQL Server Workload and assign the newly created Credential Provider to it.
# Local PostgreSQL
> This page describes how to configure Aembit to work with the local PostgreSQL Server Workload.
#
[PostgreSQL](https://www.postgresql.org/) stands out as a dynamic and versatile relational database service, delivering scalability and efficiency. This solution facilitates the effortless deployment, administration, and scaling of PostgreSQL databases in diverse cloud settings.
Below you can find the Aembit configuration required to work with PostgreSQL as a Server Workload using PostgreSQL-compatible CLI, application, or a library.
## Prerequisites
[Section titled “Prerequisites”](#prerequisites)
Before proceeding with the configuration, ensure you have access to a Kubernetes cluster. Modify the example YAML file according to your specific configurations, and then deploy it to your Kubernetes cluster.
### Example Postgres Yaml File
[Section titled “Example Postgres Yaml File”](#example-postgres-yaml-file)
Note
This example does not use TLS and is shown here for demonstration purposes only. It is strongly recommended to use TLS in production settings.
```yaml
apiVersion: apps/v1
kind: Deployment
metadata:
name: postgresql
spec:
selector:
matchLabels:
app: postgresql
strategy:
type: Recreate
template:
metadata:
labels:
app: postgresql
spec:
containers:
- image: postgres:16.0
name: postgresql
env:
- name: POSTGRES_DB
value:
- name: POSTGRES_USER
value:
- name: POSTGRES_PASSWORD
value: ""
ports:
- containerPort: 5432
name: postgresql
---
# Service
apiVersion: v1
kind: Service
metadata:
name: postgresql
annotations:
spec:
type: NodePort
ports:
- name: postgresql
port: 5432
targetPort: 5432
selector:
app: postgresql
```
:warning: Before running the command, ensure you have replaced the master user name, master password and database name in the configuration file with your desired values.
Use the following command to deploy this file to your Kubernetes cluster.
`kubectl apply -f ./postgres.yaml`
## Server Workload Configuration
[Section titled “Server Workload Configuration”](#server-workload-configuration)
1. Create a new Server Workload.
* **Name** - Choose a user-friendly name.
2. Configure the service endpoint:
* **Host** - `postgres.default.svc.cluster.local`
* **Application Protocol** - Postgres
* **Port** - 5432
* **Forward to Port** - 5432
* **Authentication method** - Password Authentication
* **Authentication scheme** - Password
## Credential Provider Configuration
[Section titled “Credential Provider Configuration”](#credential-provider-configuration)
1. Create a new Credential Provider.
* **Name** - Choose a user-friendly name.
* **Credential Type** - [Username & Password](/user-guide/access-policies/credential-providers/username-password)
* **Username** - Provide the database login ID for the PostgreSQL master user.
* **Password** - Provide the master password associated with the PostgreSQL database credentials.
## Client Workload Configuration
[Section titled “Client Workload Configuration”](#client-workload-configuration)
Aembit now handles the credentials required to access the Server Workload, eliminating the need for you to manage them directly. You can safely remove any previously used credentials from the Client Workload.
If you access the Server Workload through an SDK or library, it is possible that the SDK/library may still require credentials to be present for initialization purposes. In this scenario, you can provide placeholder credentials. Aembit will overwrite these placeholder credentials with the appropriate ones during the access process.
## Access Policy
[Section titled “Access Policy”](#access-policy)
* Create an access policy for a Client Workload to access the MySQL Server Workload and assign the newly created Credential Provider to it.
# Local Redis
> This page describes how to configure Aembit to work with the local Redis Server Workload.
#
[Redis](https://redis.io/), known as an advanced key-value store, offers a fast and efficient solution for managing data in-memory. Redis’ speed and simplicity make it the preferred choice for applications requiring rapid access to cached information, real-time analytics, and message brokering. Redis supports a variety of data structures, including strings, hashes, lists, sets, and more, allowing users to model and manipulate data based on their specific requirements.
Below you can find the Aembit configuration required to work with Redis as a Server Workload using the Redis-compatible CLI, application, or a library.
## Prerequisites
[Section titled “Prerequisites”](#prerequisites)
Before proceeding with the configuration, ensure you have access to a Kubernetes cluster. Modify the example YAML file according to your specific configurations, and then deploy it to your Kubernetes cluster.
### Example Redis Yaml File
[Section titled “Example Redis Yaml File”](#example-redis-yaml-file)
Note
This example does not use TLS and is shown here for demonstration purposes only. It is strongly recommended to use TLS in production settings.
```yaml
apiVersion: apps/v1
kind: Deployment
metadata:
name: redis
spec:
replicas: 1
selector:
matchLabels:
app: redis
strategy:
type: Recreate
template:
metadata:
labels:
app: redis
spec:
containers:
- name: redis
image: redis
imagePullPolicy: Always
ports:
- containerPort: 6379
name: redis
env:
- name: MASTER
value: "true"
- name: REDIS_USER
value: ""
- name: REDIS_PASSWORD
value: ""
---
# Service
apiVersion: v1
kind: Service
metadata:
name: redis
spec:
type: NodePort
selector:
app: redis
ports:
- port: 6379
targetPort: 6379
```
:warning: Before running the command, ensure you have replaced the master user name and master password in the configuration file with your desired values.
Use the following command to deploy this file to your Kubernetes cluster.
`kubectl apply -f ./redis.yaml`
## Server Workload Configuration
[Section titled “Server Workload Configuration”](#server-workload-configuration)
1. Create a new Server Workload.
* **Name** - Choose a user-friendly name.
2. Configure the service endpoint:
* **Host** - `redis.default.svc.cluster.local`
* **Application Protocol** - Redis
* **Port** - 6379
* **Forward to Port** - 6379
* **Authentication method** - Password Authentication
* **Authentication scheme** - Password
## Credential Provider Configuration
[Section titled “Credential Provider Configuration”](#credential-provider-configuration)
1. Create a new Credential Provider.
* **Name** - Choose a user-friendly name.
* **Credential Type** - [Username & Password](/user-guide/access-policies/credential-providers/username-password)
* **Username** - Provide the login ID for the Redis master user.
* **Password** - Provide the master password associated with the Redis credentials.
## Client Workload Configuration
[Section titled “Client Workload Configuration”](#client-workload-configuration)
Aembit now handles the credentials required to access the Server Workload, eliminating the need for you to manage them directly. You can safely remove any previously used credentials from the Client Workload.
If you access the Server Workload through an SDK or library, it is possible that the SDK/library may still require credentials to be present for initialization purposes. In this scenario, you can provide placeholder credentials. Aembit will overwrite these placeholder credentials with the appropriate ones during the access process.
## Access Policy
[Section titled “Access Policy”](#access-policy)
* Create an access policy for a Client Workload to access the Redis Server Workload and assign the newly created Credential Provider to it.
# Looker Studio
> This page describes how to configure Aembit to work with the Looker Studio Server Workload.
#
[Looker Studio](https://lookerstudio.google.com/), part of Google Cloud Platform, is a data visualization tool designed for creating and managing reports and dashboards. It enables users to connect to various data sources, transforming raw data into interactive visual insights.
Below you can find the Aembit configuration required to work with the Looker Studio service as a Server Workload using the Looker Studio API.
Prerequisites
Before proceeding with the configuration, ensure you have the following:
* An active Google Cloud account
* A GCP project with [Looker Studio API](https://console.cloud.google.com/apis/library/datastudio.googleapis.com) enabled
* Looker Studio assets (e.g., reports or data sources) available
## Server Workload Configuration
[Section titled “Server Workload Configuration”](#server-workload-configuration)
1. Create a new Server Workload.
* **Name** - Choose a user-friendly name.
2. Configure the Service endpoint:
* **Host** - `datastudio.googleapis.com`
* **Application Protocol** - HTTP
* **Port** - 443 with TLS
* **Forward to Port** - 443 with TLS
* **Authentication method** - HTTP Authentication
* **Authentication scheme** - Bearer
## Credential Provider Configuration
[Section titled “Credential Provider Configuration”](#credential-provider-configuration)
1. Sign in to the Google Cloud Console and navigate to the [Credentials](hhttps://console.cloud.google.com/apis/credentials) page. Ensure you are working within a GCP project for which you have authorization.
2. On the **Credentials** dashboard, click **Create Credentials** located in the top left corner and select the **OAuth client ID** option.

3. If there is no configured Consent Screen for your project, you will see a **Configure Consent Screen** button on the directed page. Click the button to continue.

4. Choose **User Type** and click **Create**.
* Provide a name for your app.
* Choose a user support email from the dropdown menu.
* App logo and app domain fields are optional.
* Enter at least one email for the Developer contact information field.
* Click **Save and Continue**.
* You may skip the Scopes step by clicking **Save and Continue** once again.
* In the **Summary** step, review the details of your app and click **Back to Dashboard**.
5. Navigate back to [Credentials](hhttps://console.cloud.google.com/apis/credentials) page, click **Create Credentials**, and select the **OAuth client ID** option again.
* Choose **Web Application** for Application Type.
* Provide a name for your web client.
* Switch to the Aembit UI to create a new Credential Provider, selecting the OAuth 2.0 Authorization Code credential type. After setting up the Credential Provider, copy the auto-generated **Callback URL**.
* Return to Google Cloud Console and paste the copied URL into the **Authorized redirect URIs** field.
* Click **Create**.
6. A pop-up window will appear. Copy both the **Client ID** and the **Client Secret**. Store them for later use in the tenant configuration.
7. Edit the existing Credential Provider created in the previous steps.
* **Name** - Choose a user-friendly name.
* **Credential Type** - [OAuth 2.0 Authorization Code](/user-guide/access-policies/credential-providers/oauth-authorization-code)
* **Callback URL (Read-Only)** - An auto-generated Callback URL from Aembit Admin.
* **Client Id** - Provide the Client ID copied from Google.
* **Client Secret** - Provide the Secret copied from Google.
* **Scopes** - Enter the scopes you will use for Looker Studio (e.g. `https://www.googleapis.com/auth/datastudio`) Detailed information about scopes can be found at [official Looker Studio documentation](https://developers.google.com/looker-studio/integrate/api#authorize-app).
* **OAuth URL** - `https://accounts.google.com`
Click on **URL Discovery** to populate the Authorization and Token URL fields, which can be left as populated.
* **PKCE Required** - Off
* **Lifetime** - 1 year (This value is recommended by Aembit. For more information, please refer to the [official Google documentation](https://developers.google.com/identity/protocols/oauth2#expiration).)
8. Click **Save** to save your changes on the Credential Provider.
9. In the Aembit UI, click the **Authorize** button. You are directed to a page where you can review the access request. Click **Authorize** to complete the OAuth 2.0 Authorization Code flow. You should see a success page and then be redirected to Aembit automatically. You can also verify your flow is complete by checking the **State** value in the Credential Provider. After completion, it should be **Ready**.

Caution
Once the set lifetime ends, the retrieved credential expires and will not work anymore. Aembit will notify you before this happens. Please ensure you reauthorize the credential before it expires.
## Client Workload Configuration
[Section titled “Client Workload Configuration”](#client-workload-configuration)
Aembit now handles the credentials required to access the Server Workload, eliminating the need for you to manage them directly. You can safely remove any previously used credentials from the Client Workload.
If you access the Server Workload through an SDK or library, it is possible that the SDK/library may still require credentials to be present for initialization purposes. In this scenario, you can provide placeholder credentials. Aembit will overwrite these placeholder credentials with the appropriate ones during the access process.
## Access Policy
[Section titled “Access Policy”](#access-policy)
* Create an Access Policy for a Client Workload to access the Looker Studio Server Workload. Assign the newly created Credential Provider to this Access Policy.
## Required Features
[Section titled “Required Features”](#required-features)
* You will need to configure the [TLS Decrypt](/user-guide/deploy-install/advanced-options/tls-decrypt/configure-tls-decrypt) feature to work with the Looker Studio Server Workload.
# Microsoft Graph
> This page describes how to configure Aembit to work with the Microsoft Graph Server Workload.
#
[Microsoft Graph API](https://developer.microsoft.com/en-us/graph) is a comprehensive cloud-based service that empowers developers to build applications that integrate seamlessly with Microsoft 365. This service serves as a unified endpoint to access various Microsoft 365 services and data, offering a range of functionalities for communication, collaboration, and productivity.
Below you can find the Aembit configuration required to work with the Microsoft service as a Server Workload using the Microsoft Graph REST API.
## Prerequisites
[Section titled “Prerequisites”](#prerequisites)
Before proceeding with the configuration, ensure you have the following:
* Microsoft Azure tenant.
* A registered and consent-granted application on Microsoft Entra ID (previously Azure Active Directory). If you haven’t set up an app yet, follow the steps in the next section.
### Microsoft Entra ID (Azure Active Directory) App Registration
[Section titled “Microsoft Entra ID (Azure Active Directory) App Registration”](#microsoft-entra-id-azure-active-directory-app-registration)
1. Log in to the [Microsoft Azure Portal](https://portal.azure.com/#home).
2. Navigate to **Microsoft Entra ID** (Azure Active Directory).
3. On the left panel, click on **App registrations**, and then from the right part, click on **New registration** in the ribbon list.
4. Choose a user-friendly name, select the **Accounts in this organizational directory only** option, and then click **Register**. Your application is now registered with Microsoft Entra ID (Azure Active Directory).
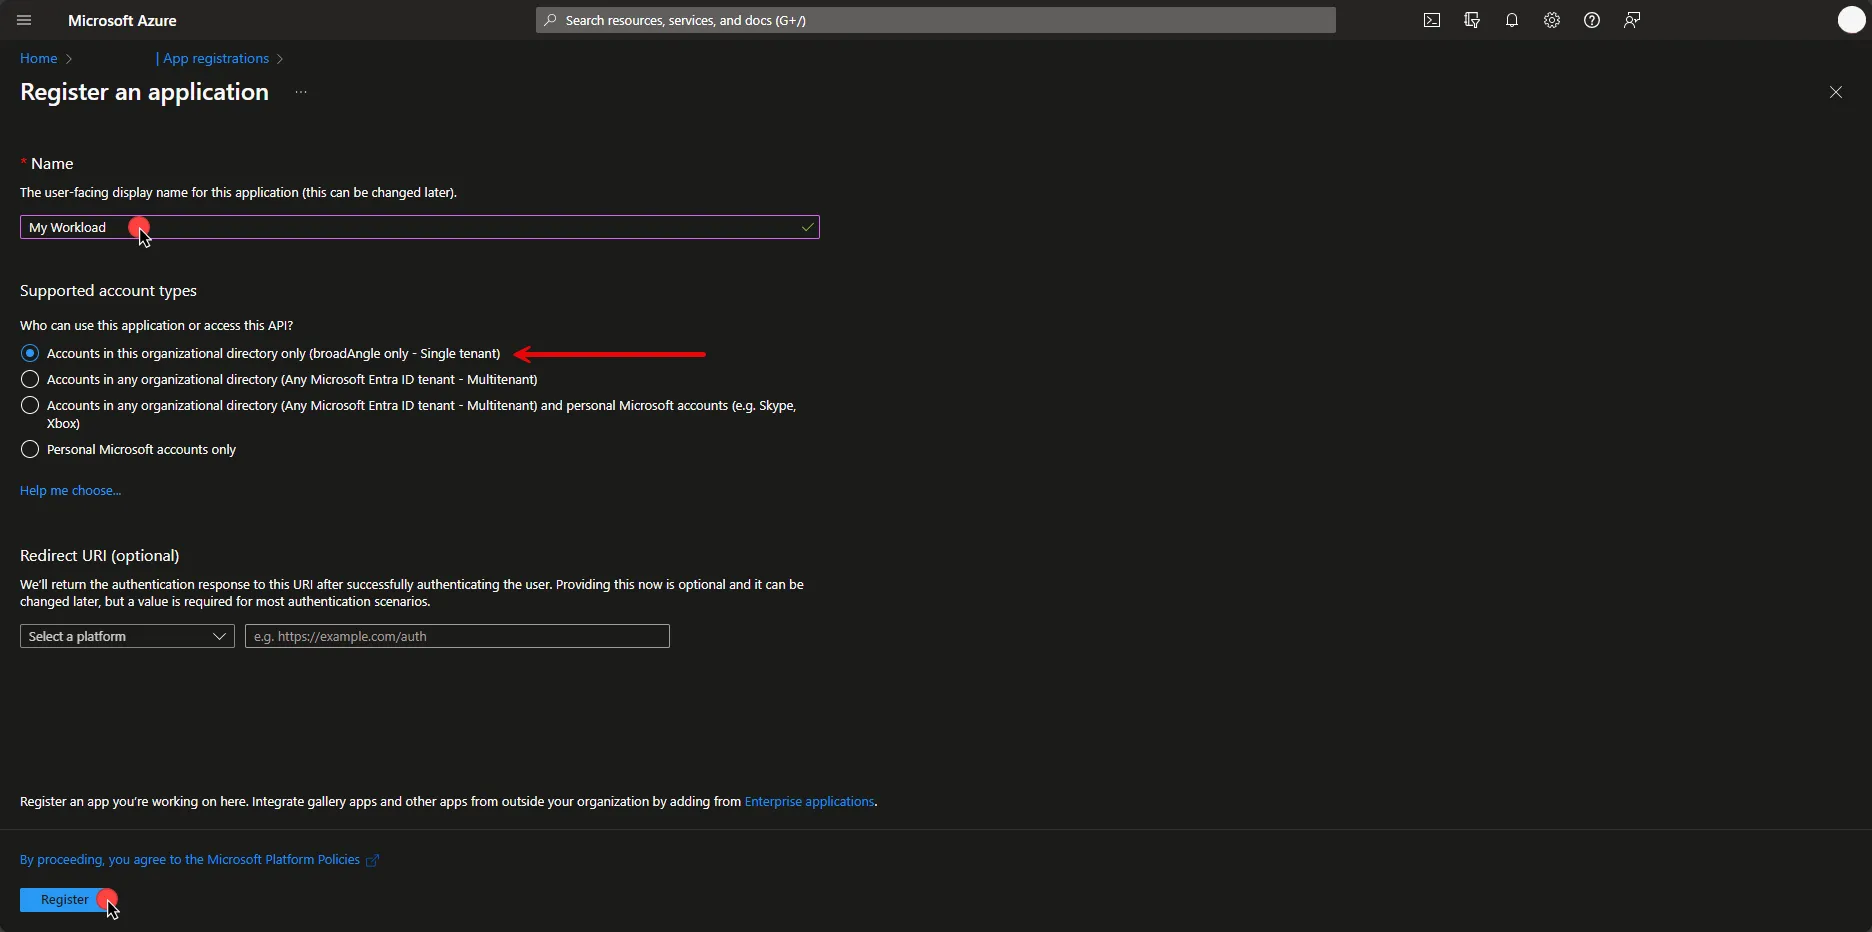
5. To set API Permissions, on the left panel, click on **API Permissions**, and then on the right part, click on **Add a permission**. In the opened dialog, click on **Microsoft Graph** and then click **Application permissions**.
Note
The current configuration with Microsoft Graph ***only*** works for the Application permission type. For more details on permissions and types, please refer to the [official Microsoft article](https://learn.microsoft.com/en-us/graph/permissions-overview?tabs=http).
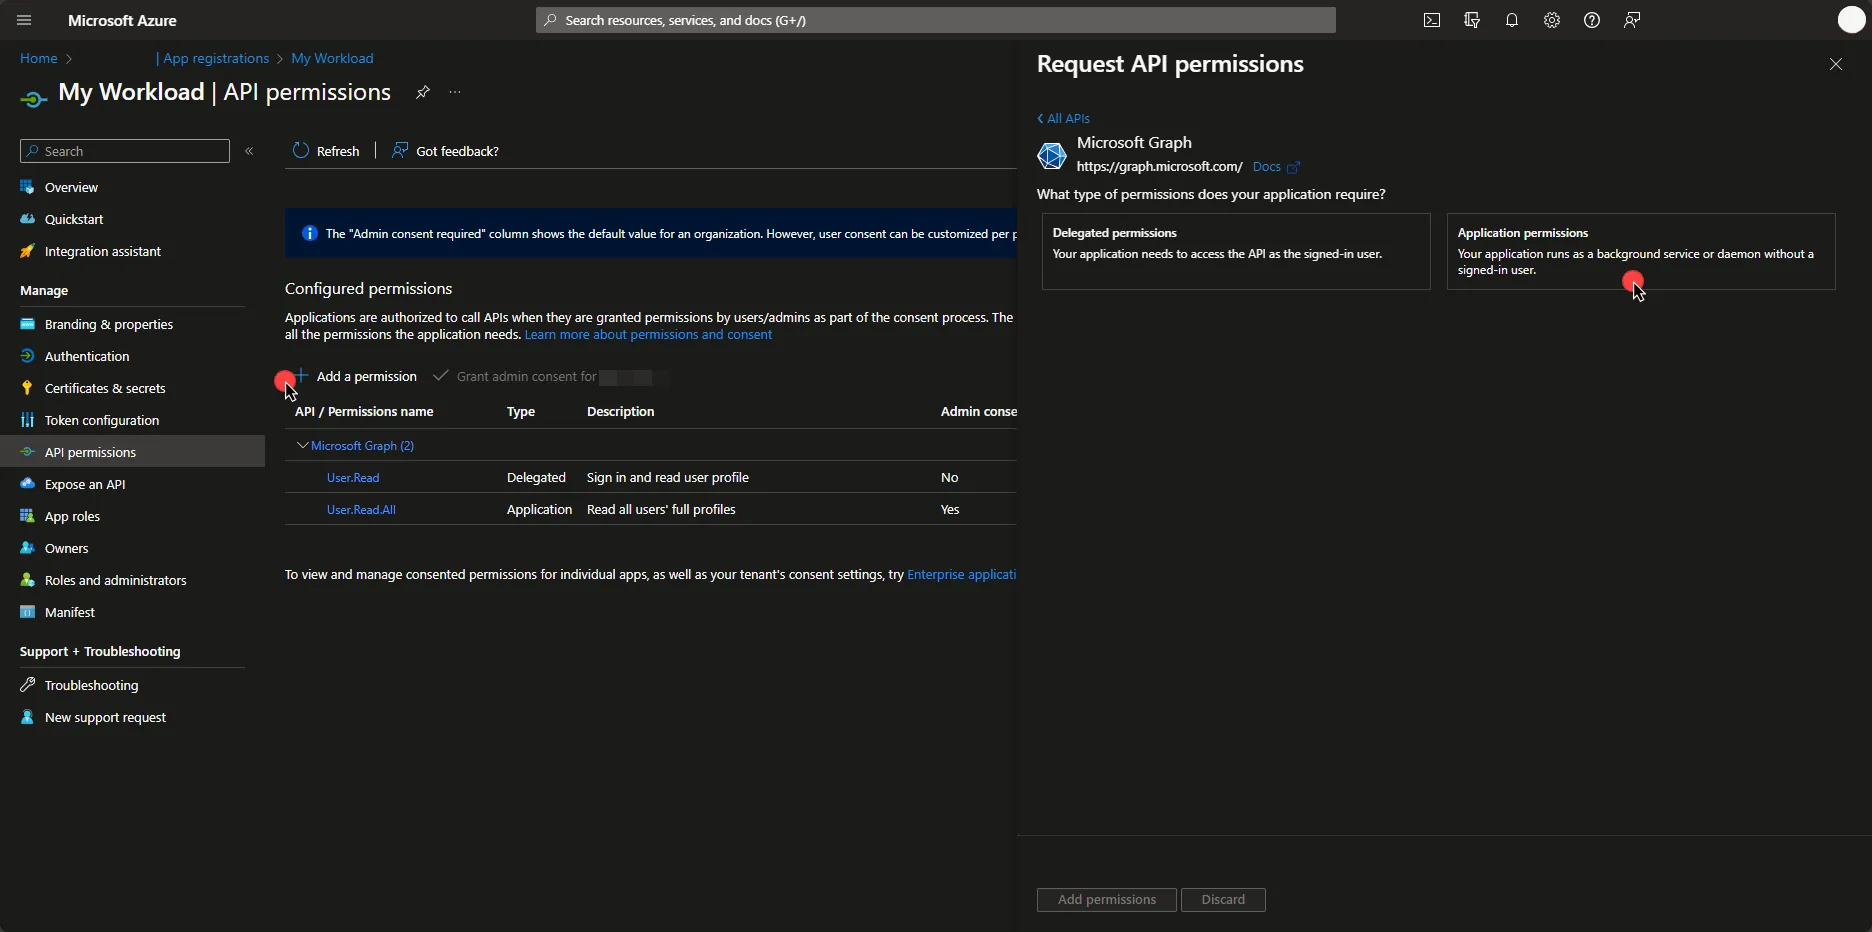
6. Select the permissions your workload needs. Since there are many permissions to choose from, it may help to search for the ones you want. Then, click on **Add permissions**.
7. Under Configured Permissions, click on **Grant admin consent for…**, and then click **Yes**.
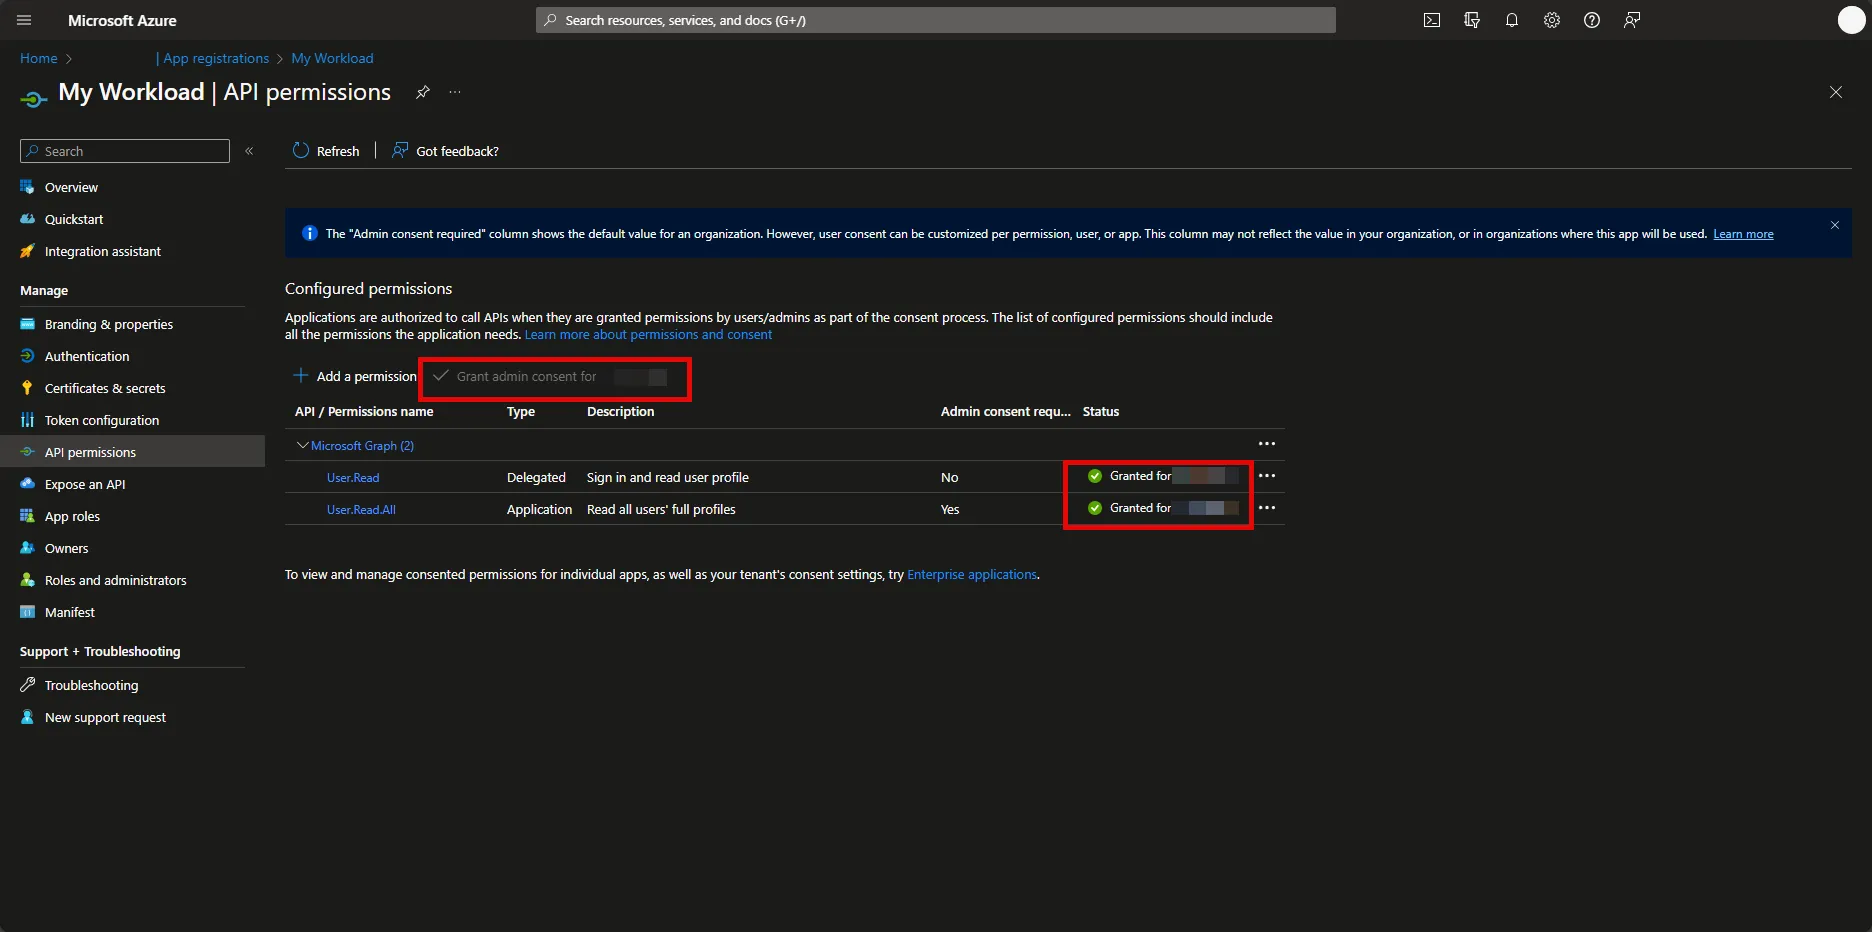
Before an app accesses your organization’s data, you need to grant specific permissions. The level of access depends on the permissions. In Microsoft Entra ID (Azure Active Directory), Application Administrator, Cloud Application Administrator, and Global Administrator are [built-in roles](https://learn.microsoft.com/en-us/entra/identity/role-based-access-control/permissions-reference) with the ability to manage admin consent request policies.
If the button is disabled for you, please contact your Administrator. Note that only users with the appropriate privileges can perform this step. For more information on granting tenant-wide admin consent, refer to the [official Microsoft article](https://learn.microsoft.com/en-us/entra/identity/enterprise-apps/grant-admin-consent?pivots=portal).
## Server Workload Configuration
[Section titled “Server Workload Configuration”](#server-workload-configuration)
1. Create a new Server Workload.
* **Name** - Choose a user-friendly name.
2. Configure the service endpoint:
* **Host** - `graph.microsoft.com`
* **Application Protocol** - HTTP
* **Port** - 80
* **Forward to Port** - 443 with TLS
* **Authentication method** - HTTP Authentication
* **Authentication scheme** - Bearer
## Credential Provider Configuration
[Section titled “Credential Provider Configuration”](#credential-provider-configuration)
1. Log in to the [Microsoft Azure Portal](https://portal.azure.com/#home).
2. Navigate to **Microsoft Entra ID** (Azure Active Directory) and on the left panel click on **App registrations**.
3. Select your application.
4. In the Overview section, copy both the **Application (client) ID** and the **Directory (tenant) ID**. Store them for later use in the tenant configuration.
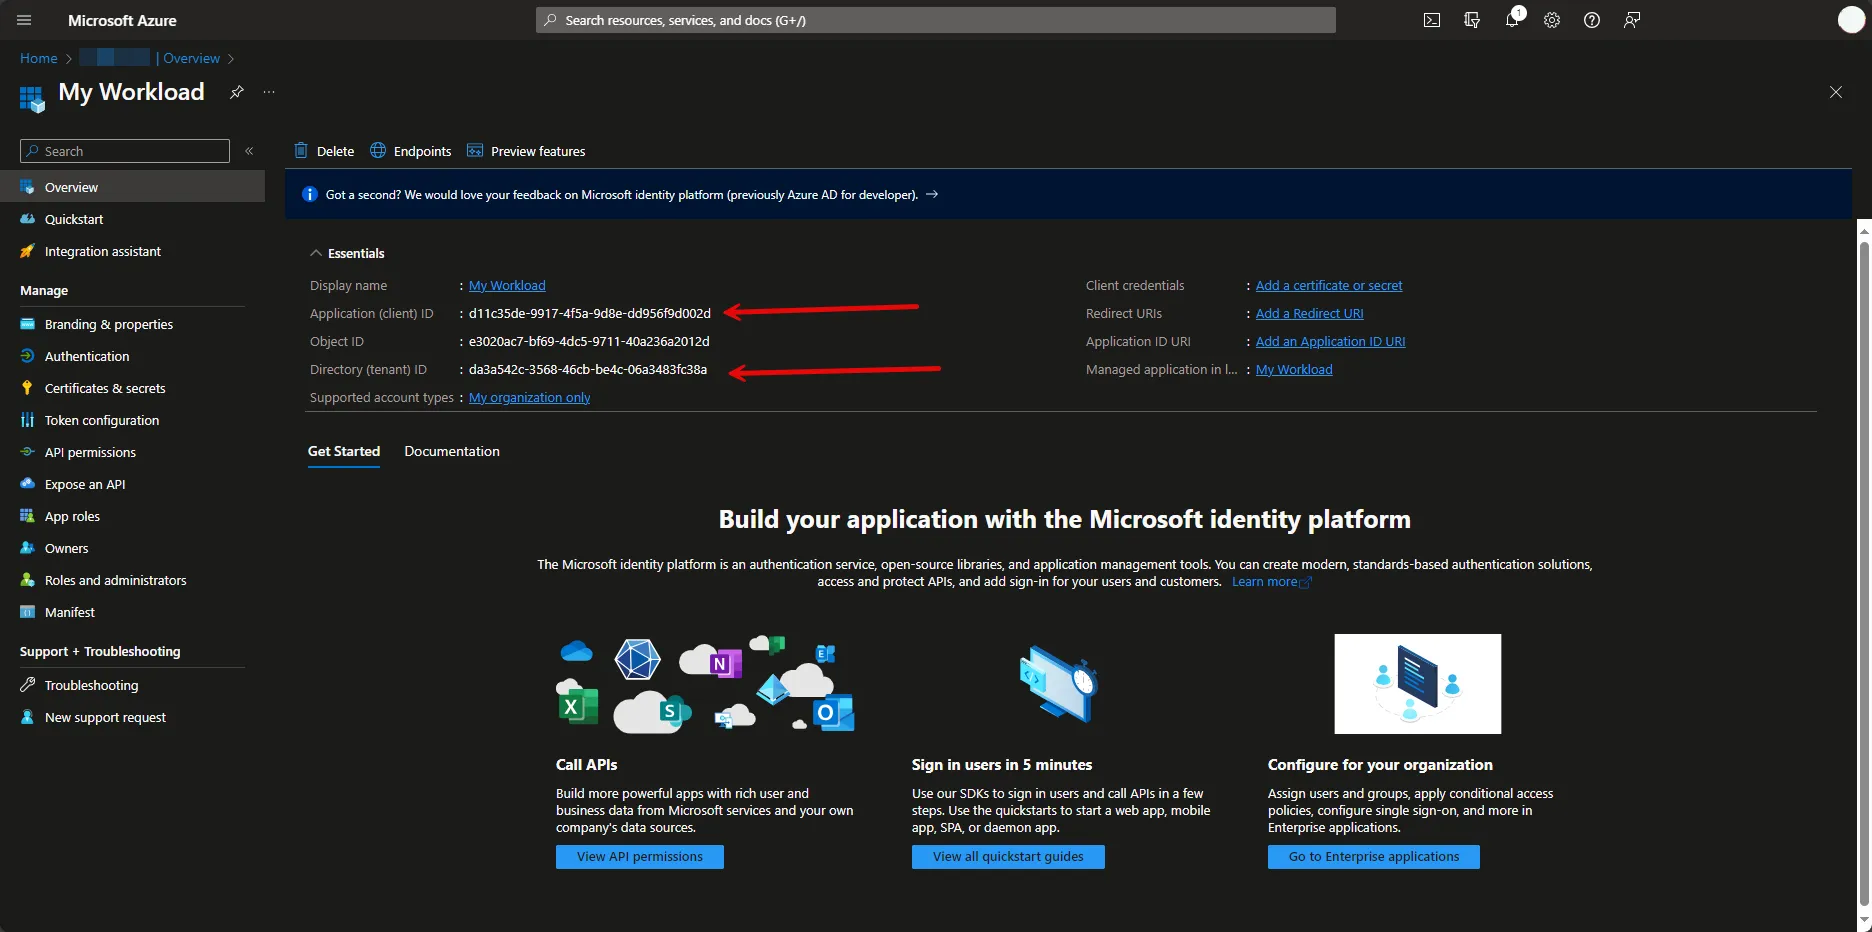
5. Under Manage, navigate to **Certificates & secrets**. In the Client Secrets tab, if there is no existing secret, please create a new secret and make sure to save it immediately after creation. If there is an existing one, please provide the stored secret in the following steps.
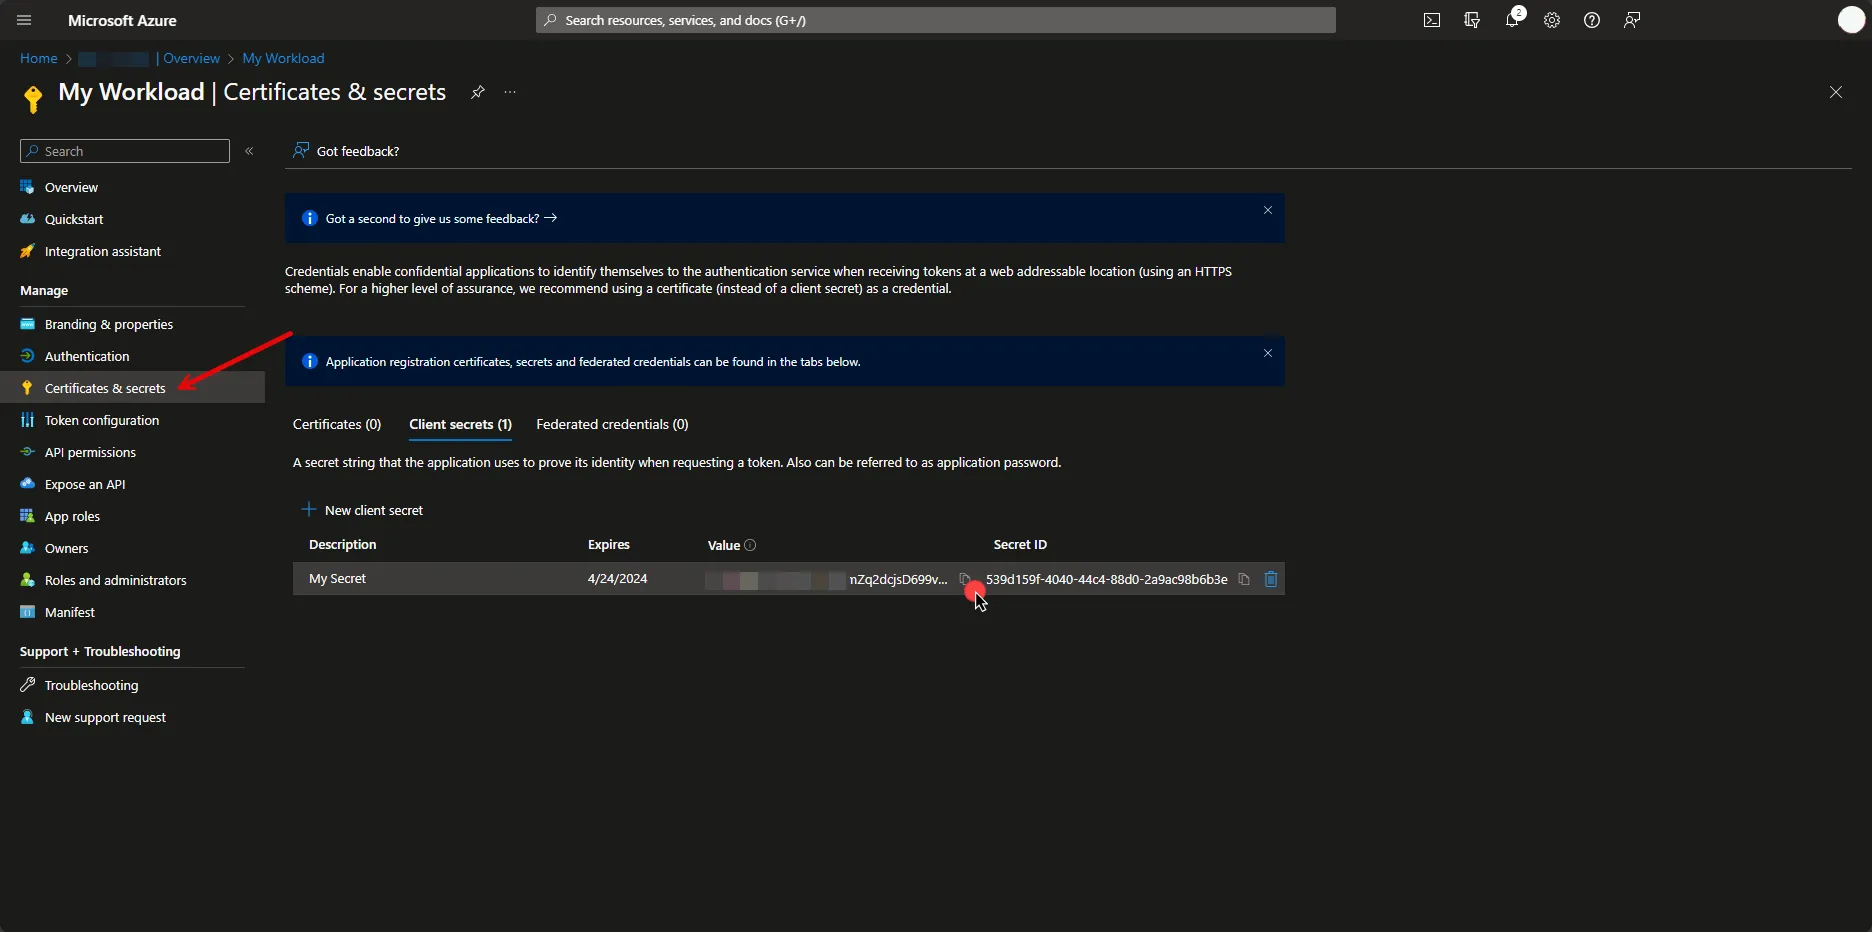
6. Create a new Credential Provider.
* **Name** - Choose a user-friendly name.
* **Credential Type** - [OAuth 2.0 Client Credentials](/user-guide/access-policies/credential-providers/oauth-client-credentials)
* **Token endpoint** - https\://login.microsoftonline.com/**Your-Tenant-Id**/oauth2/v2.0/token
* **Client ID** - Provide the client ID copied from Azure.
* **Client Secret** - Provide the client secret copied from Azure.
* **Scopes** -
## Client Workload Configuration
[Section titled “Client Workload Configuration”](#client-workload-configuration)
Aembit now handles the credentials required to access the Server Workload, eliminating the need for you to manage them directly. You can safely remove any previously used credentials from the Client Workload.
If you access the Server Workload through an SDK or library, it is possible that the SDK/library may still require credentials to be present for initialization purposes. In this scenario, you can provide placeholder credentials. Aembit will overwrite these placeholder credentials with the appropriate ones during the access process.
## Access Policy
[Section titled “Access Policy”](#access-policy)
* Create an Access Policy for a Client Workload to access the Microsoft Server Workload. Assign the newly created Credential Provider to this Access Policy.
# Okta
> This page describes how to configure Aembit to work with the Okta Server Workload.
#
[Okta](https://www.okta.com/) is a cloud-based Identity and Access Management (IAM) platform that offers tools for user authentication, access control, and security, helping streamline identity management and improve user experiences across applications and devices.
Below you can find the Aembit configuration required to work with the Okta Workforce Identity Cloud service as a Server Workload using the Core Okta API.
## Prerequisites
[Section titled “Prerequisites”](#prerequisites)
Before proceeding with the configuration, you must have an Okta Workforce Identity Cloud organization (tenant).
## Server Workload Configuration
[Section titled “Server Workload Configuration”](#server-workload-configuration)
To retrieve the connection information in the Okta Admin Console:
* Click on your username in the upper-right corner of the Admin Console. The domain appears in the dropdown menu; copy the domain.
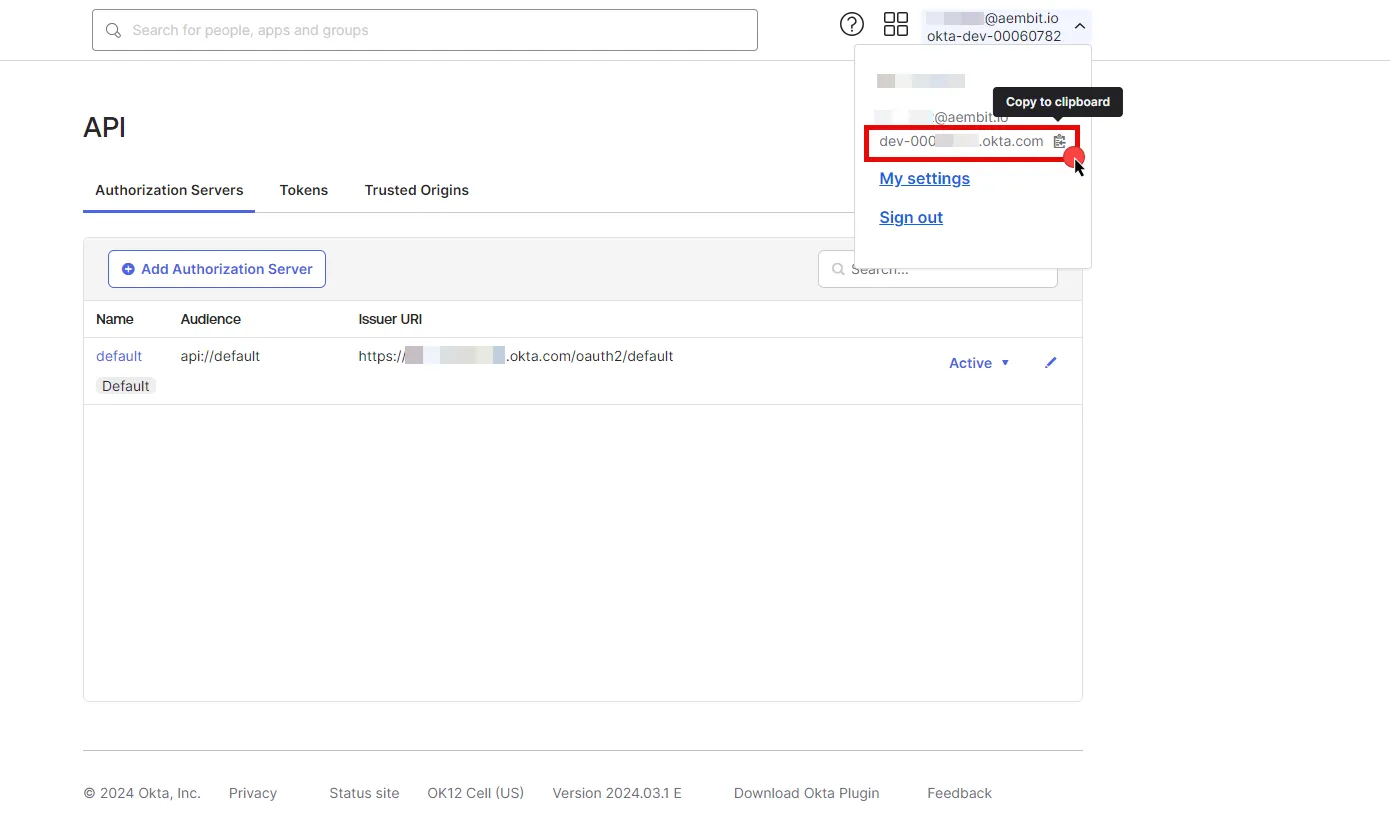
1. Create a new Server Workload.
* **Name** - Choose a user-friendly name.
2. Configure the service endpoint:
* **Host** - `.okta.com` (Provide the domain copied from Okta)
* **Application Protocol** - HTTP
* **Port** - 443 with TLS
* **Forward to Port** - 443 with TLS
* **Authentication method** - API Key
* **Authentication scheme** - Header
* **Header** - Authorization
## Credential Provider Configuration
[Section titled “Credential Provider Configuration”](#credential-provider-configuration)
1. Sign in to your Okta organization as a user with administrator privileges.
2. In the left sidebar, select **Security**, then click on **API**.
3. Navigate to the **Tokens** tab in the ribbon list.
4. Click **Create Token**, name your token, and then click **Create Token**.
5. Click the **Copy to Clipboard icon** to securely store the token for later use in the tenant configuration. For detailed information on API tokens, please refer to the [official Okta documentation](https://developer.okta.com/docs/guides/create-an-api-token/main/).
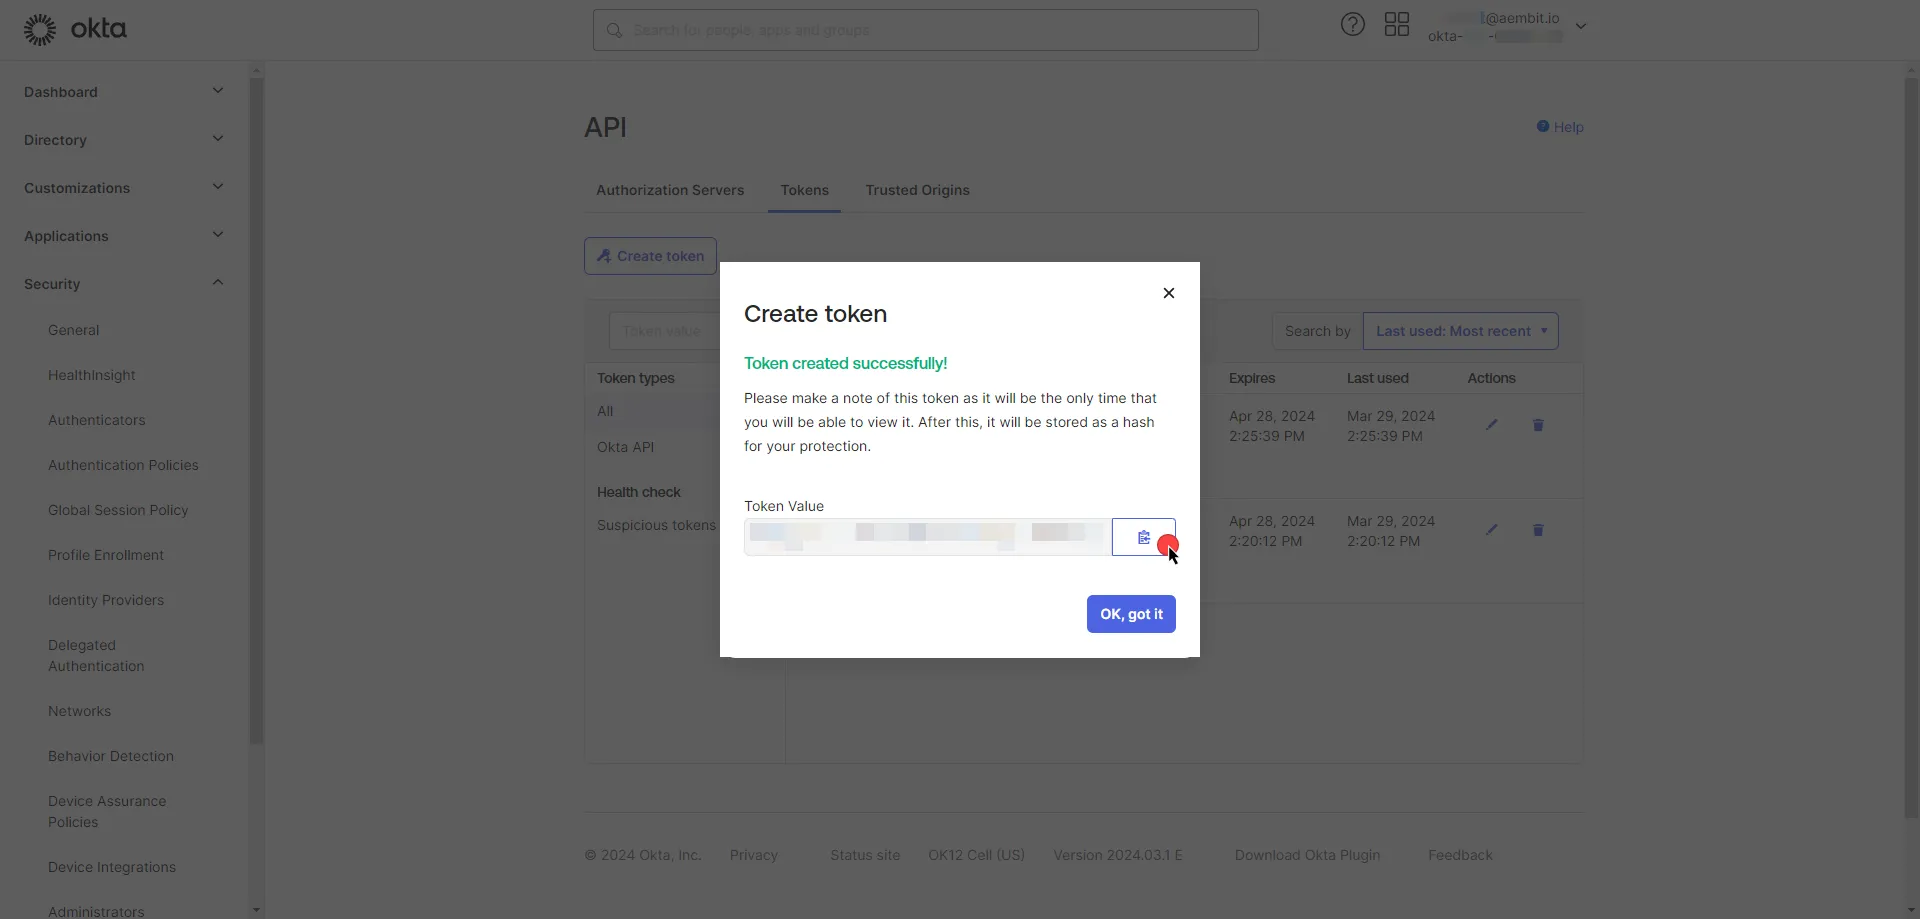
6. Create a new Credential Provider.
* **Name** - Choose a user-friendly name.
* **Credential Type** - [API Key](/user-guide/access-policies/credential-providers/api-key)
* **API Key** - Provide the key copied from Okta and use the format `SSWS api-token`, replacing `api-token` with your API token.
## Client Workload Configuration
[Section titled “Client Workload Configuration”](#client-workload-configuration)
Aembit now handles the credentials required to access the Server Workload, eliminating the need for you to manage them directly. You can safely remove any previously used credentials from the Client Workload.
If you access the Server Workload through an SDK or library, it is possible the SDK/library may still require credentials to be present for initialization purposes. In this scenario, you can provide placeholder credentials. Aembit will overwrite these placeholder credentials with the appropriate ones during the access process.
## Access Policy
[Section titled “Access Policy”](#access-policy)
* Create an Access Policy for a Client Workload to access the Okta Server Workload. Assign the newly created Credential Provider to this Access Policy.
## Required Features
[Section titled “Required Features”](#required-features)
* You will need to configure the [TLS Decrypt](/user-guide/deploy-install/advanced-options/tls-decrypt/configure-tls-decrypt) feature to work with the Okta Server Workload.
# ChatGPT (OpenAI)
> This page describes how to configure Aembit to work with the OpenAI Server Workload
[OpenAI](https://platform.openai.com/) is a artificial intelligence platform that allows developers to integrate advanced language models into their applications. It supports diverse tasks such as text completion, summarization, and sentiment analysis, enhancing software functionality and user experience.
Below you can find the Aembit configuration required to work with the OpenAI service as a Server Workload using the OpenAI API.
## Prerequisites
[Section titled “Prerequisites”](#prerequisites)
Before proceeding with the configuration, ensure you have an OpenAI account and API key. If you have not already generated a key, follow the instructions below. For more details on API key authentication, refer to the [official OpenAI API documentation](https://platform.openai.com/docs/api-reference/api-keys).
### Create Project API Key
[Section titled “Create Project API Key”](#create-project-api-key)
1. Sign in to your OpenAI account.
2. Navigate to the [API Keys](https://platform.openai.com/api-keys) page from the left menu.
3. Click on **Create new secret key** button in the middle of the page.
4. A pop-up window will appear. Choose the owner and project (if not multiple, the default project is selected). Then, fill in either the optional name field or service account ID, depending on the owner selection.
* If the owner is selected as **You**, under the **Permissions** section, select the permissions (scopes) for your application according to your needs.
* Click on **Create secret key** to proceed.
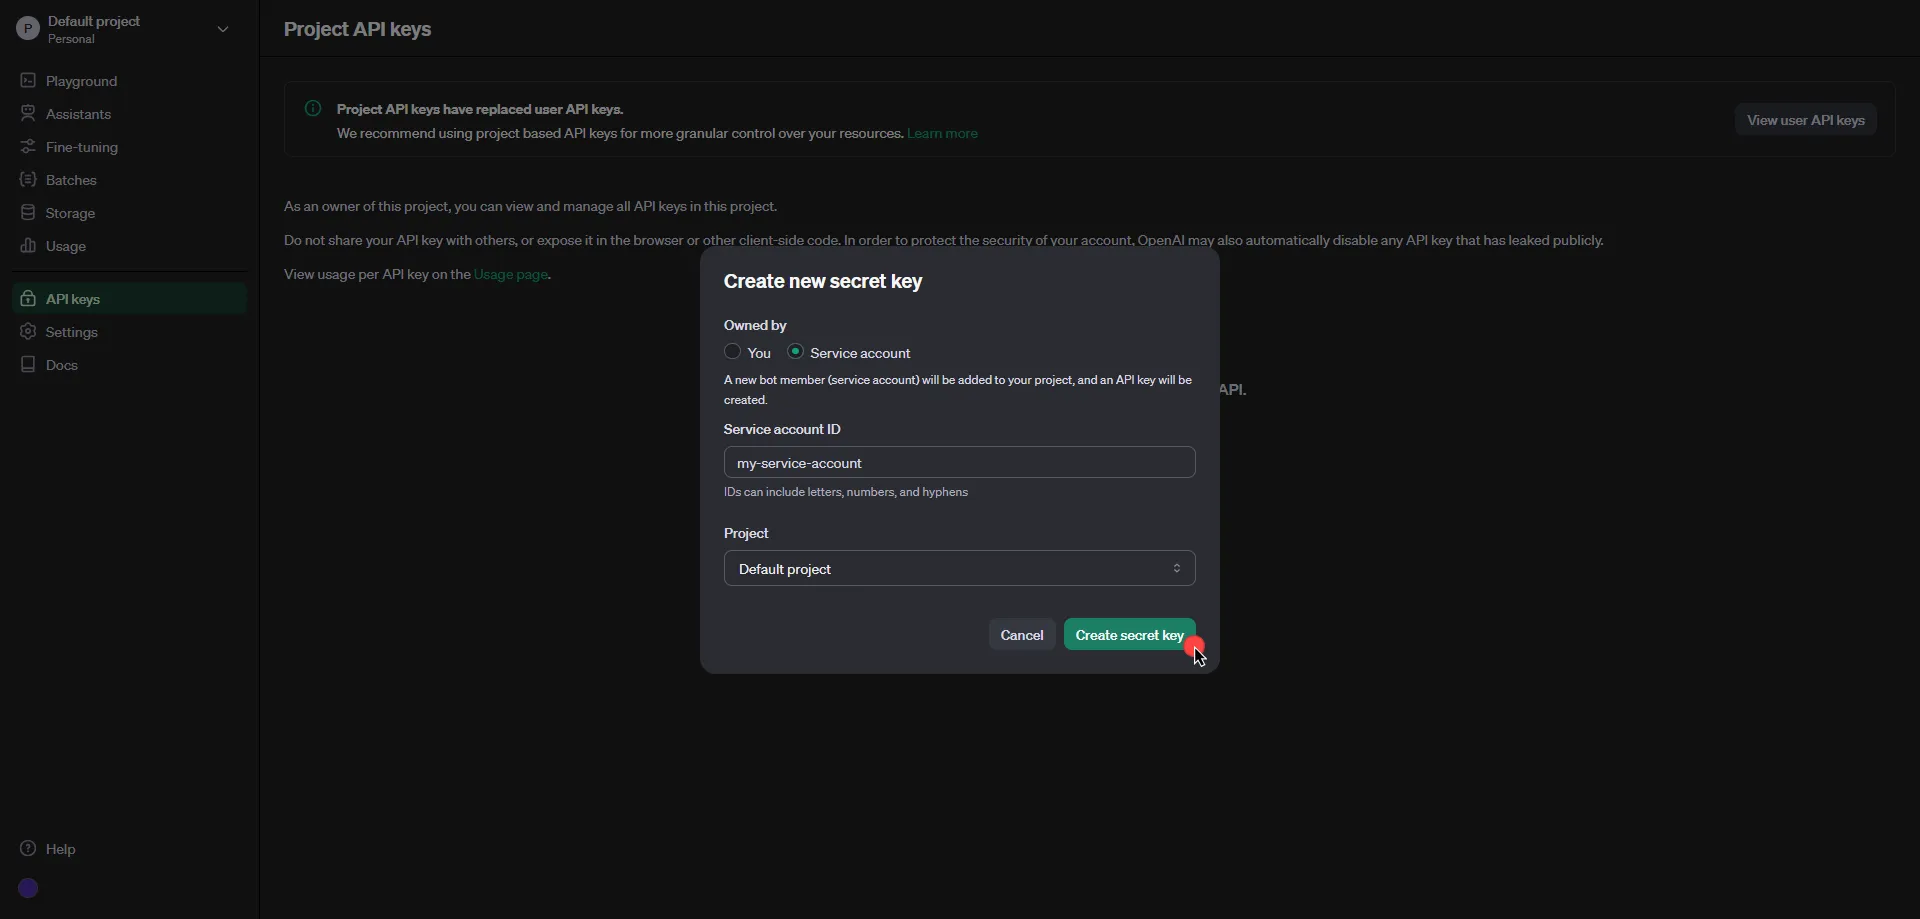
5. Click **Copy** and securely store the key for later use in the configuration on the tenant.
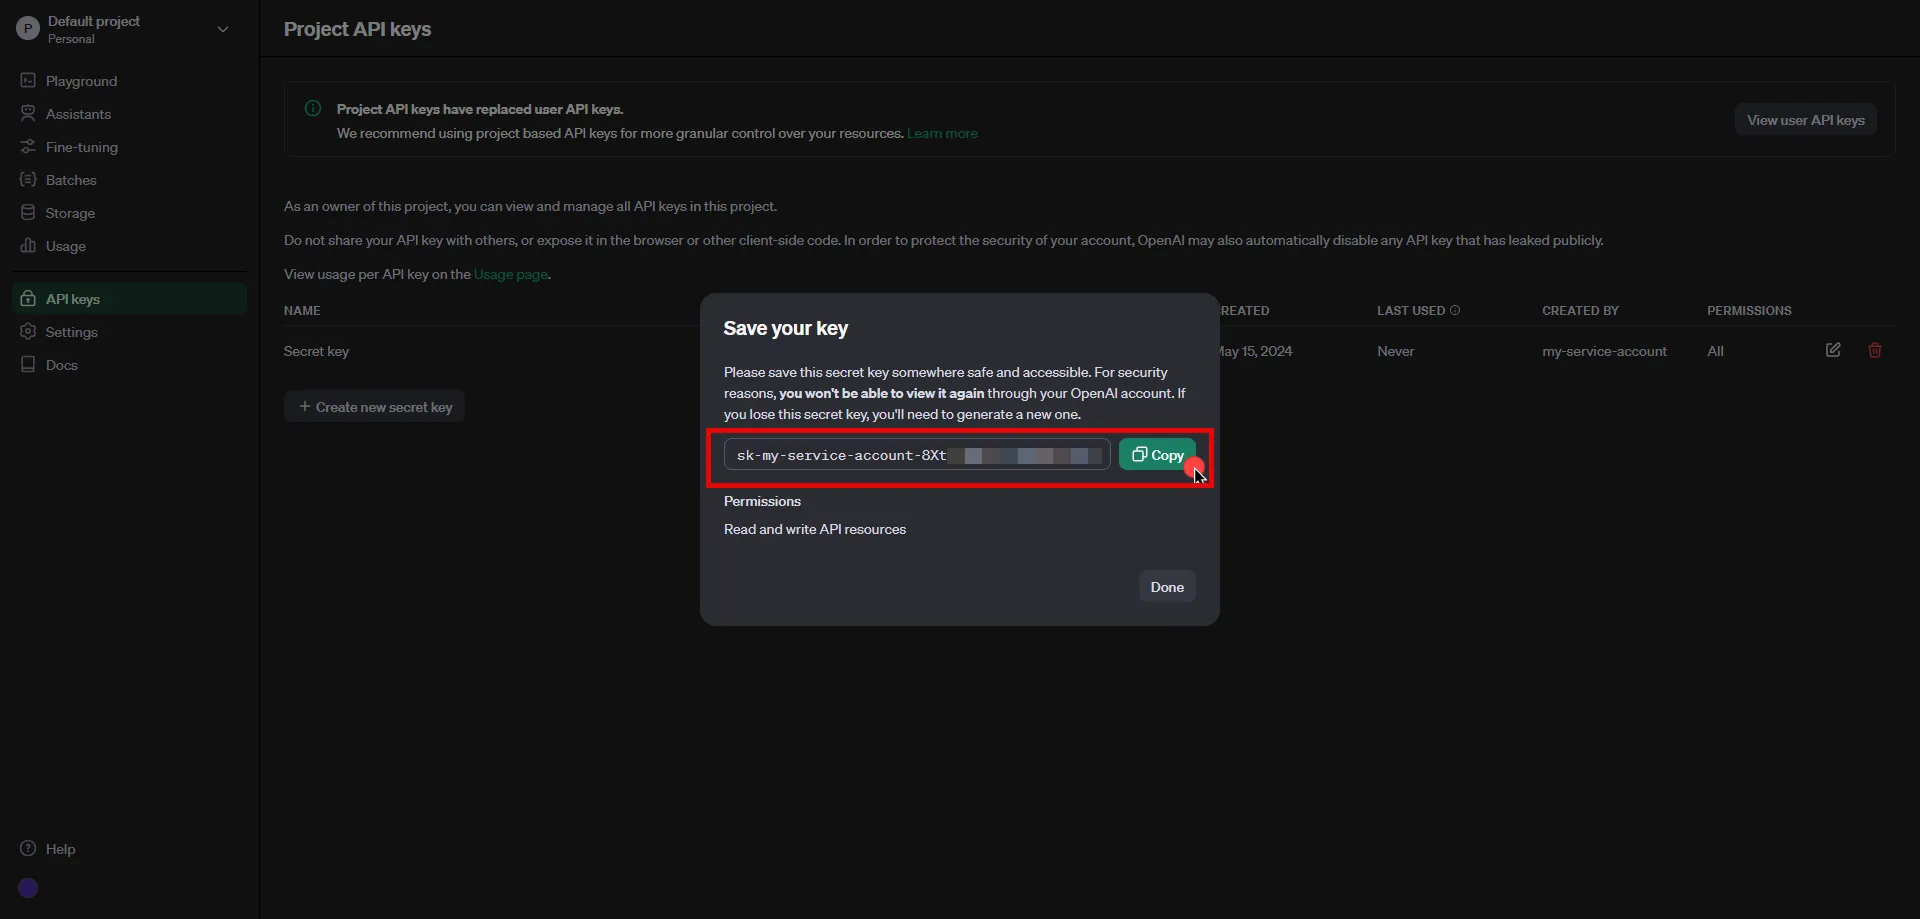
Note
The following configuration steps will also work with **user API keys**; however, **project API keys** are recommended as they offer more granular control over the resources.
## Server Workload Configuration
[Section titled “Server Workload Configuration”](#server-workload-configuration)
1. Create a new Server Workload.
* **Name** - Choose a user-friendly name.
2. Configure the service endpoint:
* **Host** - `api.openai.com`
* **Application Protocol** - HTTP
* **Port** - 443 with TLS
* **Forward to Port** - 443 with TLS
* **Authentication method** - HTTP Authentication
* **Authentication scheme** - Bearer
## Credential Provider Configuration
[Section titled “Credential Provider Configuration”](#credential-provider-configuration)
1. Create a new Credential Provider.
* **Name** - Choose a user-friendly name.
* **Credential Type** - [API Key](/user-guide/access-policies/credential-providers/api-key)
* **API Key** - Paste the key copied from OpenAI Platform.
## Client Workload Configuration
[Section titled “Client Workload Configuration”](#client-workload-configuration)
Aembit now handles the credentials required to access the Server Workload, eliminating the need for you to manage them directly. You can safely remove any previously used credentials from the Client Workload.
If you access the Server Workload through an SDK or library, it is possible that the SDK/library may still require credentials to be present for initialization purposes. In this scenario, you can provide placeholder credentials. Aembit will overwrite these placeholder credentials with the appropriate ones during the access process.
## Access Policy
[Section titled “Access Policy”](#access-policy)
* Create an Access Policy for a Client Workload to access the OpenAI Server Workload. Assign the newly created Credential Provider to this Access Policy.
## Required Features
[Section titled “Required Features”](#required-features)
* You will need to configure the [TLS Decrypt](/user-guide/deploy-install/advanced-options/tls-decrypt/configure-tls-decrypt) feature to work with the OpenAI API Server Workload.
# PagerDuty
> This page describes how to configure Aembit to work with the PagerDuty Server Workload.
#
[PagerDuty](https://www.pagerduty.com/) is a digital operations management platform that helps businesses improve their incident response process. It allows teams to centralize their monitoring tools and manage incidents in real-time, reducing downtime and improving service reliability.
Below you can find the Aembit configuration required to work with the PagerDuty service as a Server Workload using the PagerDuty API. Aembit supports multiple authentication/authorization methods for PagerDuty. This page describes scenarios where the Credential Provider is configured for PagerDuty via:
* [OAuth 2.0 Authorization Code (3LO)](/user-guide/access-policies/server-workloads/guides/pagerduty#oauth-20-authorization-code)
* [OAuth 2.0 Client Credentials](/user-guide/access-policies/server-workloads/guides/pagerduty#oauth-20-client-credentials)
Prerequisites
Before proceeding with the configuration, ensure you have the following:
* PagerDuty tenant.
* Registered app in the PagerDuty tenant. If you have not registered an app before, you can follow the steps outlined in the subsequent sections or refer to the [official PagerDuty Developer documentation](https://developer.pagerduty.com/docs/dd91fbd09a1a1-register-an-app) for more detailed instructions.
## OAuth 2.0 Authorization Code
[Section titled “OAuth 2.0 Authorization Code”](#oauth-20-authorization-code)
### Server Workload Configuration
[Section titled “Server Workload Configuration”](#server-workload-configuration)
1. Create a new Server Workload.
* **Name** - Choose a user-friendly name.
2. Configure the service endpoint:
* **Host** - `api.pagerduty.com`
* **Application Protocol** - HTTP
* **Port** - 443 with TLS
* **Forward to Port** - 443 with TLS
* **Authentication method** - HTTP Authentication
* **Authentication scheme** - Bearer
### Credential Provider Configuration
[Section titled “Credential Provider Configuration”](#credential-provider-configuration)
1. Log in to your [PagerDuty account](https://identity.pagerduty.com/global/authn/authentication/PagerDutyGlobalLogin/enter_email).
2. Navigate to the top menu, select **Integrations**, and then click on **App Registration**.
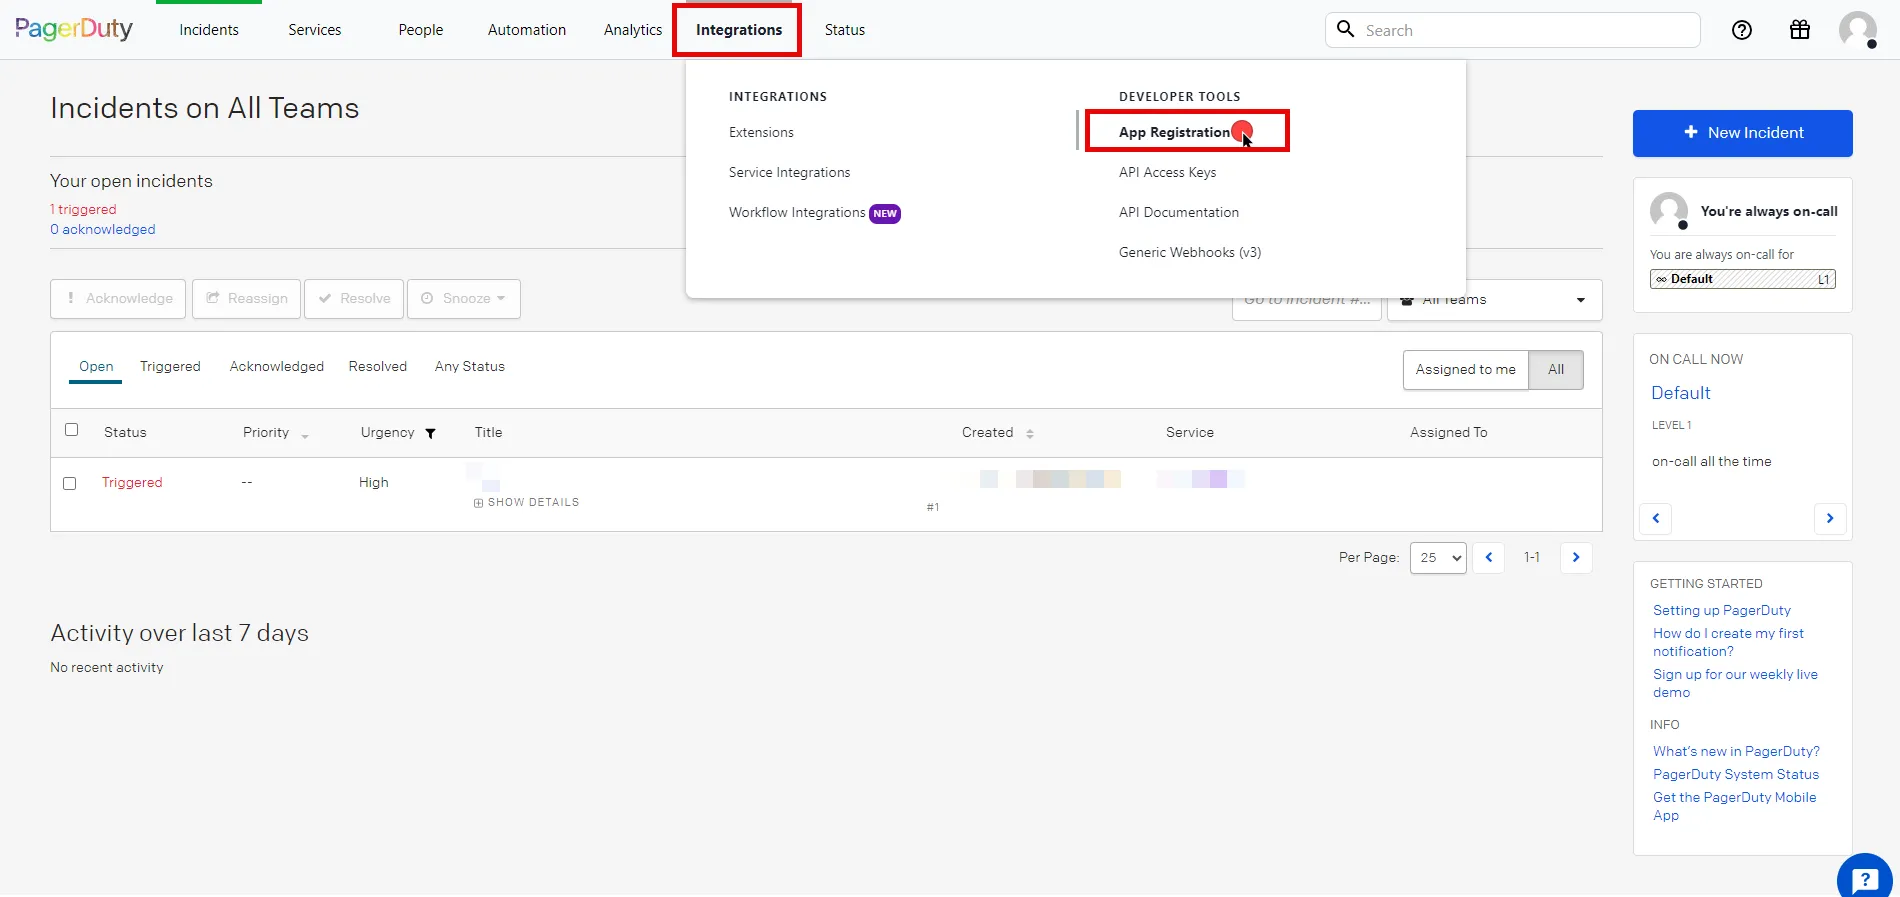
3. Click the **New App** button in the top right corner of the page.
4. Fill in the name and description fields, choose **OAuth 2.0**, and then click **Next** to proceed.
5. Select **Scoped OAuth** as the authorization method.
6. Switch to the Aembit UI to create a new Credential Provider, selecting the OAuth 2.0 Authorization Code credential type. After setting up the Credential Provider, copy the auto-generated **Callback URL**.
7. Return to PagerDuty and click to **Add Redirect URL** and paste the copied **Callback URL** into the field.
8. Choose the permissions (scopes) for your application based on your needs.
9. Before registering your app, scroll down and click **Copy to clipboard** to store your selected permission scopes for later use in the tenant configuration.
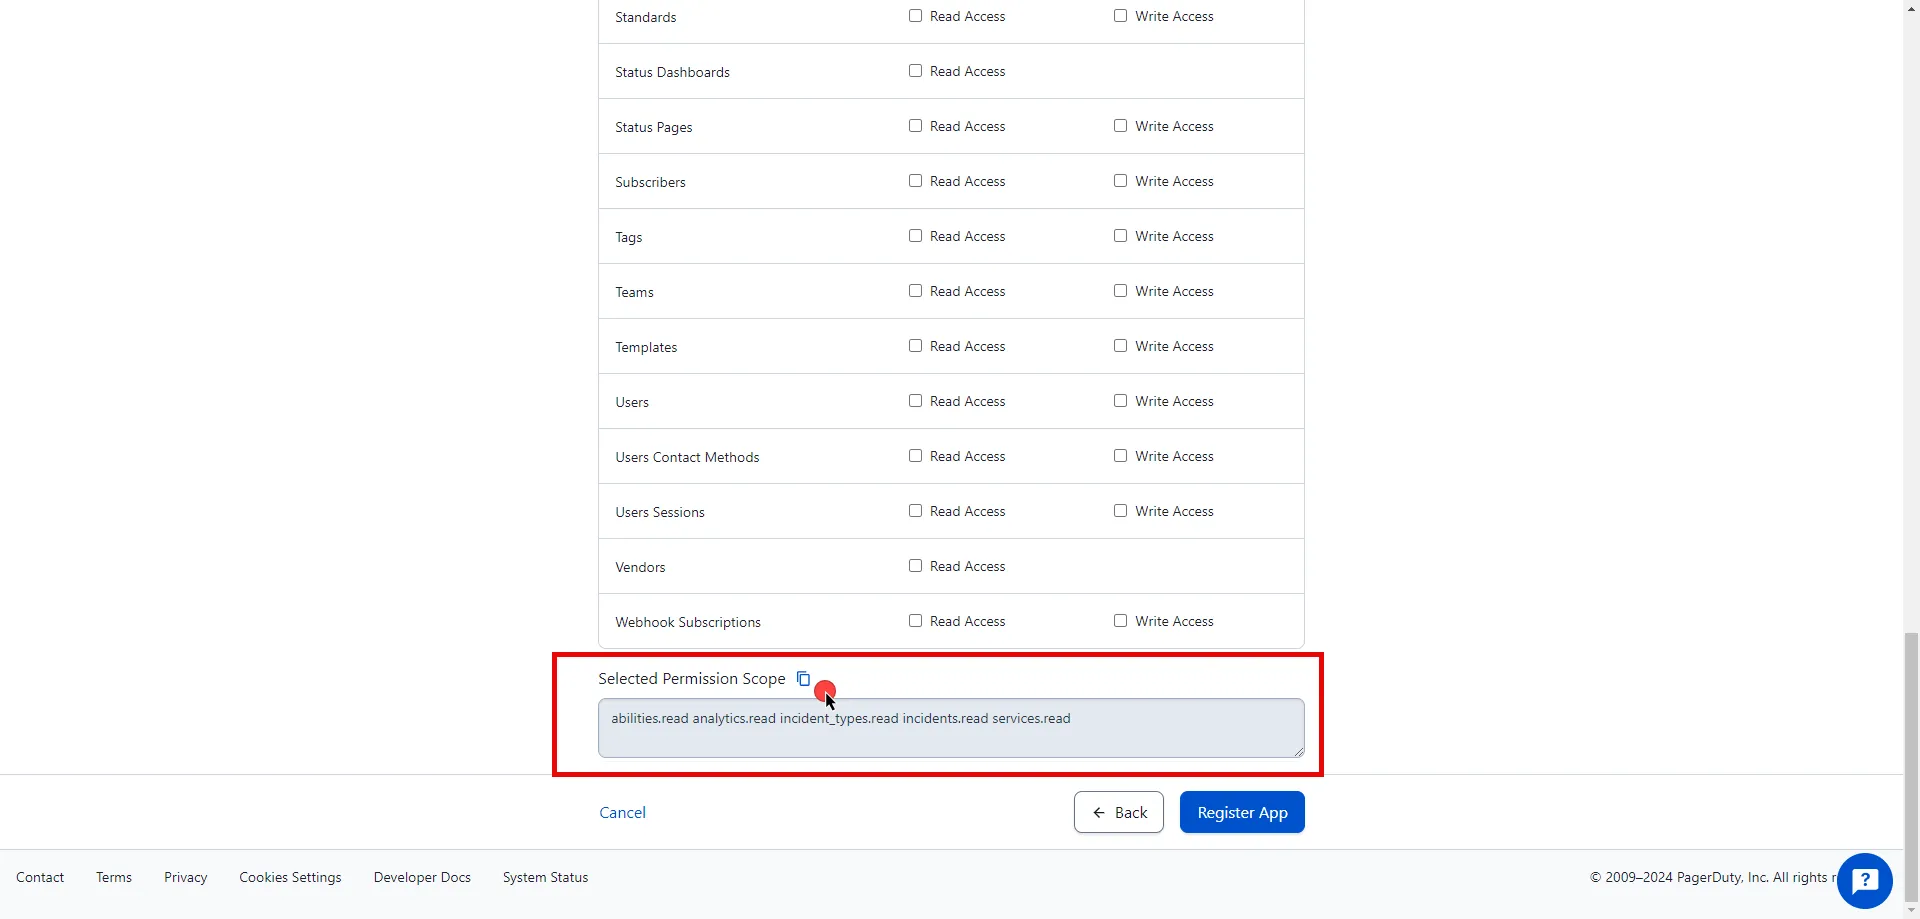
10. After making all of your selections, click on **Register App**.
11. A pop-up window appears. Copy both the Client ID and Client Secret, and store these details securely for later use in the tenant configuration.

12. Edit the existing Credential Provider created in the previous steps.
* **Name** - Choose a user-friendly name.
* **Credential Type** - [OAuth 2.0 Authorization Code](/user-guide/access-policies/credential-providers/oauth-authorization-code)
* **Callback URL (Read-Only)** - An auto-generated Callback URL from Aembit Admin.
* **Client Id** - Provide the client ID copied from PagerDuty.
* **Client Secret** - Provide the client secret copied from PagerDuty.
* **Scopes** - Enter the scopes you use, space delimited. (e.g. `incidents.read abilities.read`).
* **OAuth URL** - `https://identity.pagerduty.com/global/oauth/anonymous/.well-known/openid-configuration`
Click on **URL Discovery** to populate the Authorization and Token URL fields. These fields need to be updated to the following values:
* **Authorization URL** - `https://identity.pagerduty.com/oauth/authorize`
* **Token URL** - `https://identity.pagerduty.com/oauth/token`
* **PKCE Required** - On
* **Lifetime** - 1 year (PagerDuty does not specify a refresh token lifetime; this value is recommended by Aembit.)
13. Click **Save** to save your changes on the Credential Provider.
14. In Aembit UI, click the **Authorize** button. You are then directed to a page where you can review the access request. Click **Accept** to complete the OAuth 2.0 Authorization Code flow. You should see a success page and be redirected to Aembit automatically. You can also verify that your flow is complete by checking the **State** value in the Credential Provider. After completion, it should be in a **Ready** state.

Caution
Once the set lifetime ends, the retrieved credential expires and no longer be active. Aembit will notify you before this happens. Please ensure you reauthorize your credential before it expires.
## OAuth 2.0 Client Credentials
[Section titled “OAuth 2.0 Client Credentials”](#oauth-20-client-credentials)
### Server Workload Configuration
[Section titled “Server Workload Configuration”](#server-workload-configuration-1)
1. Create a new Server Workload.
* **Name** - Choose a user-friendly name.
2. Configure the service endpoint:
* **Host** - `api.pagerduty.com`
* **Application Protocol** - HTTP
* **Port** - 443 with TLS
* **Forward to Port** - 443 with TLS
* **Authentication method** - HTTP Authentication
* **Authentication scheme** - Bearer
### Credential Provider Configuration
[Section titled “Credential Provider Configuration”](#credential-provider-configuration-1)
1. Log in to your [PagerDuty account](https://identity.pagerduty.com/global/authn/authentication/PagerDutyGlobalLogin/enter_email).
2. Navigate to the top menu, select **Integrations**, and then click on **App Registration**.

3. Click the **New App** button in the top right corner of the page.

4. Fill in the name and description fields, choose **OAuth 2.0**, and then click **Next** to proceed.
5. Select **Scoped OAuth** as the authorization method and choose the permissions (scopes) for your application based on your needs.
6. Before registering your app, scroll down and click **Copy to clipboard** to store your selected permission scopes for later use in the tenant configuration.

7. After making all of your selections, click on **Register App**.
8. A pop-up window appears. Copy both the Client ID and Client Secret, and store these details securely for later use in the tenant configuration.

9. Create a new Credential Provider.
* **Name** - Choose a user-friendly name.
* **Credential Type** - [OAuth 2.0 Client Credentials](/user-guide/access-policies/credential-providers/oauth-client-credentials)
* **Token endpoint** - `https://identity.pagerduty.com/oauth/token`
* **Client ID** - Provide the client ID copied from PagerDuty.
* **Client Secret** - Provide the client secret copied from PagerDuty.
* **Scopes** - Enter the scopes you use, space delimited. Must include the `as_account-` scope that identifies the PagerDuty account, using the format `{REGION}.{SUBDOMAIN}` (e.g. `as_account-us.dev-aembit incidents.read abilities.read`). For more detailed information, you can refer to the [official PagerDuty Developer Documentation](https://developer.pagerduty.com/docs/e518101fde5f3-obtaining-an-app-o-auth-token).
* **Credential Style** - POST Body
## Client Workload Configuration
[Section titled “Client Workload Configuration”](#client-workload-configuration)
Aembit now handles the credentials required to access the Server Workload, eliminating the need for you to manage them directly. You can safely remove any previously used credentials from the Client Workload.
If you access the Server Workload through an SDK or library, it is possible that the SDK/library may still require credentials to be present for initialization purposes. In this scenario, you can provide placeholder credentials. Aembit will overwrite these placeholder credentials with the appropriate ones during the access process.
## Access Policy
[Section titled “Access Policy”](#access-policy)
* Create an Access Policy for a Client Workload to access the PagerDuty Server Workload. Assign the newly created Credential Provider to this Access Policy.
## Required Features
[Section titled “Required Features”](#required-features)
* You will need to configure the [TLS Decrypt](/user-guide/deploy-install/advanced-options/tls-decrypt/configure-tls-decrypt) feature to work with the PagerDuty Server Workload.
# PayPal
> This page describes how to configure Aembit to work with the PayPal Server Workload.
#
[PayPal](https://www.paypal.com/) is an online payment platform that allows individuals and businesses to send and receive payments securely. PayPal supports various payment methods, including credit cards, debit cards, and bank transfers.
Below you can find the Aembit configuration required to work with the PayPal service as a Server Workload using the PayPal REST API.
## Prerequisites
[Section titled “Prerequisites”](#prerequisites)
Before proceeding with the configuration, you will need to have a PayPal Developer tenant (or [sign up](https://www.paypal.com/signin) for one).
## Server Workload Configuration
[Section titled “Server Workload Configuration”](#server-workload-configuration)
1. Create a new Server Workload.
* **Name** - Choose a user-friendly name.
2. Configure the service endpoint:
* **Host** - `api-m.sandbox.paypal.com` (Sandbox) or `api-m.paypal.com` (Live)
* **Application Protocol** - HTTP
* **Port** - 443 with TLS
* **Forward to Port** - 443 with TLS
* **Authentication method** - HTTP Authentication
* **Authentication scheme** - Bearer
## Credential Provider Configuration
[Section titled “Credential Provider Configuration”](#credential-provider-configuration)
1. Log into the [PayPal Developer Dashboard](https://developer.paypal.com/dashboard/) using your PayPal account credentials.
2. Navigate to the [Apps & Credentials](https://developer.paypal.com/dashboard/applications/) page from the top menu.
3. Ensure you are in the correct mode (Sandbox mode for test data or Live mode for production data).
4. Locate the **Default Application** under the REST API apps list.
5. Click the copy buttons next to the **Client ID** and **Client Secret** values to copy them. Store these details securely for later use in the tenant configuration.

6. Create a new Credential Provider.
* **Name** - Choose a user-friendly name.
* **Credential Type** - [OAuth 2.0 Client Credentials](/user-guide/access-policies/credential-providers/oauth-client-credentials)
* **Token endpoint** - `https://api-m.sandbox.paypal.com/v1/oauth2/token` (Sandbox) or `https://api-m.paypal.com/v1/oauth2/token` (Live)
* **Client ID** - Provide the client ID copied from PayPal.
* **Client Secret** - Provide the client secret copied from PayPal.
* **Scopes** - You can leave this field **empty**, as PayPal will default to the necessary scopes, or specify the required scopes based on your needs, such as `https://uri.paypal.com/services/invoicing`. For more detailed information, you can refer to the [official PayPal Developer Documentation](https://developer.paypal.com/api/rest/authentication/).
## Client Workload Configuration
[Section titled “Client Workload Configuration”](#client-workload-configuration)
Aembit now handles the credentials required to access the Server Workload, eliminating the need for you to manage them directly. You can safely remove any previously used credentials from the Client Workload.
If you access the Server Workload through an SDK or library, it is possible that the SDK/library may still require credentials to be present for initialization purposes. In this scenario, you can provide placeholder credentials. Aembit will overwrite these placeholder credentials with the appropriate ones during the access process.
## Access Policy
[Section titled “Access Policy”](#access-policy)
* Create an access policy for a Client Workload to access the PayPal Server Workload and assign the newly created Credential Provider to it.
## Required Features
[Section titled “Required Features”](#required-features)
* You will need to configure the [TLS Decrypt](/user-guide/deploy-install/advanced-options/tls-decrypt/configure-tls-decrypt) feature to work with the PayPal Server Workload.
# Salesforce REST
> This page describes how to configure Aembit to work with the Salesforce REST Server Workload.
#
[Salesforce](https://www.salesforce.com/) is a cloud-based platform that helps businesses manage customer relationships, sales, and services. It supports integration with various tools and offers customization to fit different business needs.
Below you can find the Aembit configuration required to work with the Salesforce service as a Server Workload using the Salesforce REST API.
Prerequisites
Before proceeding with the configuration, ensure you have the following:
* Salesforce account.
* A connected app on Salesforce. If you have not set up an app yet, follow the steps in the next section.
### Salesforce App Configuration
[Section titled “Salesforce App Configuration”](#salesforce-app-configuration)
1. Log in to your [Salesforce account](https://login.salesforce.com/).
2. In the upper-right corner of any page, click the cog icon and then click **Setup**.
3. In the search box at the top of the Setup page, type **App Manager** and select it from the search results.
4. Click the **New Connected App** button in the top-right corner of the page.
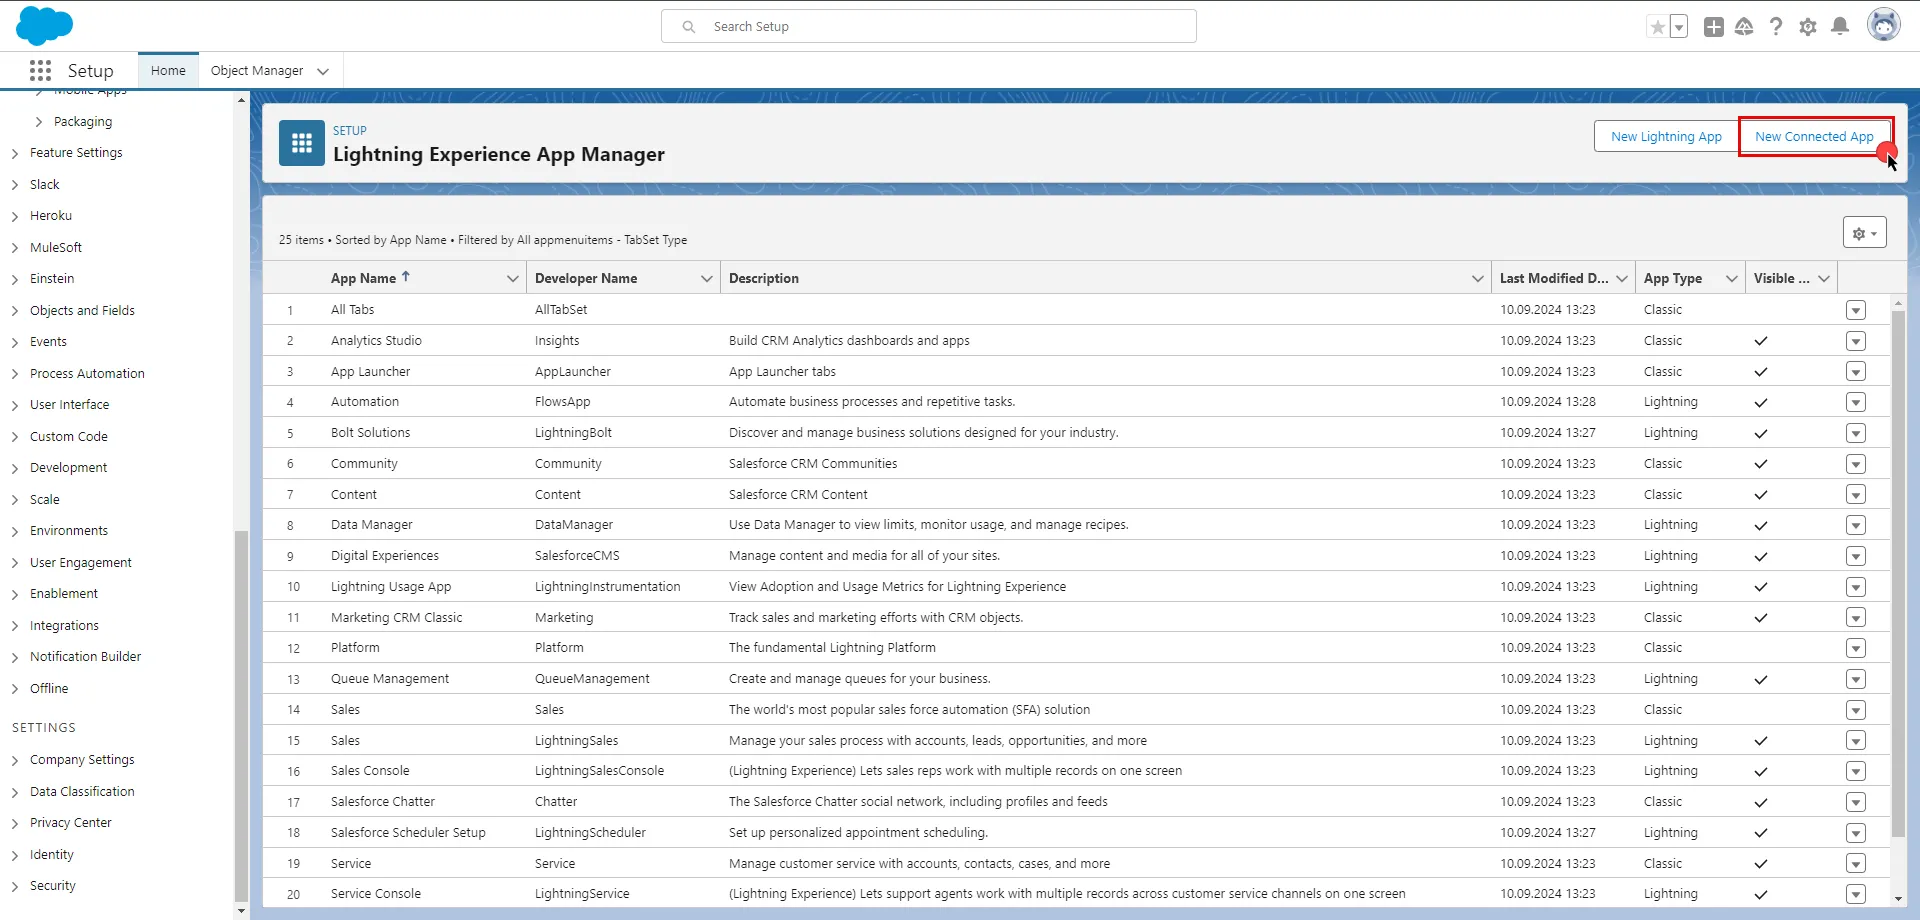
5. Configure the app based on your preferences. Below are key choices:
* Provide a name for your connected app. The API Name will be auto-generated based on the app name, but you can edit it if needed. Enter a valid email address in the **Contact Email** field. The other fields under the Basic Information section are optional.
* Check the **Enable OAuth Settings** box.
* Enter a placeholder URL such as `https://aembit.io` in the Callback URL field to pass the required check. (This field will not be used for the Client Credentials Flow.)
* Select the necessary **OAuth Scopes** for your application based on your needs.
* Uncheck the **Proof Key for Code Exchange**, **Require Secret for Web Server Flow**, and **Require Secret for Refresh Token Flow** boxes.
* Check the **Enable Client Credentials Flow** box. When the pop-up window appears, click **OK** to proceed.
* Scroll down and click **Save**.
* Click **Continue** to complete the app creation process. 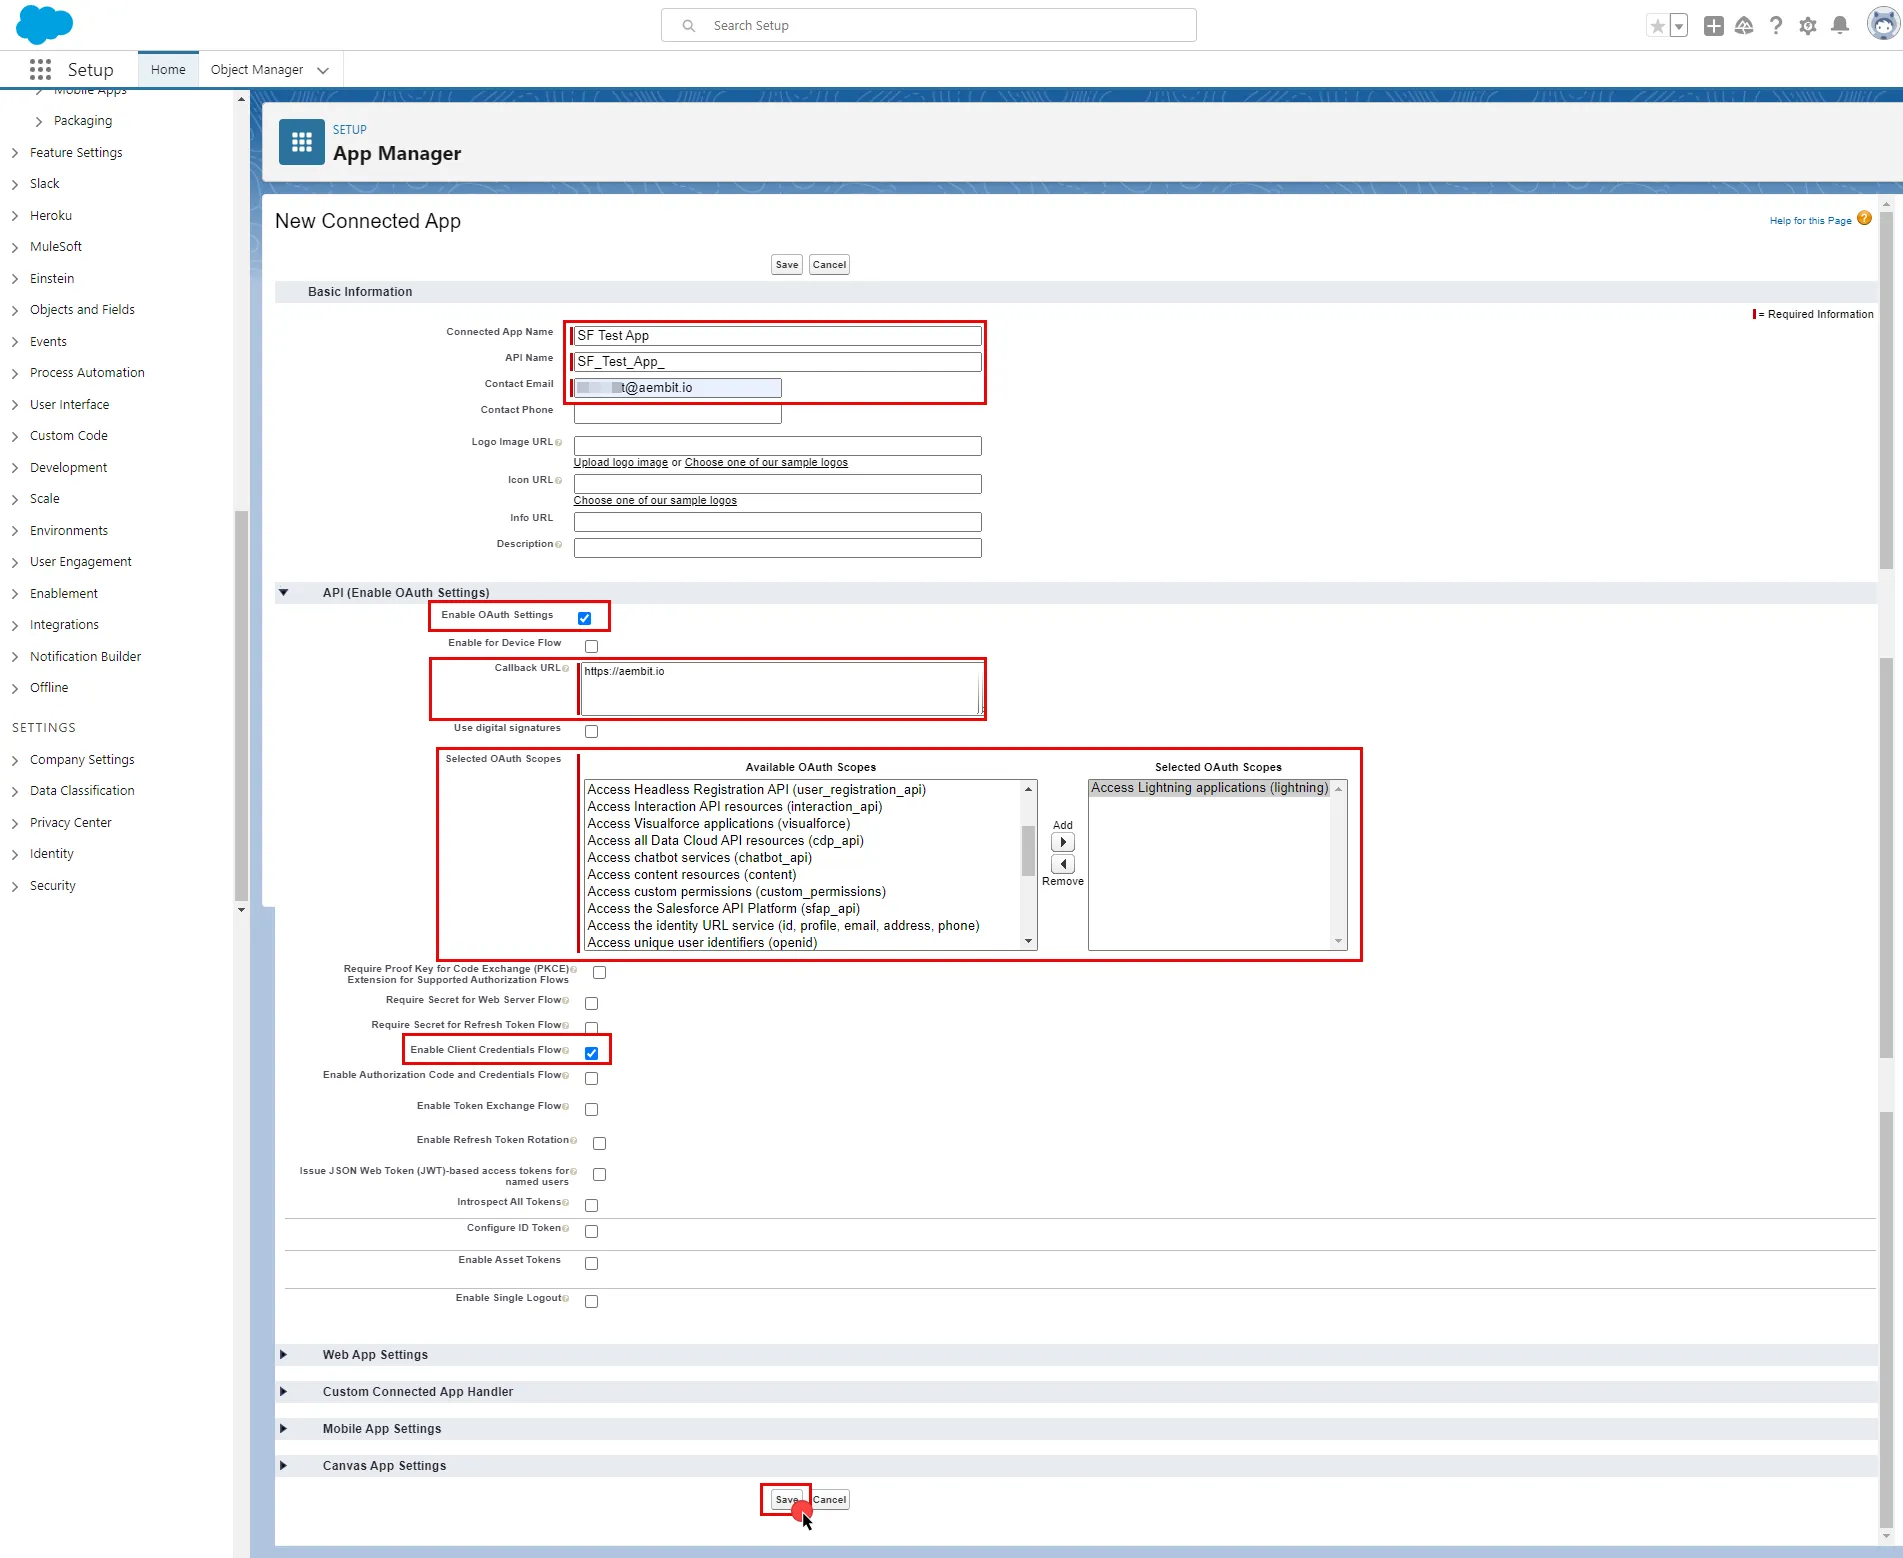
Note
Salesforce requires an execution user to be designated, allowing the platform to generate access tokens for the chosen user.
6. On the Connected App Detail page of your newly created app, click the **Manage** button, and then click **Edit Policies**.
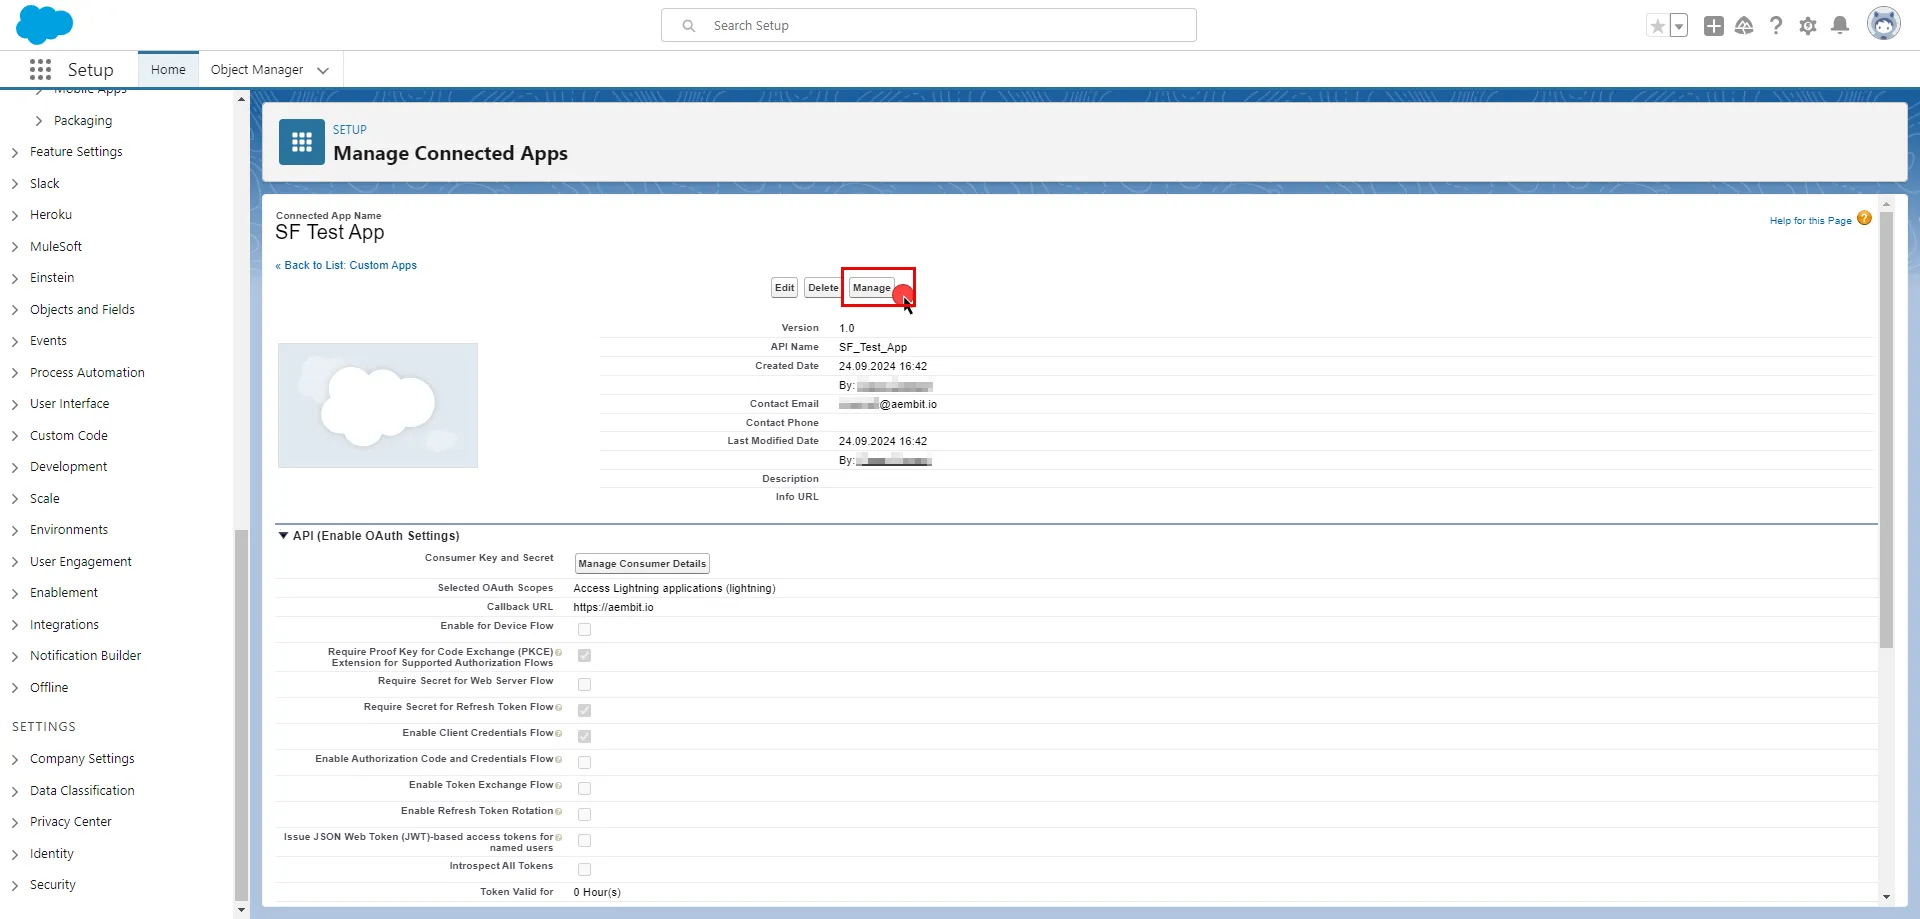
7. In the Client Credentials Flow section, click the magnifying glass icon next to the **Run As** field.
8. Select the user you want to designate from the pop-up window and click **Save**.
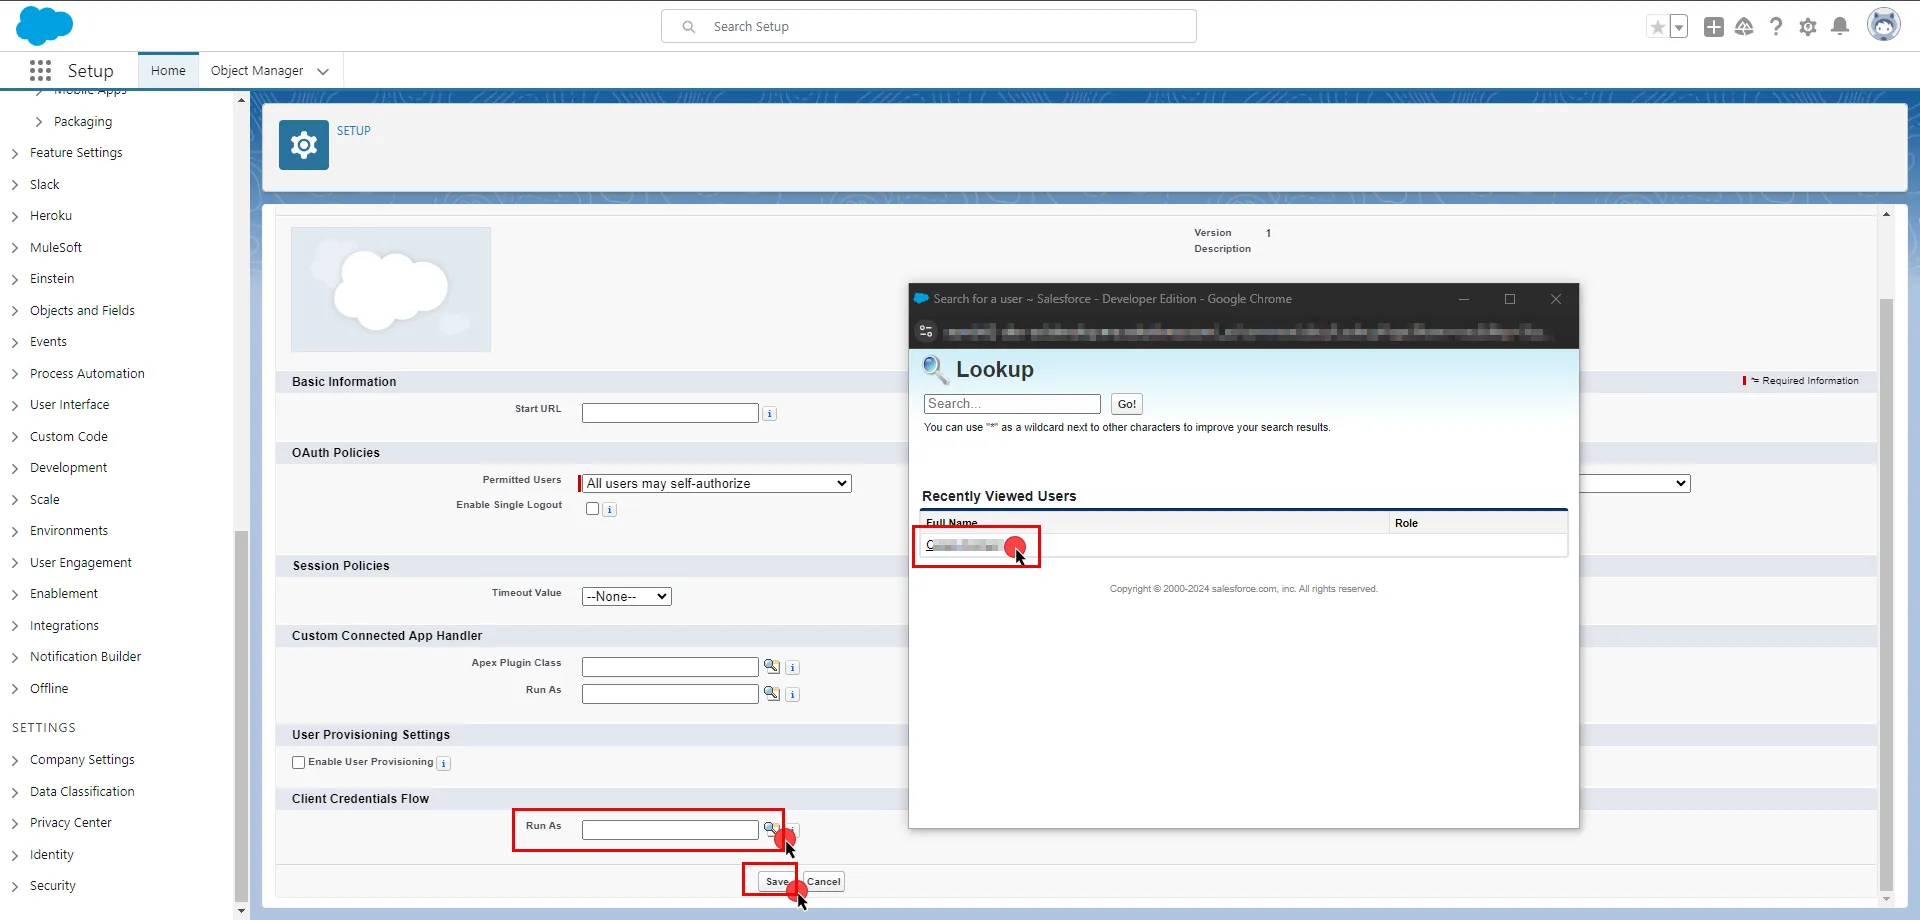
For detailed information on the OAuth 2.0 Client Credentials Flow on Salesforce, please refer to the [official Salesforce documentation](https://help.salesforce.com/s/articleView?id=sf.remoteaccess_oauth_client_credentials_flow.htm\&type=5).
## Server Workload Configuration
[Section titled “Server Workload Configuration”](#server-workload-configuration)
To retrieve connection information in Salesforce:
* Click on your profile photo in the upper-right corner of any page. The endpoint appears in the dropdown menu under your username; copy the endpoint.
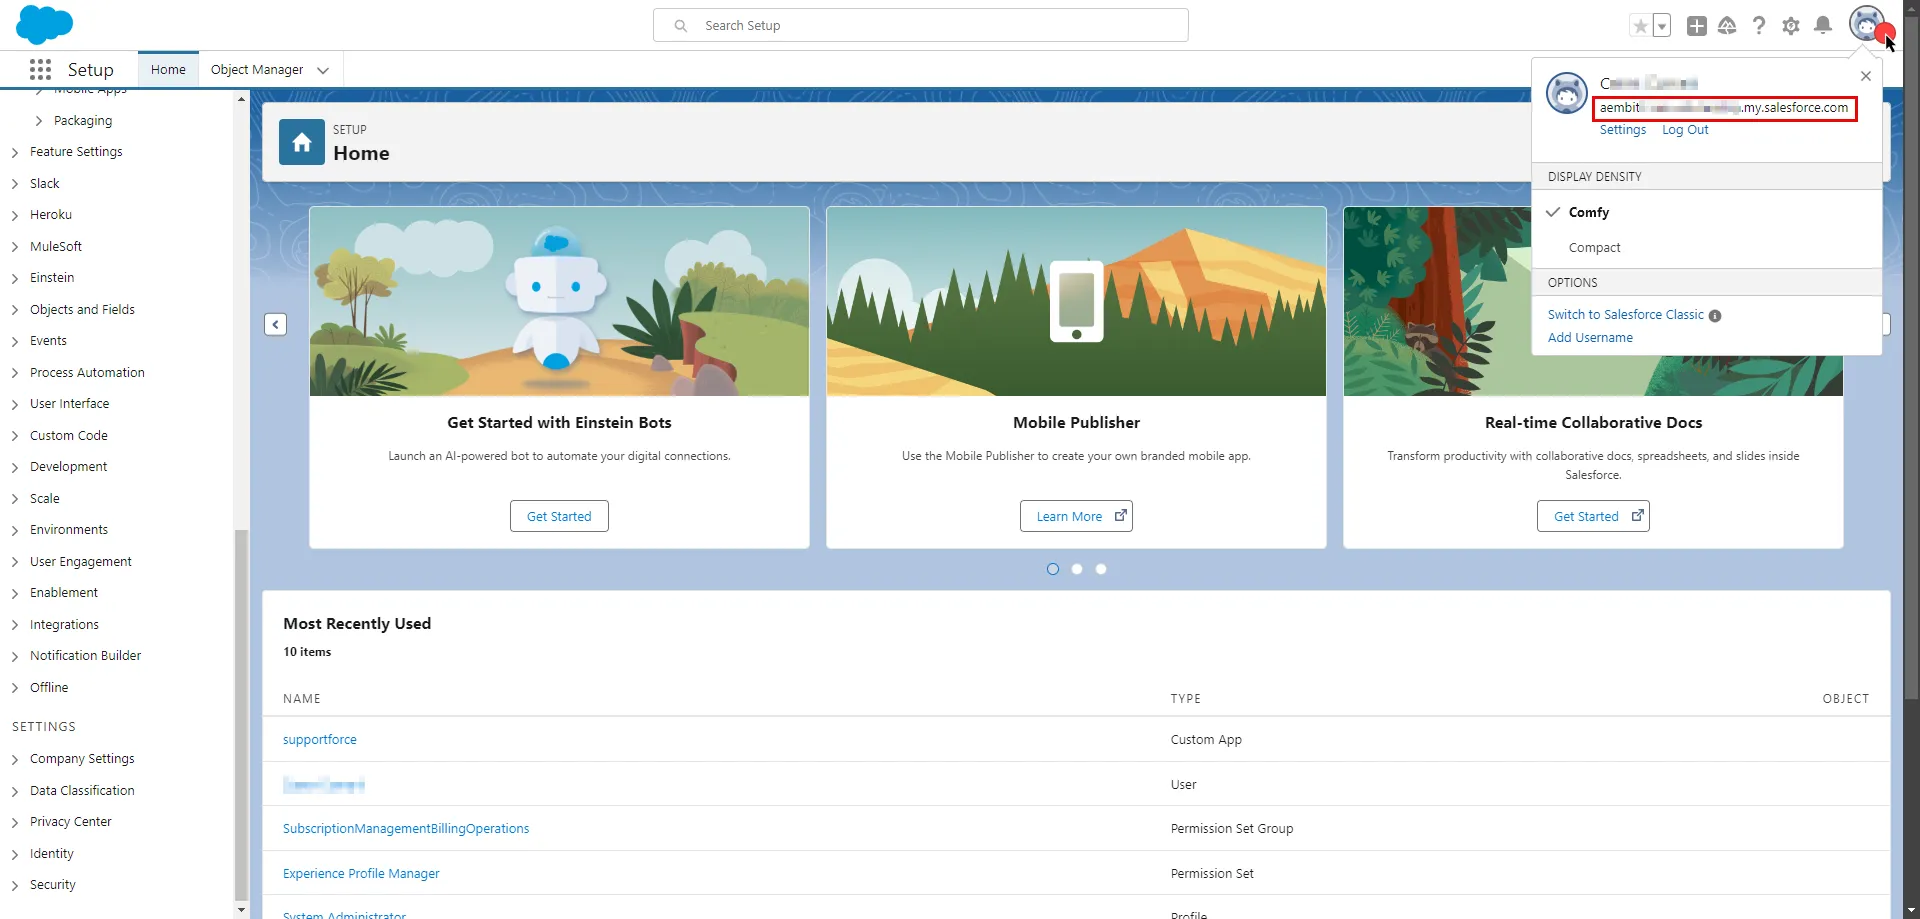
1. Create a new Server Workload.
* **Name** - Choose a user-friendly name.
2. Configure the service endpoint:
* **Host** - `.my.salesforce.com` (Provide the endpoint copied from Salesforce)
* **Application Protocol** - HTTP
* **Port** - 443
* **Forward to Port** - 443 with TLS
* **Authentication method** - HTTP Authentication
* **Authentication scheme** - Bearer
## Credential Provider Configuration
[Section titled “Credential Provider Configuration”](#credential-provider-configuration)
1. Log in to your [Salesforce account](https://login.salesforce.com/).
2. In the upper-right corner of any page, click the cog icon and then click **Setup**.

3. In the search box at the top of the Setup page, type **App Manager** and select it from the search results to view your newly created app.
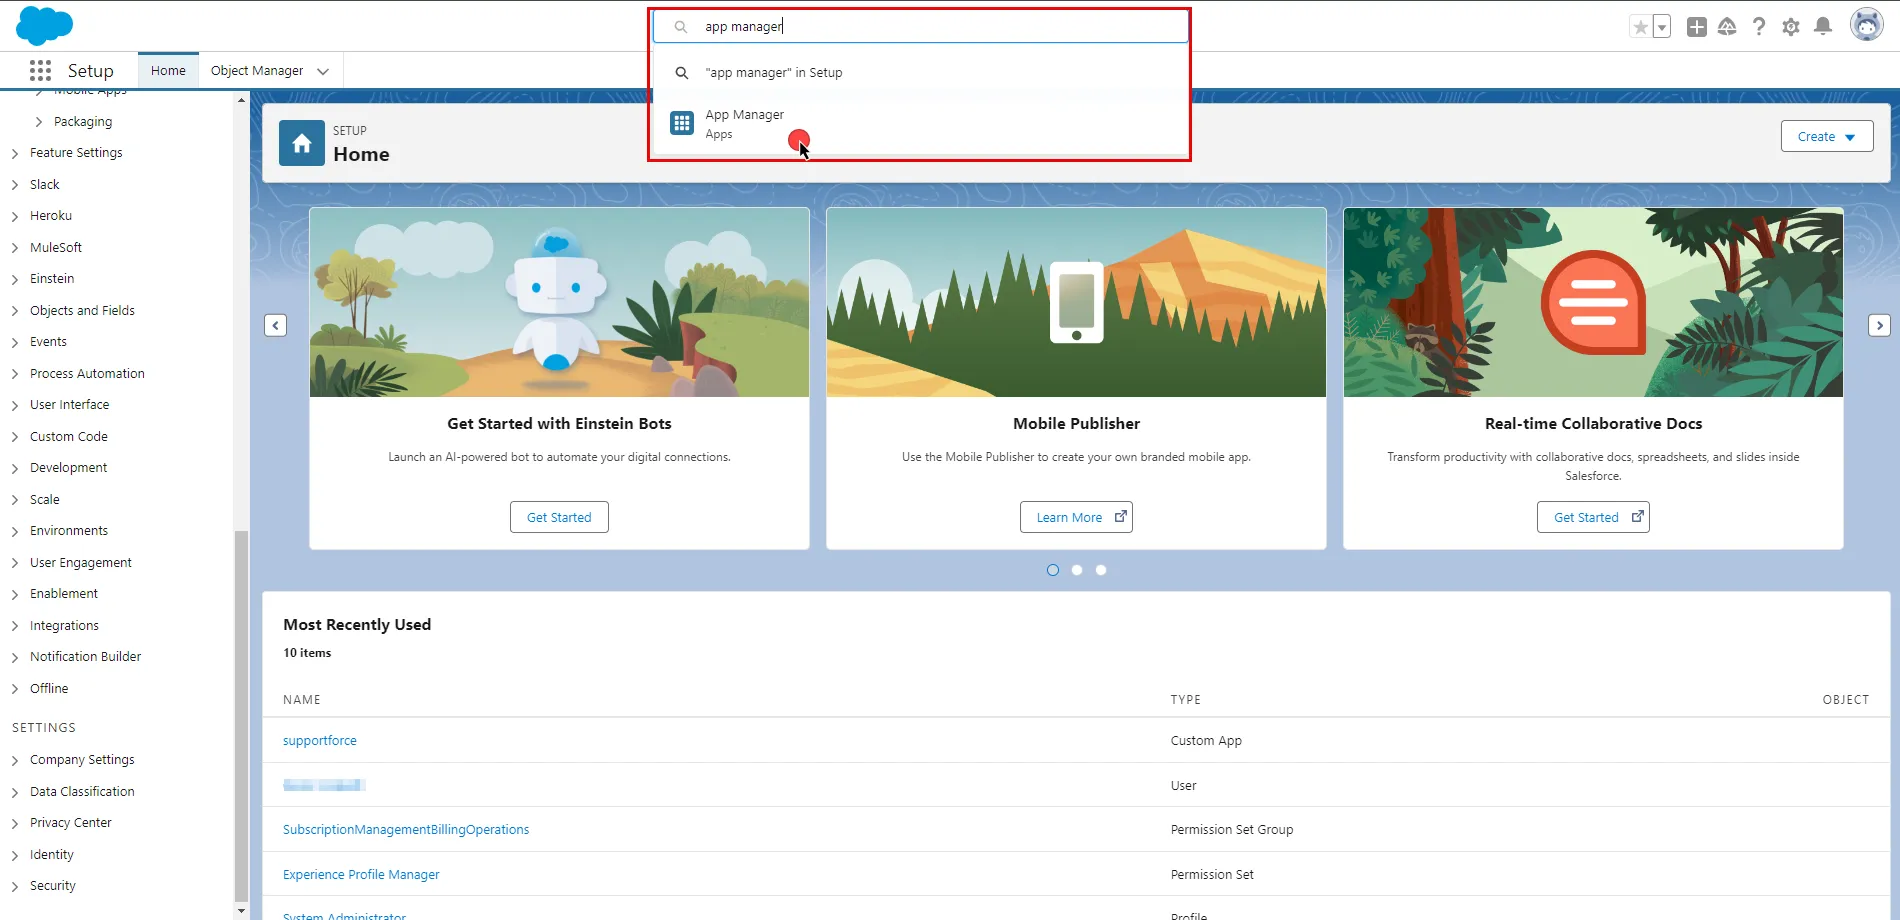
4. Scroll down the list, find your app, click the icon at the end of the row, and select **View** from the dropdown menu.
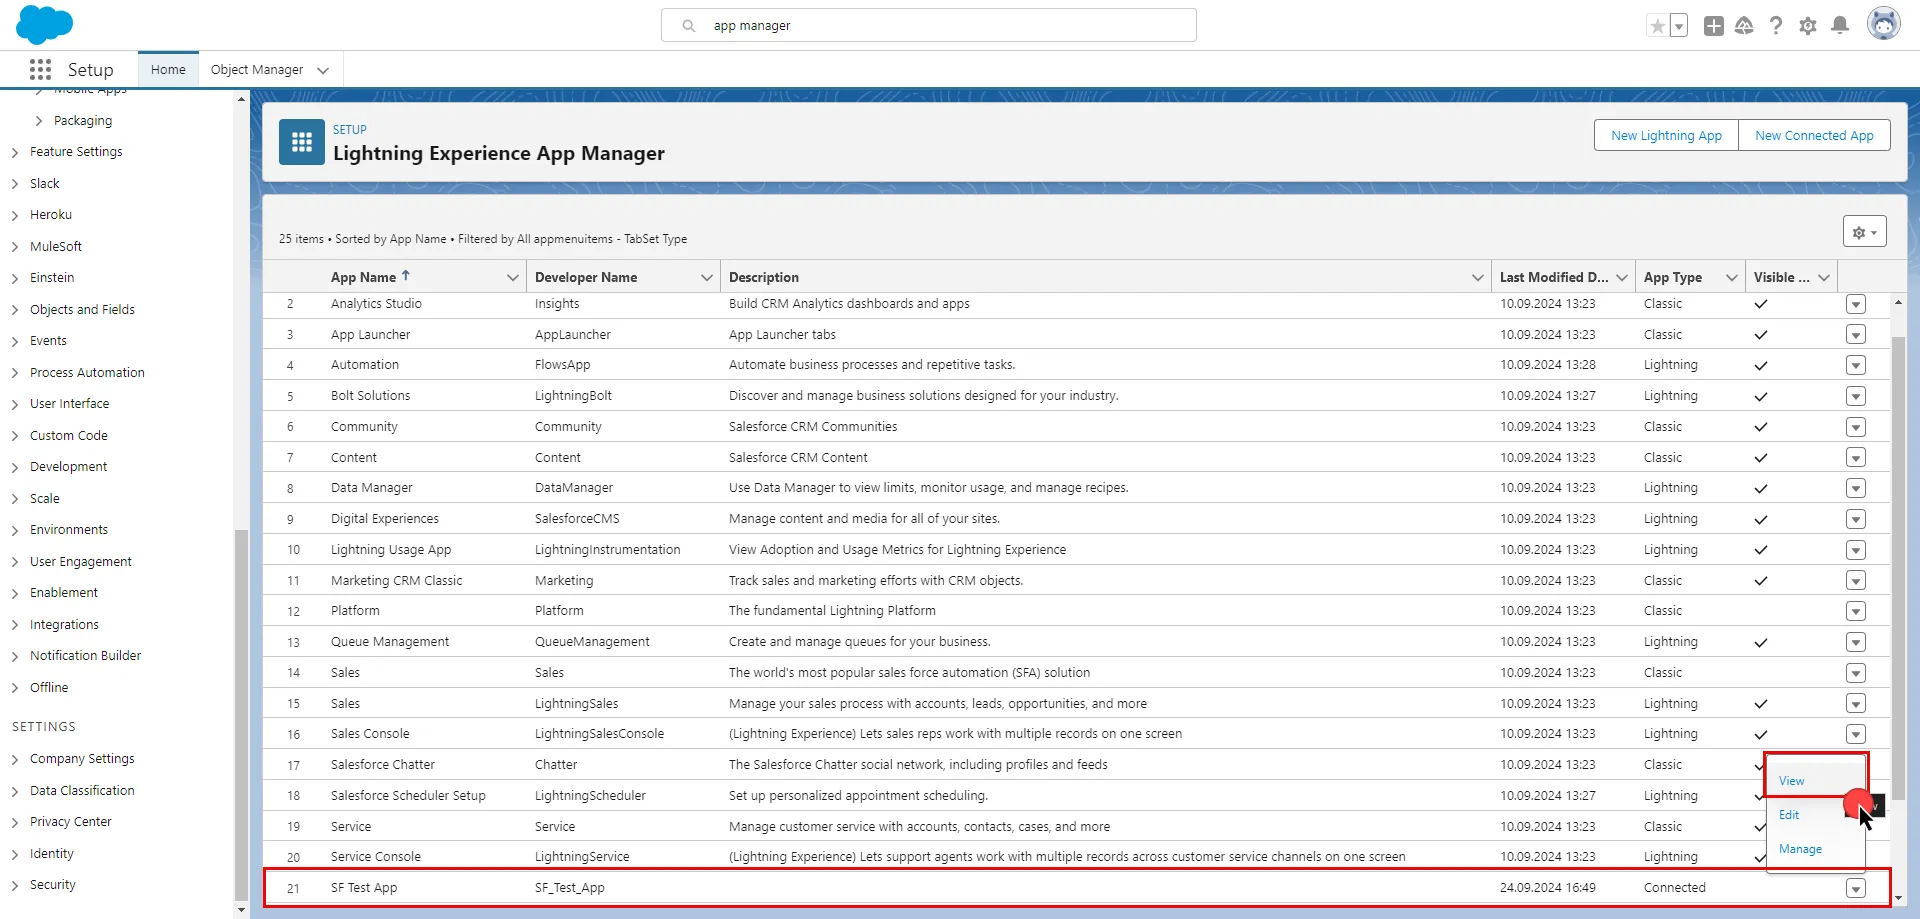
5. Click the **Manage Consumer Details** button. Salesforce will ask you to verify your identity.
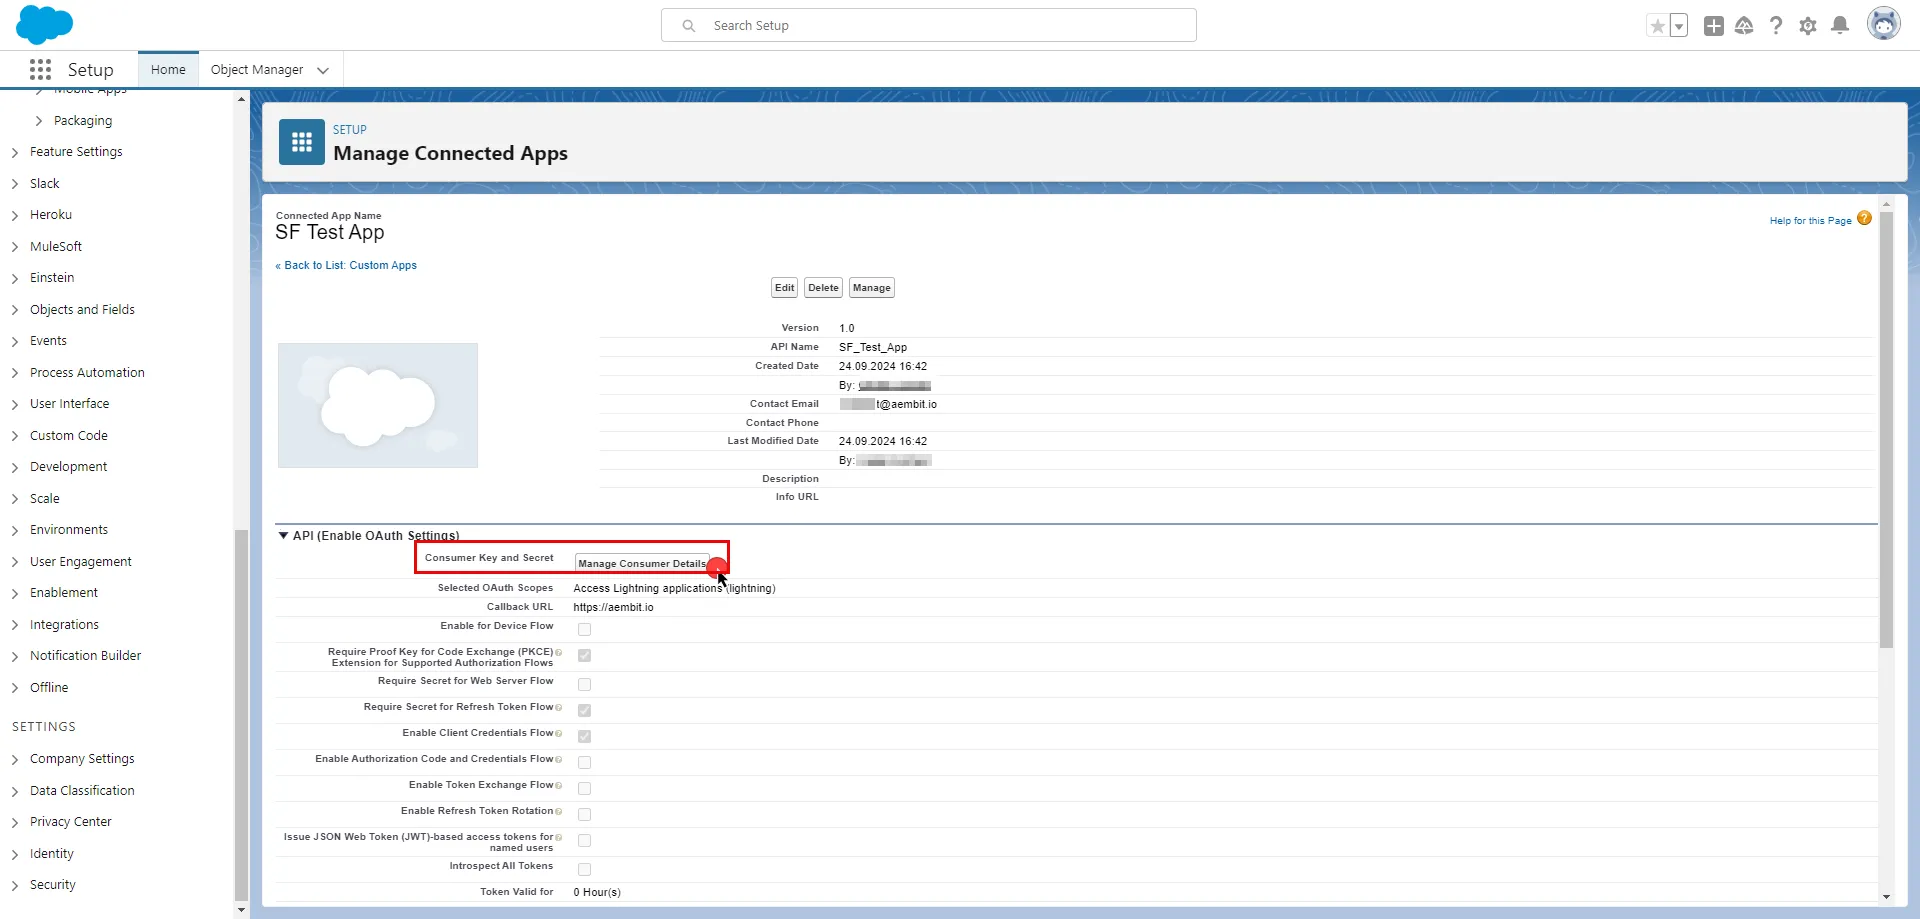
6. After verifying your identity, on the opened page, copy both the **Consumer Key** and **Consumer Secret**, and store these details securely for later use in the tenant configuration.
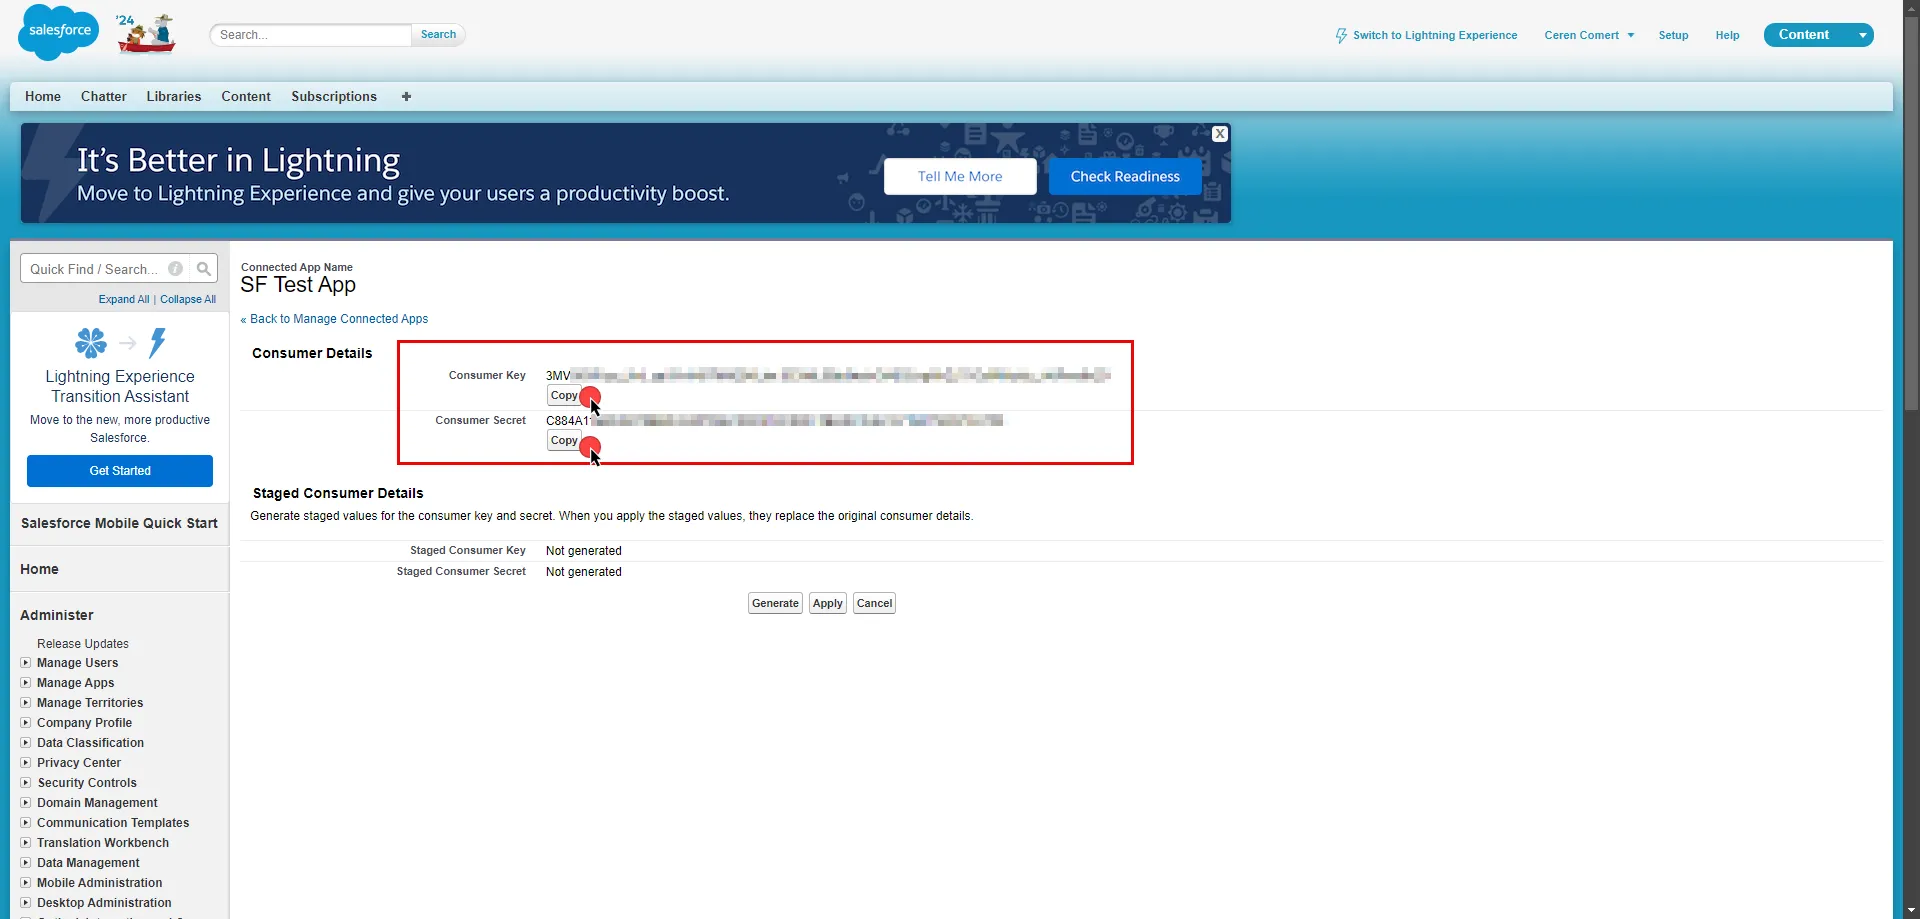
7. Create a new Credential Provider.
* **Name** - Choose a user-friendly name.
* **Credential Type** - [OAuth 2.0 Client Credentials](/user-guide/access-policies/credential-providers/oauth-client-credentials)
* **Token endpoint** - `https://.my.salesforce.com/services/oauth2/token`
* **Client ID** - Provide the Consumer Key copied from Salesforce.
* **Client Secret** - Provide the Consumer Secret copied from Salesforce.
* **Scopes** - You can leave this field empty, as Salesforce will default to your selected scopes for the app.
* **Credential Style** - Authorization Header
## Client Workload Configuration
[Section titled “Client Workload Configuration”](#client-workload-configuration)
Aembit now handles the credentials required to access the Server Workload, eliminating the need for you to manage them directly. You can safely remove any previously used credentials from the Client Workload.
If you access the Server Workload through an SDK or library, it is possible that the SDK/library may still require credentials to be present for initialization purposes. In this scenario, you can provide placeholder credentials. Aembit will overwrite these placeholder credentials with the appropriate ones during the access process.
## Access Policy
[Section titled “Access Policy”](#access-policy)
* Create an Access Policy for a Client Workload to access the Salesforce Server Workload. Assign the newly created Credential Provider to this Access Policy.
# Sauce Labs
> This page describes how to configure Aembit to work with the Sauce Labs Server Workload.
#
[Sauce Labs](https://saucelabs.com/) is a comprehensive cloud-based testing platform designed to facilitate the automation and execution of web and mobile application tests. It supports a wide range of browsers, operating systems, and devices, ensuring thorough and efficient testing processes.
Below you can find the Aembit configuration required to work with the Sauce Labs as a Server Workload using the Sauce REST APIs.
Prerequisites
Before proceeding with the configuration, you will need to have a Sauce Labs tenant.
## Server Workload Configuration
[Section titled “Server Workload Configuration”](#server-workload-configuration)
1. Create a new Server Workload.
* **Name** - Choose a user-friendly name.
2. Configure the service endpoint:
* **Host** - Use the appropriate endpoint for your data center:
* `api.us-west-1.saucelabs.com` for US West
* `api.us-east-4.saucelabs.com` for US East
* `api.eu-central-1.saucelabs.com` for Europe
* **Application Protocol** - HTTP
* **Port** - 443 with TLS
* **Forward to Port** - 443 with TLS
* **Authentication method** - HTTP Authentication
* **Authentication scheme** - Basic
## Credential Provider Configuration
[Section titled “Credential Provider Configuration”](#credential-provider-configuration)
1. Sign into your Sauce Labs account.
2. In the upper-right corner of any page, click the user icon and select **User Settings**.
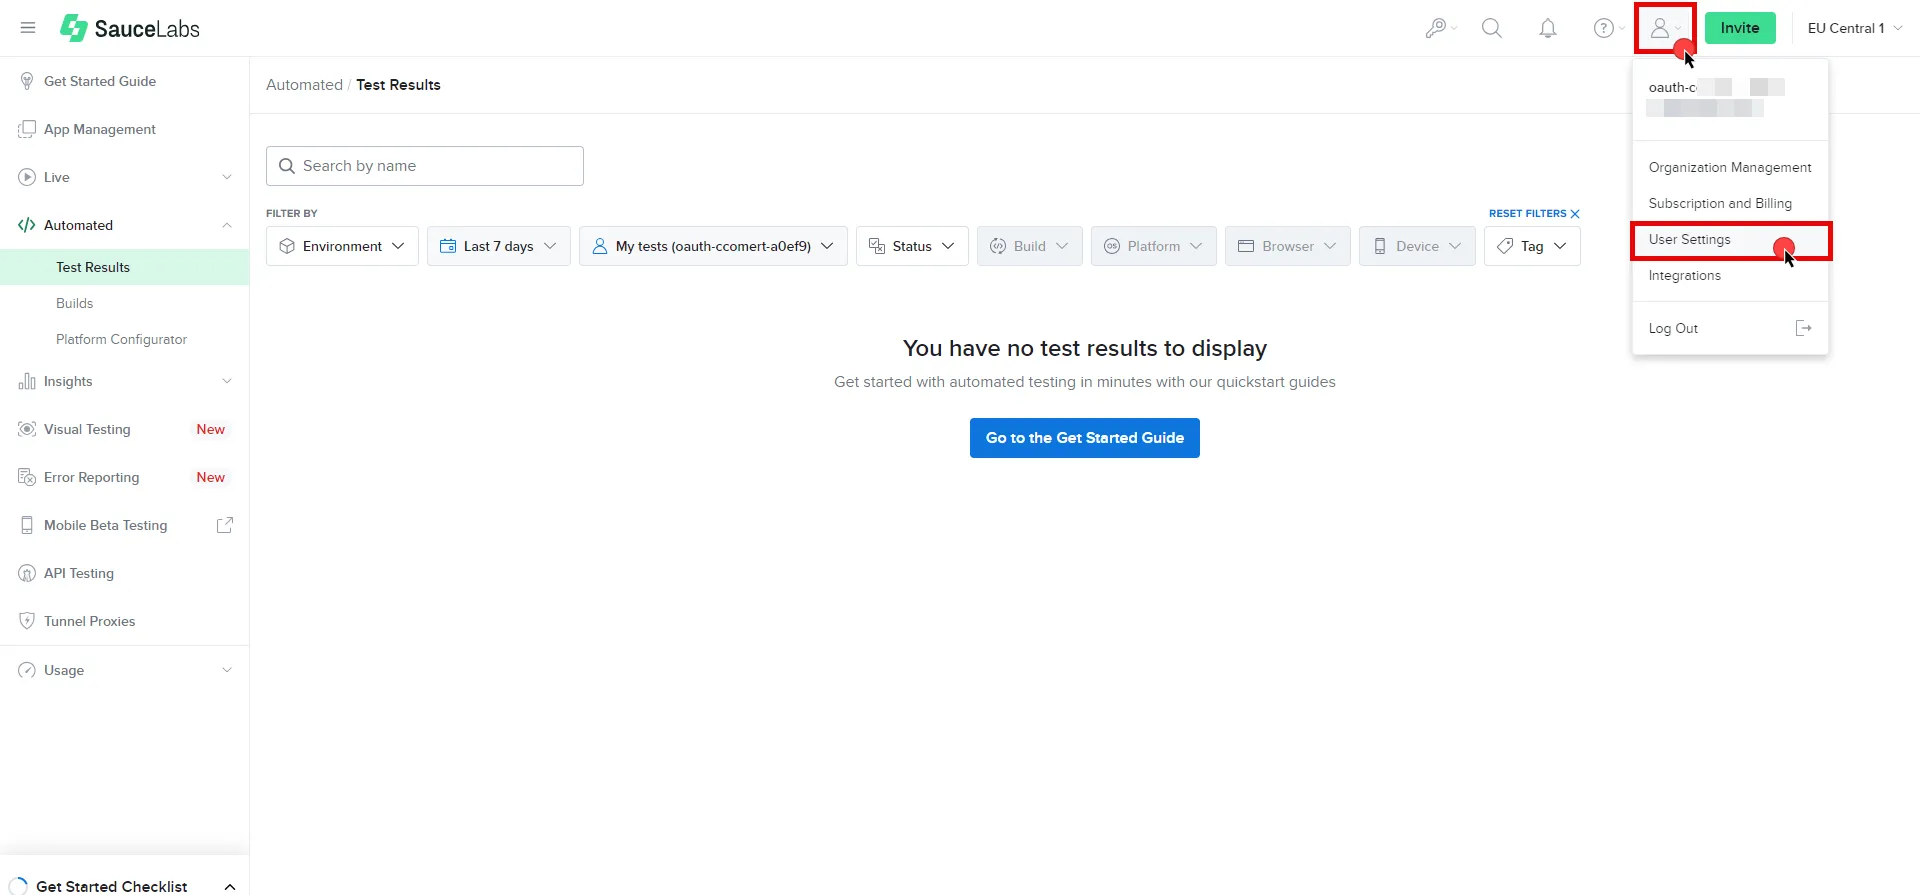
3. Under User Information, copy the **User Name**. Scroll down the page and under the Access Key section, click **Copy to clipboard** to copy the **Access Key**. Securely store both values for later use in the tenant configuration. For more information on authentication, please refer to the [official Sauce Labs documentation](https://docs.saucelabs.com/dev/api/#authentication).
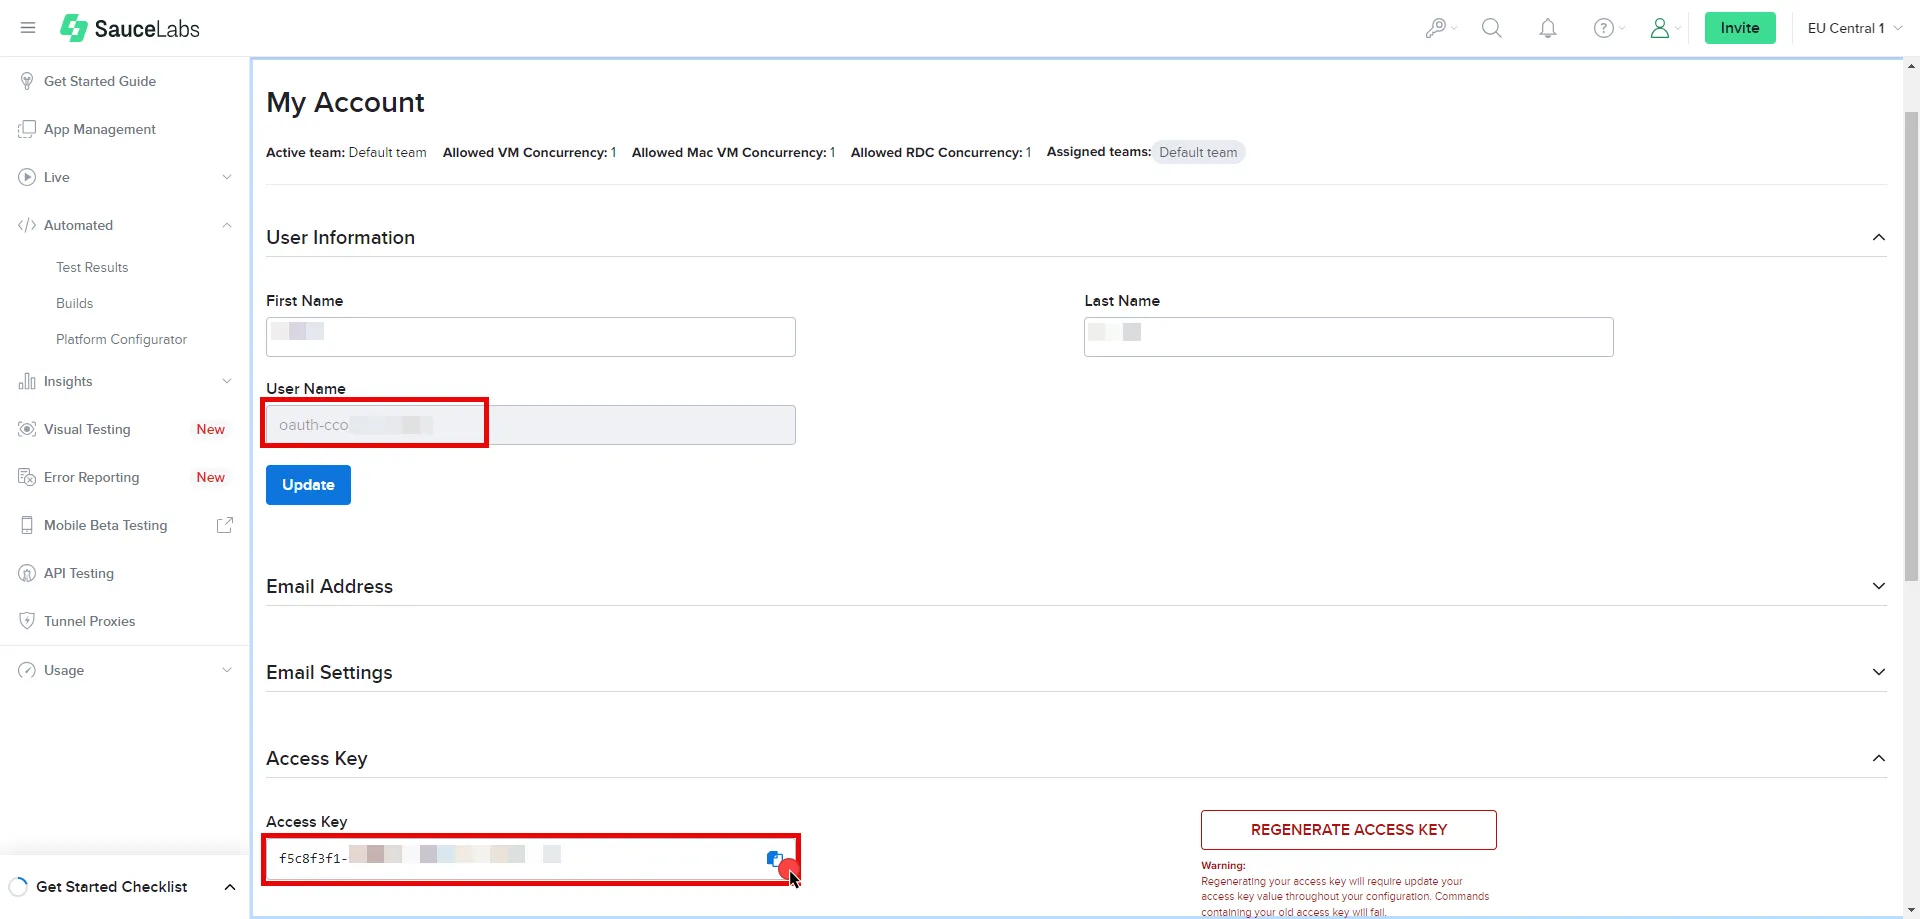
4. Create a new Credential Provider.
* **Name** - Choose a user-friendly name.
* **Credential Type** - [Username & Password](/user-guide/access-policies/credential-providers/username-password)
* **Username** - Provide the User Name copied from Sauce Labs.
* **Password** - Provide the Access Key copied from Sauce Labs.
## Client Workload Configuration
[Section titled “Client Workload Configuration”](#client-workload-configuration)
Aembit now handles the credentials required to access the Server Workload, eliminating the need for you to manage them directly. You can safely remove any previously used credentials from the Client Workload.
If you access the Server Workload through an SDK or library, it is possible that the SDK/library may still require credentials to be present for initialization purposes. In this scenario, you can provide placeholder credentials. Aembit will overwrite these placeholder credentials with the appropriate ones during the access process.
## Access Policy
[Section titled “Access Policy”](#access-policy)
* Create an Access Policy for a Client Workload to access the Sauce Labs Server Workload. Assign the newly created Credential Provider to this Access Policy.
## Required Features
[Section titled “Required Features”](#required-features)
* You will need to configure the [TLS Decrypt](/user-guide/deploy-install/advanced-options/tls-decrypt/configure-tls-decrypt) feature to work with the Sauce Labs Server Workload.
# Slack
> This page describes how to configure Aembit to work with the Slack Server Workload.
#
[Slack](https://slack.com/) is a cloud-based collaboration platform designed to enhance communication and teamwork within organizations. Slack offers channels for structured discussions, direct messaging, and efficient file sharing. With support for diverse app integrations, Slack serves as a centralized hub for streamlined workflows and improved team collaboration.
Below you can find the Aembit configuration required to work with the Slack service as a Server Workload using the Slack apps and APIs.
Aembit supports multiple authentication/authorization methods for Slack. This page describes scenarios where the Credential Provider is configured for Slack via:
* [OAuth 2.0 Authorization Code (3LO)](/user-guide/access-policies/server-workloads/guides/slack#oauth-20-authorization-code)
* [API Key](/user-guide/access-policies/server-workloads/guides/slack#api-key)
Prerequisites
Before proceeding with the configuration, ensure you have a Slack workspace and a Slack App with the necessary scopes. If you have not set up a Slack App yet, follow the steps under the Credential Provider configuration in the flow you will use. For detailed information on Slack Apps, please refer to the [official Slack documentation](https://api.slack.com/start/apps).
## OAuth 2.0 Authorization Code
[Section titled “OAuth 2.0 Authorization Code”](#oauth-20-authorization-code)
### Server Workload Configuration
[Section titled “Server Workload Configuration”](#server-workload-configuration)
1. Create a new Server Workload.
* **Name** - Choose a user-friendly name.
2. Configure the service endpoint:
* **Host** - `slack.com`
* **Application Protocol** - HTTP
* **Port** - 443 with TLS
* **Forward to Port** - 443 with TLS
* **Authentication method** - HTTP Authentication
* **Authentication scheme** - Bearer
### Credential Provider Configuration
[Section titled “Credential Provider Configuration”](#credential-provider-configuration)
1. Sign in to your Slack account.
2. Navigate to the [Slack - Your Apps](https://api.slack.com/apps) page.
3. Click on **Create an App**.

4. In the dialog that appears, choose **From Scratch**. Enter an App Name and select a workspace to develop your app in.
5. Click **Create** to proceed.
6. After the app is created, navigate to your app’s main page. Scroll down to the **App Credentials** section, and copy both the **Client ID** and the **Client Secret**. Store them for later use in the tenant configuration.
7. Scroll up to the **Add features and functionality** section, and click **Permissions**.
8. Switch to the Aembit UI to create a new Credential Provider, selecting the OAuth 2.0 Authorization Code credential type. After setting up the Credential Provider, copy the auto-generated **Callback URL**.
9. Return to Slack, under **Redirect URLs**, click **Add New Redirect URL**, paste in the URL, click **Add**, and then click **Save URLs**.
10. In the **Scopes** section, under the **Bot Token Scopes**, click **Add an OAuth Scope** to add the necessary scopes for your application.
11. Scroll up to the **Advanced token security via token rotation** section, and click **Opt In**.
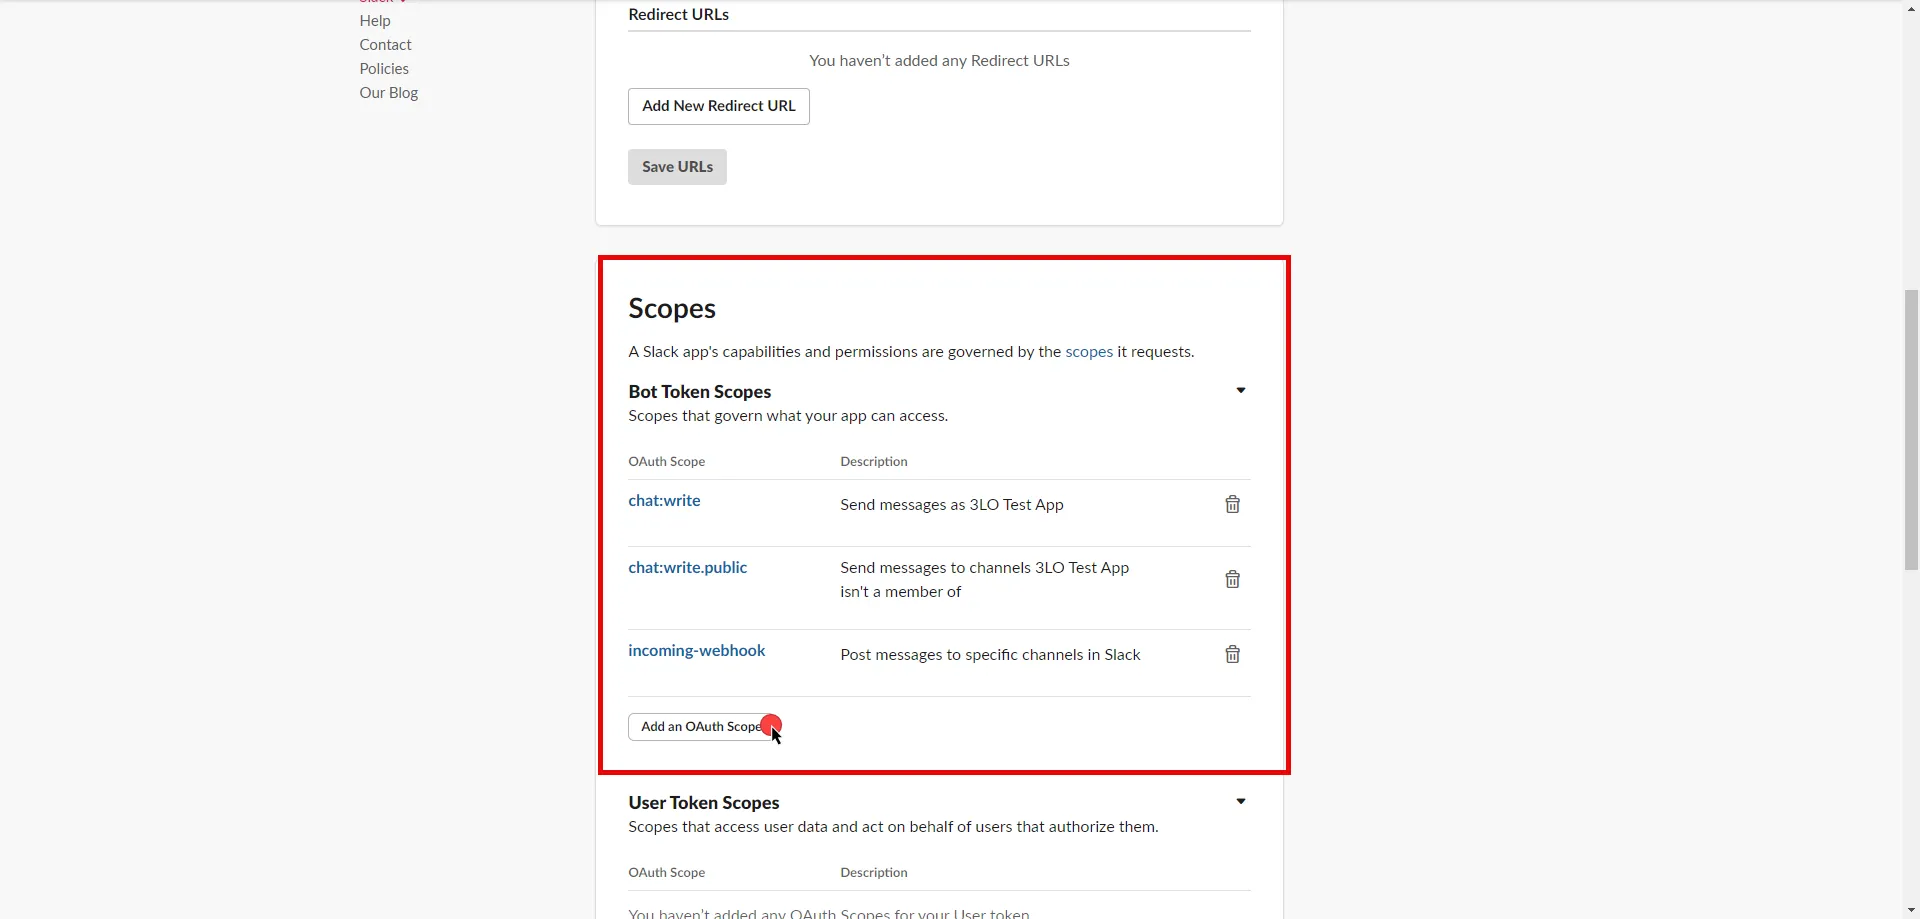
12. Edit the existing Credential Provider created in the previous steps.
* **Name** - Choose a user-friendly name.
* **Credential Type** - [OAuth 2.0 Authorization Code](/user-guide/access-policies/credential-providers/oauth-authorization-code)
* **Callback URL (Read-Only)** - An auto-generated Callback URL from Aembit Admin.
* **Client Id** - Provide the Client ID copied from Slack.
* **Client Secret** - Provide the Secret copied from Slack.
* **Scopes** - Enter the scopes you use, space delimited. A full list of Slack Scopes can be found in the [official Slack documentation](https://api.slack.com/scopes?filter=granular_bot).
* **OAuth URL** - `https://slack.com`
Click on **URL Discovery** to populate the Authorization and Token URL fields. These fields will need to be updated to the following values:
* **Authorization URL** - `https://slack.com/oauth/v2/authorize`
* **Token URL** - `https://slack.com/api/oauth.v2.access`
* **PKCE Required** - Off (PKCE is not supported by Slack, so leave this field unchecked).
* **Lifetime** - 1 year (Slack does not specify a refresh token lifetime; this value is recommended by Aembit.)
13. Click **Save** to save your changes on the Credential Provider.
14. In Aembit UI, click the **Authorize** button. You will be directed to a page where you can review the access request. Click **Allow** to complete the OAuth 2.0 Authorization Code flow. You will see a success page and will be redirected to Aembit automatically. You can also verify your flow is complete by checking the **State** value in the Credential Provider. After completion, it should be in a **Ready** state.

Caution
Once the set lifetime ends, the retrieved credential will expire and no longer be active. Aembit will notify you before this happens. Please ensure you reauthorize your credential before it expires.
## API Key
[Section titled “API Key”](#api-key)
### Server Workload Configuration
[Section titled “Server Workload Configuration”](#server-workload-configuration-1)
1. Create a new Server Workload.
* **Name** - Choose a user-friendly name.
2. Configure the service endpoint:
* **Host** - `slack.com`
* **Application Protocol** - HTTP
* **Port** - 443 with TLS
* **Forward to Port** - 443 with TLS
* **Authentication method** - HTTP Authentication
* **Authentication scheme** - Bearer
### Credential Provider Configuration
[Section titled “Credential Provider Configuration”](#credential-provider-configuration-1)
1. Sign in to your Slack account.
2. Navigate to the [Slack - Your Apps](https://api.slack.com/apps) page.
3. Click on **Create an App**.

4. In the dialog that appears, choose either **From Scratch** or **From App Manifest**.
5. Depending on your selection, enter an App Name and select a workspace to develop your app in.
6. Click **Create** to proceed.
7. After the app is created, navigate to your app’s main page. Select and customize the necessary tools for your app under the **Add features and functionality** section.
8. Proceed to the installation section and click **Install to Workspace**. You will be redirected to a page where you can choose a channel for your app’s functionalities. After choosing, click **Allow**.
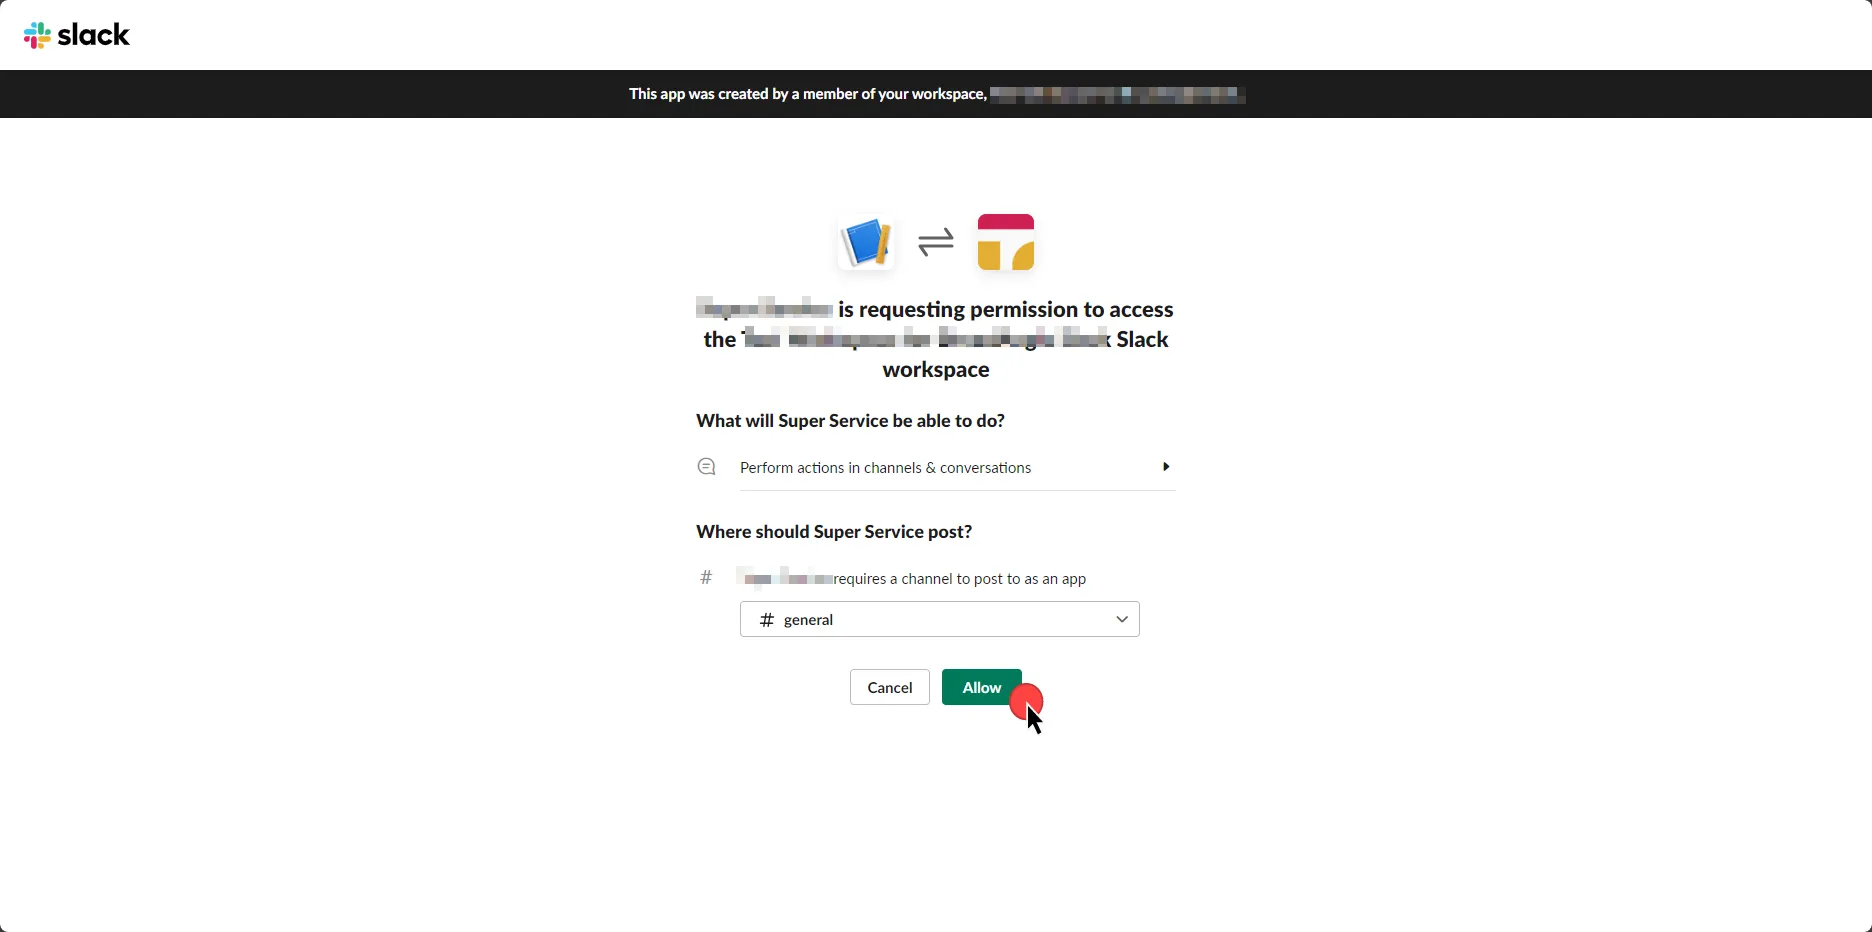
9. Select the **OAuth & Permissions** link from the left menu.
10. Click **Copy** to securely store the token for later use in the tenant configuration. For detailed information on OAuth tokens, please refer to the [official Slack documentation](https://api.slack.com/authentication/oauth-v2).
11. Create a new Credential Provider.
* **Name** - Choose a user-friendly name.
* **Credential Type** - [API Key](/user-guide/access-policies/credential-providers/api-key)
* **API Key** - Paste the token copied from Slack.
## Client Workload Configuration
[Section titled “Client Workload Configuration”](#client-workload-configuration)
Aembit now handles the credentials required to access the Server Workload, eliminating the need for you to manage them directly. You can safely remove any previously used credentials from the Client Workload.
If you access the Server Workload through an SDK or library, it is possible that the SDK/library may still require credentials to be present for initialization purposes. In this scenario, you can provide placeholder credentials. Aembit will overwrite these placeholder credentials with the appropriate ones during the access process.
## Access Policy
[Section titled “Access Policy”](#access-policy)
* Create an Access Policy for a Client Workload to access the Slack Server Workload. Assign the newly created Credential Provider to this Access Policy.
## Required Features
[Section titled “Required Features”](#required-features)
* You will need to configure the [TLS Decrypt](/user-guide/deploy-install/advanced-options/tls-decrypt/configure-tls-decrypt) feature to work with the Slack Server Workload.
# Snowflake
> This page describes how to configure Aembit to work with the Snowflake Server Workload.
#
[Snowflake](https://www.snowflake.com/) is a cloud-based data platform that revolutionizes the way organizations handle and analyze data. Snowflake’s architecture allows for seamless and scalable data storage and processing, making it a powerful solution for modern data analytics and warehousing needs.
In the sections below, you can find the required Aembit configuration needed to work with the Snowflake service as a Server Workload. This page describes scenarios where the Client Workload accesses Snowflake via:
* the [Snowflake Driver/Connector](/user-guide/access-policies/server-workloads/guides/snowflake#snowflake-via-driverconnector) embedded in Client Workload.
* the [Snowflake SQL Rest API](/user-guide/access-policies/server-workloads/guides/snowflake#snowflake-sql-rest-api).
## Prerequisites
[Section titled “Prerequisites”](#prerequisites)
Before proceeding with the configuration, you must have a Snowflake tenant (or [sign up](https://signup.snowflake.com/) for one).
## Snowflake via Driver/Connector
[Section titled “Snowflake via Driver/Connector”](#snowflake-via-driverconnector)
This section of the guide is tailored to scenarios where the Client Workload interacts with Snowflake through the [Snowflake Driver/Connector](https://docs.snowflake.com/en/developer-guide/drivers) embedded in the Client Workload.
### Snowflake key-pair authentication
[Section titled “Snowflake key-pair authentication”](#snowflake-key-pair-authentication)
Snowflake key-pair authentication, when applied to workloads, involves using a public-private key pair for secure, automated authentication. Aembit generates and securely stores a private key, while the corresponding public key is registered with Snowflake. This setup allows Aembit to authenticate with Snowflake, leveraging the robust security of asymmetric encryption, without relying on conventional user-based passwords. For more information on key-pair authentication and key-pair rotation, please refer to the [official Snowflake documentation](https://docs.snowflake.com/en/user-guide/key-pair-auth#configuring-key-pair-rotation).
#### Server Workload Configuration
[Section titled “Server Workload Configuration”](#server-workload-configuration)
1. Create a new Server Workload.
* **Name** - Choose a user-friendly name.
2. Configure the service endpoint:
* **Host** - `-.snowflakecomputing.com`
* **Application Protocol** - Snowflake
* **Port** - 443 with TLS
* **Forward to Port** - 443 with TLS
* **Authentication method** - JWT Token Authentication
* **Authentication scheme** - Snowflake JWT
#### Credential provider configuration
[Section titled “Credential provider configuration”](#credential-provider-configuration)
1. Sign into your Snowflake account.
2. Click in the bottom left corner and copy the Locator value for use in the Aembit Snowflake Account ID field.
3. Create a new Credential Provider.
* **Name** - Choose a user-friendly name.
* **Credential Type** - [JSON Web Token (JWT)](/user-guide/access-policies/credential-providers/json-web-token)
* **Token Configuration** - Snowflake Key Pair Authentication
* **Snowflake Account ID** - Your Snowflake Locator value that you copied from the previous step.
* **Username** - Your username for the Snowflake account.
4. Click **Save**.
5. After saving the Credential Provider, view the newly created provider and copy the provided SQL command. This command needs to be executed against your Snowflake account. You can use any tool of your choice that supports Snowflake to execute this command.
### Snowflake username/password authentication
[Section titled “Snowflake username/password authentication”](#snowflake-usernamepassword-authentication)
Note
Aembit will be deprecating Snowflake username/password authentication to match Snowflake’s updated MFA security guidance.
Username/password authentication in Snowflake involves using a traditional credential-based approach for access control. Users or workloads are assigned a unique username and a corresponding password. When accessing Snowflake, the username and password are used to verify identity. Username/password authentication in Snowflake is considered less secure than key pair authentication and is typically used when key pair methods are not feasible.
#### Server Workload Configuration
[Section titled “Server Workload Configuration”](#server-workload-configuration-1)
1. Create a new Server Workload.
* Name: Choose a user-friendly name.
2. Configure the service endpoint:
* **Host** - `-.snowflakecomputing.com`
* **Application Protocol** - Snowflake
* **Port** - 443 with TLS
* **Forward to Port** - 443 with TLS
* **Authentication method** - Password Authentication
* **Authentication scheme** - Password
#### Credential Provider Configuration
[Section titled “Credential Provider Configuration”](#credential-provider-configuration-1)
1. Create a new Credential Provider.
* **Name** - Choose a user-friendly name.
* **Credential Type** - [Username & Password](/user-guide/access-policies/credential-providers/username-password)
* **Username** - Your username for the Snowflake account.
* **Password** - Your password for the account.
## Snowflake SQL REST API
[Section titled “Snowflake SQL REST API”](#snowflake-sql-rest-api)
This section focuses on scenarios where the Client Workload interacts with Snowflake through the [Snowflake SQL REST API](https://docs.snowflake.com/en/developer-guide/sql-api/). The Snowflake SQL REST API offers a flexible REST API for accessing and modifying data within a Snowflake database.
### Server Workload Configuration
[Section titled “Server Workload Configuration”](#server-workload-configuration-2)
1. Create a new Server Workload.
* **Name** - Choose a user-friendly name.
2. Configure the service endpoint:
* **Host** - `-.snowflakecomputing.com`
* **Application Protocol** - HTTP
* **Port** - 443 with TLS
* **Forward to Port** - 443 with TLS
* **Authentication method** - HTTP Authentication
* **Authentication scheme** - Bearer
**Static HTTP Headers**
* **Key** - X-Snowflake-Authorization-Token-Type
* **Value** - KEYPAIR\_JWT
### Credential provider configuration
[Section titled “Credential provider configuration”](#credential-provider-configuration-2)
1. Sign into your Snowflake account.
2. Click in the bottom left corner and copy the Locator value for use in the Aembit Snowflake Account ID field.

3. Create a new Credential Provider.
* **Name** - Choose a user-friendly name.
* **Credential Type** - [JSON Web Token (JWT)](/user-guide/access-policies/credential-providers/json-web-token)
* **Token Configuration** - Snowflake Key Pair Authentication
* **Snowflake Account ID** - Your Snowflake Locator value that you copied from the previous step.
* **Username** - Your username for the Snowflake account.
4. Click **Save**.

5. After saving the Credential Provider, view the newly created provider and copy the provided SQL command. This command needs to be executed against your Snowflake account. You can use any tool of your choice that supports Snowflake to execute this command.
## Client Workload Configuration
[Section titled “Client Workload Configuration”](#client-workload-configuration)
Aembit now handles the credentials required to access the Server Workload, eliminating the need for you to manage them directly. You can safely remove any previously used credentials from the Client Workload.
If you access the Server Workload through an SDK or library, it is possible that the SDK/library may still require credentials to be present for initialization purposes. In this scenario, you can provide placeholder credentials. Aembit will overwrite these placeholder credentials with the appropriate ones during the access process.
## Access Policy
[Section titled “Access Policy”](#access-policy)
* Create an Access Policy for a Client Workload to access the Snowflake Server Workload. Assign the newly created Credential Provider to this Access Policy.
## Required Features
[Section titled “Required Features”](#required-features)
* You will need to configure the [TLS Decrypt](/user-guide/deploy-install/advanced-options/tls-decrypt/configure-tls-decrypt) feature to work with the Snowflake Server Workload.
Caution
As of Snowflake SDK 2.1.0, proxy settings must be explicitly specified within the connection string. In prior versions, the SDK automatically utilized proxy configurations based on environment variables such as `http_proxy` or `https_proxy`.
For instance, if you are deploying the SDK within an ECS environment, it is essential to include the following parameters in your connection string:
```shell
USEPROXY=true;PROXYHOST=localhost;PROXYPORT=8000
```
# Snyk
> This page describes how to configure Aembit to work with the Snyk Server Workload.
#
[Snyk](https://snyk.io/) is a security platform designed to help organizations find and fix vulnerabilities in their code, dependencies, containers, and infrastructure as code. It integrates into development workflows to maintain security throughout the software development lifecycle.
Below you can find the Aembit configuration required to work with the Snyk service as a Server Workload using the Snyk API.
Prerequisites
Before proceeding with the configuration, you need to have a Snyk tenant and an authorized Snyk App. If you have not created an app before, you can follow the steps outlined in the subsequent sections. For detailed information on how to create a Snyk App using the Snyk API or other methods, please refer to the [official Snyk documentation](https://docs.snyk.io/snyk-api/snyk-apps/create-a-snyk-app-using-the-snyk-api).
## Server Workload Configuration
[Section titled “Server Workload Configuration”](#server-workload-configuration)
1. Create a new Server Workload.
* **Name** - Choose a user-friendly name.
2. Configure the service endpoint:
* **Host** - `api.snyk.io`
* **Application Protocol** - HTTP
* **Port** - 443 with TLS
* **Forward to Port** - 443 with TLS
* **Authentication method** - HTTP Authentication
* **Authentication scheme** - Bearer
## Credential Provider Configuration
[Section titled “Credential Provider Configuration”](#credential-provider-configuration)
1. Sign in to your Snyk account.
2. In the lower-left corner of any page, click your profile name, then click **Account Settings**.
3. On the **General** page, click to reveal your **Key**.
4. Copy the **Key** and securely store it for later use in the app creation process using the Snyk API.
5. Navigate to **Settings** in the left-hand menu, and choose **General**.
6. Copy the **Organization ID** and securely store it for later use in the app creation process using the Snyk API.
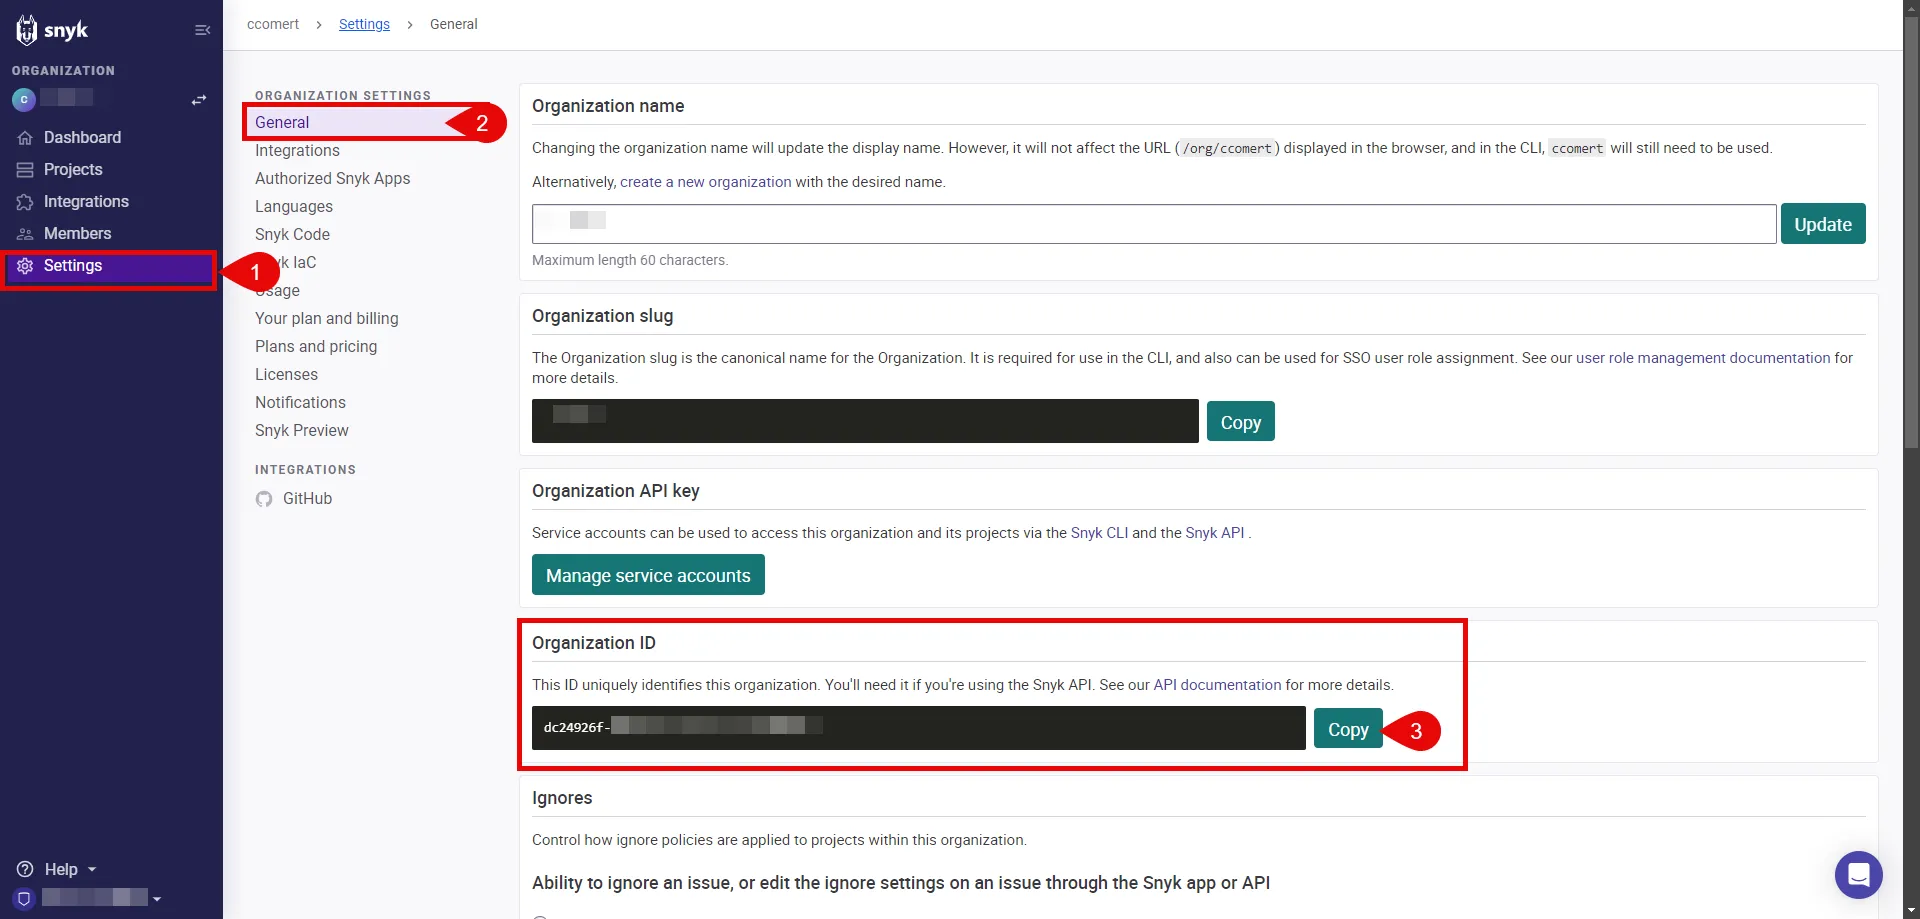
7. Switch to the Aembit UI to create a new Credential Provider, selecting the OAuth 2.0 Authorization Code credential type. After setting it up, copy the auto-generated **Callback URL**.
8. Create a Snyk App:
To create a Snyk App, execute the following `curl` command. Make sure to replace the placeholders with the appropriate values:
* REPLACE\_WITH\_API\_TOKEN: This is the token you retrieved in Step 4.
* REPLACE\_WITH\_APP\_NAME: Provide a friendly name for your app that will perform OAuth with Snyk, such as “Aembit.”
* REPLACE\_WITH\_CALLBACK\_URL: Use the callback URL obtained in the previous step.
* REPLACE\_WITH\_SCOPES: Add the necessary scopes for your app. It is crucial to include the `org.read` scope, which is required for the refresh token. For a comprehensive list of available scopes, refer to the [official Snyk documentation](https://docs.snyk.io/snyk-api/snyk-apps/scopes-to-request).
* REPLACE\_WITH\_YOUR\_ORGID: This is the organization ID you retrieved in Step 6.
```shell
curl -X POST -H "Content-Type: application/vnd.api+json" \
-H "Authorization: token " \
-d '{"data": { "attributes": {"name": "", "redirect_uris": [""], "scopes": [""], "context": "user"}, "type": "app"}}' \
"https://api.snyk.io/rest/orgs//apps/creations?version=2024-01-04"
```
The response includes important configuration details, such as the **clientId** and **clientSecret**, which are essential for completing the authorizing of your Snyk App.
9. Edit the existing Credential Provider created in the previous steps.
* **Name** - Choose a user-friendly name.
* **Credential Type** - [OAuth 2.0 Authorization Code](/user-guide/access-policies/credential-providers/oauth-authorization-code)
* **Callback URL (Read-Only)** - An auto-generated Callback URL from Aembit Admin.
* **Client Id** - Provide the `clientId` from the response of the `curl` command.
* **Client Secret** - Provide the `clientSecret` from the response of the `curl` command.
* **Scopes** - Enter the scopes you use, space delimited. (e.g. `org.read org.project.read org.project.snapshot.read`)
* **OAuth URL** - `https://snyk.io/`
* **Authorization URL** - `https://app.snyk.io/oauth2/authorize`
* **Token URL** - `https://api.snyk.io/oauth2/token`
* **PKCE Required** - On
* **Lifetime** - 1 year (Snyk does not specify a refresh token lifetime; this value is recommended by Aembit.)
10. Click **Save** to save your changes on the Credential Provider.
11. In the Aembit UI, click the **Authorize** button. You are directed to a page where you can review the access request. Click **Authorize** to complete the OAuth 2.0 Authorization Code flow. You should see a success page and then be redirected to Aembit automatically. You can also verify your flow is complete by checking the **State** value in the Credential Provider. After completion, it should be **Ready**.

Caution
Once the set lifetime ends, the retrieved credential will expire and will not work anymore. Aembit will notify you before this happens. Please ensure you reauthorize the credential before it expires.
## Client Workload Configuration
[Section titled “Client Workload Configuration”](#client-workload-configuration)
Aembit now handles the credentials required to access the Server Workload, eliminating the need for you to manage them directly. You can safely remove any previously used credentials from the Client Workload.
If you access the Server Workload through an SDK or library, it is possible that the SDK/library may still require credentials to be present for initialization purposes. In this scenario, you can provide placeholder credentials. Aembit will overwrite these placeholder credentials with the appropriate ones during the access process.
## Access Policy
[Section titled “Access Policy”](#access-policy)
* Create an access policy for a Client Workload to access the Snyk Server Workload and assign the newly created Credential Provider to it.
## Required Features
[Section titled “Required Features”](#required-features)
* You will need to configure the [TLS Decrypt](/user-guide/deploy-install/advanced-options/tls-decrypt/configure-tls-decrypt) feature to work with the Snyk Server Workload.
# Stripe
> This page describes how to configure Aembit to work with the Stripe Server Workload.
#
[Stripe](https://stripe.com/) is a digital payment processing service that allows businesses to accept and process payments online. Stripe supports various payment methods, including credit cards, and provides tools for managing subscriptions and recurring payments.
Below you can find the Aembit configuration required to work with the Stripe service as a Server Workload using the Stripe SDK or other HTTP-based client.
## Prerequisites
[Section titled “Prerequisites”](#prerequisites)
Before proceeding with the configuration, you will need to have a Stripe tenant (or [sign up](https://dashboard.stripe.com/register) for one).
## Server Workload Configuration
[Section titled “Server Workload Configuration”](#server-workload-configuration)
1. Create a new Server Workload.
* **Name** - Choose a user-friendly name.
2. Configure the service endpoint:
* **Host** - `api.stripe.com`
* **Application Protocol** - HTTP
* **Port** - 443 with TLS
* **Forward to Port** - 443 with TLS
* **Authentication method** - HTTP Authentication
* **Authentication scheme** - Bearer
## Credential Provider Configuration
[Section titled “Credential Provider Configuration”](#credential-provider-configuration)
1. Sign into your Stripe account.
2. Go to the Developers section.
3. Click on the API keys tab.
4. Ensure you are in the correct mode (Test mode for Stripe test data or Live mode for live production data).
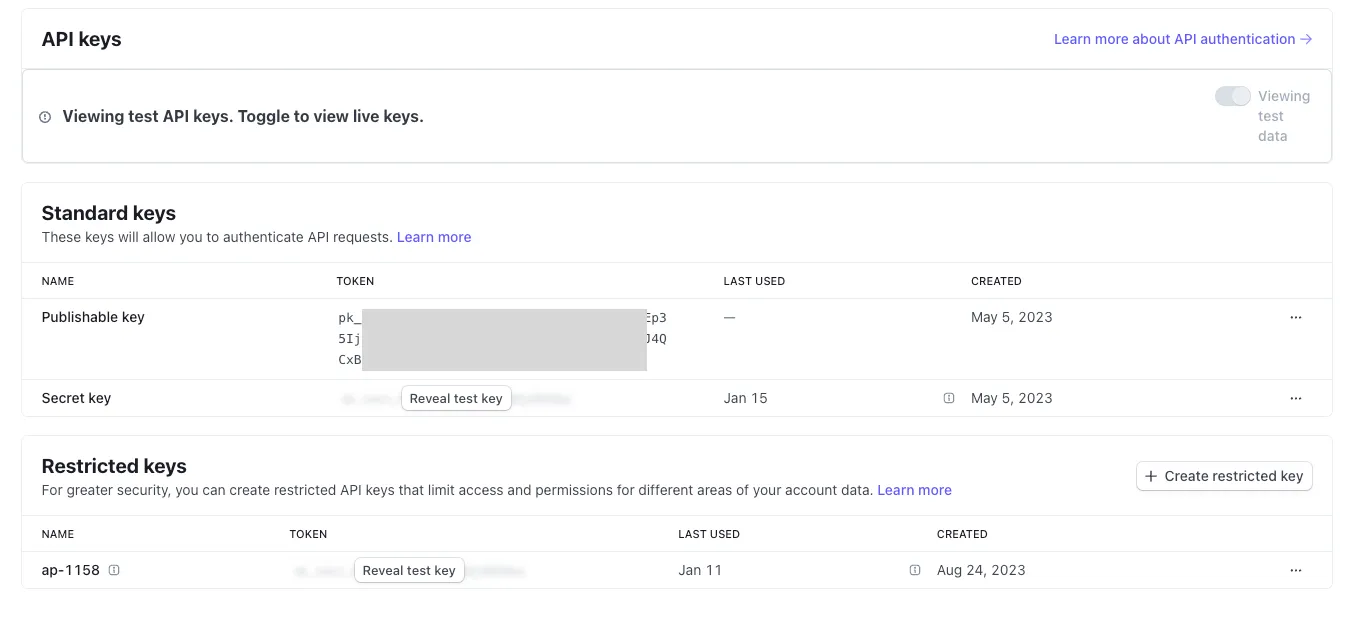
5. You can either reveal and copy the Standard keys’ secret key or, for additional security, create and copy a Restricted key. Please read more about this in the [official Stripe documentation](https://stripe.com/docs/keys).
6. Create a new Credential Provider.
* **Name** - Choose a user-friendly name.
* **Credential Type** - [API Key](/user-guide/access-policies/credential-providers/api-key)
* **API Key** - Provide the key copied from Stripe.
## Client Workload Configuration
[Section titled “Client Workload Configuration”](#client-workload-configuration)
Aembit now handles the credentials required to access the Server Workload, eliminating the need for you to manage them directly. You can safely remove any previously used credentials from the Client Workload.
If you access the Server Workload through an SDK or library, it is possible that the SDK/library may still require credentials to be present for initialization purposes. In this scenario, you can provide placeholder credentials. Aembit will overwrite these placeholder credentials with the appropriate ones during the access process.
## Access Policy
[Section titled “Access Policy”](#access-policy)
* Create an access policy for a Client Workload to access the Stripe Server Workload and assign the newly created Credential Provider to it.
## Required Features
[Section titled “Required Features”](#required-features)
* You will need to configure the [TLS Decrypt](/user-guide/deploy-install/advanced-options/tls-decrypt/configure-tls-decrypt) feature to work with the Stripe Server Workload.
# Enable TLS on a Server Workload
> How to enable TLS on a Server Workload
To enable TLS on traffic to your Server Workloads, do the following:
1. Log into your Aembit Tenant.
2. In the left sidebar menu, go to **Server Workloads**.
3. Create a new Server Workload or select an existing Server Workload from the list and click **Edit**.
4. Under **Service Endpoint** in the **Port** field, check the **TLS** checkbox.
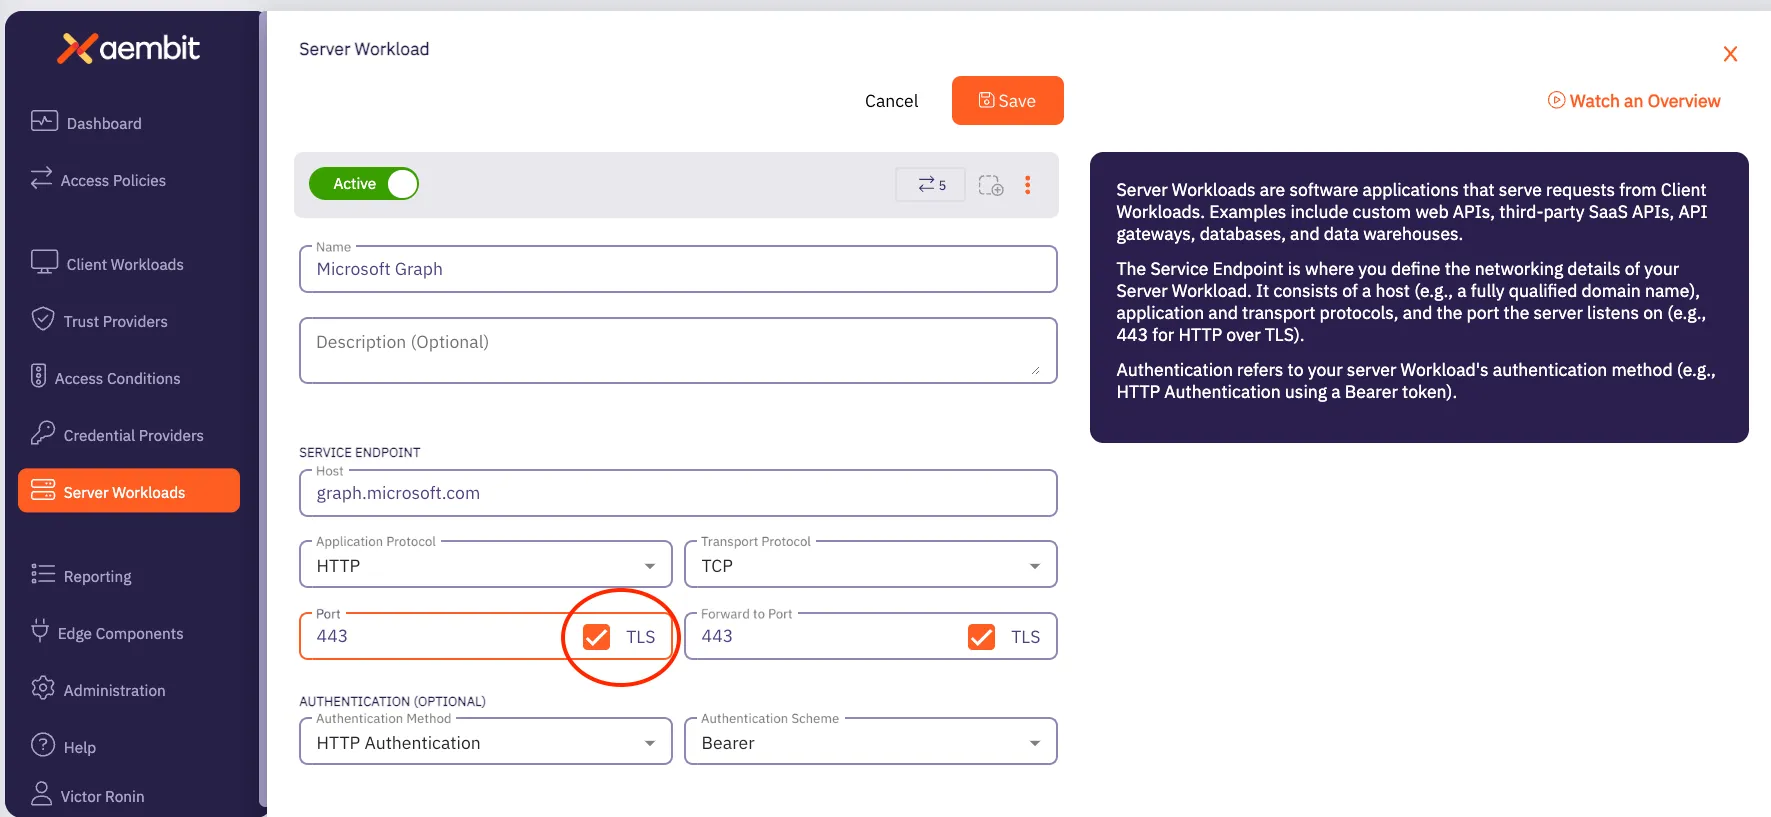
5. Click **Save**.
# Trust Providers
> This document provides a high-level description of Trust Providers
This section covers Trust Providers in Aembit, which are used to verify the identity of Client Workloads based on their infrastructure or identity context.
The following pages provide information about different Trust Provider types and how to configure them:
* [Add Trust Provider](/user-guide/access-policies/trust-providers/add-trust-provider)
* [AWS Metadata Service Trust Provider](/user-guide/access-policies/trust-providers/aws-metadata-service-trust-provider)
* [AWS Role Trust Provider](/user-guide/access-policies/trust-providers/aws-role-trust-provider)
* [Azure Metadata Service Trust Provider](/user-guide/access-policies/trust-providers/azure-metadata-service-trust-provider)
* [GCP Identity Token Trust Provider](/user-guide/access-policies/trust-providers/gcp-identity-token-trust-provider)
* [GitHub Trust Provider](/user-guide/access-policies/trust-providers/github-trust-provider)
* [GitLab Trust Provider](/user-guide/access-policies/trust-providers/gitlab-trust-provider)
* [Kerberos Trust Provider](/user-guide/access-policies/trust-providers/kerberos-trust-provider)
* [Kubernetes Service Account Trust Provider](/user-guide/access-policies/trust-providers/kubernetes-service-account-trust-provider)
* [Terraform Cloud Identity Token Trust Provider](/user-guide/access-policies/trust-providers/terraform-cloud-identity-token-trust-provider)
# Add Trust Provider
> This document describes the steps required to configure a Trust Provider for Client Workload identity attestation.
Trust Providers enable Aembit to authenticate without provisioning credentials or other secrets. Trust Providers are third-party systems or services that can attest identities with identity documents, tokens, or other cryptographically signed evidence.
Client Workload identity attestation is a core functionality to ensure only trusted Client Workloads can access the Server Workloads.
## Configure Trust Provider
[Section titled “Configure Trust Provider”](#configure-trust-provider)
If you are getting started with Aembit, configuring trust providers is optional; however, it is critical to secure all production deployments.
1. Click the **Trust Providers** tab.
2. Click **+ New** to create a new Trust Provider.
3. Give the Trust Provider a name and optional description.
4. Choose the appropriate Trust Provider type based on your Client Workloads’ environment.
5. Follow the instructions for the Trust Provider based on your selection.
* [AWS Role Trust Provider](/user-guide/access-policies/trust-providers/aws-role-trust-provider)
* [AWS Metadata Service Trust Provider](/user-guide/access-policies/trust-providers/aws-metadata-service-trust-provider)
* [Azure Metadata Service trust provider](/user-guide/access-policies/trust-providers/azure-metadata-service-trust-provider)
* [Kerberos trust provider](/user-guide/access-policies/trust-providers/kerberos-trust-provider)
* [Kubernetes Service account trust provider](/user-guide/access-policies/trust-providers/kerberos-trust-provider)
6. Configure one or more **match rules** (specific to your Trust Provider type).
Note
Aembit recommends making matching criteria as tight as possible.
7. Click **Save**.
## Client Workload Identity Attestation
[Section titled “Client Workload Identity Attestation”](#client-workload-identity-attestation)
You must associate one or more Trust Providers with the existing Access Policy for Aembit to use Client Workload identity attestation.
1. Choose one of the existing **Access Policies**.
2. Click **Edit**.
3. Add an existing, or create a new Trust Provider.
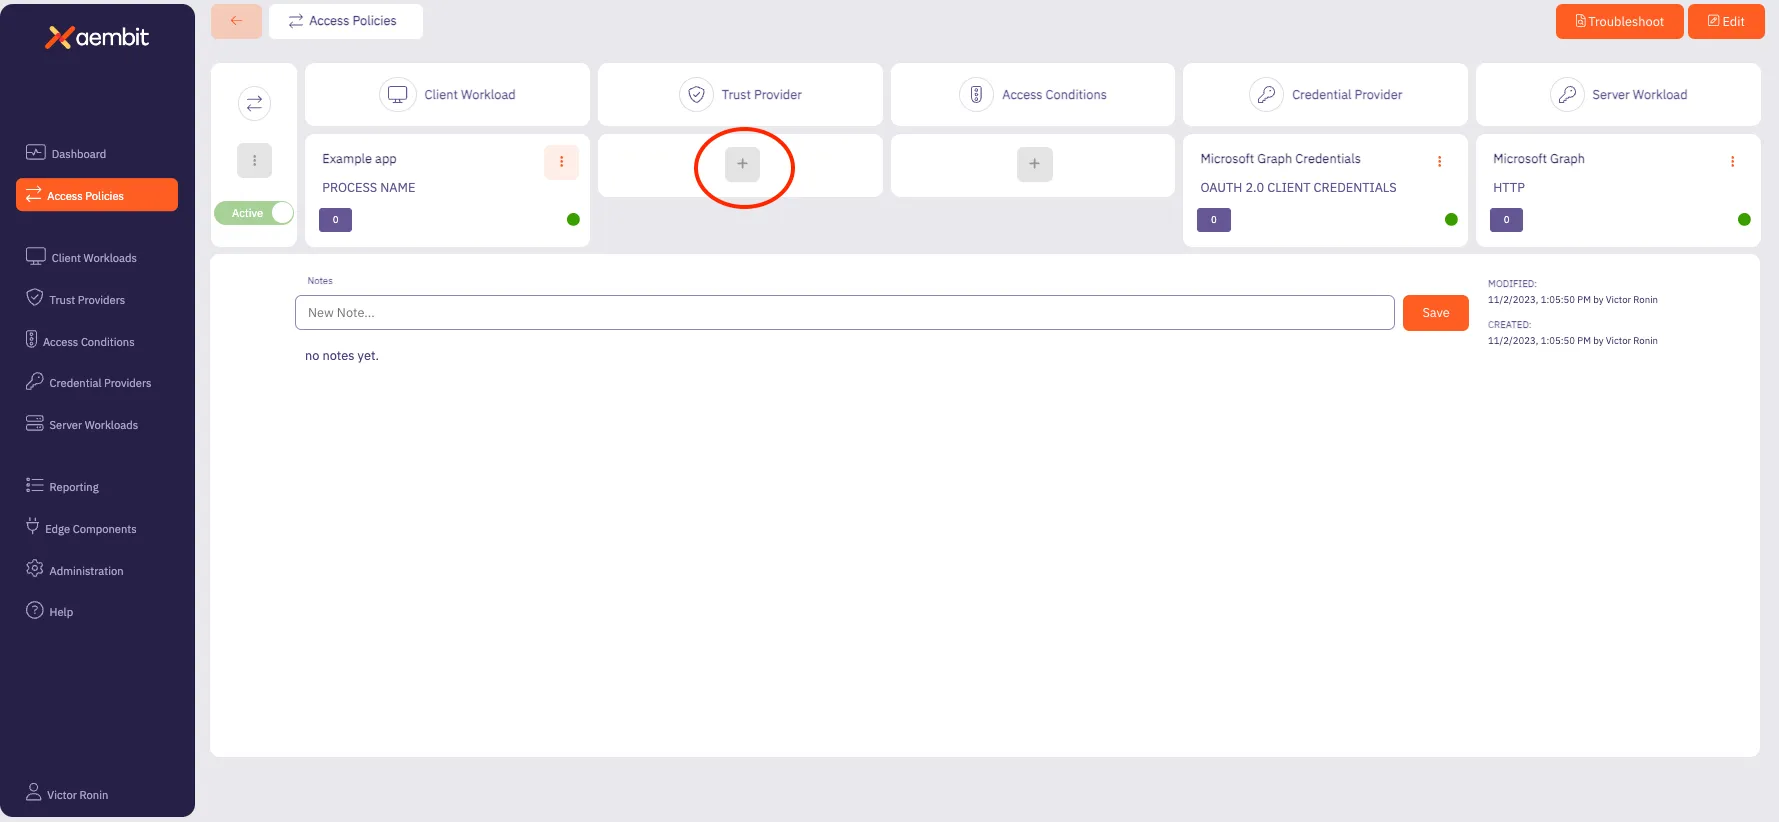
## Agent Controller Identity Attestation
[Section titled “Agent Controller Identity Attestation”](#agent-controller-identity-attestation)
You must associate a Trust Provider with Agent Controller in order for Aembit to use Agent Controller for identity attestation.
1. Click the **Edge Components** tab.
2. Select one of the existing **Agent Controllers**.
3. Click **Edit**.
4. Choose from the dropdown one of the existing **Trust Providers**.
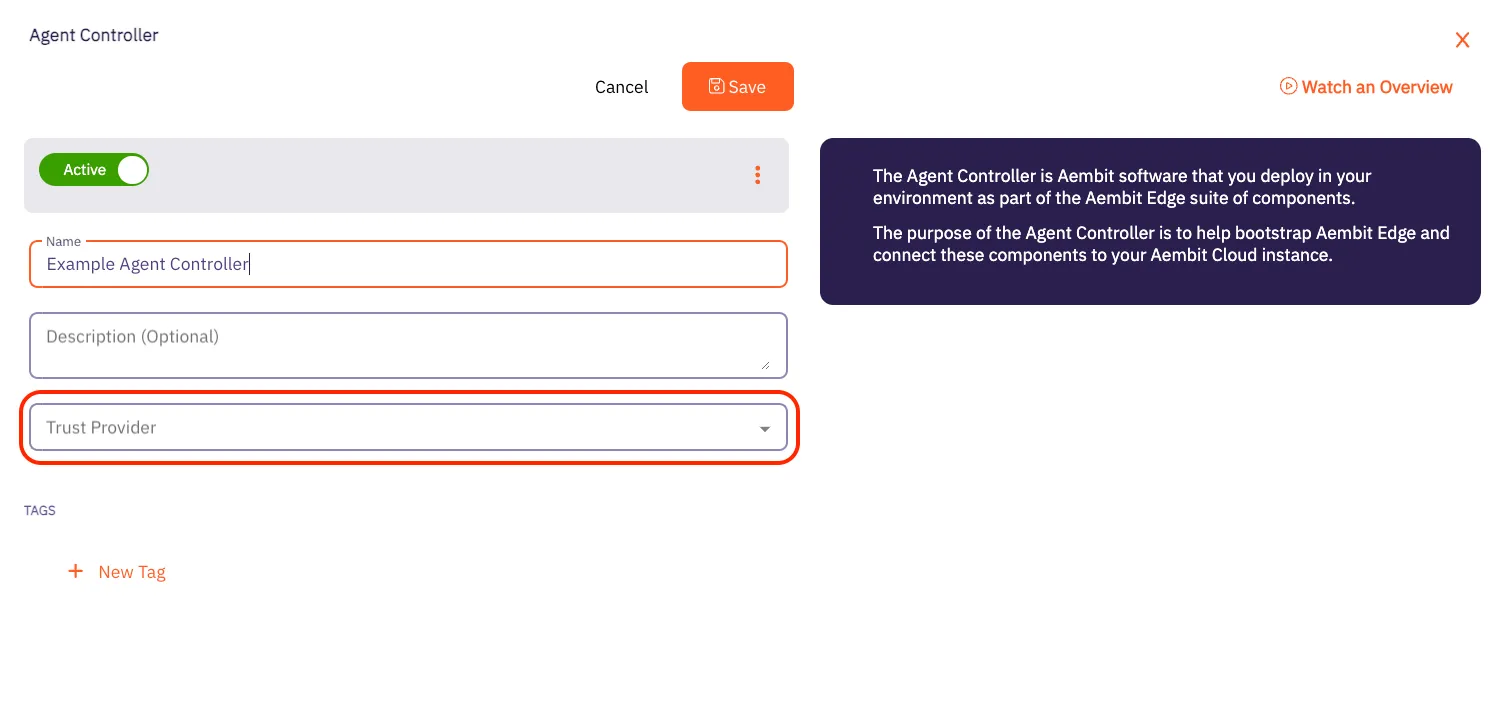
# AWS Metadata Service trust provider
> This page describes the steps required to configure an AWS Metadata Service Trust Provider.
#
The AWS Metadata Service Trust Provider supports attestation of Client Workloads and Agent Controller identities in [AWS](https://aws.amazon.com/) environments (running either directly on EC2 instances or on managed [AWS EKS](https://aws.amazon.com/eks/)).
The AWS Metadata Service Trust Provider relies on the [AWS Metadata Service](https://docs.aws.amazon.com/AWSEC2/latest/UserGuide/ec2-instance-metadata.html) for instance identity document.
## Match rules
[Section titled “Match rules”](#match-rules)
The following match rules are available for this Trust Provider type:
* accountId
* architecture
* availabilityZone
* billingProducts
* imageId
* instanceId
* instanceType
* kernelId
* marketplaceProductCodes
* pendingTime
* privateIP
* region
* version
Please refer to the [AWS documentation](https://docs.aws.amazon.com/AWSEC2/latest/UserGuide/instance-identity-documents.html) for a detailed description of match rule fields available in the identity document.
## Additional configurations
[Section titled “Additional configurations”](#additional-configurations)
Aembit requires one of AWS’s public certificates to verify the identity document signature. Please download the certificate from the [AWS public certificate page](https://docs.aws.amazon.com/es_en/AWSEC2/latest/UserGuide/regions-certs.html) for the region where your Client Workloads are located. Please use certificates under the RSA tabs on the AWS documentation page and paste the appropriate certificate into **Certificate** field on the **Trust Provider** page.
# AWS Role Trust Provider
> This page describes the steps needed to configure the AWS Role Trust Provider.
#
The AWS Role Trust Provider supports attestation within the AWS environment. Aembit Edge Components can currently be deployed in several AWS services that support AWS Role Trust Provider attestation:
* EC2 instances with an attached IAM role
* AWS Role instances
* ECS Fargate containers
* Lambda containers
## Match rules
[Section titled “Match rules”](#match-rules)
The following match rules are available for this Trust Provider type:
* `accountId`
* `assumedRole`
* `roleArn`
* `username`
For a description of the match rule fields available in the AWS Role Trust Provider, please refer to the [AWS documentation](https://docs.aws.amazon.com/STS/latest/APIReference/API_GetCallerIdentity.html).
## AWS Role support
[Section titled “AWS Role support”](#aws-role-support)
Aembit supports AWS Role-Based Trust Providers by enabling you to create a new Trust Provider using the Aembit Tenant UI. Follow the steps below to create the AWS Role Trust Provider.
1. On the Trust Providers page, click on the **New** button to open the Trust Providers dialog window.
2. In the dialog window, enter the following information:
* **Name** - The name of the Trust Provider
* **Description** - An optional text description for the Trust Provider
* **Trust Provider** - A drop-down menu that lists the different Trust Provider types
3. Select **AWS Role** from the Trust Provider drop-down menu.
4. Click on the **Match Rules** link to open an instance of the Match Rules drop-down menu.
* If you use the `roleARN` value, make sure it is in the following format: `arn:aws:sts:::assumed-role//`
* If you use the `username` value, make sure it is in the following format: `:`
Note
The username value refers to the `AccessKeyId` field in Amazon’s [IAM Roles for Amazon EC2](https://docs.aws.amazon.com/AWSEC2/latest/UserGuide/iam-roles-for-amazon-ec2.html#instance-metadata-security-credentials) documentation.
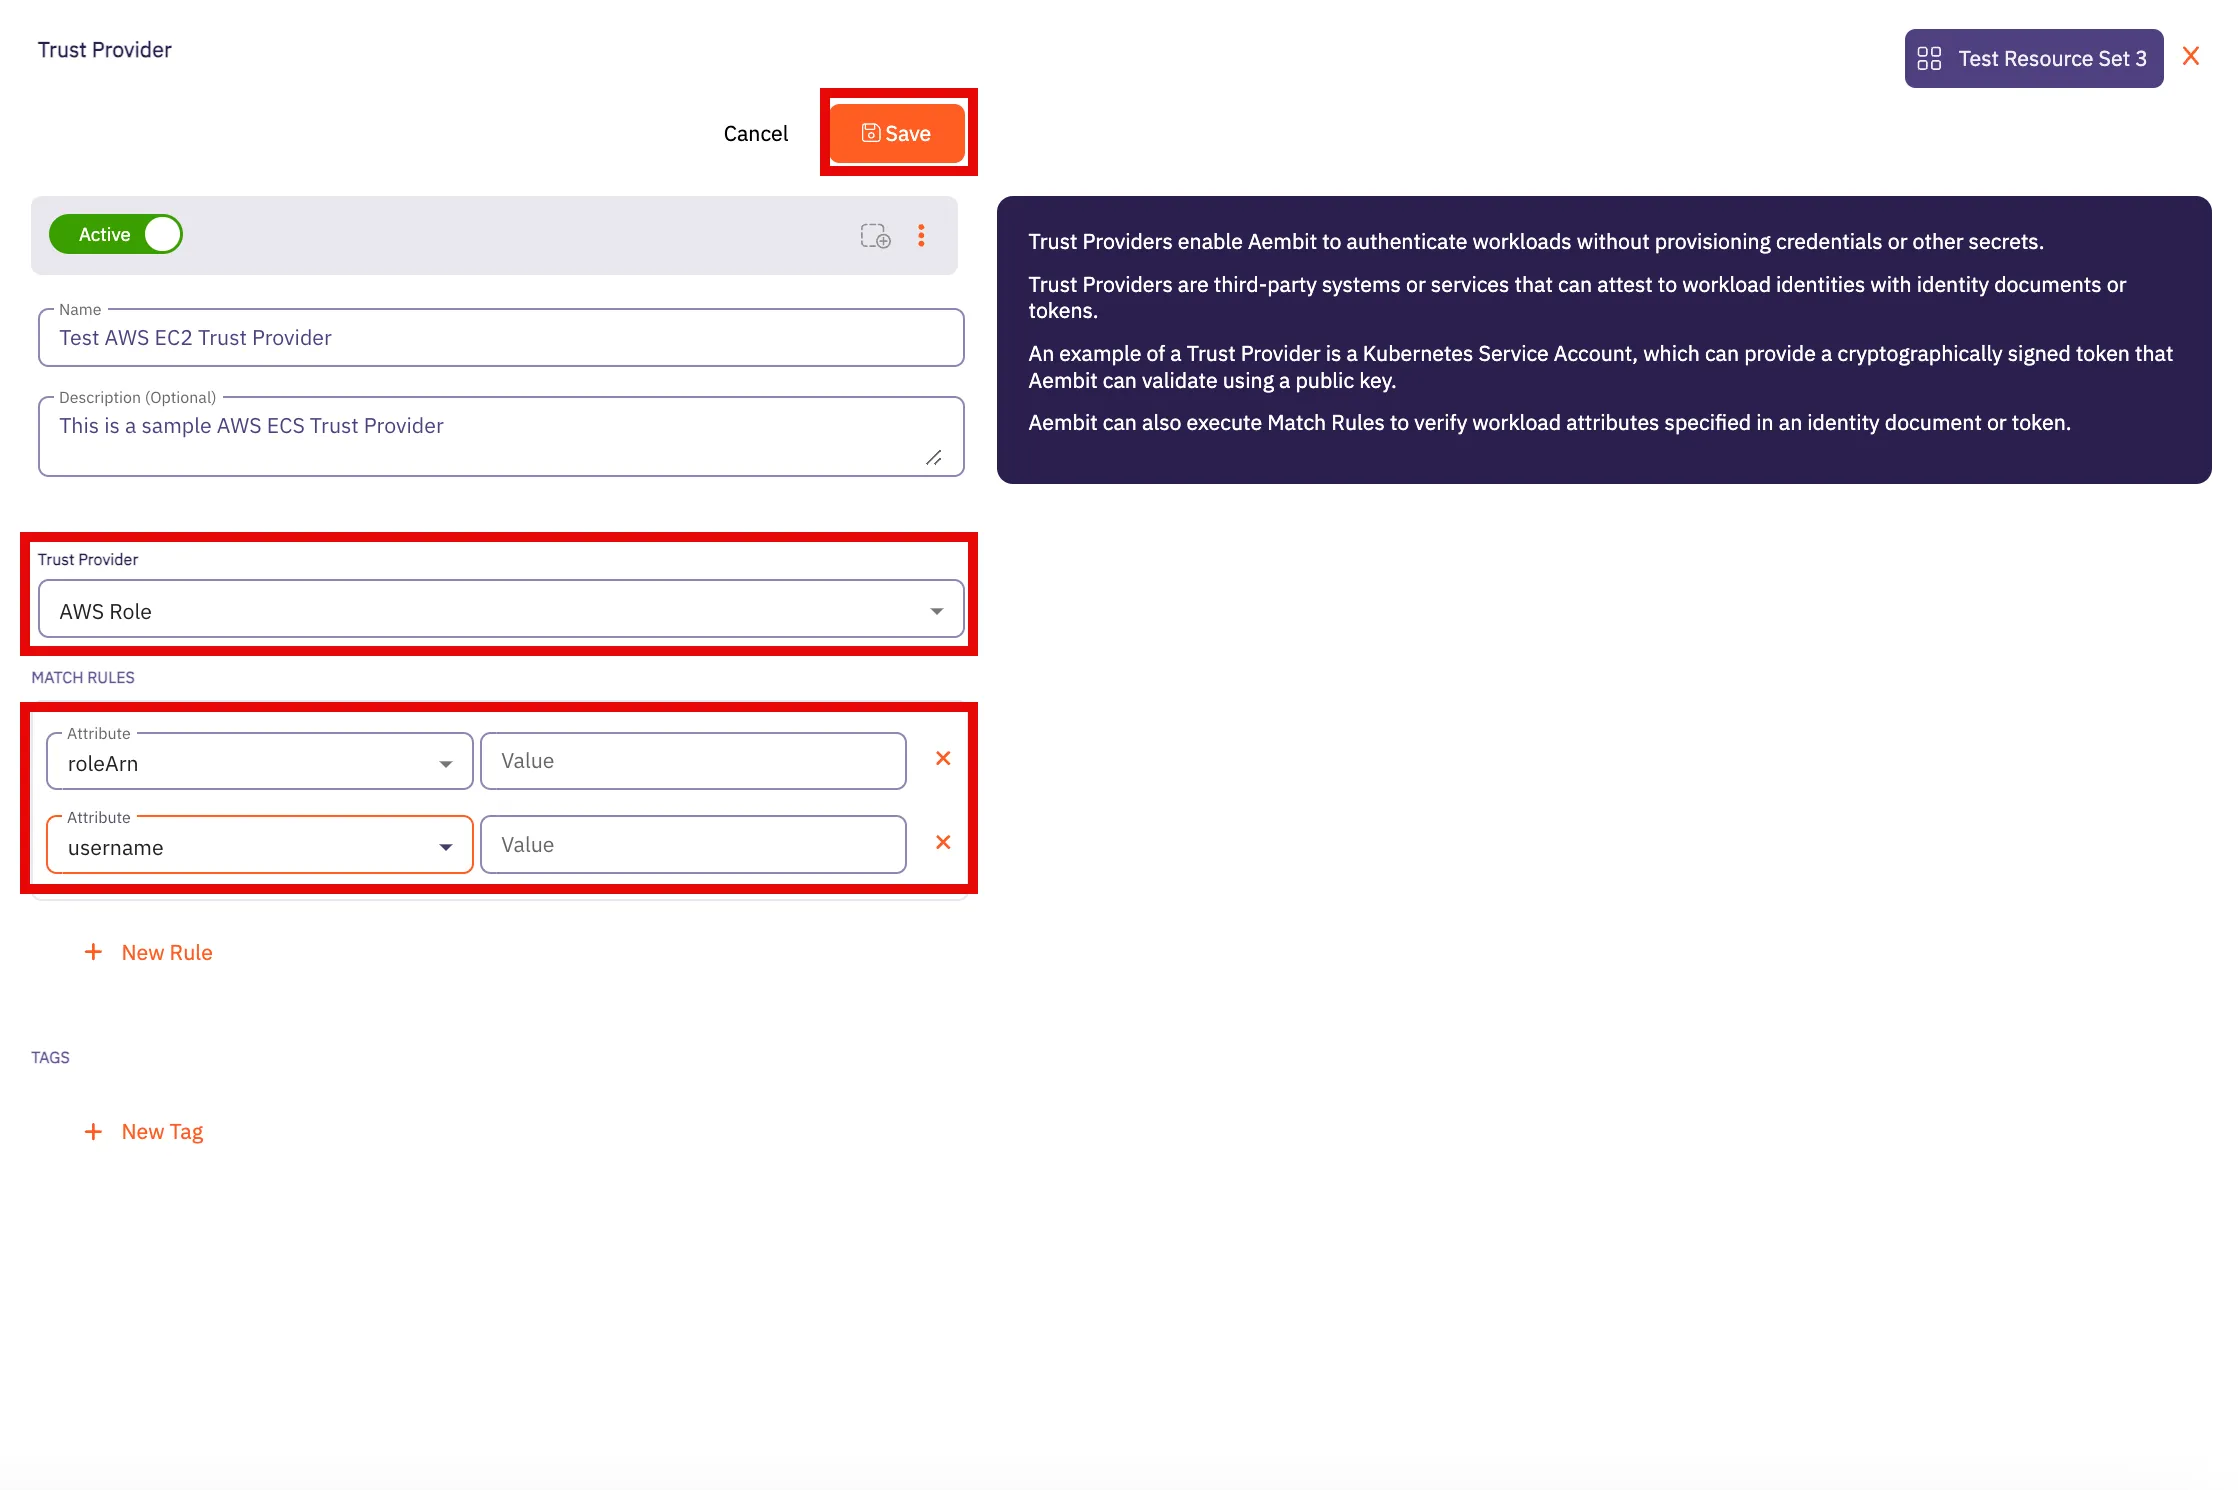
5. Click **Save** when finished. Your new EC2 Trust Provider will appear on the main Trust Providers page.
## ECS Fargate container support
[Section titled “ECS Fargate container support”](#ecs-fargate-container-support)
You must assign an AWS IAM role with `AmazonECSTaskExecutionRolePolicy` permission to your ECS tasks.
Note
You have different ways to perform the following steps (e.g. UI, API, CDK, Terraform, etc.). The following steps are one approach; however, select the way that is most appropriate for your organization.
1. Check the existence of AWS IAM ecsTaskExecutionRole. Please refer to the [AWS documentation](https://docs.aws.amazon.com/AmazonECS/latest/developerguide/task_execution_IAM_role.html#procedure_check_execution_role) for more information.
2. Create AWS IAM `ecsTaskExecutionRole` if this is missing. Please refer to the [AWS documentation](https://docs.aws.amazon.com/AmazonECS/latest/developerguide/task_execution_IAM_role.html#create-task-execution-role) for more information.
3. Retrieve the ARN of `ecsTaskExecutionRole` role. This should look like `arn:aws:iam:::role/ecsTaskExecutionRole`
4. Assign this role in your ECS task definition by setting the task role and task execute role fields.
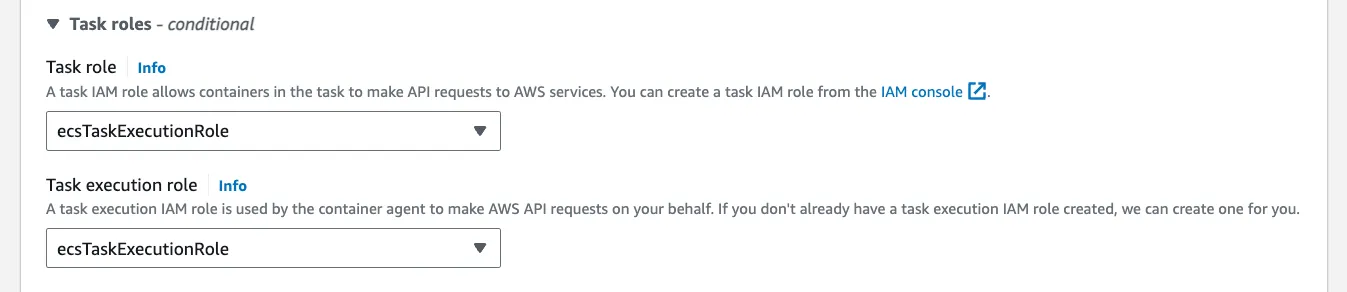
## Lambda support
[Section titled “Lambda support”](#lambda-support)
If you are using this Trust Provider for attestation of workloads running in a Lambda environment, you may use the following match rules:
* `accountId`
* `roleArn`
The Lambda **roleArn** is structured as follows:
```shell
arn:aws:sts:::assumed-role//
```
# Azure Metadata Service trust provider
> This page describes the steps required to configure the Azure Metadata Service Trust Provider.
#
The Azure Metadata Service Trust Provider supports attestation of Client Workloads and Agent Controller identities in an [Azure](https://azure.microsoft.com/) environment.
The Azure Metadata Service Trust Provider relies on the [Azure Metadata Service](https://learn.microsoft.com/en-us/azure/virtual-machines/instance-metadata-service?tabs=linux) for instance identity document.
## Match rules
[Section titled “Match rules”](#match-rules)
The following match rules are available for this Trust Provider type:
* sku
* subscriptionId
* vmId
Please refer to the [Azure documentation](https://learn.microsoft.com/en-us/azure/virtual-machines/instance-metadata-service?tabs=linux#attested-data) for a detailed description of match rule fields available in the identity document.
# GCP Identity Token Trust Provider
> This page describes the steps required to configure the GCP Identity Token Trust Provider.
#
The GCP Identity Token Trust Provider verifies the identities of workloads running within Google Cloud Platform (GCP) by validating identity tokens issued by GCP. These tokens carry metadata, such as the email associated with the service account or user executing the operation, ensuring secure and authenticated access to GCP resources.
## Match rules
[Section titled “Match rules”](#match-rules)
The following match rule is available for this Trust Provider type:
| Data | Description | Example |
| ----- | --------------------------------------------------------- | ------------------ |
| email | The email associated with the GCP service account or user | |
For additional information about GCP Identity Tokens, please refer to [Google Cloud Identity](https://cloud.google.com/docs/authentication/get-id-token) technical documentation.
# GitHub Trust Provider
> This page outlines the steps required to configure the GitHub Trust Provider.
#
The GitHub Trust Provider supports attestation of Client Workloads identities in a [GitHub Actions](https://github.com/features/actions) environment.
The GitHub Trust Provider relies on OIDC (OpenID Connect) tokens issued by GitHub. These tokens contain verifiable information about the workflow, its origin, and the triggering actor.
## Match rules
[Section titled “Match rules”](#match-rules)
The following match rules are available for this Trust Provider type:
| Data | Description | Example |
| ---------- | ----------------------------------------------------------------------------------------------------------------------------------------------------------------------------------------------------------------------------------------------------------------------------------------------------------------------------------------------------------------------------------- | ------------------------------------------------------- |
| actor | The GitHub account name that initiated the workflow run | user123 |
| repository | The repository where the workflow is running. It can be in the format `{organization}/{repository}` for organization-owned repositories or `{account}/{repository}` for user-owned repositories. For additional information about [Repository Ownership](https://docs.github.com/en/repositories/creating-and-managing-repositories/about-repositories#about-repository-ownership). | * MyOrganization/test-project
* user123/another-project |
| workflow | The name of the GitHub Action workflow. For additional information about [Workflows](https://docs.github.com/en/actions/using-workflows/about-workflows). | build-and-test |
For additional information about GitHub ID Token claims, please refer to [GitHub OIDC Token Documentation](https://docs.github.com/en/actions/deployment/security-hardening-your-deployments/about-security-hardening-with-openid-connect#understanding-the-oidc-token).
# Gitlab Trust Provider
> This page outlines the steps required to configure the Gitlab Trust Provider.
#
The Gitlab Trust Provider supports attestation of Client Workloads identities in a [Gitlab Jobs](https://docs.gitlab.com/ee/ci/jobs/) environment.
The GitLab Trust Provider relies OIDC (OpenID Connect) tokens issued by GitLab. These tokens contain verifiable information about the job, its origin within the project, and the associated pipeline.
## Match rules
[Section titled “Match rules”](#match-rules)
The following match rules are available for this Trust Provider type:
| Data | Description | Example |
| --------------- | --------------------------------------------------------------------------------------------------------------------------------------------------------------------------------------------------------------------------------------------------------------------- | -------------------------------------------------------------------------------------------------------------------------------------- |
| namespace\_path | The group or user namespace (by path) where the repository resides. | my-group |
| project\_path | The repository from where the workflow is running, using the format `{group}/{project}` | my-group/my-project |
| ref\_path | The fully qualified reference (branch or tag) that triggered the job. ([Introduced](https://gitlab.com/gitlab-org/gitlab/-/merge_requests/119075) in GitLab 16.0.) | * refs/heads/feature-branch-1
* refs/tags/v1.2.0 |
| subject | The repository and Git reference from where the workflow is running. The format is `project_path:{group}/{project}:ref_type:{type}:ref:{branch_name}`, where `type` can be either `branch` (for a branch-triggered workflow) or `tag` (for a tag-triggered workflow). | - project\_path:my-group/my-project:ref\_type:branch:ref:feature-branch-1
- project\_path:my-group/my-project:ref\_type:tag:ref:v2.0.1 |
For additional information about GitLab ID Token claims, please refer to [GitLab Token Payload](https://docs.gitlab.com/ee/ci/secrets/id_token_authentication.html#token-payload).
Note
When using GitLab Dedicated, ensure the OIDC Endpoint is properly configured; otherwise use `https://gitlab.com`.
# Kerberos Trust Provider
> How to configure a Kerberos Trust Provider
The Kerberos Trust Provider enables the attestation of Client Workloads running on virtual machines (VMs) joined to Active Directory (AD).
This attestation method is specifically designed for on-premise deployments where alternative attestation methods, such as AWS or Azure metadata service Trust Providers, aren’t available.
This Trust Provider is unique because it relies on attestation provided by an Aembit component, rather than attestation from a third-party system. In this scenario, the Aembit Agent Controller acts as the attesting system. It authenticates a client (specifically, Agent Proxy) via Kerberos and attests to the client’s identity. The client’s identity information is then signed by the Aembit Agent Controller and validated by Aembit Cloud as part of the access policy evaluation process.
## Prerequisites
[Section titled “Prerequisites”](#prerequisites)
Many prerequisites are necessary, particularly regarding domain users and principals. This page outlines Aembit’s current recommendations for a secure and scalable deployment.
Kerberos based attestation is available only for [Virtual Machine Deployments](/user-guide/deploy-install/virtual-machine/).
### Join your Edge Components to AD domain
[Section titled “Join your Edge Components to AD domain”](#join-your-edge-components-to-ad-domain)
* You must join Agent Controller VMs to AD before you install Agent Controller on them.
* You must join Client Workload VMs to AD before installing Agent Proxy.
### Domain users and service principals
[Section titled “Domain users and service principals”](#domain-users-and-service-principals)
* You must create a user in AD named `aembit_ac` for Agent Controllers. This user doesn’t need any specific permissions in AD.
* You must create a service principal for the Agent Controller under the `aembit_ac` AD user.
* For testing purposes, create a service principal `HTTP/`.
* For production purposes, see [High Availability](#high-availability).
* Agent Controllers on Windows Server in high availability (HA) configurations, must set the `SERVICE_LOGON_USER` environment variable to an AD user in [Down-Level Logon Name format](https://learn.microsoft.com/en-us/windows/win32/secauthn/user-name-formats#down-level-logon-name) (for example: `SERVICE_LOGON_USER=\$`).
### Network access
[Section titled “Network access”](#network-access)
* Agent Controller VMs don’t need access to the Domain Controller.
* Client Workload VMs must have access to the Domain Controller to acquire tickets.
### Keytabs
[Section titled “Keytabs”](#keytabs)
* Agent Controller
* Agent Controller Linux VMs require a keytab file for the Agent Controller AD user.
* You can place the keytab file on the VM before or after the Agent Controller installation.
* The Agent Controller Linux user must have read/write permissions on the keytab file (`aembit_agent_controller`). If you place a keytab file before you install the Agent Controller, Aembit recommends creating a Linux group `aembit` and a Linux user `aembit_agent_controller`, and making this file accessible by this Linux user/group.
* If your organization has mandatory AD password rotation, make sure you have a configuration in place for keytab renewal.
See [Agent Controller keytab rotation](#agent-controller-keytab-rotation-for-high-availability-deployment) for more information.
* Agent Proxy
* The Agent Proxy on the Client Workload machine uses the host keytab file.
* The Agent Proxy uses the [sAMAccountName](https://learn.microsoft.com/en-us/windows/win32/ad/naming-propertes#samaccountname) principal from the host keytab.
* The host keytab can have Linux root:root ownership.
## Kerberos Trust Provider match rules
[Section titled “Kerberos Trust Provider match rules”](#kerberos-trust-provider-match-rules)
The Kerberos Trust Provider supports the following match rules:
* Principal
* Realm/Domain
* Source IP
:::warning Important
When matching on Principal or Realm/Domain, see [Kerberos Principal formatting](#kerberos-principal-formatting) for guidance.
:::
| Data | Description | Example |
| --------- | ------------------------------------------------------ | ------------------------------ |
| Principal | The Agent Proxy’s VM principal | `IP-172-31-35-14$@EXAMPLE.COM` |
| Realm | The realm of the Client Workload VM principal | `EXAMPLE.COM` |
| Domain | The NetBIOS domain of the Client Workload VM principal | `example` |
| Source IP | The Network Source IP address of the Client request | `192.168.1.100` |
### Associated Agent Controllers
[Section titled “Associated Agent Controllers”](#associated-agent-controllers)
During the configuration of the Kerberos Trust Provider, you must specify the list of Agent Controllers responsible for providing attestation. Aembit trusts only the attestation information signed by specified Agent Controllers by a Kerberos Trust Provider entry.
### Kerberos Principal formatting
[Section titled “Kerberos Principal formatting”](#kerberos-principal-formatting)
Aembit supports Agent Controller on Windows VMs to improve management of the Aembit Edge Components. This is especially true for [Agent Controller high availability configurations](/user-guide/deploy-install/advanced-options/agent-controller/agent-controller-high-availability) that use Windows [Group Managed Service Accounts (gMSA)](https://learn.microsoft.com/en-us/windows-server/identity/ad-ds/manage/group-managed-service-accounts/group-managed-service-accounts/group-managed-service-accounts-overview) to manage multiple Agent Controllers.
The challenge is that Windows and Linux systems treat AD differently, in that Linux treats it purely as Kerberos and Windows treats it natively like AD. This results in different naming and formatting for the Kerberos Principal value that Aembit uses in Kerberos tokens which it exchanges for AD authentication.
The following table details all the combinations you can encounter based on the OS installed on Agent Controller and Agent Proxy:
| OS combination | Principal format |
| ------------------------------------------------------ | ----------------------------------------- |
| **Linux** Agent Controller + **Linux** Agent Proxy | `@` |
| **Linux** Agent Controller + **Windows** Agent Proxy | `@` |
| **Windows** Agent Controller + **Linux** Agent Proxy | `\` |
| **Windows** Agent Controller + **Windows** Agent Proxy | `\` |
As part of the Kerberos Trust Provider attestation process and to address this challenge, Aembit Cloud automatically parses the attested Kerberos Principal value and *verifies either the realm or the domain* from the value for you.
## Enable Kerberos attestation
[Section titled “Enable Kerberos attestation”](#enable-kerberos-attestation)
By default, Aembit disables Kerberos attestation on both Agent Controller and Agent Proxy.
Follow the applicable sections to enable Kerberos attestation on Aembit Edge Components:
### Agent Controller on Windows Server
[Section titled “Agent Controller on Windows Server”](#agent-controller-on-windows-server)
To enable Kerberos attestation for [Agent Controller on a Windows Server VM](/user-guide/deploy-install/virtual-machine/windows/agent-controller-install-windows), you must set the following environment variables:
```shell
AEMBIT_KERBEROS_ATTESTATION_ENABLED=true
SERVICE_LOGON_USER=\$
```
### Agent Controller on Linux
[Section titled “Agent Controller on Linux”](#agent-controller-on-linux)
To enable Kerberos attestation for [Agent Controller on a Linux VM](/user-guide/deploy-install/virtual-machine/linux/agent-controller-install-linux), you must set the following environment variables:
```shell
AEMBIT_KERBEROS_ATTESTATION_ENABLED=true
KRB5_KTNAME=
```
### Agent Proxy
[Section titled “Agent Proxy”](#agent-proxy)
Similarly, the Agent Proxy installer requires the following environment variable (in addition to the standard variables provided during [installation](/user-guide/deploy-install/virtual-machine/linux/agent-proxy-install-linux)):
```shell
AEMBIT_KERBEROS_ATTESTATION_ENABLED=true
AEMBIT_PRIVILEGED_KEYTAB=true
```
## TLS
[Section titled “TLS”](#tls)
The contents of the communication between Agent Proxy and Agent Controller is sensitive. In a production deployment, you may configure Agent Controller TLS to secure communication between these two components using either a Customer’s PKI or Aembit’s PKI. Please see the following pages for more information on using a PKI in your configuration:
* [Configure a Customer’s PKI Agent Controller TLS](/user-guide/deploy-install/advanced-options/agent-controller/configure-customer-pki-agent-controller-tls)
* [Configure Aembit’s PKI Agent Controller TLS](/user-guide/deploy-install/advanced-options/agent-controller/configure-aembit-pki-agent-controller-tls)
## High availability
[Section titled “High availability”](#high-availability)
Given the critical role of attestation in evaluating an Access Policy, Aembit strongly encourages configuring multiple Agent Controllers in a high availability architecture.
To learn how, see [Agent Controller High Availability](/user-guide/deploy-install/advanced-options/agent-controller/agent-controller-high-availability).
The following are the additional steps you must perform for Kerberos attestation to work in a highly available configuration:
* You don’t need to join the load balancer to your domain.
* You must create a service principal `HTTP/` under the Aembit Agent Controller Active Directory user.
* You don’t need to create principals for individual Agent Controller VMs.
* You must place the keytab for the Agent Controller AD user (including the load-balancer service principal) on all Agent Controller VMs.
* If you operate multiple Agent Controller clusters running behind one or more load balancers, you must add each load balancer FQDN as the service principal under Agent Controller AD account.
## Agent Controller keytab rotation for high availability deployment
[Section titled “Agent Controller keytab rotation for high availability deployment”](#agent-controller-keytab-rotation-for-high-availability-deployment)
Standard best practice recommends the periodic rotation of all keytabs.
Considering that Aembit shares the keytab representing an Agent Controller’s identity across multiple Agent Controller machines, the common method of keytab rotation on Linux (using SSSD) isn’t feasible.
Your organization must have a centrally orchestrated keytab rotation, where the Agent Controller AD user keytab is rotated centrally and then pushed to all Agent Controller Virtual Machines. Note that the entity performing the keytab rotation needs the appropriate permissions in AD to change the Agent Controller password during new-keytab creation.
# Kubernetes Service Account trust provider
> This page describes the steps required to configure the Kubernetes Service Account Trust Provider.
#
The Kubernetes Service Account Trust Provider supports attestation of Client Workloads and Agent Controller identities in a Kubernetes environment (either self-hosted or managed by cloud providers - [AWS EKS](https://aws.amazon.com/eks/), [Azure AKS](https://azure.microsoft.com/en-us/products/kubernetes-service), [GCP GKE](https://cloud.google.com/kubernetes-engine?hl=en)).
## Match rules
[Section titled “Match rules”](#match-rules)
The following match rules are available for this Trust Provider type:
* iss
* kubernetes.io { namespace }
* kubernetes.io { pod { name } }
* kubernetes.io { serviceaccount { name } }
* sub
| Data | Description | Example |
| ----------------------------------------- | ----------------------------- | ---------------------------------------------- |
| iss | Kubernetes Cluster Issuer URL | |
| kubernetes.io { namespace } | Pod namespace | default |
| kubernetes.io { pod { name } } | Pod name | example-app |
| kubernetes.io { serviceaccount { name } } | Service Account name | default |
| sub | Service Account token subject | system:serviceaccount:default:default |
## Additional configurations
[Section titled “Additional configurations”](#additional-configurations)
Aembit requires a Kubernetes cluster public key to validate the Service Account token used by this trusted provider.
The majority of cloud providers expose an OIDC endpoint that enables automatic retrieval of the Kubernetes cluster public key.
Note
There are multiple ways to retrieve the OIDC endpoint (via UI, CLI, API, etc.) The steps below use the CLI approach; however, select the way that is most appropriate for your organization.
### AWS EKS
[Section titled “AWS EKS”](#aws-eks)
* Ensure your AWS CLI is installed, configured, and authenticated.
* Execute the following command:
```shell
aws eks describe-cluster --name \ --query "cluster.identity.oidc.issuer" --output text
```
* Paste the response in **OIDC Endpoint** field.
### GCP GKE
[Section titled “GCP GKE”](#gcp-gke)
* Ensure your GCP CLI is installed, configured, and authenticated.
* Execute the following command:
```shell
gcloud container clusters describe \ --region=\ --format="value(selfLink)"
```
* Paste the response in **OIDC Endpoint** field.
## Azure AKS
[Section titled “Azure AKS”](#azure-aks)
* Ensure your Azure CLI is installed, configured, and authenticated.
* Execute the following command:
```shell
az aks show --resource-group \ --name \ --query "oidcIssuerProfile.issuerUrl" -o tsv
```
* Paste the response in **OIDC Endpoint** field.
# Terraform Cloud Identity Token Trust Provider
> This page describes the steps required to configure the Terraform Cloud Identity Token Trust Provider.
#
The Terraform Cloud Identity Token Trust Provider verifies the identities of Client Workloads within Terraform Cloud using identity tokens. These tokens include metadata such as organization, project, and workspace details, ensuring secure and authenticated access to resources.
## Match rules
[Section titled “Match rules”](#match-rules)
The following match rules are available for this Trust Provider type:
| Data | Description | Example |
| --------------------------- | ------------------------------------------------------------------------------------- | ------------------- |
| terraform\_organization\_id | The Terraform organization that is executing the run. | org-abcdefghijklmno |
| terraform\_project\_id | The specific project within the Terraform organization that is running the operation. | prj-abcdefghijklmno |
| terraform\_workspace\_id | The ID associated with the Terraform workspace where the run is being conducted. | ws-abcdefghijklmno |
For additional information about Terraform Cloud Identity Token, please refer to [Terraform Workload Identity](https://developer.hashicorp.com/terraform/cloud-docs/workspaces/dynamic-provider-credentials/workload-identity-tokens).
# Administering Aembit
> This page describes steps for troubleshooting authentication issues from Client Workloads to Server Workloads
This section covers the administration features of Aembit, which allow you to manage your Aembit Tenant, users, roles, resource sets, and other administrative functions.
The following pages provide information about administration features in Aembit:
* [Admin Dashboard](/user-guide/administration/admin-dashboard)
* [Users](/user-guide/administration/users)
* [Roles](/user-guide/administration/roles)
* [Resource Sets](/user-guide/administration/resource-sets)
* [Sign-On Policy](/user-guide/administration/sign-on-policy)
* [Identity Providers](/user-guide/administration/identity-providers)
* [Log Streams](/user-guide/administration/log-streams)
* [Discovery](/user-guide/administration/discovery)
# Admin dashboard overview
> This page describes the different views and dashboards on the Aembit Admin Dashboard
When logging into your Aembit Tenant, you are immediately shown the Admin dashboard, which displays detailed workload and operational information. Whether you want to see the number of Client Workloads requesting access to Server Workloads over the last 24 hours, or view the number of credentials requests recorded over a 24-hour period for a specific usage type, the Admin Dashboard provides you quick access to these views so you can glean insight into your Aembit environment’s performance.
## The Admin Dashboard
[Section titled “The Admin Dashboard”](#the-admin-dashboard)
To view the Admin Dashboard.
1. Log into your Aembit Tenant with your user credentials.
2. Once you are logged in, you are directed to the Admin Dashboard, where you see data displayed in various panels.
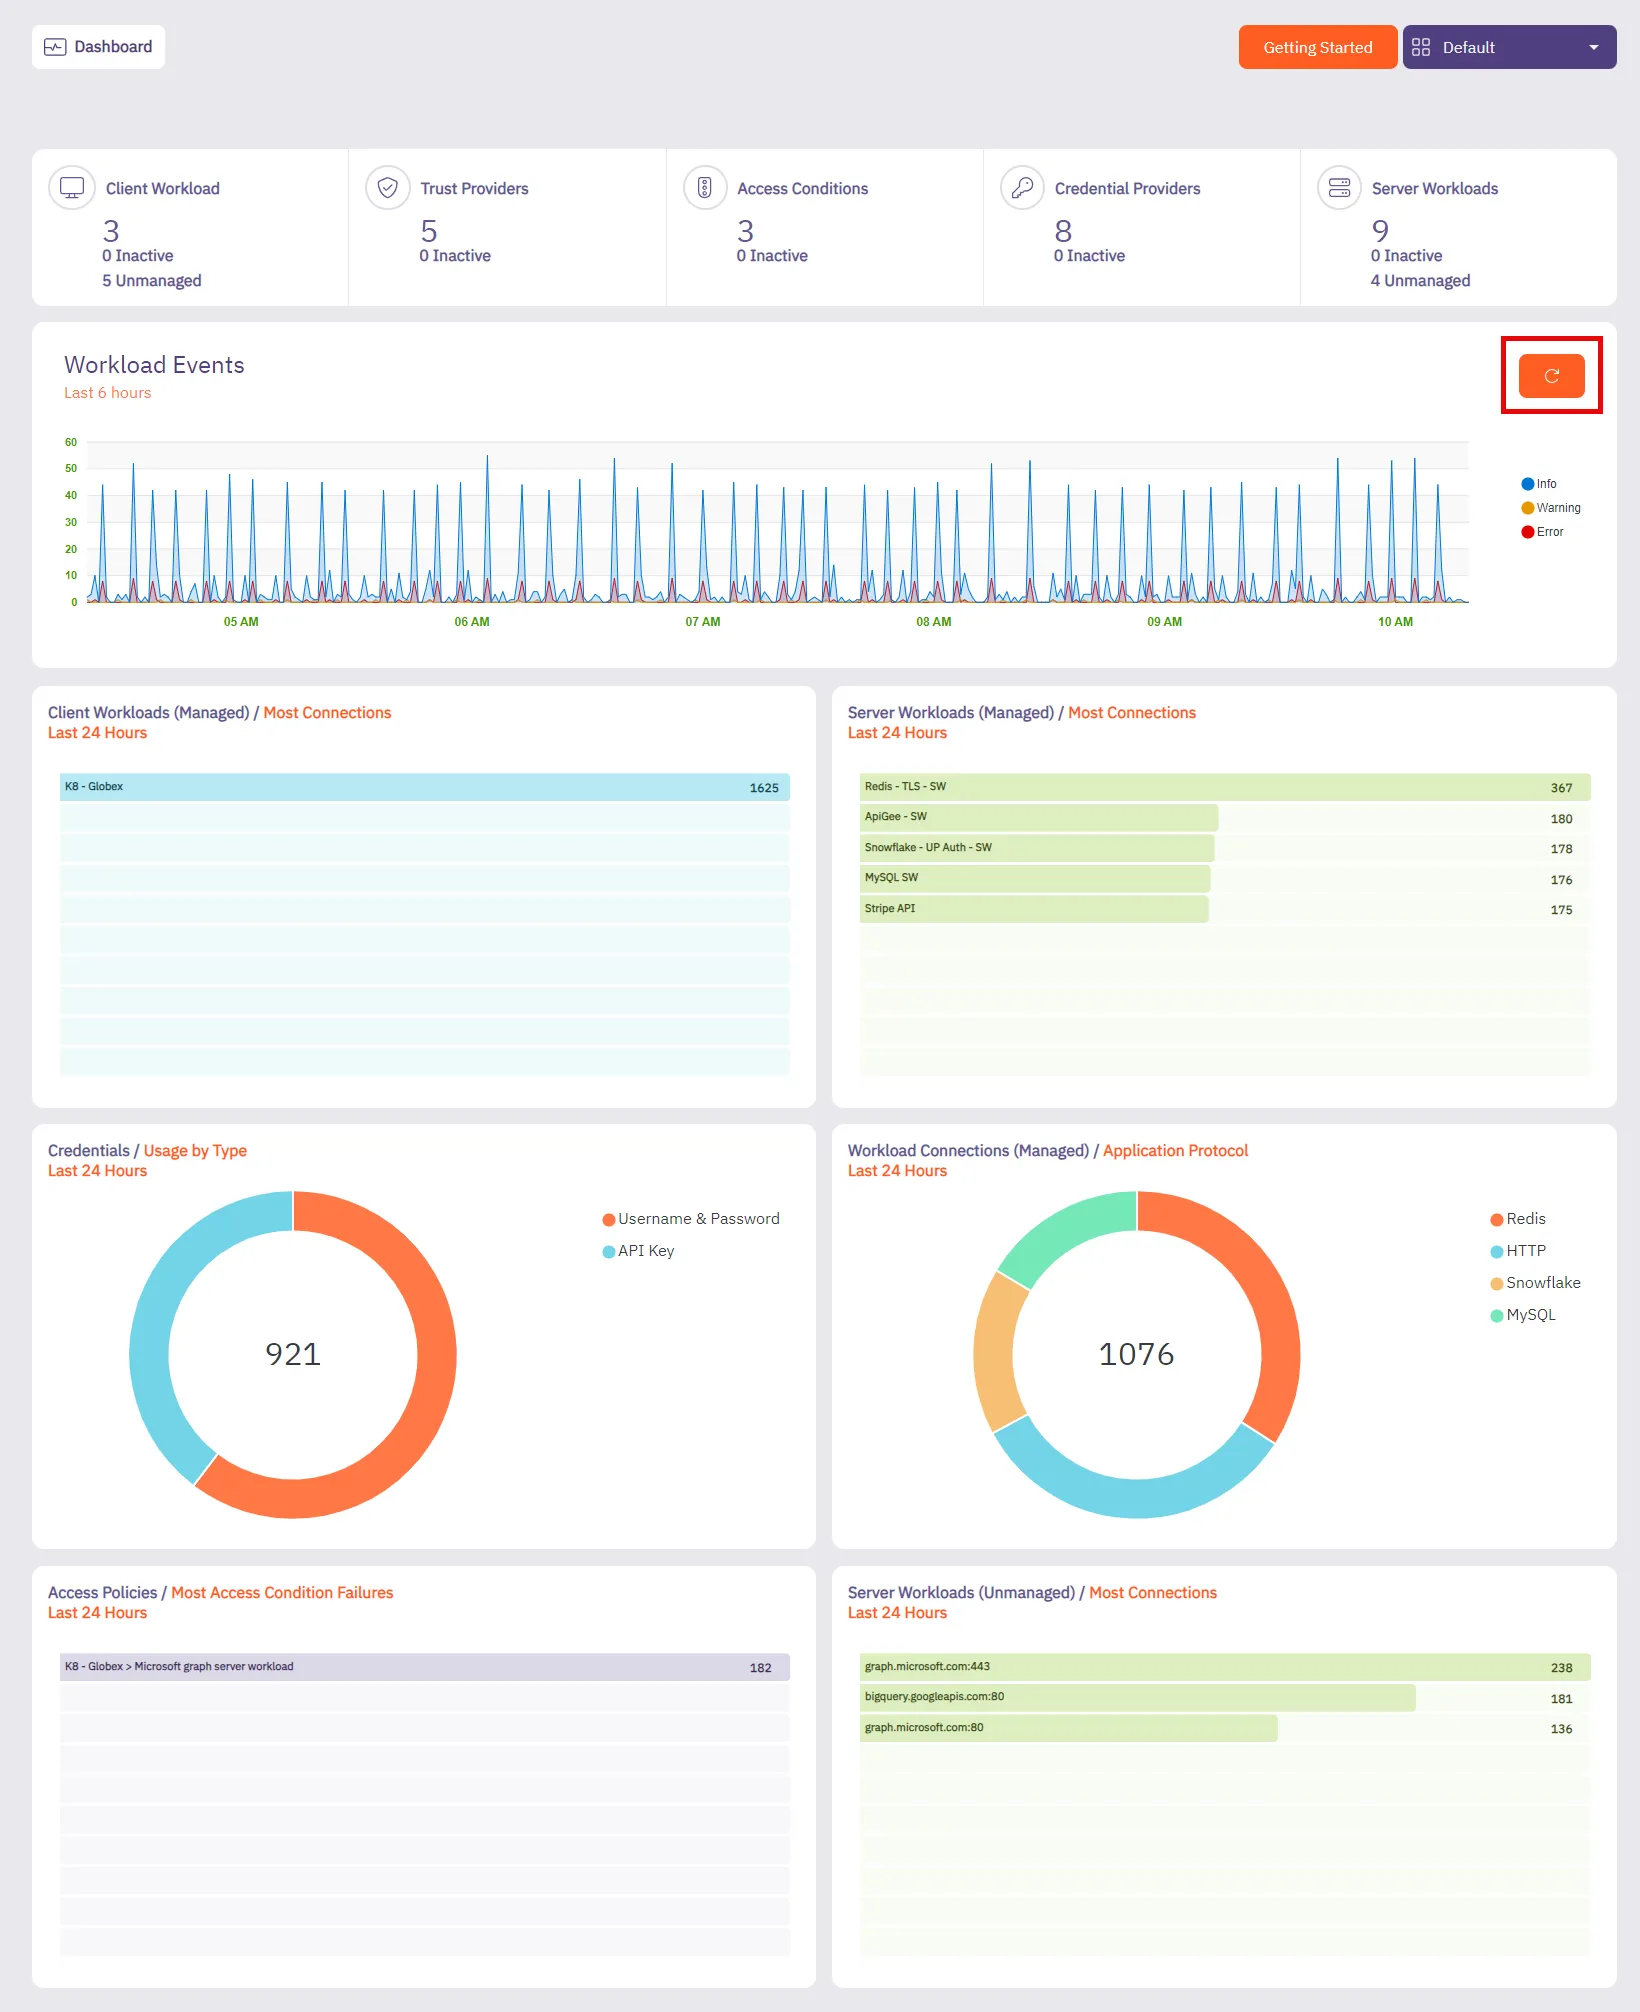
You should see the following tiles:
* Summary
* Workload Events
* Client Workloads (Managed)
* Server Workloads (Managed)
* Credentials (Usage By Type)
* Workload Connections (Managed)
* Access Conditions (Most Access Conditions Failures)
### Summary + Workload Events
[Section titled “Summary + Workload Events”](#summary--workload-events)
#### Summary
[Section titled “Summary”](#summary)
The **Summary** panel displays the number of configured workloads and entities in your Aembit environment, including the number of entities that are currently inactive.
* Client Workloads
* Trust Providers
* Access Conditions
* Credential Providers
* Server Workloads
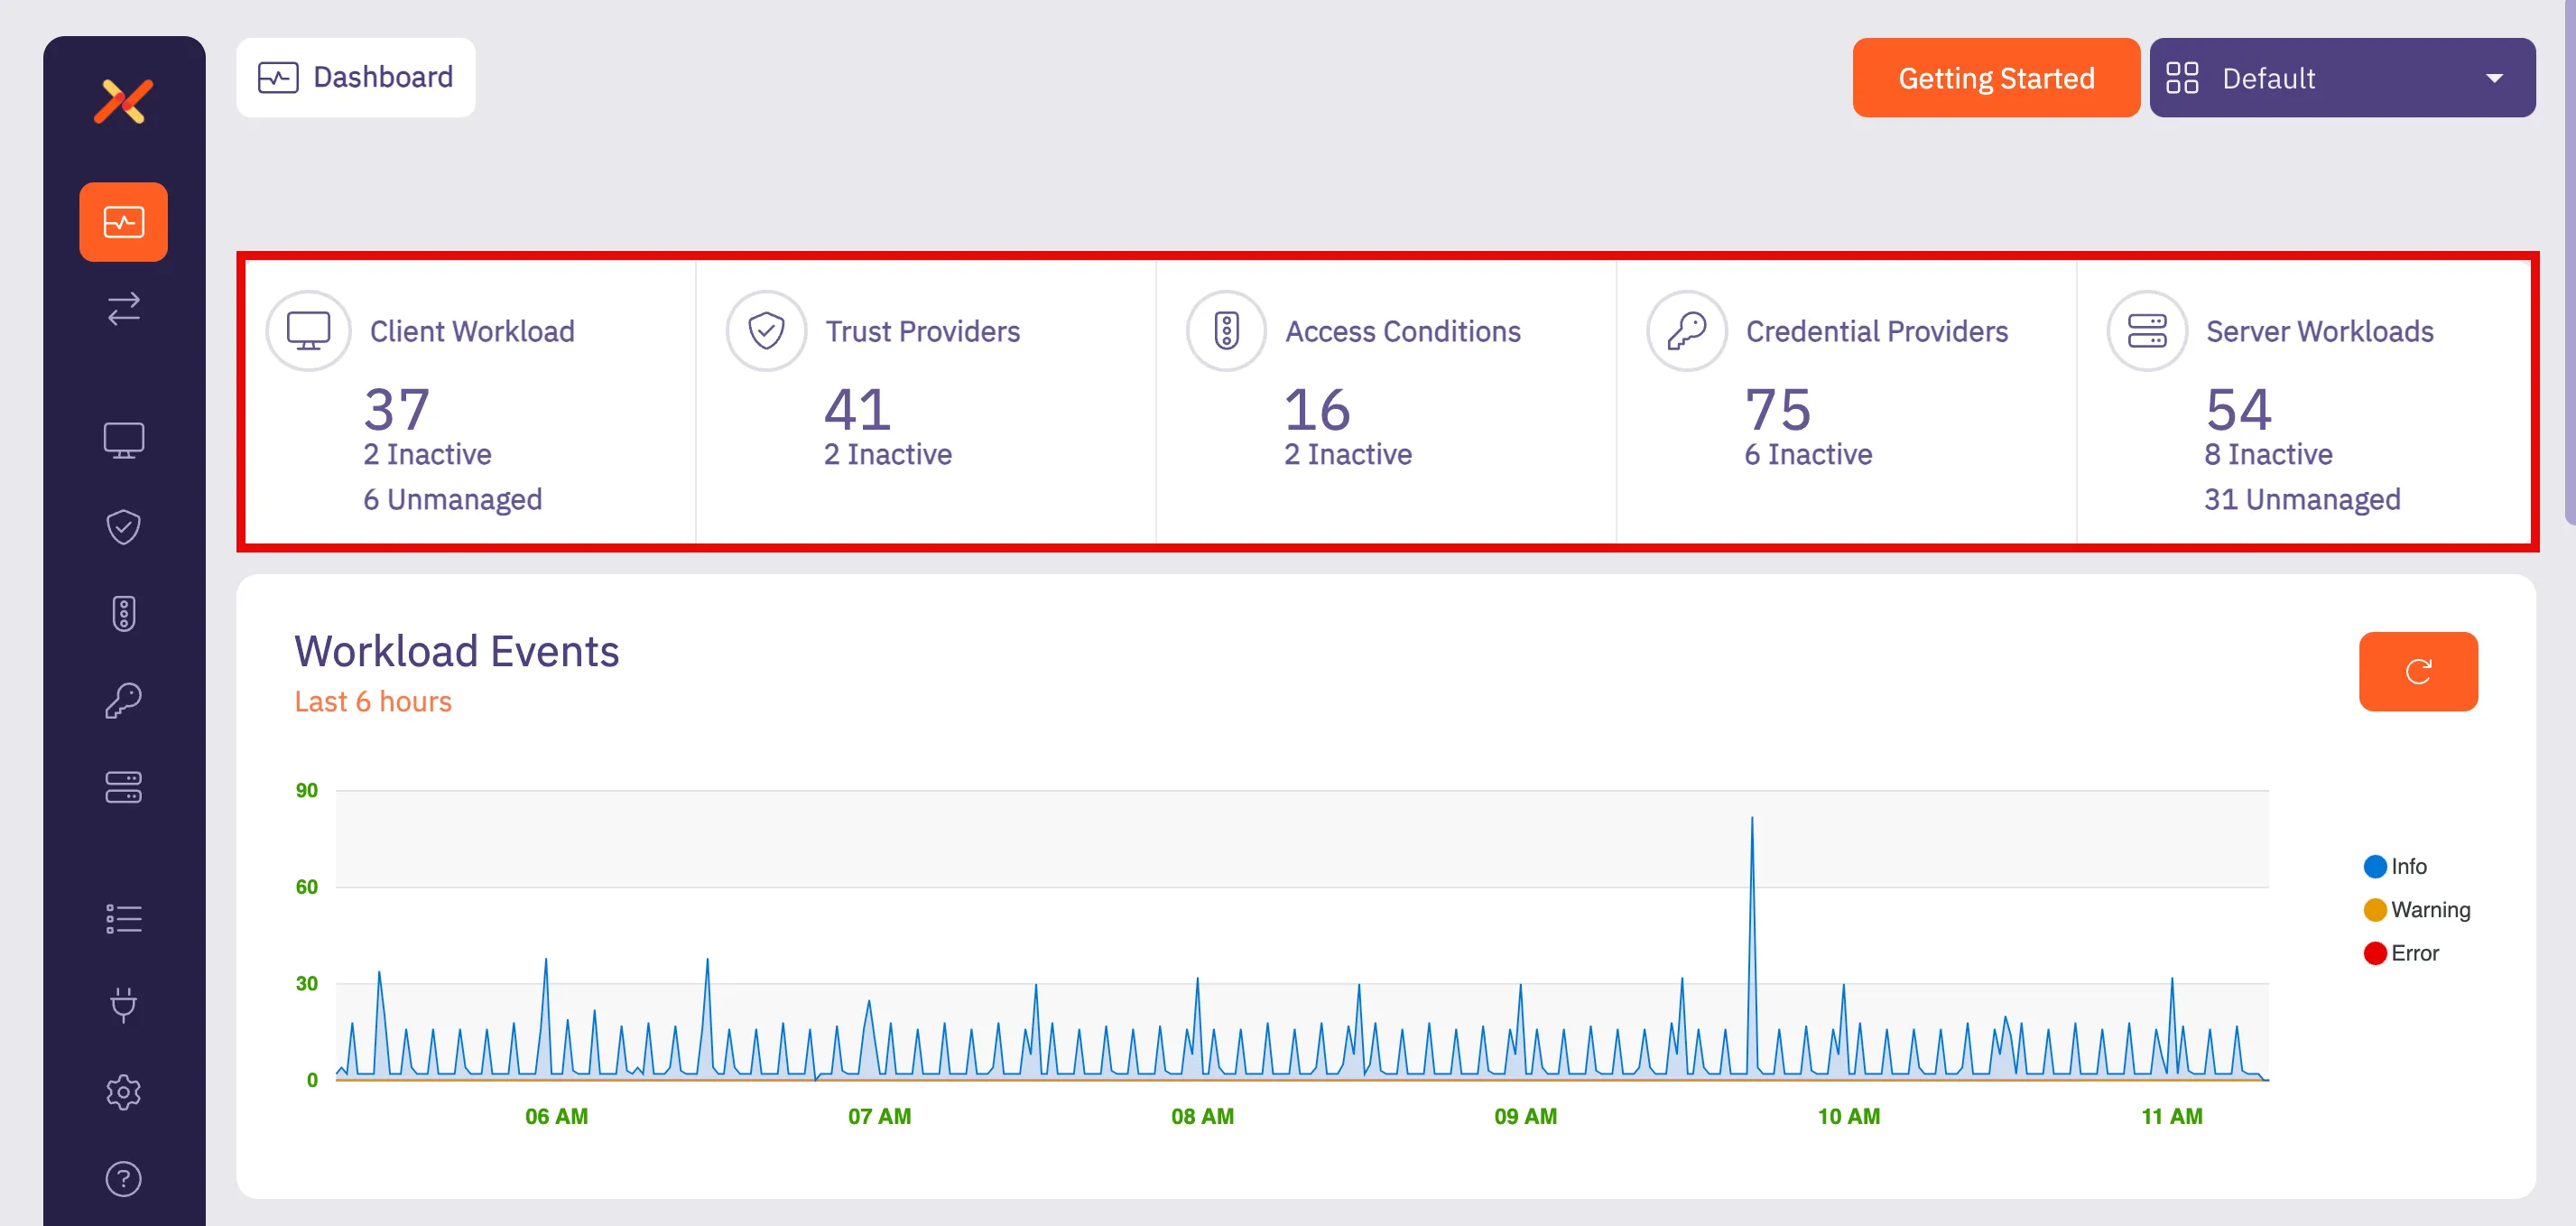
:::note When you click on one of these panels, the **Summary** tab opens the dashboard page for that resource with a list of existing configurations. :::
#### Workload Events
[Section titled “Workload Events”](#workload-events)
The **Workload Events** panel displays the number of Workload Events recorded over the last 6 hours. This historical data can be very useful in measuring how many workload events occurred over a set period of time. With this data, you can optimize your Aembit environment; this includes the workload event severity so users can quickly identify connectivity issues.

If you select the **Refresh** button, you can refresh the results to view newly received events, enabling you to view the latest event records and make any necessary changes if needed to ensure your Aembit environment is operating efficiently.
### Client Workloads (Managed)
[Section titled “Client Workloads (Managed)”](#client-workloads-managed)
The **Client Workloads (Managed)** panel displays the number of managed Client Workloads that attempted to access Server Workloads over the last 24 hours, sorted from top to bottom based on the number of Client Workload connections. This information can be helpful in determining which Client Workloads are accessing Server Workloads in your Aembit environment and identifying the most active Client Workloads.
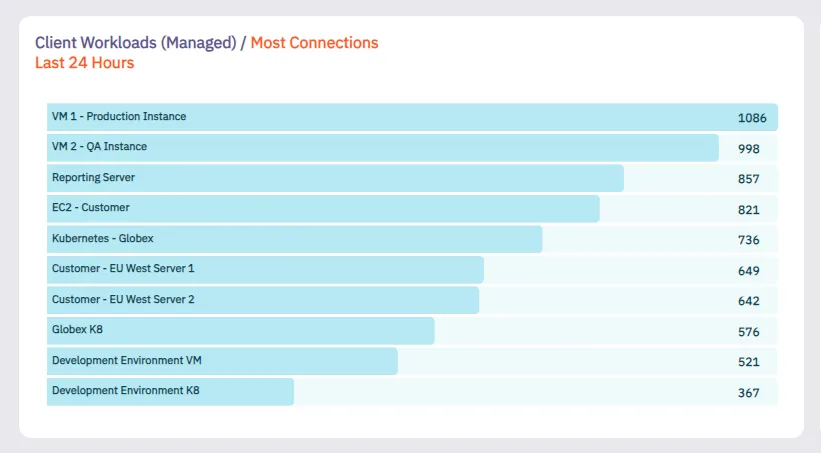
### Server Workloads (Managed)
[Section titled “Server Workloads (Managed)”](#server-workloads-managed)
The **Server Workloads (Managed)** panel displays the number of managed Server Workload connections that were recorded over the last 24 hours, sorted from top to bottom based on the number of requests received for the Server Workload. This information can be helpful in determining which Server Workloads are being accessed in your Aembit environment and identifying the most active Server Workloads.
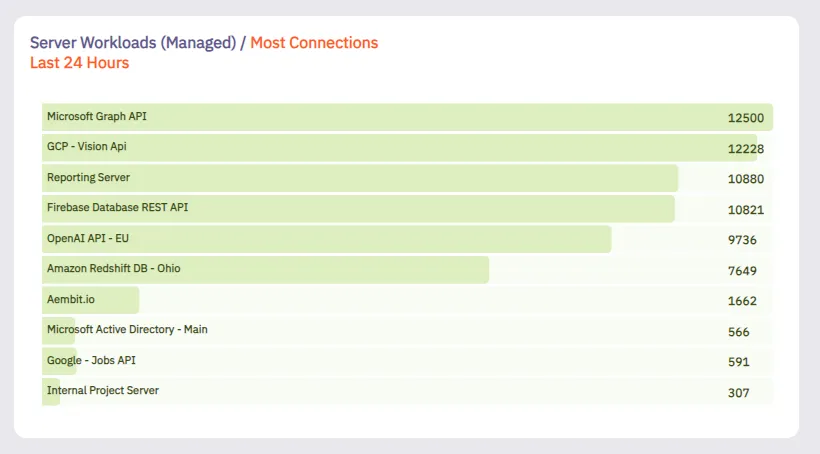
### Credential (Usage By Type)
[Section titled “Credential (Usage By Type)”](#credential-usage-by-type)
The **Credential (Usage By Type)** panel displays a pie chart showing the total number of credential types that were issued in the past 24 hours. This information can be helpful in determining which credential types are most frequently being used. Aembit encourages the use of short-lived credentials wherever possible. By identifying the usage level of different credential types, this chart can be helpful when transitioning from long-lived to short-lived credentials.

### Workload Connections (Managed) / Application Protocol
[Section titled “Workload Connections (Managed) / Application Protocol”](#workload-connections-managed--application-protocol)
The **Workload Connections** panel displays the number of managed Workload Connections that were recorded over the last 24 hours, sorted from top to bottom based on the type of application protocol used in the request.
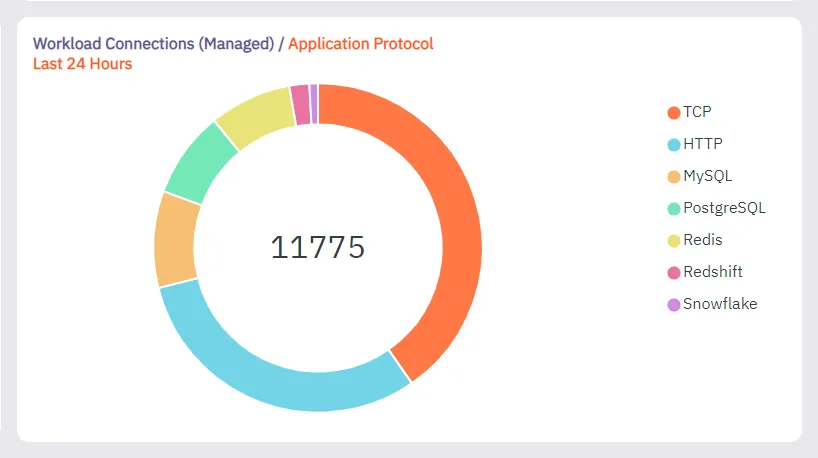
### Access Policies (Most Access Condition Failures)
[Section titled “Access Policies (Most Access Condition Failures)”](#access-policies-most-access-condition-failures)
The **Access Policies (Most Access Condition Failures)** panel displays the number of Access Condition failures based on Access Policies. In this chart, you can see that Aembit was able to identify Client Workloads and Server Workloads on Access Policies, but the Access Condition fails and these workloads can therefore not be attested, enabling you to identify how many attestations are failing because of Access Conditions.
In the example shown below, notice that for the VM1 - Production Instance, the most Access Condition failures occurred for Microsoft Graph API and Redshift DB - Ohio.
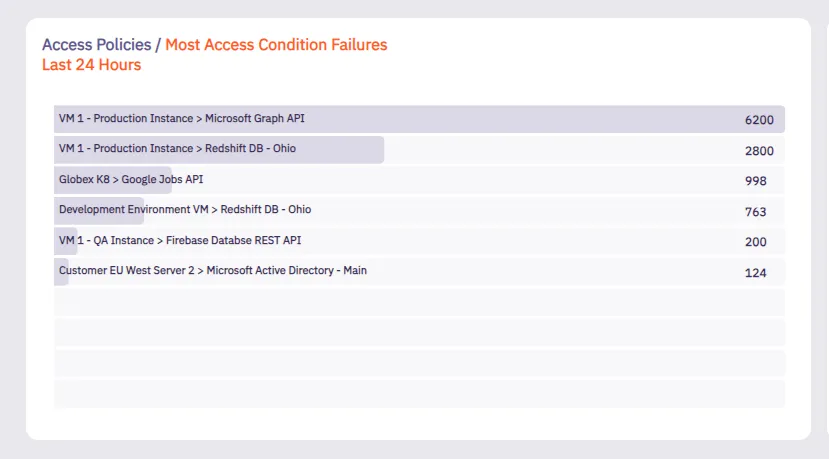
# Discovery overview
**Discovery** serves as the central control board for managing integrations related to the [Discovery](/user-guide/discovery/) process.
Note
This is a beta feature and may be subject to changes. To enable Discovery with Wiz, contact Aembit by completing the [Contact Us form](https://aembit.io/contact/).
Once you’ve contacted Aembit to enable Discovery in your Aembit Tenant, you can configure an integration to find workloads in your environment. Once you configure an integration, Aembit uses it to discover workloads. After discovering your workloads, Aembit displays them in either the **Client Workload** or **Server Workload** tab as **Discovered**. For detailed instructions on managing discovered workloads, refer to [Interacting with Discovered Workloads](/user-guide/discovery/managing-discovered-workloads).
## Using the discovery tab
[Section titled “Using the discovery tab”](#using-the-discovery-tab)
On the **Discovery tab** page, the **New** option appears in the top-right corner. Clicking **New** allows you to create and configure new integrations.

Following that, Aembit displays the **Integrations** list which lists existing integrations in a table. Each row in the table shows key details such as:
* **Name** - The name of the integration.
* **Type** - The type of integration.
* **Last Successful Sync** - The date and time of the last successful synchronization.
* **Sync Status** - Indicates the synchronization status.
To interact with an integration, you can either:
* Hover over the row in the **Integrations List**, where a three-dotted icon appear on the right end of the row. Clicking this icon opens a menu where you can:
* **View details** - See more information about the integration.
* **Edit** - Modify the integration’s configuration.
* **Delete** - Remove the integration.
* **Change active status** - Activate or deactivate the integration.
* Or, you can click directly on the integration row, which opens a **details page** where they can view, edit, or delete the integration.
Additionally, you can hover over the **Name** column to see the **ID** of the integration, which they can copy for reference.
## Related resources
[Section titled “Related resources”](#related-resources)
For more information about Discovery, see the following related pages:
* [Discovery Overview](/user-guide/discovery/) - Learn about the Discovery feature in Aembit
* [Managing Discovered Workloads](/user-guide/discovery/managing-discovered-workloads) - Learn how to work with discovered workloads
* [Discovery Sources](/user-guide/discovery/sources/) - Learn about the different Discovery Sources available in Aembit
# Create a Wiz Discovery Integration
> How to create a Wiz Discovery Integration
Note
This is a beta feature and may be subject to changes.
This page describes how to create a new Wiz integration for [Discovery](/user-guide/discovery/).
## Prerequisites
[Section titled “Prerequisites”](#prerequisites)
Before you begin, you must have access to the following:
* **Wiz Account** - You should have a **Wiz account**.
## Set up a service account in Wiz
[Section titled “Set up a service account in Wiz”](#set-up-a-service-account-in-wiz)
1. Sign in to your **Wiz account**.
2. Go to **Settings -> Integrations**.
3. Click **+ Add Integration** in the top-right corner.
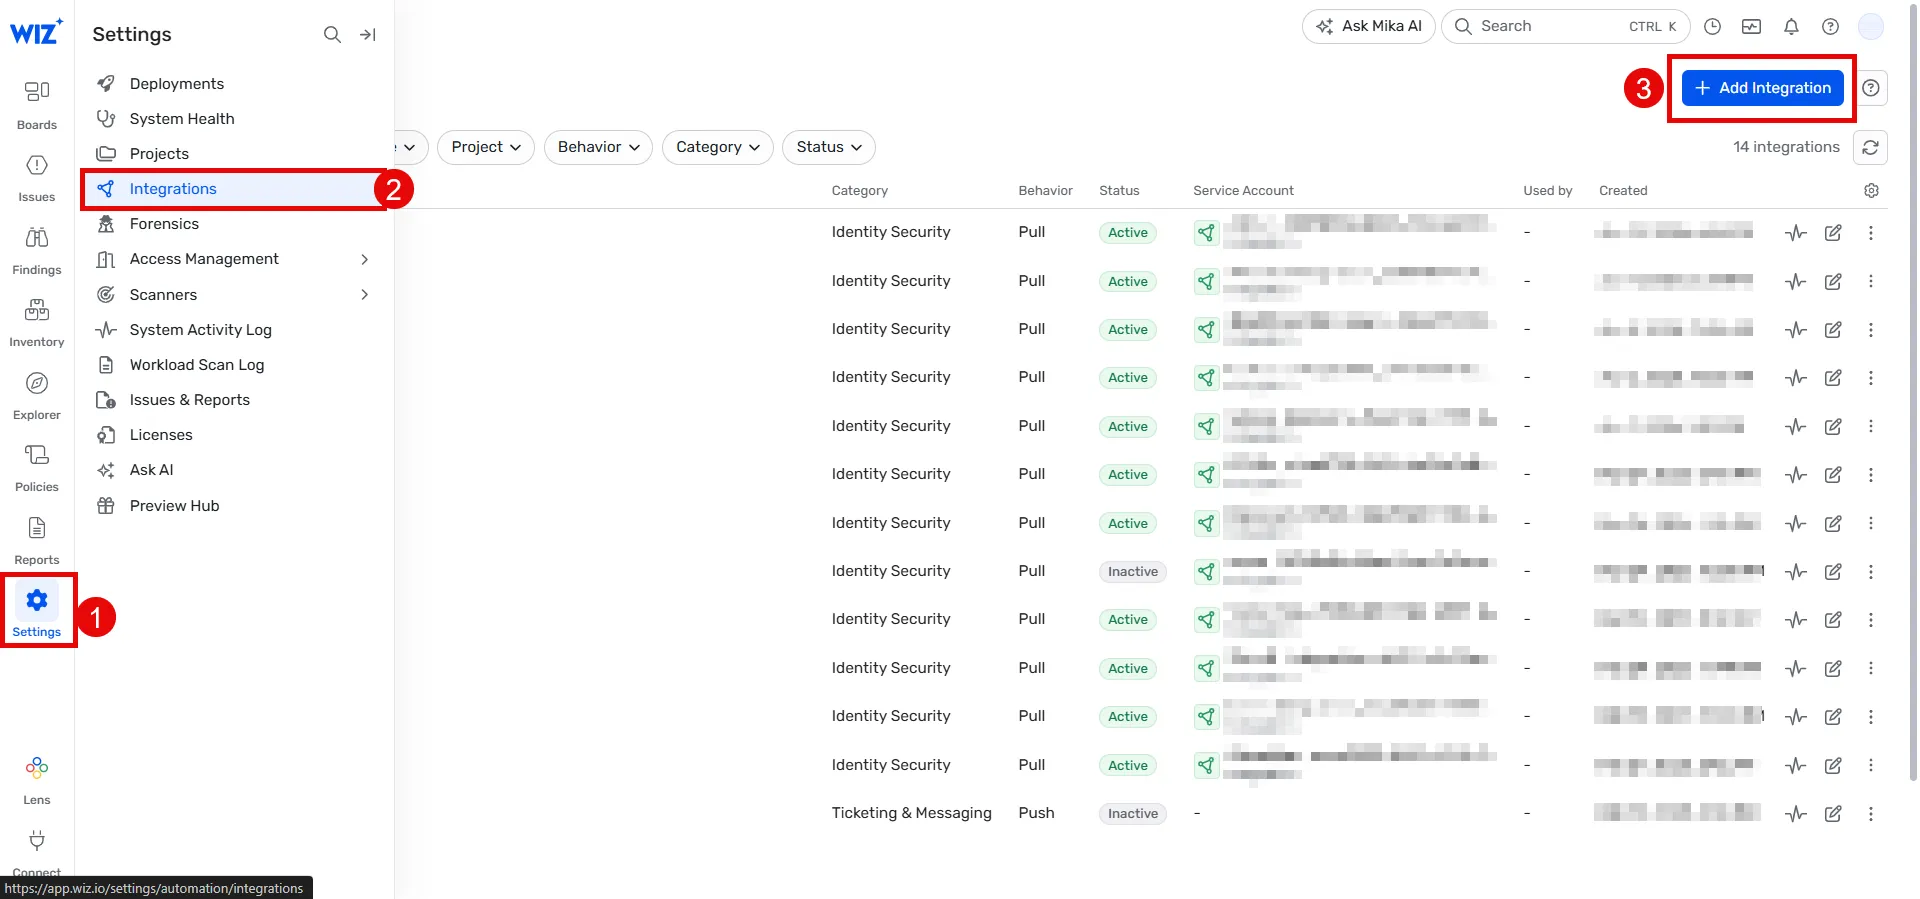
1. Search for **Aembit** and click the **Aembit integration**.
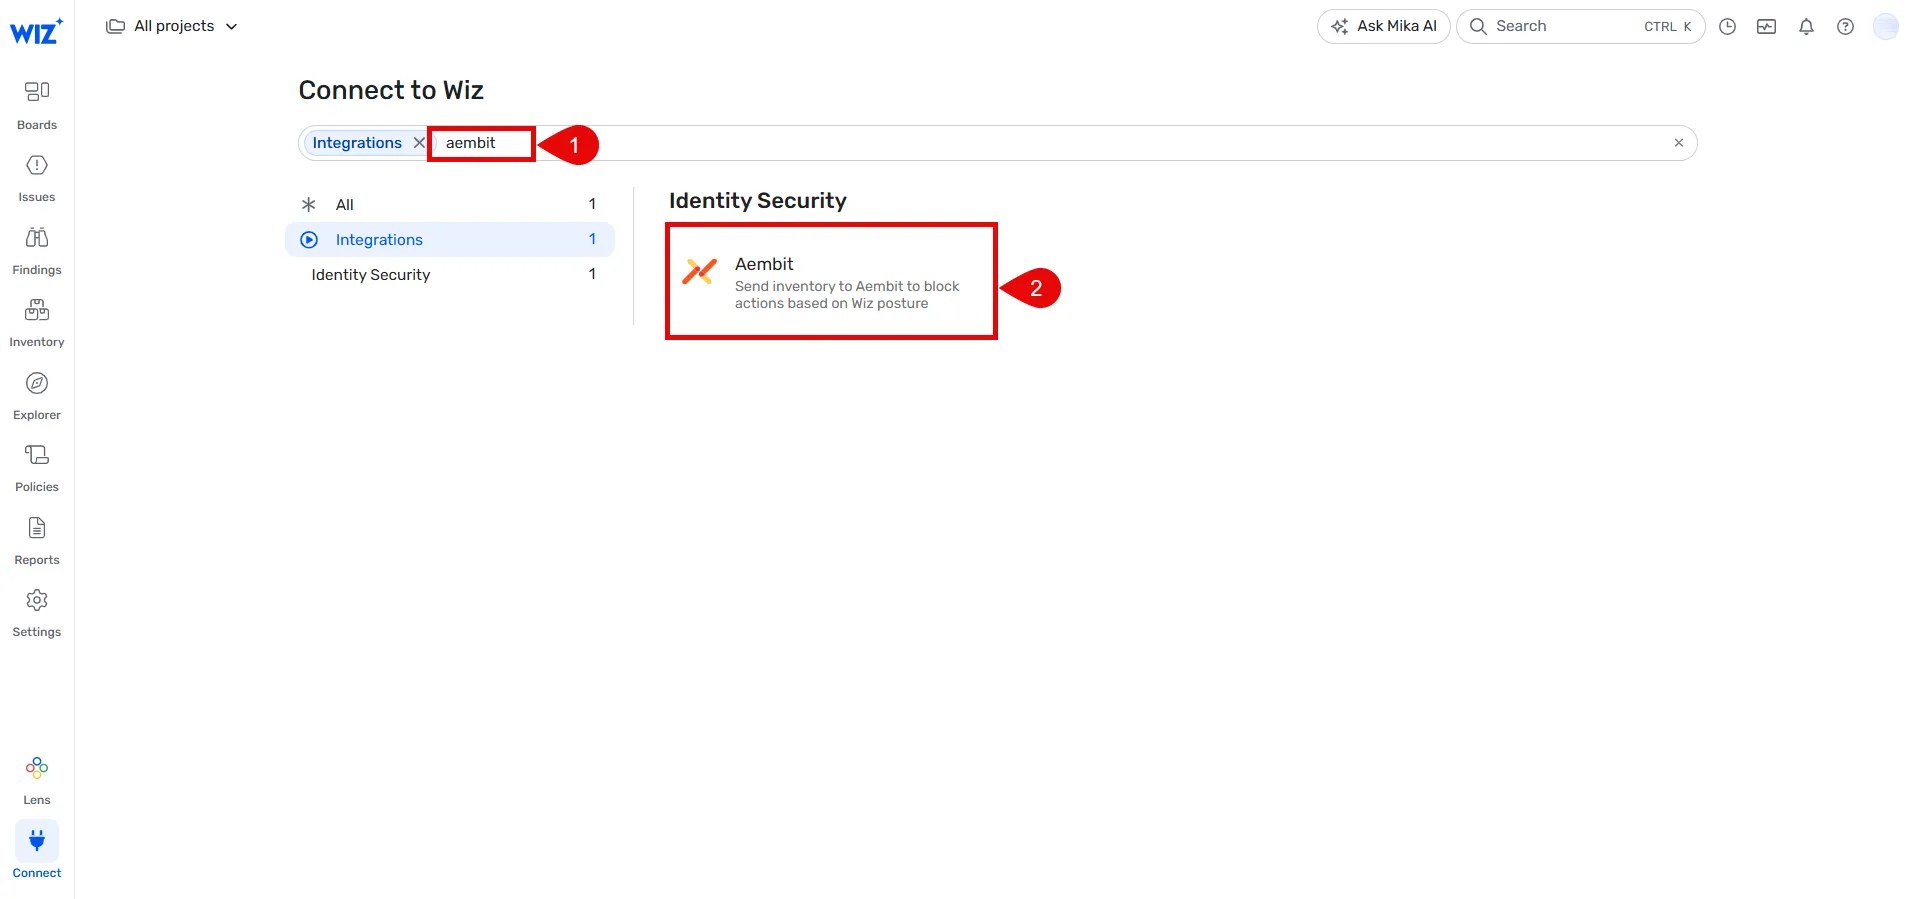
1. Provide a name for your integration (for example, **Aembit Discovery integration**).
2. Click **Add integration** at the bottom bar.
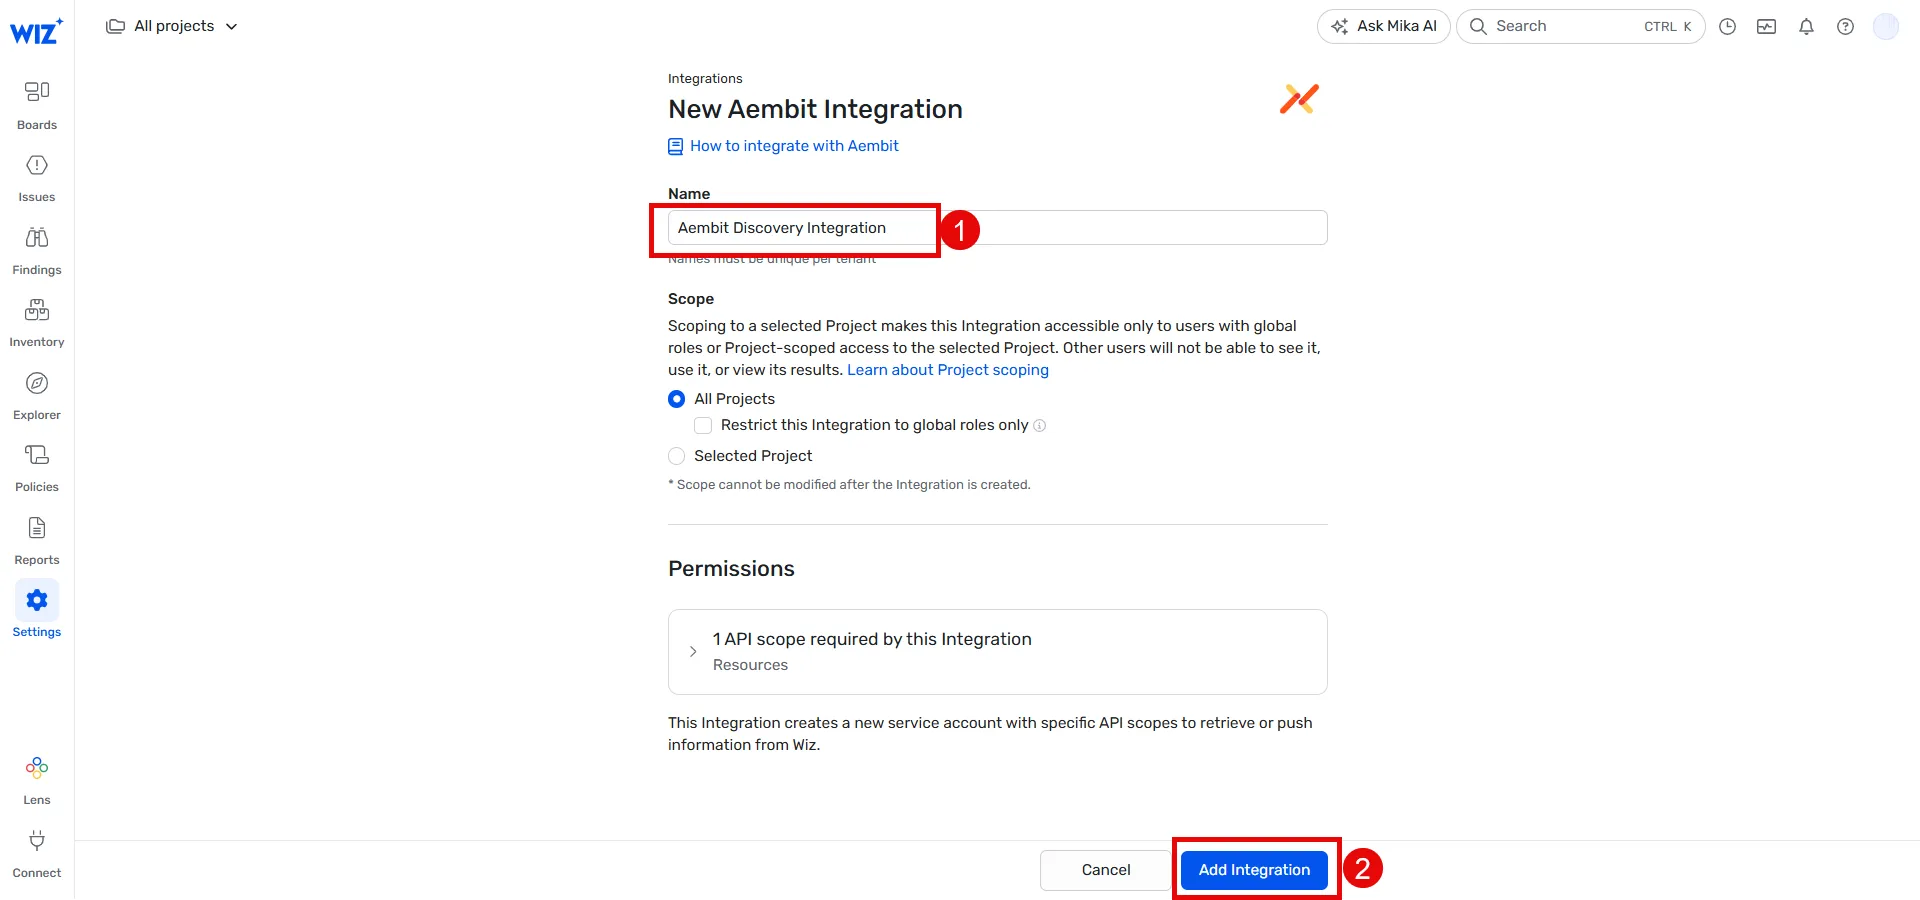
1. Open a new browser window or **copy** the following details from Wiz, as you’ll need them in the [next section](#configure-wiz-discovery):
* **API Endpoint URL**
* **Token URL**
* **Client ID**
* **Client Secret**
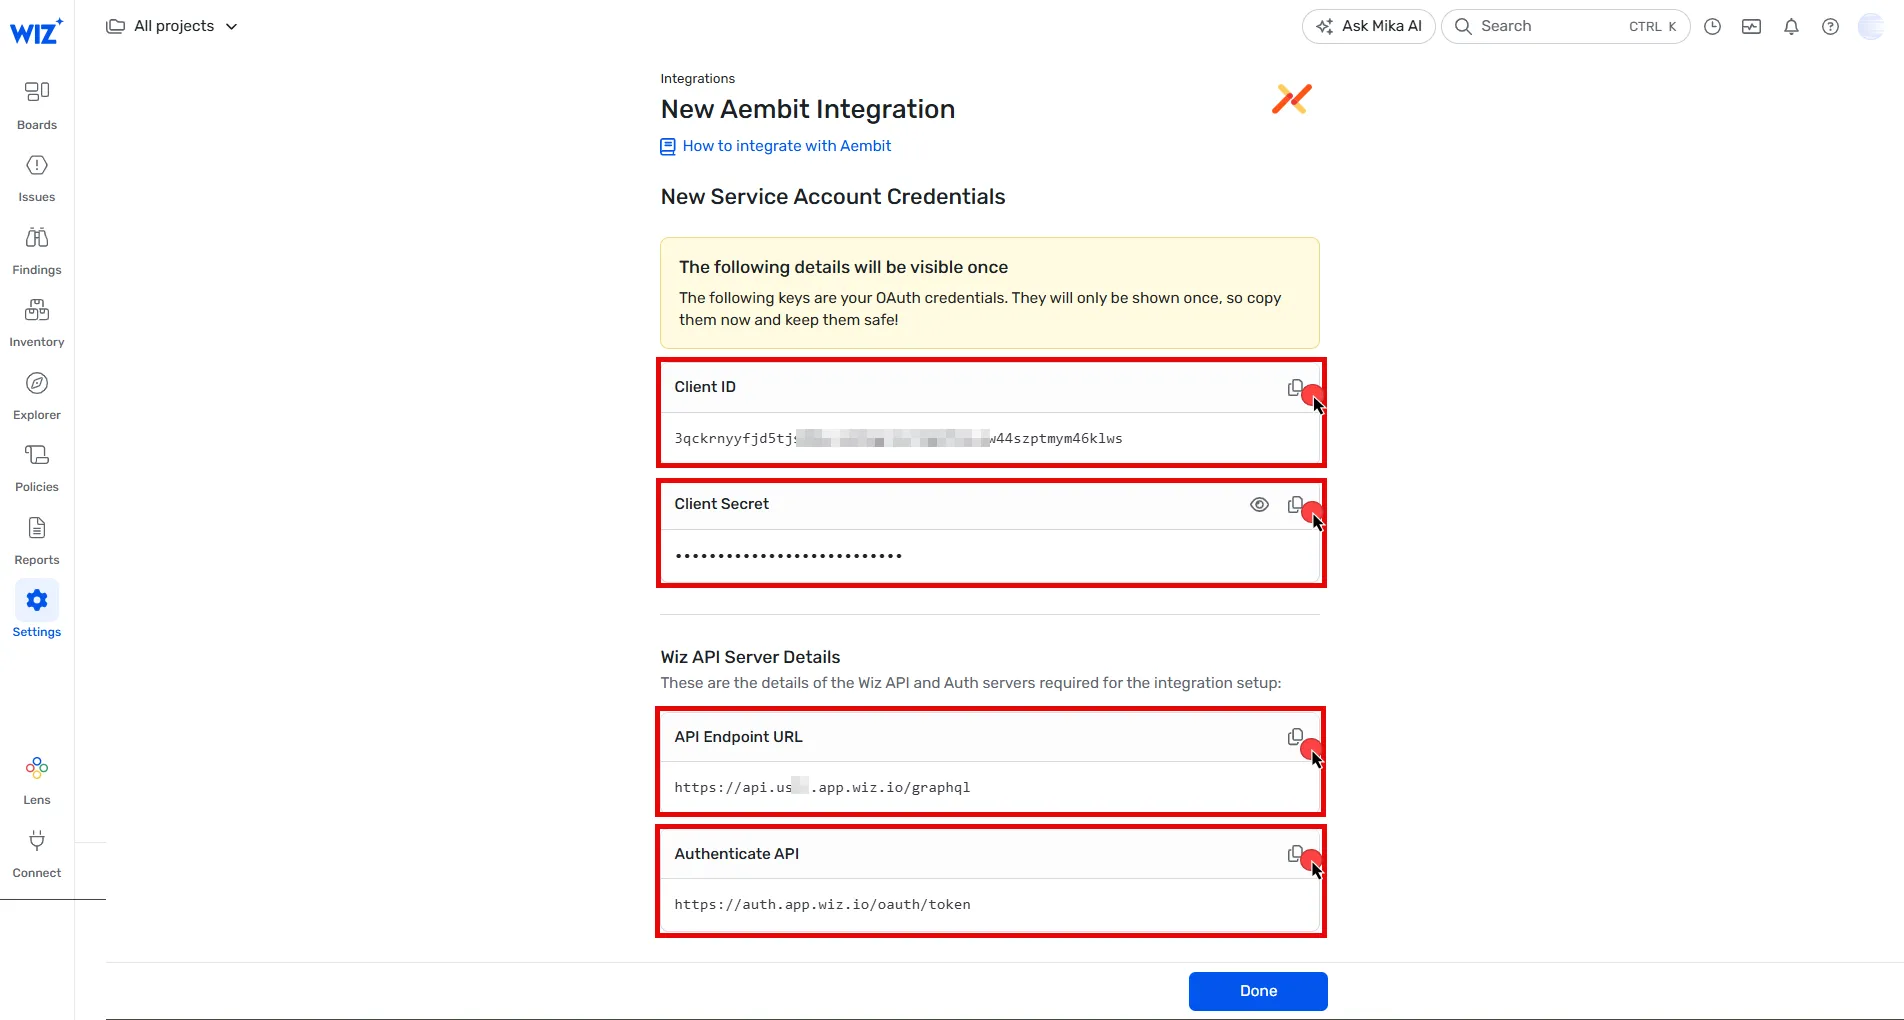
## Configure Wiz Discovery
[Section titled “Configure Wiz Discovery”](#configure-wiz-discovery)
Follow these steps to configure the Wiz integration in your Aembit Tenant:
1. Log into your Aembit Tenant.
2. Click **Administration** in the left sidebar.
3. At the top, select **Administration ☰ Discovery**
4. Click **+ New**.
5. Select **Wiz integration** from the available options.
6. Using the details from the final step in the [previous section](#set-up-a-service-account-in-wiz), fill in the integration details:
* **Name** - The name of the Integration. For example, **Wiz Discovery**.
* **Description** - An optional text description for the Integration.
* **Endpoint** - Paste the **API Endpoint URL** you copied earlier.
* **Sync Frequency** - Choose the sync frequency from dropdown menu.
* **OAuth Token Endpoint** - Paste the **Token URL** from the previous step.
* **Client ID** - Paste the **Client ID** you copied earlier.
* **Client Secret** - Paste the **Client Secret** you copied earlier.
* **Audience** - Enter `wiz-api`.
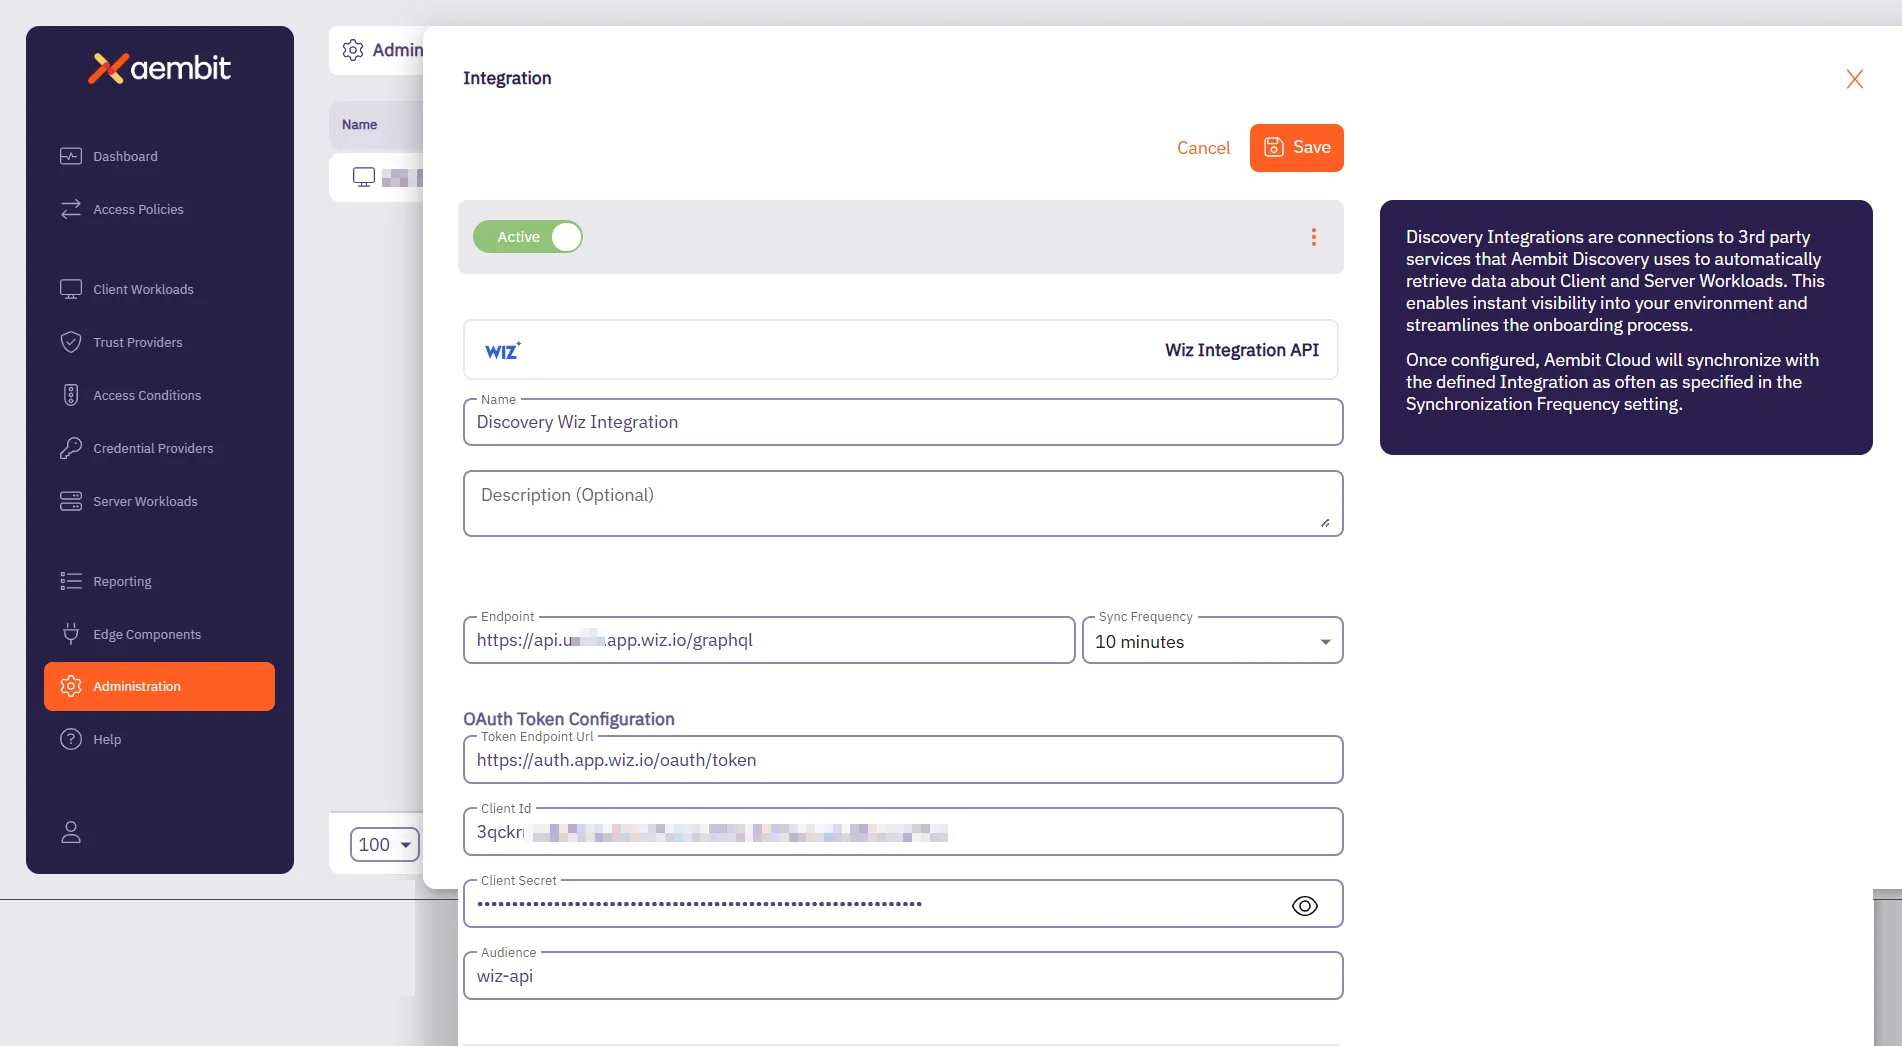
7. Click **Save**.
# Global Policy Compliance Overview
> What is Aembit Global Policy Compliance and how it works
Aembit’s Global Policy Compliance is a security enforcement feature that allows administrators to establish organization-wide security standards for Access Policies and Agent Controllers. Global Policy Compliance ensures consistent security practices across your Aembit environment and prevents the creation of policies that might inadvertently expose resources.
## What Global Policy Compliance does
[Section titled “What Global Policy Compliance does”](#what-global-policy-compliance-does)
Global Policy Compliance provides centralized control over the following Aembit administration components:
### Access Policies
[Section titled “Access Policies”](#access-policies)
* **Trust Provider Requirements** - Ensures all Access Policies include proper identity verification
* **Access Condition Requirements** - Enforces contextual access rules across all policies
### Agent Controllers
[Section titled “Agent Controllers”](#agent-controllers)
* **Trust Provider Requirements** - Ensures proper identity verification for all Agent Controllers
* **TLS Hostname Requirements** - Enforces secure communication standards
## How Global Policy Compliance works
[Section titled “How Global Policy Compliance works”](#how-global-policy-compliance-works)
You can [configure Global Policy Compliance](/user-guide/administration/global-policy/manage-global-policy) to either require, recommend, or not enforce that Aembit components such as Access Policies have certain configurations. For example, you can set Global Policy Compliance to enforce that all Access Policies have a Trust Provider configured.
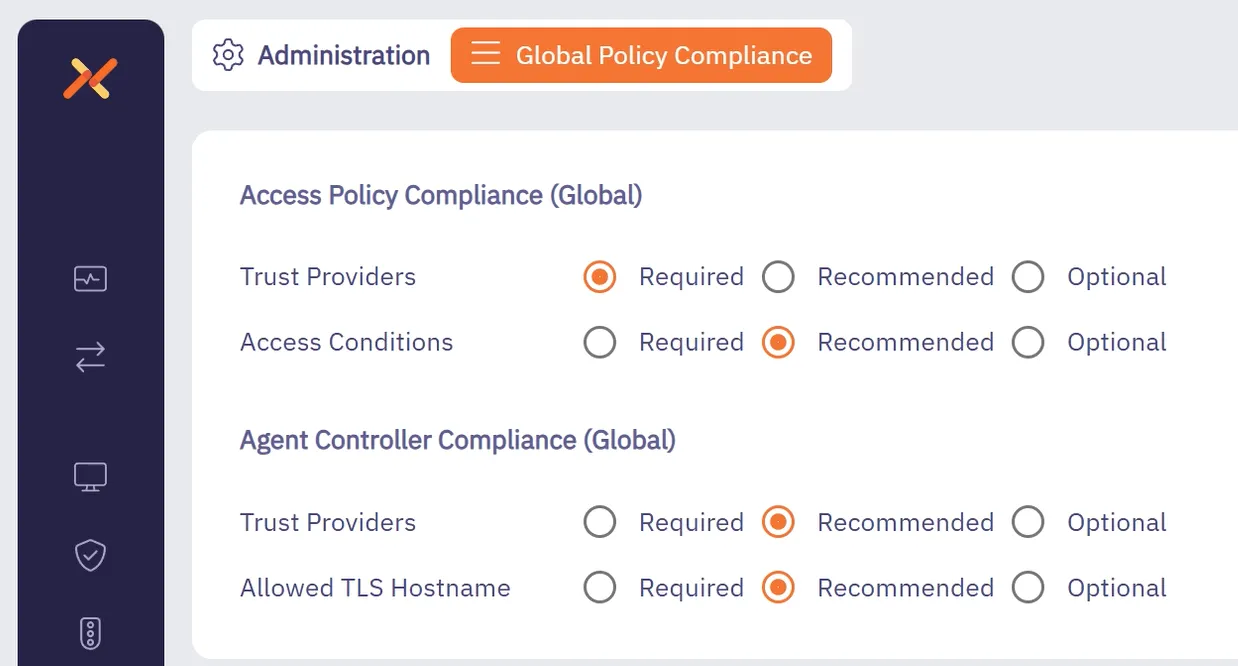
Global Policy Compliance operates on a three-tier enforcement model:
1. **Required** - Strictest setting - prevents creation or modification of non-compliant policies
2. **Recommended** (Default) - Flags non-compliant policies but allows their creation after confirmation
3. **Optional** - No enforcement - allows creation of policies without the specified security elements
Caution
Whenever you set a Global Policy Compliance setting to **Required**, Aembit prevents the creation or modification of Access Policies or Agent Controllers that don’t meet the specified requirements.
Enabling Global Policy Compliance settings to **Required** won’t deactivate existing Access Policies or Agent Controllers that don’t meet the requirements. However, you won’t be able to modify or save them until they become compliant.
## Global Policy Compliance status icons
[Section titled “Global Policy Compliance status icons”](#global-policy-compliance-status-icons)
Aembit visually identifies non-compliant Access Policies through color-coded status icons and labels:
* **Red** indicators for required but missing elements
* **Yellow** indicators for recommended but missing elements
* **Green** indicators for compliant Access Policies
* **Gray** indicators for disabled or not active Access Policies
## Review and audit compliance
[Section titled “Review and audit compliance”](#review-and-audit-compliance)
You can review and audit the compliance status of all Access Policies and Agent Controllers in your Aembit Tenant through the [Global Policy Compliance report dashboard](/user-guide/audit-report/global-policy).
## Benefits
[Section titled “Benefits”](#benefits)
* Ensures consistent security standards across your organization
* Prevents accidental creation of insecure Access Policies
* Provides visibility into policy compliance through visual indicators
* Supports role-based access control for compliance settings management
## Use cases
[Section titled “Use cases”](#use-cases)
Aembit’s Global Policy Compliance feature applies to many different use cases, such as the following:
* **Enterprise security compliance** - Security administrators in large enterprises can enforce that all Access Policies include proper identity verification through Trust Providers, ensuring consistent security practices across multiple teams and Resource Sets.
* **Regulated industries** - Organizations in healthcare, finance, and other regulated industries can use Global Policy Compliance to maintain audit-ready Access Policies that consistently implement required security controls.
* **DevOps security** - DevOps teams can implement secure-by-default practices by requiring Access Conditions on all policies, preventing deployment of resources with inadequate access controls.
* **Service providers** - Managed Service Providers (MSP) and SaaS providers can enforce strict TLS hostname requirements for Agent Controllers, ensuring secure communication standards across client environments.
## Additional resources
[Section titled “Additional resources”](#additional-resources)
-[Managing Policy Compliance](/user-guide/administration/global-policy/manage-global-policy)
# Managing Global Policy Compliance
> How to configure Aembit's Global Policy Compliance
This topic details how you can manage Global Policy Compliance in your Aembit Tenant.
## Permission requirements
[Section titled “Permission requirements”](#permission-requirements)
To configure Global Policy Compliance settings, your users must have the **Global Policy Compliance** permission with write access. You can set this permission in the [Users page](/user-guide/administration/users/) to any of the following:
* **No Access** - Can’t view or modify settings
* **Read-Only** - Can view settings but not modify them
* **Read/Write** - Can view and modify settings
## Configure Global Policy Compliance settings
[Section titled “Configure Global Policy Compliance settings”](#configure-global-policy-compliance-settings)
1. Log into your Aembit Tenant.
2. Go to **Administration** in the left sidebar menu.
3. At the top, select **Administration ☰ Global Policy Compliance**.
Aembit displays the following options:

The Global Policy Compliance page contains the settings that you can enforce specific security controls. For each setting, you can select from the following enforcement levels:
* **Required** - Prevents creation/modification of non-compliant policies
* **Recommended** - Displays warnings but allows creation after confirmation
* **Optional** - No enforcement applied
### Access Policy settings
[Section titled “Access Policy settings”](#access-policy-settings)
You can configure the following Access Policy enforcement levels:
* **Trust Provider Requirement** - Set to Required, Recommended, or Optional
* **Access Condition Requirement** - Set to Required, Recommended, or Optional
### Agent Controller settings
[Section titled “Agent Controller settings”](#agent-controller-settings)
You can configure the following Agent Controller enforcement levels:
* **Trust Provider Requirement** - Set to Required, Recommended, or Optional
* **TLS Hostname Requirement** - Set to Required, Recommended, or Optional
## Identify non-compliant Access Policies
[Section titled “Identify non-compliant Access Policies”](#identify-non-compliant-access-policies)
After configuring your [Global Policy Compliance settings](#configure-global-policy-compliance-settings):
1. Go to **Access Policies** in the left sidebar menu to view compliance status.
2. Look for the [color-coded status icons](/user-guide/administration/global-policy/#global-policy-compliance-status-icons) in the first column. The status icons indicate whether an Access Policy is compliant with your compliance policy settings.
3. Hover over icons to view specific compliance information or select an Access Policy to see more details about it.
Alternatively, you can review the compliance status of all Access Policies in your Aembit Tenant through the [Global Policy Compliance report dashboard](/user-guide/audit-report/global-policy).
## Edit non-compliant Access Policies
[Section titled “Edit non-compliant Access Policies”](#edit-non-compliant-access-policies)
When editing Access Policies under Global Policy Compliance:
1. Log into your Aembit Tenant and go to **Access Policies** in the left sidebar menu.
2. Select the Access Policy you want to view.
3. In the **Notes** section, Aembit displays **Compliance** information.
4. When saving a policy:
* If missing required elements, you can’t save until addressed
* If missing recommended elements, you’re prompted with a confirmation dialog
Aembit prevents you from saving your changes when you haven’t configured the elements your compliance policy *requires*.
For *recommended* elements that you haven’t configured, Aembit warns you that saving the policy as-is isn’t recommended.
5. To save your Access Policy, you must have no required elements not configured.
# Identity Providers overview
> Description of what Identity Providers are and how they work in the Aembit UI
The Identity Providers feature allows you to offer alternate authentication methods when users sign in to your Aembit tenant. The default authentication method is to use an email and password with the option to [enable and require MFA](/user-guide/administration/sign-on-policy/#require-multi-factor-authentication-for-native-sign-in).
Requiring your users to remember and manually enter a username and password every time they sign in to your Aembit tenant is tedious, error-prone, and insecure long-term. To improve the user experience and provide more secure authentication methods, set up SAML Single Sign-On (SSO) through integrating an external SAML-capable Identity Provider (IdP) such as Okta.
To enforce the exclusive use of SSO and prevent your users from authenticating with their username and password, enable [Require Single Sign On](/user-guide/administration/sign-on-policy/#require-single-sign-on).
Tip
The Identity Providers feature is only available on the following subscription plans:
* Teams plan
* Enterprise plan
To enable Identity Providers, please contact Aembit by completing the [Contact Us form](https://aembit.io/contact/).
## SAML overview
[Section titled “SAML overview”](#saml-overview)
SAML 2.0 (Security Assertion Markup Language) is an open standard created to provide cross-domain Single Sign-On (SSO) authentication. SSO allows a user to authenticate in one system (the [Identity Provider](#saml-identity-provider)) and gain access to a different system (the [Service Provider](#service-provider)) by providing proof of their authentication from the IdP.
### SAML Identity Provider
[Section titled “SAML Identity Provider”](#saml-identity-provider)
The SAML Identity Provider (IdP) enables SSO user authentication where Aembit acts as the Service Provider. Common SAML Identity Providers include Okta, Google, Microsoft Entra ID, and many others.
### Service Provider
[Section titled “Service Provider”](#service-provider)
The Service Provider takes this information and implicitly trusts the information given and provides access to the service or resource. The Aembit Service Provider is an example of a resource that accepts external Identity Provider data.
## Aembit SSO authentication process
[Section titled “Aembit SSO authentication process”](#aembit-sso-authentication-process)
The following occurs during the SSO authentication process on your Aembit Tenant:
1. A user selects the option to authenticate through an IdP on the Aembit Tenant login page.
2. Aembit redirects the user to the IdP’s log in page.
3. The IdP prompts the user to authenticate.
4. If the IdP authentication is successful, the IdP redirects the user back to your Aembit Tenant.
5. Aembit logs the user in through the successful SSO authentication.
## About automatic user creation
[Section titled “About automatic user creation”](#about-automatic-user-creation)
When you enable the automatic user creation feature, Aembit automatically generates new user accounts on your behalf when your users go through the [SSO authenticate process](#aembit-sso-authentication-process). This automation not only saves time and resources by reducing or eliminating the manual effort needed to manage user accounts but also minimizes errors associated with manual account management. Also, this feature provides granular control of what user roles Aembit assigns to new users it creates.
The automatic user creation feature works by extracting certain SAML attributes in the SAML response from the IdP after successful authentication with that IdP. It’s important to know, however, that not all IdPs configure their SAML attributes the same way. Different IdPs use distinct attribute names to pass user group claim information.
To alleviate these inconsistencies, Aembit allows you to map your IdP’s SAML attributes to the user roles available in your Aembit Tenant. See [Configure automatic user creation](/user-guide/administration/identity-providers/automatic-user-creation) for details.
### How automatic user creation works
[Section titled “How automatic user creation works”](#how-automatic-user-creation-works)
During the SSO authentication process, when Aembit verifies the incoming SAML response message, if no user account exists for that user, Aembit initiates the automatic user creation process.
Aembit requires an email address to uniquely identify users of your Aembit Tenant. If it can, Aembit populates the first and last name of the users it automatically creates. If not, Aembit just uses the user’s email address.
Aembit looks for the presence of the following group claim elements in the SAML response to try to create the new user account:
* A `NameID` element containing the user’s email address. If Aembit finds the `NameID` element isn’t present or the value isn’t a valid email address, Aembit searches for the `http://schemas.xmlsoap.org/ws/2005/05/identity/claims/emailaddress` claim instead. If Aembit finds neither, the automatic user creation process stops. If this happens, you must [Configure automatic user creation](/user-guide/administration/identity-providers/automatic-user-creation)
* Both `http://schemas.xmlsoap.org/ws/2005/05/identity/claims/givenname` and `http://schemas.xmlsoap.org/ws/2005/05/identity/claims/surname` to populate a user’s first and last names, respectively. Otherwise, Aembit populates a user’s first and last names with their email address.
* A `AttributeStatement` element with at least one `Attribute` child element with an attribute value matching the configuration data entered on the **Mapping** tab of the **Identity Provider** page. This match is necessary to determine which roles Aembit assigns to the new user account. If Aembit doesn’t find a matching attribute value, Aembit won’t create the new user account.
## Additional resources
[Section titled “Additional resources”](#additional-resources)
The following pages provide more information about working with Identity Providers:
* [Automatic User Creation](/user-guide/administration/identity-providers/automatic-user-creation) - Configure automatic user creation with Identity Providers
* [Creating Identity Providers](/user-guide/administration/identity-providers/create-identity-provider) - Set up new Identity Providers in your Aembit Tenant
# How to configure Single Sign On automatic user creation
> How to configure SSO automatic user creation through an identity provider
[Automatic user creation](/user-guide/administration/identity-providers/#about-automatic-user-creation) automatically generates new user accounts on your behalf when your users go through the SSO authenticate process. This feature provides granular control of what user roles Aembit assigns to new users it creates. For more details, see [how automatic user creation works](/user-guide/administration/identity-providers/#how-automatic-user-creation-works).
## Prerequisites
[Section titled “Prerequisites”](#prerequisites)
To enable automatic user creation in your Aembit Tenant, you must have the following:
* A Teams or Enterprise subscription plan.
* Your Identity Provider’s (IdP) SAML group claim information attribute names and values.
## Map IdP SAML attributes to Aembit user roles
[Section titled “Map IdP SAML attributes to Aembit user roles”](#map-idp-saml-attributes-to-aembit-user-roles)
To map the group information sent from your Identity Provider to the roles available in your tenant, follow these steps:
1. Log into your Aembit Tenant.
2. Click **Administration** in the left sidebar.
3. At the top, select **Administration ☰ Identity Providers**.
Aembit displays the **Identity Providers** page with a list of existing Identity Providers.
4. [Create a new Identity Provider](/user-guide/administration/identity-providers/create-identity-provider) or edit an existing one, and then select the **Mappings** tab.
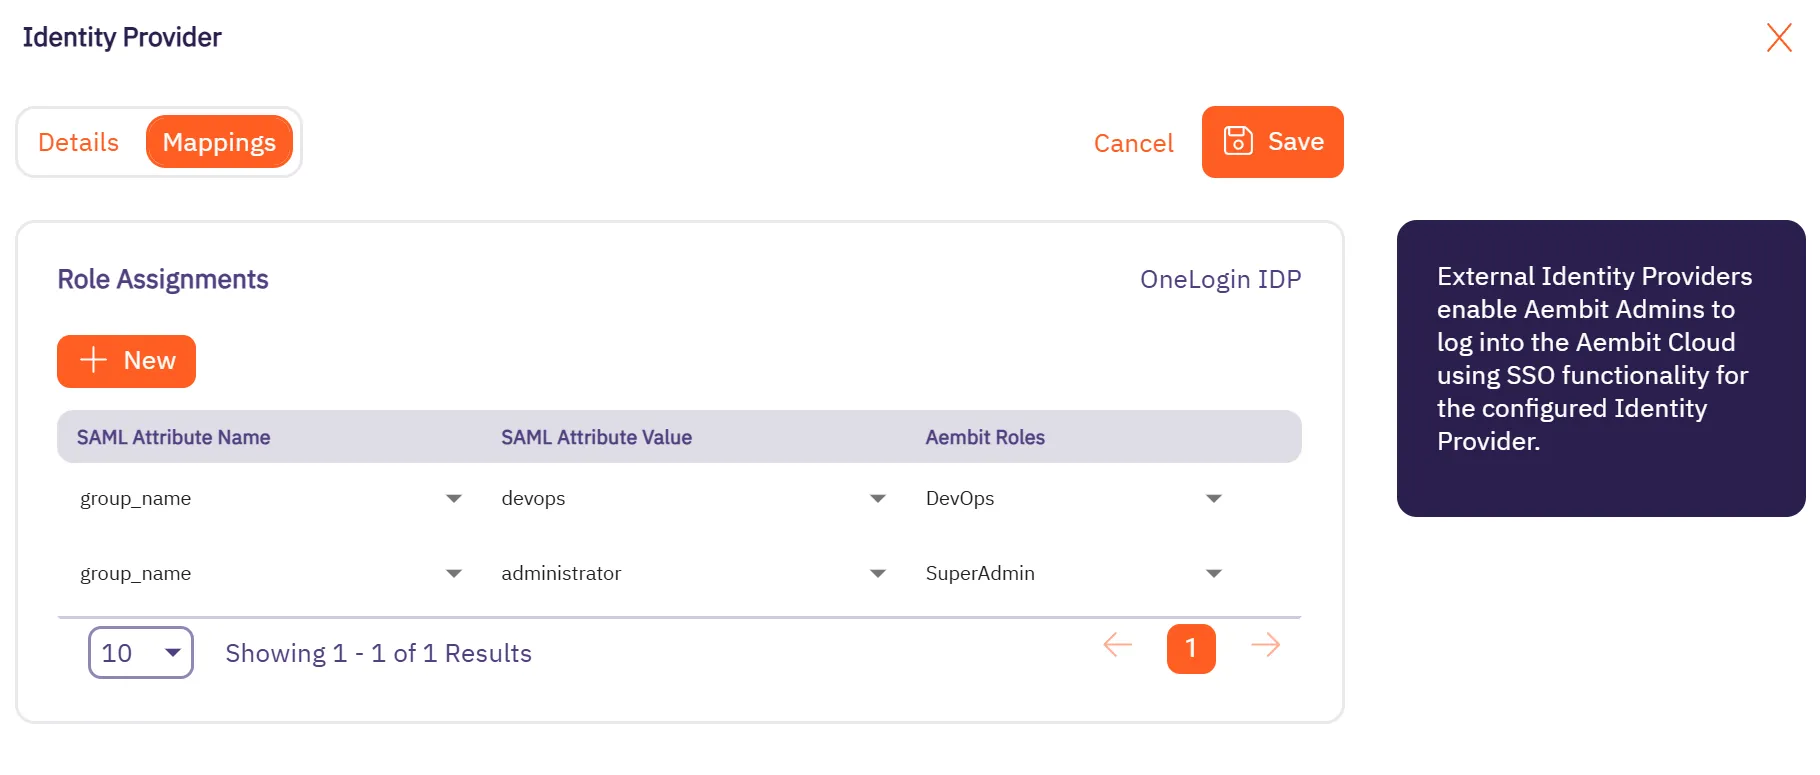
5. Click **Edit** if not already in edit mode.
6. Click **+ New**, which adds a new row to the table **Role Assignments** table.
7. In the **SAML Attribute Name** column, use the dropdown to select an existing attribute name or click ”+” to add a new one. Make sure the values correspond to the groups defined in your Identity Provider.
8. In the **SAML Attribute Value** column, use the dropdown to select an existing attribute value or click ”+” to add a new one. Make sure the values correspond to the groups defined in your Identity Provider.
Tip
Refer to your Identity Provider’s configuration documentation for the correct attribute names and values.
For example, Azure uses the predefined claim name `http://schemas.microsoft.com/ws/2008/06/identity/claims/groups`, while other Identity Providers may allow customization of the claim name for group information.
9. In the **Aembit Roles** column, use the dropdown to select one or more Aembit roles.

10. If needed, repeat the previous four steps.
11. Click **Save**.
# How to create an Identity Provider
> How to create an Identity Provider
Configuring an external Identity Provider (IdP) allows you to offer alternate authentication methods for how users sign in to your Aembit Tenant. For example, Single Sign-On (SSO) instead of the default authentication method of an email and password.
When you configure a SAML-capable IdP in your Aembit Tenant, you must enter either your IdP’s SAML **Metadata URL** or **Metadata XML** information. If either of these items are present, Aembit provides the following in the Aembit UI:
* Aembit SP Entity ID
* Aembit SSO URL (for IdP-initiated SSO)
## Configure an external Identity Provider
[Section titled “Configure an external Identity Provider”](#configure-an-external-identity-provider)
To configure an external SAML-capable IdP to work with the Aembit IdP, follow these steps:
1. Log into your Aembit Tenant.
2. Click **Administration** in the left sidebar.
3. At the top, select **Administration ☰ Identity Providers**.
Aembit displays the **Identity Providers** page with a list of existing Identity Providers.
4. Click **+ New**, revealing the **Identity Provider** pop out menu.
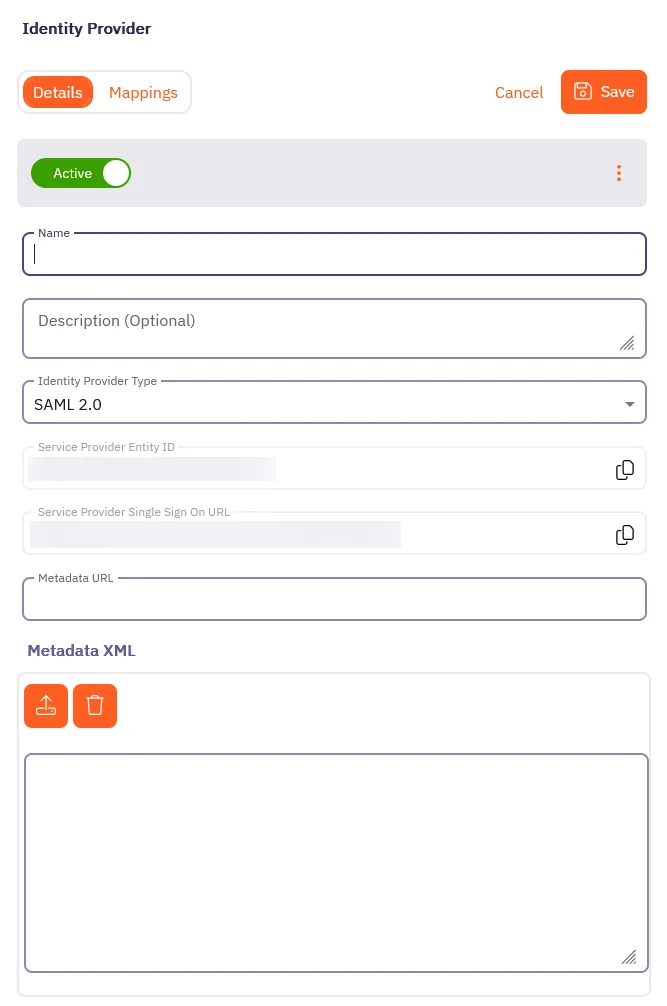
5. On the **Details** tab, fill out the following fields:
* **Name** - The name of the SAML Identity Provider (for example, Okta SSO)
* **Description** - A description of the SAML Identity Provider (this is optional)
* **Identity Provider Type** - The type of SAML Identity Provider. Aembit only supports SAML 2.0.
* Depending on your Identity Provider, either enter the Metadata URL in the **Metadata URL** field or use the **Metadata XML** field to upload an XML file with the Identity Provider Metadata information:
* **Metadata URL** - The URL where Aembit can retrieve SAML metadata for a specific SAML-capable Identity Provider.
* **Metadata XML** - Some Identity Providers may not provide a publicly accessible Metadata URL. In these cases, Identity Provider configuration may have an option to download the metadata information in XML form.
Note
You should use the **Aembit SP Entity ID** and **Aembit SSO URL** fields to configure your external Identity Provider.
6. Optionally, in the **Mappings** tab of the **Identity Provider** page you may specify mapping information between group claims configured in your Identity Provider and user roles available in your tenant.
Adding this information enables automatic user creation based on the information in SAML response messages sent by your Identity Provider.
See [Configure automatic user creation](/user-guide/administration/identity-providers/automatic-user-creation#map-idp-saml-attributes-to-aembit-user-roles) for more information.
7. Click **Save**.
Aembit displays the newly created SAML IdP listed on the **Identity Provider** page. Now, when your users log in to your Aembit Tenant, the login UI displays the available SAML SSO options similar to the following screenshot:

# Log Stream overview
> Description of what Log Streams are and how to capture and archive log information
The Log Streams feature enables you to set up a process to forward audit logs, workload events, and access authorization events from your Aembit Tenant to an AWS S3 or GCP Cloud Storage Bucket. This in turn enables you to perform more detailed data analysis and processing outside of your Aembit Tenant.
Note
This is a paid feature. To enable this feature, please reach out to [Aembit Support](https://aembit.io/support/).
The following pages provide information about configuring Log Streams for different cloud storage services:
* [AWS S3](/user-guide/administration/log-streams/aws-s3) - Configure Log Streams to send logs to AWS S3 buckets
* [CrowdStrike Next-Gen SIEM](/user-guide/administration/log-streams/crowdstrike-siem) - Configure Log Streams to send logs to CrowdStrike Next-Gen SIEM.
* [GCS Bucket](/user-guide/administration/log-streams/gcs-bucket) - Configure Log Streams to send logs to Google Cloud Storage buckets
* [Splunk SIEM](/user-guide/administration/log-streams/splunk-siem) - Configure Log Streams to send logs to Splunk SIEM
# Create a AWS S3 Log Stream
> This page describes how to create a new Log Stream to an AWS S3 Bucket
To create a new Log Stream to an AWS S3 Bucket, follow these steps:
1. Log into your Aembit Tenant.
2. Click **Administration** in the left sidebar.
3. At the top, select **Administration ☰ Log Streams**.
Aembit displays the **Log Streams** page with a list of existing Log Streams.
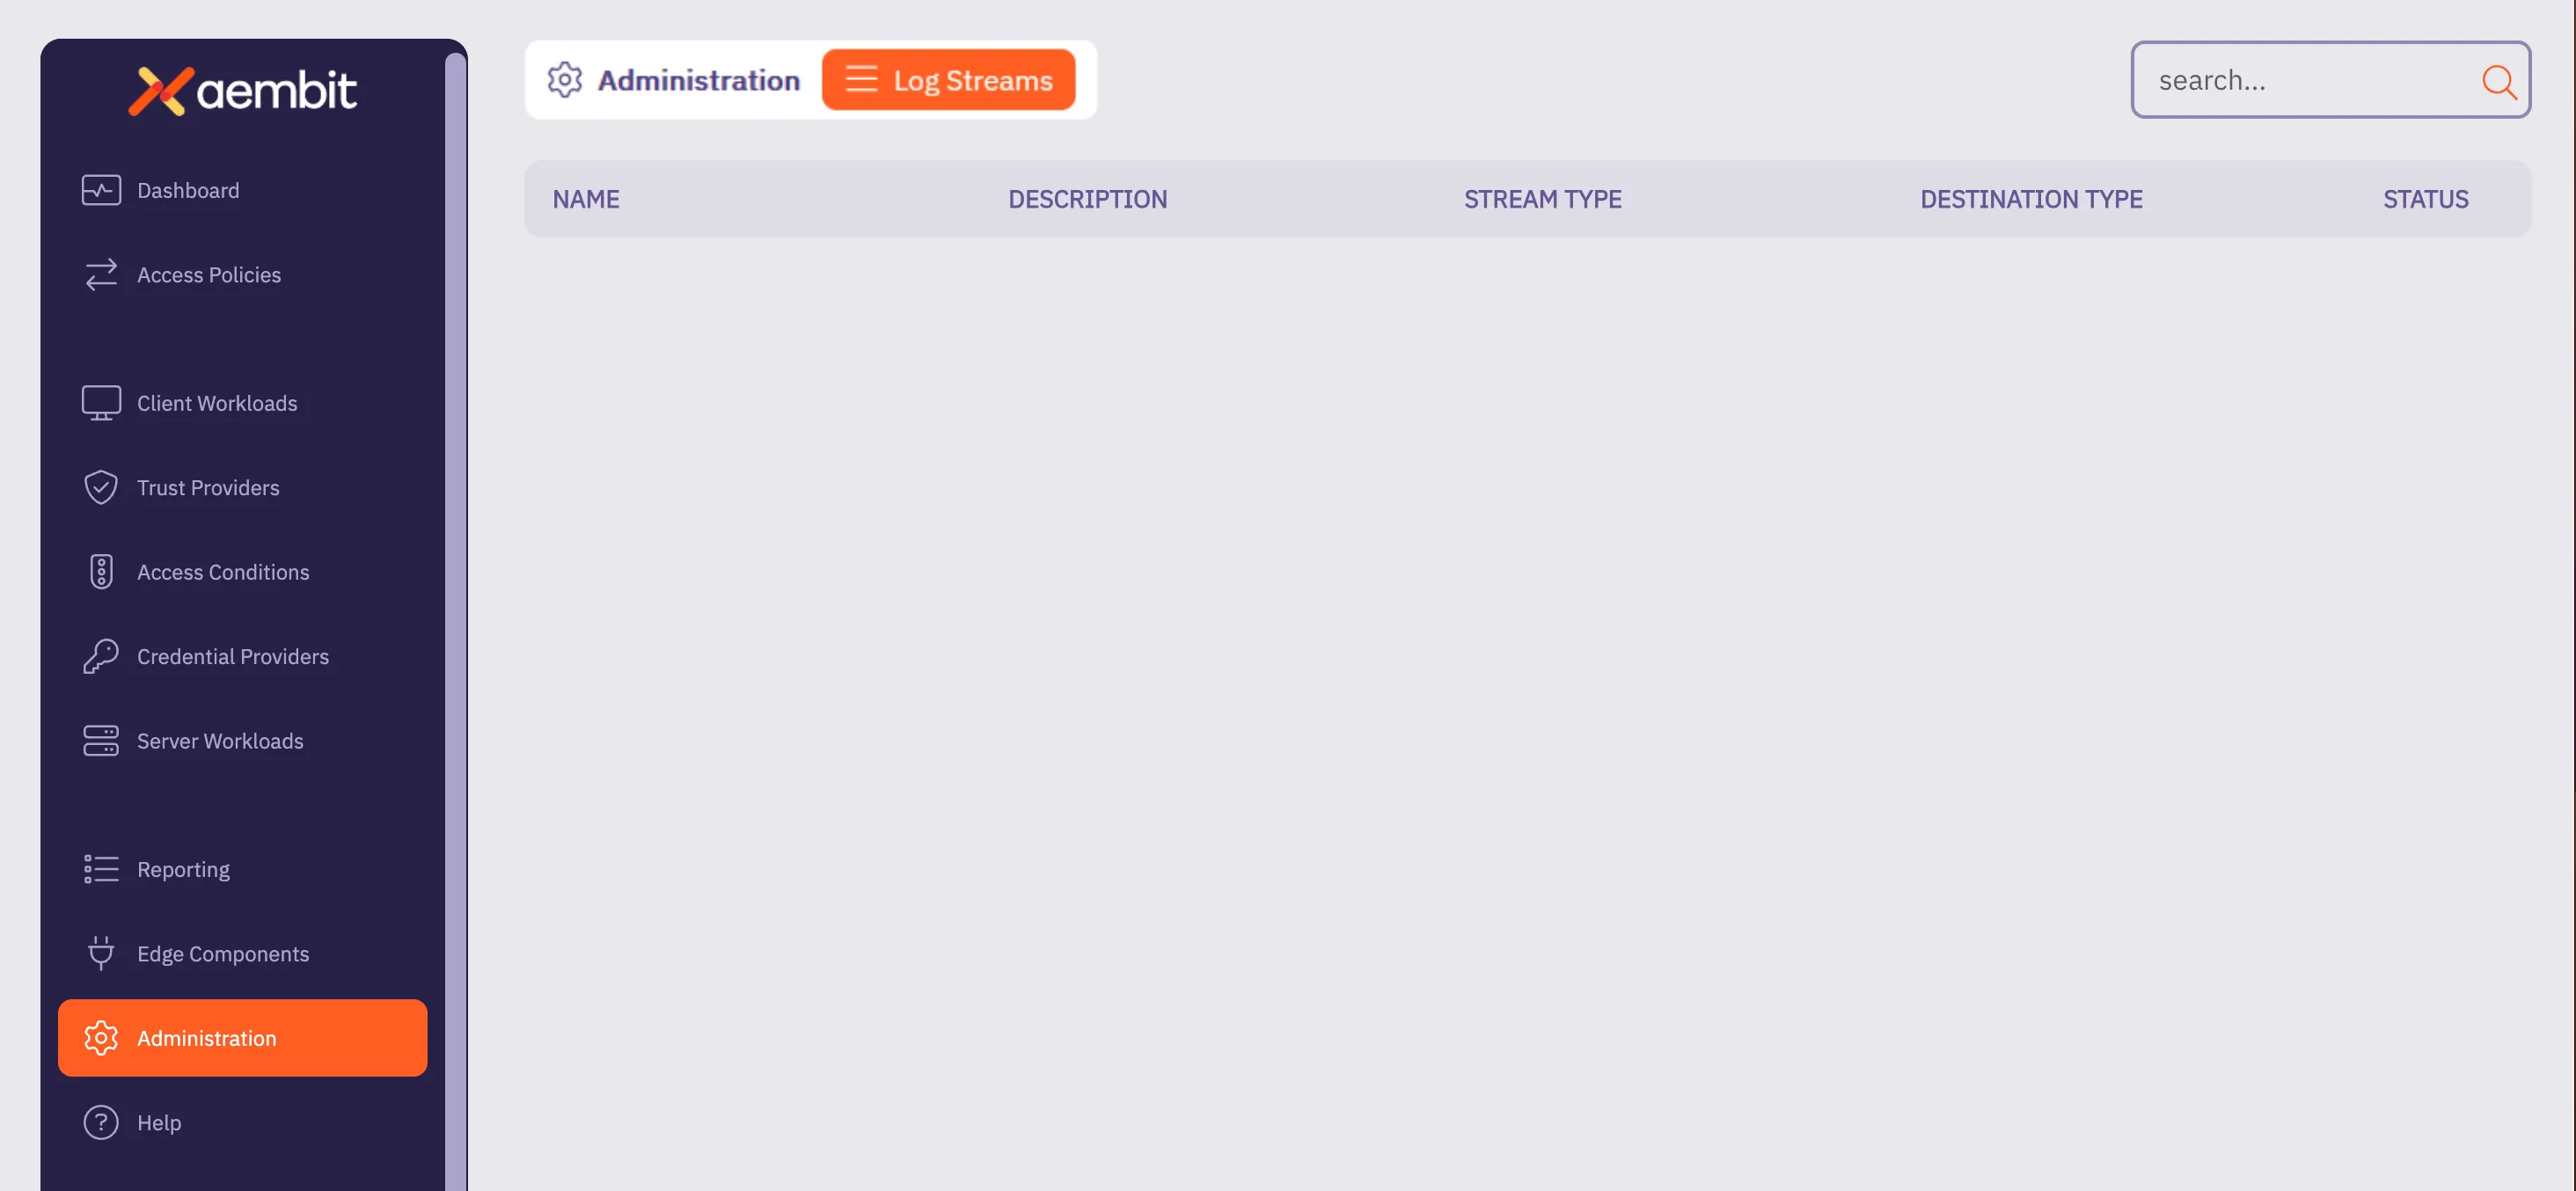
4. Click **+ New**, which displays the Log Streams pop out menu.
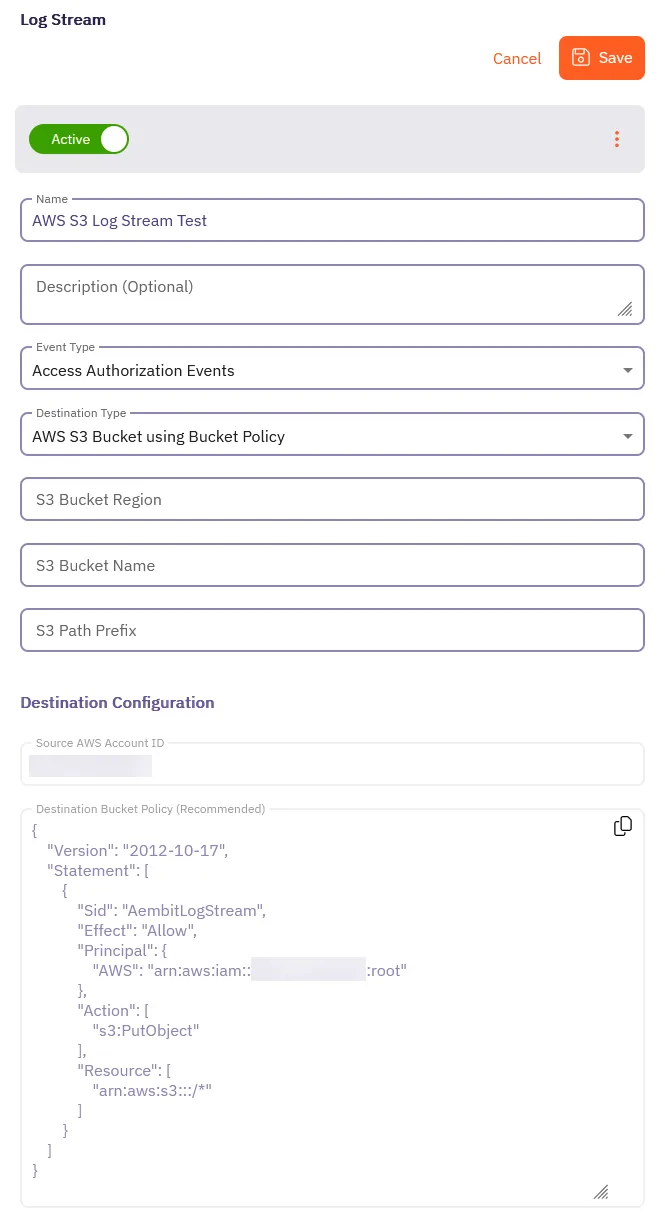
5. Fill out the following fields:
* **Name** - The name of the new Log Stream you want to create.
* **Description** - A text description for the new Log Stream.
* **Event Type** - Select the type of event you want to stream to your AWS S3 Bucket. Choose from: `Access Authorization Events`, `Audit Logs`, and `Workload Events`
6. Select **AWS S3 using Bucket Policy** as the **Destination Type**.
For more detailed information on how to create an AWS S3 Bucket, please refer to the [Amazon AWS S3](https://docs.aws.amazon.com/AmazonS3/latest/userguide/creating-bucket.html) technical documentation.
7. Fill out the revealed fields:
* **S3 Bucket Region** - Enter the AWS region where your S3 bucket is located.
* **S3 Bucket Name** - Enter the name of your S3 bucket.
* **S3 Path Prefix** - Enter the path prefix for your S3 bucket.
8. Apply the contents of the **Destination Bucket Policy (Recommended)** field to your destination AWS S3 Bucket.
9. Click **Save**.
Aembit displays the **Log Stream** on the **Log Streams** page.
# How to stream Aembit events to CrowdStrike Next-Gen SIEM
> How to create a new a Log Stream for CrowdStrike Next-Gen SIEM
Aembit’s Log Stream to CrowdStrike Next-Gen Security Information and Event Management (SIEM) feature enables rapid streaming of Aembit Edge event logs and audit logs directly to CrowdStrike. This integration uses the HTTP Event Collector (HEC) protocol to deliver comprehensive security data, enhancing threat detection capabilities, improving incident management, and streamlining compliance monitoring for your organization.
## Prerequisites
[Section titled “Prerequisites”](#prerequisites)
Before you can stream Aembit events to CrowdStrike Next-Gen SIEM, you must have an HTTP Event Collector (HEC) set up in your CrowdStrike environment with the following attributes:
* A **Data Connection** with the following:
* **Connector Name** - `HEC / HTTP Event Connector`
* **Data Source** -
* **Data Type** - JSON
Once you’ve created the Data Connection, click the \*\*Generate
Use your HEC’s **Connector name** and **API key** values in the CrowdStrike Next-Gen SIEM Log Stream configuration in your Aembit Tenant.
To configure an **HEC/HTTP Event Data Connector** in CrowdStrike, see the [HTTP Event Collector Guide](https://falcon.us-2.crowdstrike.com/documentation/page/bdded008/hec-http-event-connector-guide) in CrowdStrike’s official docs.
## Create a CrowdStrike Next-Gen SIEM Log Stream
[Section titled “Create a CrowdStrike Next-Gen SIEM Log Stream”](#create-a-crowdstrike-next-gen-siem-log-stream)
1. Log into your Aembit Tenant.
2. Click **Administration** in the left sidebar.
3. At the top, select **Administration ☰ Log Streams**.
Aembit displays the **Log Streams** page with a list of existing Log Streams.
4. Click **+ New**, which displays the Log Streams pop out menu.
5. Fill out the following fields:
* **Name** - Enter a name for the Log Stream.
* **Description** - Enter an optional description for the Log Stream.
* **Event Type** - Select the type of event you want to stream to your CrowdStrike Next-Gen SIEM. Choose from: `Access Authorization Events`, `Audit Logs`, and `Workload Events`
6. Select **CrowdStrike Next-Gen SIEM using Http Event Collector** as the **Destination Type**.
7. Fill out the revealed fields:
* **CrowdStrike Host/Port** - Enter the hostname or IP address and port of your CrowdStrike host.
* (Optional) Check **TLS** to enable TLS communication between your CrowdStrike host and Aembit.
* (Optional) **TLS Verification** - Select the desired option to enable TLS verification.
* **API Key** - Enter the **API Key** from your CrowdStrike HEC.
* **Source Name** - Enter the **Connector Name** from your CrowdStrike HEC.
8. Click **Save**.
Aembit displays the **Log Stream** on the **Log Streams** page.
Once you save your Log Stream, you can view its details by selecting it in the list of Log Streams to see something similar to the following screenshot:
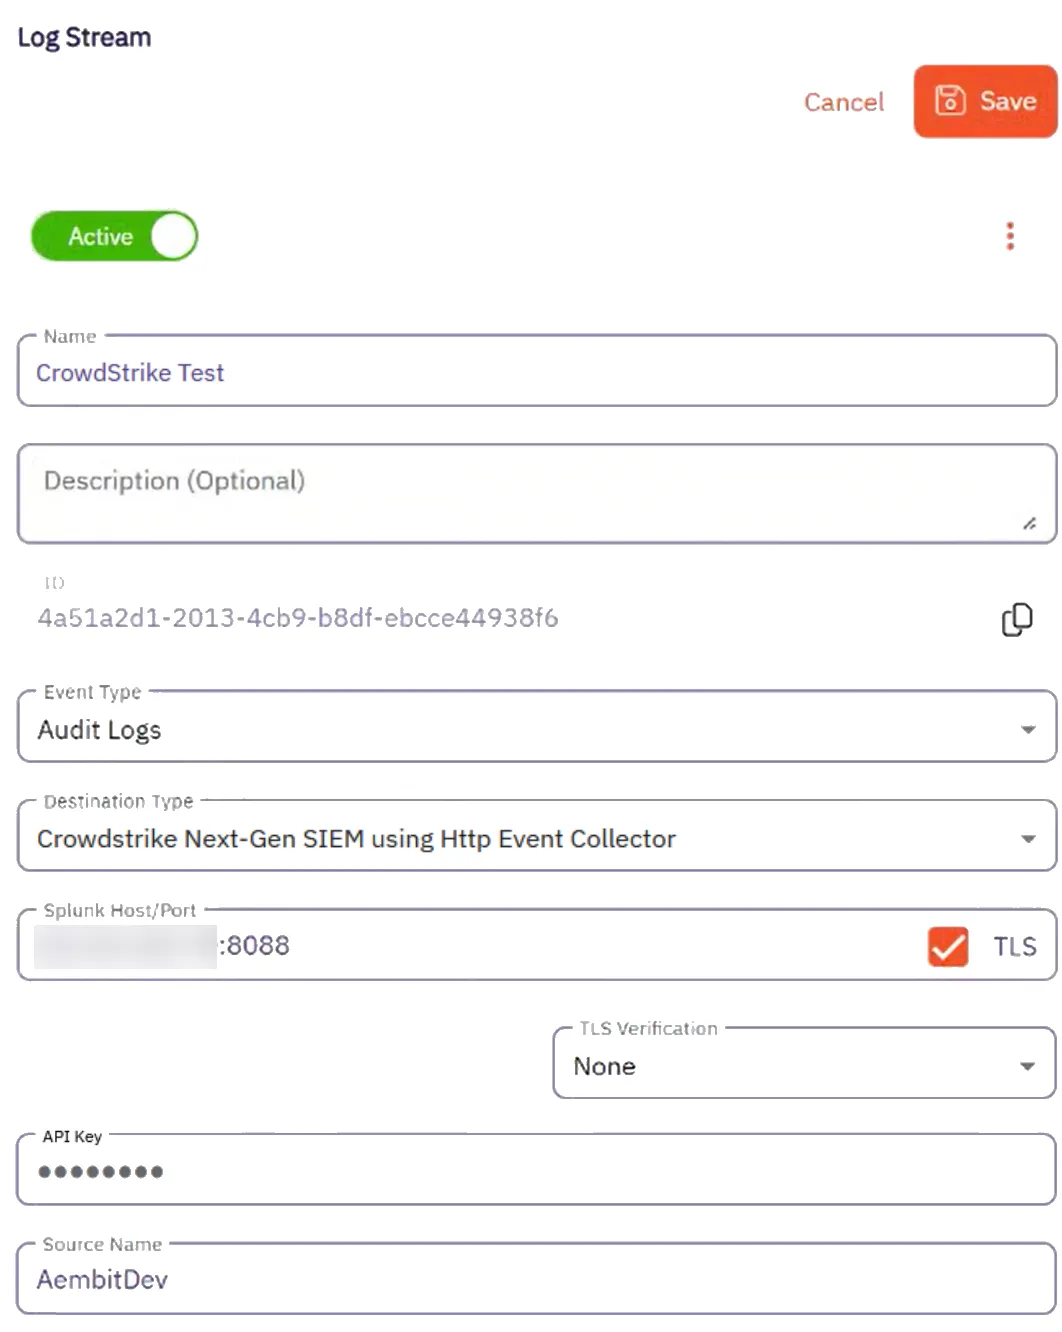
## Monitor logs in CrowdStrike SIEM
[Section titled “Monitor logs in CrowdStrike SIEM”](#monitor-logs-in-crowdstrike-siem)
After configuration, you can view logs that Aembit generates from the event type you selected in the CrowdStrike Next-Gen SIEM UI by doing the following:
1. Log into your CrowdStrike Next-Gen SIEM.
2. Go to **Data connections**.
3. In the list of **Connections**, select **Show events** from the **Actions** menu for the connection you created in the prerequisites section.
CrowdStrike displays the **Search** page pre-populated your connections details with a list of events in the **Results** pane.
You should see results similar to the following on all logs that Aembit streams to CrowdStrike Next-Gen SIEM:
```txt
#repo: 3pi_auto_raptor_174204601818S
#repo.cid: 599f927991a44b3Gae1b7fcf0acd2911
#type: json
@dataConnectionID: 6qb4ef044ccc646bfb0c38617cc3f1ee7
@id: vpQ8NosDWpukc2HZ4ELXv9G9_2_3_1742066422
@ingestTimestamp: 1742066500390
@rowString: {"timestamp":"2025-03-15T19:20:22.183751Z","source":"http.AembitDev","tenant":"3qb5d","meta":{"clientIP":"34.232.129.136","timestamp":"2025-
03-15T00:00:21.183751Z","eventType":"access.request","eventId":"d34d67b8-e22b-436e-bf35-489fe8089e56","resourceSetId":"ffffffff-ffff-ffff-ffff-ffffffffffff","contex
tId":"9fae3f4c-f16a-452a-99c5-ea095fc2a8bc","severity":"Info","clientRequest":{"version":"1.0.0","network":{"sourceIP":"127.0.0.1","sourcePort":46717,"transpor
tProtocol":"TCP"},"environment":{"dembit.clientId":"f86ef924-363636-4be2-b992-b313c54968e"},"network":{"sourceIP":"127.0.0.1"},"dembit":{"clientId":"f86ef924-363
6-4be2-a992-b313c54968e"}}}
@source: PlotFormEvents
@sourcetype: json
@timestamp: 1742066422183
@timestamp.nanos: 751000
@timezone: Z
clientRequest.network.proxyPort: 0
clientRequest.network.sourceIP: 127.0.0.1
clientRequest.network.sourcePort: 46717
clientRequest.network.targetHost: igm.googleapis.com
clientRequest.network.targetPort: 443
clientRequest.network.transportProtocol: TCP
clientRequest.version: 1.0.0
environment.dembit.clientId: f86ef924-3636-4be2-a992-b313c54968e
environment.network.sourceIP: 127.0.0.1
meta.clientIP: 256.256.256.256
meta.contextId: 9fae3f4c-f16a-452a-99c5-ea095fc2a4ert
meta.eventId: d34d67b8-e22b-436e-bf35-489fe802a4e54
meta.eventType: access.request
meta.resourceSetId: ffffffff-ffff-ffff-ffff-ffffffffffff
meta.severity: Info
meta.timestamp: 2025-03-15T00:00:21.183751Z
source: http.AembitDev
```
## Failure notifications
[Section titled “Failure notifications”](#failure-notifications)
If your Aembit account has write privileges for Log Streams, Aembit automatically sends you and email notification when Log Stream transactions consistently fail.
# Create a Google Cloud Storage Bucket Log Stream
> This page describes how to create a new Log Stream to an Google Cloud Storage (GCS) Bucket
## Prerequisites
[Section titled “Prerequisites”](#prerequisites)
Before creating a new Google Cloud Storage (GCS) Bucket Log Stream, make sure you have set up and configured:
* [Google Cloud Storage Bucket](https://cloud.google.com/storage/docs/creating-buckets)
* [IAM Service Account](https://cloud.google.com/iam/docs/service-accounts-create)
* [Workload Identity Federation](https://cloud.google.com/iam/docs/workload-identity-federation-with-other-providers)
## Create a new Google Cloud Storage Bucket Log Stream
[Section titled “Create a new Google Cloud Storage Bucket Log Stream”](#create-a-new-google-cloud-storage-bucket-log-stream)
To create a new Log Stream for a Google Cloud Storage (GCS) Bucket, follow these steps:
1. Log into your Aembit Tenant.
2. Click **Administration** in the left sidebar.
3. At the top, select **Administration ☰ Log Streams**.
Aembit displays the **Log Streams** page with a list of existing Log Streams.

4. Click **+ New**, which displays the Log Streams pop out menu.
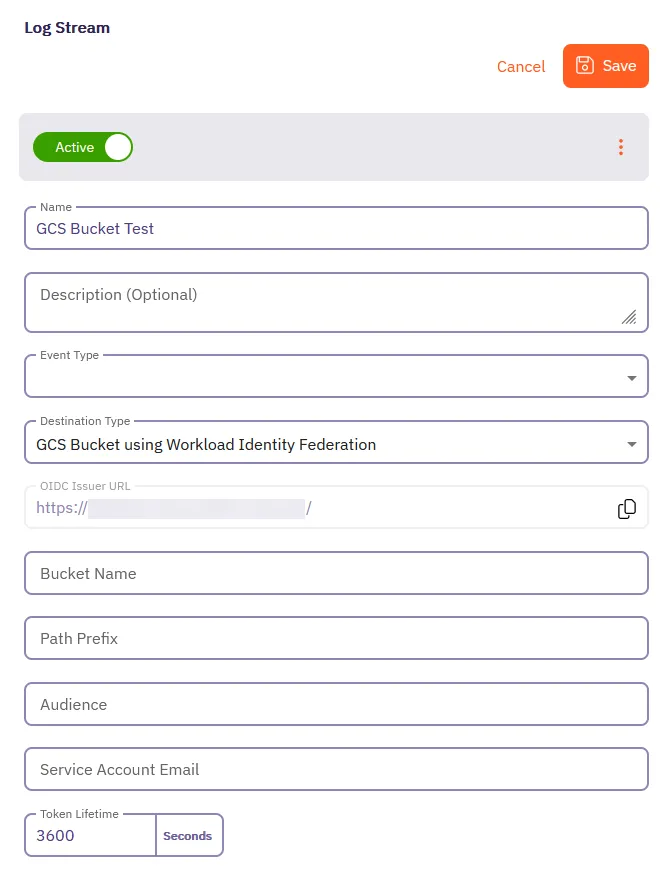
5. Fill out the following fields:
* **Name** - The name of the new Log Stream you want to create.
* **Description** - A text description for the new Log Stream.
* **Event Type** - Select the type of event you want to stream to your GCS Bucket. Choose from: `Access Authorization Events`, `Audit Logs`, and `Workload Events`
6. Select **GCS Bucket using Workload Identity Federation** as the **Destination Type**.
7. Fill out the revealed fields:
8. Add your information for the Google Cloud Storage Bucket in the following fields:
* **Bucket Name** - Name of the bucket.
* **Audience** - The value from the **Provider Details** in your GCS Bucket Console.
Aembit matches any audience value you specific for the provider, and can be either the default audience or a custom value.
* **Service Account Email** - The email address of the Service Account (set at the time of Service Account creation).
* **Token Lifetime** - The amount of time that the token will remain active.
9. Click **Save**.
Aembit displays the **Log Stream** on the **Log Streams** page.
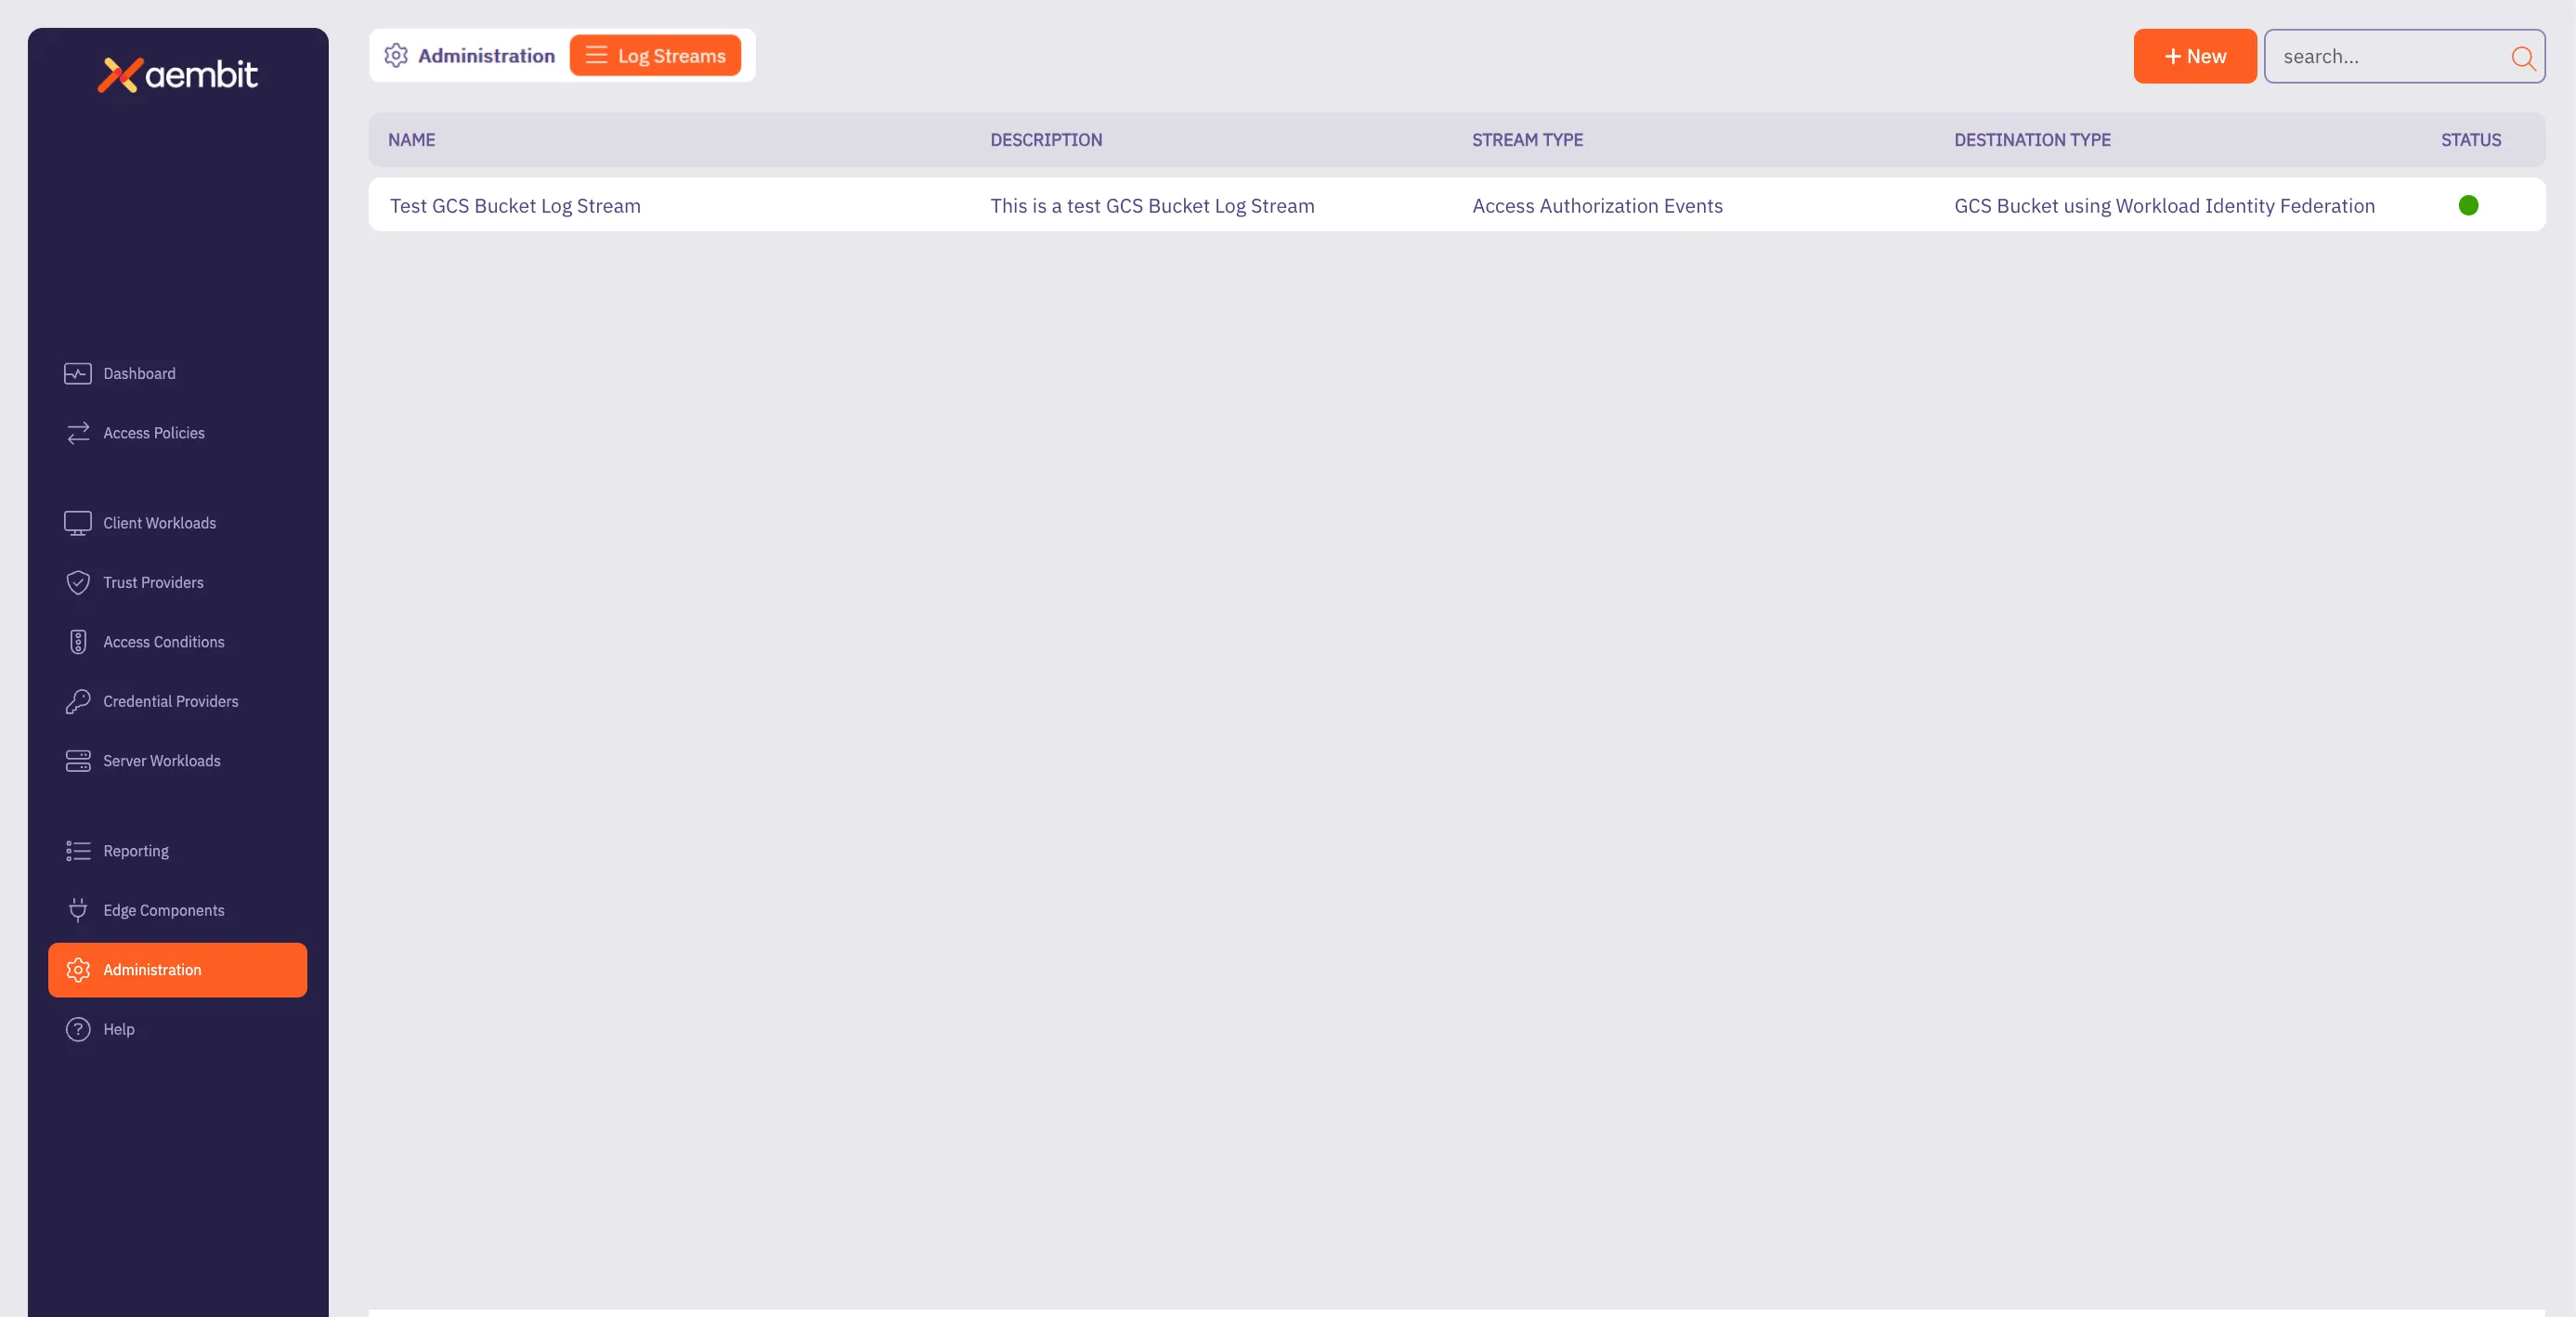
# How to stream Aembit events to Splunk SIEM
> How to create a new a Log Stream for Splunk SIEM
Aembit’s Log Stream to Splunk Security Information and Event Management (SIEM) feature enables rapid streaming of Aembit Edge event logs and audit logs directly to Splunk. This integration uses the HTTP Event Collector (HEC) protocol to deliver comprehensive security data, enhancing threat detection capabilities, improving incident management, and streamlining compliance monitoring for your organization.
## Prerequisites
[Section titled “Prerequisites”](#prerequisites)
Before you can stream Aembit events to Splunk SIEM, you must have an HTTP Event Collector (HEC) set up in your Splunk environment with the following attributes:
* **Source Type** - **Miscellaneous -> `generic_single_line`**.
* **Default Index** - **`Default`**.
Use your HEC’s **Source Name** and **Token Value** in your Splunk SIEM Log Stream configuration.
To configure an HEC in Splunk, see [Set up and use HTTP Event Collector in Splunk Web](https://docs.splunk.com/Documentation/SplunkCloud/latest/Data/UsetheHTTPEventCollector) in Splunk’s official docs.
## Create a Splunk SIEM Log Stream
[Section titled “Create a Splunk SIEM Log Stream”](#create-a-splunk-siem-log-stream)
1. Log into your Aembit Tenant.
2. Click **Administration** in the left sidebar.
3. At the top, select **Administration ☰ Log Streams**.
Aembit displays the **Log Streams** page with a list of existing Log Streams.

4. Click **+ New**, which displays the Log Streams pop out menu.
5. Fill out the following fields:
* **Name** - Enter a name for the Log Stream
* **Description** - Enter an optional description for the Log Stream
* **Event Type** - Select the type of event you want to stream to your Splunk SIEM. Choose from: `Access Authorization Events`, `Audit Logs`, and `Workload Events`
6. Select **Splunk SIEM using Http Event Collector (HEC)** as the **Destination Type**.
7. Fill out the revealed fields:
* **Splunk Host/Port** - Enter the hostname or IP address and port of your Splunk host.
* (Optional) Check **TLS** to enable TLS communication between your Splunk host and Aembit.
* (Optional) **TLS Verification** - Select the desired option to enable TLS verification.
* **Authentication Token** - Enter the **Token Value** from your Splunk HEC.
* **Source Name** - Enter the Source Name from your Splunk HEC.
8. Click **Save**.
Aembit displays the **Log Stream** on the **Log Streams** page.
Once you save your Log Stream, you can view its details by selecting it in the list of Log Streams to see something similar to the following screenshot:
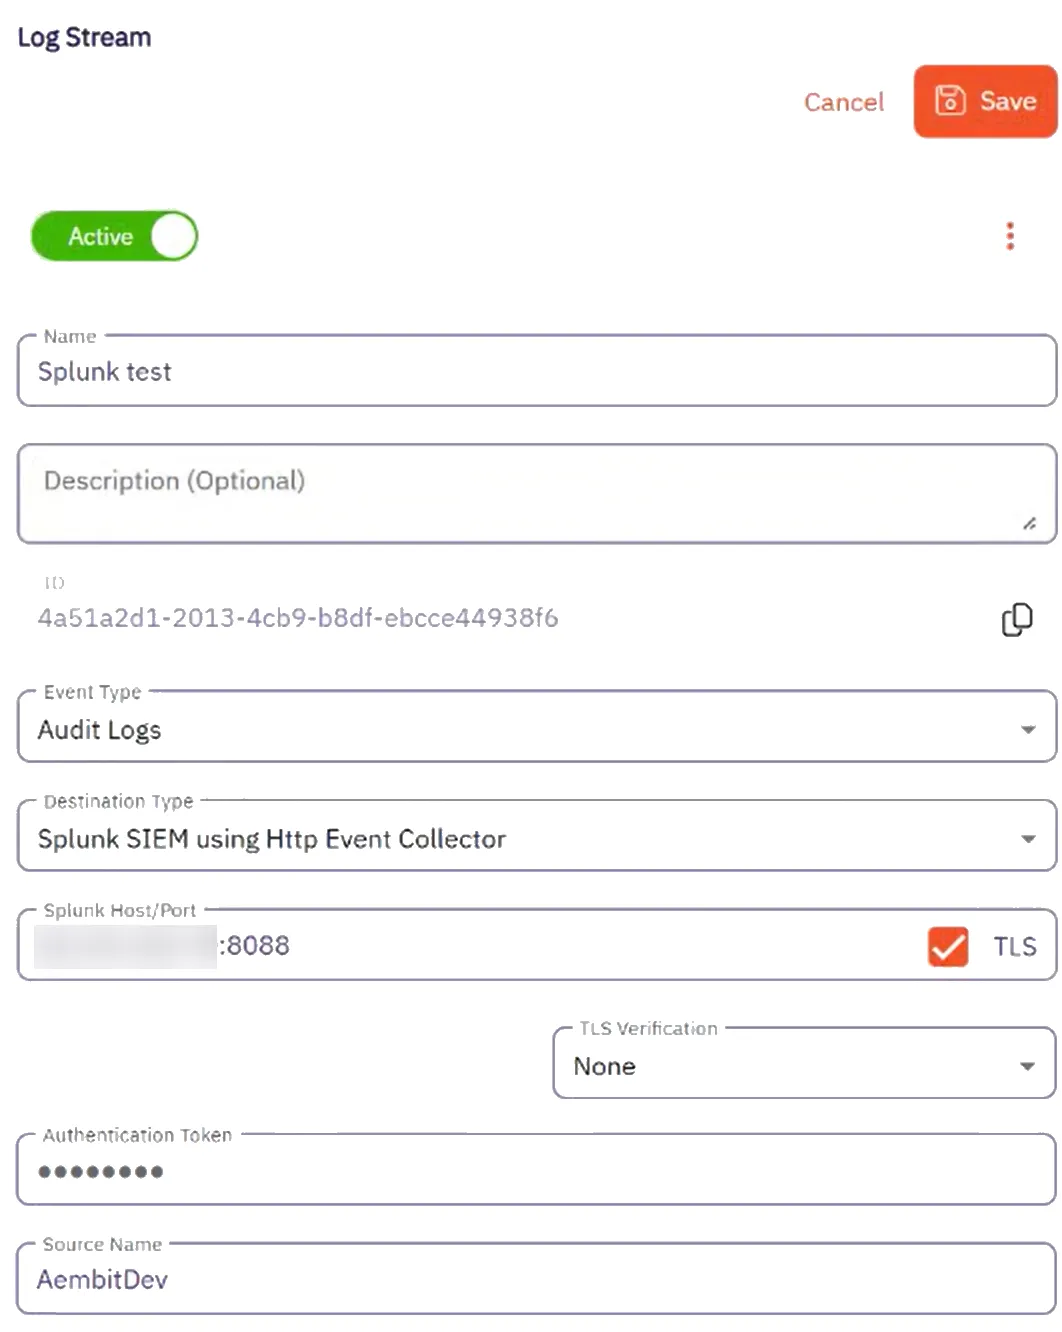
## Monitor logs in Splunk SIEM
[Section titled “Monitor logs in Splunk SIEM”](#monitor-logs-in-splunk-siem)
After configuration, you can search and view logs that Aembit generates from the event type you selected in Splunk’s Search and Reporting page using the following search phrase:
```shell
source=
```
You should see results similar to the following screenshot:
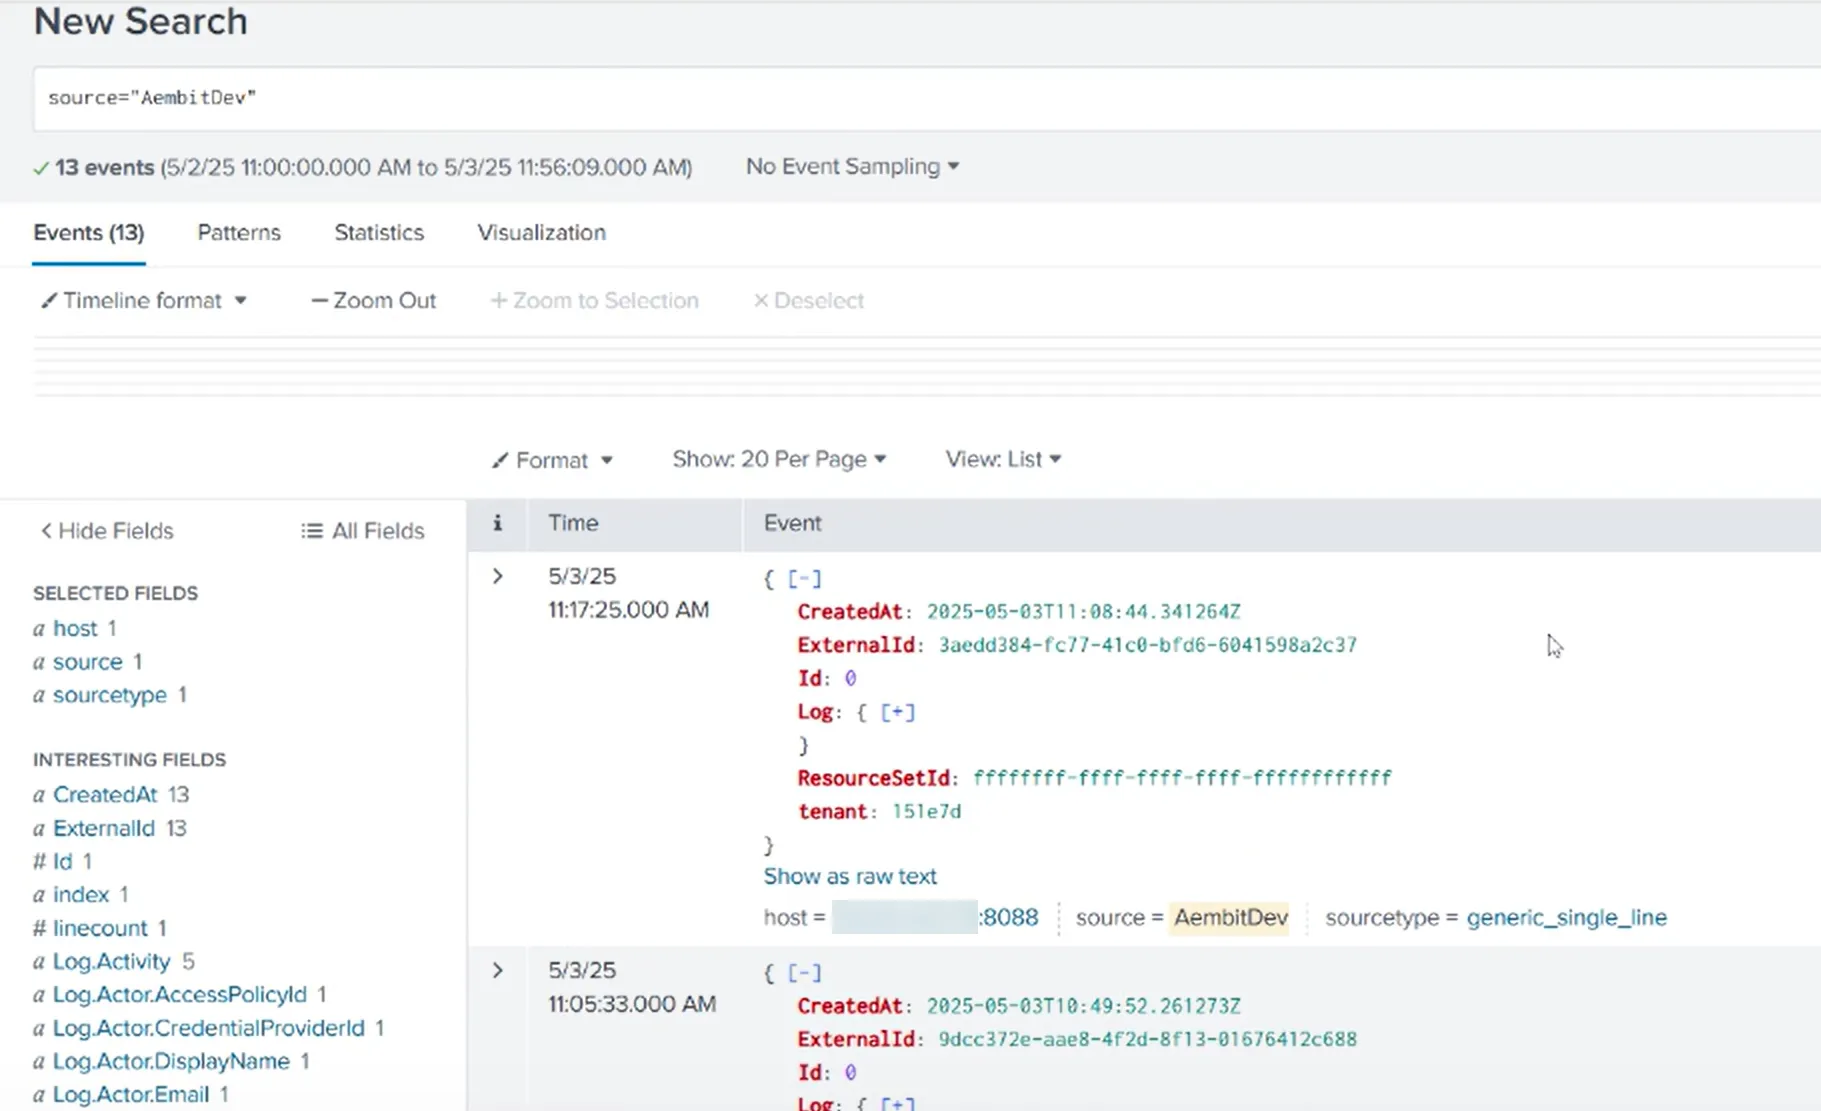
## Failure notifications
[Section titled “Failure notifications”](#failure-notifications)
If your Aembit account has write privileges for Log Streams, Aembit automatically sends you an email notification when Log Stream transactions consistently fail.
# Resource Sets overview
> Description of what Resource Sets are and how they work
In complex environments, managing access to sensitive resources requires granular control. Aembit’s Resource Sets are an advanced feature that extends Aembit’s existing Role-Based Access Control (RBAC) capabilities, providing fine-grained permissions and roles within your Aembit Tenant. This feature enables you to define and manage logical and isolated sets of resources. Resources include things such as Client Workloads, Server Workloads, deployed Agent Proxy instances and their associated operational events such as Audit Logs, Access Authorization, and Workload Events.
Each Resource Set acts as a mini-environment or sub-tenant, enabling segmentation of security boundaries to best secure your environment. This segmentation allows roles to be specifically tailored for your Resource Sets, thereby ensuring that users and workloads have access limited to the resources necessary for their designated tasks. Therefore, this approach not only enhances security by adhering to the principle of least privilege (PoLP) but also supports complex operational and organizational configurations.
### Configuration
[Section titled “Configuration”](#configuration)
Resource Sets primarily govern Access Policies and their associated entities. The following list contains all available Access Policy entities:
* Client Workloads
* Trust Providers
* Access Conditions
* Integrations
* Credential Providers
* Server Workloads
The resources you configure can then operate independently of similar or identical resources in other Resource Sets, enabling numerous configuration and control options.
To ensure this separation, Aembit administrators can configure user assigned roles associated to specific Resource Sets and assign users to these roles. This logical association enables support for numerous advanced permission sets as best suited for your organization’s security needs.
Aembit generates Audit Logs for all configuration updates, separates them out into their respective Resource Sets, and ensures they’re only visible to those users with the appropriate permissions.
### Deployment
[Section titled “Deployment”](#deployment)
You can specify a Resource Set association when deploying an Aembit Agent Proxy or using the Aembit Agent. This enables all operational activity to execute within the bounds of that Resource Set.
### Reporting
[Section titled “Reporting”](#reporting)
Aembit segments its comprehensive event logging, which includes Audit Logs, Access Authorization, and Workload Events, into the associated Resource Set. Aembit restricts access to these events only to authorized users. This separation ensures that event data is logically isolated but also subject to stringent access controls, restricting visibility to authorized users within each specific Resource Set.
Resource Sets empower you to enforce the principle of least privilege. PoLP makes sure that your users can only view configuration details and operational results for the environments and workloads under their direct responsibility. Moreover, this approach facilitates compliance by providing clear audit trails within defined security boundaries, and it simplifies troubleshooting by limiting the scope of event analysis to relevant resource contexts.
## About Resource Set Roles and Permissions
[Section titled “About Resource Set Roles and Permissions”](#about-resource-set-roles-and-permissions)
While a Resource Set is a collection of individual resources grouped together, within that same Resource Set, you will also need to assign users a specific role, and permissions for that role. When configuring Resource Sets, consider the following:
* Roles should be assigned to users based on their responsibilities for managing the Resource Set. When thinking of roles and role assignments, consider the role assignment from a resource-first perspective.
* Permissions should be granted for each Role to ensure the user can perform their required tasks. Permissions in a role work with the Resource Set association to enable access to specific Resource Set entities as configured.
## Additional resources
[Section titled “Additional resources”](#additional-resources)
The following pages provide more information about working with Resource Sets:
* [Creating Resource Sets](/user-guide/administration/resource-sets/create-resource-set) - Learn how to create Resource Sets
* [Adding Resources to Resource Sets](/user-guide/administration/resource-sets/adding-resources-to-resource-set) - Add resources to your Resource Sets
* [Assign Roles](/user-guide/administration/resource-sets/assign-roles) - Assign roles to your Resource Sets
* [Deploying Resource Sets](/user-guide/administration/resource-sets/deploy-resource-set) - Deploy your Resource Sets
# How to add a resource to a Resource Set
> How to add resources to a Resource Set
To add resources to a Resource Set, perform the following steps:
Note
When you log into your Aembit Tenant, by default, Aembit displays the **Default** Resource Set.
If you want to add resources to a different Resource Set, you must select that Resource Set from the **Resource Selector** drop-down menu in the top right corner of the Aembit web UI. The **Resource Selector** drop-down menu is available on *most* pages in the Aembit web UI.
1. Log into your Aembit Tenant.
2. Click **Dashboard** in the left sidebar.
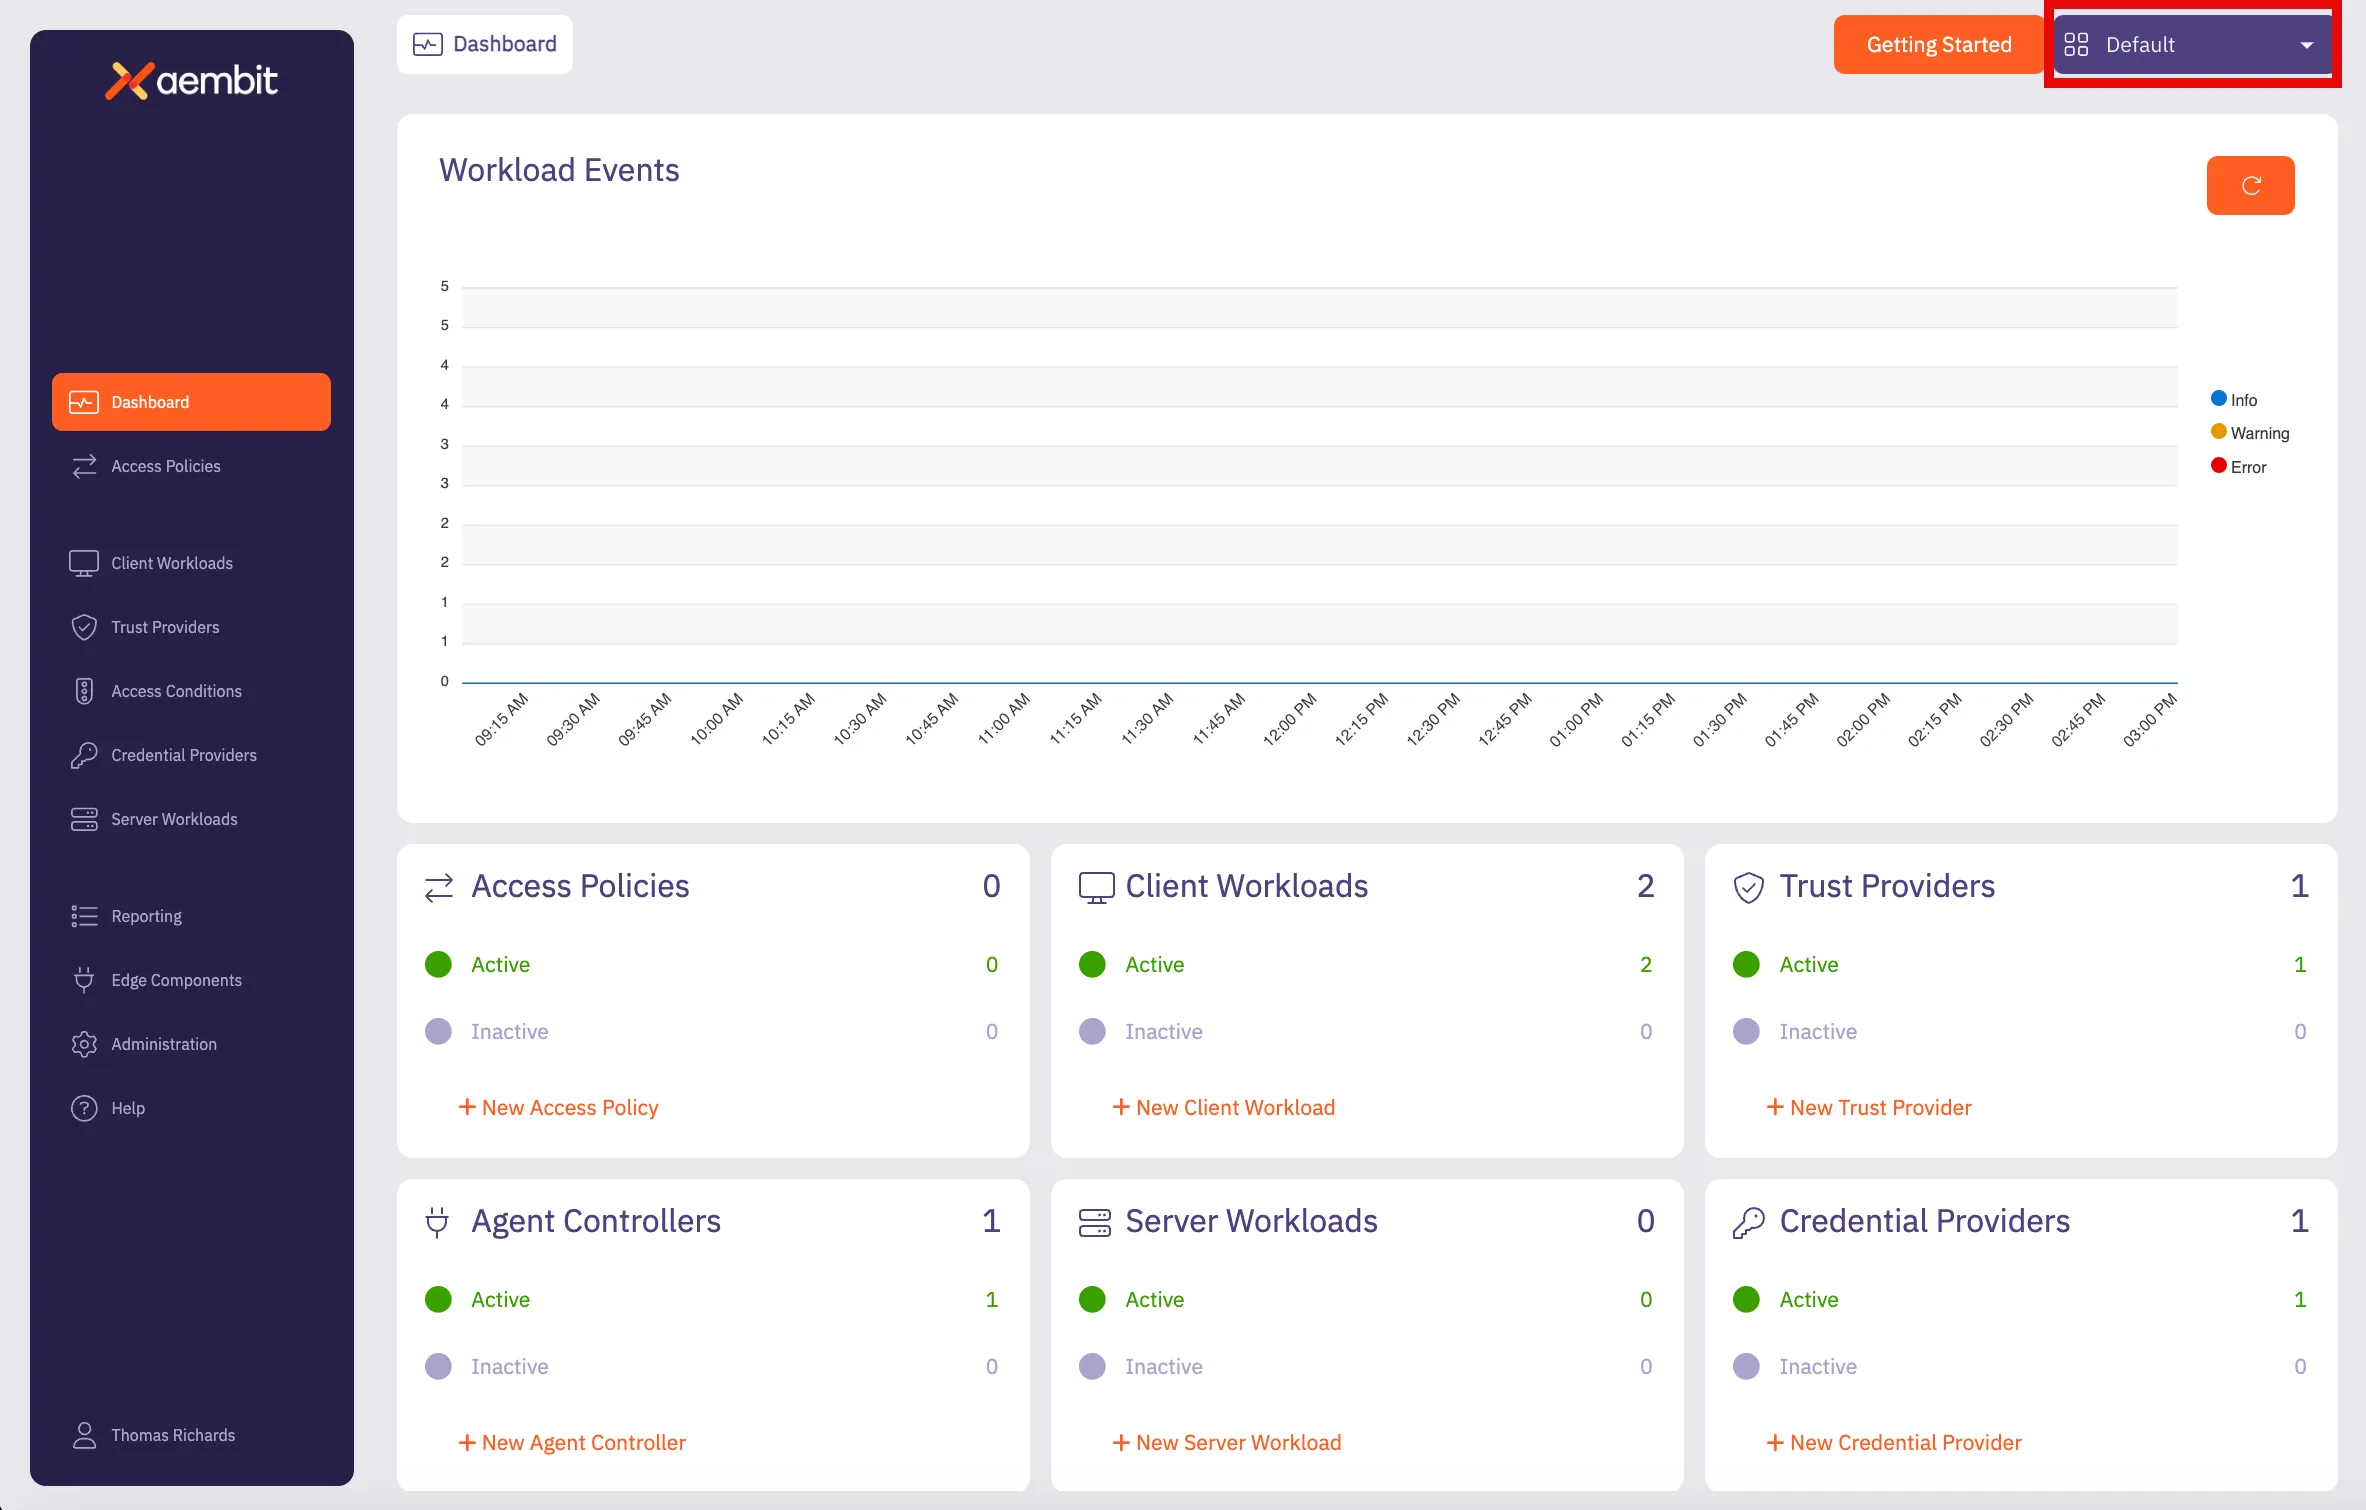
3. In the top right corner, select the Resource Set you would like to use to add new resources. In this example, *DevOps Team Resource Set* is selected.
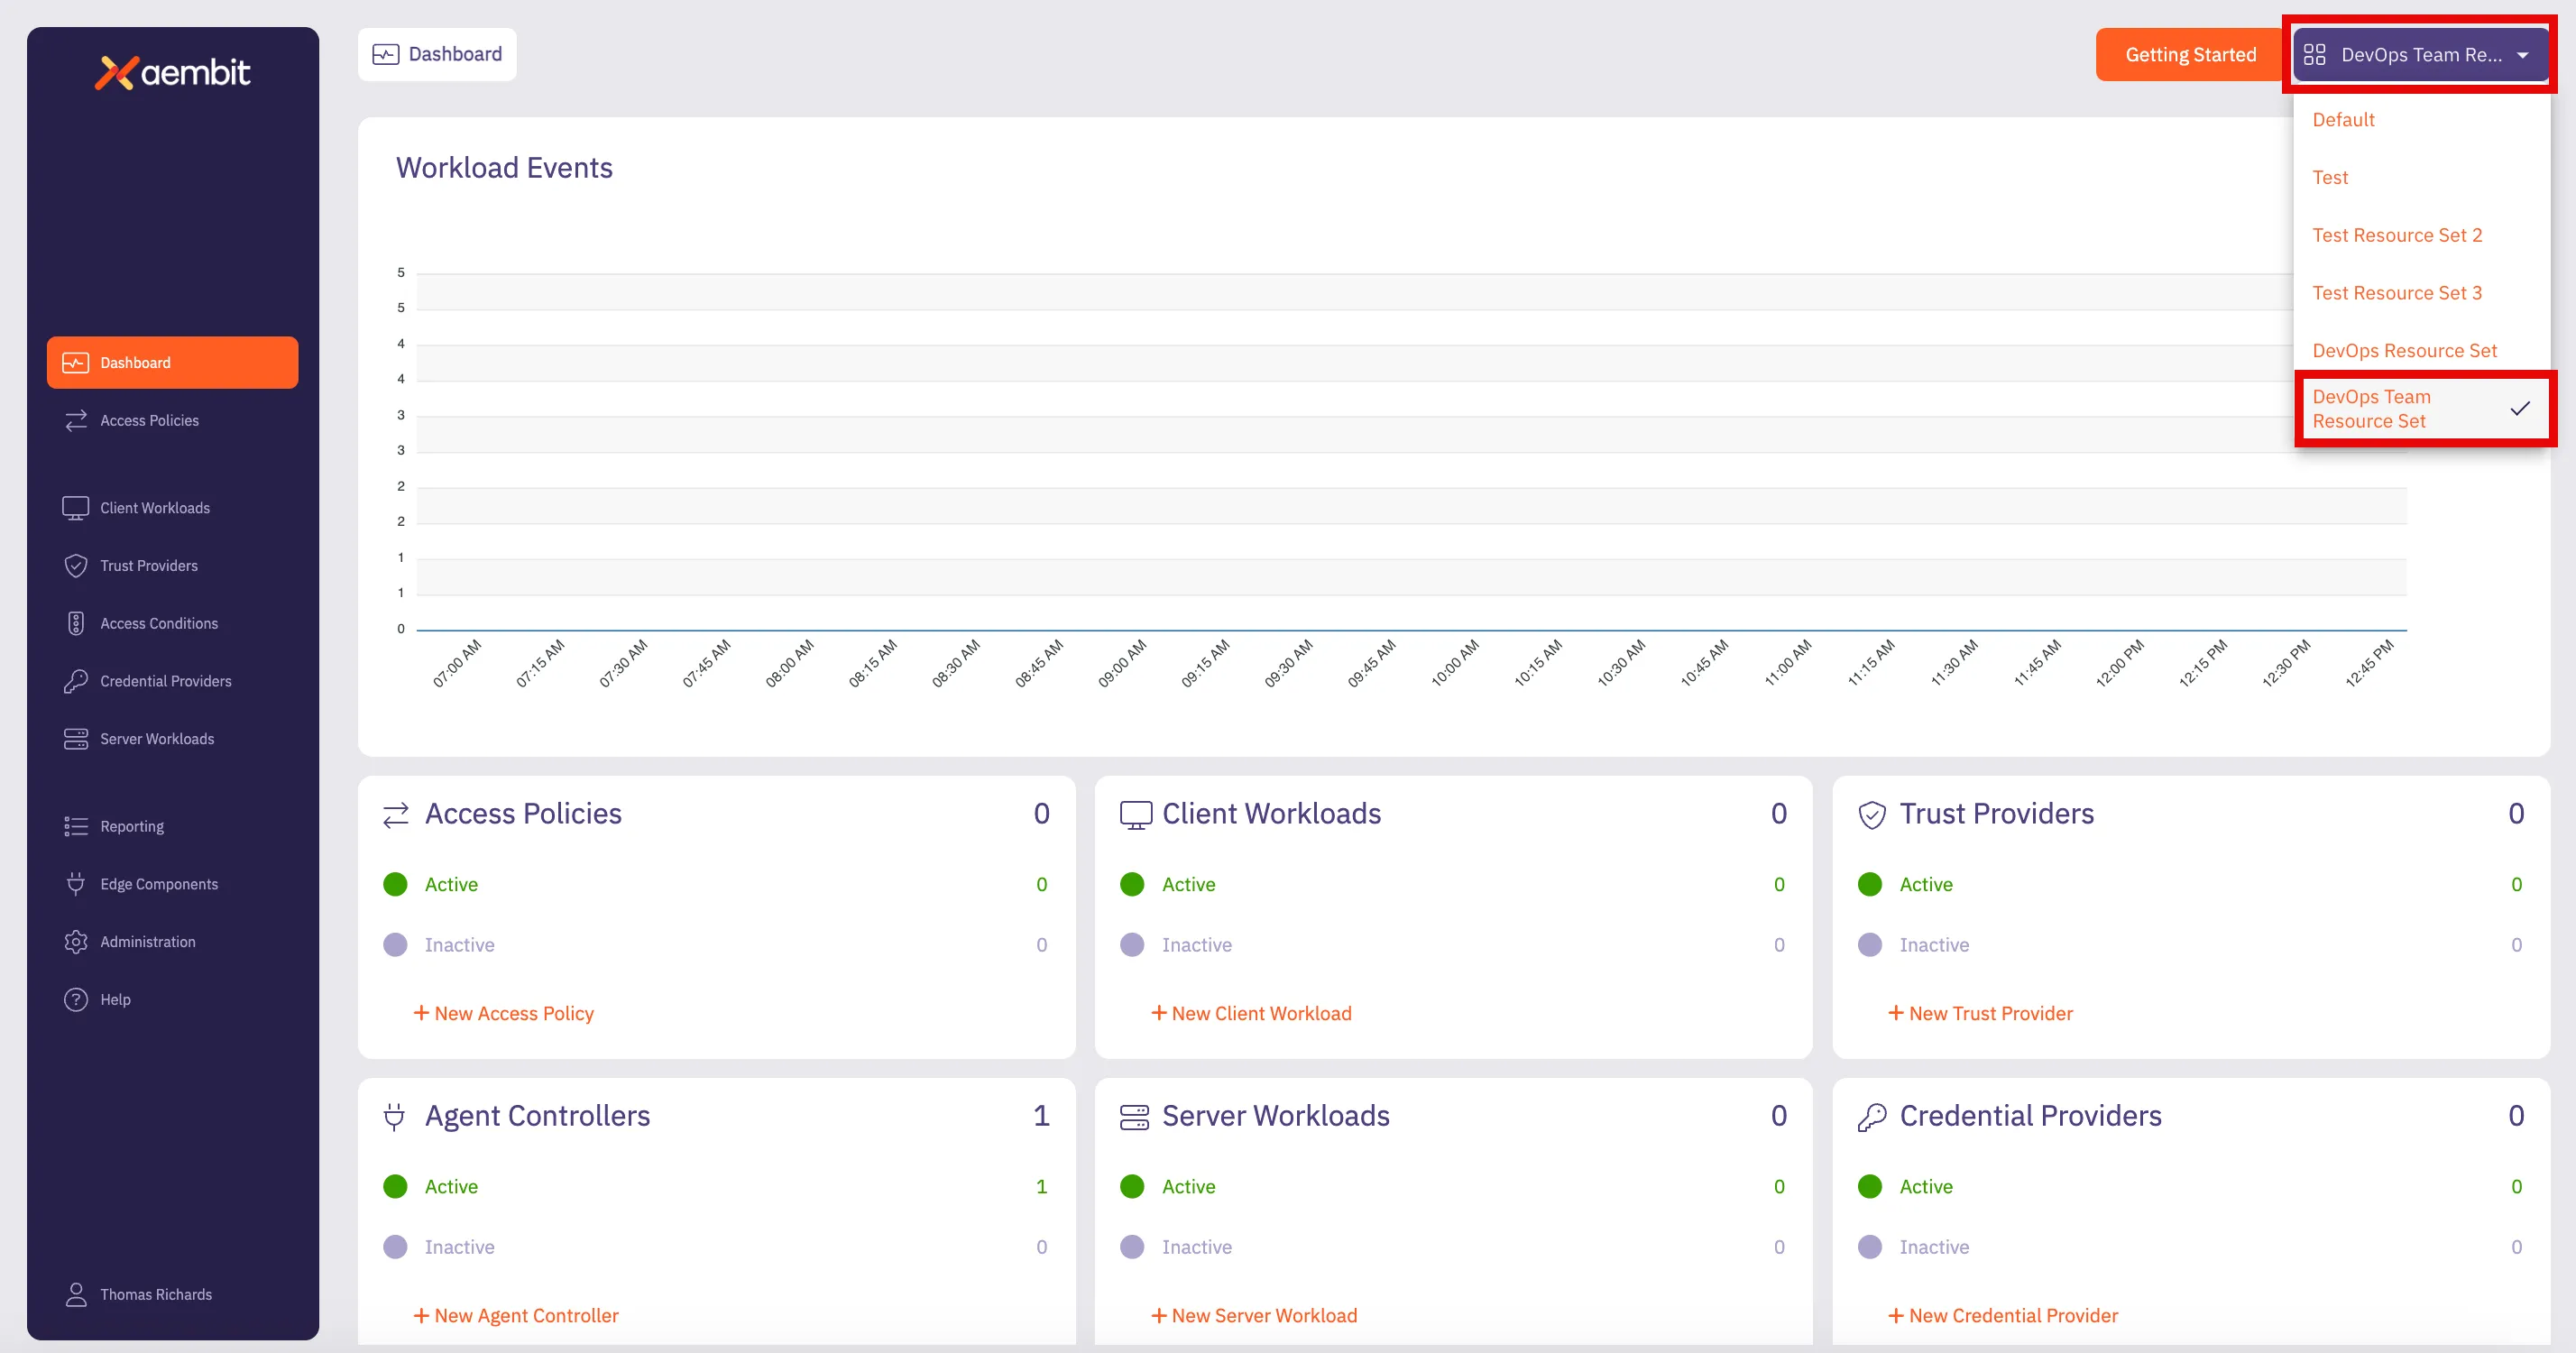
4. To select the type of resource you would like to create, either click on the tile at the bottom of the page for that resource; or click on the tab in the left sidebar. In this example, to select the **Client Workload** resource has been selected.
5. The Client Workload Dialog window will then appear. Notice in the top-right corner of the window that there is a label that designates that this resource will be included in the *DevOps Team Resource Set*.
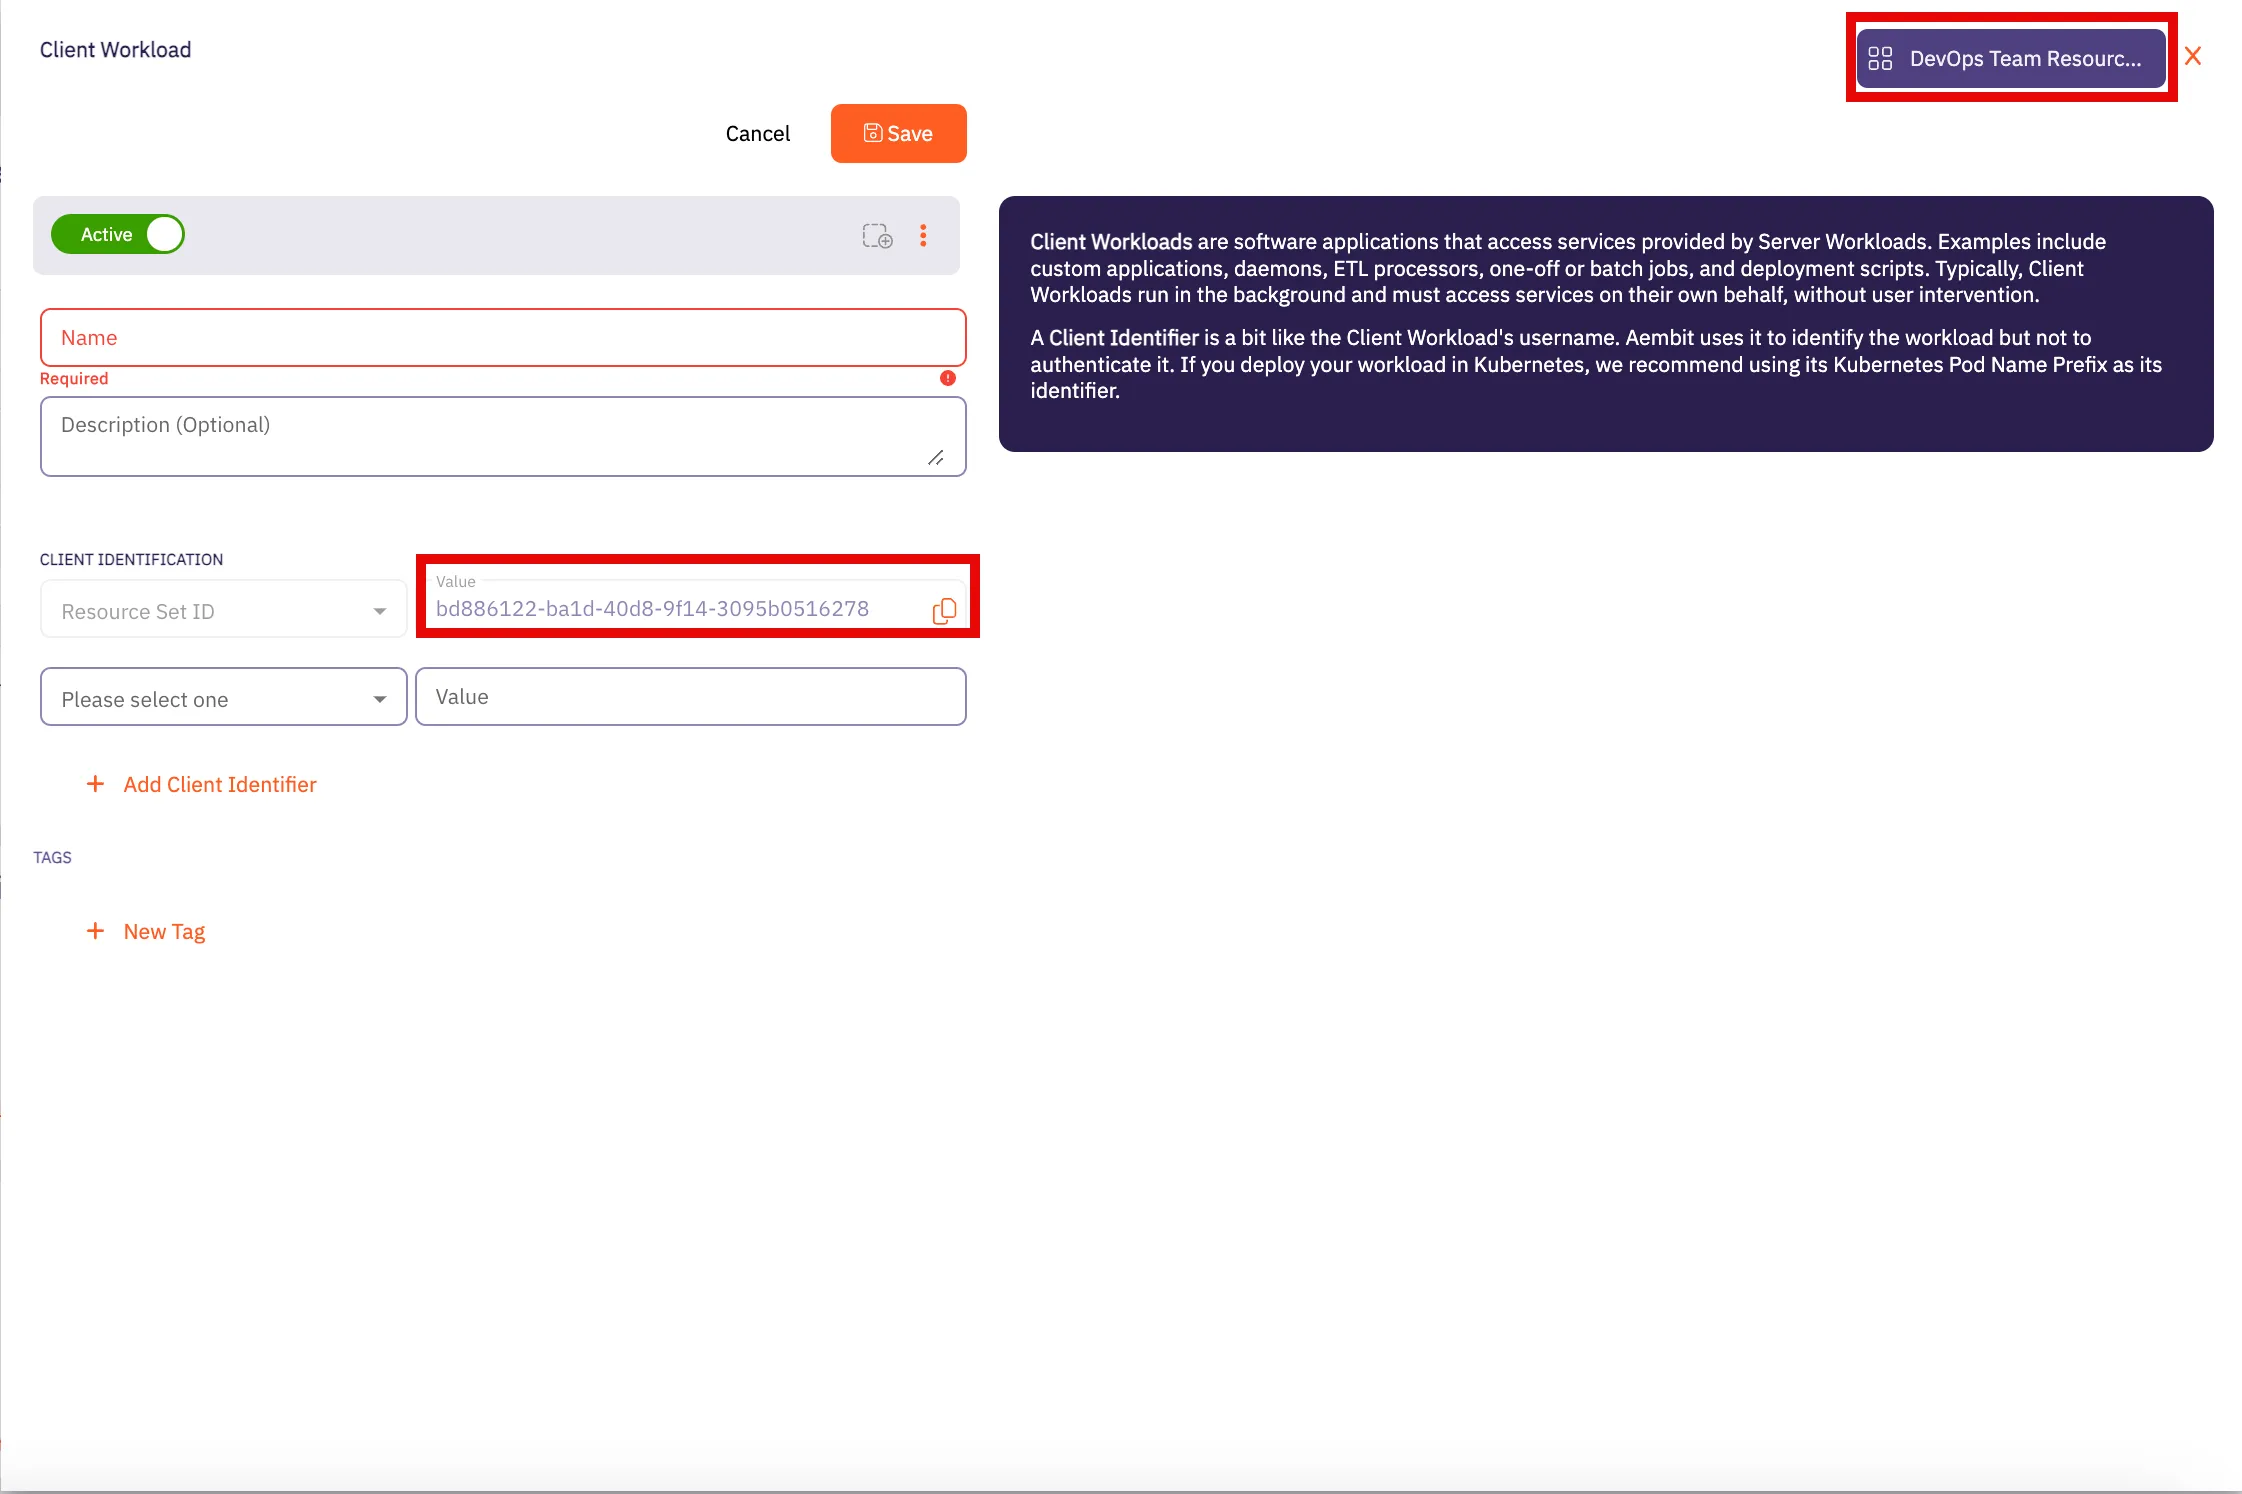
6. Enter all information required for adding the new Client Workload to the *DevOps Team Resource Set* in this dialog window. Click **Save** when finished.
7. Repeat these steps for any other resources you would like to add to the Resource Set.
## Additional resources
[Section titled “Additional resources”](#additional-resources)
* [Create a Resource Set](/user-guide/administration/resource-sets/create-resource-set)
* [Assign roles to a Resource Set](/user-guide/administration/resource-sets/assign-roles)
# How to assign roles to a Resource Set
> How to assign roles for a Resource Set
To assign roles within a Resource Set, perform the following steps:
1. Log into your Aembit Tenant.
2. Click **Administration** in the left sidebar.
3. At the top, select **Administration ☰ Resource Sets**.
Aembit displays the **Resource Sets** page with a list of existing Resource Sets.
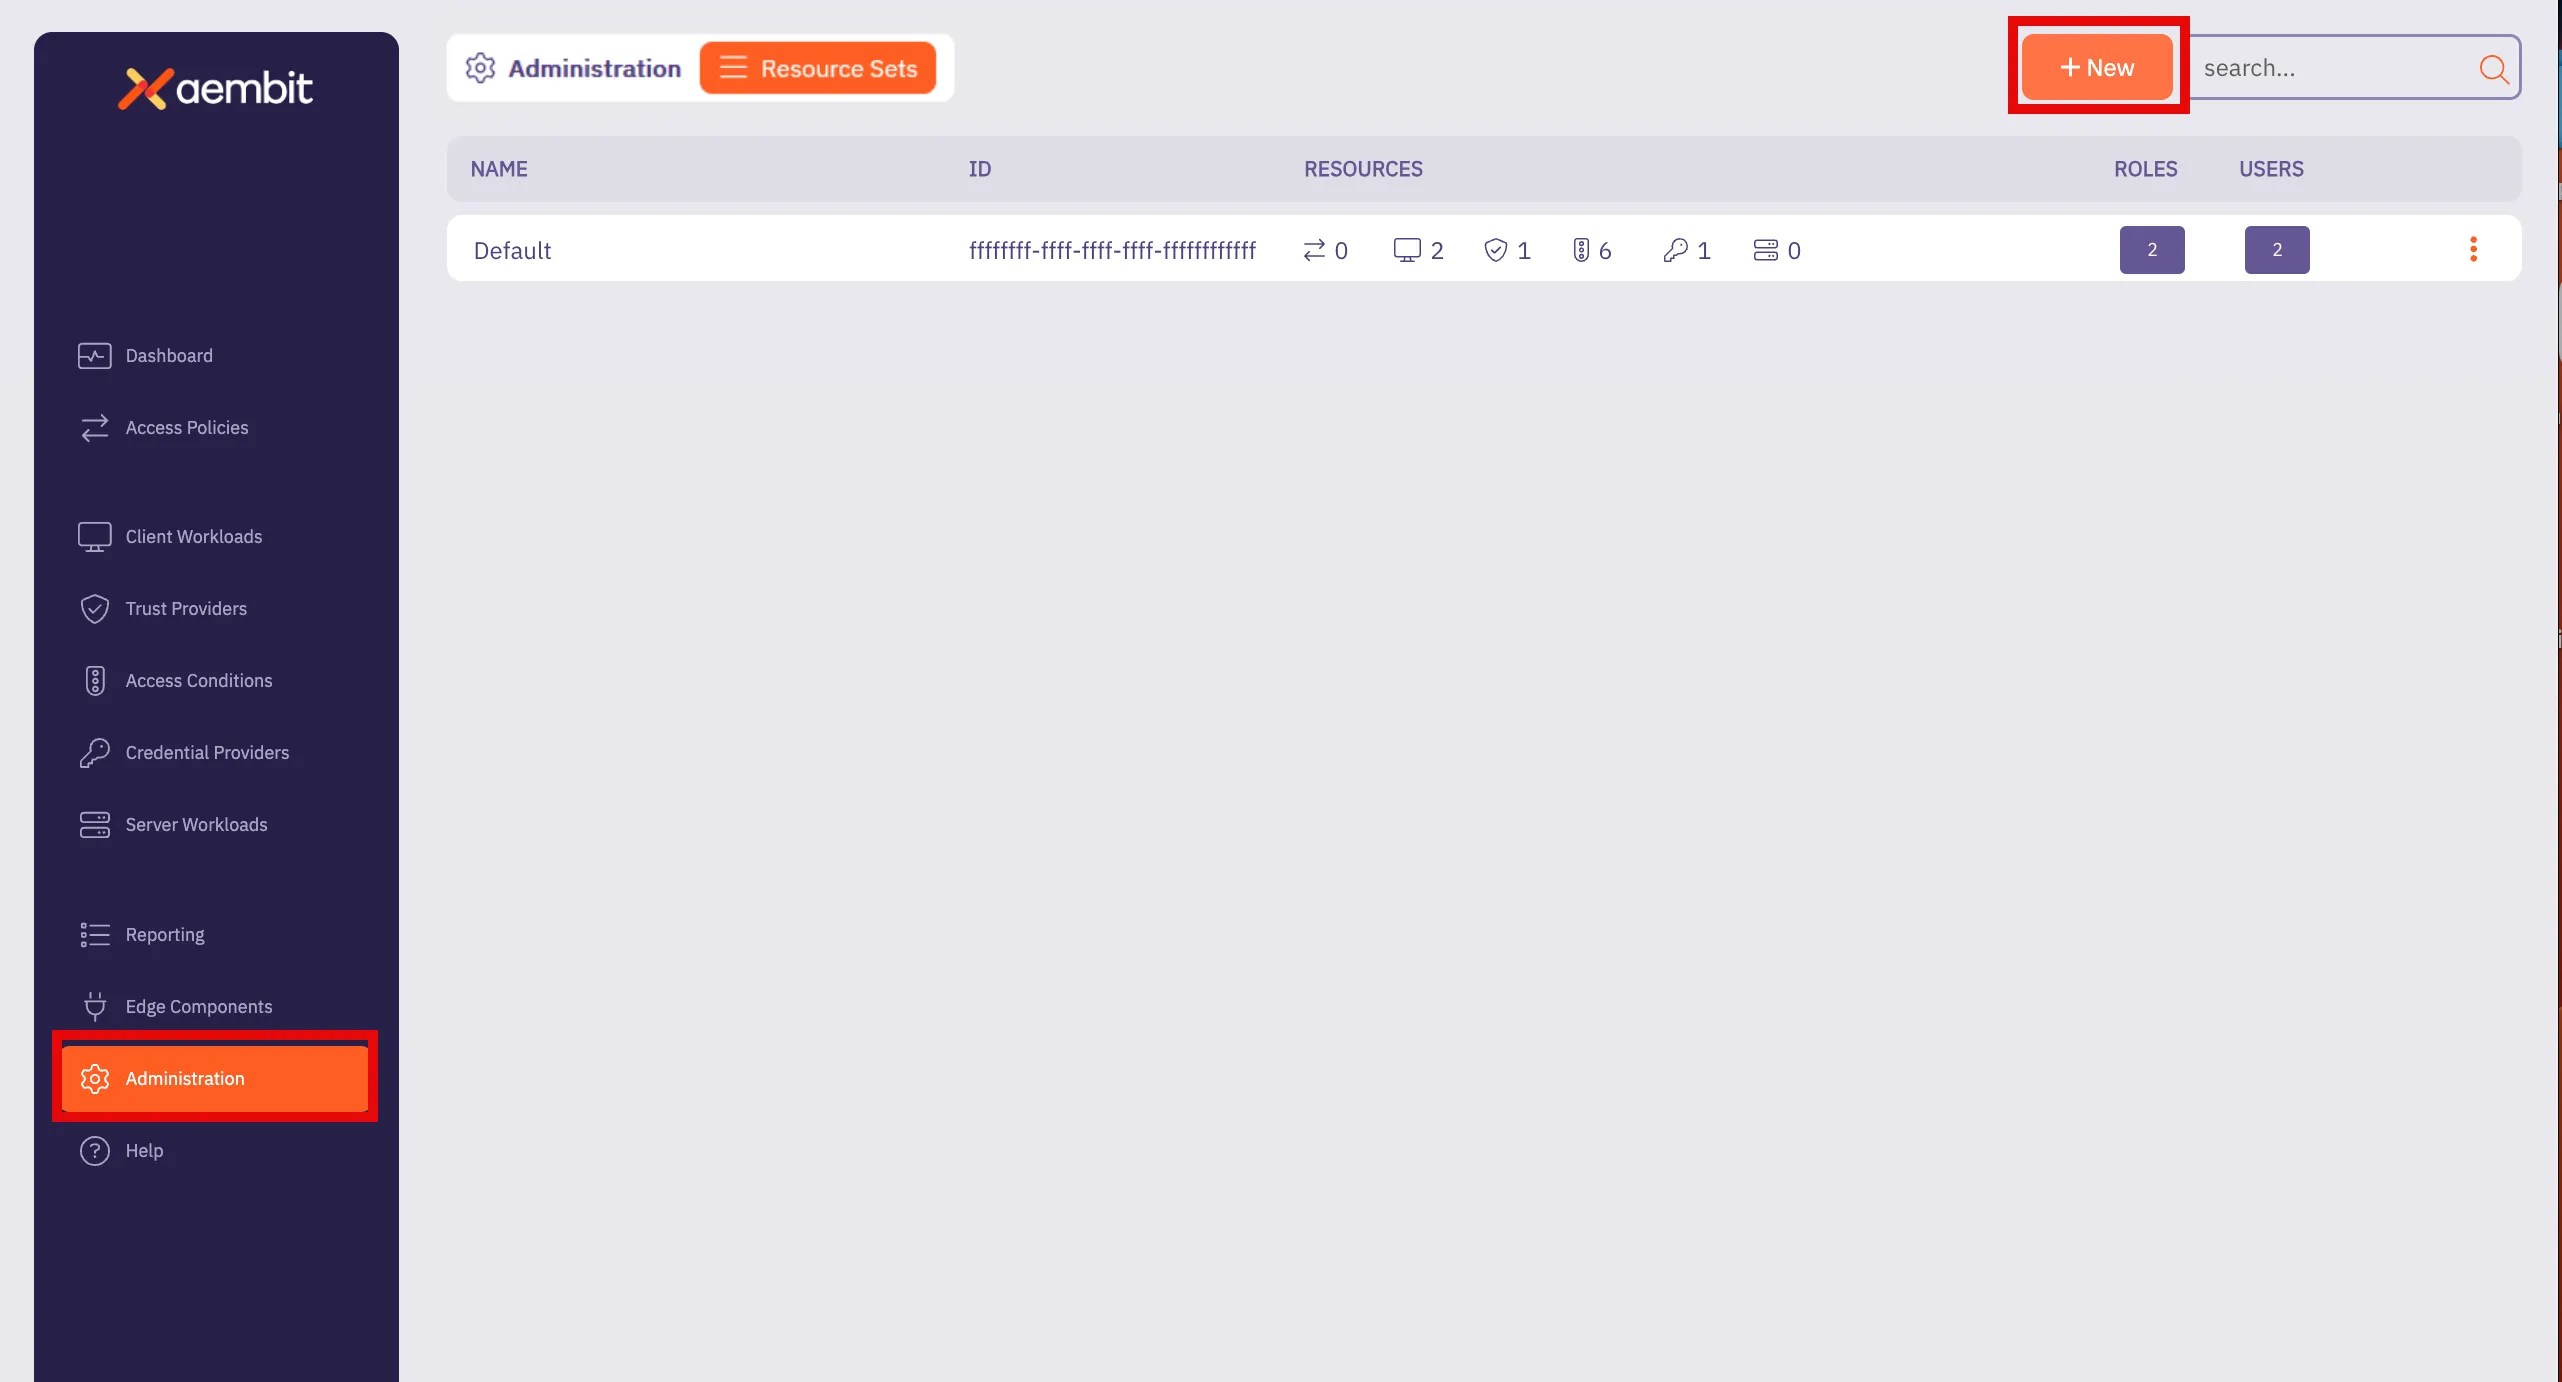
4. Click **+ New**, revealing the Resource Sets pop out menu.
5. Select the **Roles** tab.
Follow the applicable step to either add a new role or select from existing roles:
* Add New Role
1. Click the **Add New** tab.
2. Check **Create New Admin** for the new role.
3. Enter a **Display Name** for the new role.
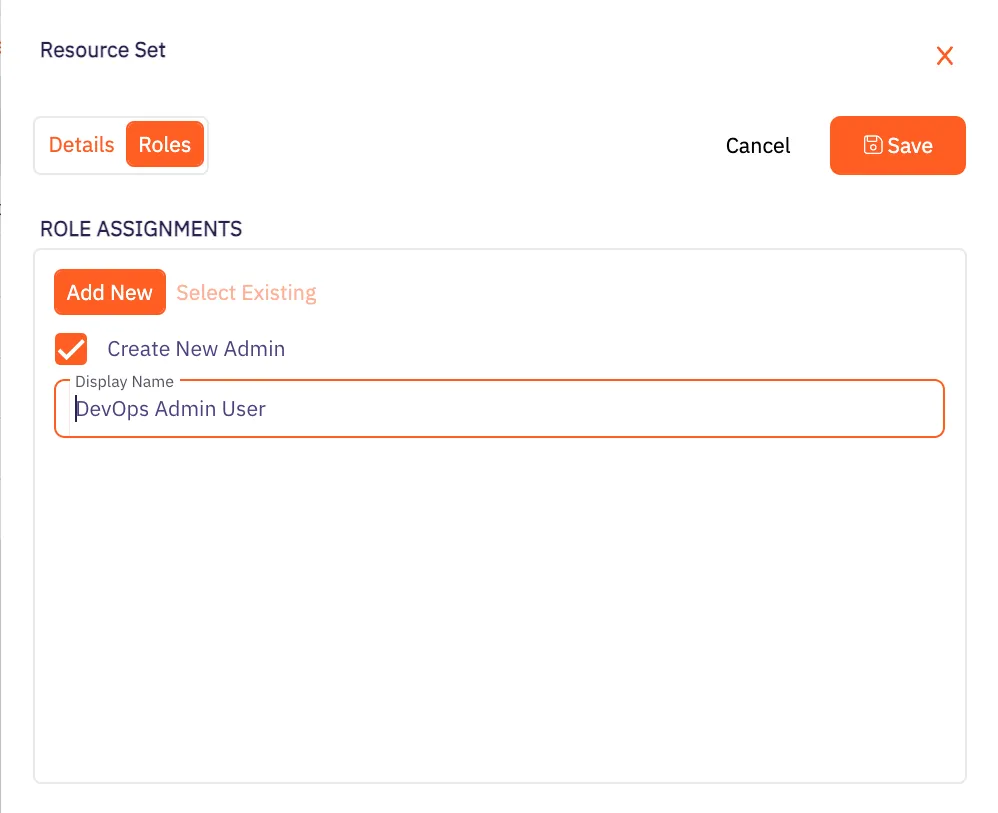
* Select Existing Role
1. Click the **Select Existing** tab.
2. Select the roles you want to use from the drop-down menu.
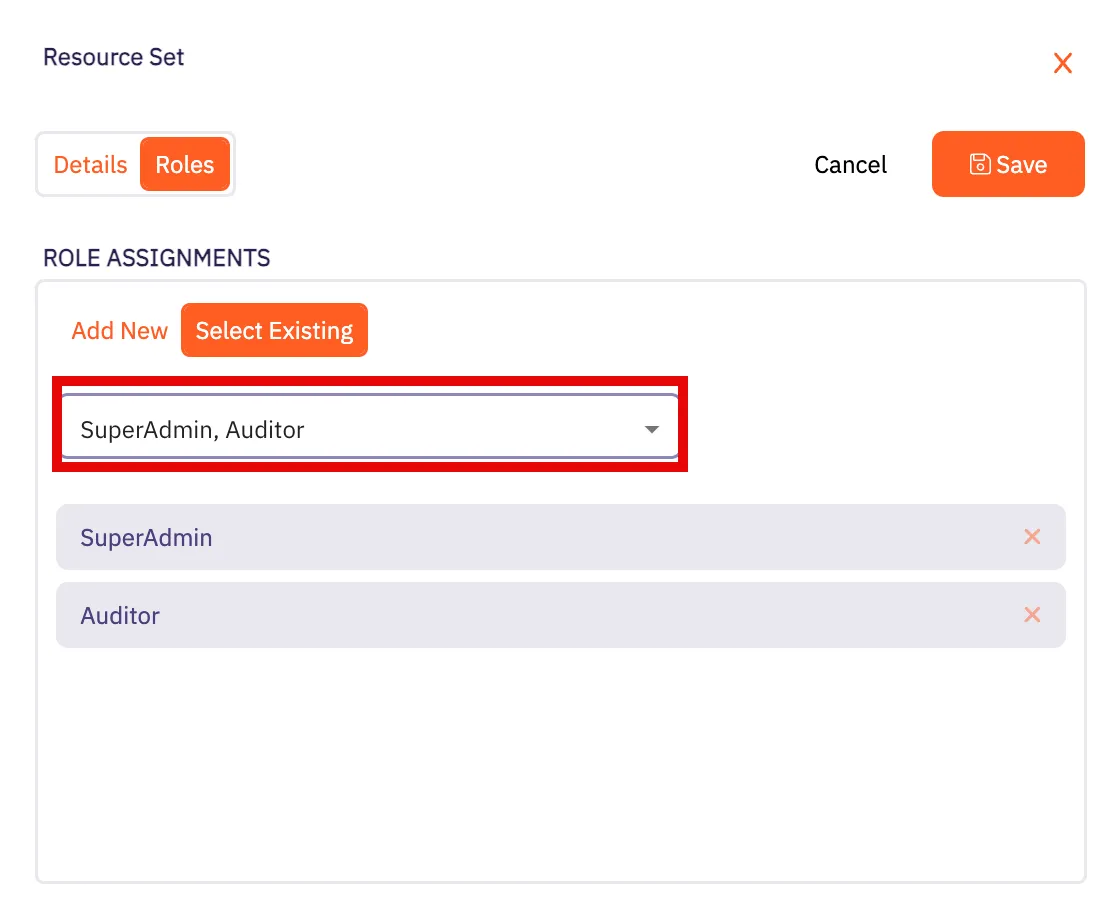
6. Click **Save**.
Aembit displays the Resource Set on the **Resource Sets** page.
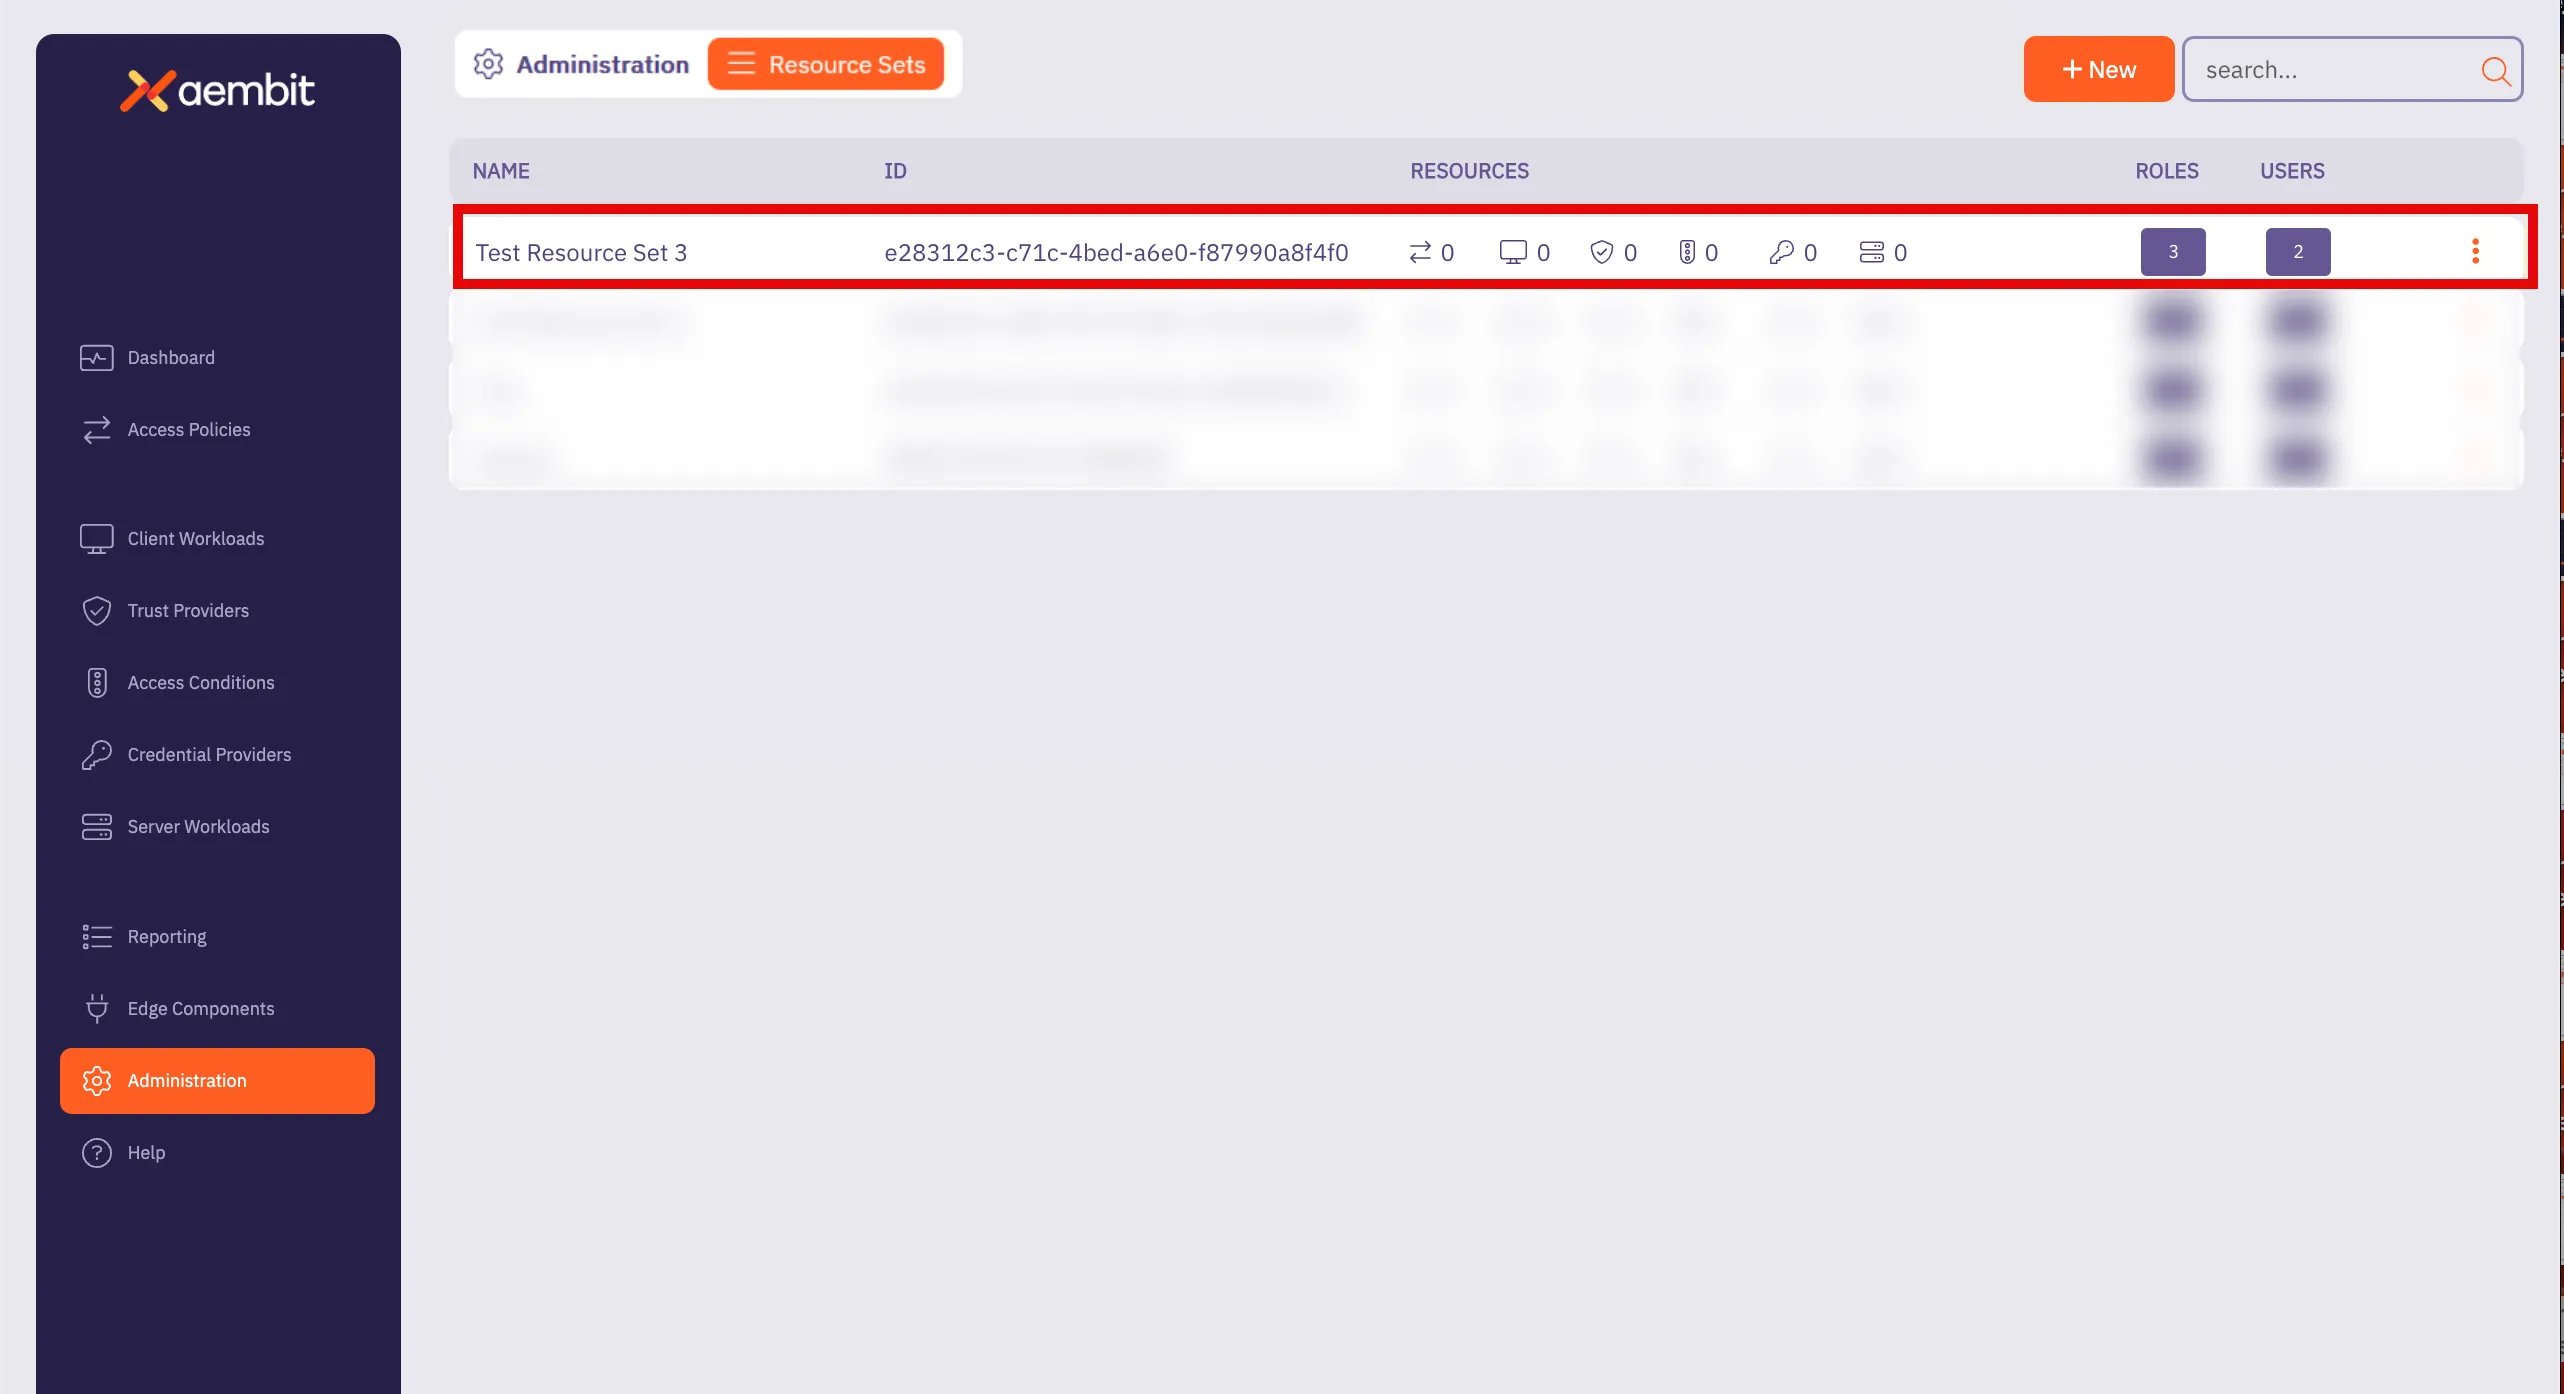
# How to create a Resource Set
> How to create a Resource Set
To create a Resource Set in your Aembit Tenant, perform the following steps:
1. Log into your Aembit Tenant.
2. Click **Administration** in the left sidebar.
3. At the top, select **Administration ☰ Resource Sets**.
Aembit displays the **Resource Sets** page with a list of existing Resource Sets.

4. Click **+ New**, revealing the **Resource Sets** pop out menu.
5. Select the **Details** tab.
6. Fill out the following fields:
* **Name** - The name of the Resource Set.
* **Description** - An optional text description for the Resource Set.
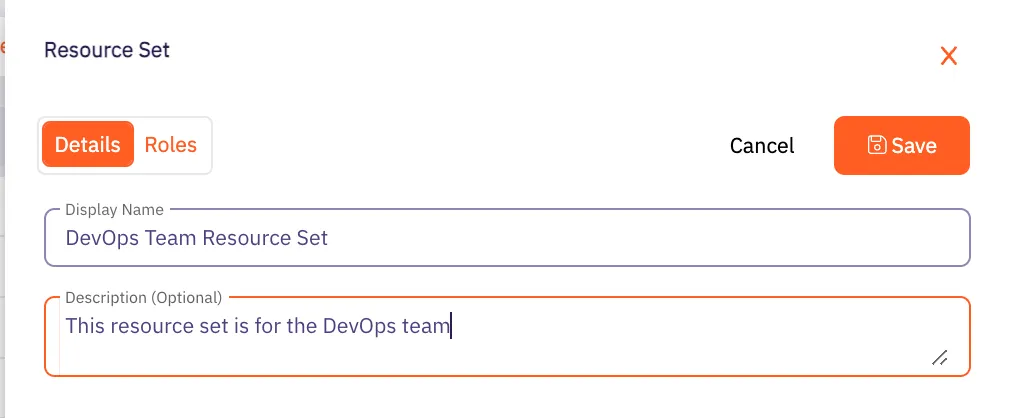
7. Click **Save**.
Aembit displays the Resource Set on the **Resource Sets** page.
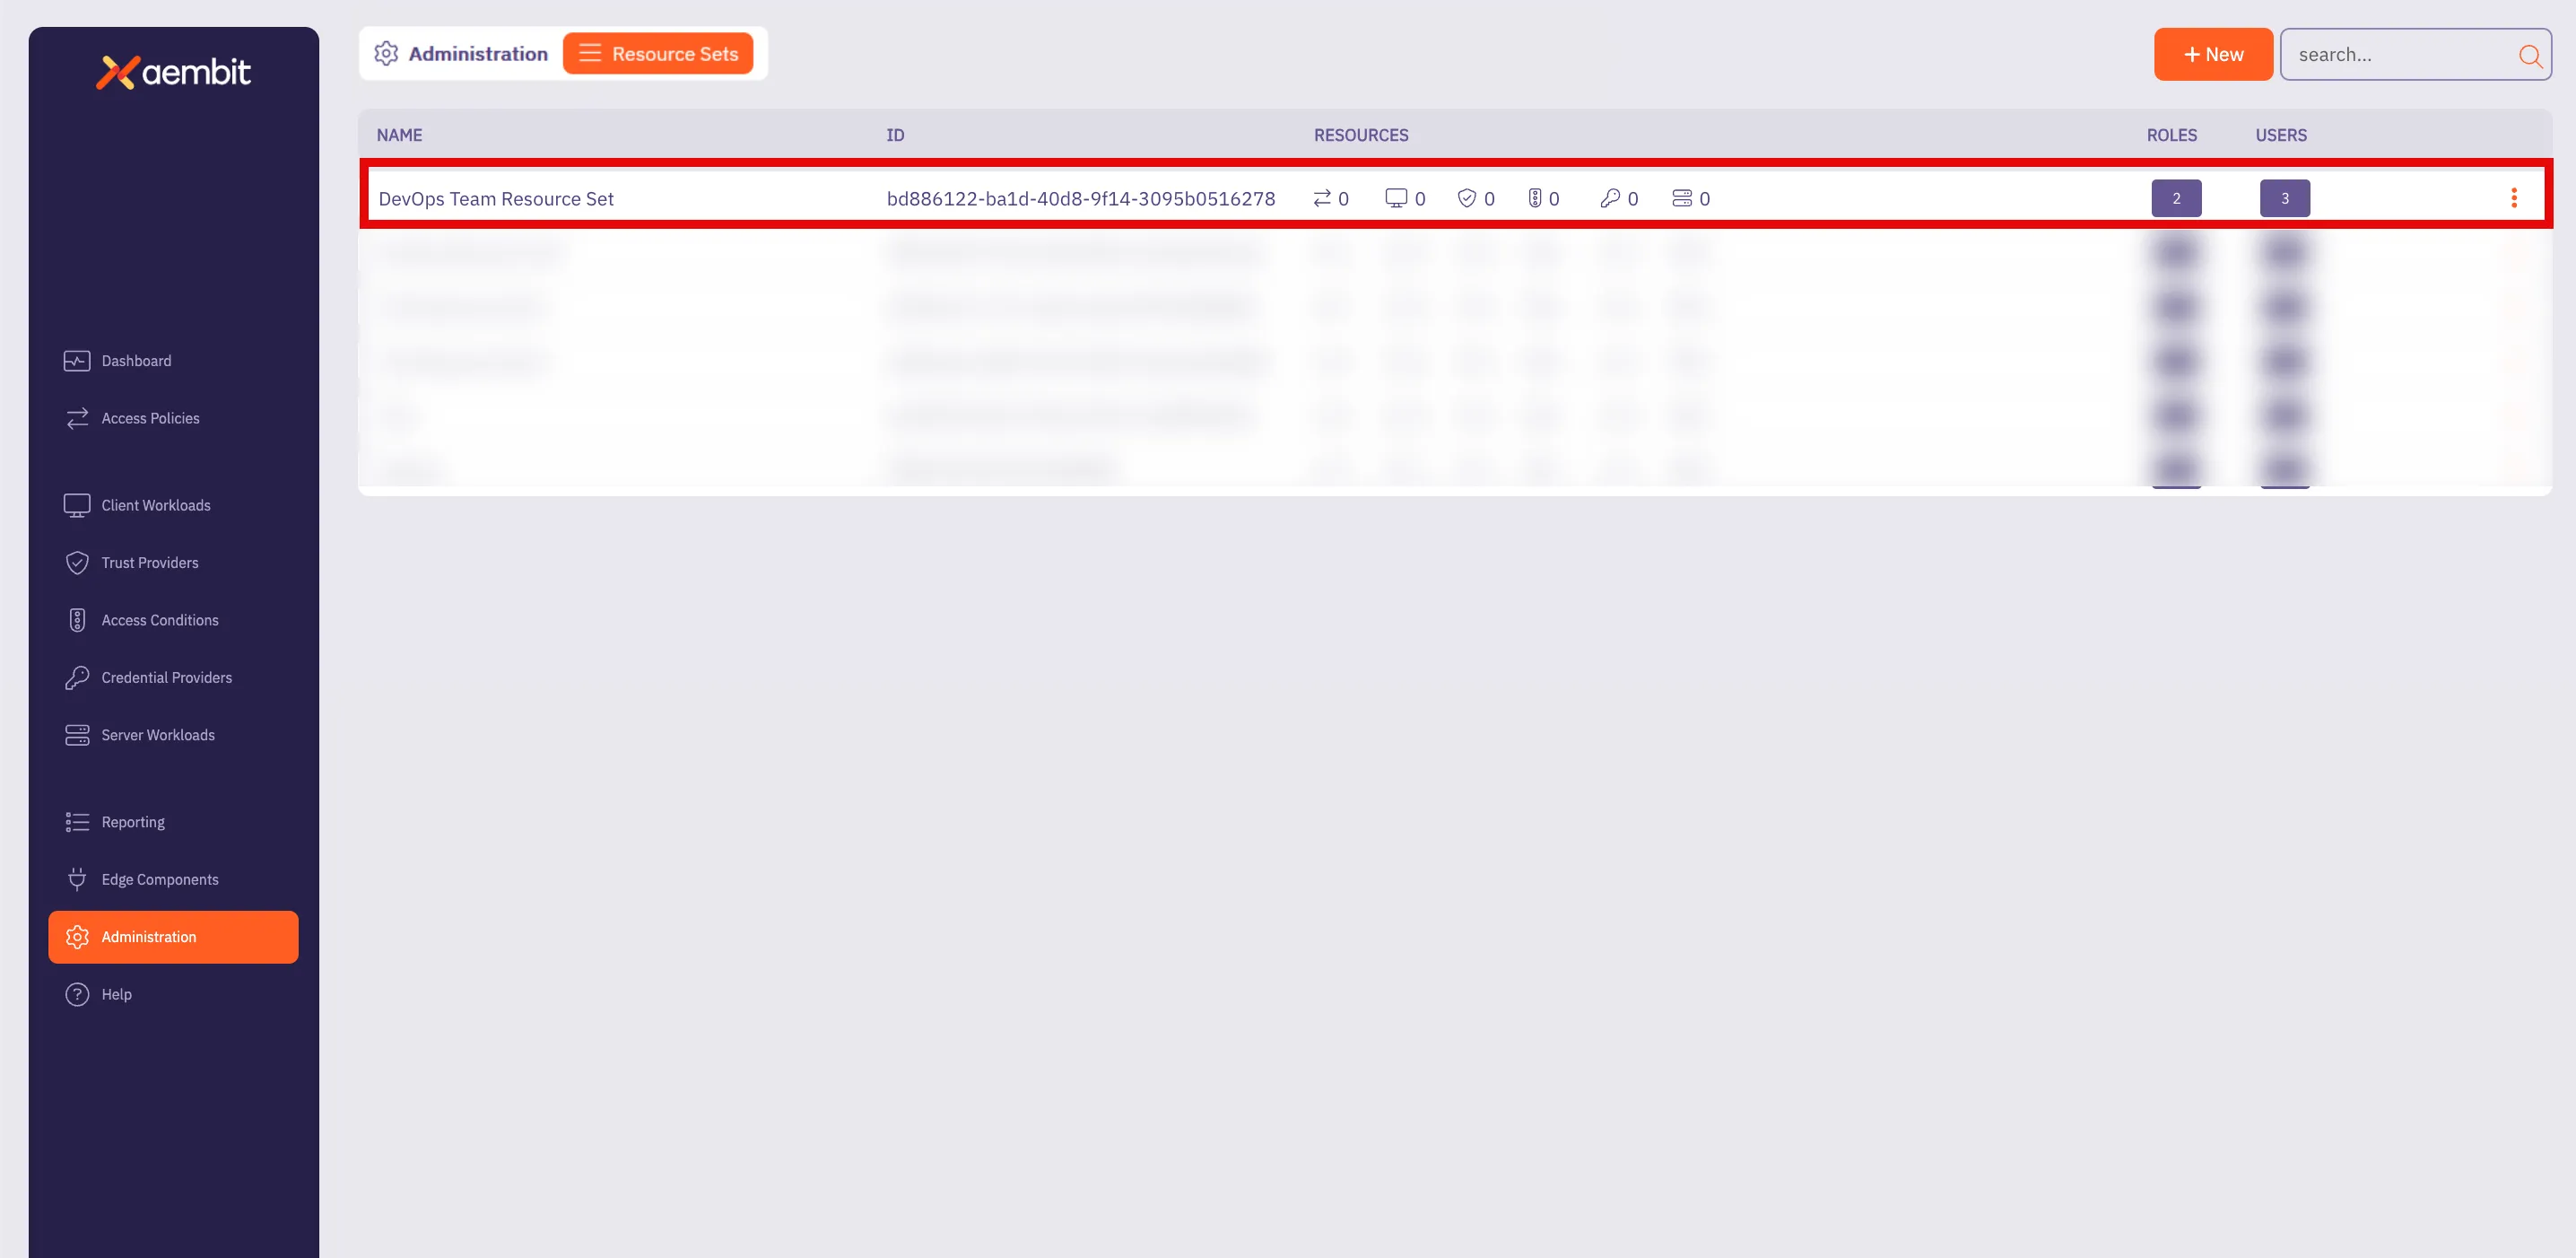
# How to deploy a Resource Set
> How to deploy a Resource Set
Once a Resource Set has been created, and roles and responsibilities have been assigned, the Agent Proxy component needs to be configured and deployed to work with the specific [`AEMBIT_RESOURCE_SET_ID` Agent Proxy environment variable](/reference/edge-components/edge-component-env-vars#agent-proxy-environment-variables). All Aembit deployment mechanisms are supported, including:
* Kubernetes
* Terraform ECS Module
* Agent Proxy VM Installer
* AWS Lambda
### Kubernetes deployment
[Section titled “Kubernetes deployment”](#kubernetes-deployment)
To deploy a Resource Set using Kubernetes, you need to add the `aembit.io/resource-set-id` annotation to your Client Workload deployments.
For more information on how to deploy Resource Sets using Kubernetes, please see the [Kubernetes Deployment](/user-guide/deploy-install/kubernetes/kubernetes) page.
### Terraform ECS module deployment
[Section titled “Terraform ECS module deployment”](#terraform-ecs-module-deployment)
To deploy a Resource Set using the Terraform ECS Module, you need to provide the `AEMBIT_RESOURCE_SET_ID` environment variable in the Client Workload ECS Task.
For more detailed information on how to deploy a Resource Set using the Terraform ECS Module, please see the [Terraform Configuration](/user-guide/access-policies/advanced-options/terraform/terraform-configuration#resources-and-data-sources) page.
### Agent Proxy VM installer deployment
[Section titled “Agent Proxy VM installer deployment”](#agent-proxy-vm-installer-deployment)
To deploy a Resource Set using the Agent Proxy Virtual Machine Installer, you need to specify the `AEMBIT_RESOURCE_SET_ID` environment variable during the Agent Proxy installation.
For more information on how to deploy a Resource Set using the Agent Proxy Virtual Machine Installer, please see the [Virtual Machine Installation](/user-guide/deploy-install/virtual-machine/) page.
### AWS Lambda deployment
[Section titled “AWS Lambda deployment”](#aws-lambda-deployment)
To deploy a Resource Set using an AWS Lambda Container, you need to specify the `AEMBIT_RESOURCE_SET_ID` environment variable to your Client Workload.
For more information on AWS Lambda deployment environments, see the [AWS Lambda function](/user-guide/deploy-install/serverless/aws-lambda-function) and [AWS Lambda container](/user-guide/deploy-install/serverless/aws-lambda-container) pages.
# Roles overview
> Description of Aembit roles and how they work
When working in your Aembit environment, you may find it necessary to assign specific roles and permissions for groups so they only have access to certain resources that they are required to manage in order to perform their tasks.
By creating roles and assigning permissions to that role, you can enhance your overall security profile by ensuring each role, with its assigned permissions, only has the access required.
Your Aembit Tenant enables you to create new roles within your organization, assign Resource Sets for a role, and set permissions for the role.
The following pages provide more information about managing roles in your Aembit Tenant:
* [Adding Roles](/user-guide/administration/roles/add-roles) - Learn how to add roles to your Aembit Tenant
# How to add a new role
> How to create a new Role in your Aembit Tenant
To add a role to your Aembit Tenant, perform the following steps:
1. Log into your Aembit Tenant.
2. Click **Administration** in the left sidebar.
3. At the top, select **Administration ☰ Roles**.
Aembit displays the **Roles** page with a list of existing roles.
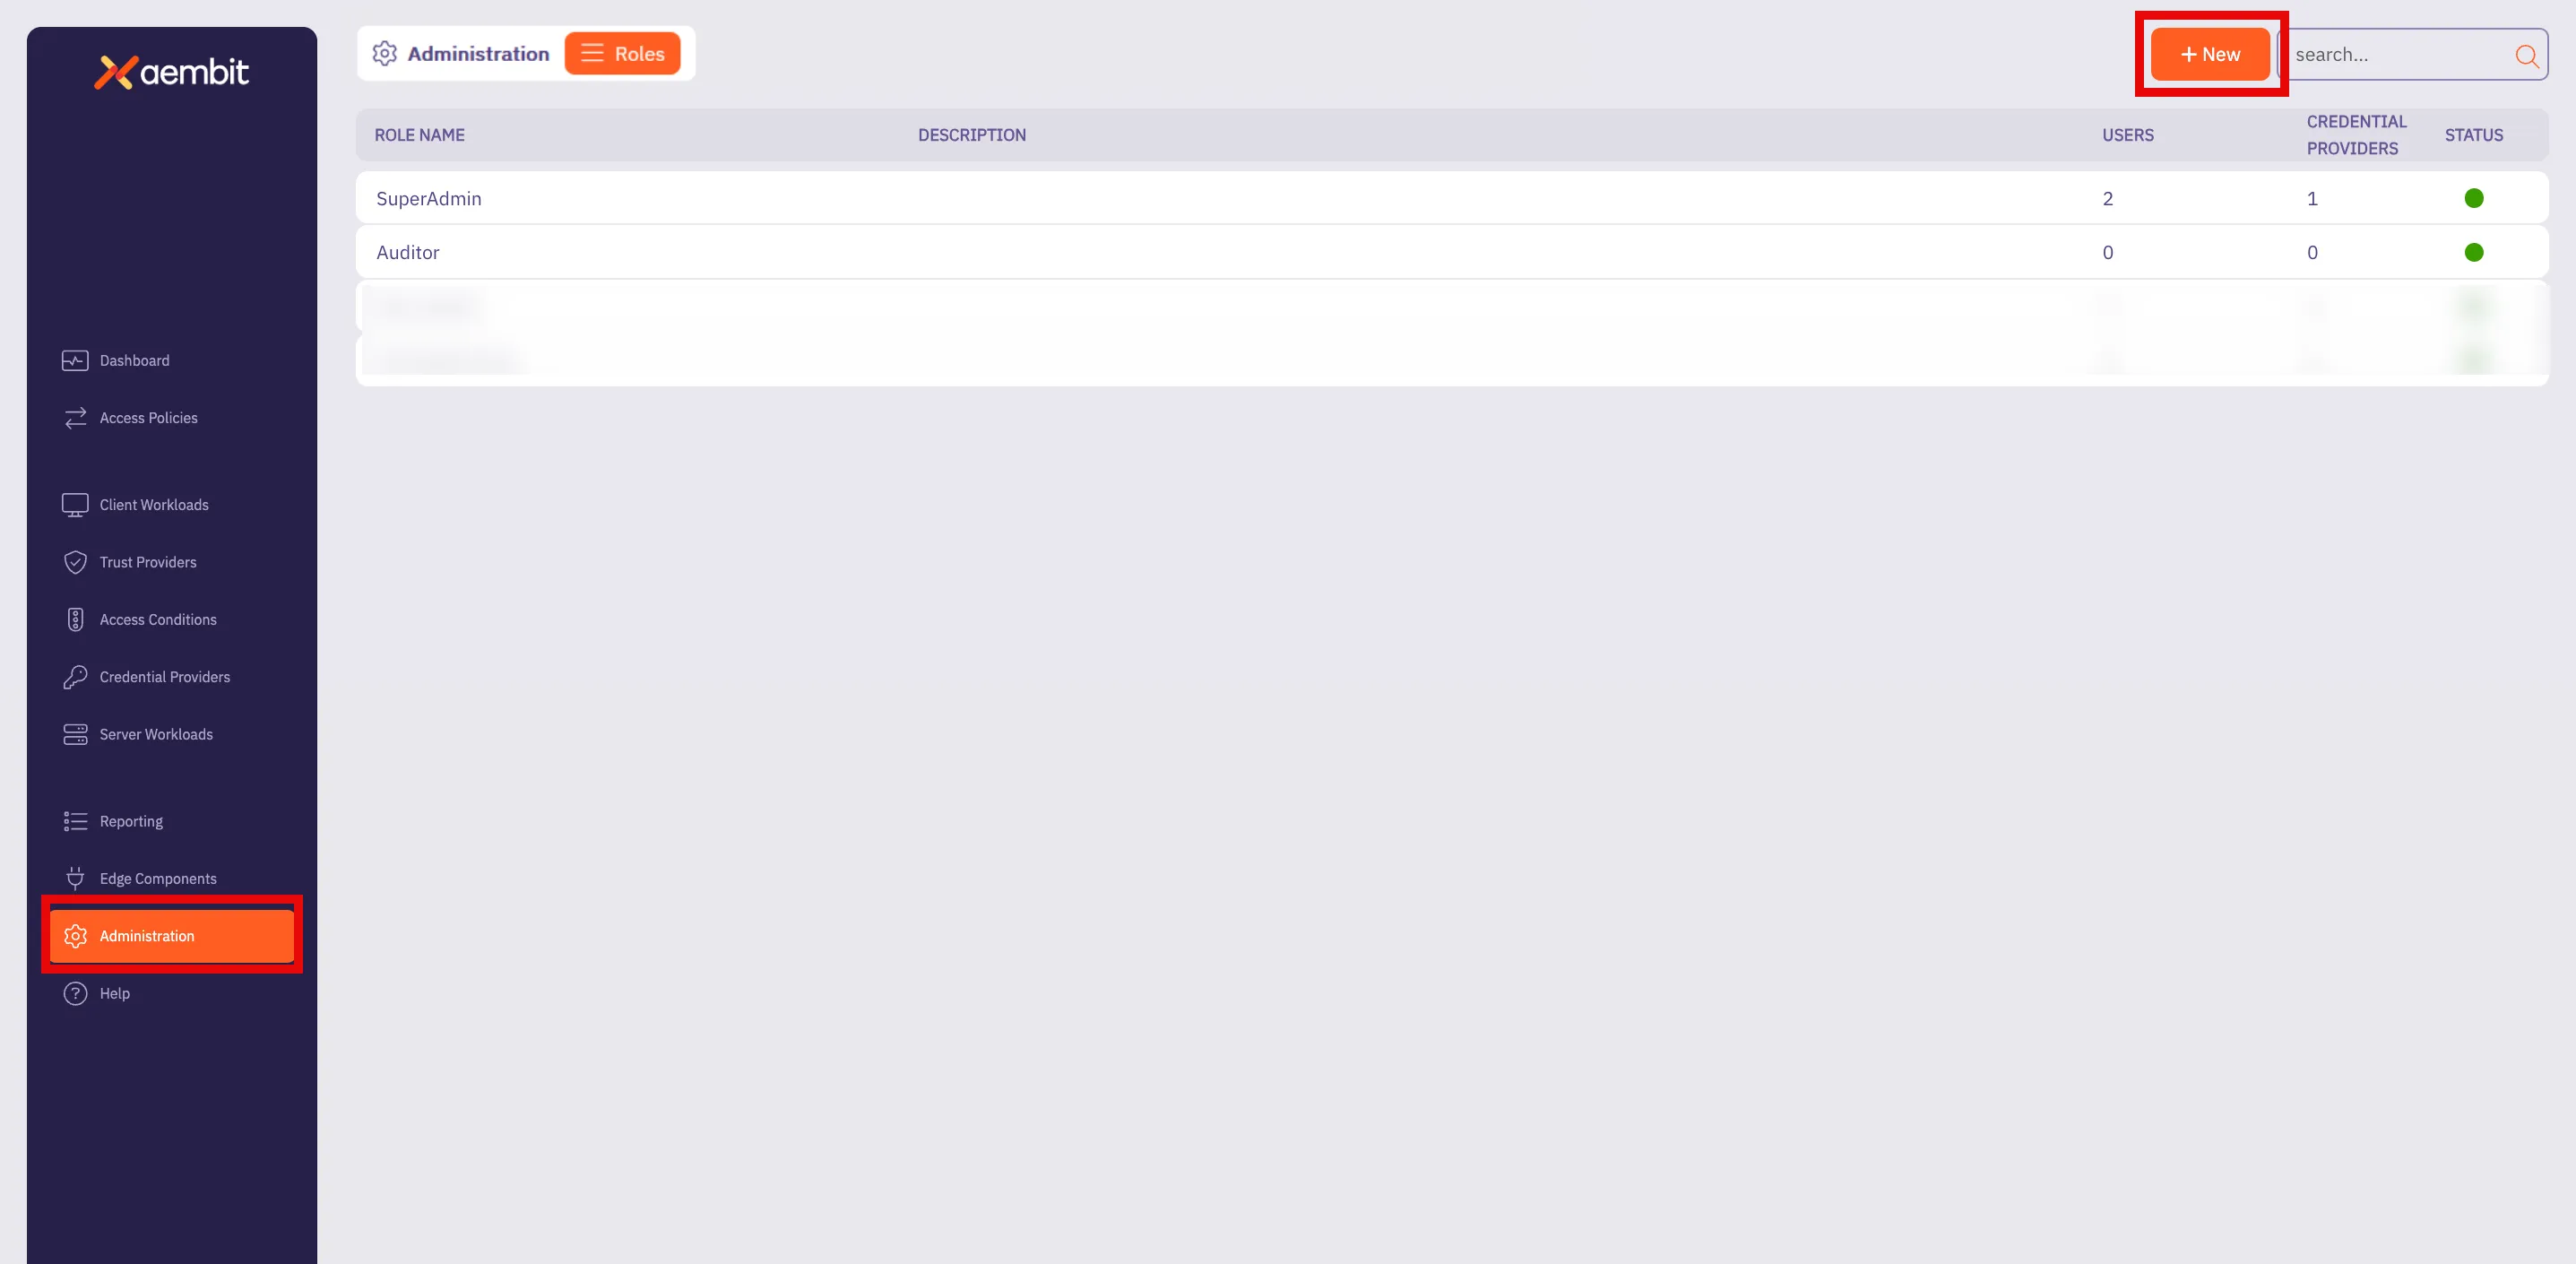
Note
By default, Aembit Tenants includes both the **SuperAdmin** and **Auditor** roles.
4. Click **+ New**, revealing the **Roles** pop out menu.
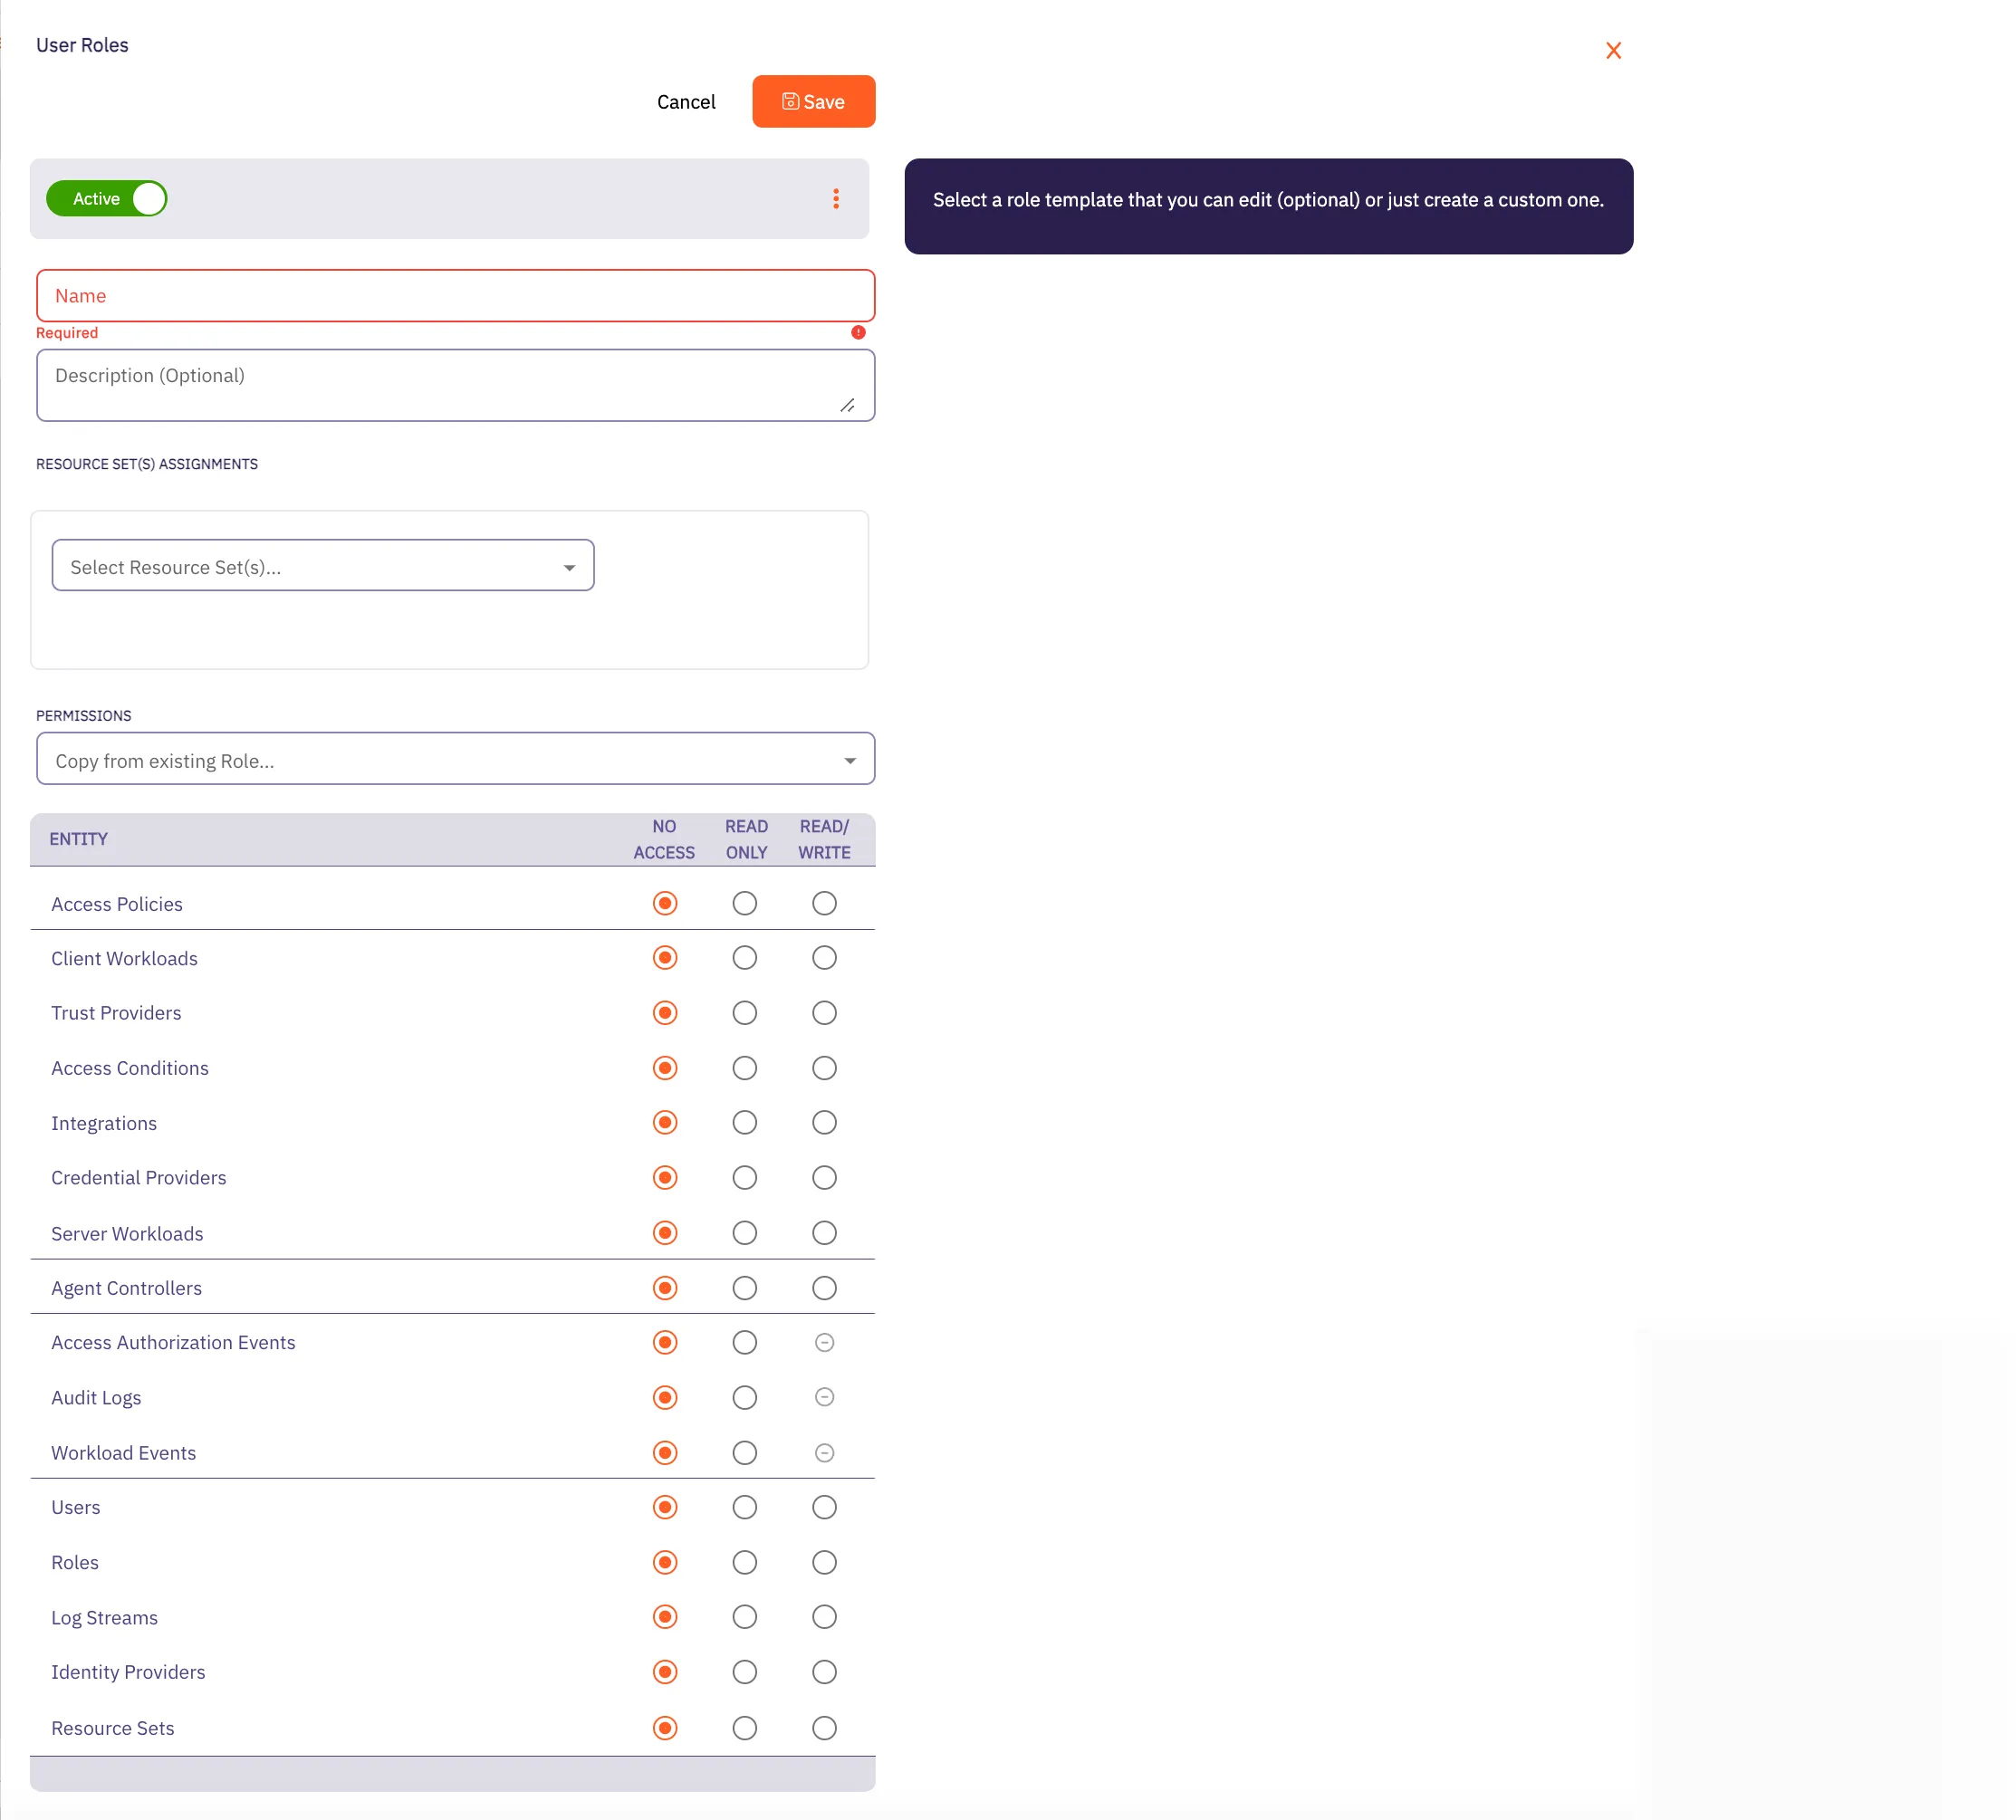
5. Fill out the following fields:
* **Name** - The name of the Role.
* **Description** - An optional text description of the Role.
* **Resource Set Assignment(s)** - A drop-down menu that enables you to assign existing Resource Sets to the Role.
* **Permissions** - Select an existing permission set based on the type of Role you would like to create. By selecting from this list, the radio buttons in the Permissions section Aembit auto-fills with the default permissions for that role.
In the following example using the **SuperAdmin** role, Aembit has auto-filled the default permissions for that role:
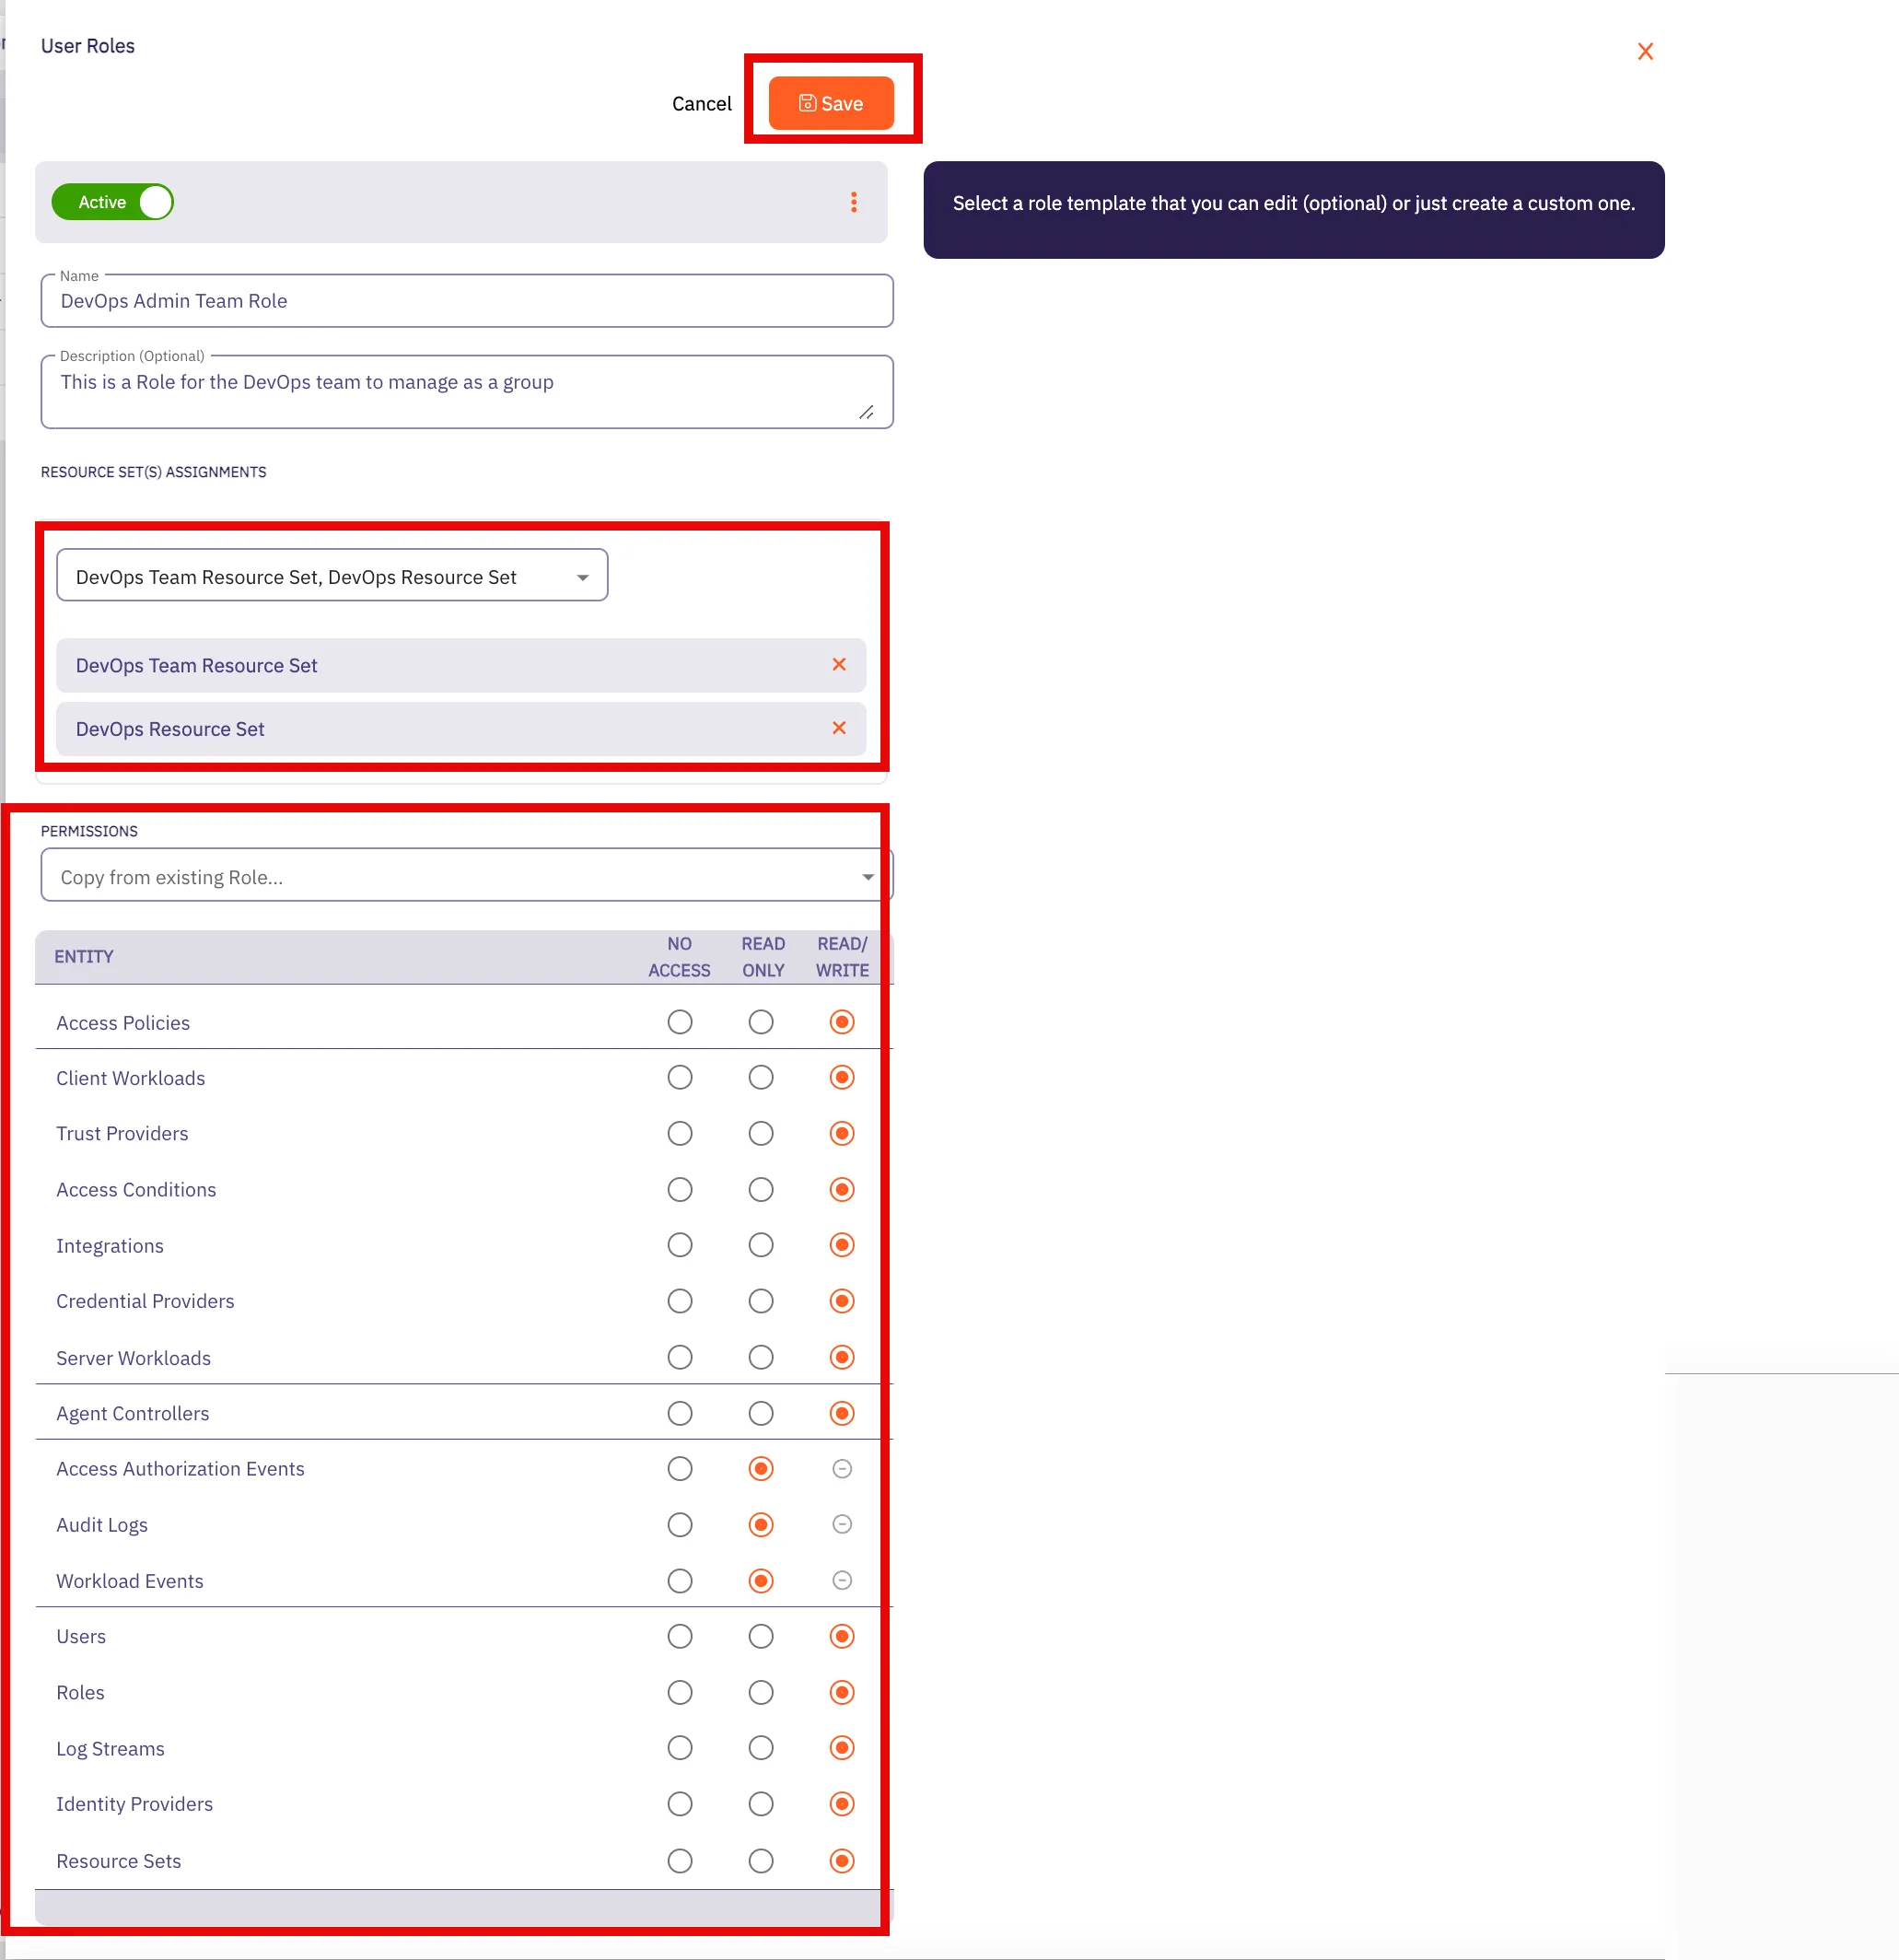
6. Click **Save**.
Aembit displays the role on the **Roles** page.
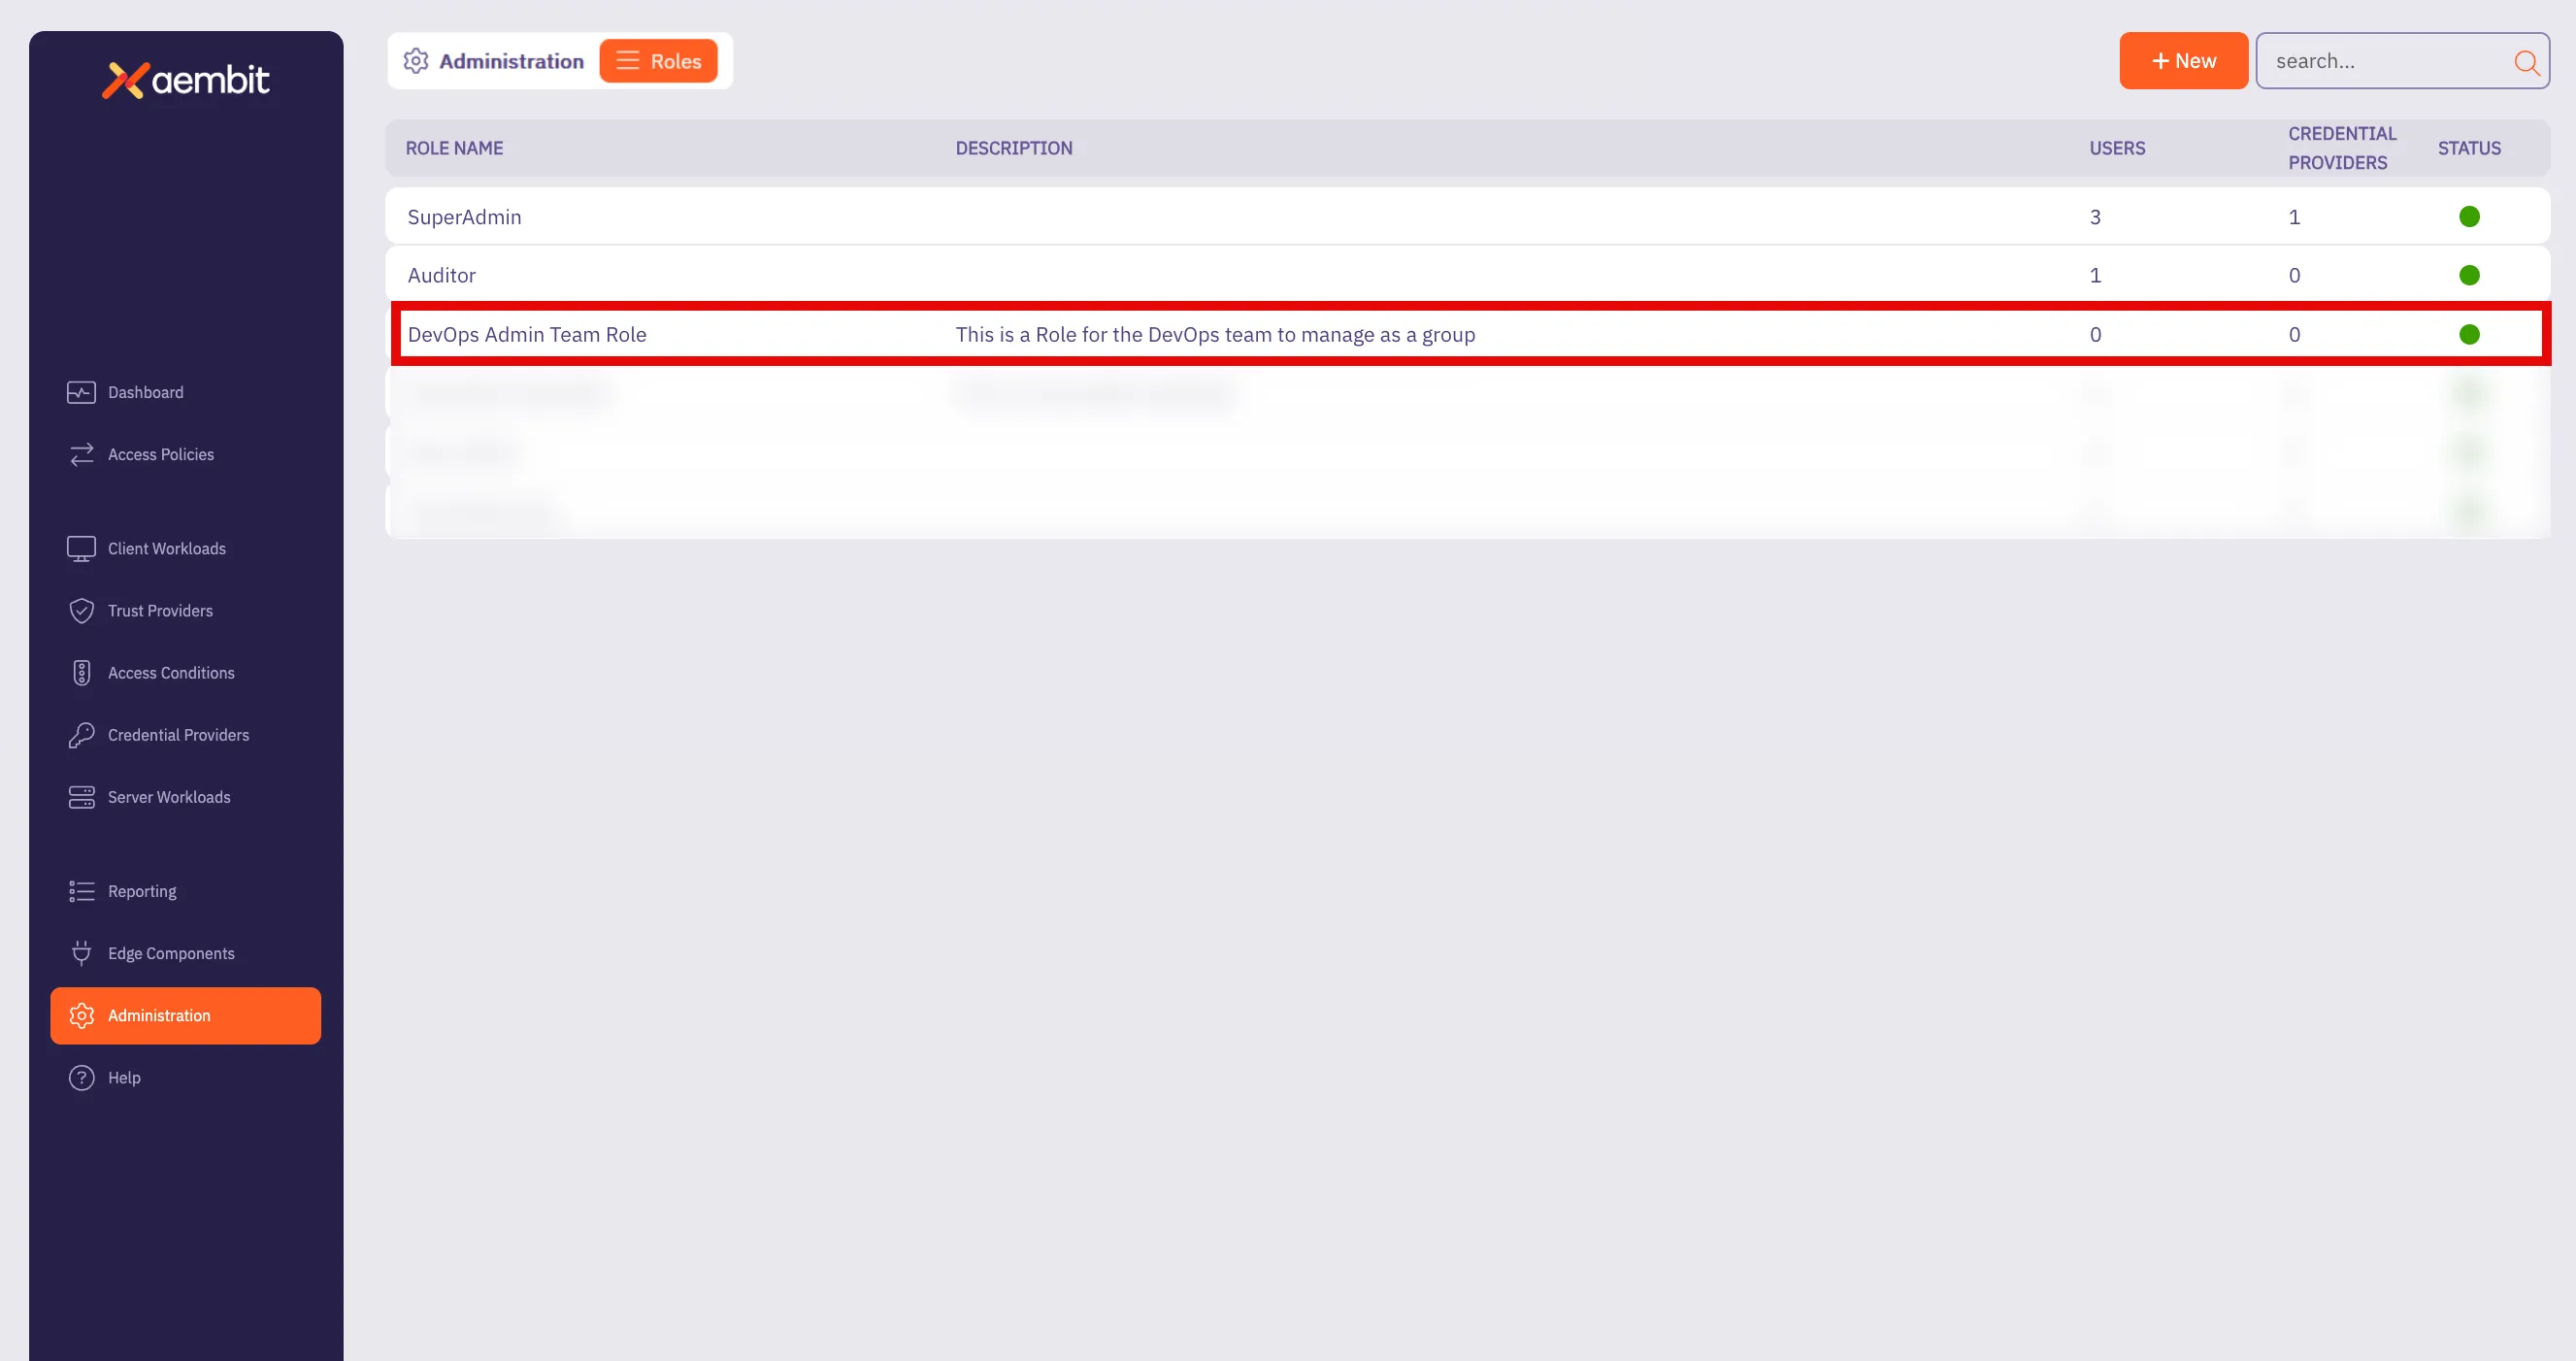
# Sign-On Policy overview
> Description of what Sign-On Policies are and how they work
Use the Sign-On Policy page to control how users log in to your Aembit Tenant. The settings in this page allow you to customize the login experience and security level according to the organization’s needs. The Sign-On Policy page offers two key options to enhance security and streamline the authentication process:
## Require Single Sign-On
[Section titled “Require Single Sign-On”](#require-single-sign-on)
The following are requirements for using Single Sign-On (SSO):
Paid feature
This option is available only to tenants with enabled Identity Providers feature.
This option mandates that users authenticate through a Single Sign-On provider. This not only simplifies the login process but also enhances security by centralizing authentication management.
When you turn on the require SSO option, your users with the system Super Admin role can always use the native sign-in option (username and password).
## Require multi-factor authentication for native sign-in
[Section titled “Require multi-factor authentication for native sign-in”](#require-multi-factor-authentication-for-native-sign-in)
This option enforces the use of multi-factor authentication (MFA) for users logging in directly through Aembit’s native sign-in method. When enabled, users must provide an MFA code, as well as their password. This markedly increases security by adding an extra layer of protection against unauthorized access.
Aembit provides users a 24-hour grace period once you require users to authenticate with MFA. The grace period resets for any users that update their accounts (for example: due to a password reset or account unlocking activity). After this period, Aembit locks accounts without MFA configured.
## Required permissions
[Section titled “Required permissions”](#required-permissions)
Access to the policy settings on this page requires the **Sign-On Policy** permission.
# Users overview
> This page provides a high-level description of users
When you are working in your Aembit environment, you may find it necessary to add new users to your organization’s Aembit Tenant so they can be added to groups, manage resources, and be assigned certain roles within your organization.
In your Aembit Tenant, adding a user entails creating a new user in the tenant UI, and then assigning specific roles for that user. Once the user has been added and a role has been assigned, that user can then manage resources.
The following pages provide more information about managing users in your Aembit Tenant:
* [Adding Users](/user-guide/administration/users/add-user) - Learn how to add users to your Aembit Tenant
# How to add a user
> How to add a user to your Aembit Tenant
To add a user to your Aembit Tenant, perform the following steps:
1. Log into your Aembit Tenant.
2. Click **Administration** in the left sidebar.
3. At the top, select **Administration ☰ Users**.
Aembit displays the **Users** page with a list of existing users.

4. Click **+ New**, revealing the **Users** pop out menu.
5. Fill out the following fields:
* **First Name** - First name of the user **Last Name** - Last name of the user
* **Email** - The email address associated with the user
* **Country Code (optional)** - The country code associated with the user
* **Phone Number (optional)** - The phone number associated with the user.
* **Role Assignments** - Select the specific role assignments for the user from a list of available roles.
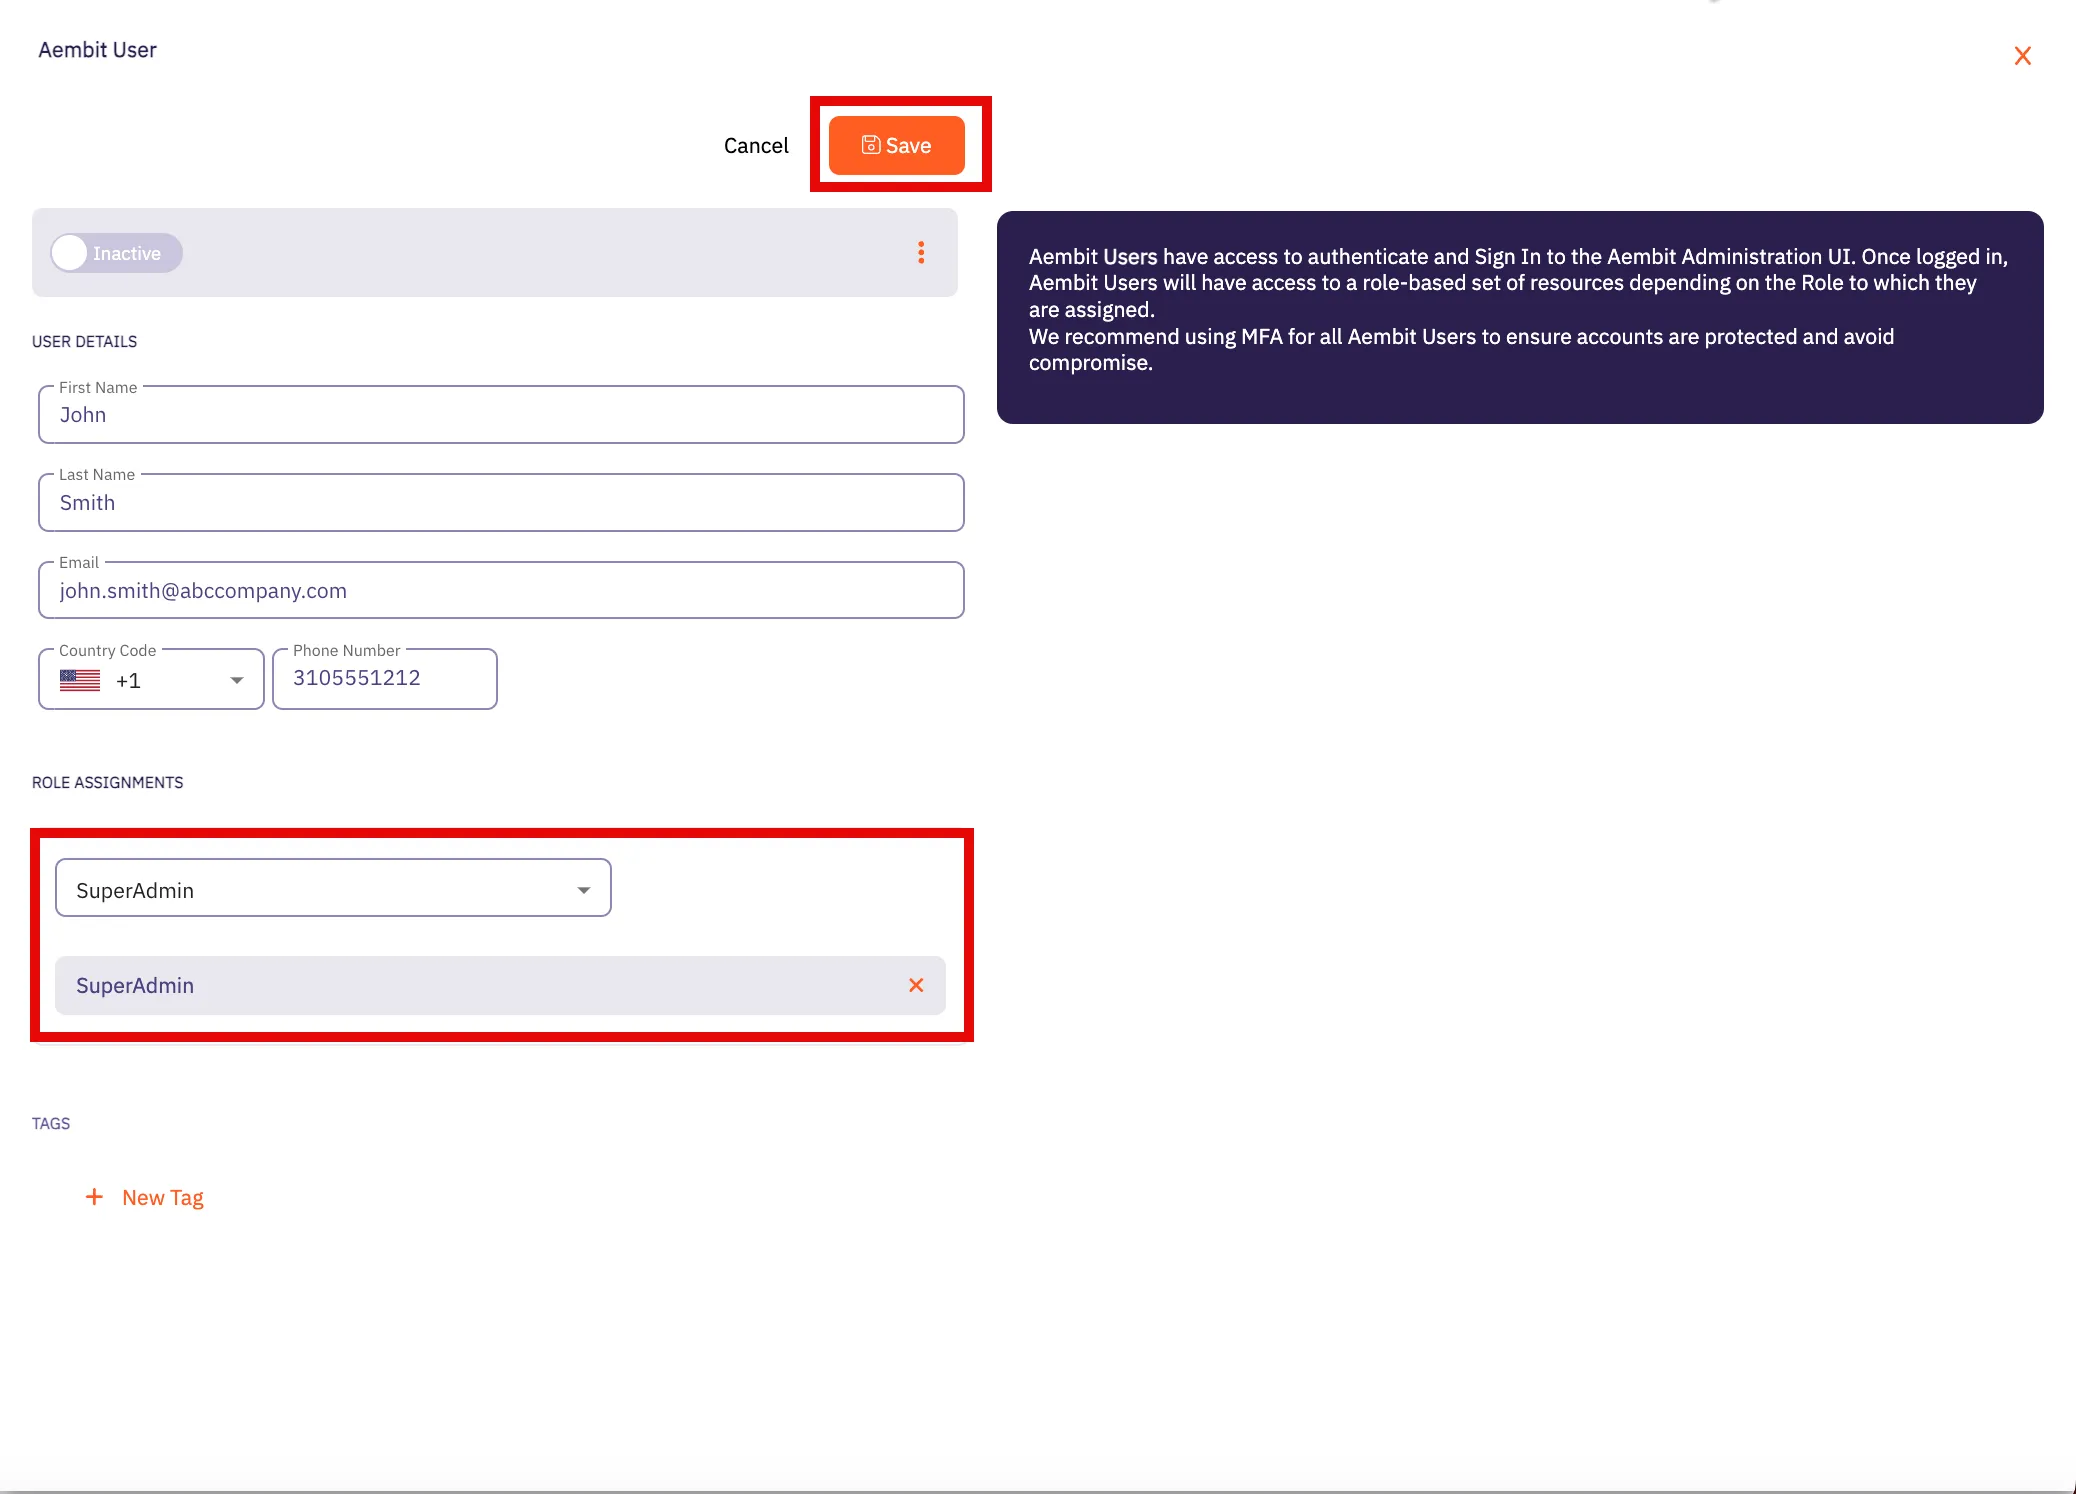
6. Click **Save**.
Aembit displays the new user on the **Users** page.
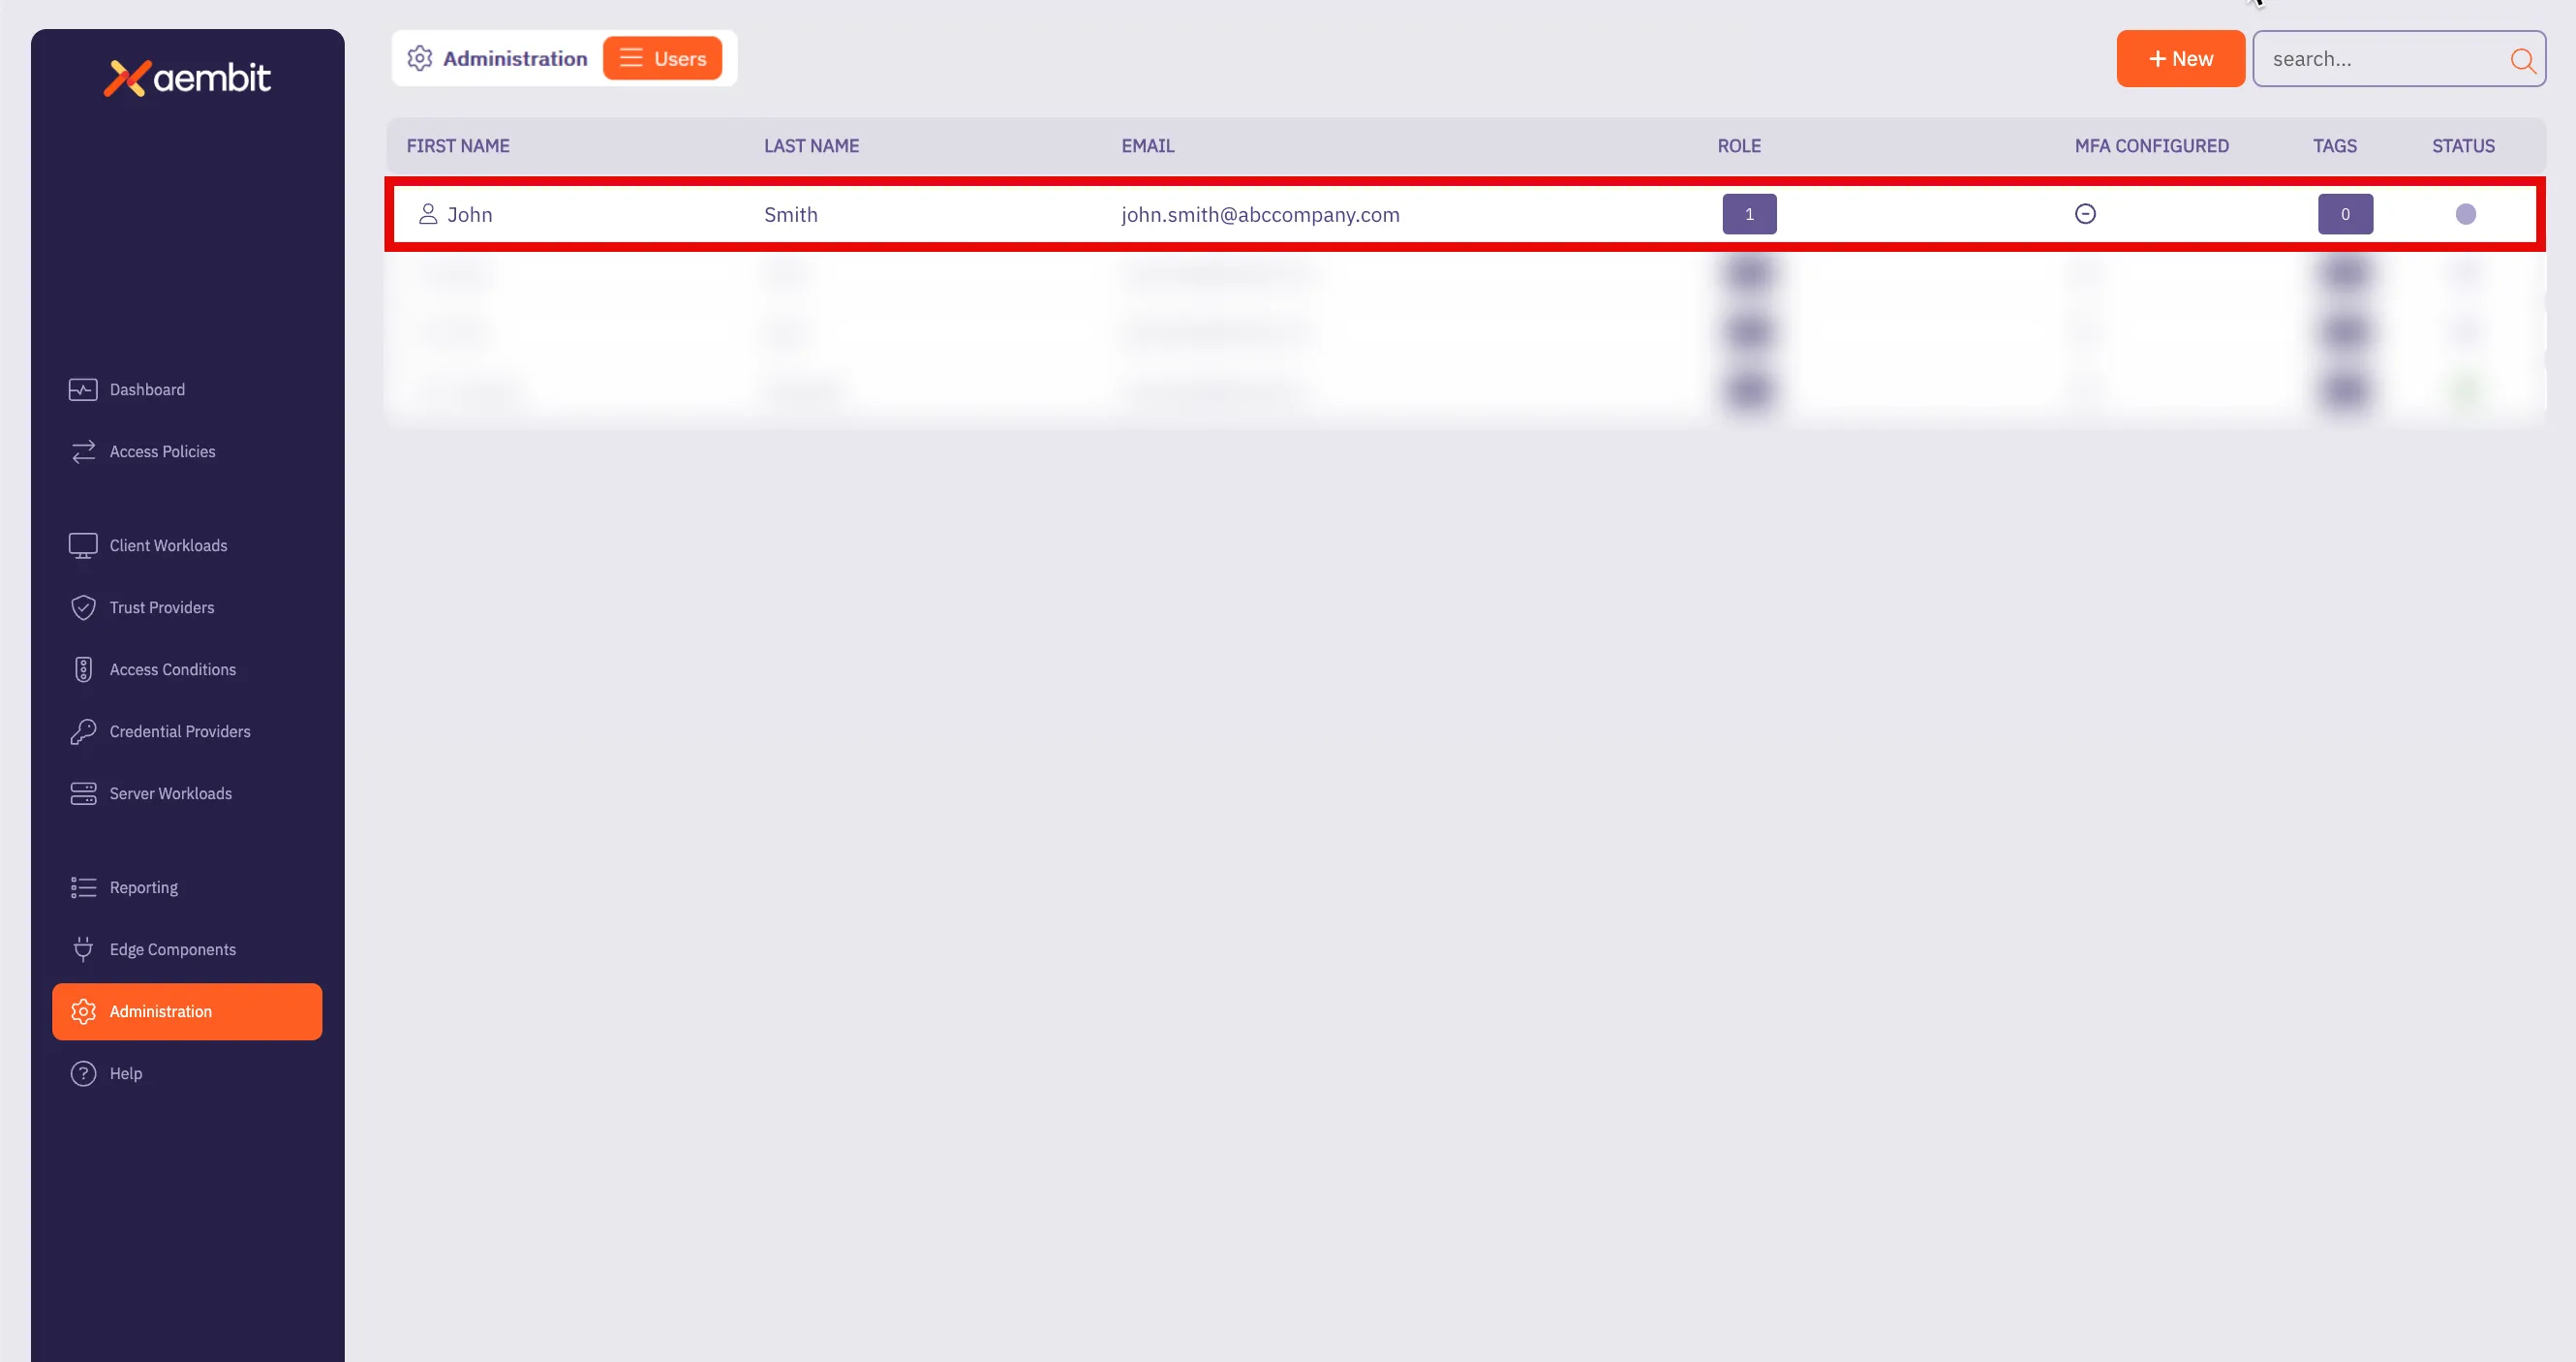
# Audit and report on Workload activity
> This document provides a high-level conceptual overview of auditing and reporting workload activity
Your Aembit Tenant includes three different reporting tools that allow you to review detailed event information. These tools provide insights into your Aembit environment, enabling you to review historical event data and remediate any issues that may arise. This content is useful for reviewing the number of credential requests recorded over a specific period or diving deep into audit logs to troubleshoot errors.
The Aembit Tenant includes the following views in the Reporting Dashboard:
* [Access Authorization Events](#access-authorization-events)
* [Audit Logs](#audit-logs)
* [Workload Events](#workload-events)
* [Global Policy Compliance](#global-policy-compliance)
## Access Authorization Events
[Section titled “Access Authorization Events”](#access-authorization-events)
Aembit generates Access Authorization events when Edge Components request access to Aembit-managed Server Workloads. These events detail the evaluation of requests against Access Policies, including the request, evaluation steps, and the outcome (granted or denied). The three event types are: Access Request, Access Authorization, and Access Credential. These logs are essential for diagnosing access-related issues and detecting potential security threats.

[More on Access Authorization Events ](/user-guide/audit-report/access-authorization-events/)Learn how to review Access Authorization event information in the Reporting dashboard.
→
## Audit logs
[Section titled “Audit logs”](#audit-logs)
Audit logs capture detailed information about configuration and administrative activities within your Aembit Tenant. You can filter these logs by timespan, category, and severity to focus on specific events or time frames. The logs include timestamps, actors, categories, activities, targets, and results, that help you identify relevant events. This information, combined with client-specific details like IP address, browser, and operating system, provide you valuable context for troubleshooting and maintaining a comprehensive audit trail. This detailed logging also helps you identify the source of issues and understand the context of events within your Aembit environment.

[More on Audit Logs ](/user-guide/audit-report/audit-logs/)Learn how to review Audit Log information in the Reporting dashboard.
→
## Workload Events
[Section titled “Workload Events”](#workload-events)
Workload events enable a detailed view of network activities proxied by Aembit’s Agent Proxy. These events capture granular data related to the communication and interactions of workloads within your environment. By logging these activities, you gain insights into network traffic patterns, potential security anomalies, and the overall behavior of their workloads. This level of visibility is crucial for monitoring performance, troubleshooting network-related issues, and ensuring the secure operation of applications relying on Agent Proxy. The logged information typically includes details such as source and destination, timestamps, protocols, and any relevant metadata associated with the proxied network traffic.

[More on Workload Events ](/user-guide/audit-report/workload-events/)Learn how to review Workload event information in the Reporting dashboard.
→
## Global Policy Compliance
[Section titled “Global Policy Compliance”](#global-policy-compliance)
Use the Global Policy Compliance view to review the compliance status of your Aembit Tenant’s global policies. It enables you to identify any compliance issues and take necessary actions to ensure that your workloads are aligned with your security and operational standards.

[More on Global Policy Compliance ](/user-guide/audit-report/global-policy/)Learn how to review Global Policy Compliance information in the Reporting dashboard.
→
# Access Authorization Events
> This page describes how users can review access authorization event information in Aembit Reporting.
An access authorization event is an event that Aembit generates that occurs whenever an Edge Component requests access to a Server Workload. When Aembit receives an access request, the generated events include detailed information, providing a granular view of the processing steps to evaluate the request against an existing Access Policy. Once Aembit Cloud processes the request and the evaluation is complete, a result is generated that specifies if access is granted or denied (success or failure).
Having the ability to view information about these access authorization events enables you to not only troubleshoot issues, but also have a historical records of these events. You may also use these logs to perform threat detection analysis to ensure malicious actors and workloads don’t gain access to your resources.
## Event types
[Section titled “Event types”](#event-types)
The three different types of access authorization events that you may view in the Aembit Reporting dashboard include:
* Access Request
* Access Authorization
* Access Credential
## Access Request events
[Section titled “Access Request events”](#access-request-events)
An `access.request` event captures the request and associated metadata.
An example of an `access.request` event type is shown below.
```json
{
"meta": {
"clientIP": "1.2.3.4",
"timestamp": "2024-09-14T20:29:11.0689334Z",
"eventType": "access.request",
"eventId": "5b788a92-accd-49a1-851f-171f7c20d355",
"resourceSetId": "ffffffff-ffff-ffff-ffff-ffffffffffff",
"contextId": "4e876ace-d1b0-4095-ac22-f9c0fb7e676a",
"severity": "Info"
},
"clientRequest": {
"version": "1.0.0",
"network": {
"sourceIP": "10.0.0.15",
"sourcePort": 53134,
"transportProtocol": "TCP",
"proxyPort": 8080,
"targetHost": "server.domain.com",
"targetPort": 80
}
}
}
```
## Access Authorization events
[Section titled “Access Authorization events”](#access-authorization-events)
In an `access.authorization` event, you can view detailed information about the steps Aembit Cloud Control Plane undertakes to evaluate an Access Policy. Information shown in an access authorization event includes event metadata, the outcome of the evaluation, and details about the identified Client Workload, Server Workload, Access Policy, Trust Providers, Access Conditions and Credential Provider.
The following example shows the type of data you should expect to see in an access authorization event.
```json
{
"meta": {
"clientIP": "1.2.3.4",
"timestamp": "2024-09-14T20:29:11.0689334Z",
"eventType": "access.authorization",
"eventId": "5b788a92-accd-49a1-851f-171f7c20d355",
"resourceSetId": "ffffffff-ffff-ffff-ffff-ffffffffffff",
"contextId": "4e876ace-d1b0-4095-ac22-f9c0fb7e676a",
"severity": "Info"
},
"outcome": {
"result": "Unauthorized",
"reason": "Attestation failed"
},
"clientWorkload": {
"id": "7c466803-9dd4-4388-9e45-420c57a0432c",
"name": "Test Client",
"result": "Identified",
},
"serverWorkload": {
"id": "49183921-55ab-4856-a8fc-a032af695e0d",
"name": "Test Server",
"result": "Identified",
},
"accessPolicy": {
"id": "dd987f8c-34fb-43e2-9d43-89d862e6b7ec",
"name": "Test Access Policy",
"result": "Identified",
}
"trustProviders": [{
"id": "24462228-14c1-41a4-8b23-9be789b48452",
"name": "Kerberos",
"result": "Attested"
},{
"id": "c0bd6c06-71ce-4a87-b03c-4c64cb311896",
"name": "AWS Production",
"result": "Unauthorized",
"reason": "InvalidSignature"
},{
"id": "5f0c2962-2af4-4b5f-97c0-9046b37198a9",
"name": "Kubernetes",
"result": "Unauthorized",
"reason": "MatchRuleFailed",
"attribute": "serviceNameUID",
"expectedValue": "foo",
"actualValue": "bar",
}],
"accessConditions": [],
"credentialProvider": {
"id": "bb7927f8-060c-4486-9a5e-bcbe1efc53d6",
"name": "Production PostgreSQL",
"result": "Identified",
"maxAge": 60,
}
}
```
### Authorization Failure
[Section titled “Authorization Failure”](#authorization-failure)
If an authorization request fails during the check, a `reason` property value is returned in either the `trustProviders` and/or `accessConditions` elements notifying you that a failure has occurred, and providing a reason for the failure. By providing you a reason for the failure, you can then use this information to diagnose and troubleshoot the issue.
There are several different types of `reason` values that can be returned with a failure. Some of these values include:
* **NoDataFound** - Attestation didn’t succeed because the necessary data wasn’t available.
* **InvalidSignature** - The cryptographic verification check failed.
* **MatchRuleFailed** - The match rules for the Trust Provider weren’t satisfied.
* **ConditionFailed** - The Access Condition check failed.
In the example shown above, notice that the `Trust Providers` check failed.
For the Trust Provider ID `5f0c2962-2af4-4b5f-97c0-9046b37198a9` here for this example, the reasons specified in the JSON response are:
* `MatchRuleFailed`
With this information, you can determine that not only did Trust Provider fail the `AWS Production` cryptographic check, but the check was also unable to match the Trust Provider to an existing match attribute for that Trust Provider (the check was looking for `ServiceNameUID` with the expected value `foo`). Now that you know why the failure occurred, you can troubleshoot the issue.
### Access Credential
[Section titled “Access Credential”](#access-credential)
The `access.credential` event type shows the result of the Edge Controller retrieval attempt of the required credential when requested. If the request was successful, the Edge Controller acquires credentials for the Server Workload via the Credential Provider and the event will specify the result as `Retrieved`.
The example below shows what you should expect to see in an `access.credential` event.
```json
{
"meta": {
"clientIP": "1.2.3.4",
"timestamp": "2024-09-14T20:29:11.0689334Z",
"eventType": "access.credential",
"eventId": "5b788a92-accd-49a1-851f-171f7c20d355",
"resourceSetId": "ffffffff-ffff-ffff-ffff-ffffffffffff",
"contextId": "4e876ace-d1b0-4095-ac22-f9c0fb7e676a",
"severity": "Info"
},
"outcome": {
"result": "Authorized",
},
"clientWorkload": {
"id": "7c466803-9dd4-4388-9e45-420c57a0432c",
"name": "Test Client",
"result": "Identified",
},
"serverWorkload": {
"id": "49183921-55ab-4856-a8fc-a032af695e0d",
"name": "Test Server",
"result": "Identified"
},
"accessPolicy": {
"id": "dd987f8c-34fb-43e2-9d43-89d862e6b7ec",
"name": "Test Access Policy",
"result": "Identified"
}
"trustProviders": [{
"id": "49183921-55ab-4856-a8fc-a032af695e0d",
"name": "Kerberos",
"result": "Attested"
}],
"accessConditions": [],
"credentialProvider": {
"id": "bb7927f8-060c-4486-9a5e-bcbe1efc53d6",
"name": "Production PostgreSQL",
"result": "Retrieved",
"maxAge": 60,
}
}
```
### Credential Failure
[Section titled “Credential Failure”](#credential-failure)
If an credential request fails during the check, a `reason` property value is returned with the `credentialProvider` entity notifying you that a failure has occurred, and providing you a reason for the failure. By providing you a reason for the failure, you can then use this information to diagnose and troubleshoot the issue.
There may be several reasons why credential request fails. Some of these reasons may be:
* **Token expired** - The requested token has expired.
* **Request failed with BadRequest** - There was a communication error with the credential provider. Note: This will include the encountered HTTP status code.
* **Aembit Internal Error** - There was an internal Aembit error during the credential retrieval.
* **Unknown error** - An unexpected error occurred during credential retrieval and is being investigated by Aembit support.
With this information, you can determine the reason for the failure and then troubleshoot the issue.
## Retrieving Access Authorization Event data
[Section titled “Retrieving Access Authorization Event data”](#retrieving-access-authorization-event-data)
To retrieve detailed information about access authorization events, perform the steps described below.
1. Log into your Aembit Tenant.
2. Once you are logged in, click on the **Reporting** link in the left sidebar. You are directed to the Reporting Dashboard page.
Note
By default, when you navigate to the Reporting Dashboard, access authorization events data is displayed.
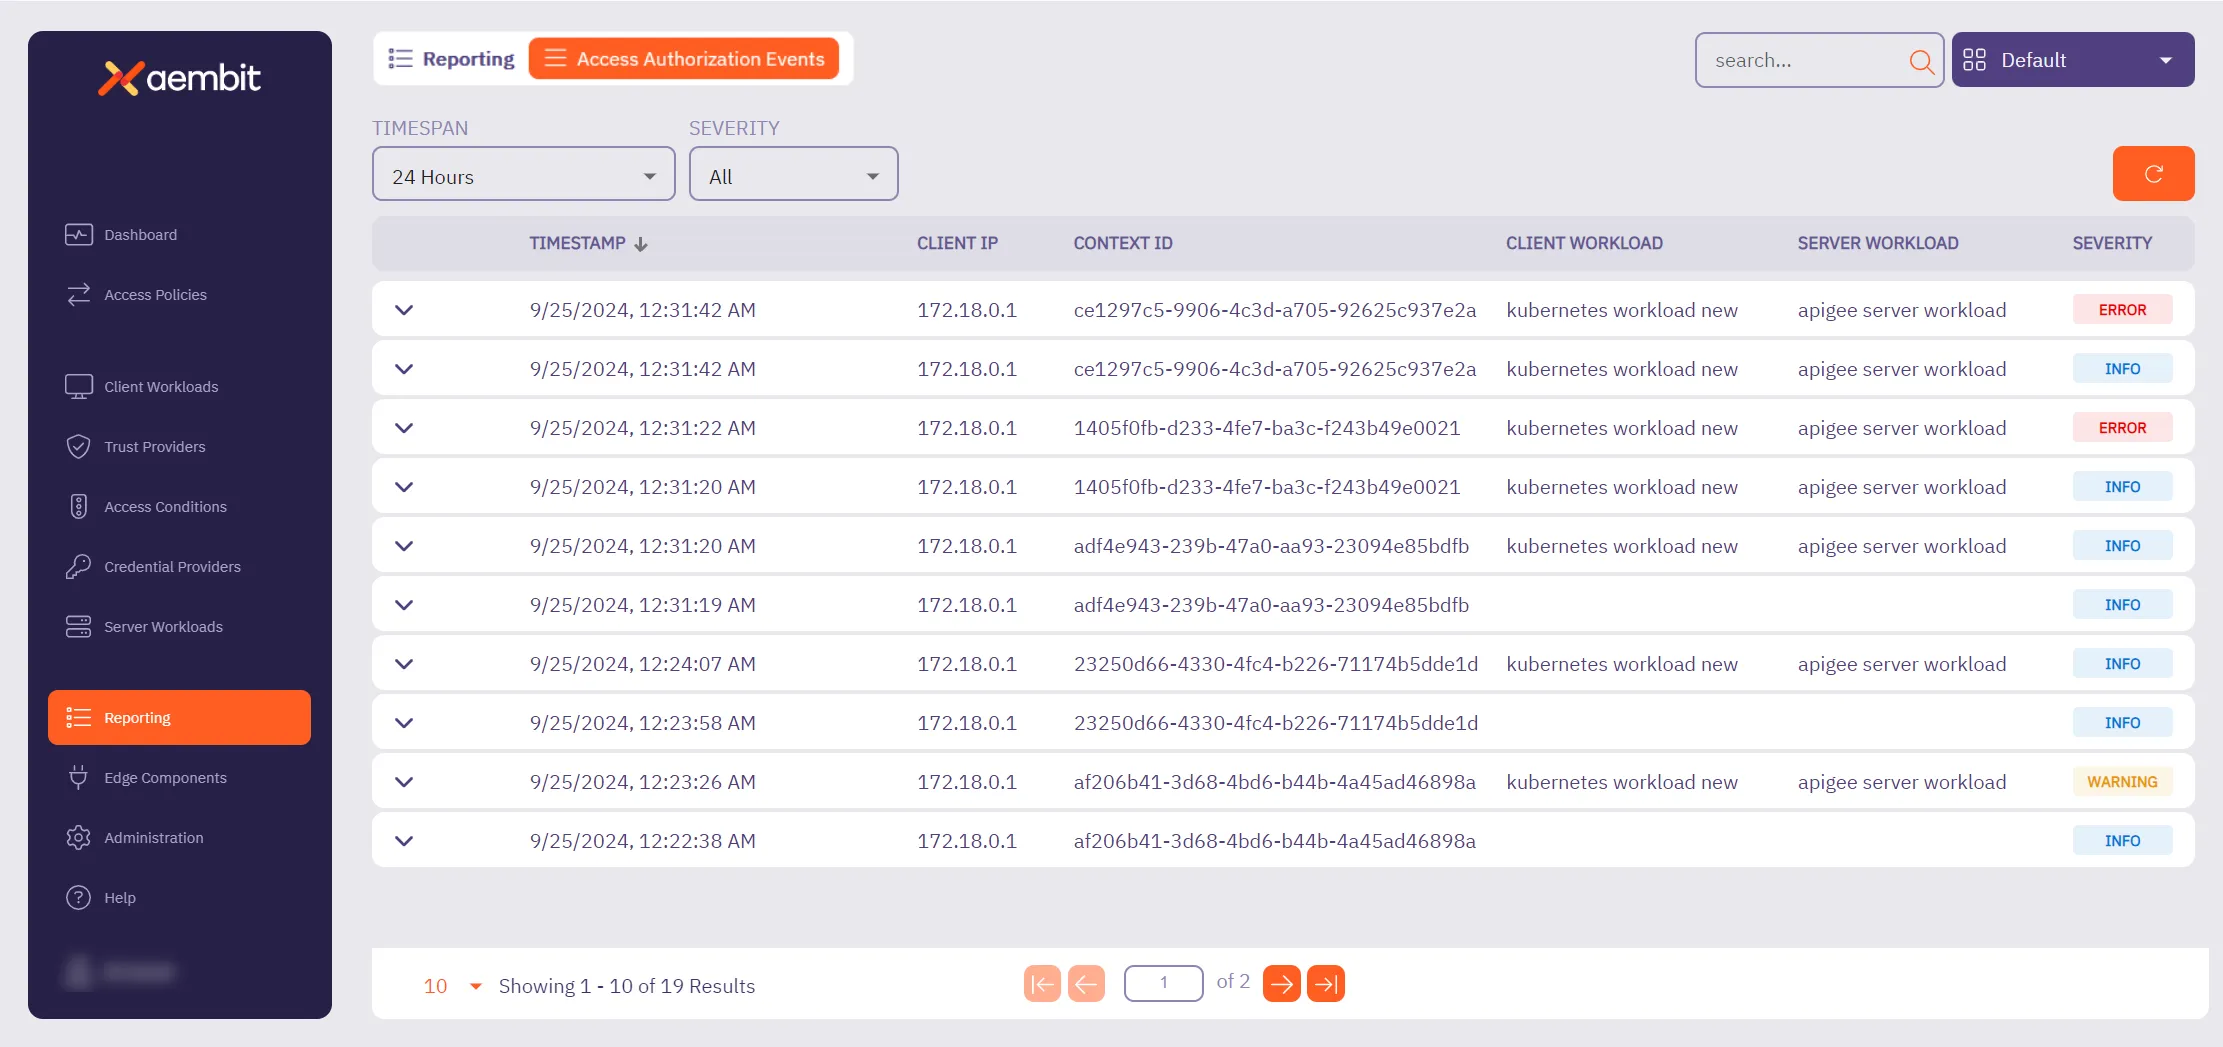
You will see two dropdown menus at the top of the page that enable you to filter and sort the results displayed:
* **Timespan** - The period of time you would like to have event data displayed.
* **Severity** - The level of importance of the event.
Note
When the **Access Authorization Events** page loads, the page loads with default display filters of: **Timespan = 24 Hours**, and **Severity = All**.
3. Select the period of time you would like to view by clicking on the **Timespan** dropdown menu. Options are:
* 1 hour, 3 hours, 6 hours, 12 hours, or 24 hours.
4. Select the severity level of the results you would like to view by clicking on the **Severity** dropdown menu. Options are:
* Error, Warning, Info, or All
5. Once you have selected your filtering options, the table displays access authorization event information based on these selections.
### Viewing Access Authorization event data
[Section titled “Viewing Access Authorization event data”](#viewing-access-authorization-event-data)
When you select an access authorization event from the dashboard, you can expand the view to display detailed data for that event. Depending on the event type, different data is displayed. The sections below show example of the type of data that may be displayed with an event.
### Access authorization event example
[Section titled “Access authorization event example”](#access-authorization-event-example)
If you would like to review detailed information about an access authorization event, click on the event. This expands the view for that event, revealing both a summary of the event with quick links to each entity, and detailed JSON output, including event metadata.
Depending on the type of access authorization event, the information presented in the expanded view will be specific to that event type.
For example, if you review an example below shows an event where Trust Provider attestation failed.
#### Trust Provider attestation failure example
[Section titled “Trust Provider attestation failure example”](#trust-provider-attestation-failure-example)
In the following example, you can see detailed information about an access authorization event that shows a failure because the Trust Provider couldn’t be attested.
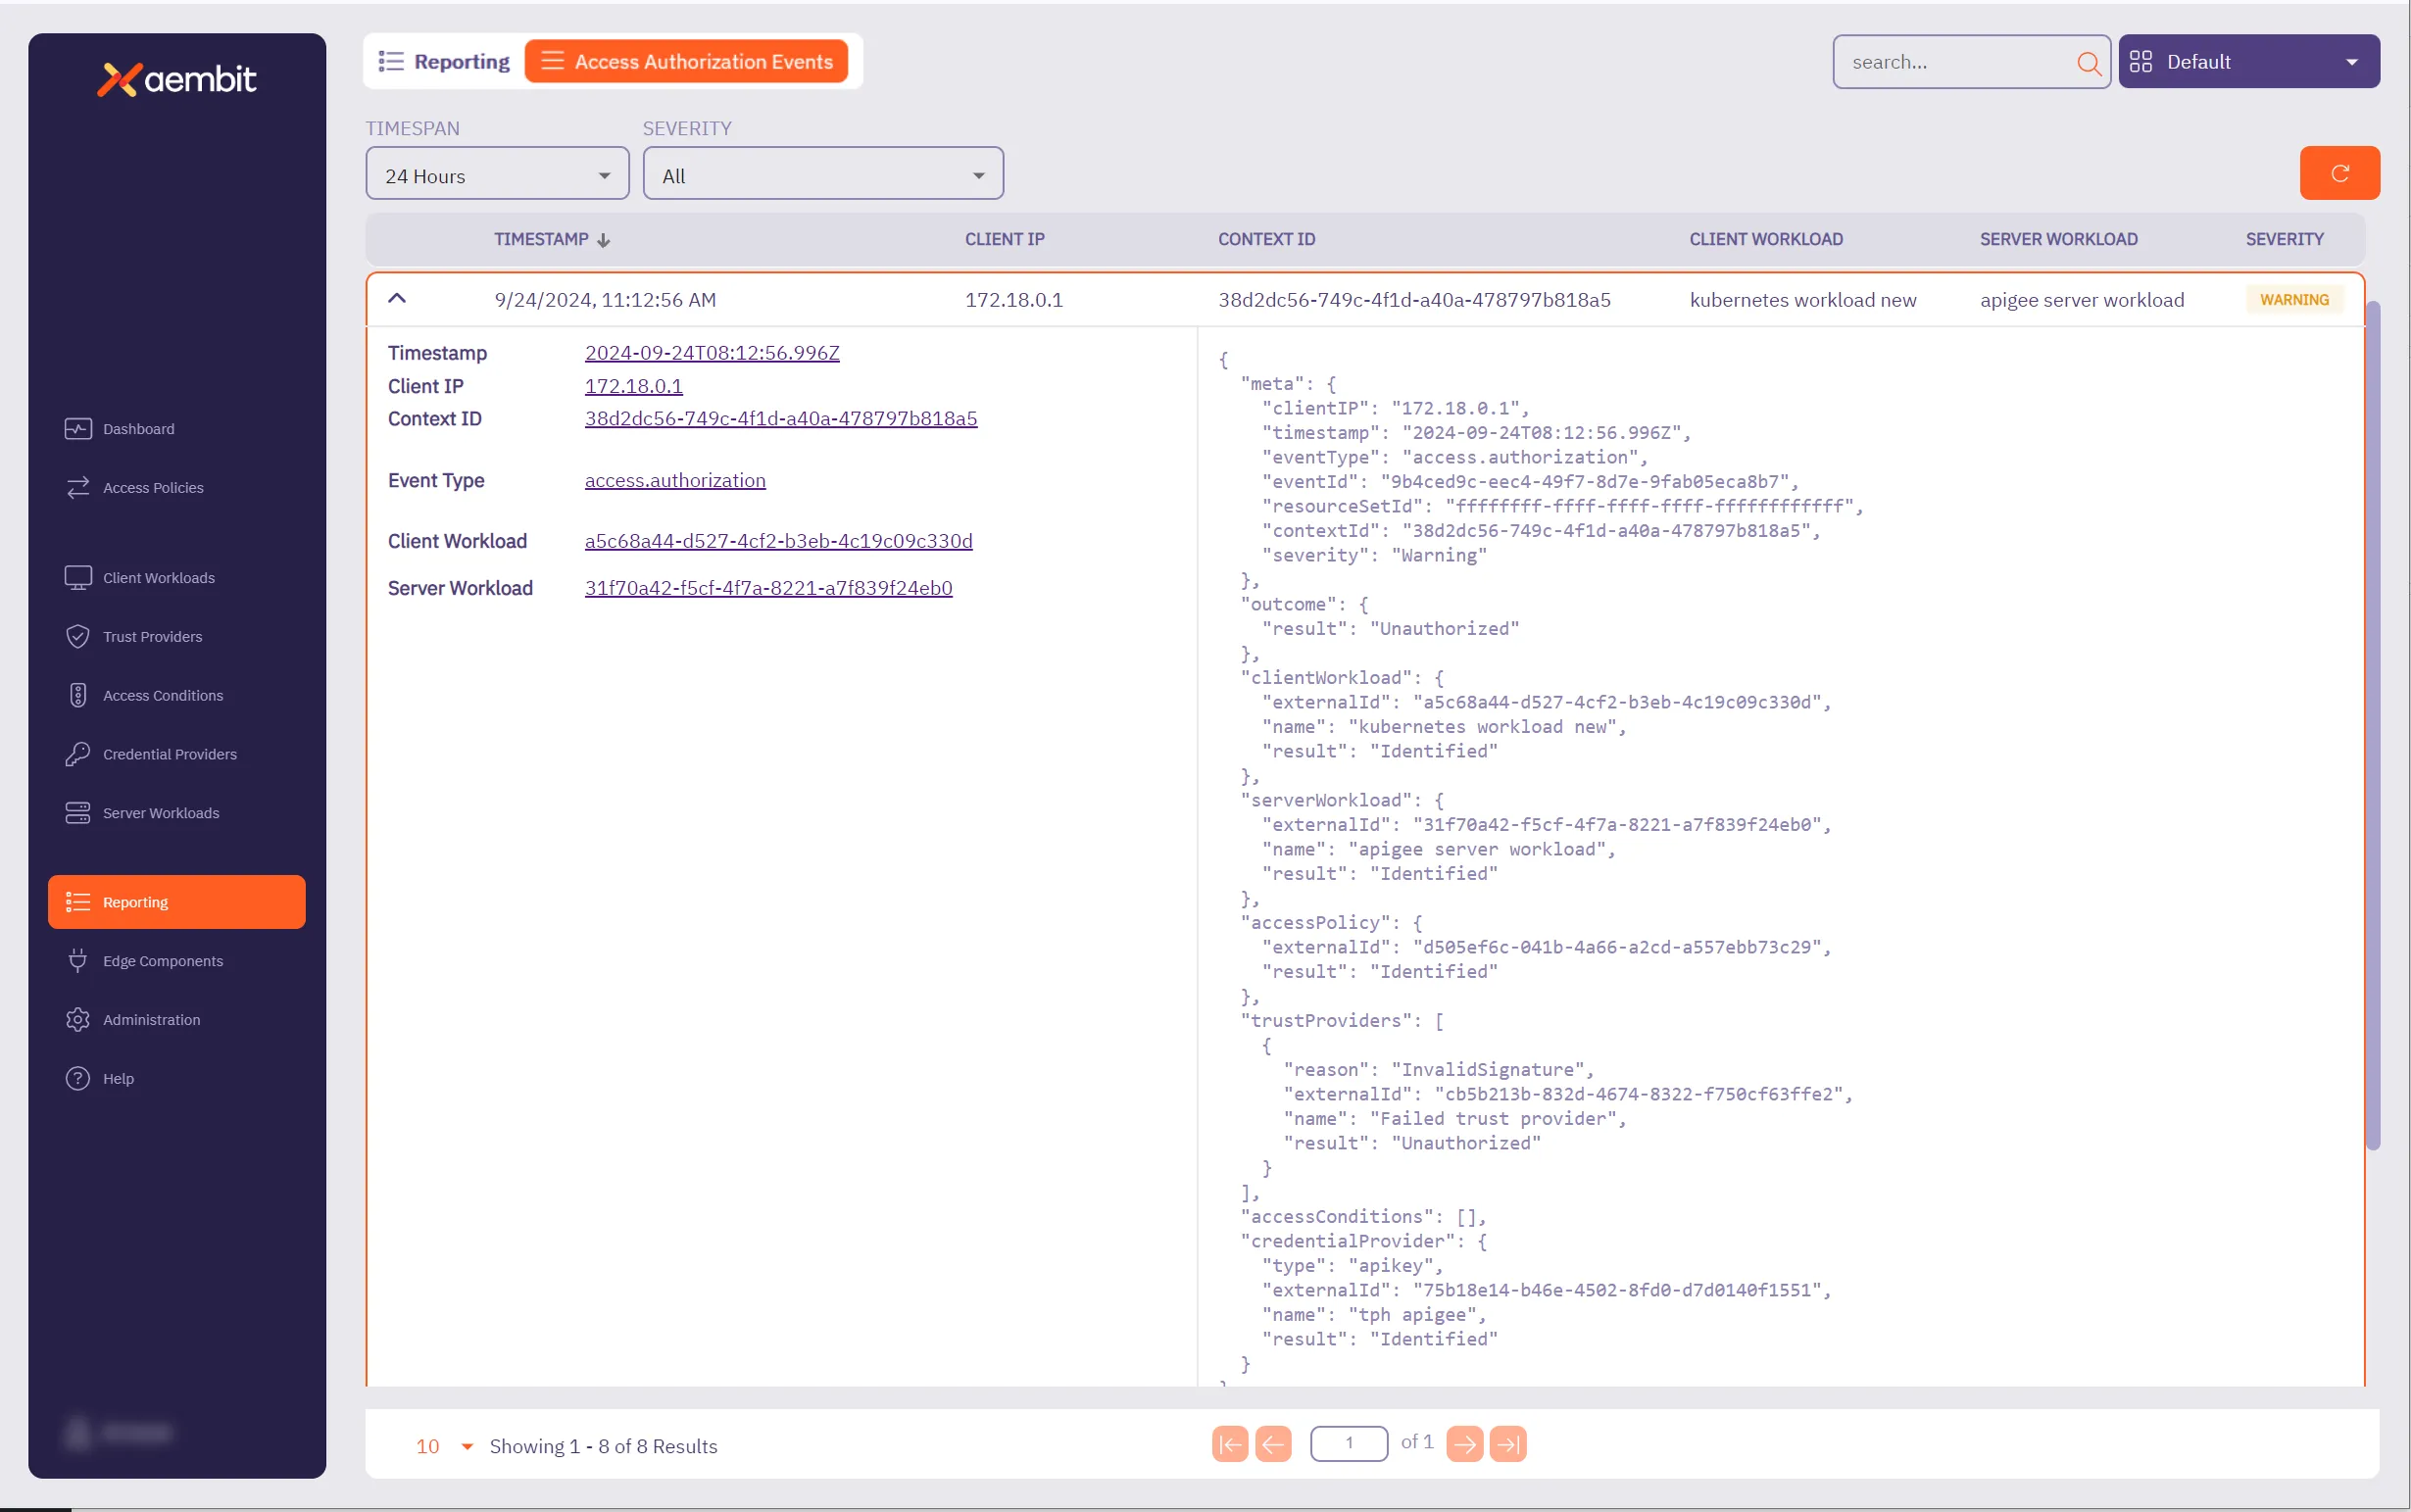
In the left side of the information panel, you see the following information displayed:
* **Timestamp** - The time when the event was recorded.
* **Client IP** - The client IP address that made the access authorization request. This will typically be a network egress IP from your edge environment.
* **Context ID** - ID used to associate the relevant access authorization events together.
* **Event Type** - The type of event that was recorded.
* **Client Workload** - The identified Client Workload ID.
* **Server Workload** - The identified Server Workload ID.
Note
Each of these entities has a quick link, enabling you to go directly to that entity.
In the right side of the information panel, you see the more granular, detailed information displayed about each of these entities, including:
* **Meta** - Metadata associated with the event.
* Information includes `clientIP`, `timestamp`, `eventType`, `contextId`, `directiveId`, and `severity`.
* **Outcome** - The result of the access authorization request.
* Options are `Authorized`, `Unauthorized`, or `Error`.
* **Client Workload** - The Client Workload used in the access authorization request.
* Detailed information includes `id`, `name`, `result`, and `matches`. Note that the `matches` value is optional, and is only rendered if multiple Client Workloads are matched.
* **Server Workload** - The Server Workload used in the access authorization request.
* Detailed information about the Server Workload includes `id`, `name`, `result`, and `matches`.
* Note that the `matches` value is optional, and is only rendered if multiple Server Workloads are matched.
* **Access Policy** - The Access Policy used to evaluate the access authorization request.
* Information includes `id`, `name`, `result`, and `matches`.
* **Trust Providers** - The Trust Providers assigned to the Access Policy at the time of evaluation.
* Information in the JSON response includes `id`, `name`, `result`, `attribute`, `expectedValue`, and `actualValue`.
* The `reason`, `attribute`, `expectedValue` and `actualValue` fields are all optional; however, in the case of Trust Provider attestation failure, you will see the `reason` field populated.
* If a `reason` value is returned, refer to the [Authorization Failure](#authorization-failure) section on this page for more information.
* **Access Conditions** - The Access Conditions assigned to the Access Policy at the time of evaluation.
* Information in the JSON response includes `id`, `name`, `result`, `attribute`, `expectedValue`, and `actualValue`.
* The `reason`, `attribute`, `expectedValue` and `actualValue` fields will only be returned if there is a failure, and the reason for the failure is `ConditionFailed`.
* **Credential Provider** - The Credential Provider used in the access authorization request.
* Detailed information includes `id,` `name`, `result`, and `maxAge` values.
* If a failure occurs during credential retrieval, then a `reason` value will also be included.
Note
If a `reason` value is returned, refer to the [Credential Failure](#credential-failure) section on this page for more information.
# How to review Audit Logs
> How to review Audit Log information in the Reporting Dashboard
Your Aembit Tenant includes the ability for you to review detailed audit log information so you can troubleshoot any issues encountered in your environment. Having this data readily available can assist you in diagnosing any issues that may arise, while also providing you with detailed information about these events.
## Retrieving audit log data
[Section titled “Retrieving audit log data”](#retrieving-audit-log-data)
To retrieve event information from audit logs, perform the following steps:
1. Log into your Aembit Tenant.
2. Click **Reporting** in the left sidebar.
3. At the top, select **Reporting ☰ Audit Logs**.
Aembit displays the **Audit Logs** page with a list of existing Audit Logs.
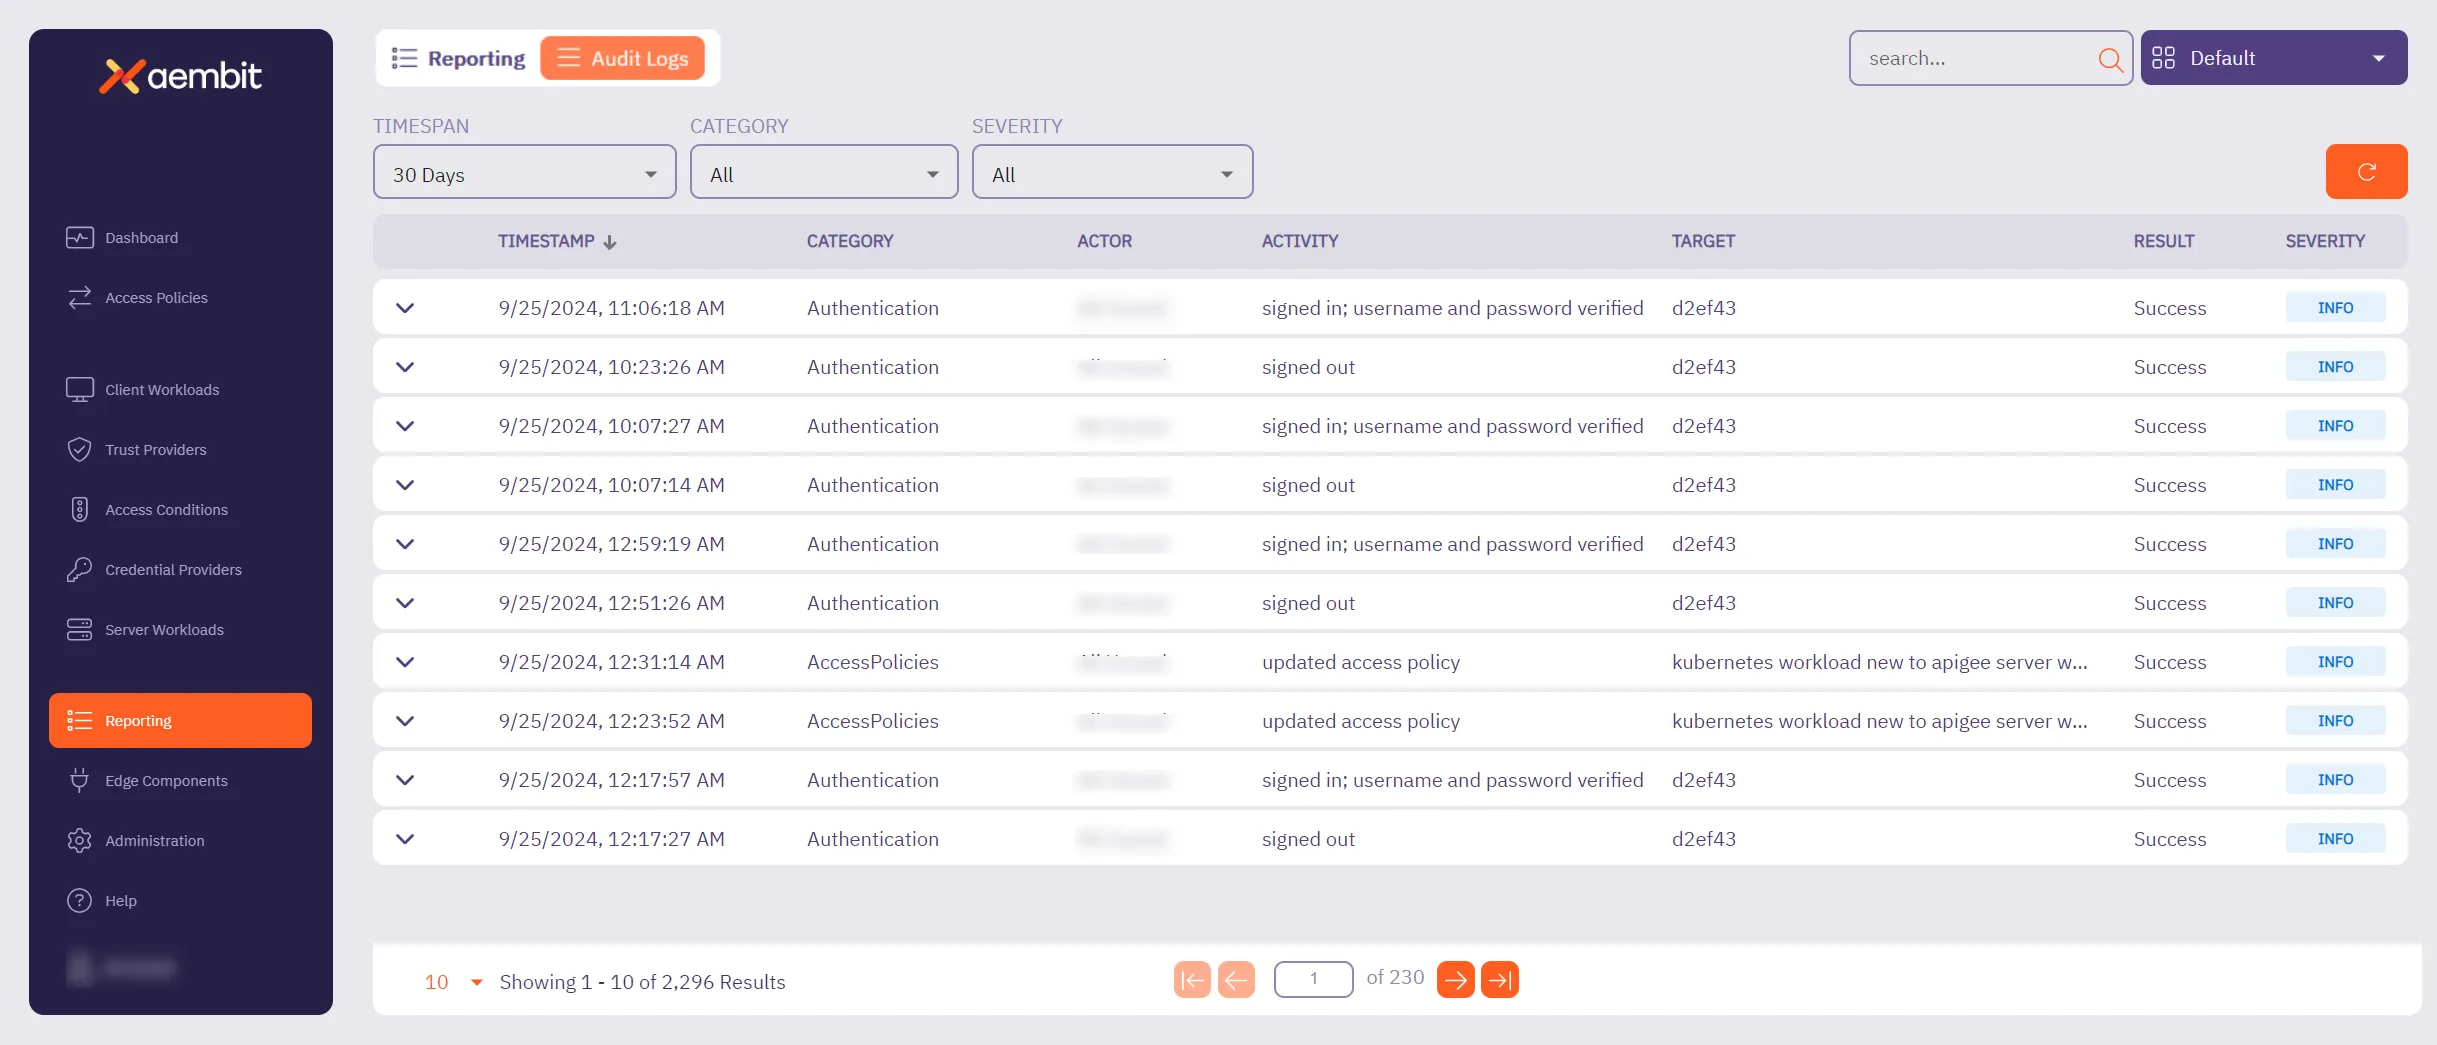
4. By default Aembit displays all logs. You can filter the results to your liking using the following:
* **Timespan** - The period of time you would like to have audit logs data displayed.
Default - **30 Days**
Options - `1 Day`, `15 Days`, `30 Days`, `3 Months`, `6 Months`, `1 Year`, or `All`
* **Category** - The type of event information you want displayed.
Default - **All**
Options - `AccessConditions`, `AccessPolicies`, `AgentControllers`, `Agents`, `Authentication`, `CredentialProvider`, `CredentialProviderIntegrations`, `DiscoveryIntegration`, `GlobalPolicyCompliance`, `IdentityProviders`, `Integrations`, `LogStreams`, `PkiSettings`, `ResourceSets`, `Roles`, `Routing`, `SignOnPolicies`, `StandaloneCertificateAuthorities`, `Tenant`, `TrustProvider`, `Users`, `Workloads`.
* **Severity** - The level of importance of the event.
Default - **All**
Options - `Alert`, `Warn`, `Info`
5. Once you have selected your filtering options, Aembit displays the audit log information based on your selections in the table.
### Audit logs reporting example
[Section titled “Audit logs reporting example”](#audit-logs-reporting-example)
If you would like to review detailed audit log information for an event, select the event. This expands the window for that event, enabling you to see both a summary of the event (on the left side of the information panel), and detailed JSON output (on the right side of the information panel).
The following example shows audit log information for an event where Trust Provider attestation failed.
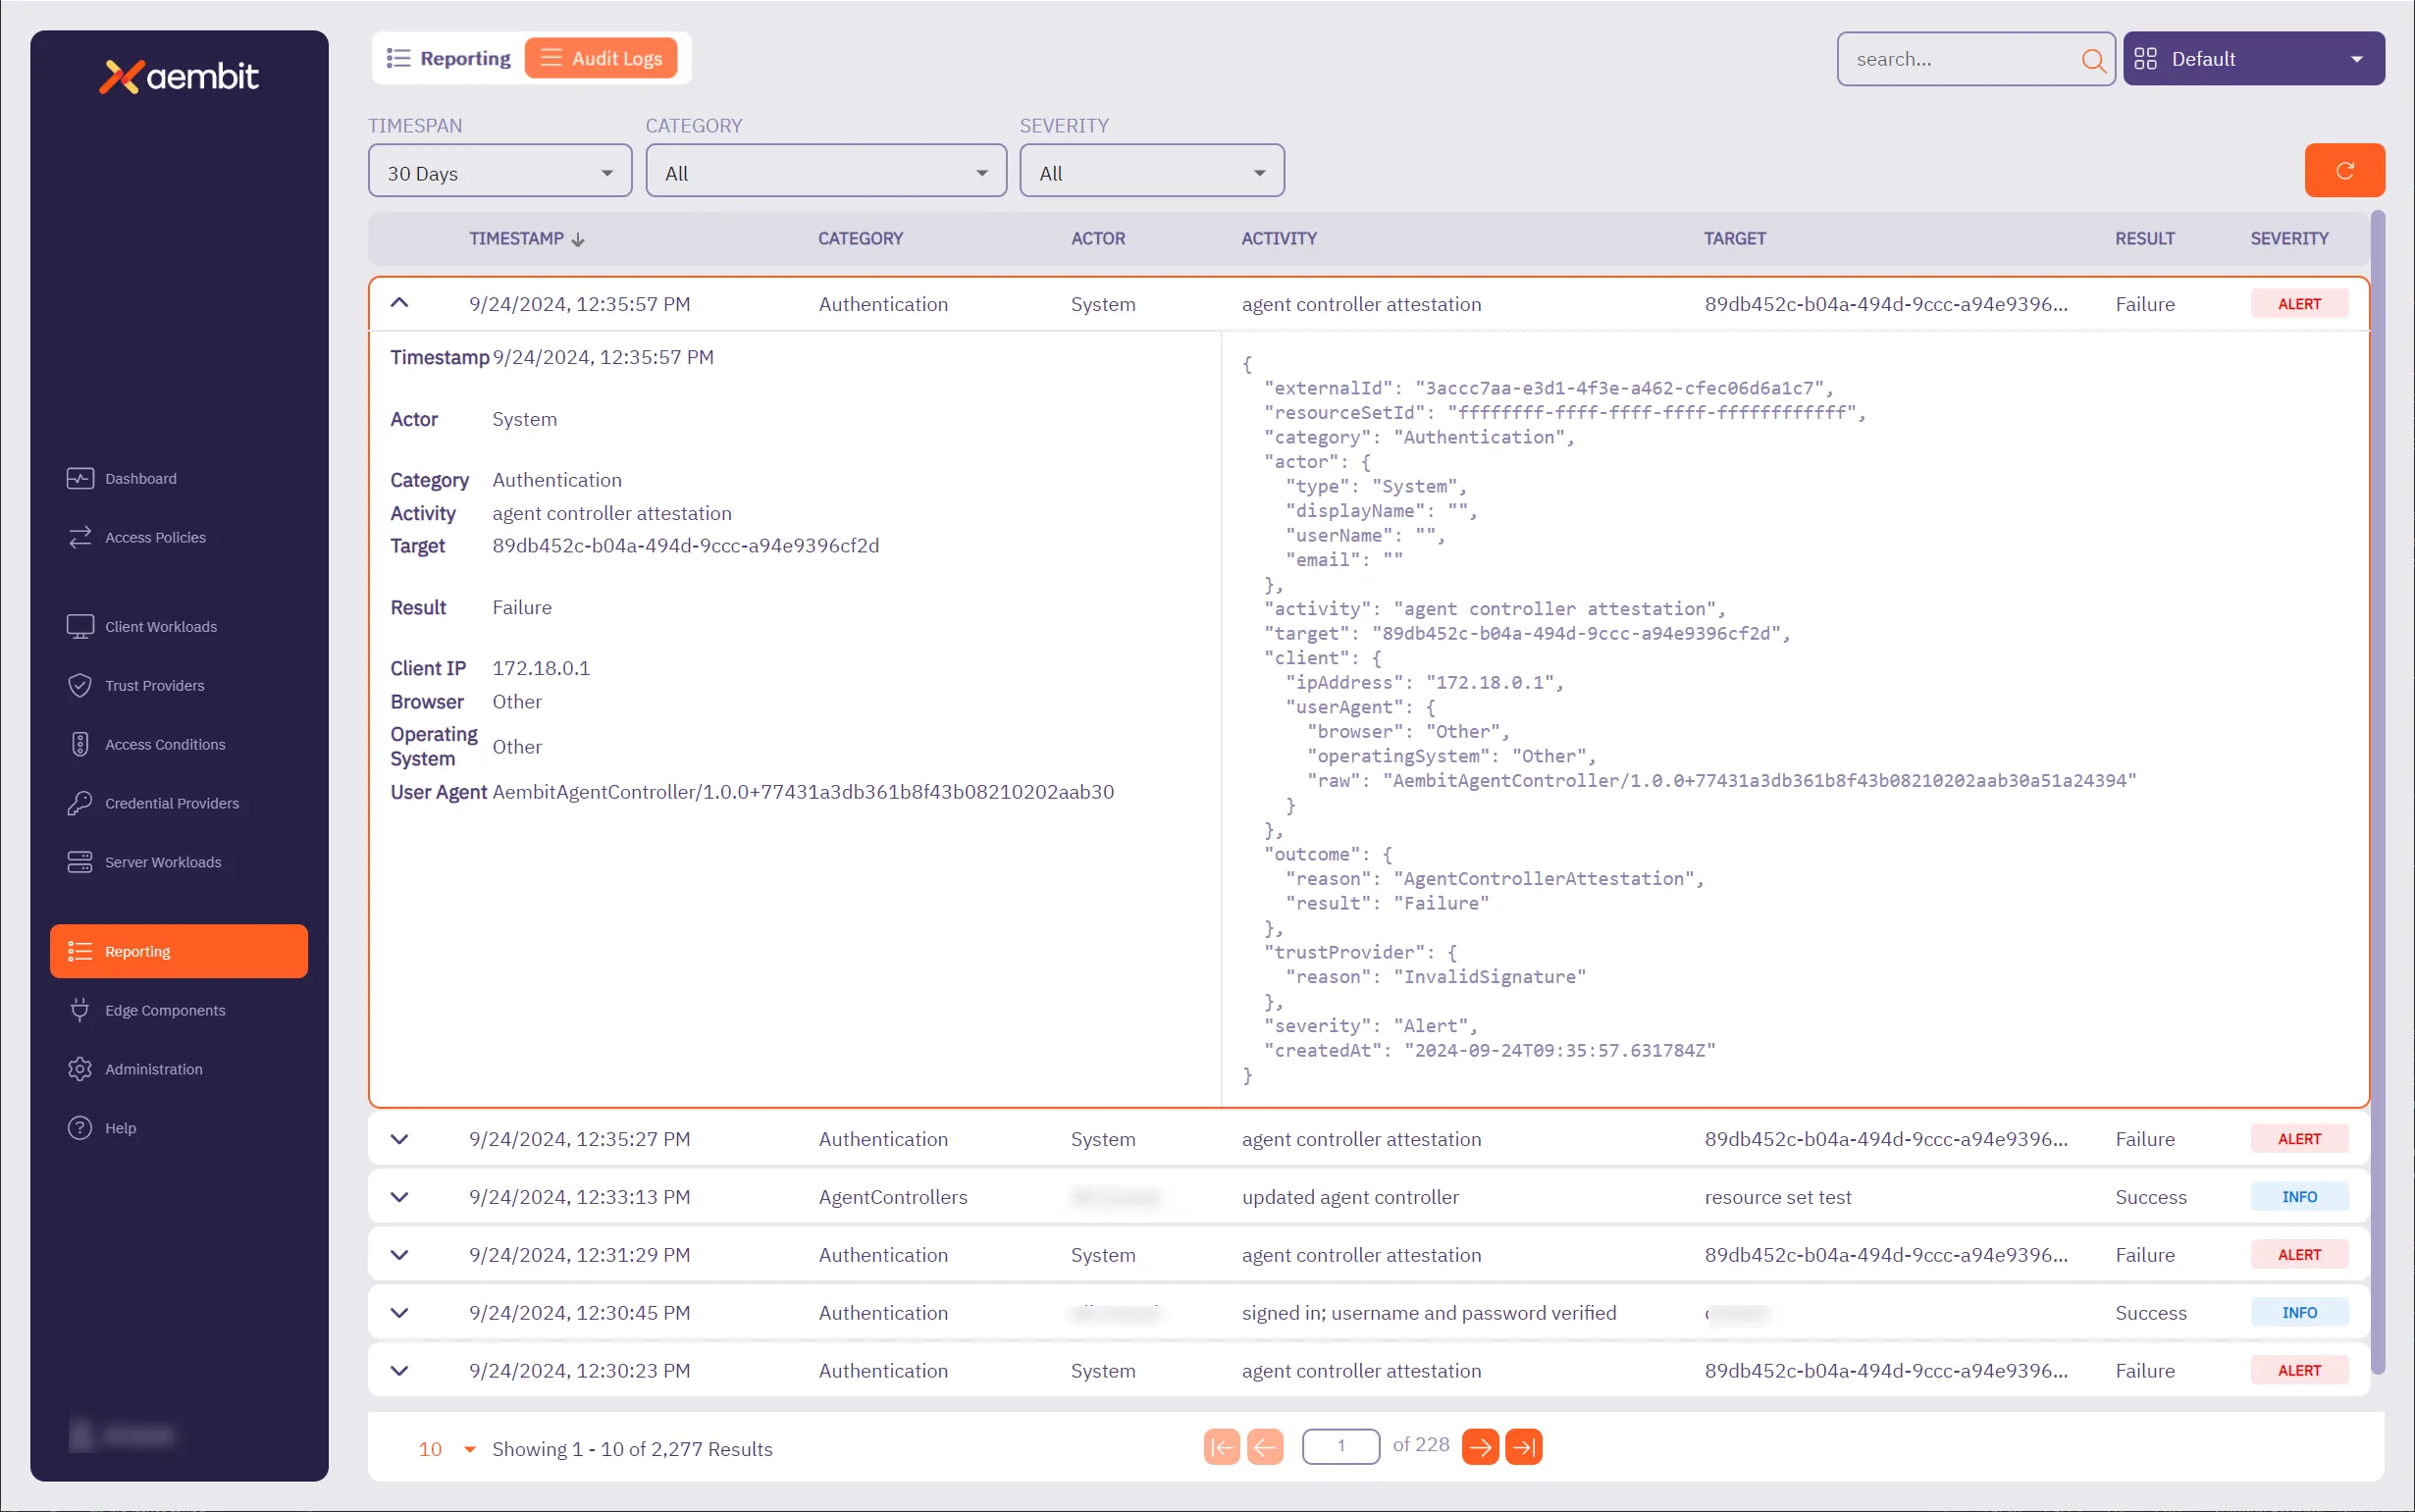
In the left side of the information panel, you see a summary of the event information displayed, including:
* **Timestamp** - The time the event was recorded.
* **Actor** - The entity responsible for the request.
* **Category** - The category of the event.
* **Activity** - The type of request being made.
* **Target** - The identifier of the entity that you are running the activity against. For example, if you are editing a Credential Provider, the target is the name of the Credential Provider.
* **Result** - The result of the event.
* **Client IP** - The IP address of the user or workload that executed the action that is recorded by the audit log.
* **Browser** - The browser used by the client.
* **Operating System** - The operating system used by the client.
* **User Agent** - The User-Agent HTTP header included in the API request that generated the audit log activity.
In the right side of the information panel, you see the more granular, detailed information, including:
* **ExternalID** - The external ID of the audit log.
* **Resource Set ID** - The Resource Set ID of the entity affected by the audit log generating activity.
* **Category** - The category of the event in the audit log.
* **Actor** - The entity responsible for the request.
* **Activity** - The type of request being made.
* **Target** - The target entity of the action represented by the audit log record.
* **Client** - The metadata for the Client (e.g. browser) environment.
* **Outcome** - The verdict of the request.
* **Trust Provider** - The Trust Provider used in the request. Note that this value is only applicable for Trust Provider attestation based authentication (e.g. Agent Controller attested authentication or Proxyless authentication).
* **Severity** - The severity of the event.
* **Created At** - The time the request was made.
# How to review Global Policy Compliance
> How to review Global Policy Compliance information in the Reporting dashboard
Global Policy Compliance is a feature in Aembit that allows you to enforce security standards across your Aembit environment. It ensures that Access Policies and Agent Controllers adhere to specific security requirements, such as Trust Provider configurations and TLS hostname settings. This helps maintain consistent security practices and prevents the creation of policies that could expose resources unintentionally.
On the Global Policy Compliance page, you can review the compliance status of your Aembit Tenant’s global policies.
## About Global Policy Compliance status
[Section titled “About Global Policy Compliance status”](#about-global-policy-compliance-status)
Aembit uses color-coded status icons and labels to indicate the compliance status of Access Policies in relation to Global Policy Compliance:
* **Red** - a required element is missing from the Access Policy.
* **Yellow** - a recommended element is missing from the Access Policy.
* **Green** - the Access Policy is compliant with Global Policy Compliance requirements.
* **Gray** - the Access Policy is disabled or not active.
When you edit an Access Policy, Aembit displays the current compliance status and prevents you from saving non-compliant Access Policies based on your configured enforcement level. This ensures that all policies meet the required security standards before they can be saved or activated.
## Reviewing Global Policy Compliance data
[Section titled “Reviewing Global Policy Compliance data”](#reviewing-global-policy-compliance-data)
To review Global Policy compliance data, perform the following steps:
1. Log into your Aembit Tenant.
2. Click **Reporting** in the left sidebar.
3. At the top, select **Reporting ☰ Global Policy Compliance**.
Aembit displays the **Global Policy Compliance** page with a list of existing Access Policies and their **Compliance Status**.

4. By default Aembit displays all Access Policies. You can filter the results to your liking using the following:
* **Resource Set** - A dynamic list of Resource Sets in your Aembit Tenant. You can select a specific Resource Set to filter the Access Policies the report dashboard displays.
Default - **All**
Options - all Resource Sets in your Aembit Tenant.
* **Compliance Status** - The status of the Access Policies in relation to Global Policy Compliance. You can select a specific compliance status to filter the Access Policies the report dashboard displays.
Default - **All**
Options - `Compliant`, `Missing Required`, `Missing Recommended`,
5. Once you have selected your filtering options, Aembit displays the Access Policies based on your filter selections in the table.
# How to review Workload events
> How to review Workload event information in the Reporting dashboard
Work in progress
This page is a work in progress. It may contain incomplete or unverified information.
Please check back later for updates.
If you have feedback or suggestions, please fill out the [Aembit New Docs Feedback Survey](https://forms.gle/mfjhV2TtXP1pXAym8).
Thanks for your patience!
# Install and Deploy Aembit Edge
> This document provides a high-level conceptual overview of how Aembit Edge handles Workload connections
Aembit manages the identities of and access from workloads (typically, software applications) to services.
Aembit provides Aembit Edge, software components deployed in your environment that intermediate connections between workloads, gather assessment data from your operating environment, inject credentials into requests, and log interactions between Client Workloads and services.
This page describes for each deployment type the various connections and protocols used to enable Aembit in support of your Workloads.
## Aembit Edge - data plane
[Section titled “Aembit Edge - data plane”](#aembit-edge---data-plane)
Aembit Edge Components include:
* Aembit Agent Proxy
* Aembit Agent Controller
* Aembit Agent Injector (Kubernetes Only)
* Aembit Agent Sidecar Init (Kubernetes Only)
Before describing these components, let’s review conceptually how Workloads communicate and where Aembit fits into this mix. At its most basic level, a Client Workload communicates with a Server Workload using a transport protocol, such as TCP, utilizing a set of IP addresses and ports to exchange data. Aembit is generally based on a Proxy model and will intercept the network communication between Client and Server Workloads, authenticating the connection as configured by an Aembit Access Policy.
## Deployment
[Section titled “Deployment”](#deployment)
To achieve these capabilities, the Aembit Architecture depends on deploying Agent Controller instances, which Agent Proxy instances can then leverage to bootstrap secure communication with the Aembit Cloud.
From a network/protocol perspective, that deployment is achieved by the following steps:
1. Deploy Agent Controller with Device Code or Agent Controller ID.
* Device Code: Authenticates and registers with the Aembit Cloud using the time-bound and single-use Device Code created for a specific Agent Controller.
* Agent Controller ID: Authenticates and registers with the Aembit Cloud using the TrustProvider with the associated Agent Controller.
2. Deploy Agent Proxy configured to communicate with an Agent Controller.
* Agent Proxy registers with the Agent Controller and Aembit Cloud.
* Optional: The Agent Controller can be configured with a TLS Certificate to enable and enforce HTTPS communication.
### Virtual Machine
[Section titled “Virtual Machine”](#virtual-machine)

### Kubernetes
[Section titled “Kubernetes”](#kubernetes)

### AWS ECS Fargate
[Section titled “AWS ECS Fargate”](#aws-ecs-fargate)

## Workload communication
[Section titled “Workload communication”](#workload-communication)
After the Aembit Edge is deployed and registered, we can now begin identifying workloads and managing access for the configured policies.
1. Client Workloads connect to Server Workloads - the Agent Proxy handles both DNS and application traffic.
1. **DNS** - DNS requests and responses are read in order to route application traffic.
2. **Application Traffic** - Uses the configured Access Policy and Credentials from the Aembit Cloud for authorized injection.

# About the Aembit Agent Controller
> About the Aembit Agent Controller and how it works
Work in progress
This page is a work in progress. It may contain incomplete or unverified information.
Please check back later for updates.
If you have feedback or suggestions, please fill out the [Aembit New Docs Feedback Survey](https://forms.gle/mfjhV2TtXP1pXAym8).
Thanks for your patience!
# About the Aembit Agent Proxy
> About the Aembit Agent Proxy and how it works
Work in progress
This page is a work in progress. It may contain incomplete or unverified information.
Please check back later for updates.
If you have feedback or suggestions, please fill out the [Aembit New Docs Feedback Survey](https://forms.gle/mfjhV2TtXP1pXAym8).
Thanks for your patience!
# About Colocating Aembit Edge Components
> Considerations and best practices if colocating Aembit Edge Components
Deploying Aembit’s Edge Components is all about balancing security, scalability, and operational simplicity. Ideally, the Agent Controller and Agent Proxy should run on separate machines. However, in some situations—perhaps for a test environment or because of infrastructure limitations—you may have no choice but to colocate them. If that’s the case, understanding the risks and following best practices can help you minimize issues.
## Why Aembit recommends separating Edge Components
[Section titled “Why Aembit recommends separating Edge Components”](#why-aembit-recommends-separating-edge-components)
Keeping Agent Controller and Agent Proxy on separate machines is the best way to make sure they remain resilient and secure.
Colocating Edge Components introduces a single point of failure, which can disrupt both traffic interception (Proxy) and trust anchor services (Controller) at the same time.
Security is another major concern. Agent Controller and Agent Proxy serve distinct roles, and combining them on one machine increases the potential impact of a compromise. If an attacker breaches the host, they gain access to both components, expanding their reach.
Colocation also limits your ability to scale efficiently. The Agent Proxy may require more CPU or memory during high traffic periods, and colocating it with the Agent Controller makes it harder to allocate additional resources where needed.
Lastly, colocation can complicate your network design. The Agent Proxy must sit in a position to intercept workload traffic, while the Agent Controller belongs in a more secure, isolated network segment. Finding a placement that serves both roles effectively can be challenging.
## When colocation might be the right choice
[Section titled “When colocation might be the right choice”](#when-colocation-might-be-the-right-choice)
While Aembit recommends separate deployments, there may be times when colocation is your only option. In smaller test environments, proof-of-concept setups, or resource-constrained scenarios, colocating the Agent Controller and Proxy may be acceptable. When this happens, taking steps to mitigate risk is essential.
## Best Practices for colocating Edge Components
[Section titled “Best Practices for colocating Edge Components”](#best-practices-for-colocating-edge-components)
If you must colocate, follow these guidelines to reduce risk and maintain performance:
* **Harden the host machine** - Apply stricter security controls, such as enhanced monitoring, restricted access, and regular audits.
* **Allocate sufficient resources** - Ensure the host has enough CPU, memory, and network bandwidth to support both components without performance degradation.
* **Plan for recovery** - Develop clear recovery procedures to minimize downtime if the colocated host fails.
* **Carefully design your network** - Ensure the Agent Proxy can intercept workload traffic while maintaining secure access to the Agent Controller’s trust anchor services.
## Making the best decision for your environment
[Section titled “Making the best decision for your environment”](#making-the-best-decision-for-your-environment)
Colocating Aembit’s Edge Components should be a last resort, not a first choice. When separation isn’t possible, understanding the risks and applying best practices can help you maintain a secure and stable deployment. By taking these steps, you can make sure your environment remains resilient, even in less-than-ideal circumstances.
# Advanced deployment options
> Advanced deployment options for Aembit deployments
This section covers advanced deployment options for Aembit Edge Components, providing more sophisticated configuration capabilities for your Aembit deployment.
The following pages provide information about advanced deployment options:
* [Aembit Edge Prometheus-Compatible Metrics](/user-guide/deploy-install/advanced-options/aembit-edge-prometheus-compatible-metrics)
* [Changing Agent Log Levels](/user-guide/deploy-install/advanced-options/changing-agent-log-levels)
* [Trusting Private CAs](/user-guide/deploy-install/advanced-options/trusting-private-cas)
### TLS Decrypt
[Section titled “TLS Decrypt”](#tls-decrypt)
* [About TLS Decrypt](/user-guide/deploy-install/advanced-options/tls-decrypt) - Overview of the TLS Decrypt feature
* [About TLS Decrypt Standalone CA](/user-guide/deploy-install/advanced-options/tls-decrypt/about-tls-decrypt-standalone-ca)
* [Configure TLS Decrypt](/user-guide/deploy-install/advanced-options/tls-decrypt/configure-tls-decrypt)
* [Configure TLS Decrypt Standalone CA](/user-guide/deploy-install/advanced-options/tls-decrypt/configure-tls-decrypt-standalone-ca)
# Aembit Edge Prometheus-compatible metrics
> How to view Aembit Edge Prometheus-compatible metrics
Many organizations rely on and use various data collection and visualization tools to monitor components in their environment. This information provides users with the ability to quickly be alerted to any potential issues that may arise, and troubleshoot those issues.
Aembit Edge Components expose various Prometheus-compatible metrics so you have greater visibility into each of these components (Agent Controller, Agent Proxy, Agent Injector).
## Prometheus configuration
[Section titled “Prometheus configuration”](#prometheus-configuration)
Aembit exposes Prometheus-compatible metrics in several different deployment models, including Kubernetes and Virtual Machines. The installation and configuration steps for both of these deployment models are described below, but please note that you may select any observability tool you wish, as long as it can to scrape Prometheus-capable metrics.
### Configuring Prometheus (Kubernetes)
[Section titled “Configuring Prometheus (Kubernetes)”](#configuring-prometheus-kubernetes)
These steps described below show an example of how you can configure a “vanilla” Prometheus instance in a Kubernetes cluster. Depending on your own Kubernetes cluster configuration, you may need to perform a different set of steps to configure Prometheus for your cluster.
1. Open a terminal window in your environment and run the command shown below.
`kubectl edit configmap prometheus-server`
2. Edit the `prometheus.yaml` configuration file by adding the following code snippet before the `kubernetes-pods` section:
```shell
- honor_labels: true
job_name: kubernetes-pods-aembit
kubernetes_sd_configs:
- role: pod
relabel_configs:
- action: keep
regex: true
source_labels:
- __meta_kubernetes_pod_annotation_aembit_io_metrics_scrape
- action: replace
regex: (.+)
source_labels:
- __meta_kubernetes_pod_annotation_aembit_io_metrics_path
target_label: __metrics_path__
- action: replace
regex: (\d+);(([A-Fa-f0-9]{1,4}::?){1,7}[A-Fa-f0-9]{1,4})
replacement: "[$2]:$1"
source_labels:
- __meta_kubernetes_pod_annotation_aembit_io_metrics_port
- __meta_kubernetes_pod_ip
target_label: __address__
- action: replace
regex: (\d+);((([0-9]+?)(\.|$)){4})
replacement: $2:$1
source_labels:
- __meta_kubernetes_pod_annotation_aembit_io_metrics_port
- __meta_kubernetes_pod_ip
target_label: __address__
- action: labelmap
regex: __meta_kubernetes_pod_label_(.+)
- action: replace
source_labels:
- __meta_kubernetes_namespace
target_label: namespace
- action: replace
source_labels:
- __meta_kubernetes_pod_name
target_label: pod
- action: drop
regex: Pending|Succeeded|Failed|Completed
source_labels:
- __meta_kubernetes_pod_phase
- action: replace
source_labels:
- __meta_kubernetes_pod_node_name
target_label: node
```
The example code block shown above allows for the automatic detection of Aembit annotations so Prometheus can automatically scrape Agent Proxy metrics.
3. Save your changes in the `prometheus.yaml` configuration file.
#### Kubernetes Annotations
[Section titled “Kubernetes Annotations”](#kubernetes-annotations)
Agent Controller and Agent Proxy come with standard Prometheus annotations, enabling Prometheus to automatically discover and scrape metrics from these Aembit Edge Components.
Since the Agent Proxy runs as part of the Client Workload, which may already expose Prometheus metrics and have its own annotations, a new set of annotations was introduced. These annotations can be added to Client Workload pods without conflicting with existing annotations.
The following annotations have been introduced, which are automatically added to the Client Workload where the Agent Proxy is injected:
* `aembit.io/metrics-scrape` - Default value is `true`.
* `aembit.io/metrics-path` - Default value is `/metrics`.
* `aembit.io/metrics-port` - Default value is `9099`. This is a default metrics port used by Agent Proxy to expose metrics.
You may override these annotations, `aembit.io/metrics-port` to adjust metrics port on Agent Proxy.
#### Helm Variables
[Section titled “Helm Variables”](#helm-variables)
The following Helm variables control whether metrics are enabled or disabled:
* agentController.metrics.enabled
* agentInjector.metrics.enabled
* agentProxy.metrics.enabled
### Configuring Prometheus (Virtual Machine)
[Section titled “Configuring Prometheus (Virtual Machine)”](#configuring-prometheus-virtual-machine)
You need to configure which Virtual Machines you want to scrape for metrics and data by editing the `/etc/prometheus/prometheus.yml` YAML file and replacing `example.vm.local:port` with the Agent Controller and Agent Proxy VM hostname, and port number on which the metrics servers are listening. For Agent Controller, set the port number to **9090**. For Agent Proxy, set the port number to **9099**.
```yaml
scrape_configs:
- job_name: 'vm-monitoring'
static_configs:
- targets: ['example.vm.local:']
```
#### Virtual Machine Environment Variables
[Section titled “Virtual Machine Environment Variables”](#virtual-machine-environment-variables)
These environment variables can be passed to the Agent Controller installer to manage the metrics functionality.
* **AEMBIT\_METRICS\_ENABLED** - enabled for both Agent Controller and Agent Proxy
* **AEMBIT\_METRICS\_PORT** - available only for Agent Proxy
## Aembit Edge Prometheus Metrics
[Section titled “Aembit Edge Prometheus Metrics”](#aembit-edge-prometheus-metrics)
Aembit Edge Components expose Prometheus-compatible metrics that can be viewed using an observability tool that is capable of scraping these types of metrics.
The sections below list the various Prometheus-compatible metrics that Aembit Edge Components expose, along with the labels you can use to filter results and drill down into specific data.
### Agent Proxy Metrics
[Section titled “Agent Proxy Metrics”](#agent-proxy-metrics)
The Agent Proxy Prometheus-compatible metrics listed below may be viewed in a dashboard.
* `aembit_agent_proxy_incoming_connections_total` - The total number of incoming connections (connections established from a Client Workload to the Agent Proxy).
* labels:
* `application_protocol`: `http`, `snowflake`, `postgres`, `redshift`, `mysql`, `redis`, `unspecified`
* `resource_set_id` (optional): ``
* `client_workload_id` (optional): ``
* `server_workload_id` (optional): ``
* `aembit_agent_proxy_active_incoming_connections` - The number of active incoming connection (connections established from a Client Workload to the Agent Proxy).
* labels:
* `application_protocol`: `http`, `snowflake`, `postgres`, `redshift`, `mysql`, `redis`, `unspecified`
* `resource_set_id` (optional): ``
* `client_workload_id` (optional): ``
* `server_workload_id` (optional): ``
* `aembit_agent_proxy_credentials_injections_total` - The total number of credentials injected by Agent Proxy.
* labels:
* `application_protocol`: `http`, `snowflake`, `postgres`, `redshift`, `mysql`, `redis`, `unspecified`
* success: `success`, `failure`.
* `aembit_agent_proxy_token_expiration_unix_timestamp` - The expiration timestamp for Aembit Agent Proxy Token (to access Aembit Cloud).
* `aembit_agent_proxy_aembit_cloud_connection_status` - The current connection status between Agent Proxy and Aembit Cloud. If the connection is up, the result is “1” (Connected). If the status is down, the result is “0” (Disconnected).
* `aembit_agent_proxy_credentials_cached_entries_total` - The total number of unexpired credentials currently cached by Agent Proxy.
* labels:
* `resource_set_id` (optional): ``
* `aembit_agent_proxy_directives_cached_entries_total` - The total number of unexpired directives currently cached by Agent Proxy.
* labels:
* `resource_set_id` (optional): ``
* `version` - The Agent Proxy version.
* labels:
* component: `aembit_agent_proxy`
* version: `version: `
* `process_cpu_second_total` - The Amount of CPU seconds used by the Agent Proxy. This value could be more than the wall clock time if Agent Proxy used more than one core. This metric is useful in conjunction with `machine_cpu_cores` to calculate CPU % usage.
* labels:
* component: `aembit_agent_proxy`
* hostname: `hostname: `
* `machine_cpu_cores` - The number of CPU cores available to Agent Proxy.
* labels:
* component: `aembit_agent_proxy`
* hostname: `hostname: `
* `process_memory_usage_bytes` - The amount of memory (in bytes) used by Agent Proxy.
* labels:
* component: `aembit_agent_proxy`
* hostname: `hostname: `
### Agent Controller Metrics
[Section titled “Agent Controller Metrics”](#agent-controller-metrics)
The Agent Controller Prometheus-compatible metrics listed below may be viewed in a dashboard.
* `aembit_agent_controller_token_expiration_unix_timestamp` - The expiration timestamp for Aembit Agent Controller Token (to access Aembit Cloud).
* `aembit_agent_controller_access_token_requests_total` - The number of Agent Controller requests to get access token (for Agent Controller use).
* label
* Result: `success`, `failure`
* `Agent_Controller_Id`: ``
* `aembit_agent_controller_proxy_token_requests_total` - The number of Agent Proxy requests received by the Agent Controller to get access token.
* labels
* Result: success, `failure`
* `Agent_Controller_Id` (optional): ``
* `aembit_agent_controller_registration_status` - The Agent Controller registration status. Status can be either: `0` (Not Registered) or `1` (Registered).
* labels
* `Agent_Controller_Id` (optional): ``
* `version` - The Agent Controller version.
* labels
* component: `aembit_agent_controller`
* version: ``
### Agent Injector metrics
[Section titled “Agent Injector metrics”](#agent-injector-metrics)
The Agent Injector Prometheus-compatible metrics listed below may be viewed in a dashboard.
* `aembit_injector_pods_seen_total` - The number of pods proceeded by the Agent Injector.
* `aembit_injector_pods_injection_total` - The number of pods into which Aembit Edge Components were injected.
* label
* `success`: “success” or “failure”
# Agent Controller High Availability
> How to install and configure Agent Controllers in a high availability configuration
The Agent Controller is a critical Aembit Edge Component that facilitates Agent Proxy registration. Ensuring the continuous availability of the Agent Controller is vital for the uninterrupted operation of Agent Proxies. As a result, for any production deployment, it’s essential to install and configure the Agent Controller in a high availability configuration.
[Three key principles](https://en.wikipedia.org/wiki/High_availability#Principles) must be addressed to achieve high availability for the Agent Controller:
* Elimination of single points of failure
* Ensuring reliable crossover
* Failure detection
## Remove single points of failure
[Section titled “Remove single points of failure”](#remove-single-points-of-failure)
Having one Agent Controller instance can be a single point of failure. To mitigate this, multiple Agent Controller instances should be operational within an environment, providing redundancy and eliminating this risk.
To deploy multiple instances, repeat the [Agent Controller installation procedure](/user-guide/deploy-install/virtual-machine/).
Trust Provider-based registration of the Agent Controller simplifies launching multiple instances, as it removes the need to generate a new device code for each instance. When employing this method, you can use the same Agent Controller ID while installing additional instances for the same logical Agent Controller.
If you opt for the device code registration method, you must create a separate Agent Controller entry for each deployed instance in your tenant.
## Ensure reliable crossover
[Section titled “Ensure reliable crossover”](#ensure-reliable-crossover)
For effective traffic routing to multiple Agent Controller instances, use a load balancer.
It’s critical that the load balancer itself is configured for high availability to avoid becoming a single point of failure.
To accommodate the technical requirement of load balancing HTTPS (encrypted) traffic between Agent Proxies and Agent Controllers, a TCP load balancer (Layer 4) is necessary. Choose a TCP load balancer that aligns with your company’s preferences and standards.
## Failure detection
[Section titled “Failure detection”](#failure-detection)
Monitoring of both Agent Controllers and load balancers is necessary to quickly detect any failures. Establish a manual or automated procedure for failure remediation upon detection.
The health status of an Agent Controller can be checked through an `HTTP GET` request to the /health endpoint on port 80. A healthy Agent Controller will return an HTTP Response code of `200`.
## Transport Layer Security (TLS)
[Section titled “Transport Layer Security (TLS)”](#transport-layer-security-tls)
When Transport Layer Security (TLS) is configured on Agent Controllers behind a load balancer, it is crucial for the certificates on these Agent Controllers to include the domain names associated with the load balancer. This ensures that SSL/TLS termination at the Agent Controllers presents a certificate valid for the domain names clients use to connect.
### Agent Controller health endpoint Swagger documentation
[Section titled “Agent Controller health endpoint Swagger documentation”](#agent-controller-health-endpoint-swagger-documentation)
```yaml
openapi: 3.0.0
info:
title: Agent Controller Health Check API
version: 1.0.0
paths:
/health:
get:
summary: Agent Controller Health Check Endpoint
description: Returns the health status of the Agent Controller.
responses:
'200':
description: Healthy - the Agent Controller is functioning properly.
content:
application/json:
schema:
type: object
properties:
status:
type: string
example: "Healthy"
version:
type: string
example: "1.9.696"
gitSHA:
type: string
example: "b16139605d32ce60db0a5682de8ee3b579c6e885"
host:
type: string
example: "hostname"
'401':
description: Unhealthy - the Agent Controller is not registered yet or can't register.
content:
application/json:
schema:
type: object
properties:
status:
type: string
example: "Unregistered"
version:
type: string
example: "1.9.696"
gitSHA:
type: string
example: "b16139605d32ce60db0a5682de8ee3b579c6e885"
host:
type: string
example: "hostname"
```
Note
A newly deployed Agent Controller may take up to 10 seconds to register and attain a healthy state.
# Configure Agent Controller TLS with Aembit's PKI
> How to configure Agent Controller TLS with Aembit's PKI in Kubernetes and Virtual Machine deployments
Aembit provides the ability for you to use Agent Controller Transport Layer Security (TLS) certificates for secure Agent Proxy to Agent Controller communication in Kubernetes environments, and on Virtual Machine deployments, using Aembit’s PKI.
## Configure Agent Controller TLS with Aembit’s PKI in Kubernetes
[Section titled “Configure Agent Controller TLS with Aembit’s PKI in Kubernetes”](#configure-agent-controller-tls-with-aembits-pki-in-kubernetes)
If you have a Kubernetes deployment and would like to use Aembit’s PKI, there are two configuration options, described below.
### Automatic TLS configuration
[Section titled “Automatic TLS configuration”](#automatic-tls-configuration)
If you *aren’t already* using a custom PKI, install the latest Aembit Helm Chart. By default, Agent Controllers are automatically configured to accept TLS communication from Agent Proxy.
### Preserve existing custom configuration
[Section titled “Preserve existing custom configuration”](#preserve-existing-custom-configuration)
If you have already configured a custom PKI-based Agent Controller TLS, no additional steps are necessary, as your configuration will be preserved.
## Configure Aembit’s PKI-based Agent Controller for VM deployments
[Section titled “Configure Aembit’s PKI-based Agent Controller for VM deployments”](#configure-aembits-pki-based-agent-controller-for-vm-deployments)
If you are using a Virtual Machine, Agent Controller will not know which hostname Agent Proxy should use to communicate with Agent Controller. This requires you to manually configure Agent Controller to enable TLS communication between Agent Proxy and Agent Controller.
### Aembit Tenant configuration
[Section titled “Aembit Tenant configuration”](#aembit-tenant-configuration)
1. Log into your Aembit Tenant, and go to **Edge Components -> Agent Controllers**.
2. Select or create a new Agent Controller.
3. In **Allowed TLS Hostname (Optional)**, enter the FQDN (Ex: `my-subdomain.my-domain.com`), subdomain, or wildcard domain (Ex: `*.example.com`) to use for the Aembit Managed TLS certificate.
Note
The allowed TLS hostname is unique to each Agent Controller that you configure it on.
4. Click **Save**.
### Manual configuration
[Section titled “Manual configuration”](#manual-configuration)
If you have not already configured Aembit’s PKI, perform the steps listed below.
1. Install Agent Controller on your Virtual Machine, and set the `AEMBIT_MANAGED_TLS_HOSTNAME` environment variable to the hostname that Agent Proxy uses to communicate with Agent Controller. When set, Agent Controller retrieves the certificate for the hostname from Aembit Cloud, enabling TLS communication between Agent Proxy and Agent Controller.
2. Configure Agent Proxy’s Virtual Machines to trust the Aembit Tenant Root Certificate Authority (CA).
## Confirming TLS Status
[Section titled “Confirming TLS Status”](#confirming-tls-status)
When you have configured Agent Controller TLS, you can verify the status of Agent Controller TLS by performing the following steps:
1. Log into your Aembit Tenant.
2. Click on the **Edge Components** link in the left sidebar. You are directed to the Edge Components dashboard.

3. By default, the **Agent Controllers** tab is selected. You should see a list of your configured Agent Controllers.
4. Verify TLS is active by confirming color status button in the TLS column for the Agent Controller.
Note
If the TLS status is not colored, this means TLS is not configured for Agent Controller.
## Agent Controller TLS Support Matrix
[Section titled “Agent Controller TLS Support Matrix”](#agent-controller-tls-support-matrix)
The table below lists the various Agent Controller TLS deployment models, denoting whether the configuration process is manual or automatic.
| Agent Controller Deployment Model | Customer Based PKI | Aembit Based PKI |
| --------------------------------- | ------------------ | ---------------- |
| Kubernetes | Manual | Automatic |
| Virtual Machine | Manual | Manual |
| ECS | Not Supported | Automatic |
## Automatic TLS Certificate Rotation
[Section titled “Automatic TLS Certificate Rotation”](#automatic-tls-certificate-rotation)
Aembit-managed certificates are automatically rotated by the Agent Controller, with no manual steps or extra configuration required.
# Configure a custom PKI-based Agent Controller TLS
> How to configure a custom PKI-based Agent Controller TLS in Kubernetes and Virtual Machine deployments
Aembit provides the ability for you to use your own PKI-based Transport Layer Security (TLS) for secure Agent Proxy to Agent Controller communication in Kubernetes environments, and on Virtual Machine deployments.
## Prerequisites
[Section titled “Prerequisites”](#prerequisites)
* Access to a Certificate Authority such as HashiCorp Vault or Microsoft Active Directory Certification Authority.
* A TLS PEM Certificate and Key file pair that is configured for the hostname of the Agent Controller.
* On Kubernetes, the hostname will be `aembit-agent-controller..svc.cluster.local` where `` is the namespace where the Aembit Helm chart is installed.
* On Virtual Machines, the hostname is going to depend on your network and DNS configuration. Please use the FQDN or PQDN hostname which will be used by Agent Proxy instances to access the Agent Controller.
* The TLS PEM Certificate file should contain both the Agent Controller certificate and chain to the Root CA.
* Self-signed certificates are not supported by the Agent Proxy for Agent Controller TLS communication.
## Kubernetes environment configuration
[Section titled “Kubernetes environment configuration”](#kubernetes-environment-configuration)
The Aembit Agent Controller requires that the TLS certificate and key be available in a [Kubernetes TLS Secret](https://kubernetes.io/docs/reference/kubectl/generated/kubectl_create/kubectl_create_secret_tls/). Therefore, there are 2 steps to completing this configuration.
1. Create a Kubernetes TLS Secret using the `kubectl create secret tls` command or similar method. For example:
```shell
kubectl create secret tls NAME --cert=path/to/cert/file --key=path/to/key/file
```
2. In the Aembit Helm chart installation file, set the `agentController.tls.secretName` value equal to the name of the secret created in step #1.
Note
Both prior steps assume that the TLS Secret and Aembit Helm chart are installed into the same namespace.
If you don’t have your own CA, you may consider [Kubernetes cert-manager](https://github.com/cert-manager/cert-manager) to create and maintain certificates and keys in your Kubernetes environment.
## Virtual machine environment configuration
[Section titled “Virtual machine environment configuration”](#virtual-machine-environment-configuration)
When installing the Agent Controller on a Virtual Machine, there are two installation parameters that must be specified:
* `TLS_PEM_PATH`
* `TLS_KEY_PATH`
For example, the Agent Controller installation command line could be specified like:
```shell
sudo TLS_PEM_PATH=/path/to/tls.crt TLS_KEY_PATH=/path/to/tls.key AEMBIT_TENANT_ID=tenant AEMBIT_AGENT_CONTROLLER_ID=aaaaaaaa-bbbb-cccc-dddd-eeeeeeeeeeee ./install
```
## Rotating custom PKI Agent Controller TLS certificates
[Section titled “Rotating custom PKI Agent Controller TLS certificates”](#rotating-custom-pki-agent-controller-tls-certificates)
Regular certificate rotation is essential to ensure that certificates remain valid and do not expire unexpectedly. By routinely updating certificates before their expiration, you prevent service disruptions and maintain secure communication.
In the Aembit environment, Agent Controller stores TLS certificate and key files in the `/opt/aembit/edge/agent_controller` directory.
### Update TLS Certificate
[Section titled “Update TLS Certificate”](#update-tls-certificate)
To update your TLS certificate and key, perform the steps described below.
1. Replace the existing TLS certificate and key files in the `/opt/aembit/edge/agent_controller` directory with the new key files provided by the customer.
2. Ensure the ownership of these new files matches the original permissions (`user: aembit_agent_controller, group aembit`).
```shell
sudo chown aembit_agent_controller:aembit /opt/aembit/edge/agent_controller/tls.crt
sudo chown aembit_agent_controller:aembit /opt/aembit/edge/agent_controller/tls.key
```
3. Verify the file permissions match the original settings.
```shell
$: /opt/aembit/edge/agent_controller# ls -l
-r-------- 1 aembit_agent_controller aembit ....... tls.crt
-r-------- 1 aembit_agent_controller aembit ....... tls.key
```
4. After you have replaced the files and adjusted the permissions, restart the Agent Controller service to apply these changes.
```shell
sudo systemctl restart aembit_agent_controller
```
5. You can verify that TLS certificate/key was properly rotate by checking the following log message:
```shell
$: journalctl --namespace aembit_agent_controller | grep "Tls certificate sync background process"
[INF] (Aembit.AgentController.Business.Services.BackgroundServices.TlsSyncUpService)
```
* If TLS is configured successfully, you will see the following message displayed: *Tls certificate sync background process is active.*
* If TLS is not configured successfully, you will see the following message displayed: *Tls certificate sync background process will not run because Tls is not enabled.*
# How to create an Agent Controller
The Agent Controller is a helper component that facilitates the registration of other Aembit Edge Components. This page details how to create a new Agent Controller in your Aembit Tenant.
## Create an Agent Controller
[Section titled “Create an Agent Controller”](#create-an-agent-controller)
To create an Agent Controller in your Aembit Tenant, follow these steps:
1. Log into your Aembit Tenant, and go to **Edge Components -> Agent Controllers**. 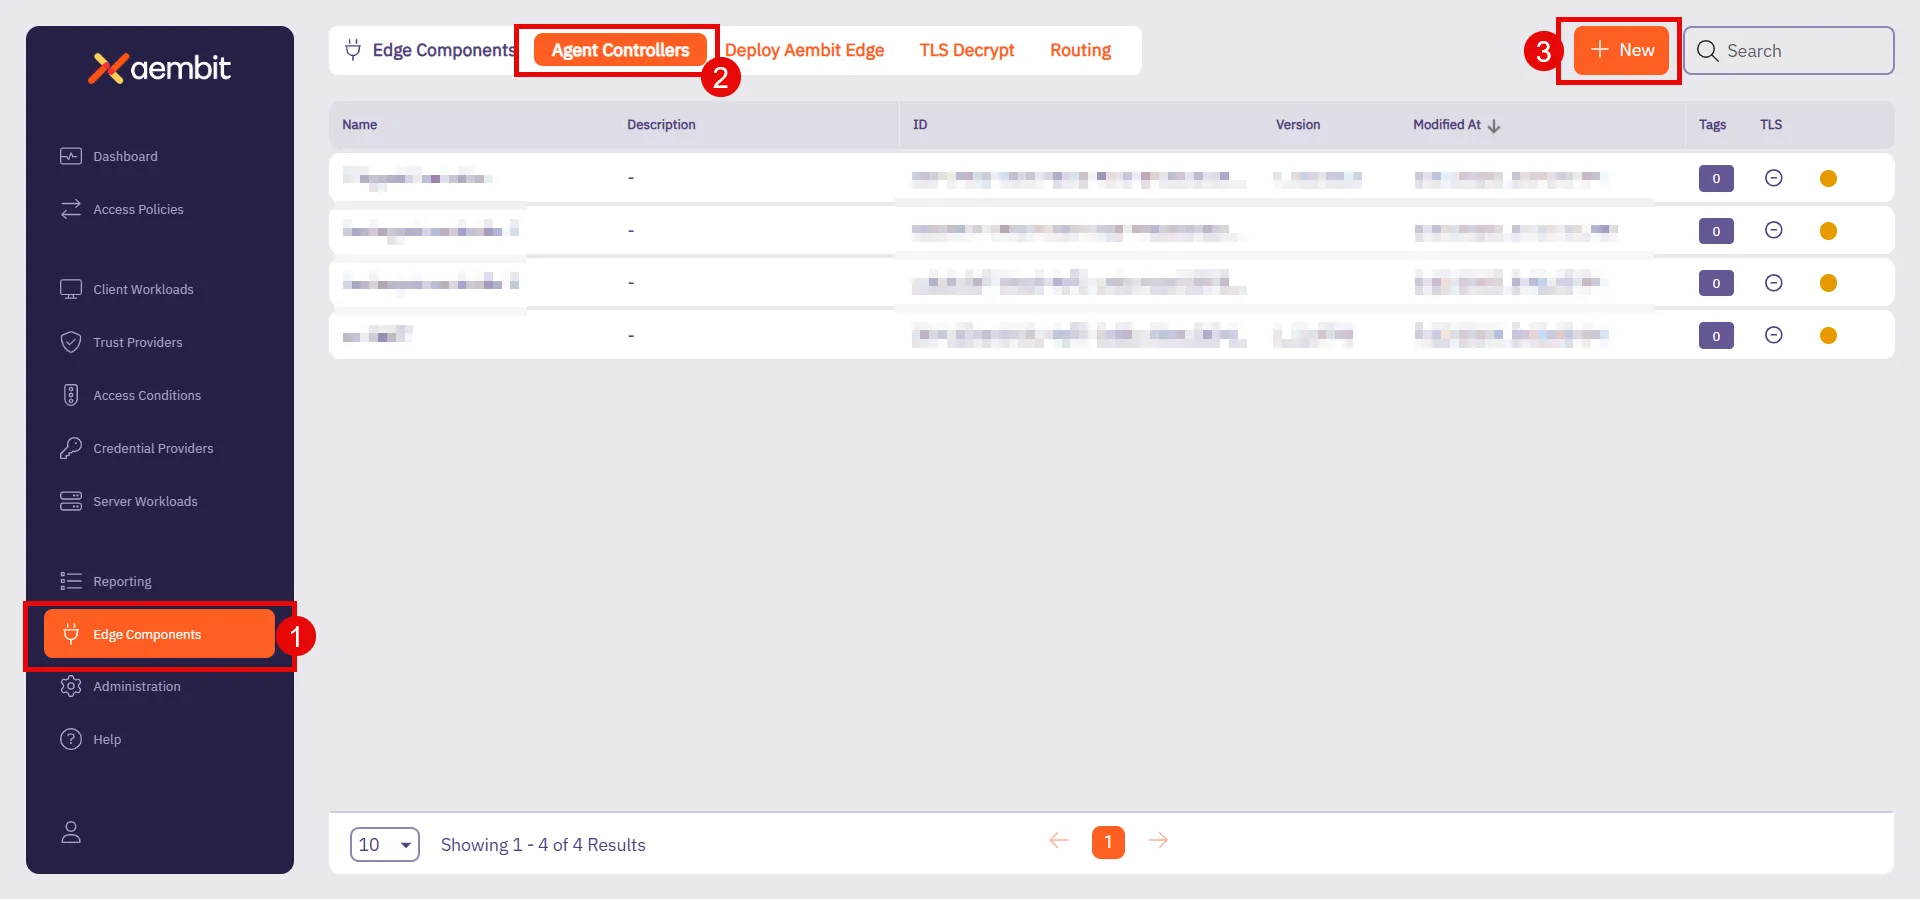
2. Click **+ New**, which displays the **Agent Controller** pop out menu.
3. Fill out the following fields:
* **Name** - Choose a user-friendly name for your controller.
* **Description (optional)** - Add a brief description to help identify its purpose.
* **Trust Provider** - Select an existing Trust Provider from the dropdown menu.
If you don’t have a Trust Provider set up, refer to [Add Trust Provider](/user-guide/access-policies/trust-providers/add-trust-provider) to create one.
Note
Trust Providers enable identity attestation during workload registration. Associating your Agent Controller to a Trust Provider accomplishes this for you.
This makes sure there is secure, verified communication between components. Aembit recommends configuring a Trust Provider as part of your setup.
* **Allowed TLS Hostname (Optional)** - Enter the FQDN (Ex: `my-subdomain.my-domain.com`), subdomain, or wildcard domain (Ex: `*.example.com`) to include in the [Aembit Managed TLS](/user-guide/deploy-install/advanced-options/agent-controller/configure-aembit-pki-agent-controller-tls) certificate. This restricts the certificate to only be valid when Agent Proxies attempt to access Agent Controller using this specific domain name.
The allowed TLS hostname is unique to each Agent Controller that you configure it on.
4. Click **Save**.
Once you save it, your newly created Agent Controller appears in the list of available Agent Controllers.
# How to shutdown Agent Proxy using HTTP
> How to shut down the Agent Proxy using HTTP
## Introduction
[Section titled “Introduction”](#introduction)
In certain scenarios, it may be necessary to manually shut down the Agent Proxy when the main container has exited but the sidecar process continues running.
This situation commonly occurs with Kubernetes jobs, where the main container exits upon job completion. Terminating the entire job in this case might appear as a cancelled job. To avoid that, Aembit provides a way to gracefully stop the sidecar, allowing the job to complete cleanly.
## Agent Proxy Shutdown
[Section titled “Agent Proxy Shutdown”](#agent-proxy-shutdown)
The Agent Proxy can be shut down by sending an HTTP `POST` request to its `/quit` endpoint.
### Example Command
[Section titled “Example Command”](#example-command)
An example command using `curl`:
```shell
curl -X POST localhost:/quit
```
When the Agent Proxy is properly configured to receive this request, it will flush any remaining events to the backend before exiting gracefully.
## Configuration Flags
[Section titled “Configuration Flags”](#configuration-flags)
The behavior of the Agent Proxy can be controlled through specific environment variables outlined below:
`AEMBIT_ENABLE_HTTP_SHUTDOWN` Environment Variable
This variable controls whether the Agent Proxy supports the `/quit` endpoint.
* **Default Value** - `false`
* **Accepted Values** - `false` or `true`
`AEMBIT_SERVICE_PORT` Environment Variable
This variable specifies the port on which the Agent Proxy responds to the diagnostic and configuration endpoint `/quit`.
* **Default Value** - `51234`
* **Accepted Values** - an integer number in the range 1 to 65535 (inclusive)
### Accessibility and Security Considerations
[Section titled “Accessibility and Security Considerations”](#accessibility-and-security-considerations)
Note
Handler endpoints, including `/quit`, are only accessible via `localhost` or `127.0.0.1`. This setting is non-configurable to ensure security.
Caution
The `/quit` handler should only be enabled in fully trusted environments. When enabled, any application with network access to `127.0.0.1` can send a request to shut down the Agent Proxy.
## Recommended Environments
[Section titled “Recommended Environments”](#recommended-environments)
Note
The `/quit` handler is intended for use primarily within **Kubernetes** environments.
# Agent Proxy termination strategy
> Learn about Agent Proxy's termination strategies across different environments and how to configure the AEMBIT_SIGTERM_STRATEGY variable
Agent Proxy must be able to serve Client Workload traffic throughout the entire lifecycle of the Client Workload. When both the Client Workload and Agent Proxy receive a termination signal (`SIGTERM`), the Agent Proxy attempts to continue operating and serving traffic until the Client Workload exits.
Agent Proxy runs in distinct environments, such as Virtual Machines, Kubernetes, and ECS Fargate, where workload lifecycles can differ. To handle these variations, Agent Proxy uses different termination strategies.
## Configuration
[Section titled “Configuration”](#configuration)
You can configure the termination strategy by setting the `AEMBIT_SIGTERM_STRATEGY` environment variable.
The supported values are:
* `immediate` – Exits immediately upon receiving `SIGTERM`.
* `sigkill` – Ignores the `SIGTERM` signal and waits for a `SIGKILL`.
## Default termination strategies
[Section titled “Default termination strategies”](#default-termination-strategies)
The following table lists the default termination strategy for each environment. You can override the default behavior using the `AEMBIT_SIGTERM_STRATEGY` environment variable.
| Environment | Default Termination Strategy |
| ------------------------- | ---------------------------- |
| AWS ECS Fargate | `sigkill` |
| AWS Lambda function | `immediate` |
| AWS Lambda container | `immediate` |
| Docker-compose on VMs | `sigkill` |
| Kubernetes | `sigkill` |
| Virtual Machine (Linux) | `immediate` |
| Virtual Machine (Windows) | N/A |
| Virtual Appliance | `immediate` |
# AWS Relational Database Service (RDS) Certificates
> How to install AWS RDS Certificate to Agent Proxy to make it trust the AWS RDS Certificate
Note
MySQL, PostgreSQL, and Redshift in AWS uses a TLS certificate issued from an AWS root certificate authority that’s not publicly trusted.
You must follow the steps on this page when attempting to connect to MySQL, PostgreSQL, and Redshift in AWS.
To install all the possible CA Certificates for AWS RDS databases, follow the instructions and use the following commands:
1. Transition to a root session so you have root access.
```shell
sudo su
```
2. Run the following commands to download the CA certificate bundle from AWS, split it into a set of `.crt` files, and then update the local trust store with all these files.
```shell
apt update ; apt install -y ca-certificates curl
rm -f /tmp/global-bundle.pem
curl "https://truststore.pki.rds.amazonaws.com/global/global-bundle.pem" -o /tmp/global-bundle.pem
csplit -s -z -f /usr/local/share/ca-certificates/aws-rds /tmp/global-bundle.pem '/-----BEGIN CERTIFICATE-----/' '{*}'
for file in /usr/local/share/ca-certificates/aws-rds*; do mv -- "$file" "${file%}.crt"; done
update-ca-certificates
```
3. After running this command, you should see the following output:
```shell
Updating certificates in /etc/ssl/certs...
118 added, 0 removed; done.
```
4. Ensure you exit your root session.
```shell
exit
```
Note
Make sure to follow the preceding instructions for each virtual machine running Client Workloads that needs access to AWS MySQL, PostgreSQL, or Redshift.
# How to configure explicit steering
> How to use the Explicit Steering feature to direct specific traffic to the Agent Proxy
The Explicit Steering feature enables you to route and direct specific traffic in a Kubernetes deployment to the Agent Proxy.
Note
By default, in Kubernetes deployment, all traffic in a given pod is sent to the Agent Proxy.
## Configure Explicit Steering
[Section titled “Configure Explicit Steering”](#configure-explicit-steering)
To configure explicit steering in your Kubernetes cluster, simply follow the steps described on the [Kubernetes Deployment](/user-guide/deploy-install/kubernetes/kubernetes) page in the Aembit Technical Documentation and set the `aembit.io/steering-mode` annotation to `explicit`. This sets the steering mode to `explicit`.
Once you have set the steering mode to `explicit`, each Client Workload that wants to use Aembit will need to be configured to use Agent Proxy as its HTTP proxy.
The default port used for explicit steering is `8000`. In the case, it conflicts with a port that the Client Workload uses. The explicit port number may be overridden via the `AEMBIT_HTTP_SERVER_PORT` environment variable.
The following section provides several examples of how Agent Proxy is used as an HTTP proxy.
## Examples
[Section titled “Examples”](#examples)
The section below shows several different Client Workload examples using different applications with Agent Proxy as an HTTP proxy.
### Example Client Workload using `curl` with `-x` to specify an HTTP proxy
[Section titled “Example Client Workload using curl with -x to specify an HTTP proxy”](#example-client-workload-using-curl-with--x-to-specify-an-http-proxy)
```sh
curl -x localhost:8000 myserverworkload
```
### Example Client Workload using HashiCorp Vault CLI (Vault CLI implicitly uses VAULT\_HTTP\_PROXY)
[Section titled “Example Client Workload using HashiCorp Vault CLI (Vault CLI implicitly uses VAULT\_HTTP\_PROXY)”](#example-client-workload-using-hashicorp-vault-cli-vault-cli-implicitly-uses-vault_http_proxy)
```shell
export VAULT_HTTP_PROXY="http://localhost:8000"
vault token lookup
```
### Example Client Workload written in Go (Go’s HTTP client implicitly uses HTTPS\_PROXY)
[Section titled “Example Client Workload written in Go (Go’s HTTP client implicitly uses HTTPS\_PROXY)”](#example-client-workload-written-in-go-gos-http-client-implicitly-uses-https_proxy)
```shell
export HTTPS_PROXY=localhost:8000
./run_go_app [...]
```
# Selective Transparent Steering
> This page describes the selective transparent steering feature.
Selective transparent steering allows users to control egress traffic by specifying which destinations should be directed to the Agent Proxy.
By default, all egress traffic from a host with Agent Proxy installed is proxied. The selective transparent steering feature introduces the ability to restrict this proxied traffic to a specific list of hostnames. When this feature is enabled, only egress traffic to the user-specified hostnames will be proxied. This allows more precise control over which destinations’ traffic is managed by the Agent Proxy.
### Usage
[Section titled “Usage”](#usage)
Selective transparent steering is **off** by default. To enable this feature, add the environment variable `AEMBIT_STEERING_ALLOWED_HOSTS` when installing Agent Proxy. The variable’s value should be a comma-separated list of hostnames for which traffic should be proxied.
Note
This is only applicable to VM deployment (vs other types of our deployments - Kubernetes, AWS Lambda, ECS Fargate).
```shell
AEMBIT_STEERING_ALLOWED_HOSTS=graph.microsoft.com,vault.mydomain [...] ./install
```
# About traffic steering methods
> How different traffic steering methods and how to configure them for various deployment models
Traffic steering is the process of directing network traffic from Client Workloads to an Agent Proxy, which inspects and modifies this traffic.
Selecting the appropriate steering method depends on factors such as the deployment model, protocol compatibility, and the level of control required over traffic management.
Certain deployment models offer flexibility, allowing you to select the steering method that best suits your needs. In other cases, the deployment model dictates the steering method.
## Conceptual overview
[Section titled “Conceptual overview”](#conceptual-overview)
Traffic steering methods determine how network traffic from Client Workloads reaches the Agent Proxy. Three primary methods exist:
* **Transparent Steering** - Automatically redirects all TCP traffic without client configuration.
* **Selective Transparent Steering** - Automatically redirects TCP traffic only for specified hostnames without client configuration.
* **Explicit Steering** - Requires explicit client-side configuration to route traffic.
## Method comparison and protocol support
[Section titled “Method comparison and protocol support”](#method-comparison-and-protocol-support)
| Deployment Model | Transparent Steering | Selective Transparent Steering | Explicit Steering |
| --------------------------------------- | -------------------- | ------------------------------ | ----------------- |
| Kubernetes (K8S) | ✅ (default) | ❌ | ✅ |
| Virtual Machines (VM) | ✅ (default) | ✅ | ❌ |
| Elastic Container Service (ECS) Fargate | ❌ | ❌ | ✅ (default) |
| AWS Lambda Extension | ❌ | ❌ | ✅ (default) |
| Virtual Appliance | ❌ | ❌ | ✅ (default) |
**Protocol Support** -
* **Transparent Steering** - All supported protocols.
* **Selective Transparent Steering** - All supported protocols.
* **Explicit Steering** - HTTP-based protocols only.
## Technical details and configuration
[Section titled “Technical details and configuration”](#technical-details-and-configuration)
### Transparent steering
[Section titled “Transparent steering”](#transparent-steering)
Transparent Steering automatically redirects all TCP traffic using `iptables` without requiring any client-side awareness. It’s straightforward, minimizing configuration overhead. Transparent Steering is the default method for Kubernetes(K8S) and Virtual Machine (VM) deployments and doesn’t require additional configuration.
### Selective transparent steering
[Section titled “Selective transparent steering”](#selective-transparent-steering)
Selective Transparent Steering redirects TCP traffic only for specified hostnames, providing precise control without explicit client configuration.
* Turned off by default.
* Available exclusively for virtual machines.
* Enable this by setting the environment variable `AEMBIT_STEERING_ALLOWED_HOSTS` during installation:
```shell
AEMBIT_STEERING_ALLOWED_HOSTS=graph.microsoft.com,vault.mydomain [...] ./install
```
For further information, see the [Agent Proxy Virtual Machine Installation Guide](/user-guide/deploy-install/virtual-machine/linux/agent-proxy-install-linux).
### Explicit steering
[Section titled “Explicit steering”](#explicit-steering)
Explicit steering directs Client Workloads traffic based on specific configurations. It’s the default steering method for Elastic Container Service (ECS) Fargate, AWS Lambda Extensions, and virtual appliances deployment models. Explicit Steering is also an optional configuration for Kubernetes deployments.
In Kubernetes, enable explicit steering by setting the `aembit.io/steering-mode` annotation on a Client Workload:
```yaml
aembit.io/steering-mode: explicit
```
For Kubernetes-specific installation details and annotation configurations, refer to the [Kubernetes Installation Guide](/user-guide/deploy-install/kubernetes/kubernetes).
#### Explicit steering port configuration
[Section titled “Explicit steering port configuration”](#explicit-steering-port-configuration)
Agent Proxy listens on port `8000` for traffic sent using explicit steering. If this conflicts with an existing application port, override it using the `AEMBIT_HTTP_SERVER_PORT` environment variable.
#### Explicit steering examples
[Section titled “Explicit steering examples”](#explicit-steering-examples)
Many ways exist to configure Client Workloads to use explicit steering. Common methods include setting environment variables such as `HTTP_PROXY` or `HTTPS_PROXY`. However, specific applications might provide their own explicit configuration methods to route traffic via a proxy.
The following are examples:
* **Go applications** -
* Using the `HTTPS_PROXY` environment variable, widely recognized by many HTTP libraries:
```shell
export HTTPS_PROXY=localhost:8000
./run_go_app [...]
```
* **Using `curl` command** -
* Explicitly specifying proxy configuration via a command-line argument:
```shell
curl -x localhost:8000 myserverworkload
```
* **HashiCorp Vault CLI** -
* Configuring the HashiCorp Vault-specific environment variable to route traffic via the proxy:
```shell
export VAULT_HTTP_PROXY="http://localhost:8000"
vault token lookup
```
# How to change Edge Component log levels
> How to change the log levels of Aembit's Edge Components
Sometimes, you’ll want to use a different value than an Agent Controller’s or Agent Proxy’s default value for logging. For example, when troubleshooting a problem with your agent or when trying out a new feature.
The following sections detail how to change the log level of your:
* [Agent Controller](#change-agent-controller-log-level)
* [Agent Proxy](#change-agent-proxy-log-level)
Note
The process to change your Agent Controller’s or Agent Proxy’s log level does differ depending on your chosen deployment type. Make sure to use the correct tab in the sections to change your log levels.
See [Log level reference](/reference/edge-components/agent-log-level-reference) for complete details about each agent’s log levels.
## Change Agent Controller log level
[Section titled “Change Agent Controller log level”](#change-agent-controller-log-level)
Use the following tabs to set change your Agent Controller’s log level using the `AEMBIT_LOG_LEVEL` environment variable:
* Virtual Machine
1. Log into your Agent Controller.
2. Open the Aembit Agent Controller service at `/etc/systemd/system/aembit_agent_controller.service`.
You may have to open this as root using `sudo`.
3. Under `[Service]`, update or add `Environment=AEMBIT_LOG_LEVEL=`, and set the log level you want. For example:
/etc/systemd/system/aembit\_agent\_controller.service
```txt
[Service]
...
User=aembit_agent_controller
Restart=always
Environment=AEMBIT_TENANT_ID=abc123
Environment=AEMBIT_DEVICE_CODE=
Environment=AEMBIT_AGENT_CONTROLLER_ID=A12345
Environment=ASPNETCORE_URLS=http://+:5000,http://+:9090
Environment=AEMBIT_LOG_LEVEL=
StandardOutput=journal
StandardError=journal
...
```
4. Reload the Aembit Agent Controller config:
```shell
systemctl daemon-reload
```
5. Restart the Aembit Agent Controller service:
```shell
systemctl restart aembit_agent_controller.service
```
## Change Agent Proxy log level
[Section titled “Change Agent Proxy log level”](#change-agent-proxy-log-level)
Use the following tabs to set change your Agent Proxy’s log level using the `AEMBIT_LOG_LEVEL` environment variable:
* Virtual Machine
1. Log into your Agent Proxy.
2. Open the Aembit Agent Proxy service at `/etc/systemd/system/aembit_agent_proxy.service`.
You may have to open this as root using `sudo`.
3. Under `[Service]`, update or add `Environment=AEMBIT_LOG_LEVEL=`, and set the log level you want. For example:
```txt
[Service]
...
User=aembit_agent_proxy
Restart=always
StandardOutput=journal
StandardError=journal
TimeoutStopSec=20
Nice=-20
LimitNOFILE=65535
Environment=AEMBIT_SIGTERM_STRATEGY=immediate
Environment=AEMBIT_AGENT_CONTROLLER=https://my-proxy-service:5000
Environment=AEMBIT_DOCKER_CONTAINER_CIDR=
Environment=CLIENT_WORKLOAD_ID=
Environment=AEMBIT_AGENT_PROXY_DEPLOYMENT_MODEL=vm
Environment=AEMBIT_SERVICE_PORT=51234
// highlight-next-line
Environment=AEMBIT_LOG_LEVEL=
...
```
4. Reload the Aembit Agent Proxy config:
```shell
systemctl daemon-reload
```
5. Restart the Aembit Agent Proxy service:
```shell
systemctl restart aembit_agent_proxy.service
```
# About TLS Decrypt
> Overview of how TLS Decrypt works
TLS Decrypt allows the Aembit Agent Proxy to decrypt and manage encrypted traffic between your Client and Server Workloads, enabling Workload IAM functionality.
To configure TLS Decrypt, see [Configure TLS Decrypt](/user-guide/deploy-install/advanced-options/tls-decrypt/configure-tls-decrypt).
One of the most important aspects of TLS decryption is the way in which you manage keys and certificates. Aembit has implemented the following set of security measures to make sure TLS decryption is secure in your Aembit environment:
* Aembit stores private keys for certificates used in TLS decryption in the Agent Proxy memory only, which never persists.
* The private key that Aembit uses for the TLS Decrypt CA is securely stored and kept in Aembit Cloud.
* The default lifetime for a TLS decryption certificate is 1 day.
* TLS certificates are only generated for the target host. Wildcards are explicitly **not** used.
* The certificate hostname can only match the hostnames that are in your Server Workloads.
* A certificate is only issued if the certificate meets the requirements of the Access Policy, which includes Client Workload and Server Workload identification, Trust Provider attestation, successful validation of conditional access checks.
* Each Aembit Tenant has a unique Root CA, making sure TLS decryption certificates issued by one tenant aren’t trusted by Client Workloads configured to trust the Root CA of a different tenant.
Caution
Since Aembit issues each tenant its own Root CA, Aembit recommends setting up separate tenants for environments with distinct security boundaries.
By configuring separate tenants, each environment remains securely isolated. This prevents potential risks where an actor uses a certificate issued in one environment (with lower safeguards) to attack another environment with stricter safeguards.
## Example workflow
[Section titled “Example workflow”](#example-workflow)
When a Client Workload first attempts to establish a connection to a Server Workload, Agent Proxy intercepts the connection, generates a key pair and Certificate Signing Request (CSR), and then requests a certificate for TLS decryption from Aembit Cloud. This certificate is then cached and reused for subsequent connections until a [configurable percentage of its lifetime](/user-guide/deploy-install/advanced-options/tls-decrypt/configure-tls-decrypt#change-your-leaf-certificate-lifetime) has elapsed, optimizing performance while maintaining security.
Once Aembit Cloud evaluates the request and authorizes the Client Workload to access the Server Workload, Aembit Cloud issues a certificate the Agent Proxy can use to decrypt TLS and permit the Client Workload to access the Server Workload.
## Decryption scope
[Section titled “Decryption scope”](#decryption-scope)
Aembit Agent Proxy only decrypts connections when it evaluates and matches the associated Access Policy, and the Server Workload for this Access Policy has the TLS Decrypt flag enabled.
Because of these restrictions, the Agent Proxy only decrypts the connection when it:
* Identifies the Client Workload
* Identifies the Server Workload
* Finds the associated Access Policy
* Attests the Client Workload
* Conditional Access checks pass
* Server Workload has the TLS flag enabled
If any of these conditions aren’t met, Aembit leaves the connection intact and doesn’t decrypt it.
## Standalone CA for TLS Decrypt
[Section titled “Standalone CA for TLS Decrypt”](#standalone-ca-for-tls-decrypt)
Instead of using your Aembit Tenant’s CA, you have the option to define and use your own Standalone CA.
See [About Standalone CA for TLS Decrypt](/user-guide/deploy-install/advanced-options/tls-decrypt/configure-tls-decrypt-standalone-ca) to learn more.
To set up a Standalone CA, see [How to configure a Standalone CA](/user-guide/deploy-install/advanced-options/tls-decrypt/configure-tls-decrypt-standalone-ca).
# About Standalone CA for TLS Decrypt
> How to configure TLS Decrypt with a Standalone CA
Standalone Certificate Authorities (CAs) function as dedicated, isolated entities that grant you more granular control over managing [TLS Decrypt](/user-guide/deploy-install/advanced-options/tls-decrypt/). With Standalone CAs, you can create, assign, and manage unique CAs what are independent from Aembit’s default CAs to precisely manage TLS traffic.
You can assign Standalone CAs to specific resources (such as Client Workloads or [Resource Sets](/user-guide/administration/resource-sets/)) rather than tying those resources to your Aembit configuration at the Tenant-level.
To set up a Standalone CA, see [How to configure Standalone CA for TLS Decrypt](/user-guide/deploy-install/advanced-options/tls-decrypt/configure-tls-decrypt-standalone-ca).
## Important terminology
[Section titled “Important terminology”](#important-terminology)
**Trust model** - A set of rules and configurations that define which CAs are trusted within a given context. In the context of Aembit’s TLS Decrypt feature, a trust model determines whether Aembit uses a Tenant-level CA, a Standalone CA, or both to validate TLS certificates.
**Trust boundary** - The defined scope within which a CA is trusted. By assigning a Standalone CA to a Resource Set, you create a distinct trust boundary that isolates that Resource Set’s workloads from other environments.
## How Standalone CAs work
[Section titled “How Standalone CAs work”](#how-standalone-cas-work)
Standalone CAs provide a decentralized approach to certificate management by allowing individual resources to define their own trusted CAs rather than relying on a single Tenant-wide CA.
After you create and assign a Standalone CA to a Resource Set, it establishes a distinct trust boundary, making sure that workloads in separate Resource Sets operate independently. This isolation makes it so different Resource Sets don’t rely on the same root certificate. It also reduces the risk of unintended certificate exposure by limiting each CA’s visibility and application to its defined scope.
Additionally, assigning a Standalone CA directly to a Client Workload overrides any Resource Set or Tenant-level CA, providing a way to enforce unique trust requirements for workloads that require separate security controls.
If you don’t assign a Standalone CA to a Client Workload or its associated Resource Set, Aembit automatically falls back to the Tenant-level CA. This fallback makes sure workloads can still establish trusted TLS connections even if no Standalone CA is explicitly configured, maintaining continuity in certificate management.
## Standalone CA assignment
[Section titled “Standalone CA assignment”](#standalone-ca-assignment)
You have two options when assigning a Standalone CA:
* **Assign to a Resource Set** - Assigning a Standalone CA to a Resource Set isolates its trust model and establishes a shared trust boundary for all workloads within that set. This makes sure that only workloads within that Resource Set rely on the selected CA.
* **Assign to a Client Workload** - By explicitly assigning a Standalone CA to a Client Workload, you can override the Tenant-level CA or Standalone CA set at the Resource Set-level. This assignment takes precedence over the Resource Set’s CA, giving you have fine-grained control over TLS decryption behavior on individual Client Workloads.
This layered structure allows you to establish both broad certificate policies via Resource Sets and targeted overrides for specific Client Workloads.
## How Aembit chooses which CA to use
[Section titled “How Aembit chooses which CA to use”](#how-aembit-chooses-which-ca-to-use)
Aembit resolves certificate authorities during the TLS Decrypt process from most to least restrictive:
1. **Client Workload Level** - Aembit first checks for a Standalone CA assigned directly to the requesting Client Workload.
2. **Resource Set Level** - If Aembit doesn’t find a workload-specific CA, it checks for a CA assigned to the workload’s Resource Set.
3. **Tenant Level** - If you’ve not assigned a Standalone CA at either level, Aembit defaults to using the Tenant-level CA.
This hierarchical approach allows targeted overrides for specific workloads while preserving the broader certificate structure across your infrastructure.
Expand for a complex example
Imagine an organization that operates multiple environments for development, staging, and production, each managed within its own Resource Set.
In this setup, the production Resource Set has a Standalone CA configured to enforce stricter security controls. A critical backend API within this Resource Set also has a Standalone CA assigned directly to it, designed to meet its unique certificate requirements. Meanwhile, the development and staging Resource Sets have no Standalone CAs assigned.
If a workload in the production Resource Set attempts to establish a TLS connection:
* Aembit first checks for a Standalone CA assigned directly to that workload. Since the backend API has its own CA, that certificate is used.
* If the workload didn’t have a workload-specific CA, Aembit would default to the production Resource Set’s Standalone CA.
* If no Standalone CA were assigned to either the workload or the Resource Set, Aembit would instead use the Tenant-level CA.
Meanwhile, workloads in the development and staging Resource Sets would skip the first two steps, defaulting directly to the Tenant-level CA since no Standalone CAs are defined.
This hierarchy allows the organization to enforce stricter security controls for critical services while maintaining simpler certificate management in less sensitive environments.
## Best practices for Standalone CAs
[Section titled “Best practices for Standalone CAs”](#best-practices-for-standalone-cas)
* **Use Standalone CAs for Critical Resources** - For sensitive services requiring stricter control, Standalone CAs improve isolation and minimize certificate sprawl.
* **Define Clear Certificate Lifetimes** - Setting appropriate expiration periods reduces exposure to outdated certificates.
* **Audit and Monitor CA Usage** - Periodically review CA associations to maintain secure and predictable TLS decryption behavior.
* **Keep organization consistent** - Consistency matters for predictable TLS decryption behavior, so align Standalone CA assignments with your infrastructure’s organizational structure.
* **Simplify where you can** - While scoping CAs narrowly can reduce exposure, consolidating similar workloads under a shared Resource Set can simplify certificate management.
## Scoping Standalone CAs too tightly
[Section titled “Scoping Standalone CAs too tightly”](#scoping-standalone-cas-too-tightly)
While tightly scoped Standalone CAs improve security and isolation, they can increase operational complexity. Managing multiple narrowly scoped CAs requires careful tracking of certificate rotations and renewals. Frequent resource movement across environments may lead to mismatched CA associations, disrupting communication. Additionally, troubleshooting becomes more complex when multiple isolated trust boundaries exist.
Balance security with operational efficiency when defining CA scopes.
## Standalone CA behavior
[Section titled “Standalone CA behavior”](#standalone-ca-behavior)
When managing Standalone CAs, it’s crucial to understand how Resource Sets influence their behavior. Resource Sets define the scope within which a Standalone CA is trusted, which directly impacts both certificate visibility and Client Workload associations.
### In Resource Sets
[Section titled “In Resource Sets”](#in-resource-sets)
* **Consider trust boundary establishment** - Assigning a Standalone CA to a Resource Set creates a distinct trust boundary, with all Client Workloads in that Resource Set inheriting the assigned CA unless overridden.
* **Plan for certificate isolation** - Maintain unique Standalone CAs for different Resource Sets to prevent certificate trust from extending across unrelated workloads.
* **Beware of resource portability risks** - Moving workloads between Resource Sets may break certificate trust unless the new Resource Set shares the same Standalone CA or you reconfigure it.
### In Client Workloads
[Section titled “In Client Workloads”](#in-client-workloads)
* **Use targeted overrides strategically** - Assign a Standalone CA directly to a Client Workload to override the Resource Set’s CA only when workloads have distinct security requirements.
* **Watch for inconsistent trust models** - Carefully coordinate workload-level CA assignments to avoid creating fragmented trust models and certificate mismatches.
* **Remember the tenant-level fallback** - If you don’t assign a Standalone CA to either the Resource Set or Client Workload, Aembit defaults to using the Tenant-level CA.
By thoughtfully aligning Standalone CA assignments with your Resource Sets and workload structure, you can achieve stronger security without adding unnecessary complexity.
## Additional resources
[Section titled “Additional resources”](#additional-resources)
* [About TLS Decrypt](/user-guide/deploy-install/advanced-options/tls-decrypt/)
* [Configure a Standalone CA](/user-guide/deploy-install/advanced-options/tls-decrypt/configure-tls-decrypt-standalone-ca)
# Configure TLS Decrypt
> How to configure TLS Decrypt when using HTTPS or Redis over TLS
When your Client Workload uses Transport Layer Security (TLS) (such as HTTPS or Redis with TLS) to communicate with the Server Workload, you must enable [TLS Decrypt](/user-guide/deploy-install/advanced-options/tls-decrypt/) in your Aembit Tenant. TLS Decrypt allows the Aembit Agent Proxy to decrypt and manage encrypted traffic between your Client and Server Workloads, enabling Workload IAM functionality.
To configure TLS Decrypt, you must configure your Client Workloads to trust your Aembit Tenant Root Certificate Authorities (CAs) so they can establish TLS connections with your Server Workload. To do this, you must:
* [Get your Aembit Tenant Root CA](#get-your-aembit-tenant-root-ca).
* [Add the root CA to the root store](#add-your-aembit-tenant-root-ca-to-a-trusted-root-store) on your Client Workloads.
* You also have the option to [change your Leaf Certificate Lifetime](#change-your-leaf-certificate-lifetime) (default 1 day).
## Prerequisites
[Section titled “Prerequisites”](#prerequisites)
To configure TLS Decrypt, you must have the following:
* A Server Workload with TLS enabled (see [Enable Server Workload TLS](/user-guide/access-policies/server-workloads/server-workload-enable-tls)).
* Your Aembit Tenant Root CA.
* TLS version 1.2+ on your Client and Server Workloads (Agent Proxy requirement).
Note
If your Client Workloads support TLS version 1.3, then Agent Proxy uses TLS version 1.3.
## Get your Aembit Tenant Root CA
[Section titled “Get your Aembit Tenant Root CA”](#get-your-aembit-tenant-root-ca)
To get your Aembit Tenant Root CA, perform the following steps:
1. Log in to your Aembit Tenant.
2. In the left sidebar menu, go to **Edge Components**.
3. In the top ribbon menu, click **TLS Decrypt**.
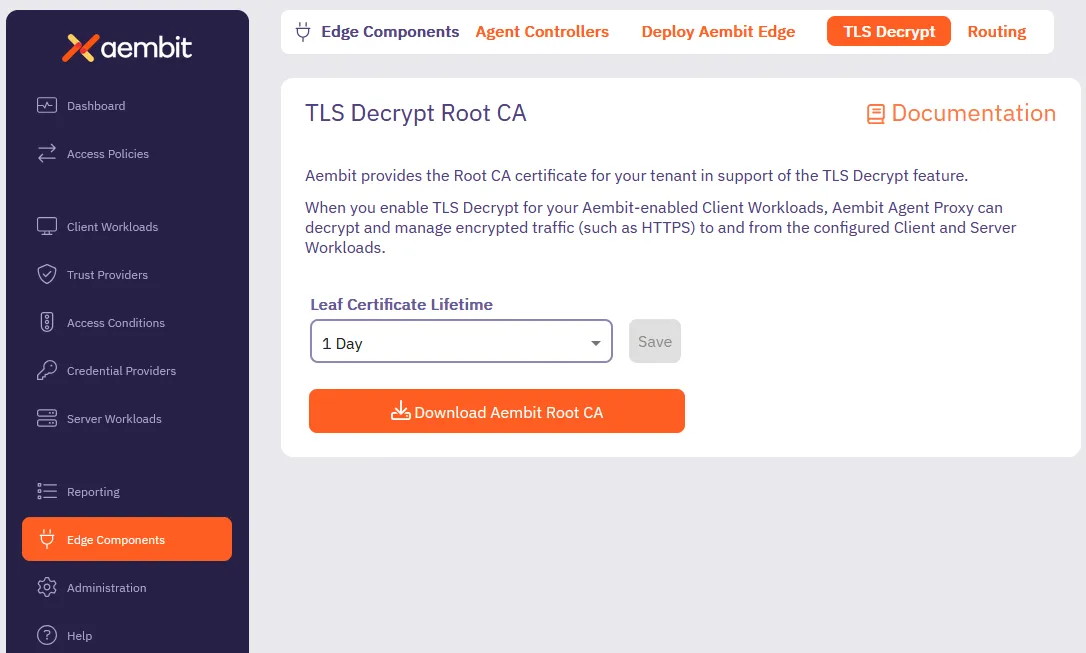
4. Click Download your Aembit Tenant Root CA certificate.
Alternatively, you may download the Aembit Tenant Root CA directly by using to the following URL, making sure to replace `` with your actual Aembit Tenant ID:
```shell
https://.aembit.io/api/v1/root-ca
```
## Add your Aembit Tenant Root CA to a trusted root store
[Section titled “Add your Aembit Tenant Root CA to a trusted root store”](#add-your-aembit-tenant-root-ca-to-a-trusted-root-store)
Different operating systems and application frameworks have different methods for adding root certificates to their associated root store. Most Client Workloads use the system root store. This isn’t always the case, however, so make sure to consult your operating system’s documentation.
You must install your Aembit Tenant Root CA on your Client Workload container or Virtual Machine (VM). Install your Aembit Tenant Root CA either during workload build/provisioning time, or at runtime, as long as the Client Workload processes trust the Aembit Tenant Root CA.
Select a tab for your operating system, distribution, and specific application to see the steps to adding your Aembit Tenant Root CA to your root store:
* Debian/Ubuntu-based container
For Debian/Ubuntu Linux, you must include the Aembit Tenant Root CA in your Client Workload container image:
1. [Get your Aembit Tenant Root CA](#get-your-aembit-tenant-root-ca) and save it to `/.crt`.
2. Run the following commands to include the root CA in your `Dockerfile`:
```dockerfile
RUN apt-get update && apt-get install -y ca-certificates
COPY /.crt /usr/local/share/ca-certificates
RUN update-ca-certificates
```
* Debian/Ubuntu-based VM
```shell
sudo apt-get update && sudo apt-get install -y ca-certificates
sudo wget https://.aembit.io/api/v1/root-ca \
-O /usr/local/share/ca-certificates/.crt
sudo update-ca-certificates
```
* Red Hat VM
```shell
sudo yum update -y && sudo yum install -y ca-certificates
sudo wget https://.aembit.io/api/v1/root-ca \
-O /etc/pki/ca-trust/source/anchors/.crt
sudo update-ca-trust
```
* Windows Server VM
```powershell
Invoke-WebRequest `
-Uri https://.aembit.io/api/v1/root-ca `
-Outfile .cer
Import-Certificate `
-FilePath .cer `
-CertStoreLocation Cert:\LocalMachine\Root
```
* Node.js-based Client Workload
Node.js uses its own certificate store, distinct from the system’s certificate store (such as `/etc/ssl/certs/ca-certificates.crt` on Ubuntu/Debian and `/etc/pki/tls/certs/` on RedHat), to manage and validate trusted root CAs.
To include additional trusted root certificates, use the environment variable [NODE\_EXTRA\_CA\_CERTS](https://nodejs.org/api/cli.html#node_extra_ca_certsfile):
1. [Get your Aembit Tenant Root CA](#get-your-aembit-tenant-root-ca).
2. Set the `NODE_EXTRA_CA_CERTS` environment variable accordingly.
* Python-based Client Workload
For Python-based applications, [get your Aembit Tenant Root CA](#get-your-aembit-tenant-root-ca), then follow the section that applies to you:
#### Using the Python `requests` library
[Section titled “Using the Python requests library”](#using-the-python-requests-library)
Configure the environment variable `REQUESTS_CA_BUNDLE` to point to a bundle of trusted certificates, including the Aembit Tenant Root CA.
For more details, refer to the [requests advanced user guide](https://requests.readthedocs.io/en/latest/user/advanced/).
#### Using the Python `httpx` package
[Section titled “Using the Python httpx package”](#using-the-python-httpx-package)
Configure the environment variable `SSL_CERT_FILE` to include the Aembit Tenant Root CA.
For additional information, see [PEP 476](https://peps.python.org/pep-0476/).
* Other
Please contact Aembit support if you need instructions for a different distribution or trust root store location.
## Change your leaf certificate lifetime
[Section titled “Change your leaf certificate lifetime”](#change-your-leaf-certificate-lifetime)
The default lifetime of leaf certificates for your Aembit Tenant Root CA is **1 day**. To change this value, follow these steps:
1. Log in to your Aembit Tenant.
2. In the left sidebar menu, go to **Edge Components**.
3. In the top ribbon menu, click **TLS Decrypt**.
4. Under **Leaf Certificate Lifetime**, select the desired value (`1 hour`, `1 day`, or `1 week`) from the dropdown menu.
5. Click **Save**.
6. (Optional) To apply the changes to existing leaf certificates, you must either:
* Restart the associated Agent Proxy. See [Verifying your leaf certificate lifetime](#verifying-your-leaf-certificate-lifetime).
* Wait for existing certificates to expire.
Security best practice
Changing the lifetime duration for leaf certificates doesn’t require reinstallation of the root CA certificate in any location where it’s already installed. The root CA certificate itself remains unchanged, and this modification only affects the validity period of newly issued leaf certificates.
That said, it’s important to remember that **existing certificates retain their original expiration dates**. This means you’ll need to restart the associated Agent Proxy to fully transition to the shorter lifetime. This is especially important for more drastic decreases like going from one week to one hour.
### Verifying your leaf certificate lifetime
[Section titled “Verifying your leaf certificate lifetime”](#verifying-your-leaf-certificate-lifetime)
[After changing your leaf certificate lifetime](#change-your-leaf-certificate-lifetime), verify the changes by viewing the details of the cert through the following commands:
1. After changing the leaf certificate lifetime, log in to the Agent Proxy associated with the leaf certificate lifetime you updated.
2. Restart the Agent Proxy.
3. Run the following command to create a test TLS connection from the Agent Proxy to a Server Workload. The hostname must be in a Server Workload associated with the Access Policy for that Agent Proxy.
```shell
openssl s_client -connect :
```
4. Inspect the output and look for the `Server certificate` section.
Copy the contents of the certificate (highlighted in the following example):
```txt
Server certificate
-----BEGIN CERTIFICATE-----
MjUwMjA1MjI1MDIxWhcNMzUwMjAzMjI1MDIxWjBrMSUwIwYDVQQDDBxBZW1iaXQg
...
... omitted for brevity
...
0ApHb7jB+YkL59eG9WOdCUqjQjBAA=
-----END CERTIFICATE-----
subject-CN - my.service.com
```
5. View and inspect the detailed contents of the certificate by echoing the certificate you just copied into the `openssl x509 -text` command:
```shell
echo "" | openssl x509 -text
```
You should see output similar to the following:
```shell
Certificate:
Data:
Version: 3 (0x2)
Serial Number: 1234567890 (0x12345fe4)
Signature Algorithm: ecdsa-with-SHA384
Issuer: CN = Aembit Tenant 1a2b3c Issuing CA, O = Aembit Inc, C = US, emailAddress = support@aembit.io
Validity
Not Before: Feb 10 13:25:42 2025 GMT
Not After : Feb 11 13:30:42 2025 GMT
Subject: CN = my.service.com
...
... omitted for brevity
...
```
Notice that the highlighted `Validity` section has the new lifetime representing the leaf certificate lifetime you selected. Aembit intentionally adds five minutes to the `Not Before` time to account for clock skew between different systems.
# How to configure a Standalone CA
> How to configure Standalone CA for TLS Decrypt
To configure a [Standalone CA](/user-guide/deploy-install/advanced-options/tls-decrypt/configure-tls-decrypt-standalone-ca), you must first [create a Standalone CA](#how-to-create-a-standalone-ca) then assign it to your desired resources:
* [Resource Set](#assign-a-standalone-ca-to-a-resource-set)
* [Client Workload](#assign-a-standalone-ca-to-a-client-workload)
Paid feature
Standalone CAs are a paid feature. Please contact your Aembit representative for more information about pricing and implementation.
## Prerequisites
[Section titled “Prerequisites”](#prerequisites)
* [Aembit Role](/user-guide/administration/roles/) with the following **Read/Write** permissions:
* `Standalone Certificate Authorities`
* `Client Workloads`
* `Resource Sets`
Optional
If you’ve never configured Standalone CA for TLS Decrypt before, Aembit recommends that you read [Standalone CA behavior](/user-guide/deploy-install/advanced-options/tls-decrypt/about-tls-decrypt-standalone-ca#standalone-ca-behavior) to familiarize yourself with how Standalone CAs interact with Resource Sets.
## How to create a Standalone CA
[Section titled “How to create a Standalone CA”](#how-to-create-a-standalone-ca)
Follow these steps to create a Standalone CA:
1. Log into your Aembit Tenant, and go to **Edge Components -> TLS Decrypt**.
2. In the top right corner, select the **Resource Set** where you want your Standalone CA to reside.
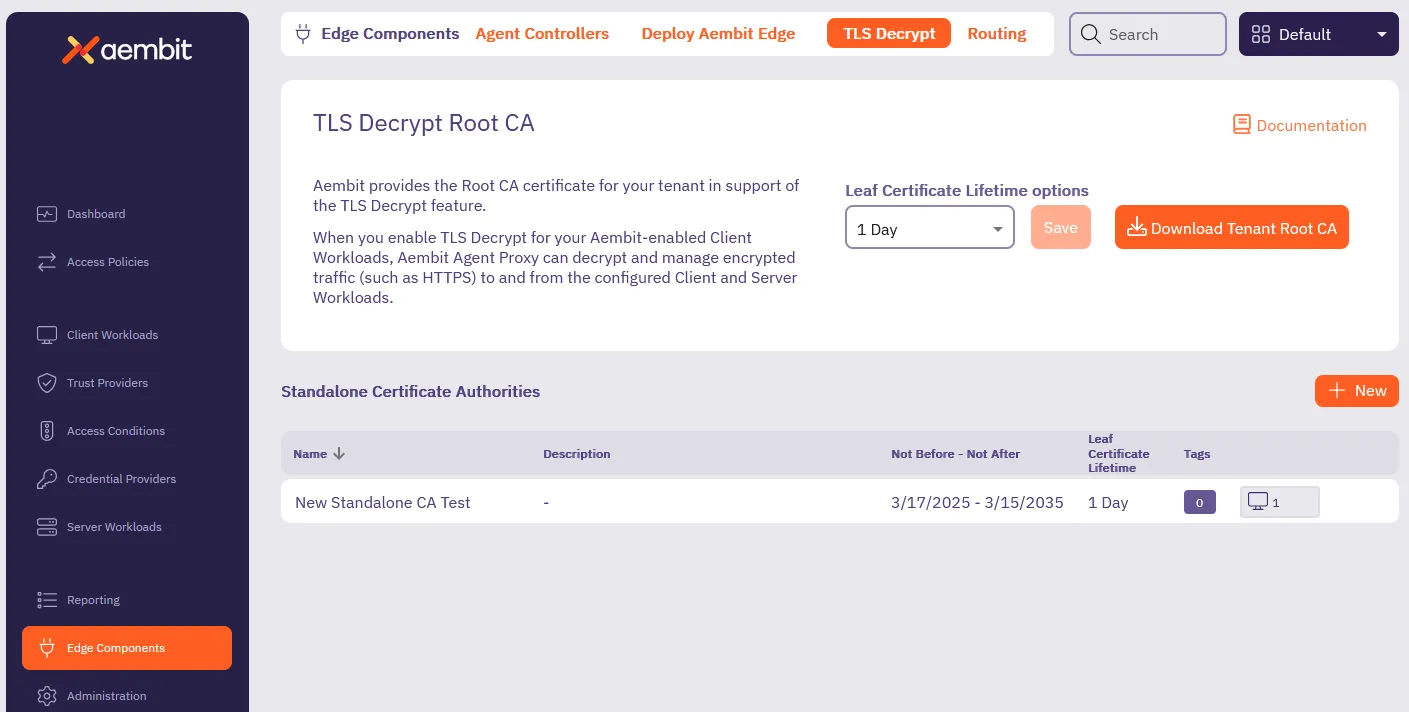
3. In the **Standalone Certificate Authorities** section, click **+ New**.
This displays the **Standalone Certificate Authority** pop out menu:
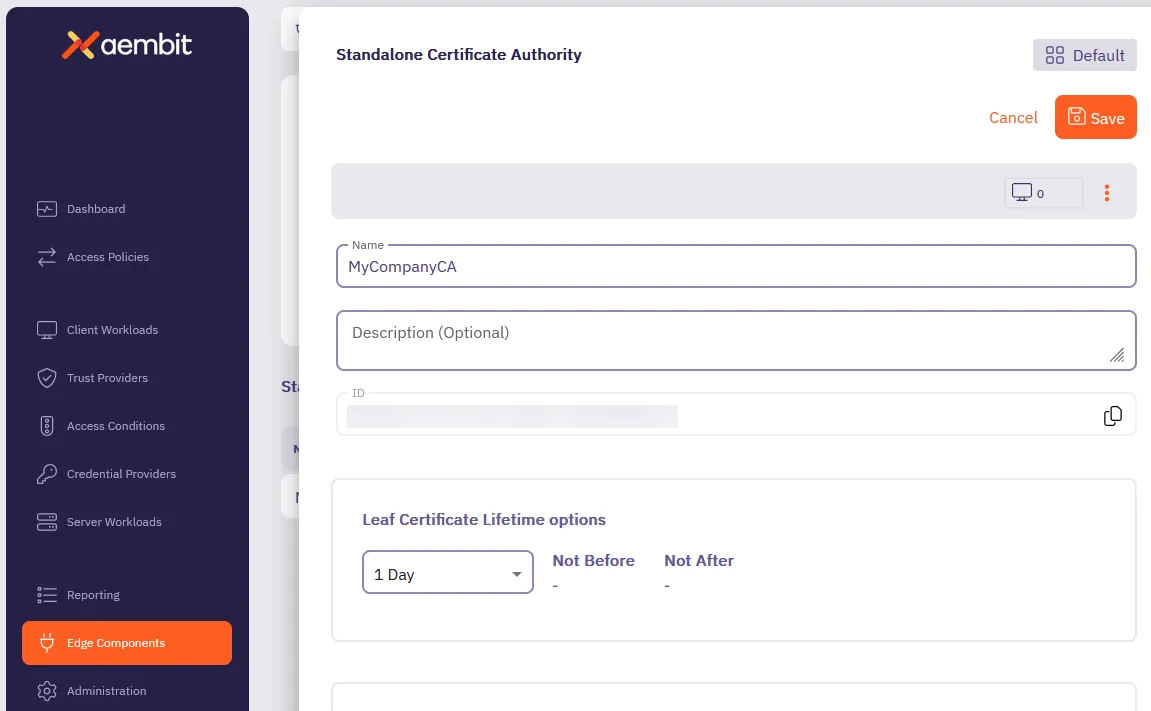
4. Enter a **Name** and optional **Description**.
5. Select the lifetime you desire from the **Leaf Certificate Lifetime options** dropdown.
6. Click **Save**.
Aembit displays your new Standalone CA in the **Standalone Certificate Authorities** table.
## Assign a Standalone CA to a Resource Set
[Section titled “Assign a Standalone CA to a Resource Set”](#assign-a-standalone-ca-to-a-resource-set)
1. Log into your Aembit Tenant.
2. Click **Administration** in the left sidebar.
3. At the top, select **Administration ☰ Resource Sets**.
4. Click the **Resource Set** that you want to assign a Standalone CA, then click **Edit**.
Or follow [Create a new Resource Set](/user-guide/administration/resource-sets/create-resource-set) to create one.
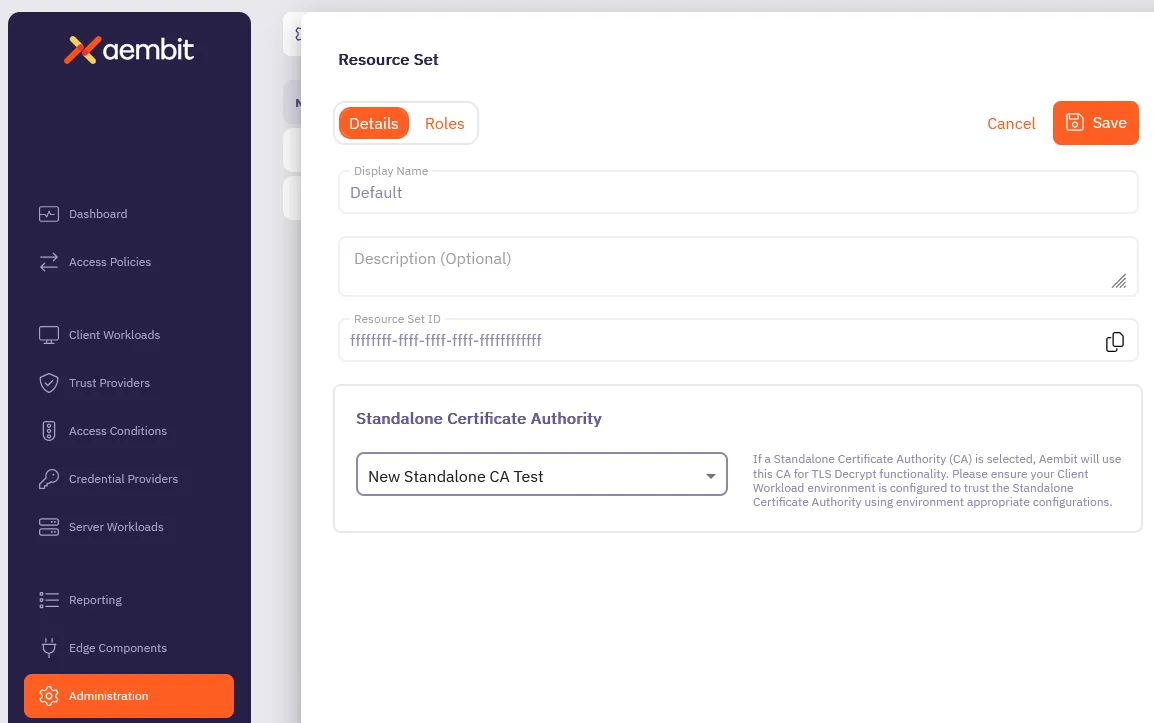
Note
If you don’t see the Standalone CA that you want to assign, the Standalone CA may reside in a different Resource Set.
5. In the **Standalone Certificate Authority** section, select the Standalone CA you want to assign to the Resource Set.
6. Click **Save**.
## Assign a Standalone CA to a Client Workload
[Section titled “Assign a Standalone CA to a Client Workload”](#assign-a-standalone-ca-to-a-client-workload)
1. Log into your Aembit Tenant, and go to **Client Workloads**.
2. In the top right corner, select the **Resource Set** where the Standalone CA you want to assign resides.
Caution
It’s crucial that you select the correct Resource Set, or you may not see your Standalone CA when assigning it. Or worse, you may assign the wrong Standalone CA to your Client Workload.
1. Select the Client Workload you wan to assign the Standalone CA to, then click **Edit**.
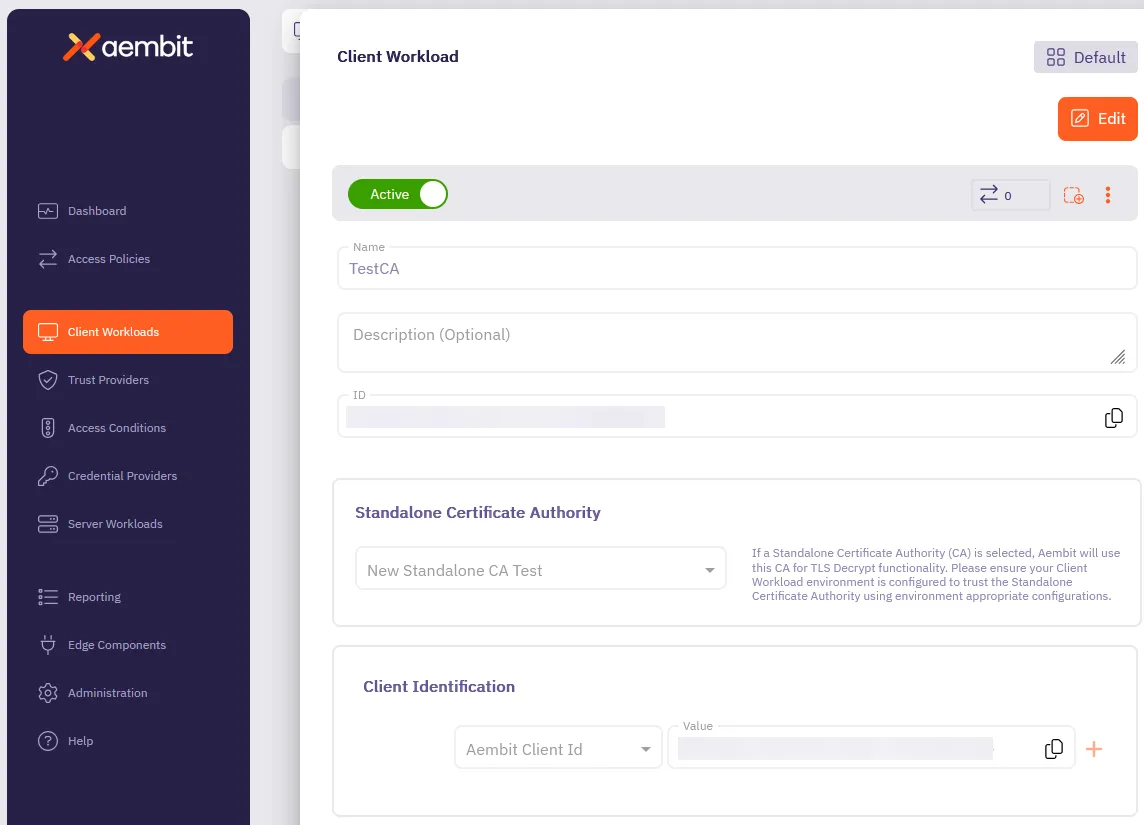
2. In the **Standalone Certificate Authority** section, select the Standalone CA you want to assign to the Client Workload.
3. Click **Save**.
## Additional resources
[Section titled “Additional resources”](#additional-resources)
* [About Standalone CA for TLS Decrypt](/user-guide/deploy-install/advanced-options/tls-decrypt/configure-tls-decrypt-standalone-ca)
* [About TLS Decrypt](/user-guide/deploy-install/advanced-options/tls-decrypt/)
# How to trust certificates issued by private CAs
> How to configure Aembit Edge Components to trust certificates issued by private CAs
There are scenarios where Server Workloads are secured with certificates issued by private Certificate Authorities (CAs), which are not publicly trusted. The Aembit Agent Proxy, by default, does not trust certificates issued by such private CAs and will not connect to these workloads.
This article describes the steps required to configure Edge Components to establish trust with these certificate authorities.
## Adding Private CA
[Section titled “Adding Private CA”](#adding-private-ca)
### Kubernetes
[Section titled “Kubernetes”](#kubernetes)
To have your private CAs trusted, pass them as the `agentProxy.trustedCertificates` parameter in the Aembit Helm chart.
This parameter should be a base64-encoded list of PEM-encoded certificates.
The resulting Helm command will look like this (please remember to replace your tenant ID and other parameters):
```shell
helm install aembit aembit/aembit `
--create-namespace -n aembit `
--set tenant=TENANT,agentController.deviceCode=123456,agentProxy.trustedCertificates=LS0tLS1CRUdJTiBDRVJUSUZJQ0FURS0....
```
### Elastic Container Service (ECS)
[Section titled “Elastic Container Service (ECS)”](#elastic-container-service-ecs)
To trust private CAs, pass them as a variable to the Aembit ECS Terraform module.
This variable should be a base64-encoded list of PEM-encoded certificates.
```hcl
module "aembit-ecs" {
source = "Aembit/ecs/aembit"
version = "1.12.0"
...
aembit_trusted_ca_certs = "LS0tLS1CRUdJTiBDRVJUSUZJQ0FURS0...."
}
```
### Virtual machine
[Section titled “Virtual machine”](#virtual-machine)
The Agent Proxy automatically trusts all certificates installed in the system’s trust root certificate store.
Below are the steps to add them to the appropriate system trust root certificate store.
#### Debian/Ubuntu-based VM
[Section titled “Debian/Ubuntu-based VM”](#debianubuntu-based-vm)
Place your private CA certificate in `/usr/local/share/ca-certificates/`, ensuring the file contains PEM-encoded certificate(s) and that the file extension is `.crt`. Then, execute the following commands:
```shell
sudo apt-get update && sudo apt-get install -y ca-certificates
sudo update-ca-certificates
```
## Disabling TLS verification
[Section titled “Disabling TLS verification”](#disabling-tls-verification)
In rare circumstances, Server Workloads could be secured with certificates that would normally be rejected by full TLS verification. For example, a Server Workload may have a certificate with a mismatch between the service’s Fully Qualified Domain Name (FQDN) and its Common Name (CN) or Subject Alternative Name (SAN).
Aembit allows the disabling of TLS verification for specific Server Workloads.
:warning: Please exercise extreme caution with this configuration. Using certificates that are rejected by full TLS verification and disabling TLS verification are considered poor security practices.
To disable TLS verification, toggle the **Forward TLS Verification** option to “None” within the **Server Workload** settings.
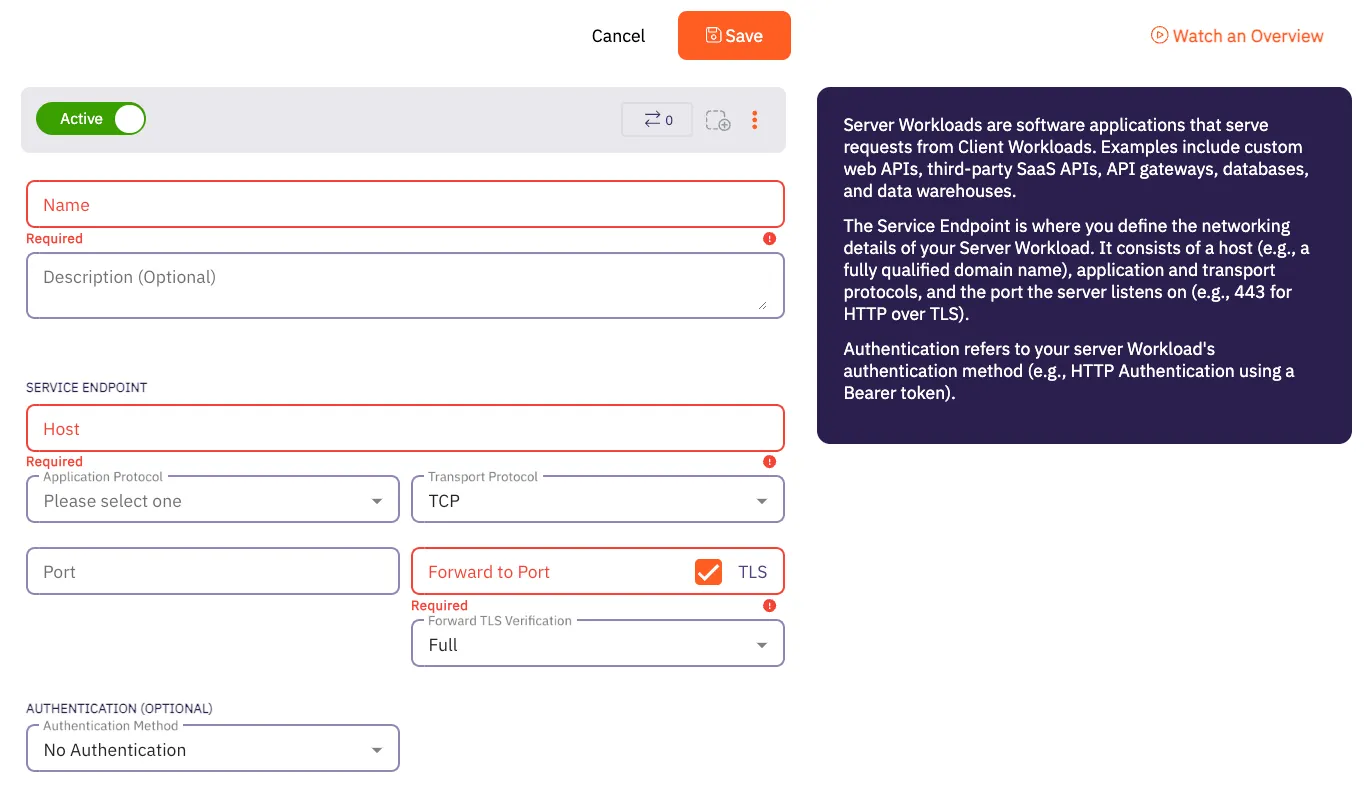
# Aembit Components and Packages
> Comparison of Aembit components and packages
Work in progress
This page is a work in progress. It may contain incomplete or unverified information.
Please check back later for updates.
If you have feedback or suggestions, please fill out the [Aembit New Docs Feedback Survey](https://forms.gle/mfjhV2TtXP1pXAym8).
Thanks for your patience!
# Edge Component container image best practices
> Best practices for deploying official Aembit container images
Aembit built its official [Aembit container images](https://hub.docker.com/u/aembit) to streamline the deployment process. Aembit provides a [Helm chart for Kubernetes](/user-guide/deploy-install/kubernetes/kubernetes) and a [Terraform module for ECS](/user-guide/deploy-install/serverless/aws-ecs-fargate) that ease deployment in containerized environments.
If these are incompatible with your deployment environment, you may run into issues as you hand craft a Kubernetes configuration or an ECS task definition.
The details on this page help you as you follow your own path.
## Container user IDs
[Section titled “Container user IDs”](#container-user-ids)
Some container images declare a specific user ID that the containerized application expects to run as. The following table lists Aembit container images and their expected user IDs:
| Container Image | User ID |
| --------------------- | ------- |
| `aembit_agent_proxy` | `65534` |
| `aembit_sidecar_init` | `26248` |
You shouldn’t need to specify these user IDs unless you define a pod-level `securityContext/runAsUser` attribute in a Kubernetes deployment or extend the container image in a way that changes the default user ID. If you’ve specified the wrong user for either the `aembit-agent-proxy` container or the `aembit-init-iptable` container, you’ll see a log error message such as:
```plaintext
sudo: you do not exist in the passwd database
```
Since the v1.22 release of the Aembit Helm chart, the injected container definitions include `securityContext/runAsUser` attributes that will override any such pod-level attribute. Since the v1.22 release of the Aembit Agent Injector, you will see a warning message:
```plaintext
The injected container (...) is unlikely to run correctly because it will run as UID ... where UID ... is expected."
```
If you see this warning, you must make sure to specify the `securityContext/runAsUser` attribute for each of the Aembit containers that you are injecting into any Client Workload pods that specify a `securityContext/runAsUser` attribute at the pod-level.
## Client Workload user IDs
[Section titled “Client Workload user IDs”](#client-workload-user-ids)
Transparent Steering relies on the user ID of the process initiating a network connection to exempt the Agent Proxy outbound connections. Therefore any Client Workload that runs under the `65534` UID (commonly named `nobody`) will also be exempt from Transparent Steering.
## Write-accessible filesystem
[Section titled “Write-accessible filesystem”](#write-accessible-filesystem)
The `aembit_agent_proxy` container image depends on being able to write to the root filesystem to download your tenant’s CA certificate and add it to the trusted certificate bundle. If you disable writing to the root filesystem, Agent Proxy logs an error message similar to the following:
```plaintext
Error when fetching token. Will attempt to refresh in 16 seconds. Error: error sending request ... invalid peer certificate: UnknownIssuer
```
ECS and Kubernetes use slightly different spelling, using a different letter casing, for the same setting:
* `readonlyRootFilesystem` on ECS
* `readOnlyRootFilesystem` on Kubernetes
# How to deploy to Kubernetes
> How to deploy Aembit Edge Components in a Kubernetes environment
Aembit provides different deployment options that you can use to deploy Aembit Edge Components in your environment. Each of these options provides similar features and functionality. The steps for each of these options, however, are specific to the deployment option you select.
This page describes the process to deploy Aembit Edge Components to Kubernetes cluster using Helm.
To deploy Aembit Edge Components to your Kubernetes cluster, you must follow these steps:
1. [Prepare Edge Components](#step-1---prepare-edge-components)
2. [Add and install the Aembit Edge Helm chart](#step-2---install-aembit-edge-helm-chart)
3. [Annotate Client Workloads](#step-3---annotate-client-workloads)
4. [Optional configurations](#optional-configurations)
You also have the option to [upgrade the Aembit Edge Helm chart](#upgrade-the-aembit-edge-helm-chart).\
To further customize your deployments, see the available [optional configurations](#optional-configurations).
## Prerequisites
[Section titled “Prerequisites”](#prerequisites)
1. Make sure you run all commands from your local terminal with `kubectl` configured for your cluster.
2. Verify that you have set your current context in Kubernetes correctly:
```shell
kubectl config current-context
```
If the context output is incorrect, set it correctly by running:
```shell
kubectl config use-context
```
## Step 1 - Prepare Edge Components
[Section titled “Step 1 - Prepare Edge Components”](#step-1---prepare-edge-components)
1. Log into your Aembit Tenant and go to **Edge Components -> Deploy Aembit Edge**.
2. In the **Prepare Edge Components** section, [create a new Agent Controller](/user-guide/deploy-install/about-agent-controller) or select an existing one.
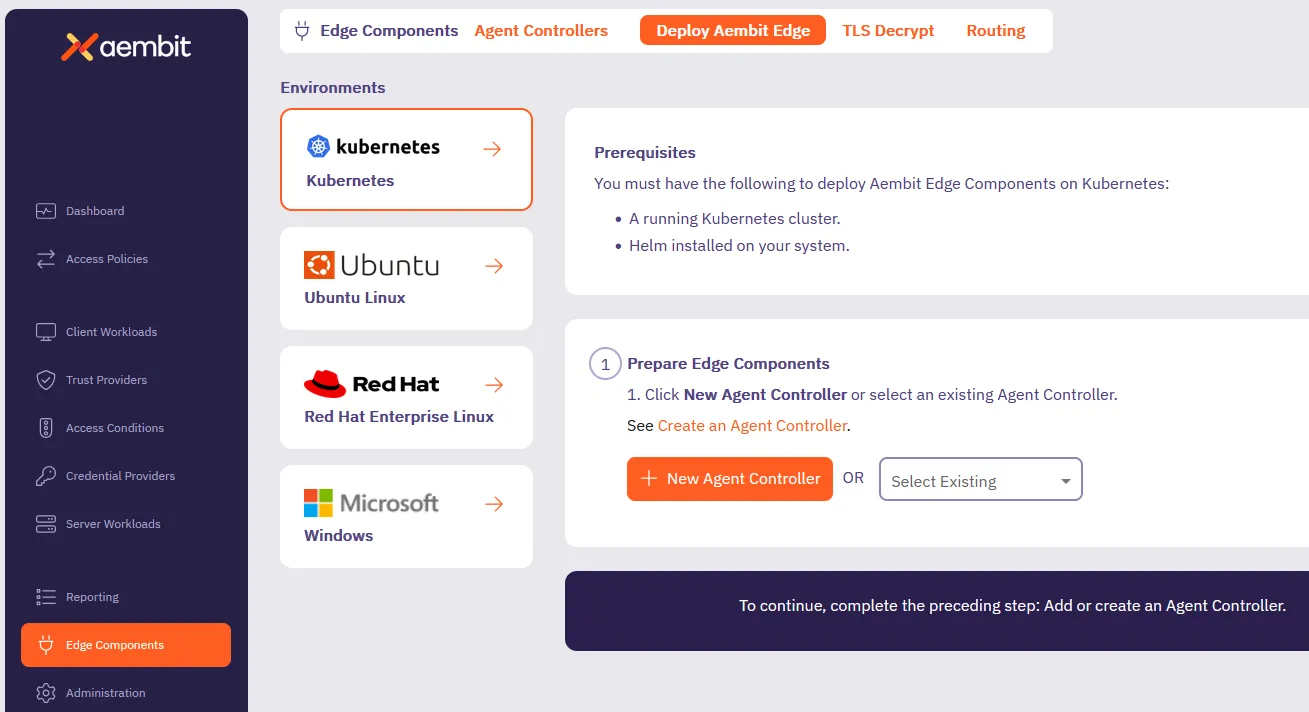
3. If the Agent Controller you selected does have a Trust Provider configured, skip ahead to the next section.
Otherwise, click **Generate Code**.
This creates a temporary `` that Aembit uses to authorize your Agent Controller.
## Step 2 - Install Aembit Edge Helm chart
[Section titled “Step 2 - Install Aembit Edge Helm chart”](#step-2---install-aembit-edge-helm-chart)
Follow the steps in the **Install Aembit Edge Helm Chart** section:
1. Add the Aembit Helm repository to your local Helm configuration by running:
```shell
helm repo add aembit https://helm.aembit.io
```
2. Install the Aembit Helm chart by running the following command, making sure to replace:
* `` with your tenant ID (Find this in the Aembit website URL: `.aembit.io`)
* `` with the code you generated in the Aembit web UI if your Agent Controller doesn’t have a Trust Provider configured
Also, this is the time to add extra [Helm configurations options](#optional-configurations) to the installation that fit your needs.
```shell
helm install aembit aembit/aembit \
-n aembit \
--create-namespace \
--set tenant=,agentController.DeviceCode=
```
Tip
To reduce errors, copy the command from the Aembit Web UI for this step, as it populates your `` and `` for you.

## Step 3 - Annotate Client Workloads
[Section titled “Step 3 - Annotate Client Workloads”](#step-3---annotate-client-workloads)
For Aembit Edge to manage your client workloads, you must annotate them with `aembit.io/agent-inject: "enabled"` so that the Aembit Agent Proxy can intercept network requests from them.
To add this annotation to your client workloads, you can:
* Modify your client workload’s Helm chart by adding the following annotation in the deployment template and applying the changes:
```yaml
template:
metadata:
annotations:
aembit.io/agent-inject: "enabled"
```
* If using ArgoCD, update your GitOps repository with the annotation and sync the changes.
* Directly modify your deployment YAML files to include the annotation in the pod template metadata section and applying your changes:
```yaml
apiVersion: apps/v1
kind: Deployment
metadata:
name: your-application
spec:
template:
metadata:
annotations:
aembit.io/agent-inject: "enabled"
```
## Upgrade the Aembit Edge Helm chart
[Section titled “Upgrade the Aembit Edge Helm chart”](#upgrade-the-aembit-edge-helm-chart)
To stay up to date with the latest features and improvements, follow these steps to update and upgrade the Aembit Edge Helm chart:
1. From your local terminal with `kubectl` configured for your cluster, update the Aembit Helm chart repo:
```shell
helm repo update aembit
```
2. Upgrade the Helm chart:
```shell
helm upgrade aembit aembit/aembit -n aembit
```
## Optional configurations
[Section titled “Optional configurations”](#optional-configurations)
The following sections contain optional configurations that you can use to customize your Kubernetes deployments.
### Agent Proxy native sidecar configuration
[Section titled “Agent Proxy native sidecar configuration”](#agent-proxy-native-sidecar-configuration)
For Kubernetes versions `1.29` and higher, Aembit supports init-container-based Client Workloads. This starts the Agent Proxy as part of the init containers.
To enable native sidecar configurations, do the following:
1. Make sure you add the [required Client Workload annotation](#step-3---annotate-client-workloads).
2. Set the Helm chart value `agentProxy.nativeSidecar=true` during chart installation by adding the following flag:
```shell
--set agentProxy.nativeSidecar=true
```
### Edge Component environment variables
[Section titled “Edge Component environment variables”](#edge-component-environment-variables)
The Edge Components you deploy as part of this process have environment variables that you can configure to customize your deployment further. See [Edge Component environment variables reference](/reference/edge-components/edge-component-env-vars), for all available configuration options.
### Aembit Edge Component configurations
[Section titled “Aembit Edge Component configurations”](#aembit-edge-component-configurations)
The Aembit Helm Chart includes configurations that control the behavior of Aembit Edge Components (both Agent Controller and Agent Proxy). See [Helm chart config options](/reference/edge-components/helm-chart-config-options), for all available configuration options.
### Resource Set deployment
[Section titled “Resource Set deployment”](#resource-set-deployment)
To deploy a Resource Set using Kubernetes, you need to add the `aembit.io/resource-set-id` annotation to your Client Workload deployment and specifying the proper Resource Set ID. For example:
```shell
aembit.io/resource-set-id: f251f0c5-5681-42f0-a374-fef98d9a5005
```
Once you add the annotation, the Aembit Edge injects this Resource Set ID into the Agent Proxy. This configuration enables the Agent Proxy to support Client Workloads in this Resource Set.
For more information, see [Resource Sets overview](/user-guide/administration/resource-sets/).
### Delaying pod startup until Agent Proxy has registered
[Section titled “Delaying pod startup until Agent Proxy has registered”](#delaying-pod-startup-until-agent-proxy-has-registered)
By default, Agent Proxy allows Client Workload pods to enter the [`Running`](https://kubernetes.io/docs/concepts/workloads/pods/pod-lifecycle/#pod-phase) state as soon as proxying ports become available, even if registration with Aembit Cloud isn’t yet complete. While in this pre-registration state, Agent Proxy operates in Passthrough mode and can’t inject credentials into Client Workloads. As a result, you may have to retry application requests.
To delay the Client Workload pod startup until registration completes, set the `AEMBIT_PASS_THROUGH_TRAFFIC_BEFORE_REGISTRATION` Agent Proxy environment variable to `false`.
This causes the `postStart` lifecycle hook to wait until Agent Proxy has registered with the Aembit Cloud service before entering the [`Running`](https://kubernetes.io/docs/concepts/workloads/pods/pod-lifecycle/#pod-phase) state.
If registration fails to complete within 120 seconds (due to misconfiguration or connectivity issues) the pod fails to start and eventually enters a `CrashBackOff` state. To override how long the Client Workload pods wait during `postStart`, set the Agent Proxy `AEMBIT_POST_START_MAX_WAIT_SEC` environment variable to specify the maximum wait time in seconds.
Important limitation
Due to a [known Kubernetes issue](https://github.com/kubernetes/kubernetes/issues/116032), pod deletion doesn’t correctly interrupt the `postStart` hook. As a result, deleting a pod that’s waiting for Agent Proxy registration takes the full `AEMBIT_POST_START_MAX_WAIT_SEC` duration, even if you’ve set the pod’s `terminationGracePeriodSeconds` to a lower value.
See [Edge Component environment variables reference](/reference/edge-components/edge-component-env-vars), for a description of the `AEMBIT_PASS_THROUGH_TRAFFIC_BEFORE_REGISTRATION` and `AEMBIT_POST_START_MAX_WAIT_SEC` configuration options.
# Aembit Edge on serverless services
> Guides and topics about deploying Aembit Edge Components on serverless services functions and CI/CD
This section covers how to deploy Aembit Edge Components on serverless environments to enable secure, identity-based access between workloads. Serverless deployments remove the need to manage underlying infrastructure, providing more scalable and flexible deployment options.
The following pages provide information about deploying Aembit Edge on various serverless platforms:
* [AWS ECS Fargate](/user-guide/deploy-install/serverless/aws-ecs-fargate) - Deploy Aembit Edge on AWS ECS Fargate
* [AWS EKS Fargate](/user-guide/deploy-install/serverless/aws-eks-fargate) - Deploy Aembit Edge on AWS EKS Fargate
* [AWS Lambda Container](/user-guide/deploy-install/serverless/aws-lambda-container) - Deploy Aembit Edge in AWS Lambda containers
* [GitHub Actions](/user-guide/deploy-install/serverless/github-actions) - Use Aembit Edge with GitHub Actions
* [GitLab Jobs](/user-guide/deploy-install/serverless/gitlab-jobs) - Use Aembit Edge with GitLab CI/CD jobs
# Deploying to AWS ECS Fargate
> How to deploy Aembit Edge Components in a ECS Fargate environment
Aembit provides different deployment options that you can use to deploy Aembit Edge Components in your environment. Each of these options provides similar features and functionality. The steps for each of these options, however, are specific to the deployment option you select.
This page describes the process to deploy Aembit Edge Components to ECS Fargate using Terraform.
To deploy Aembit Edge Components to your Kubernetes cluster, you must follow these steps:
1. [Add a Trust Provider](#step-1---add-a-trust-provider)
2. [Add an Agent Controller](#step-2---add-an-agent-controller)
3. [Modify and deploy terraform configuration](#step-3---modify-and-deploy-terraform-configuration)
To further customize your deployments, see the available [optional configurations](#configuration-variables).
## Before you begin
[Section titled “Before you begin”](#before-you-begin)
1. Ensure that Terraform has valid AWS credentials to deploy resources. Terraform doesn’t require the AWS CLI but can use its credentials if available. Terraform automatically looks for credentials in environment variables, AWS credentials files, IAM roles, and other sources.
For details on configuring authentication, refer to the [AWS Provider Authentication Guide](https://registry.terraform.io/providers/hashicorp/aws/latest/docs#authentication-and-configuration).
2. Verify that you have initialized Terraform and that you have the required permissions to execute the deployment. Go to your Terraform deployment directory for the Client Workload and run the following command:
```shell
terraform plan
```
The command should complete without errors.
## Step 1 - Add a Trust Provider
[Section titled “Step 1 - Add a Trust Provider”](#step-1---add-a-trust-provider)
You need to create a Trust Provider, or use an existing one, to enable the Agent Controller (created in the next step) to authenticate with the Aembit cloud. This Trust Provider relies on the AWS Role associated with your application for authentication.
1. Log into your Aembit Tenant and go to **Edge Components —> Trust Providers**.
2. Click **+ New**, revealing the **Trust Provider** pop out.
3. Enter a **Name** and optional **Description**.
4. Select **AWS Role** as the **Trust Provider**.
5. Under **Match Rules**, click **+ New Rule** and set the following:
1. **Attribute** - Select **accountId**
2. **Value** - Enter the AWS account ID (without dashes) where your Client Workload is running
6. Click **Save**.
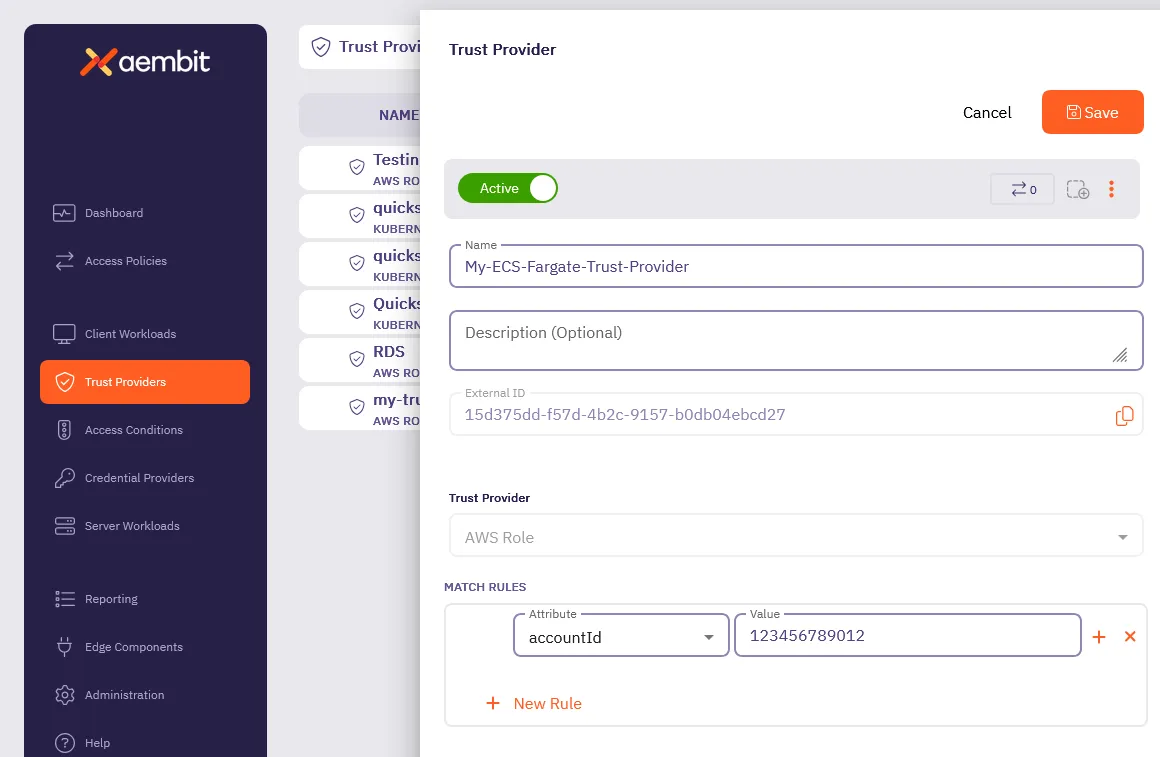
## Step 2 - Add an Agent Controller
[Section titled “Step 2 - Add an Agent Controller”](#step-2---add-an-agent-controller)
1. Log into your Aembit Tenant and go to **Edge Components —> Agent Controllers**.
2. Click **+ New**, revealing the **Agent Controller** pop out.
3. Enter a **Name** and optional **Description**.
4. Select the **Trust Provider** you created in [Step 1](#step-1---add-a-trust-provider).
5. Click **Save**.
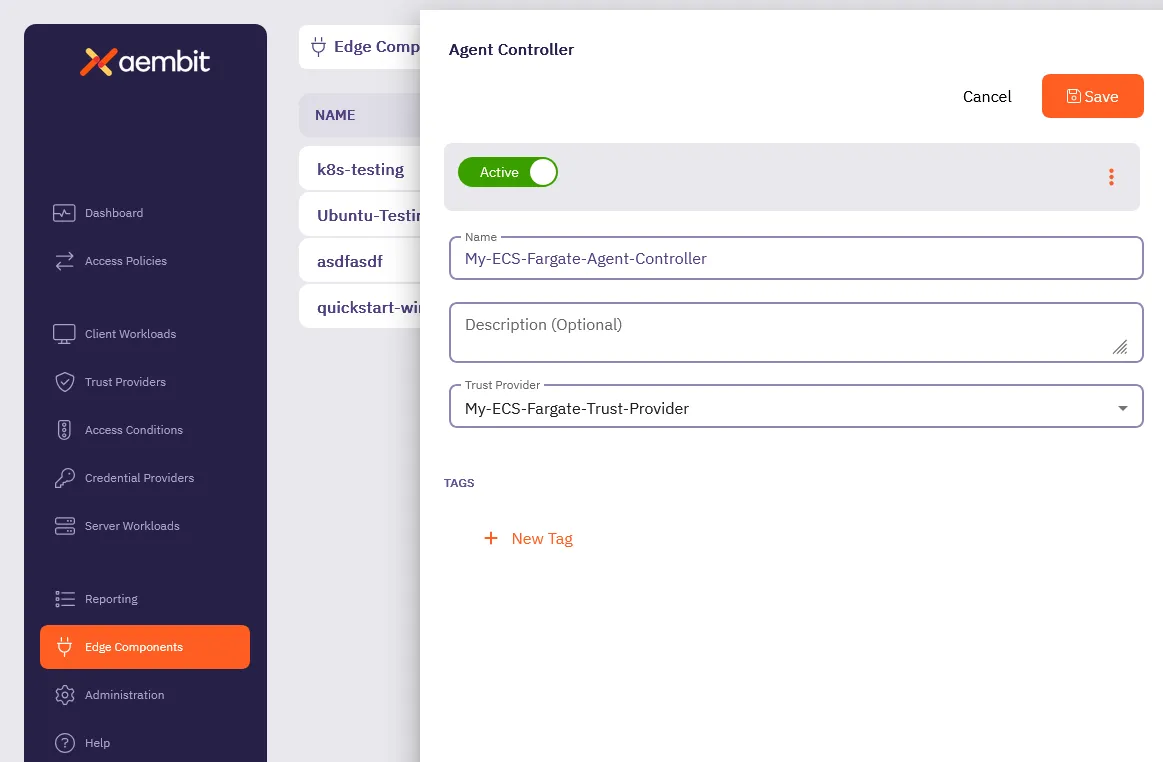
## Step 3 - Modify and deploy Terraform configuration
[Section titled “Step 3 - Modify and deploy Terraform configuration”](#step-3---modify-and-deploy-terraform-configuration)
1. Add the Aembit Edge ECS Module to your Terraform code, using configuration:
```hcl
module "aembit-ecs" {
source = "Aembit/ecs/aembit"
version = "1.x.y" # Find the latest version at https://registry.terraform.io/modules/Aembit/ecs/aembit/latest
aembit_tenantid = ""
aembit_agent_controller_id = ""
ecs_cluster = ""
ecs_vpc_id = ""
ecs_subnets = ["","",""]
ecs_security_groups = [""]
}
```
Note
To see additional configuration options, see [Optional configurations](#configuration-variables)
2. Add the Aembit Agent Proxy container definition to your Client Workload Task Definitions.
The following code sample shows an example of this by injecting `jsondecode(module.aembit-ecs.agent_proxy_container)` as the first container of the Task definition for your Client Workload.
```hcl
resource "aws_ecs_task_definition" "workload_task" {
family = "workload_task"
container_definitions = jsonencode([
jsondecode(module.aembit-ecs.agent_proxy_container),
{
name = "workload"
...
}])
```
3. Add the required for explicit steering environment variables to your Client Workload Task Definitions. For example:
```hcl
environment = [
{"name": "http_proxy", "value": module.aembit-ecs.aembit_http_proxy},
{"name": "https_proxy", "value": module.aembit-ecs.aembit_https_proxy}
]
```
4. Execute `terraform init` to download Aembit ECS Fargate module.
5. With your Terraform code updated as described, run `terraform apply` or your typical Terraform configuration scripts to deploy Aembit Edge into your AWS ECS Client Workloads.
## Configuration variables
[Section titled “Configuration variables”](#configuration-variables)
The following table lists the configurable variables of the module and their default values.
*All variables are required unless marked* Optional.
### `aembit_tenantid`
[Section titled “aembit\_tenantid”](#aembit_tenantid)
Default - not set
The Aembit TenantID with which to associate this installation and Client Workloads.
***
### `aembit_agent_controller_id`
[Section titled “aembit\_agent\_controller\_id”](#aembit_agent_controller_id)
Default - not set
The Aembit Agent Controller ID with which to associate this installation.
***
### `aembit_trusted_ca_certs`
[Section titled “aembit\_trusted\_ca\_certs”](#aembit_trusted_ca_certs)
Optional Default - not set
Additional CA Certificates that the Aembit AgentProxy should trust for Server Workload connectivity.
***
### `ecs_cluster`
[Section titled “ecs\_cluster”](#ecs_cluster)
Default - not set
The AWS ECS Cluster into which the Aembit Agent Controller should be deployed.
***
### `ecs_vpc_id`
[Section titled “ecs\_vpc\_id”](#ecs_vpc_id)
Default - not set
The AWS VPC which the Aembit Agent Controller will be configured for network connectivity. This must be the same VPC as your Client Workload ECS Tasks.
***
### `ecs_subnets`
[Section titled “ecs\_subnets”](#ecs_subnets)
Default - not set
The subnets which the Aembit Agent Controller and Agent Proxy containers can utilize for connectivity between Proxy and Controller and Aembit Cloud.
***
### `ecs_security_groups`
[Section titled “ecs\_security\_groups”](#ecs_security_groups)
Default - not set
The security group which will be assigned to the AgentController service. This security group must allow inbound HTTP access from the AgentProxy containers running in your Client Workload ECS Tasks.
***
### `agent_controller_task_role_arn`
[Section titled “agent\_controller\_task\_role\_arn”](#agent_controller_task_role_arn)
Default - `arn:aws:iam::${data.aws_caller_identity.current.account_id}:role/ecsTaskExecutionRole`
The AWS IAM Task Role to use for the Aembit AgentController Service container. This role is used for AgentController registration with the Aembit Cloud Service.
***
### `agent_controller_execution_role_arn`
[Section titled “agent\_controller\_execution\_role\_arn”](#agent_controller_execution_role_arn)
Default - `arn:aws:iam::${data.aws_caller_identity.current.account_id}:role/ecsTaskExecutionRole`
The AWS IAM Task Execution Role used by Amazon ECS and Fargate agents for the Aembit AgentController Service.
***
### `log_group_name`
[Section titled “log\_group\_name”](#log_group_name)
Optional Default - `/aembit/edge`
Specifies the name of an optional log group to create and send logs to for components created by this module. You can set this value to `null`.
***
### `agent_controller_image`
[Section titled “agent\_controller\_image”](#agent_controller_image)
Default - not set
The container image to use for the AgentController installation.
***
### `agent_proxy_image`
[Section titled “agent\_proxy\_image”](#agent_proxy_image)
Default - not set
The container image to use for the AgentProxy installation.
***
### `aembit_stack`
[Section titled “aembit\_stack”](#aembit_stack)
Default - `useast2.aembit.io`
The Aembit Stack which hosts the specified Tenant.
***
### `ecs_task_prefix`
[Section titled “ecs\_task\_prefix”](#ecs_task_prefix)
Default - `aembit_`
Prefix to include in front of the Agent Controller ECS Task Definitions to ensure uniqueness.
***
### `ecs_service_prefix`
[Section titled “ecs\_service\_prefix”](#ecs_service_prefix)
Default - `aembit_`
Prefix to include in front of the Agent Controller Service Name to ensure uniqueness.
***
### `ecs_private_dns_domain`
[Section titled “ecs\_private\_dns\_domain”](#ecs_private_dns_domain)
Default - `aembit.local`
The Private DNS TLD that will be configured and used in the specified AWS VPC for AgentProxy to AgentController connectivity.
***
### `agent_proxy_resource_set_id`
[Section titled “agent\_proxy\_resource\_set\_id”](#agent_proxy_resource_set_id)
Default - not set
Associates Agent Proxy with a specific [Resource Set](/user-guide/administration/resource-sets/)
***
### `agent_controller_environment_variables`
[Section titled “agent\_controller\_environment\_variables”](#agent_controller_environment_variables)
Default - not set
Set [Agent Controller Environment Variables](/reference/edge-components/edge-component-env-vars#agent-controller-environment-variables) directly.
***
### `agent_proxy_environment_variables`
[Section titled “agent\_proxy\_environment\_variables”](#agent_proxy_environment_variables)
Default - not set
Set [Agent Proxy Environment Variables](/reference/edge-components/edge-component-env-vars#agent-proxy-environment-variables) directly.
## Overriding Agent Controller and Agent Proxy environment variables
[Section titled “Overriding Agent Controller and Agent Proxy environment variables”](#overriding-agent-controller-and-agent-proxy-environment-variables)
Use the `agent_controller_environment_variables` and `agent_proxy_environment_variables` Terraform module variables to set the respective Edge Component [environment variables](/reference/edge-components/edge-component-env-vars/).
```hcl
agent_controller_environment_variables = {
"AEMBIT_LOG_LEVEL": "debug"
}
agent_proxy_environment_variables = {
"AEMBIT_LOG_LEVEL": "debug"
}
```
# AWS EKS Fargate
> Aembit Edge Component deployment considerations in an EKS Fargate environment
Aembit provides different deployment options that you can use to deploy Aembit Edge Components in your environment. Each of these options provides similar features and functionality. The steps for each of these options, however, are specific to the deployment option you select.
This page describes the extra considerations that apply to AWS EKS Fargate that differ from the standard Kubernetes deployment.
AWS Elastic Kubernetes Service (EKS) Fargate is a serverless Kubernetes solution, where EKS automatically provisions and scales the compute capacity for pods. To schedule pods on Fargate in your EKS cluster, instead of on EC2 instances that you manage, you must define a [Fargate profile](https://docs.aws.amazon.com/eks/latest/userguide/fargate-profile.html). Fargate profiles provide a selector based on `namespace` and (optionally) `labels`, pods that match the selector will be scheduled on Fargate.
## Deployment considerations
[Section titled “Deployment considerations”](#deployment-considerations)
In general, the same deployment steps should be undertaken as described in the [Kubernetes](/user-guide/deploy-install/kubernetes/kubernetes) page. However, you must use a namespace that matches the Fargate profile selector so that Aembit schedules Edge Components on Fargate with the Client Workload. You must provide this namespace when deploying the Aembit Edge Helm Chart.
For example:
```shell
helm install aembit aembit/aembit \
-n \
--create-namespace \
--set ...
```
## Limitations
[Section titled “Limitations”](#limitations)
You must use the [Explicit Steering](/user-guide/deploy-install/advanced-options/agent-proxy/explicit-steering#configure-explicit-steering) feature when deploying in AWS EKS Fargate. This is a limitation of the AWS Fargate serverless environment, which intentionally restricts network configuration, preventing advanced networking features like transparent steering.
# Deploy Aembit Edge to AWS Lambda Container
> How to deploy Aembit Edge Components in an AWS Lambda container environment
Aembit provides many different deployment options which you can use to deploy Aembit Edge Components in your environment. Each of these options provides similar features and functionality; however, the steps for each of these options are specific to the deployment option you select.
This page describes the process to deploy Aembit Edge Components to an [AWS Lambda container](https://docs.aws.amazon.com/prescriptive-guidance/latest/patterns/deploy-lambda-functions-with-container-images.html) environment.
Note
For information on deploying Aembit Edge Components for zip-based AWS Lambda functions, see [AWS Lambda Functions](/user-guide/deploy-install/serverless/aws-lambda-function).
## Deploy Aembit Edge Components
[Section titled “Deploy Aembit Edge Components”](#deploy-aembit-edge-components)
### Topology
[Section titled “Topology”](#topology)
Aembit Agent Proxies for AWS Lambda containers are deployed within Lambda Containers. They are packaged as [AWS Lambda Extensions](https://docs.aws.amazon.com/lambda/latest/dg/lambda-extensions.html) and are automatically launched by the AWS Lambda Runtime.
The deployed Lambda function must connect to an Amazon Virtual Private Cloud (VPC) with access to both the Agent Controller and the Internet.
### VPC
[Section titled “VPC”](#vpc)
For each AWS region hosting your Lambda containers, you must create a VPC (or use an existing one). All Lambda containers in each AWS account/region that include Aembit components must connect to a corresponding VPC in the same region.
This VPC must provide:
* Access to the Agent Controller.
* Access to the Internet.
Agent Controllers can either operate directly within this VPC or be located elsewhere, but accessible from this VPC.
AWS Lambda containers are automatically placed within a VPC’s private network. To enable Internet access, traffic from the VPC must pass through a NAT located in the public network. For more information, consult the [Connecting outbound networking to resources in a VPC](https://docs.aws.amazon.com/lambda/latest/dg/configuration-vpc.html#vpc-internet) documentation.
### Agent Controller
[Section titled “Agent Controller”](#agent-controller)
Deploy the Agent Controller either on a [Virtual Machine](/user-guide/deploy-install/virtual-machine/) or within your [Kubernetes Cluster](/user-guide/deploy-install/kubernetes/kubernetes).
### Lambda Container Packaging
[Section titled “Lambda Container Packaging”](#lambda-container-packaging)
The Aembit Edge Components are distributed as part of the Aembit AWS Lambda Extension. All Lambda extensions are incorporated into Lambda containers at build time.
Include the following commands in your Dockerfile to add the extension to your AWS Lambda container image, replacing `` with the current `aembit_aws_lambda_extension` version available on [DockerHub](https://hub.docker.com/r/aembit/aembit_aws_lambda_extension/tags).
```dockerfile
COPY --from=aembit/aembit_aws_lambda_extension: /extension/ /opt/extensions
```
### Lambda container deployment
[Section titled “Lambda container deployment”](#lambda-container-deployment)
Deploy or update your Lambda container:
* Specify additional environment variables for your Lambda function.
For Agent Controllers with TLS configured:
```shell
AEMBIT_AGENT_CONTROLLER=https://:5443
```
For Agent Controllers without TLS:
```shell
AEMBIT_AGENT_CONTROLLER=http://:5000
```
* Specify `http_proxy` and/or `https_proxy` environment variables to direct HTTP and/or HTTPS traffic through Aembit:
```shell
http_proxy=http://localhost:8000
https_proxy=http://localhost:8000
```
Additional environment variables can be configured to set the Agent Proxy log level, among other settings. Please refer to the list of [available Agent Proxy environment variables](/user-guide/deploy-install/virtual-machine/).
## Client Workload identification
[Section titled “Client Workload identification”](#client-workload-identification)
The most convenient way to identify Lambda container Client Workloads is using [AWS Lambda ARN Client Workload Identification](/user-guide/access-policies/client-workloads/identification/aws-lambda-arn).
:::note Please note that if you plan to work with a specific version of a Lambda function or aliases (as opposed to the latest version), you will need to use Qualified ARNs. For more details, refer to the Client Workload Identification article linked above. :::
Alternatively, you can use [Aembit Client ID](/user-guide/access-policies/client-workloads/identification/aembit-client-id) by setting the `CLIENT_WORKLOAD_ID` environment variable.
## Trust Providers
[Section titled “Trust Providers”](#trust-providers)
The only Trust Provider available for Lambda containers Client Workloads is [AWS Role Trust Provider](/user-guide/access-policies/trust-providers/aws-role-trust-provider).
See [Lambda Support](/user-guide/access-policies/trust-providers/aws-role-trust-provider#lambda-support) for more details about the configuration.
## Resource Set deployment
[Section titled “Resource Set deployment”](#resource-set-deployment)
To deploy a Resource Set using an AWS Lambda Container, you need to specify the `AEMBIT_RESOURCE_SET_ID` environment variable in your Client Workload. This configuration enables the Agent Proxy to support Client Workloads in this Resource Set.
## Lambda Container lifecycle and workload events
[Section titled “Lambda Container lifecycle and workload events”](#lambda-container-lifecycle-and-workload-events)
Lambda Containers are paused immediately after the completion of the Lambda function. As a result, workload events may not have enough time to be sent by the Aembit Agent Proxy to Aembit Cloud.
These events will be retained by the Aembit Agent Proxy and sent either at the next Lambda function invocation or during the container shutdown process.
As a result, it may take longer than in other environments for these workload events to become available in your tenant.
## Configuring TLS Decrypt
[Section titled “Configuring TLS Decrypt”](#configuring-tls-decrypt)
To use TLS Decrypt in your AWS Lambda container, download and trust the tenant certificate within your AWS Lambda container. Considering that the Lambda container’s filesystem is configured to be read-only, Aembit recommends including this step in your build pipeline.
Refer to the [Configure TLS Decrypt](/user-guide/deploy-install/advanced-options/tls-decrypt/configure-tls-decrypt) page for comprehensive instructions on configuring TLS Decrypt.
## Performance
[Section titled “Performance”](#performance)
The startup and shutdown times for the Aembit Agent Proxy normally take several seconds, which results in an increase in the execution time of your Lambda function by several seconds.
## Limitations
[Section titled “Limitations”](#limitations)
Aembit currently supports only the following protocols in AWS Lambda container environments:
* HTTP
* HTTPS
* Snowflake
## Supported phases
[Section titled “Supported phases”](#supported-phases)
The Aembit AWS Lambda Extension supports Client Workload identification and credential injection during the following Lambda container lifecycle phases:
* [INIT phase](https://docs.aws.amazon.com/lambda/latest/dg/lambda-runtime-environment.html#runtimes-lifecycle-invoke) Supported for internal extensions, function inits, and external extensions executed after the Aembit extension.
* [INVOKE phase](https://docs.aws.amazon.com/lambda/latest/dg/lambda-runtime-environment.html#runtimes-lifecycle-ib) Fully supported.
# Deploy Aembit Edge to AWS Lambda function
> How to deploy Aembit Edge Components in an AWS Lambda function environment
Aembit provides many different deployment options which you can use to deploy Aembit Edge Components in your environment. Each of these options provides similar features and functionality; however, the steps for each of these options are specific to the deployment option you select.
This page describes the process to deploy Aembit Edge Components in zip-based (vs container-based) AWS Lambda functions using an [AWS Lambda layer](https://docs.aws.amazon.com/lambda/latest/dg/chapter-layers.html).
Note
For information on deploying Aembit Edge Components in AWS Lambda container environment, see [AWS Lambda Containers](/user-guide/deploy-install/serverless/aws-lambda-container).
## Deploy Aembit Edge Components
[Section titled “Deploy Aembit Edge Components”](#deploy-aembit-edge-components)
### Topology
[Section titled “Topology”](#topology)
Aembit deploys Agent Proxies for AWS Lambda functions as [AWS Lambda Layers](https://docs.aws.amazon.com/lambda/latest/dg/chapter-layers.html) which are automatically launched by the AWS Lambda Runtime.
### VPC
[Section titled “VPC”](#vpc)
For each AWS region hosting your Lambda functions, you must create a Virtual Private Cloud (VPC) (or use an existing one). All Lambda functions in each AWS account or region that include Aembit components must connect to a corresponding VPC in the same region.
This VPC must provide:
* Access to Agent Controller.
* Access to the Internet.
Agent Controllers can either operate directly within this VPC or another location, but must be accessible from this VPC.
AWS Lambda functions using zip-based packaging must explicitly connect to a VPC subnet to enable Agent Proxy communication.
To enable Internet access, traffic from the VPC must pass through a NAT located in the public network. For more information, see [Connecting outbound networking to resources in a VPC](https://docs.aws.amazon.com/lambda/latest/dg/configuration-vpc.html#vpc-internet).
### Agent Controller
[Section titled “Agent Controller”](#agent-controller)
Deploy Agent Controller either on a [virtual machine](/user-guide/deploy-install/virtual-machine/) or within your [Kubernetes cluster](/user-guide/deploy-install/kubernetes/kubernetes).
### Lambda layer packaging
[Section titled “Lambda layer packaging”](#lambda-layer-packaging)
Aembit publishes the Aembit AWS Lambda Layer to the [AWS Serverless Application Repository (SAR)](https://serverlessrepo.aws.amazon.com/applications) which you can deploy into your AWS account.
To deploy the Aembit Lambda layer:
1. Navigate to **SAR** and search the public applications list for “Aembit Lambda layer”.
Public **SAR** entry for [Aembit AWS Lambda Layer](https://serverlessrepo.aws.amazon.com/applications/us-east-1/833062290399/aembit-agent-proxy-lambda-layer).
2. Deploy via the **AWS Console** or **AWS CLI**.
3. Once deployed find the **Lambda Layer Version ARN** .
4. Attach the Aembit Layer to your function by doing the following:
1. In the AWS Console, open your **Lambda function**.
2. Under **Layers** section, click **Add a Layer**.
3. Select **Provide a layer version ARN** and paste the ARN you retrieved.
### Lambda function configuration
[Section titled “Lambda function configuration”](#lambda-function-configuration)
To use the Aembit Lambda Layer in your Lambda functions:
* Specify additional environment variables for your Lambda function.
For Agent Controllers with TLS configured:
```shell
AEMBIT_AGENT_CONTROLLER=https://:5443
```
Caution
To configure TLS Decrypt on your Agent Controller, see [Configuring TLS Decrypt](#configuring-tls-decrypt).
For Agent Controllers without TLS:
```shell
AEMBIT_AGENT_CONTROLLER=http://:5000
```
* Specify `http_proxy` and/or `https_proxy` environment variables to direct HTTP and/or HTTPS traffic through Aembit:
```shell
http_proxy=http://localhost:8000
https_proxy=http://localhost:8000
```
You can configure additional environment variables to set the Agent Proxy log level, among other settings. For details, see the [list of available Agent Proxy environment variables](/user-guide/deploy-install/virtual-machine/).
## Client Workload identification
[Section titled “Client Workload identification”](#client-workload-identification)
The most convenient way to identify Lambda function Client Workloads is to use the [AWS Lambda ARN Client Workload identification method](/user-guide/access-policies/client-workloads/identification/aws-lambda-arn).
Note
If you plan to work with a specific version of Lambda functions or aliases (as opposed to the latest version), you must use Qualified ARNs. For more details, see the Client Workload Identification article linked above.
Alternatively, you can use [Aembit Client ID](/user-guide/access-policies/client-workloads/identification/aembit-client-id) by setting the `CLIENT_WORKLOAD_ID` environment variable.
## Trust Providers
[Section titled “Trust Providers”](#trust-providers)
The only Trust Provider available for Lambda function Client Workloads is [AWS Role Trust Provider](/user-guide/access-policies/trust-providers/aws-role-trust-provider).
See [Lambda Support](/user-guide/access-policies/trust-providers/aws-role-trust-provider#lambda-support) for more details about the configuration.
## Resource Set Deployment
[Section titled “Resource Set Deployment”](#resource-set-deployment)
To deploy a Resource Set using an AWS Lambda function, you must specify the `AEMBIT_RESOURCE_SET_ID` environment variable in your Client Workload. Configuring this environment variable enables Agent Proxy to support Client Workloads in the Resource Set you specify.
## Lambda lifecycle and Workload Events
[Section titled “Lambda lifecycle and Workload Events”](#lambda-lifecycle-and-workload-events)
Lambda functions that use zip-based packaging don’t support long-lived container instances in the same way as Lambda containers. As a result, workload events that Agent Proxy generates may not transmit immediately.
Agent Proxy buffers these events in memory and attempts to transmit them either:
* At the end of the function invocation.
* On subsequent invocations (if the Lambda instance is reused).
If the Lambda is frequently cold-started, it’s possible that it may delay or drop some events. In practice, AWS reuses Lambda instances under normal load conditions, so buffering is often sufficient.
## Configuring TLS Decrypt
[Section titled “Configuring TLS Decrypt”](#configuring-tls-decrypt)
To enable TLS decryption, download the Aembit Tenant certificate via the Aembit UI and include it in your Lambda function package or inject it into the execution environment.
Due to the read-only filesystem in Lambda functions, Aembit recommends the following these steps:
1. Create a `rootCA.pem` bundle that includes:
* Commonly trusted certificate authorities appropriate for your environment
* Your Aembit Tenant root CA, available at `https://$.aembit.io/api/v1/root-ca`
2. Add the following environment variable:
```shell
SSL_CERT_FILE=/var/task/rootCA.pem
```
To configure TLS Decrypt, see [Configure TLS Decrypt](/user-guide/deploy-install/advanced-options/tls-decrypt/configure-tls-decrypt).
## Performance
[Section titled “Performance”](#performance)
The startup and shutdown times for Agent Proxy normally take several seconds, which results in an increase in the execution time of your Lambda function by several seconds.
## Limitations
[Section titled “Limitations”](#limitations)
Aembit supports only the following protocols in AWS Lambda function environments:
* HTTP
* HTTPS
* Snowflake
## Supported phases
[Section titled “Supported phases”](#supported-phases)
The Aembit AWS Lambda layer supports credential injection during the following Lambda lifecycle phase:
[INIT phase](https://docs.aws.amazon.com/lambda/latest/dg/lambda-runtime-environment.html#runtimes-lifecycle-invoke): Fully supported.
Note
Unlike Lambda Containers, zip-based Lambda functions don’t have an INIT phase that the Lambda function exposes separately for external extensions. The Aembit Layer relies on the Lambda function’s runtime execution to launch Agent Proxy during the invocation phase.
# GitHub Actions
> This page describes the steps required to deploy Aembit Edge Components in a GitHub environment.
#
Aembit provides several different deployment options you can use to deploy Aembit edge components in your environment. Each of these options provides similar features and functionality; however, the steps for each of these options are specific to the deployment option you select.
This page describes the process to utilize the Aembit Edge Agent in [GitHub Actions](https://docs.github.com/en/actions/learn-github-actions/understanding-github-actions).
## Configure a Serverless Access Policy
[Section titled “Configure a Serverless Access Policy”](#configure-a-serverless-access-policy)
To configure your Aembit Tenant to support GitHub Actions as a Client Workload:
1. Configure your **Client Workload** to identify the Aembit Agent runtime environment with one or more of the following Client Identification options.
* [GitHub ID Token Repository](/user-guide/access-policies/client-workloads/identification/github-id-token-repository)
* [GitHub ID Token Subject](/user-guide/access-policies/client-workloads/identification/github-id-token-subject)
Note
Please keep the following in mind as you go through the steps:
* For **Step 2** - Make sure to copy the provided Client ID and (where appropriate) Audience values for configuration of the Agent command line parameters.
* For **Step 3** - Any Credential Provider type can be used; however, some Credential Provider types may require specifying the `--credential_names` parameter when running the Aembit Agent.
* For **Step 4** - Any Server Workload type can be used. The `--server_workload_host` and `--server_workload_port` parameters will need to match the values specified.
2. Configure your **Trust Provider** type to [**GitHub Action ID Token**](/user-guide/access-policies/trust-providers/github-trust-provider) to identify and attest the Aembit Agent runtime environment.
3. Configure your **Credential Provider** to specify the credential values which you want to be available in the Serverless runtime environment.
4. Configure your **Server Workload** to specify the service endpoint host and port which you want to utilize in the Serverless runtime environment.
5. Configure your **Access Policy** referencing the Aembit entities from steps 3 - 6, and then click **Save & Activate**.
## Configure for use with a Custom Resource Set
[Section titled “Configure for use with a Custom Resource Set”](#configure-for-use-with-a-custom-resource-set)
To configure GitHub Actions to work with a Custom Resource Set:
1. Open your existing GitHub Actions configuration file.
2. Go to your Aembit Tenant, click on the **Trust Providers** link in the left sidebar and locate your GitLab Trust Provider in the Custom Resource Set you are working with.
3. In your GitHub Actions configuration file, go to the `env` section for the action step and add both the `AEMBIT_CLIENT_ID` and `AEMBIT_RESOURCE_SET_ID` values. In the example below, notice that the `AEMBIT_CLIENT_ID` and `AEMBIT_RESOURCE_SET_ID` values have been added in the `steps` section.
```yaml
jobs:
sample:
steps:
- name: Sample
env:
AEMBIT_CLIENT_ID: aembit:stack:tenant:identity:github_idtoken:uuid
AEMBIT_RESOURCE_SET_ID: 585677c8-9g2a-7zx8-604b-e02e64af11e4
```
4. Verify both the `AEMBIT_CLIENT_ID` and `AEMBIT_RESOURCE_SET_ID` environment variables match the values in your Resource Set and Trust Provider in your Aembit Tenant.
5. Commit your changes to your GitHub Actions configuration file.
# Deploy the Serverless Script
[Section titled “Deploy the Serverless Script”](#deploy-the-serverless-script)
1. Retrieve the latest available Aembit Agent release. The latest release can be found on the [Agent Releases](https://releases.aembit.io/agent/index.html) page.
2. Include the Aembit Agent within your Serverless environment. This can be accomplished by bundling it within an image, or retrieving it dynamically as appropriate for your workload.
3. Configure your Serverless script to call the Aembit Agent with the proper parameters. The example below shows configurations for **GitHub Actions**.
```yaml
# The id-token permissions value must be set to write for retrieval of the GitHub OIDC Identity Token
permissions:
id-token: write
...
jobs:
sample:
steps:
- name: Sample
env:
# Copy the Client ID value from your Trust Provider to this value
AEMBIT_CLIENT_ID: aembit:stack:tenant:identity:github_idtoken:uuid
run: |
$(./aembit credentials get --client_id $AEMBIT_CLIENT_ID --server_workload_host oauth.sample.com --server_workload_port 443)
echo OAuth Token $TOKEN
```
:warning: In the configuration file, replace the value for AEMBIT CLIENT ID with the Client ID value generated on your Trust Provider, and set the Server Workload Host and Server Workload Port values to your desired values.
## Verify Aembit Agent
[Section titled “Verify Aembit Agent”](#verify-aembit-agent)
To verify the Aembit Agent:
1. When downloading the Aembit Agent from the [Agent Releases](https://releases.aembit.io/agent/index.html) page, also download the matching `SHA256SUMS` and `SHA256SUMS.sig` file.
2. Use the `gpg` and `shasum` commands (or similar) to perform a signature/hash verification against the [Aembit Keybase Key](https://keybase.io/aembit). For example:
```shell
curl https://keybase.io/aembit/pgp_keys.asc | gpg --import
gpg --verify aembit_1.13.0_SHA256SUMS.sig aembit_1.13.0_SHA256SUMS
grep $(shasum -a 256 aembit_1.13.0_linux_amd64.zip) aembit_1.13.0_SHA256SUMS
```
# GitLab Jobs
> This page describes the steps required to deploy Aembit Edge Components in a GitLab environment.
#
Aembit provides several different deployment options you can use to deploy Aembit Edge Components in your environment. Each of these options provides similar features and functionality; however, the steps for each of these options are specific to the deployment option you select.
This page describes the process to utilize the Aembit Edge Agent in [GitLab Jobs](https://docs.gitlab.com/ee/ci/jobs/).
## Configure a Serverless Access Policy
[Section titled “Configure a Serverless Access Policy”](#configure-a-serverless-access-policy)
To configure your Aembit Tenant to support GitLab Jobs as a Client Workload:
1. Configure your **Client Workload** to identify the Aembit Agent runtime environment with one or more of the following Client Identification options.
* [GitLab ID Token Namespace Path](/user-guide/access-policies/client-workloads/identification/gitlab-id-token-namespace-path)
* [GitLab ID Token Project Path](/user-guide/access-policies/client-workloads/identification/gitlab-id-token-project-path)
* [GitLab ID Token Ref Path](/user-guide/access-policies/client-workloads/identification/gitlab-id-token-ref-path)
* [GitLab ID Token Subject](/user-guide/access-policies/client-workloads/identification/gitlab-id-token-subject)
Note
Please keep the following in mind as you go through the steps:
* For **Step 2** - Make sure to copy the provided Client ID and (where appropriate) Audience values for configuration of the Agent command line parameters.
* For **Step 3** - Any Credential Provider type can be used. Some may require specifying the `--credential_names` parameter when running the Aembit Agent.
* For **Step 4** - Any Server Workload type can be used. The `--server_workload_host` and `--server_workload_port` parameters will need to match the values specified.
2. Configure your **Trust Provider** type to [**Gitlab Job ID Token**](/user-guide/access-policies/trust-providers/gitlab-trust-provider) to identify and attest the Aembit Agent runtime environment.
3. Configure your **Credential Provider** to specify the credential values which you want to be available in the Serverless runtime environment.
4. Configure your **Server Workload** to specify the service endpoint host and port which you want to utilize in the Serverless runtime environment.
5. Configure your **Access Policy** and then click **Save & Activate**.
## Configure for use with a Custom Resource Set
[Section titled “Configure for use with a Custom Resource Set”](#configure-for-use-with-a-custom-resource-set)
To configure a GitLab Job to work with a Custom Resource Set:
1. Open your existing GitLab CI configuration file.
2. Go to your Aembit Tenant, click on the **Trust Providers** link in the left sidebar and locate your GitLab Trust Provider in the Custom Resource Set you are working with.
3. In your `gitlab-ci.yml` file, either:
* update the `AEMBIT_CLIENT_ID` and add the `AEMBIT_RESOURCE_SET_ID` environment variables if you moving to a custom Resource Set; or
* add both `AEMBIT_CLIENT_ID` and `AEMBIT_RESOURCE_SET_ID` environment variables if you are just getting started with enabling your workload to use Aembit.
In the example below, you see the `AEMBIT_CLIENT_ID` and `AEMBIT_RESOURCE_SET_ID` environment variables have been added to the `variables` section.
```yaml
variables:
AEMBIT_CLIENT_ID: aembit:stack:tenant:identity:gitlab_idtoken:uuid
AEMBIT_RESOURCE_SET_ID: bd886157-ba1d-54x86-9f26-3095b0515278
```
4. Verify these environment variables match the values in your Resource Set and Trust Provider in your Aembit Tenant.
5. Commit your changes to the GitLab CI configuration file, `.gitlab-ci.yml`.
# Deploy the Serverless Script
[Section titled “Deploy the Serverless Script”](#deploy-the-serverless-script)
1. Retrieve the latest available Aembit Agent release. The latest release can be found on the [Agent Releases](https://releases.aembit.io/agent/index.html) page.
2. Include the Aembit Agent within your Serverless environment. This can be accomplished by bundling it within an image or retrieving it dynamically as appropriate for your workload.
3. Configure your Serverless script to call the Aembit Agent with the proper parameters. The example below show configuration for GitLab Jobs.
```yaml
sample:
variables:
# Copy the Client ID value from your Trust Provider to this value
AEMBIT_CLIENT_ID: aembit:stack:tenant:identity:gitlab_idtoken:uuid
id_tokens:
GITLAB_OIDC_TOKEN:
# Copy the Audience value from your Trust Provider to this value
aud: https://tenant.id.stack.aembit.io
script:
# Following are samples for OAuth Client Credentials flow, API Key, and Username/Password Credential Provider Types
# Please update the --server_workload_host and --server_workload_port values to match your target workloads
- $(./aembit credentials get --client_id $AEMBIT_CLIENT_ID --id_token $GITLAB_OIDC_TOKEN --server_workload_host oauth.sample.com --server_workload_port 443)
- echo OAuth Token $TOKEN
- $(./aembit credentials get --client_id $AEMBIT_CLIENT_ID --id_token $GITLAB_OIDC_TOKEN --server_workload_host apikey.sample.com --server_workload_port 443 --credential_names APIKEY)
- echo API Key Example $APIKEY
- $(./aembit credentials get --client_id $AEMBIT_CLIENT_ID --id_token $GITLAB_OIDC_TOKEN --server_workload_host password.sample.com --server_workload_port 443 --credential_names USERNAME,PASSWORD)
- echo Username Password Example $USERNAME -- $PASSWORD
```
:warning: Update the configuration file as follows:
* Replace the AEMBIT CLIENT ID and `aud` placeholders with the values of Client ID and Audience generated on your Trust Provider.
* Set the Server Workload Host and Server Workload Port values to your desired values.
## Verify Aembit Agent
[Section titled “Verify Aembit Agent”](#verify-aembit-agent)
To verify the Aembit Agent:
1. When downloading the Aembit Agent from the [Agent Releases](https://releases.aembit.io/agent/index.html) page, also download the matching `SHA256SUMS` and `SHA256SUMS.sig` file.
2. Use the `gpg` and `shasum` commands (or similar) to perform a signature/hash verification against the [Aembit Keybase Key](https://keybase.io/aembit). For example:
```shell
curl https://keybase.io/aembit/pgp_keys.asc | gpg --import
gpg --verify aembit_1.13.0_SHA256SUMS.sig aembit_1.13.0_SHA256SUMS
grep $(shasum -a 256 aembit_1.13.0_linux_amd64.zip) aembit_1.13.0_SHA256SUMS
```
# Aembit Edge on virtual appliances
> Guides and topics about deploying Aembit Edge Components on virtual appliances
This section covers how to deploy Aembit Edge Components on virtual appliances. Virtual appliances provide a pre-configured environment for running Aembit Edge, simplifying the deployment process.
The following pages provide information about deploying Aembit Edge on virtual appliances:
* [Virtual Appliance](/user-guide/deploy-install/virtual-appliances/virtual-appliance) - Guide for deploying Aembit Edge using virtual appliances
# Virtual Appliance
> This page describes the steps required to deploy the Aembit Edge Components as a virtual appliance.
Note
This feature is available as a limited beta only. Please contact your Aembit representative for more information.
#
The Aembit Edge Components can be deployed as a virtual appliance. This allows more than one Client Workload to use the same set of Edge Components. Aembit provides an OVA file suitable for deployment on a [VMWare ESXi](https://www.vmware.com/products/cloud-infrastructure/esxi-and-esx) server.
## Limitations
[Section titled “Limitations”](#limitations)
The virtual appliance deployment model is limited in the following ways:
1. Only explicit steering is supported.
2. Only HTTP(S) and Snowflake traffic is supported.
3. Client Workloads may only be identified by the source IP.
4. There are no Trust Providers currently compatible.
5. Of the current Access Conditions, only the **Aembit Time Condition** is compatible.
## Deployment Instructions
[Section titled “Deployment Instructions”](#deployment-instructions)
For VM-creation details for your specific ESXi version, consult the [vSphere Documentation](https://docs.vmware.com/en/VMware-vSphere/index.html).
1. Download the virtual appliance OVA from the [Virtual Appliance Releases](https://releases.aembit.io/edge_virtual_appliance/index.html).
2. Upload the OVA to your ESXi server.
3. Create a new virtual machine, entering the appropriate configuration values. See the below [Configurations](#configurations) section for details.
4. Deploy the virtual machine.
5. Log into the virtual machine. For login details, please contact your Aembit representative.
Danger
Immediately update the `aembit_edge` user password using by running the `passwd` command and supplying a new password.
### Device Code Expiration
[Section titled “Device Code Expiration”](#device-code-expiration)
In the event your device code expires before installation is complete, please contact your Aembit representative for assistance.
## Configurations
[Section titled “Configurations”](#configurations)
There are two fields that must first be populated for a virtual appliance deployment to succeed:
1. `AEMBIT_TENANT_ID`
2. `AEMBIT_DEVICE_CODE`
The virtual appliance deployment uses a subset of the virtual machine deployment options. See the [virtual machine deployment](/user-guide/deploy-install/virtual-machine/) page for a detailed discussion of these options.
## Usage
[Section titled “Usage”](#usage)
Configure the proxy configuration of your Client Workloads to send traffic to the virtual appliance. For more information on configuring the proxy settings of your Client Workload, see [Explicit Steering](/user-guide/deploy-install/advanced-options/agent-proxy/explicit-steering#configure-explicit-steering).
# Deploying Aembit Edge on VMs
> Guides and topics about deploying Aembit Edge Components on virtual machines (VMs)
You can run Aembit Edge Components on virtual machines (VMs) to enable secure, identity-based access between workloads.
When deploying on VMs, you install Agent Controller and Agent Proxy directly onto each machine.
After installation, you must register Agent Proxy with an Agent Controller configured with a [Trust Provider](/user-guide/access-policies/trust-providers/) or with your Aembit Tenant using a one-time Device Code.
Once deployed, the Agent Proxy intercepts workload traffic, injects credentials, and enforces access policies—without requiring application changes.
This section provides installation guides for deploying Aembit Edge Components on VMs in Linux and Windows environments.
Note
Aembit recommends deploying Agent Controller and Agent Proxy on standalone VMs and not collocating them on the same VM.
See [About Colocating Aembit Edge Components](/user-guide/deploy-install/about-colocating-edge-components) for more info.
## By operating system
[Section titled “By operating system”](#by-operating-system)
The following sections provide installation guides by Linux and Windows operating systems:
### Linux installation guides
[Section titled “Linux installation guides”](#linux-installation-guides)
* [Agent Controller](/user-guide/deploy-install/virtual-machine/linux/agent-controller-install-linux)
* [Agent Proxy](/user-guide/deploy-install/virtual-machine/linux/agent-proxy-install-linux)
* [Agent Proxy on SELinux or RHEL](/user-guide/deploy-install/virtual-machine/linux/agent-proxy-selinux-config)
### Windows installation guides
[Section titled “Windows installation guides”](#windows-installation-guides)
* [Agent Controller](/user-guide/deploy-install/virtual-machine/windows/agent-controller-install-windows)
* [Agent Proxy](/user-guide/deploy-install/virtual-machine/windows/agent-proxy-install-windows)
## By Edge Component
[Section titled “By Edge Component”](#by-edge-component)
The following sections provide installation guides by Aembit Edge Components
### Agent Controller
[Section titled “Agent Controller”](#agent-controller)
* [Linux](/user-guide/deploy-install/virtual-machine/linux/agent-controller-install-linux)
* [Windows](/user-guide/deploy-install/virtual-machine/windows/agent-controller-install-windows)
### Agent Proxy
[Section titled “Agent Proxy”](#agent-proxy)
* [Linux](/user-guide/deploy-install/virtual-machine/linux/agent-proxy-install-linux)
* [SELinux or RHEL](/user-guide/deploy-install/virtual-machine/linux/agent-proxy-selinux-config)
* [Windows](/user-guide/deploy-install/virtual-machine/windows/agent-proxy-install-windows)
# How to set up Agent Controller on Linux
> How to set up Aembit Agent Controller on Linux
Aembit provides many different deployment options you can use to deploy Aembit Edge Components in your environment. Each of these options provide similar features and functionality. The steps for each of these options, however, are specific to the deployment option you select.
This page describes the process to deploy Agent Controller to a Linux virtual machine (VM).
Note
Aembit recommends deploying Agent Controller and Agent Proxy on standalone VMs and not collocating them on the same VM.
See [About Colocating Aembit Edge Components](/user-guide/deploy-install/about-colocating-edge-components) for more info.
## Supported versions
[Section titled “Supported versions”](#supported-versions)
Use the following table to make sure that Aembit supports the operating system and platform you’re deploying to your VM:
| Operating system | Edge Component versions |
| ---------------- | --------------------------- |
| Ubuntu 20.04 LTS | Agent Controller v1.12.878+ |
| Ubuntu 22.04 LTS | Agent Controller v1.12.878+ |
| Red Hat 8.9 \* | Agent Controller v1.12.878+ |
\* See [How to configure Agent Proxy on SELinux or RHEL](/user-guide/deploy-install/virtual-machine/linux/agent-proxy-selinux-config) for more info.
## Install Agent Controller
[Section titled “Install Agent Controller”](#install-agent-controller)
To install Agent Controller, follow these steps:
1. Download the latest [Agent Controller Release](https://releases.aembit.io/agent_controller/index.html).
2. Log on to the remote host with your user:
```shell
ssh -i @
```
3. Download Agent Controller using the correct ``:
```shell
wget https://releases.aembit.io/agent_controller//linux/amd64/aembit_agent_controller_linux_amd64_.tar.gz
```
4. Unpack the archive:
```shell
tar xf aembit_agent_controller_linux_amd64..tar.gz
```
5. Go to the unpacked directory:
```shell
cd aembit_agent_controller_linux_amd64
```
6. Run the installer to enable Trust Provider-based Agent Controller registration, making sure to replace `` and `` with the values from your Aembit Tenant:
```shell
sudo AEMBIT_TENANT_ID= AEMBIT_AGENT_CONTROLLER_ID= ./install
```
Optionally, add any other [Agent Controller environment variables reference](/reference/edge-components/edge-component-env-vars#agent-controller-environment-variables) in the format `ENV_VAR_NAME=myvalue`.
Trust Providers
If you don’t already have a Trust Provider, see [Add Trust Provider](/user-guide/access-policies/trust-providers/add-trust-provider).
Popular Trust Providers:
* [AWS Metadata Service](/user-guide/access-policies/trust-providers/aws-metadata-service-trust-provider)
* [Azure Metadata Service](/user-guide/access-policies/trust-providers/azure-metadata-service-trust-provider)
Using Device Codes
Aembit doesn’t recommend using device codes because they don’t give you the same level of control and flexibility in attestation as Trust Providers. However, Kerberos attestation may sometimes require Agent Controllers using a device code.
Device codes are a suitable fallback mechanism in environments without a Trust Provider or in non-prod scenarios such as a proof of concept, lab, or demo environment.
To use a device code, you must generate a device code in the Aembit website UI and replace `AEMBIT_AGENT_CONTROLLER_ID` with the `AEMBIT_DEVICE_CODE` environmental variable in the preceding command.
### Agent Controller environment variables
[Section titled “Agent Controller environment variables”](#agent-controller-environment-variables)
For a list of all available environment variables for configuring the Agent Controller installer, see [Agent Controller environment variables reference](/reference/edge-components/edge-component-env-vars#agent-controller-environment-variables).
Security Best Practice
Make sure the Agent Controller can accept connections on port 5000 from Agent Proxies (update your security groups if needed). Because access to Agent Controller is sensitive, *your Agent Controller’s port should not be open to the Internet*.
### Uninstall Agent Controller
[Section titled “Uninstall Agent Controller”](#uninstall-agent-controller)
Run the following command to uninstall the previously installed Agent Controller.
```shell
sudo ./uninstall
```
# How to set up Agent Proxy on a Linux VM
> How to set up Aembit Agent Proxy on a Linux virtual machine (VM)
Aembit provides many different deployment options you can use to deploy Aembit Edge Components in your environment. Each of these options provide similar features and functionality. The steps for each of these options, however, are specific to the deployment option you select.
This page describes the process to deploy Agent Proxy to a Linux virtual machine (VM).
Note
Aembit recommends deploying Agent Controller and Agent Proxy on standalone VMs and not collocating them on the same VM.
See [About Colocating Aembit Edge Components](/user-guide/deploy-install/about-colocating-edge-components) for more info.
## Supported versions
[Section titled “Supported versions”](#supported-versions)
Use the following table to make sure that Aembit supports the operating system and platform you’re deploying to your VM:
| Operating system | Edge Component versions |
| ---------------- | ----------------------- |
| Ubuntu 20.04 LTS | Agent Proxy v1.11.1551+ |
| Ubuntu 22.04 LTS | Agent Proxy v1.11.1551+ |
| Red Hat 8.9 \* | Agent Proxy v1.11.1551+ |
\* See [How to configure Agent Proxy on SELinux or RHEL](/user-guide/deploy-install/virtual-machine/linux/agent-proxy-selinux-config) for more info.
## Install Agent Proxy
[Section titled “Install Agent Proxy”](#install-agent-proxy)
To install Agent Proxy on Linux, follow these steps:
1. Download the latest [Agent Proxy Release](https://releases.aembit.io/agent_proxy/index.html).
2. Log on to the VM with your username:
```shell
ssh -i @
```
3. Download the latest released version of Agent Proxy. Make sure to include the `` in the command:
```shell
wget https://releases.aembit.io/agent_proxy/